Axicon 15000 series User manual

THE BARCODE EXPERTS
Church Road, Weston on the Green, Oxfordshire, OX25 3QP, UK
Web: www.axicon.com
user guide
Axicon 15000 series
2D &linear barcode verier
Industry
Partner

Page 2 of 28
Axicon Auto ID Limited | 15000 series verier user guide | June 2018
www.axicon.com

Page 3 of 28
Axicon Auto ID Limited | 15000 series verier user guide | June 2018
www.axicon.com
Contents
Introduction 5
How the verier works 6
Calibration 7
Getting started 8
Operating the verier 11
Saving and using scan les 13
Saving and printing reports 14
Settings 15
Warranty 22
Software licence agreement 23
Annual service 25
Certicate of conformance 27
Contact 28

Page 4 of 28
Axicon Auto ID Limited | 15000 series verier user guide | June 2018
www.axicon.com
Introduction
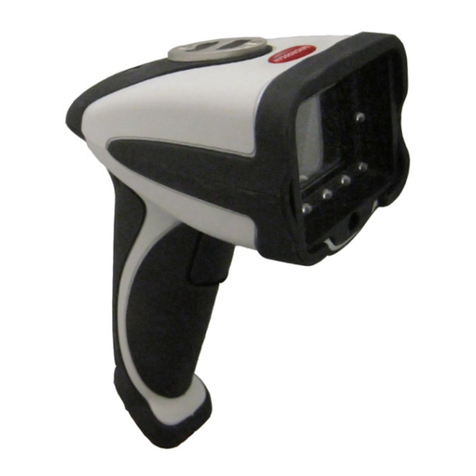
The Axicon 15000 series veriers are designed to work with any PC running a
currently supported version of Windows (Windows 7, Windows 8, Windows 10 – both
32 bit and 64 bit versions).
Specication and application
The 15200’s eld of view is 60mm x 45mm, and is designed to verify linear and 2D
barcodes, including those used on retail point of sale and healthcare items. These
are typically EAN/UPC or GS1 DataMatrix symbols.
The 15500’s eld of view is 95mm x 70mm, and may be used to scan a larger range
of barcodes at dierent sizes. These include all GS1 symbols, and Code 93, Code
128, ITF, MSI Plessey – if they are no wider than 95mm.
The software is able to decode the following symbols:
Linear barcodes: EAN-8, EAN-13, UPC-A, UPC-E, Code 39, Code 93, Code 128,
Codabar, ITF, MSI Plessey, GS1 DataBar.
2D barcodes: Data Matrix, GS1 DataMatrix, QR Code, GS1 QR Code.
Application standards: Data content checking can be carried out on all the symbols
that have been veried. This includes check digits, and combinations of
GS1 application identiers and their element strings especially for various
healthcare applications.
Multiple barcodes within the eld of view will be found and can be veried to the
appropriate standards.

Page 5 of 28
Axicon Auto ID Limited | 15000 series verier user guide | June 2018
www.axicon.com
What is in the case.
• Axicon 15000 Series verier
• Software CD
• Wallet containing this user guide and the calibration card.
System requirements
• Currently supported Windows Operating System (either 32 or 64 bit)
• 100 MB disc space
• 512 MB RAM minimum
• USB 2.0 port or higher
Software installation
Insert the CD into an appropriate drive and the Install program should start
automatically. If it does not, run autorun.exe. When the software has been
successfully installed, leave the CD in the drive, so that the USB driver will be
installed when the verier is connected to the computer. The software is called
Axicon Camera Verier, and the latest version can always be downloaded from the
Axicon website, www.axicon.com. The software will check automatically if a later
version is available. It can be used on any PC or laptop to view the verication scan
les that have been saved even when the verier is not connected.
Hardware installation
Connect the USB lead from the verier to a USB2 or USB3 port on the computer.
Please install the software before connecting the 15000 series verier.

Page 6 of 28
Axicon Auto ID Limited | 15000 series verier user guide | June 2018
www.axicon.com
How the verier works
The verier must be connected to a PC or laptop that is running a currently
supported version of Windows using the USB connection, and used with the Axicon
Camera Verier program.
The verier has two buttons, which both do the same thing, and either one is
pressed to turn the verier on. The image capture process will start and you can
see what the verier sees on the main software window. When the barcodes you
want to verify are in the right place, press one of the buttons again to begin the
decoding and verication of the barcodes.
Ideally each barcode should be veried when it appears on the nal lled item,
in its nal conguration. If the packaging by itself is veried, and is completely
covered by the verier, the verication process will be good.
If the verier is placed on its side, or upside down, take care to minimise the eect
of ambient light. Ensure that any semi-translucent substrates are backed by a
uniform black surface to minimise the eect of light being transmitted through the
substrate.
There are two buttons so that you can easily use the one that is most convenient if
you have the verier on its side or upside down. The keyboard shortcut Ctrl + G is
the equivalent to pressing the button.
The image that has been captured and decoded can be saved as a scan le (.png),
and this can be re-veried at any later time. The software allows the creation of
verication reports for each barcode that appears in the image, and the user simply
clicks on the relevant barcode for which a report is required.
More details about this process, saving scan les, and saving verication reports are
explained later on in this user guide.

Page 7 of 28
Axicon Auto ID Limited | 15000 series verier user guide | June 2018
www.axicon.com
Calibration
When you use the verier for the rst time, it will tell you that it must be
calibrated. This will ensure that its reectance measurements are correct.
Take the calibration card from the plastic wallet, and place on a at surface. Place
the verier over the EAN-13 barcode at the top left hand side of card so that it
appears in the verier window.
Then choose calibrate from the reader menu. The verier will ask you to conrm
positioning and that the RMax and RMin gures shown on the window match those
printed on the card. If they are
dierent, alter the numbers on
the window as required. You will
then need to press start.
The verier software will then
check the image, calibrate, and
recheck the image. When this
has been done a message Calibration Successful will be shown. After this message,
another scan will be made so that you can check that the verication results are
correct. The Rmin and Rmax gures need to agree with those on the calibration
card.
The calibration card supplied with the verier provides barcodes with known
maximum and minimum reectance values. The calibration card is certied for a
minimum of one year (unless it has been physically damaged).
When it is not being used please keep the card at in its plastic envelope, and away
from direct sunlight. If the card shows any sign of damage – for example, scratches
or any change in colour – please obtain a new card from us.

Page 8 of 28
Axicon Auto ID Limited | 15000 series verier user guide | June 2018
www.axicon.com
Getting started
After calibration, the home window for the software will look this:
The window main areas are explained below.
The top section includes the le menu and the toolbar with its command icons.
The File menu includes options for saving and loading scans, creating and printing
reports. The View menu gives access to Settings (F5) and User data.
The Reader menu provides options for choosing which verier is operational, reader
information,scanning, decoding, and calibrating the reader (the verier).
The Help menu provides access to the Axicon website, a check for software
updates, and information about the software.

Page 9 of 28
Axicon Auto ID Limited | 15000 series verier user guide | June 2018
www.axicon.com
The Command icons on the tool bar are as follows:
Quit the application, or use Ctrl + Q
Load a saved barcode image, or use Ctrl + O
Save the current image and verication report, or use Ctrl + S
Print, or use Ctrl +P
Start collecting barcode images in the eld of view, or press one of the two
buttons on the verier. This will be green when the verier is connected and
grey when it is not. It will change into a pause icon when scanning.
Stop collecting images from the current reader.
Search for barcodes in the current image and decode them. This will change
into a stop icon when the barcodes are being decoded.
Stop searching for barcodes.
Edit the settings for the application, or use F5
Display and edit user-dened data for this scan.

Page 10 of 28
Axicon Auto ID Limited | 15000 series verier user guide | June 2018
www.axicon.com
The top right section provides the overall results for the verication. It will provide
the grade in the format n.n/aa/www (X), where n.n is the ISO/IEC grade, aa is the
aperture reference number, www the wavelength of the light being used for the
verication in nanometres and X is the ANSI equivalent.
This panel also has three tabs, where the rst set of information about the barcode
is shown.
The General tab will show you the decoded data from the symbol, its x and y
dimensions, the print gain, and the aperture size.
The Reader tab simply gives you detailed information about the verier such as its
serial number and build version, and when it was last calibrated.
The Scan tab provides details of when the image to be veried was scanned by the
verier.
The bottom right section includes two tabs; ISO and Details.
The ISO tab will include details of all the parameters dened by ISO/IEC for the
particular barcode being veried.
The Details tab provides a breakdown of the results by individual scan line and by
parameter for linear symbols only.
The bottom left panel will include details that relate to the analysis of a symbol by
one or more of the optional plugins. Plugins are chosen by the user and they will be
used to check if the symbol meets the requirements of one or more applications.
More information about this is provided later on in this user guide.
The status bar is at the very bottom of the window, and provides details of what
the verier is doing. If a verier is not connected, the message ‘Found Readers 0’
will appear in the status bar. When a verier is connected, the message will be
‘Selected reader: xxxxx’, where ‘xxxxx’ is the serial number of the verier.
Getting started
Page 11 of 28
Axicon Auto ID Limited | 15000 series verier user guide | June 2018
www.axicon.com
Make sure the Axicon Camera Verier program is open, the verier is connected,
and press one of the buttons on the verier or press the green ‘Start collecting
images…’ arrow on the toolbar. Then place the verier over the barcode(s).
The message ‘Scanning’ will appear in the status bar at the bottom of the window.
With the verier held still, press one of the verier buttons again to begin the
decode process. You can also press the ‘search for barcodes…’ icon in the tool bar.
Do not move the verier until ‘Decoding’ appears in the status bar or until the stop
icon appears.
The verier will draw a purple box around each of the barcodes it has found. You
must click on one of these to select it, and then the results will be displayed. Click
on any other barcode to see its results. Clicking on the selected code will zoom in.
When only one symbol is present the code will be selected automatically. To verify
the next barcode, simply press one of the verier buttons or the green arrow
to begin the scanning again. This action will clear all the details of the previous
verication.
Any linear barcode will be veried using ten dierent scan lines, as specied by
ISO/IEC 15416, and the verication grade will be based on the average of these ten
readings.
Operating the verier

Page 12 of 28
Axicon Auto ID Limited | 15000 series verier user guide | June 2018
www.axicon.com
The bottom right hand section of the window, with the ISO and Details tabs, will
provide you with more information, especially about linear symbols.
If the ISO tab is selected, and you click on the names for each parameter in turn,
you will see the scan lines across the barcode shown in the verier window. These
will change colour according to whether that parameter has a pass (in green) or a
fail (in red) for that particular scan line. To get a scan reectance prole of your
linear barcode you can click on the Details tab and select individual scans, and then
a particular scan info (1 to 10). The scan reectance prole (SRP) will now show at
the bottom of the scan info results. Click on the reectance prole to enlarge it.
If you select an area of the SRP using
your mouse it will be enlarged. Click
away from the enlargement to return to
the complete SRP.
With a 2D code only the ISO tab will
appear. Click on the selected symbol to
zoom in, and then click on the name of
one of the parameters. For example,
clicking on modulation will colour each
module according to its modulation
value.
Operating the verier

Page 13 of 28
Axicon Auto ID Limited | 15000 series verier user guide | June 2018
www.axicon.com
Saving and using scan les
The image, and verication and plugin results of any codes that have been veried
can be saved in a scan le. This is done by choosing ‘Save As’ from the File menu.
The scan le is the basis for the verication reports that are created from it. For
example, one scan le may include four barcodes if each one has been decoded and
each barcode will have its own verication results.
To open a saved scan, select Load Scan from the File menu.
When a saved scan le is opened by the application, the original data is available
and displayed. In addition, the original image can also be re-veried using the
‘search for barcodes and decode them’ icon – this will then automatically use any
plugins that are activated regardless of whether the plugins were used at the time
of original verication. The plugin details will be included in each verication
report.
The full verication results are then shown and reports can be viewed (and printed)
as required.

Page 14 of 28
Axicon Auto ID Limited | 15000 series verier user guide | June 2018
www.axicon.com
A verication report may be saved in .csv, .pdf, .html or .txt formats. Additionally
reports can be manually saved for subsequent printing or printed without saving.
Select ‘Save Report’ from the File menu and select the required format from the
list. This selection will be remembered and can be repeated with the shortcut
Ctrl + R.
If you want the report to be automatically opened on creation (for example, if
there is a need to print the report) then tick the ‘Open Report’ box.
You can append verication reports if you are using a CSV format, and you have
ticked the ‘Append Report’ box. If this box is left unticked and the le name is not
changed, the data will be overwritten.
Saving and printing reports

Page 15 of 28
Axicon Auto ID Limited | 15000 series verier user guide | June 2018
www.axicon.com
Settings
The verier has a range of conguration settings. These can be set by clicking on
View and then selecting Settings.
Appearance: The Appearance tab allows you to change the colours used for Fail,
Warning and Pass, choose the language and switch between metric or imperial units
of measurement.
Plugins: The Plugins tab is used to select how the symbols will be checked for
their data content, their dimensions, and any other aspects dened by a particular
application. These include GS1 Data Content, which will check for correct
combinations of application identiers, GS1 Retail (point-of-sale) which will check
the type and size of the barcode, and many more.
By default, many plugins are switched o. To change this, select the plugin you
require, and choose from the drop-down list: On will check relevant codes, Always
Show will check every code, and O will deactivate the plugin.

Page 16 of 28
Axicon Auto ID Limited | 15000 series verier user guide | June 2018
www.axicon.com
Settings
Reports: In this window you can enable automatic saving and/or printing of reports.
Select the type of report le and choose an output le where the data will be kept.
There is an option to add the records to an existing le rather than replacing the
le, which is of benet with text les, including CSV les. Choose Append and then
where you want these reports kept.

Page 17 of 28
Axicon Auto ID Limited | 15000 series verier user guide | June 2018
www.axicon.com
If Use Decode box is ticked, the report name will automatically be created using
the rst digits of the decoded number.
If Use Date and Time box is ticked, the report name will automatically be created
using the date followed by the time as a le name.
If Use Decode and Use Date and Time boxes are both ticked, the le name will
automatically be created using the decoded number followed by the date and time.
Saving: The Saving tab can be used to enable automatic saving of all of the scan
les for audit purposes. The enable box must be ticked for the software to save the
scan les. Browse to your chosen location in the directory.
If Use Decode or Use Date & Time (or both) are ticked, then the dialogue box
will appear with the pre-selected data and allow the operator to override this if
required.
User Data: User Data allows you to program the Axicon 15000 series software to
ask questions when a verication is being made, to collect the answers and to store
these with the verication report. This supplementary user data will then always be
displayed with the verication report.
Such data may typically be a job reference number or batch number, but equally
it could be information about the barcode such as the substrate or print process or
details about the operator, the department or the site. Multiple questions can be
entered if desired.
To set up the User Data:
From the View menu select Settings. Click on the User Data tab of the Settings
window. To add a User Data item press the + symbol at the bottom left of the
window. The Create User Datum window will be shown. This can now be completed
as required.

Page 18 of 28
Axicon Auto ID Limited | 15000 series verier user guide | June 2018
www.axicon.com
Settings
An example of a Job Reference entry is shown here.
The title is entered and the Allow Blank is un-ticked
to force you to enter data into this eld.
This sample shows how you can be oered a pull-
down menu of options but with a default option
given. The default can be left blank. When the list
of selected questions has been completed press the
OK button.
Now when you verify a barcode and select ‘save’
scan the User Data dialogue window will appear and
allow you to enter the required information. If you
now save the scan le the User Data information is
automatically saved with it.
When loading a pre-saved scan le for which User
Data has been attached you simply need to load the
scan le, and re-verify the code using the Search
for all barcodes icon and then select View/User-
Data from the pull-down menu.
The Axicon software also includes a facility for
transferring the User data settings from an existing
scan le (whether made from this computer or not).
Simply load an existing scan le, go to the View/
settings/User Data screen and then press the ‘Add
the user data elds’ icon.
There are also facilities to edit an existing User
Data entry (ideal for adding items to a pull-down
menu). You can also clear any existing User Data
requirements.

Page 19 of 28
Axicon Auto ID Limited | 15000 series verier user guide | June 2018
www.axicon.com
Advanced: This window allows you to lock all the settings for the verier so that
other users cannot change them, and to require individual users to login before
using the software.
By default the settings for the Axicon Camera Verier software are congurable
by each user of the software. This means that if several people use the same PC
and verier, and login in with their own user names and passwords, they can each
change the settings to suit their use of the verier.
The detailed settings for the verier, such as its calibration record, are used by all
users, so that a change of user will not require the
verier to be re-calibrated.
To use this window you will need to change the
settings for the ‘users.ini’ le, which is in the
common conguration directory. This le normally
has a read-only attribute which disables the
common conguration and user login settings. This
is done to prevent changing the settings by accident
because it will aect all users on the computer.
Go to C:\ProgramData\Axicon\Camera Verier, right-
click on ‘users.ini’, select ‘Properties’ and untick
the ‘Read-only’ tick box and click on ‘OK’.
The common conguration and user login options
will now be enabled in the Advanced window of the
Settings dialog.

Page 20 of 28
Axicon Auto ID Limited | 15000 series verier user guide | June 2018
www.axicon.com
Settings
When you tick the ‘Use common conguration’ box, all the settings that you have
made will be applied to everyone that uses the computer. If you tick the ‘Require
user login’ box, every time a person opens the software, the computer’s normal
operating system login screen will appear. The settings are now locked by the user
that enabled the option and only this user can disable it, at which point individual
users can make changes to the settings as before.
You must restart the software now so that these changes take eect. If you return
to this window, you will see that it now looks like this:
Other manuals for 15000 series
2
Table of contents
Other Axicon Barcode Reader manuals

Axicon
Axicon 12500 2D VERIFIER User manual

Axicon
Axicon PV-1000 User manual

Axicon
Axicon 6000 series User manual

Axicon
Axicon 12600 Operator's manual

Axicon
Axicon 15000 series User manual

Axicon
Axicon 6015 Operator's manual

Axicon
Axicon 12000 Operator's manual

Axicon
Axicon 12000 User manual

Axicon
Axicon PV-1072 User manual

Axicon
Axicon 15000 series User manual