Axicon 12600 Operator's manual

1
AXICON
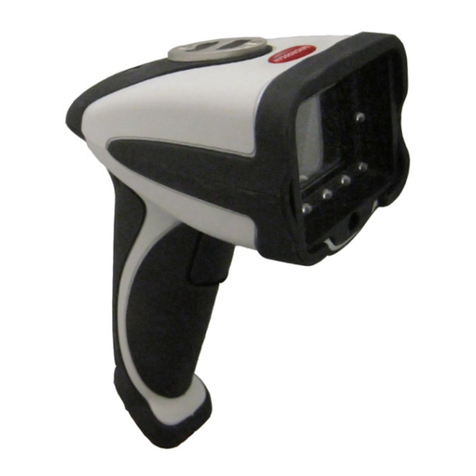
BARCODE VERIFIER
Model 12600
Model 12700
(with “Trucheck” software)
DOCUMENTATION BOOKLET
www.axicon.com
© Copyright
2014 Axicon Auto ID Ltd

2

Axicon 12700 Start-Up Guide
CONTENTS
Page
START UP GUIDE
Important information 6
Minimum System Requirements 7
What’s in the transit case 8
Software Installation 9
Hardware installation 11
Software Configuration 12
User Calibration 15
How to use the verifier 18
The Verification Report 20
Explanation of the 2D ISO parameters 22
AXICON SOFTWARE LICENCE AGREEMENT AND TERMS 24
(INCL DISCLAIMER ETC)
AXICON WARRANTY AND SERVICE CONTRACT
Warranty on all Products 27
Service Contract 28
VERIFIER SERVICING & FACTORY RECALIBRATION (VCAS)
Axicon Factory Recalibration Service (VCAS) 29
Other faults or damage 30
Equipment Rental Scheme 30
CONTACT US 31
SERVICE RECORD 32

- 4 -

Axicon 12700 Start-Up Guide
5
Thank you for purchasing an Axicon Model 12700 2D Verifier. This
short guide will enable you to get started with your Axicon 2D
Verifier quickly and easily.
This Axicon Verifier is a precision piece of quality control
equipment.
It has been manufactured to the highest standards through our ISO
9001 Quality Management System and has been thoroughly and
extensively tested immediately prior to shipment.
When used in accordance with the manufacturer’s instructions this
equipment will provide accurate quality analysis for a minimum of
12 (twelve) months from the date of testing shown on the
Certificate of Conformance.
Different operating conditions will affect the frequency with which
this equipment will need to be serviced.
We recommend that this equipment is regularly checked and re-
certified. This can be done either by returning the verifier to
Axicon for a VCAS (Verifier clean and service) program or else by
purchasing the optional “Performance Qualification Test Kit” that
comprises a test program and a set of traceable Reference Test
Cards which, by following the instructions, will enable the user to
re-certify the equipment after satisfactory on-site testing or else
know for certain that the equipment needs returning to the
manufacturer for servicing.
Axicon 12700 Start-Up Guide
6
IMPORTANT INFORMATION
1. Your Axicon verifier is a piece of high precision quality control
equipment and should be handled with due care.
2. Please retain the plastic transit case. It will protect the
equipment in transit.
3. Only use power and data cables supplied by Axicon. Use of non-
approved accessories will invalidate the warranty.
4. If the verifier is dropped (or subjected to similar misuse) the
accuracy of the results may be affected. The unit should be
returned to Axicon immediately for servicing.
5. Axicon recommends that the verifier is factory recalibrated
annually. The unit should be returned to Axicon or to your
approved Axicon reseller for this check to be performed.

Axicon 12700 Start-Up Guide
7
MINIMUM SYSTEM REQUIREMENTS
System required :
- A Microsoft-supported version of Windows (32 or 64 bit)
- 512 MB of RAM (Minimum)
- A USB 2.0 port
- Microsoft .NET Framework Version 3.5 SP1 or later
The following table shows the various models in the Axicon 12000
series which can be used in conjunction with this software – and
their typical applications:
Model Field of
View Applications
Axicon
12000 24 x 18 mm High resolution 2D codes
Axicon
12500 40 x 24 mm High to medium resolution 2D codes
Axicon
12600 51 x 38 mm EAN/UPC and 2D codes
Axicon
12700 70 x 51 mm EAN/UPC and large 2D Codes

Axicon 12700 Start-Up Guide
8
WHAT’S IN THE TRANSIT CASE?
Please ensure that the following items are present upon receipt.
• Axicon 12000 series 2D verifier
• Power supply and fly lead
• Mains lead
• Software CD
• Wallet containing Documentation Booklet (includes Start Up
Guide), Conformance Certificate and Calibration Sheet
OPTIONAL EXTRAS
Axicon also offer the following optional extras to be used in
conjunction with the system:-
-IQ/OQ Procedural Documentation
-Performance Qualification Test Kit – Comprising a set of
test cards traceable to international standards and full
procedural instructions. (Use of this kit enables users to
run sufficient tests to empower them to re-certify the
verifier on-site.)
-Set of Reference Test Cards – traceable to international
standards (ideal for optimising the location, angle,
distance etc of on-line scanning equipment)

Axicon 12700 Start-Up Guide
9
SOFTWARE INSTALLATION
Note:- Please do NOT connect the verifier to the PC at this stage –
the software MUST be installed first and only once this has
been completed should the verifier be connected.
• The “Trucheck” application software supplied with this product
requires the .NET Framework version 3.5 to be installed.
The software installation process will automatically check
whether the .NET framework is present. If it is not present then
the installation process will install it for the user.
• Insert the CD into an
appropriate drive and the
Install program should start
automatically. If not run
“Setup.exe”
Set the location where you
would like the software
installed (the default is
shown).
Also at this stage specify
whether the installation
should be for a single user
or all users.

Axicon 12700 Start-Up Guide
10
The user will be asked to confirm the installation before it
proceeds which will then be confirmed:-
At this point the user will be asked to confirm that they want
to install the (essential) USB drivers.
Please press “Install” to install the drivers
After the software installation has been completed, please
connect the verifier to install the USB drivers prior to
running the software.

Axicon 12700 Start-Up Guide
11
HARDWARE INSTALLATION
1. Connect the metal connector on the end of the verifier fly-lead
to the metal connector on the power supply lead.
2. Plug the mains lead into the Power Supply Module.
3. Connect the mains lead to the mains power supply.
4. Connect the USB lead from the verifier to a USB2 port on the
computer.
5. The USB2 drivers that need to be installed for the hardware
to work correctly are all located on the CD-ROM. The
installation of the driver will be done automatically.
6. SECTION 4. – RUNNING THE SOFTWARE – FIRST TIME
4.1 When running the software
for the first time, this dialogue
boxs will pop up, please click on
the OK button.
Select as appropriate and then
click OK.
4.3 If in any doubt select the
“Non UID” and “Don’t print
report after each scan” options.
(You can always change these
later if required. Click on the
“OK” button.

Axicon 12700 Start-Up Guide
12
Section 5 – Software Configuration
The “Trucheck” software is designed to enable the user to
verify both 1D (linear) and 2D barcodes.
Configuration of the software to meet the requirements of each
should be made independently through the different
configuration icons.
5.1 Configuration of the 1D mode
Double click the icon to display the configuration screen

Axicon 12700 Start-Up Guide
13
1D linear settings apply to linear barcodes such as EAN-13 codes.
The configuration in the image above is the recommended one for
basic use.
As you will notice the user can select from a range of different
barcode symbologies to be checked and can also set up different
file saving and printing options.
If in any doubt about the settings to be used please contact your
Axicon reseller for more information. We would also remind you
that in many countries Axicon are able to offer on-site installation
and/or training services should these be considered beneficial.

Axicon 12700 Start-Up Guide
14
5.2 - Configuration of the 2D mode
Double click the icon to display the configuration screen
“2D settings” relate to the 2D barcodes Data Matrix, QR Codes and
Aztec codes.
Please note that “Maxicode” is an (chargeable) optional extra
feature that can be added if required .
As you will notice the user can also set up different file saving and
printing options.
If in any doubt about the settings to be used please contact your
Axicon reseller for more information.

Axicon 12700 Start-Up Guide
15
6.3 CALIBRATION
We recommend that you calibrate your Axicon verifier on a regular
basis. The software allows you to set a calibration notification
message and we recommend that you set the value to a maximum
of 30 days (“15” is recommended).
Calibration should only be done with the calibration card supplied
by Axicon.
The calibration process is used to give the verifier one known
“high” level of Reflectance (Rmax) and one known “low” level of
reflectance (RMin) by which to assess all reflectance
measurements. As such, during the calibration process the verifier
is only looking for the darkness of the black bars and for the
lightness of the background.
5.3.1 Take the calibration card out of the plastic pouch and
check that it is not creased, damaged or stained – If it is damaged
then it should be replaced as soon as possible – Contact Axicon or
your Axicon reseller to obtain a replacement calibration card.
5.3.2 Place the card on a flat surface
5.3.3 Use the largest of the codes on the card and position the
verifier over the card such that the bars are vertical in the camera
window.

Axicon 12700 Start-Up Guide
16
5.3.4 Click on the start button of
the verifier to activate the
camera On the PC you should
see the bars vertically on the
image as on the image shown.
5.3.5 From the “pull-down menu” go to “Options” and then select
“Calibrate Remote”.
5.3.5 The calibration dialog box gets
displayed :
- Tick the box next to the linear
barcode as shown in the image.
- Set the Rmin and Rmax value to the
ones shown on your calibration card
(Generally 5% and 85%)
- Set the calibration reminder to 30
days or less.
5.3.7 Finally click on the calibrate button of the software

Axicon 12700 Start-Up Guide
17
5.3.8 The calibration is done automatically in about 5 seconds and
then the following windows pops up.
5.3.9 Press « OK » to confirm.
5.3.10 Press “Close” to close the Calibration Dialog window

- 18 -
Section 6 – How to use the verifier
6.1 – Activate the camera
• Press either the “start” button on the verifier hardware or press the
“Activate” button on the software
• The LEDs should start flashing and the software displays the camera
image.
6.2 – Postion the barcode
• For a 2D code the code should be positioned roughly centrally in the
image area with the red “target” cross positioned over the barcode ;
• For a 1D code please ensure that the bars are positioned vertically in
the field of view and that the barcode is roughly central to the field
of view.
• The whole barcode must be visible to the verifier.
Correct Positioning:-
Incorrect Positioning:-

Axicon 12700 Start-Up Guide - 19 -
6.3- Verify the barcode
• Click again on the start button or the activate button to take the
picture and start the verification process.
• Once the code has been decoded the results will be displayed.

Axicon 12700 Start-Up Guide - 20 -
Section 7 – The verification report
Click here to export data to
an Excel sheet
Click where appropriate
whether you verify a linear
or a 2D barcode
Decoded data Image of the bar code
ISO Grade
Detailed results – Click
on the enlarge window
icon to show this panel;
Click here to print the
verification report
This manual suits for next models
1
Table of contents
Other Axicon Barcode Reader manuals

Axicon
Axicon 6000 series User manual

Axicon
Axicon 6000-W User manual

Axicon
Axicon 12500 2D VERIFIER User manual

Axicon
Axicon 15000 series User manual

Axicon
Axicon 6025-S Operator's manual

Axicon
Axicon 15000 series User manual

Axicon
Axicon PV-1072 User manual

Axicon
Axicon 6525-S User manual

Axicon
Axicon 15000 series User manual

Axicon
Axicon 6015 Operator's manual