Axicon PV-1072 User manual

The Axicon PV-1072
ISO/ANSI
Portable Barcode Verifier
System.
Operating Manual
www.axicon.com

2

- 5 -
Thank you for purchasing an Axicon PV-1072 Portable
Verification System. This manual will enable you to get started
with your new Axicon ISO/ANSI Verifier quickly and easily.
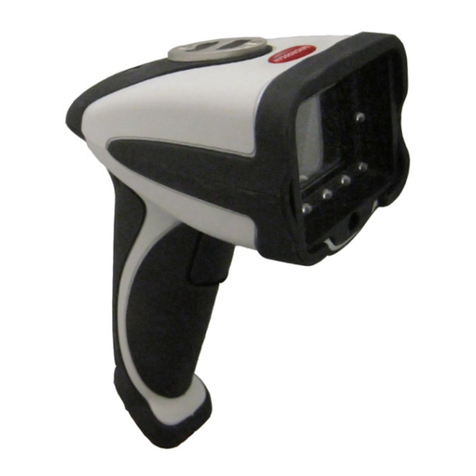
The Axicon PV-1072 Portable verifier comes complete with an
Axicon P-72 verification read head. In addition the display and
collection unit may be used in conjunction with any of the
Axicon 6000, 6500 or 7000 series verifiers.
(Please note that the P-72 read-head can only work in conjunction with
the display and collection unit supplied – it cannot be used as a PC or
Mac based verifier whereas the 6000, 6500, and 7000 series verifiers can
also be used as PC or Mac based verifiers)
IMPORTANT INFORMATION
1. Your Axicon verifier is a piece of high precision quality control
equipment and should be handled with due care.
2. Only use accessories supplied or approved by Axicon. Use of non-
approved accessories will invalidate the warranty.
3. If the verifier is dropped (or subjected to similar misuse) the
accuracy of the results may be affected. The unit should be
returned to Axicon immediately for servicing.
4. Axicon recommends that for optimum accuracy the verifier is
factory recalibrated annually. The unit should be returned to Axicon
or to your approved Axicon reseller for this check to be performed.
5. Any attempt to dismantle the display box or the read head will
immediately invalidate the warranty. This equipment contains no
user-serviceable parts.
- 6 -
INDEX
SectionContent Page
Intro What’s in the Box 7
Optional accessories 7
2.0 Getting started with your Verifier 8
2.4 Calibration 9
2.5 Using the PV-1072 11
2.6 Multi-Scan averaging 12
2.7 Printing and Saving results 13
3.0 Configuration Set-up 15
3.1 Setting date and time 15
3.2 Power Management 16
APPENDIX
“A” - Summary of Menu Screen Formats 18
“B” - Frequently Asked Questions 19
“C” - Technical Specification 22
“D” - Software License 23
“E” - Warranty and Service Contract details 25
“F” - Conformance Certificates 29

- 7 -
INTRODUCTION
1. What’s in the box?
a) This manual
b) The PV-1072 Portable Barcode Verifier (A black verifier display box
with an attached black P-72 verifier read head.
c) A Calibration card (Please keep this safe)
d) Belt-bag to enable the verifier to be carried easily around a factory
or warehouse.
e) A set of 4 “AA” sized alkaline batteries (where it is permitted to
ship batteries).
Optional extras:-
As optional extras Axicon can supply…..
- A set of Rechargeable batteries and charger – These are 2700 ma NiMH
batteries for long life and efficient usage.
- A serial interface printer (for verification reports)
- A printer cable (offered separately in case the user already has a
suitable printer available).
- Replacement Calibration cards
- A rubber protective boot for the verifier control box
A PV-1000 display unit with
protective boot fitted

- 8 -
2. Getting started with your verifier
2.1 If not already fitted, slide the battery housing cover open and fit the
4 x “AA” sized batteries. Please take care to observe the correct polarity.
2.2 Plug in the Axicon verifier read-head to the USB port on the base of
the verifier. (The PV-1000 will work with the P-72 read-head or any of the
range of Axicon 6000, 6500, or 7000 series verifiers).
2.3 Switch on the verifier by pressing the on/off switch.
A light will come on but nothing will be displayed on the screen for
about 15 seconds – this is quite normal and to be expected.
(This is the power-up and initialisation phase).
In quick succession the verifier will show an “initialising” message before
showing the message:-
Axicon Verifier
Ready to Scan !
If the verifier is left for some time the screen will go blank in order to
conserve battery power, but can quickly be restarted by pressing the
on/off button again – the time-out before battery conservation can be
adjusted to suit the requirements of the user – see section 3.xxxx below

- 9 -
2.4 Calibration
Before using the verifier it is necessary to calibrate it.
This is done using the calibration card supplied.
2.4.1
With the “Ready to Scan” message showing (see above),
Press the “Menu/select” key.
And the screen will show “►Information”
Press the “Scroll down” button until the screen displays
“►Calibrate”
Press the “Menu/Select” Button
There will be a “¡Set RMin” message with a “5” below.
Look at you calibration card – If will normally show “5” also in which case
you can proceed to 2.4.2
(Otherwise Press “Menu/Select” and you can move it up or down using
the “Scroll up” and “Scroll down” buttons until it reads the same number
as is printed on the calibration card then press “Menu/Select” to confirm
the setting).
2.4.2. Press the “Scroll down” button again and the screen will display
“¡Set RMax” message with a “85” below.
Look at you calibration card – If will normally show “85” also in which
case you can proceed to 2.4.3
(Otherwise Press “Menu/Select” and you can move it up or down using
the “Scroll up” and “Scroll down” buttons until it reads the same number

- 10 -
as is printed on the calibration card then press “Menu/Select” to confirm
the setting).
2.4.3
Press the “Scroll down” button and the message will be displayed
“¡Calibrate”
Press the “Menu/ Select button.
The message will be displayed
Calibrate
Cal. Scan (0/3)
Pick up the verifier read-head, place it over the barcode on the
calibration card in such a way that all four corners of the read head are
touching the card and then press the trigger on the read head.
The message will change to read Cal. Scan (1/3).
Press the trigger two more times and the display will first read “Cal. Scan
(2/3)” and then “Calibration Successful !”
Press the “Clear/Back” button twice to see the message
Axicon Verifier
Ready to scan
Your PV-1072 is now ready for use.

- 11 -
2.5 Using the PV-1072
2.5.1
Pick up the verifier read-head, place it over the barcode such that the
read head is flat against the barcode and then press the trigger on the
read-head
2.5.2
The initial screen will show the decoded number followed by the overall
print quality grade and a detail of the scan number in the format:-
5012345678900
4.0/06/660 Scan 1/3
Using the Scroll down button the user can look at further information
regarding the quality of the barcode, the symbology, magnification, bar
gain (ink spread) etc.
Using the “Scroll up” button reviews the data.
2.5.3
Use the Clear/Back button to get ready to scan the next barcode.

- 12 -
2.6 Multi-scan averaging
The PV-1072 allows the user to take up to 10 scans of a barcode at
different points in the bar height, and then to average the results in
order to get the most accurate answer.
To do this simply use the “Menu/Select” button and you will see the
message “►Information”
Use the “Scroll Down” button until you see the message “►Setup”
Press the “Menu/Select” button and you will see:
¡Average No
3
Press the “Menu/Select” button and then use the “Scroll up” and “Scroll
down” buttons until you reach the desired number.
Press the “Menu/Select” button to store this scan number.
Press the “Clear/Back” button twice to return to the main menu.
When multiple scans of a barcode have been taken then the “Previous
Scan” button allows the user to review all of the previous scans for that
barcode.

- 13 -
2.7 Print / Save Facilities
2.7.1 Axicon recognises that some users will be operating the PV-1072 in
a location where a printer is present. Others may need to save the
printed reports to memory for subsequent uploading or printing.
2.7.2 The PV-1072 has facilities for both direct printing and text-file
saving for subsequent printing.
2.7.3
Direct Printing:-
Attach a suitable printer to the printer port on the verifier using the
optional Axicon printer lead.
Verify the desired barcode.
Press the “Print” button – the screen will show ¡Print
Press the “Menu/Select” button – The screen will display the message
“Printing” and shortly afterwards the message “Done”
Press the “Clear/Back” button to return to the main screen.
Please note that this is an omni-directional signal transfer – if the printer
is not connected properly or not switched on then the PV-1072 is not
aware of this.
2.7.4
Verifying while on the move for subsequent printing.
Verify the desired barcode.
Press the “Print” button – the screen will show ¡Print

- 14 -
Press the “Scroll down” button and the screen will show ¡Save
Press the “Menu/Select” button – The screen will display the message
“Successful!”
Press the “Clear/Back” button to return to the main screen.
2.7.5
To print saved scans
Unplug the verifier read-head from the PV-1072 display unit.
Plug in a USB stick or other USB memory device to the USB port on the
PV-1072
From the main screen press the “Menu/Select” button and you will see
the message “►Information”
Press “Menu/Select” and the screen will display ¡Show Code
Press “Scroll down” until the message ¡Transfer is displayed.
Press “Menu/Select”
The message ¡Transferring will be displayed followed by the message ¡
Transfer Successful.
The text file printout will be in a directory named “Scans” on the
memory device.
This file can then be opened in any suitable program such as Microsoft
“Word” or Windows “Notepad” for subsequent printing.
(Please note that with the PV-1072 Portable verifier it is only possible to extract/
review and print text files – If there is a need to have the full .scn file available for
review then a PV-1000 Blue portable unit should be used instead of the PV-1072)

- 15 -
3.0 CONFIGURATION SET-UP
3.1 Setting Date and Time
The PV-1072 has its own clock facilities.
The user scan set a date and time and then all printouts will be able to
show the date and time at which a scan occurred.
To set the date and time:-
3.1.1 Switch on the PV-1072
From the main screen press the “Menu/Select” button and you will see
the message “►Information”
Use the “Scroll Down” button until “►Setup” is displayed.
Press “Menu/Select”
Press the “Scroll Down” button until “►Time” is displayed
Press “Menu/Select”
The Verifier will show “¡Time Zone”
If the Time Zone is to be changed then press “Menu/Select” and use the
“Scroll up” and “Scroll Down” buttons until the correct time zone is
shown and then press “Menu/Select” to lock the data.
3.1.2
Use the “Scroll Down” button and “¡Time” will be displayed.
Press “Menu/Select”
Use the “Scroll up” and “Scroll Down” buttons until the correct time is
shown and then press “Menu/Select” to lock the data.
3.1.3
Use the “Scroll Down” button and “¡Date” will be displayed.
Press “Menu/Select”

- 16 -
Use the “Scroll up” and “Scroll Down” buttons until the correct time is
shown and then press “Menu/Select” to lock the data.
3.1.4
Press “Clear/Back” until the “Ready to Scan !” message is shown
Please note that the date and time is maintained by an on-board battery
that has an estimated life span of four years. It is not possible for the
user to change the battery.
When the battery reaches the end of its life it will lose the date and time
and these settings will be cleared each time the verifier is powered
down….
At this point the verifier should be returned to Axicon for replacement
(By this time the verifier should be ready for a service anyway!)
3.2 Power Management
The PV-1072 has facilities for the user to control the elapsed time before
“Sleep Mode” is enabled and also the amount of time before “Power
Down” is enabled.
3.2.1 To set the “Sleep Mode”
From the main screen press the “Menu/Select” button and you will see
the message “►Information”
Use the “Scroll Down” button until “►Setup” is displayed.
Press “Menu/Select”
Press the “Scroll Down” button until the screen displays the message
“►Power” is displayed.
Press “Menu/Select”
The screen will display ¡Sleep (m)
Press the “Menu/Select” button.

- 17 -
Use the “Scroll up” and “Scroll Down” buttons until the desired number
of minutes before Sleep mode is displayed.
Remember that if the number of minutes before “sleep mode” is enabled
is higher than the number of minutes before “Power Down” mode then
“Power Down” will occur first.
Note that “0” (Zero minutes) means that sleep mode will be disabled.
Press “Clear/Back” twice to move back to the main screen.
To set the automatic “Power Off” option.
From the main screen press the “Menu/Select” button and you will see
the message “►Information”
Use the “Scroll Down” button until “►Setup” is displayed.
Press “Menu/Select”
Press the “Scroll Down” button until the screen displays the message
“►Power” is displayed.
Press “Menu/Select”
The screen will display ¡Sleep (m)
Press the “Scroll down” button and the screen will display ¡Power Off
(m)
Press the “Menu/Select” button.
Use the “Scroll up” and “Scroll Down” buttons until the desired number
of minutes before Power down is displayed.
Note that “0” (Zero minutes) means that automatic power-down mode
will be disabled.
Press “Clear/Back” twice to move back to the main screen.

- 18 -
APPENDIX A - Summary of Menu Screen Formats
Menu Level
1
Menu Level
2
Menu Level
3
Information Show Code
Encodation
Transfe
r
Calibrate Set Rmin
Set Rmax
Calibrate
Setup Average No
Pass Grade
Units
Language
Time Time Zone
Time
Date
Power Sleep
Power Off
Printer Trailing LF

- 19 -
APPENDIX B - Frequently asked questions.
Q1) I am verifying barcodes with a lot of data – why can’t I see
the full decoded number?
A1) This is purely a matter of the number of characters that can be
displayed on a single line. In order to see the full decoded number Press
“Menu/Select” and the display will change to “►Information” now press
“Menu/Select” again and you will see the message ¡Show Code. Press
“Menu/Select” again and the full decoded number will be displayed. To
return to the original display press “Clear/Back” three times.
Q2) Why do I have to wait for my PV-1072 to get to the message
“Ready to Scan”?
A2) Previous generations of portable verifiers were built around a
“single-task” function – which made them fast but virtually impossible to
upgrade effectively. The Axicon PV-1072 is built around a fully powered
Linux computer in order to facilitate upgrades and product enhancements
– thus protecting the investment for years to come. (and we are all very
used to having our PCs go through a power-up cycle before they are ready
for use….)
Q3) My verifier keeps switching off by itself – why? And what
can I do about it?
A3) Axicon have built a Power-Management facility into the verifier
in order to give even longer battery life.
We recognise that in some applications this “Longer-life” is extremely
beneficial whereas in others it can become rather frustrating.
Section 3.2 of this manual guides the user into how to set both the
“Sleep” mode and the “Power down” mode options.
Note that if you want to disable the power management and keep the
verifier permanently switched on until you choose to press the on/off
button then just set both “Sleep” to zero minutes and “Power down” to
zero minutes.
Q4) I want to verify larger barcodes – are other “P-Series” read
heads available?
A4) At present the answer to that is “no” – there are no other “P-
series” read heads, however, if you want to verify larger barcodes then
either an Axicon 6515 or 7015 verifier can be plugged into the PV-1072
display box and used effectively.

- 20 -
Q5) Can I use other Axicon Verifiers with my PV-1072 ?
A5) You may use any of the Axicon 6015, 6515 or 7015 USB verifiers
in conjunction with the PV-1072, however please note that the PV-1072
display box cannot be used in conjunction with any “S” range or “HS”
range Axicon verifiers, and nor with the Axicon 12000 series (all of these
models require USB2 drivers that are not available on the Linux platform)
Q6) I want to have greater access to the diagnostics information
about a barcode and I heard that the PV-1000 verifiers could
save .scn files for uploading to a PC. How can I do this ?
A6) The PV-1072 has been designed as a low-cost portable
ISO/ANSI verifier with some limitations in features. If the .scn files are
required then the user should instead purchase the Axicon PV-1000
portable display and collection unit (Recognised by its blue casing) and use
this in conjunction with any of the Axicon 6015/6515 or 7015 verifiers. Then
when using the “Save” facility both text file and .scn file will be saved.
Q7) I have tried plugging my P-72 read-head into my computer
but it does not work – why?
A7) The P-72 read head has been designed to work exclusively with
the Axicon PV-1000 series portable display units – it cannot be used as if it
were either an Axicon PC-verifier or a barcode scanner. The internal
electronics and firmware are completely different.
If you need a verifier that can also act as a PC-verifier then an Axicon 6015
verifier will work with both the PV-1000 series portable display units and
also the Axicon PC-Verifier software.
Q8) I want to print out the results of my verification – How can I
do it ?
A8) Axicon have provided a number of options – There is an optional
printer available from Axicon, alternatively you may use any other serial
(RS232) printer and just purchase the printer cable from Axicon. For
convenience we have found that most users tend to prefer to use the
“Save” facility and then transfer the text files across to a PC for subsequent
printing.
Q9) How long will a set of batteries last ?
A9) That depends upon the settings used for the Power Management
(see section 3.2 above). Obviously rechargeable high-power NiMH
batteries will last considerably longer than alkalines.

- 21 -
In tests with the PV-1072 remaining continuously on, a set of 2700 Ma
NiMH batteries (the type supplied by Axicon as an optional extra) lasts at
least ten hours on a single charge.
Q10) How many scans can I store in my PV-1072 before I have to
transfer them to a computer ? Is it enough for a full day/week of
work?
A10) It is Plenty !! – A typical 3 scan verification of a barcode would
save 4 reports (each of the individual scans plus the average). Together
these would take around 1 k of memory – the allocated memory capacity
for stored scans is 1Gb…. On this basis you could store the verification on
about a million barcodes before you had to transfer any data!

- 22 -
APPENDIX “C” - Technical Specifications:-
Barcode Symbologies checked:
EAN-8, EAN-13, EAN-13+2, EAN13+5, UPC-A, UPC-E, Code 39, Code 93,
Code 128, GS1-Databar, (both linear and stacked).
Technical:-
Power: 4: “AA” sized batteries – Alkaline or
rechargeable (rechargeable
batteries must be charged
externally
Size: Display Box: 180 x 95 x 40mm
(7.2” x 3.8” x 1.6”)
Read head: 165 x 75 (50) x 55mm
(6.6” x 3 (2)” X 2.2”)
Weight: 650 gms (23oz) incl. batteries
Operating Temperature 0ºC to 50ºC
Storage Temperature -20ºC to 70ºC
Humidity 5% to 95% RH non condensing
Regulatory Approvals CE approval (see certificates below
for full specification)
© Copyright information
The Axicon software embedded in the PV-1072 together with any accompanying
Axicon software is the copyright of Axicon Auto ID Ltd and is subject to the software
license described below.
This manual is copyright to Axicon Auto ID Ltd and may not be reproduced in whole or
in part, nor may it be stored in any electronic storage or retrieval system without the
express permission in writing from a director of Axicon Auto ID Ltd.
Acknowledgement is made of the relevant copyrights of “Microsoft”, “Word”, and
“Notepad” referenced in this document.
Other manuals for PV-1072
2
Table of contents
Other Axicon Barcode Reader manuals

Axicon
Axicon 15000 series User manual

Axicon
Axicon 6025-S Operator's manual

Axicon
Axicon 12600 Operator's manual

Axicon
Axicon 6000 series User manual

Axicon
Axicon 6000-W User manual

Axicon
Axicon 6000 series User manual

Axicon
Axicon 12500 2D VERIFIER User manual

Axicon
Axicon 12000 User manual

Axicon
Axicon 15000 series User manual

Axicon
Axicon 6525-S User manual