Axicon 12000 Operator's manual

AXICON
2D BARCODE VERIFIER
DOCUMENTATION BOOKLET
www.axicon.com


- 1 -
CONTENTS
Page
AXICON VERIFIER PASSWORD CERTIFICATE 3
CONFORMANCE CERTIFICATE 3
START UP GUIDE
Important information 6
Introduction 7
What’s in the transit case 8
System Requirements 9
Software Installation 9
Hardware installation 9
Running the application 10
User Calibration 12
Explanation of the ISO parameters 15
Saving and retrieving results 16
AXICON SOFTWARE LICENCE AGREEMENT AND TERMS 17
(INCL DISCLAIMER ETC)
AXICON WARRANTY AND SERVICE CONTRACT
Warranty on all Products 21
Service Contract 23

- 2 -
VERIFIER SERVICING & FACTORY RECALIBRATION (VCAS)
Axicon Factory Recalibration Service (VCAS) 24
Other faults or damage 24
Equipment Rental Scheme 24
VCAS RECORD 25
CONTACT US 26

- 3 -
Serial Number and activation password
VERIFIER SERIAL N0. TC-
CAMERA SERIAL No.
ACTIVATION KEY
DECLARATION OF CONFORMITY
We Axicon Auto ID Ltd
of Church Road, Weston on the Green, Oxfordshire, OX25 3QP, UK
declare under our sole responsibility that the product has been designed and
manufactured at our address in the year 2014 to perform verification of barcode
quality in accordance with the following standards:
ANSI X3. 182 ISO/IEC 15416 ISO/IEC 15415
ISO/IEC 15420 ISO/IEC 16388 ISO/IEC 16390
ISO/IEC 15417 ISO/IEC 24724 ISO/IEC 16022
We also certify that this equipment conforms to ISO/IEC 15426-2 VERIFIER
CONFORMANCE STANDARD
CE Compliance specification:-
This equipment complies with: European Safety EN 60950
Electromagnetic Compatibility EN 55022, EN 55024
We also certify that the standards EN 60825 is not applicable to the product.
The equipment meets the requirements of the directives 89/336/EEC
(Electromagnetic Compatibility), 73/23/EEC (Low Voltage), based on our own relevant
test reports.
Axicon Auto ID Ltd also certifies that this equipment, when used in conjunction with
the latest software, has all of the features necessary to meet the 21CFR Part 11
requirements.
Signed:- …………………………………………………. Date:-……………………………………..
(Authorised Signatory)
Church Road, Weston on the Green, Oxfordshire, OX25 3
Q
P, UK
Tel: +44
(
0
)
1869 351155 / Fax: +44
(
0
)

- 4 -

- 5 -
This Axicon Verifier is a precision piece of quality control
equipment.
It has been manufactured to the highest standards
through our ISO 9001 Quality Management System and
has been thoroughly and extensively tested immediately
prior to shipment.
When used in accordance with the manufacturer’s
instructions this equipment will provide accurate quality
analysis for a minimum of 12 (twelve) months from the
date of testing shown on the Certificate of Conformance.
Different operating conditions will affect the frequency
with which this equipment will need to be serviced.
We recommend that this equipment is regularly checked
and re-certified. This can be done either by returning the
verifier to Axicon for a VCAS (Verifier clean and service)
program or else by purchasing the optional “Performance
Qualification Test Kit” that comprises a test program and
a set of traceable Reference Test Cards which, by
following the instructions, will enable the user to re-
certify the equipment after satisfactory on-site testing or
else know for certain that the equipment needs returning
to the manufacturer for servicing.

- 6 -
Thank you for purchasing an Axicon 2D Verifier. This
short guide will enable you to get started with your
Axicon 2D Verifier quickly and easily.
IMPORTANT INFORMATION
1. Your Axicon verifier is a piece of high precision quality control
equipment and should be handled with due care.
2. Please retain the plastic transit case. It will protect the equipment in
transit.
3. Only use power and data cables supplied by Axicon. Use of non-
approved accessories will invalidate the warranty.
4. If the verifier is dropped (or subjected to similar misuse) the accuracy
of the results may be affected. The unit should be returned to Axicon
immediately for servicing.
5. Axicon recommends that the verifier is factory recalibrated annually.
The unit should be returned to Axicon or to your approved Axicon
reseller for this check to be performed.
6. As the owner of an Axicon Verifier you are entitled to free software
updates for life. The latest copy of the software is always posted on
our website (www.axicon.com).
7. Subject to the terms of the license you are permitted to make
additional copies of the Axicon Verifier software.

- 7 -
INTRODUCTION
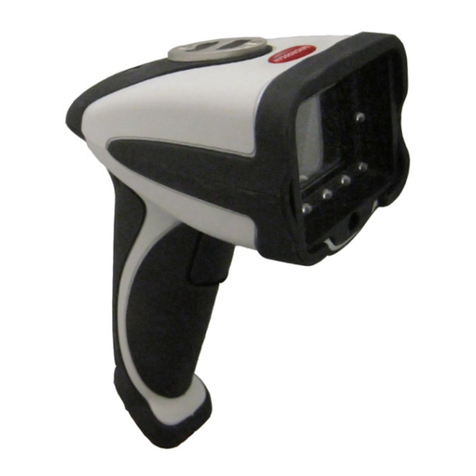
The Axicon 2D Verifier is designed to work with any PC running Windows
XP or later (including Vista and Windows 7). The Axicon 2D Verifier uses a
high resolution camera to capture an image of a barcode symbol. It has
been designed specifically to image and then analyse Data Matrix
barcodes, however, it can be configured to analyse some other barcode
types of a similar size. Please contact Axicon if you wish to use this
product for other barcode types.
When analysing Data Matrix barcodes the software will apply the relevant
ISO standards – It can also apply the appropriate application standards,
including GS1-Data Matrix, CIP-Data Matrix, Turkish Ministry of Health
etc.
Although historically Data Matrix symbols could be encoded in a number
of different ways the Axicon 2D Verifier will only decode and verify
symbols of the most recent type known as Data Matrix ECC200. This type
is the only one recommended for new applications and is the type used
with GS1 Data Matrix.
Data Matrix barcodes come in many different sizes depending on the
amount of data that is encoded. There is a limit, both in terms of the
physical size and also in the amount of data encoded, that the Axicon 2D
Verifier can successfully decode and verify. With the standard optical
arrangement, matrix symbols cannot exceed 18 mm tall by 24 mm wide,
including their quiet zones. There must also be no more than four data
regions - note that symbols with four data regions can encode up to 408
numeric characters. In most practical applications these limitations will
not be a problem, but if your application requires larger Data Matrix
symbols then please contact Axicon to discuss your requirement further.
- 8 -
WHAT’S IN THE TRANSIT CASE?
Please ensure that the following items are present upon receipt.
• Axicon 12000 2D verifier
• Power supply and fly lead
• Mains lead
• Software CD
• Wallet containing Documentation Booklet (includes Start Up Guide)
and Calibration Sheet
OPTIONAL EXTRAS
Axicon also offer the following optional extras to be used in conjunction
with the system:-
-IQ/OQ Procedural Documentation
-Performance Qualification Test Kit – Comprising a set of test
cards traceable to international standards and full procedural
instructions. (Use of this kit enables users to run sufficient
tests to empower them to re-certify the verifier on-site.)
-Set of Reference Test Cards – traceable to international
standards (ideal for optimising the location, angle, distance
etc of on-line scanning equipment)

- 9 -
SYSTEM REQUIREMENTS
Here are the operating system and hardware requirements to use the
Axicon 2D Verifier:
• Windows Currently supported Operating System (either 32 or 64 bit)
• 512 MB RAM minimum
• USB 2.0 port
• .NET Framework version 4.0 or later
SOFTWARE INSTALLATION
• The Axicon 2D Verifier application requires the .NET Framework
version 4.0 or later to be installed.
The Axicon software installation process will automatically check
whether the .NET framework is present. If it is not present then the
Axicon installation will install it for the user.
• Insert the CD into an appropriate drive and the Install program should
start automatically. If not run “Setup.exe”
• Leave the installation CD in the driver. After the hardware is
connected the USB driver will be installed
HARDWARE INSTALLATION
1. Connect the metal connector on the end of the verifier fly-lead to the
metal connector on the power supply lead.
2. Plug the mains lead into the Power Supply Module.
3. Connect the mains lead to the mains power supply.

- 10 -
4. Connect the USB lead from the verifier box to a USB2 port on the
computer
5. The USB2 drivers that need to be installed for the hardware to work
correctly are all located on the CD-ROM.
RUNNING THE APPLICATION
• Please note that on first use the password provided by Axicon for the
hardware will be required.
• When the application is launched it will first check to see whether the
hardware is connected. If the imaging hardware is not found
connected to the computer, then a dialogue will open to inform the
user and when this dialogue is cleared the application will continue to
load but in a demonstration mode only, however, it will be possible to
load in the results of scans that have been previously made when in
this mode.
• When the application initially starts up, the camera is not capturing
any images. To activate the camera, and the illumination for the
barcode sample that has been placed beneath it, the user should
request the camera to start scanning.
• The camera is activated by pressing the button on the imaging
hardware itself, or by clicking with the mouse on the 'Get Scan' button
or using the keyboard short cut which is Ctrl+G as shown on the Tools
menu.
• The first request activates the camera such that it continues to take
one scan after another. In this mode it is possible to adjust the
position of the imaging hardware with respect to the barcode sample
while observing where the captured images are in the camera image
view Window.

- 11 -
• A red cross indicates where the centre of the camera image lies and
the barcode should be located such that it is positioned roughly in the
centre of this view. If the barcode extends to the edge of the camera
view, then it may not be possible to achieve a decode of the symbol.
The illuminating lights will flash while in this mode.
• Pressing the button or clicking the 'Get Scan' button a second time will
cause the illuminating lights to stop flashing and the application will
now attempt to decode the barcode. If successful, the camera image
view will now be superimposed with a grid pattern and the results of
the decode and the analysis will be displayed on the various reporting
Windows.
There are several Windows that can be viewed when using the
application.
• The Command Window contains the menus and controls for the
application and this Window will always open when the application is
launched.
• Of the remaining Windows, some are used to display the results of
scans that have been made and others are used to control the
configuration of the application.
• One Window also shows the view that the imaging hardware has
captured or is capturing.

- 12 -
USER CALIBRATION
In order to achieve accurate reflectance measurements, there is a
calibration routine which once performed will ensure that subsequent
measurements are compared to reference values. A calibration card
containing barcode symbols that have known reflectance values for the
black and white areas on it, is supplied with the verifier.
During calibration the captured image will be examined for the readings
achieved for both the darkest and lightest reflectance areas, so it is
important to place the camera such that it captures black bars and white
background.
It is not necessary to use a Data Matrix symbol for the calibration. The
default values for the maximum and minimum reflectance values used for
the calibration are those of the Axicon Calibration Card, but if an
alternative reference test card is used then the known reflectance values
used for the calibration process can be changed by going to the
appropriate setup window.

- 13 -
DISPLAYING THE RESULTS
• The Summary Window will show an overall view of the quality of the
barcode that has been decoded.
- A quality grade is shown, along with the aperture and illumination
that has been used when making the analysis.
- The amount of print gain that has been measured is shown, in both
X and Y directions and this will be a positive value if dark modules
have grown in size or a negative value if the dark modules are
smaller than nominal.
- The percentage value is a fraction of the X dimension or nominal
module size and the X dimension is also shown on this view.
• Data Matrix symbols are encoded with error correction codewords in
addition to the codewords which are used to encode the data that is
being carried in the symbol.
If errors are found in any of the codewords, then some, or all, of the
error correction capability will be used up in correcting the errors that
have been detected.
A measure of how much damage the symbol has suffered is indicated
by the amount of unused error correction, so 100% means that no
error correction has been used and a figure of 0% means that all of the
error correction capability has been used up, implying considerable
damage to the barcode.
• Data Matrix symbols can be used to carry GS1 formatted data if the
very first codeword that is encoded is the Function 1 codeword.
If the application determines that there is a Function 1 codeword at
the beginning of the data stream, then the data that follows will be
checked to ensure that it conforms to the GS1 specification for that

- 14 -
data content, a pass or fail message being indicated on the Summary
Window.
• A Details Window provides a more in depth report on the individual
parameters that have been measured and graded while analyzing the
barcode.
• Where appropriate, percentage measurements are displayed and for
each of the ISO parameters that have been checked a grade is also
displayed.
• The bar graphs give a visual indication of the percentage and grade
values, and in addition the actual numeric values can be seen if the
mouse is positioned over the bar chart for each of the parameters.

- 15 -
EXPLANATION OF THE ISO PARAMETERS
• The parameters which are measured according to the method
described in ISO/IEC 15415 for 2D matrix barcodes results in a grade
for each parameter, with a grade of 4 being the best and a grade of 0
being a fail.
• The lowest grade of each of the parameters; Decode, Unused Error
Correction, Symbol Contrast, Modulation, Axial Non-uniformity, Grid
Non-uniformity and Fixed Pattern Damage, becomes the grade for this
scan.
• Unused error correction is the percentage of error correction
capability left after correcting for errors encountered while decoding
the barcode.
• In the case of symbols that have more than one block of data and
error correction codewords, the unused error correction is calculated
for each block and the lowest value from each block is the value that
is displayed for the scan.
• Symbol contrast is the difference between the highest and lowest
reflectance values found in the symbol, including the quiet zones.
Barcodes printed black on white will generally have a high symbol
contrast.
• Modulation is a measure of variability of reflectance for each module
in the symbol.
• Reflectance margin is also a measure of variability but unlike
modulation, reflectance margin also takes into account whether
modules are correctly encoded or not. These measurements are
significantly affected by excessive print growth.

- 16 -
• Axial non-uniformity is a measure of the consistency of the grid
spacing comparing one axis with the other. An elongation in one
direction compared to the other results in a poor grade.
• Grid non-uniformity is the worst case positional error of the centre of
a module from its ideal grid position.
• Fixed pattern damage includes many different tests on the 'L' pattern,
the quiet zones and the clock tracks.
• Symbols with more than one block of data will be assessed for each of
the blocks in turn.
• The fixed pattern damage grade for the scan is the worst of these
individual graded tests or if several of the individual tests produce
poor results, then an assessment of all of these together, called
Average Grade, might result in an overall grade for Fixed Pattern
Damage which is less than any of the individual test grades.
SAVING AND RETRIEVING RESULTS
• Following a successful decode of a Data Matrix code, the results that
are displayed can be saved to a file. This enables the user to review
these results again at some later stage and also provides a means to
share results with other colleagues or business partners.
• When a saved scan is opened by the application, the results are
displayed just as if the scan and analysis had just been made.

- 17 -
AXICON SOFTWARE LICENCE AGREEMENT
This software is Copyright © 1995-2014 Axicon Auto ID Limited
Use of the Software is subject to the Axicon Software Licence terms set
forth below. Using the Software indicates your acceptance of these
Licence terms. If you do not accept these Licence terms within 14 days,
you may return the entire unused product for a full refund.
AXICON SOFTWARE LICENCE TERMS -LICENCE GRANT
Axicon grants you a Licence to use any number of copies of the
Software, but only for Use in conjunction with the Axicon hardware
product that accompanied the Software.
"Use" means storing, loading, installing, executing or displaying the
Software.
You may not modify the Software or disable any licensing or control
features of the Software.
OWNERSHIP
The Software is owned and copyrighted by Axicon Auto ID Limited.
Your Licence confers no title or ownership in the Software and is not a
sale of rights in the Software.
COPIES
You may only make copies of the Software for archival purposes or
when copying is an essential step in the authorised use of the
Software.
You must reproduce all copyright notices in the original Software on
all copies.
You may not copy the Software onto a bulletin board or similar
publicly accessible system.

- 18 -
NO DISASSEMBLY OR DECRYPTION
You may not disassemble or decompile the software without prior
written consent from Axicon.
TRANSFER
Your Licence will automatically terminate upon any transfer of the
Software. Upon transfer, you must deliver the Software, including any
copies and related documentation, to the transferee.
The transferee must accept these Licence Terms as a condition of the
transfer.
TERMINATION
Axicon may terminate your Licence upon notice of failure to comply
with any of these Licence Terms.
Upon termination, you must immediately destroy the Software,
together with all copies, adaptations and merged portions in any
form.
EXPORT REQUIREMENTS
You may not export or re-export the Software in contravention of any
applicable laws or regulations.
This agreement should be construed in accordance with the laws of
England.
Other manuals for 12000
1
Table of contents
Other Axicon Barcode Reader manuals

Axicon
Axicon 12500 2D VERIFIER User manual

Axicon
Axicon 6015 Operator's manual

Axicon
Axicon 15000 series User manual

Axicon
Axicon 6025-S Operator's manual

Axicon
Axicon 6000 series User manual

Axicon
Axicon 15000 series User manual

Axicon
Axicon 6000-W User manual

Axicon
Axicon PV-1000 User manual

Axicon
Axicon PV-1072 User manual

Axicon
Axicon 6525-S User manual