RIOTEC RIOSCAN iLS6307LS User manual

1
*
RIOSCAN 2D barcode scanner
Quick Guide
M o d e l n o . :
i L S 6 3 0 7 L S
Introduction
Designed primarily for smartphone, the iLS6307LS is a 2D
barcode scanner that allows you to scan various barcoded
items and send data to smartphone.
Its in-built excellent 2D engine allows you to reliably read 2D
barcodes on various shapes and is a great space-saver for
busy or limited workspaces.
It supports not only iOS devices through Bluetooth
communication, but also Android OTG devices through USB
cable
Delivery content
*Bluetooth Barcode scanner x 1
*Charging cradle x 1
*PCB material board+3 screws x 1
*Holder for smartphone x 1
*USB cable x 1
*Quick instructions x 1
Limited Warranty
Riotec provides a one year limited warranty.
This warranty does not cover any product which has been subject
to improper use, neglect or unauthorized repair or installation.
This warranty does not cover consumable parts. (Cables &
batteries are consumables.)
Safety instructions
Read the operating instructions carefully and especially
observe the safety information. If you do not follow the safety
instructions and information on proper handling in this
manual, we assume no liability for any resulting personal
injury or damage to property.
*Don’t put scanner in places excessively high temperatures,
such as expose under direct sunlight
*Don’t use scanner in extremely humid area or drastic
temperature change
*The rechargeable battery is permanently built into the
product and cannot be replaced.
*Never damage the rechargeable battery. Damaging the
casing of the rechargeable battery might cause an explosion
or a fire!
Charging:
1. Please switch on and charge scanner for 3~4 hours before first
use as shown on Fig.2
2. When user charge smartphone & scanner, please use
smartphone original USB power adapter.
3. The cradle functions as a charger for the scanner. Even if the
scanner’s battery is full, the cradle will continue to supply power
to the scanner. We suggest removing the scanner from the cradle
when fully charged.
4. When you charge scanner & smartphone, please enter Wired
OTG mode & switch to “C- Charging mode”.
iLS6307LS supports BT communication mode (for iOS & Android
devices) and wired OTG communication mode (for Android OTG
devices)
If you want to switch to another mode, please read the below configuration
code first.
Demo
%W%L%T
Bluetooth BT communication
Demo
%W%I%R
wired OTG communication mode
(default)

2
Operating elements
*Please switch ON and charge scanner for 3~4 hours at first
time before use.
How to Connect to Smartphone via BT
1. Make sure the default is BT mode (below right, page #1) & your
device supports BT HID or SPP profile
2. Turn off Power-Saving mode on your smartphone/tablet
3. Then, choose HID or SPP profile and scans the following 2
settings codes before connecting to smartphone/tablet.
(A1 A2 or B1 B2)
If you don’t know which profile to choose for your device, try HID
first, then, SPP.
HID profile
SPP profile
A1
Demo
%H%I%D
B1
Demo
.
A2
Demo
%B%R%C
B2
Demo
%B%R%C
1. click the “Settings”
2. click “General”
3. click “Bluetooth”
4. Turn it ON, and search the
Devices
5. Select “Rxxxxxx” to connect
6. When see the “Connected”
means the connection is OK.
(example: pairing with iPhone)
4. Please complete the connection procedures as the above
photos.
5. After the devices are paired, the screen will show
“Connected”. (see step #6 above)
6. Before using WordPad file or appropriate APP, please set
keyboard language of device to US English. Then, scan the
barcodes and the barcode data will show on the cursor side. If
the data cannot be sent to smartphone/tablet, please scan the
“Reset Configuration to Defaults” setting codes (on page #3)..
Notes 1:
*This product complies with Bluetooth standards. This device used
with this product must support the same SPP or HID standard. For
Bluetooth devices with other profiles we cannot guarantee a
connection before the product has been tested.
*The communication speed and range of the product may vary due to
obstacles and radio interference between the product and device.
Condition on the host device may also effect the communication
speed and range of the scanner
Note 2:
*When the battery power is too low, the Orange LED will flash
and beep once. Scanner should be charged immediately. If
scanner shuts down it is recommended to charge it fully then
power it back on.
Trigger / Power ON
Button
(For iOS Device ONLY)
Press the trigger for 4~5
seconds to raise and
lower soft-Keyboard
Exit
Window
Micro USB port (OTG)
Use Micro USB cable to
connect to smartphone.
Charging
cradle
Indicator
(LED)
Before entering BT mode, you
must switch to right “C”
(Charging mode) first.
Then, cradle can supply
power to iOS / Android device
(through micro USB cable) &
scanner simultaneously.
Indicator (LED)
Please check the “LED
Indicator Information”on
page #4

3
Reset Configuration to Defaults
(scan from A1 to A4 for HID profile or B1 to B5 for SPP profile)
HID profile
SPP profile
A1
0006010
B1
0006010
A2
0001160
B2
0001160
A3
0006000
B3
0310020
B4
0006000
A4
Demo
%D%F%T
B5
Demo
%D%F%T
How to Connect to Smartphone via OTG cable
1. Make sure you enter wired OTG mode (below right, page #1)
and your Android device supports OTG functionality.
2. Make sure scanner is in ”O” (OPERATION MODE) (see below)
3. Connect scanner to Android OTG device through micro USB cable.
4. Scan the barcode
5. Open app on smartphone/tablet & data will be sent to the app
directly
Keyboard Country
(Wired OTG mode only)
Scan the appropriate country code as below to program the keyboard
layout for your country or language. As a general rule, the following
characters are supported, but need special care for countries other
than the United States: @ | $ # { } [ ] = / ‘ \ < > ~
Demo
%+-$.00
Demo
%+-$.06
USA
(Original setting)
Italian
Demo
%+-$.01
Demo
%+-$.07
Norway
France
Demo
%+-$.02
www.tec-it.com
%+-$.08
Germany
Vietnam
Demo
%+-$.03
Demo
%+-$.09
Sweden
Spain
Demo
%+-$.04
Demo
%+-$.10
Denmark
Portugal
Demo
%+-$.05
Demo
%+-$.11
Switzerland
Hungary
1. Place the mobile device holder by having the side of open and
close red switch on the right side of the scanner as presented on
the above image.
2. CAUTION: Please do not pull or press on any of the 4 extensions
or legs of the holder, for it can unbalance and disrupt the normal
function of the holder’s 4 extensions.
Place the mobile device holder lightly on the top of the base, so the 4
elevated studs fit into the 4 holes of the holder.
Switch to left:
“O” (Operation mode)
(data transmission)
Switch to right:
“C” (Charging mode)
Indicator (LED)
Please check the
“LED Indicator
Information”on
page #4
Holder’s back with 4 holes to fit on
and lock up with the 4 studs the
scanner.
4 Elevated Studs to fit into the
4 holes of the Holder’s back.
Holder’s front side: Make sure the red switch is on the right
side (exactly as the above picture shows), when fitting the 4
holes of the holder to the 4 studs of the scanner

4
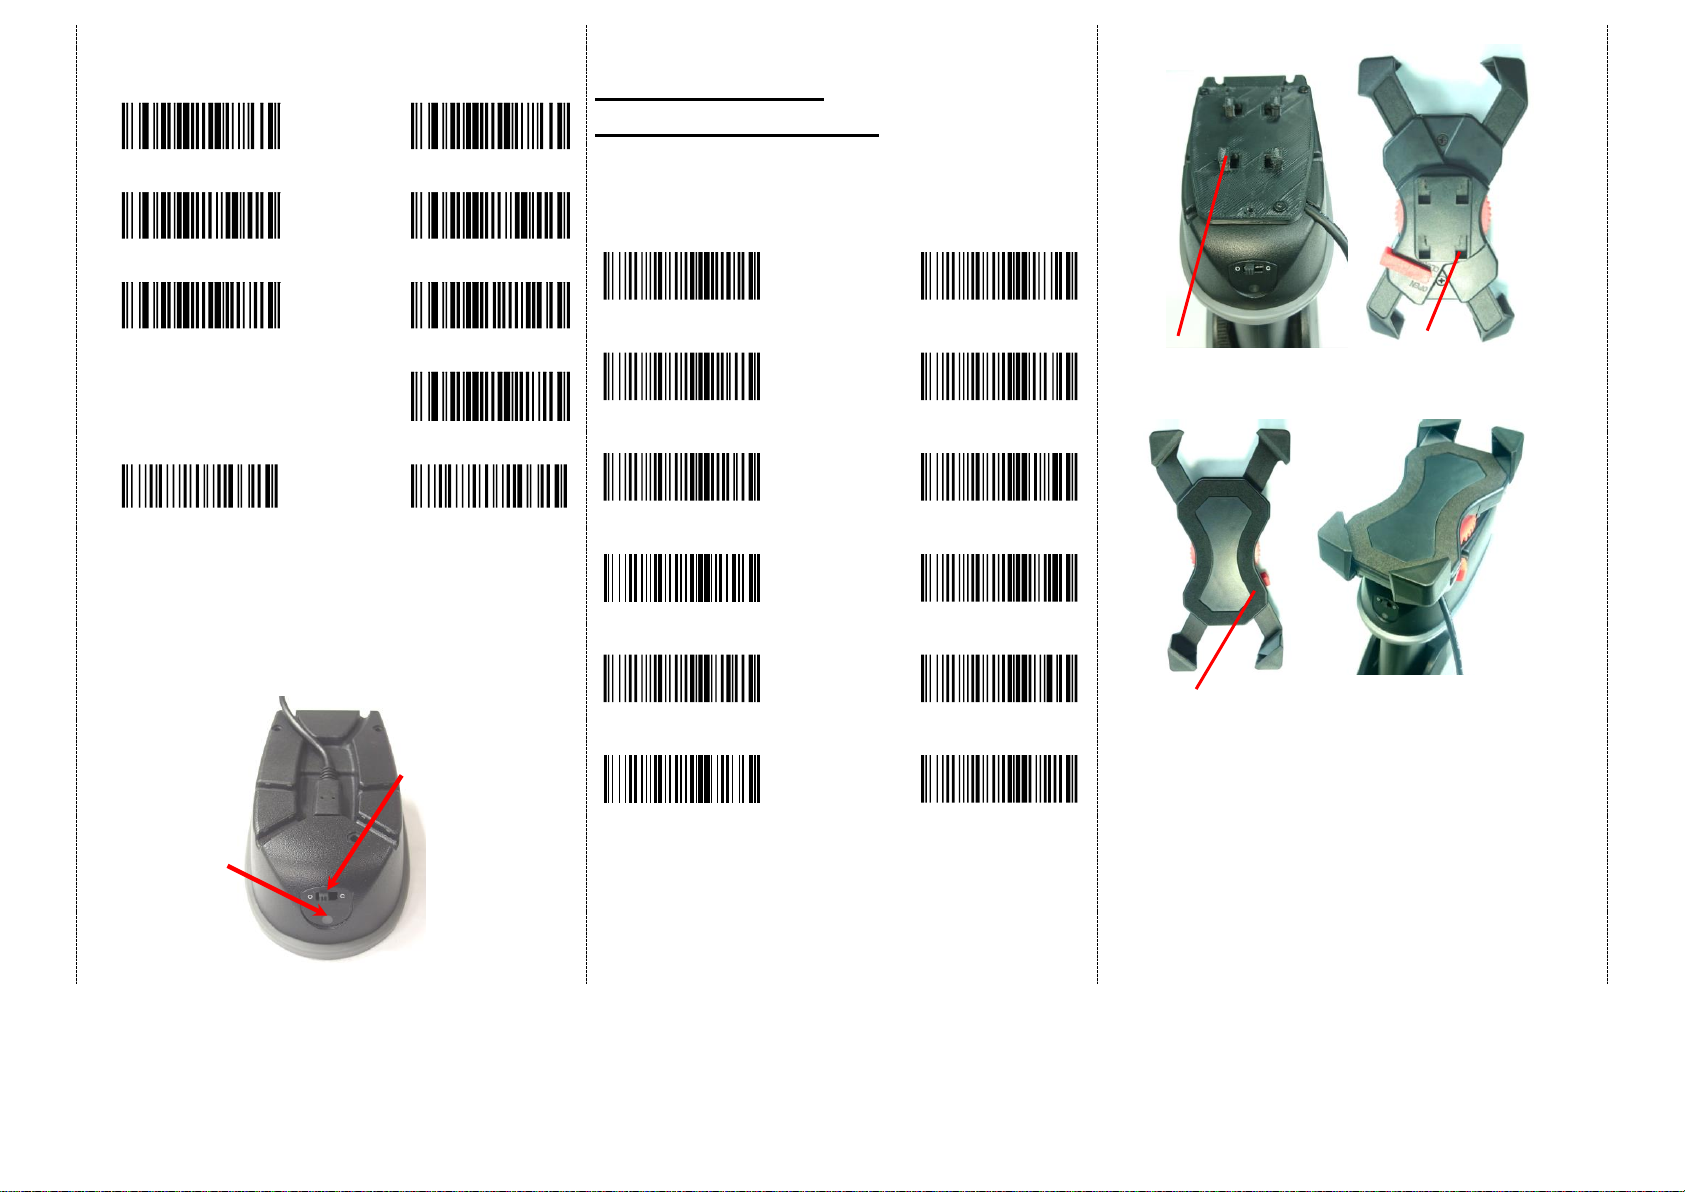
3. Press the holder to the scanner firmly and draw back very
carefully until you hear a low clicking sound.
4. To separate the holder from the scanner: Press on the holder
towards the scanner firmly, then push it forward carefully.
5. IMPORTANT: We do not recommend the repetitive action of
detaching and reattaching the holder.
6. Place the smartphone onto holder (Recommendation: use
mobile device less than 14.5 cm in length), plug the micro usb to
the mobile device, then close in the extensions.
7. Push in the tiny rectangular switch at the bottom of the handle,
then switch the scanner to Operation mode, now it can scan
directly to the mobile’s APP. The user may choose to connect
through Bluetooth as well (Please review the different ways of
connection at page 2 and 3, for a more detail explanation).
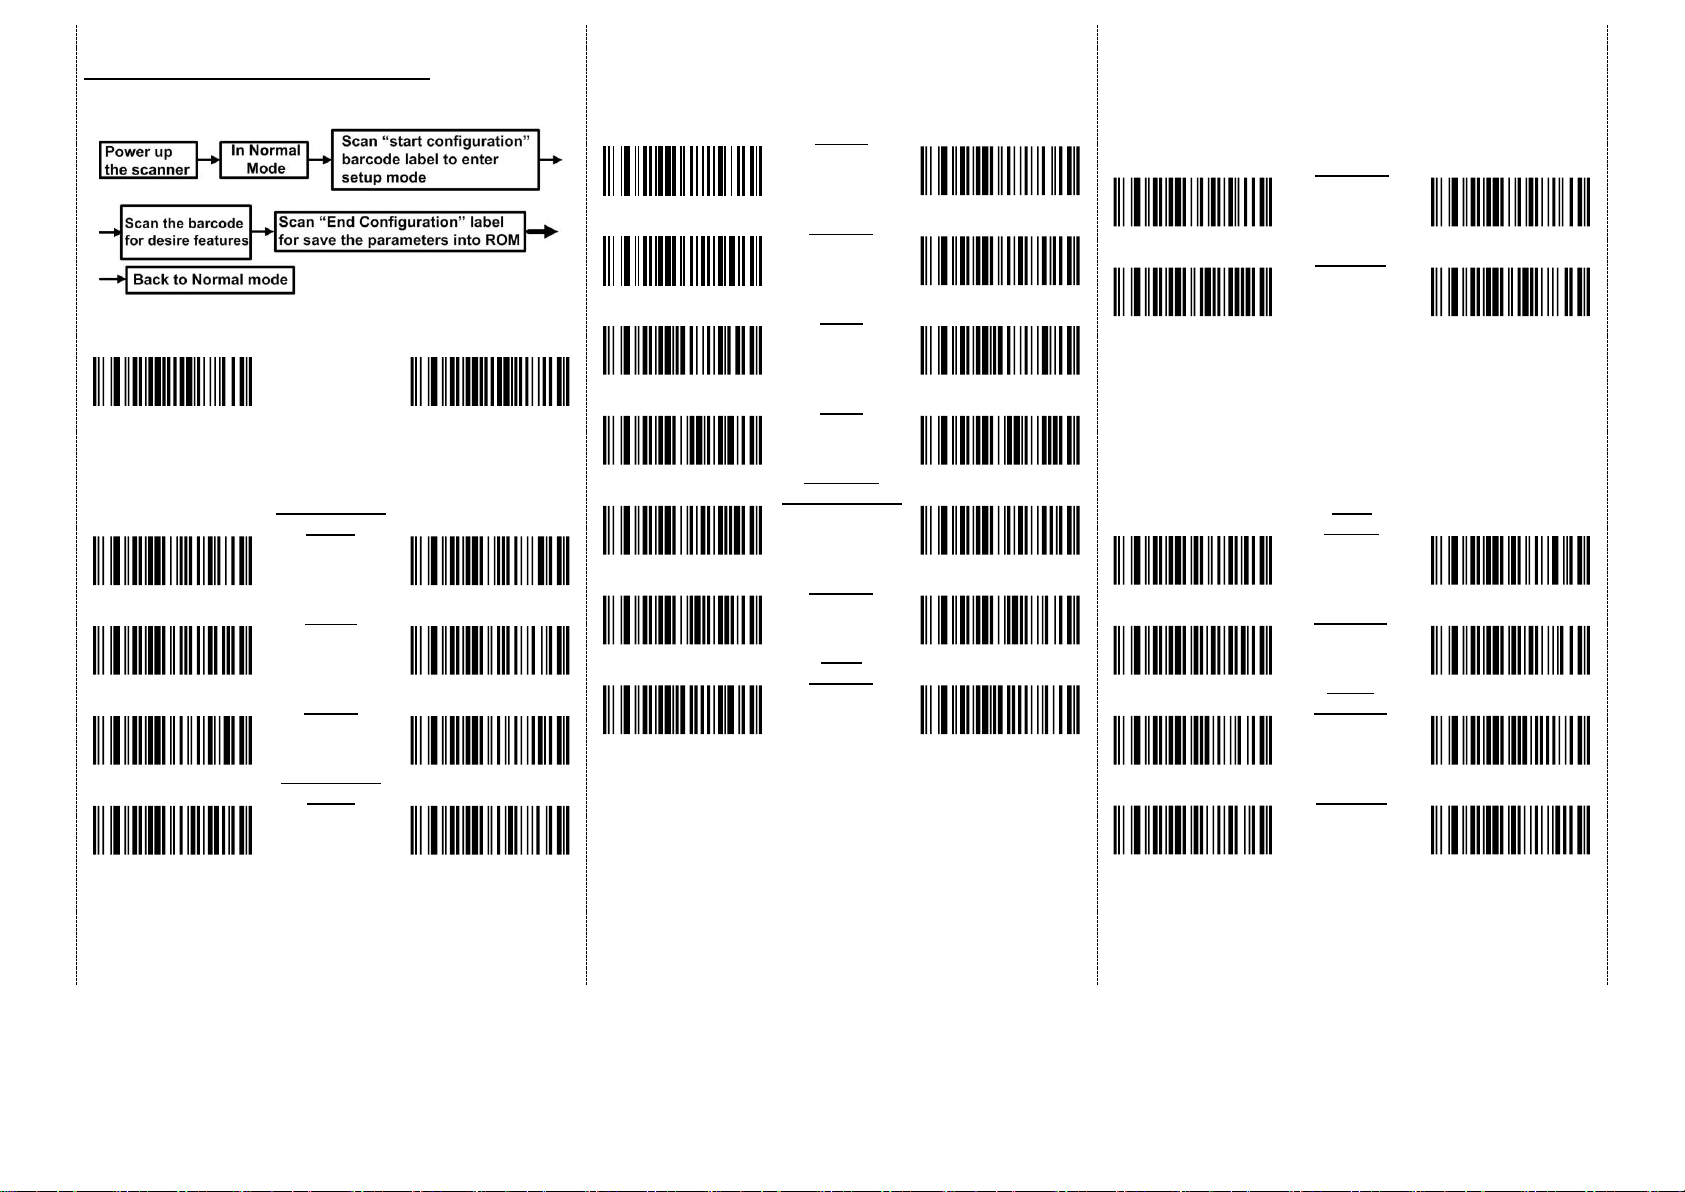
There are two operating modes on the scanner
1.Data Transmission mode(Default)
Demo
%M%A%F
It is a necessary to scan “clean memory data”when
switching between these two modes.
Within Bluetoothz radio
range
Beyond Bluetoothz radio range
Data
read
Transmit data to
smartphone/tablet directly
Save data in scanner’s memory,
scanner will transmit data to
smartphone/tablet automatically
after getting back to Bluetoothz
radio range.
Enter Data Storage mode
LED
Green/ Orange LED flashes,
followed by 3 beeps.
2. Data Storage mode(Batch Mode)
Demo
%M%A%N
It is a necessary to scan “clean memory data”when
switching between these two modes.
Data
read
Save data directly to scanner’s memory. It will transmit data to
smartphone/tablet after you scan the Transmit memory data
code. To delete data, please scan the Clean memory data code.
Enter Data Transmission mode
LED
Green/ Orange LED flashes followed by 3 beeps.
Always Clean memory data before switching to Data Transmission
Mode.
Otherwise Red/ Orange LED will flash with one long beep sounds
and will not switch modes.
A. Data Transmission mode
(Default)
1. When you are out of BT signal range,
the data you scan will be saved to
memory. Once you are back within
range, the data will be sent to
smartphone/tablet automatically.
B. Data Storage mode(Batch mode)
1. Data Storage mode (Batch mode):
When you scan the barcodes, the data
will be saved directly to scanner’s
memory. After you scan the
“Transmit memory data” code
(above right), the data will be sent to
smartphone/tablet.
2. Before you can continue to scan or
switch modes, you must first delete
the data stored in the memory. To do
this, scan the “Clean memory data”
code. (below right)
Demo
%R%E%C
Transmit memory data
Green/Orange LED flashes
followed by 3 beeps
The barcode data which is stored
in the memory will be sent to
smartphone/tablet directly.
(under Batch mode, within
Bluetooth service range)
Demo
%E%R%A
Clean memory data
Green/Orange LED flashes
followed by 3 beeps.
The barcode data which is stored
in the memory will be deleted. You
can then switch modes.
After the scanner connects to your iOS device and is inserted
into cradle, it may display the above message.
If this happens, remove and reinsert device into cradle.
LED Indicator Information
Orange LED ON
Full charged
Orange LED Flashing
Charging / Low battery
Red LED ON
Offline / out of service
Green LED ON
Good read
Orange LED ON
Good read (Batch mode)
LED
Indicator
1. Holder’s front side: Shift
and Hold the red switch to
Open while you rotate the
wheel either way, in order to
shrink or spread the 4
extensions.
2. Do not pull or push the 4
extensions, nor extend the
wheel across the limit, for it
can disrupt the balance and
functionality of the holder.
3. Use mobile device less
than 14.5 cm in length.

5
Transmission Speed
Transmission speed is dependent on your device. In order not
to lose data, please choose the correct speed. Middle-speed is
the Default.
Demo
%B%T%H
High-speed transmission
(for HID, SPP)
Demo
.
Middle-speed transmission
(for HID only, HID Default)
Demo
%B%T%L
Slow-speed transmission
(for HID/SPP, SPP Default)
Demo
.
Ultra Slow-speed 1 transmission
(for HID only)
Demo
.
Ultra Slow-speed 2 transmission
(for HID only)
Demo
.
Ultra Slow-speed 3 transmission
(for HID only)
Power-saving Mode
Demo
%P%D%T00
Power-saving mode OFF
Demo
%P%D%T01
Power-saving mode ON (Default):
Enter power-saving mode after one
minute inactivity. This function
conserves battery power. When you
press the "SCAN/Power ON" button, it
will wake up and begin to scan.
*When charging, the scanner will not enter power-saving mode
automatically.
Battery information
Demo
.
When you scan this setting
code, scanner will output the battery
information to device.
Demo
.
Output battery information
automatically –Enable
Will send data to device
every 30 seconds.
Demo
.
Output battery information
automatically –Disable.
The output format of battery information is as below:
For example: %^4^%
%^NUMBER^% Number is from 0~4.
4 means 80%~100%
3 means 55%~80%
2 means 30%~55%
1 means 10%~30%
0 means under 10% -- When output reads “0”, it means low
battery power and device should be charged immediately.
Barcode Configuration Method:
(Flow chart for setup procedure :)
Start
Configuration
End
Configuration
0006010
0006000
1D Symbologies –1
ENABLE
Matrix
2 of 5
DISABLE
0406020
0406010
ENABLE
Industrial 25
DISABLE
0417020
0417010
ENABLE
Code 39
DISABLE
0408020
0408010
ENABLE
Code 93
DISABLE
0410020
0410010

6
Barcode Configuration Method:
(Flow chart for setup procedure :)
Start
Configuration
End
Configuration
0006010
0006000
1D Symbologies –2
ENABLE
GS1-Databar
(RSS)
DISABLE
0413020
0413010
ENABLE
UPC-E
DISABLE
0403020
0403010
ENABLE
UPC-A
DISABLE
0404020
0404010
ENABLE
Interleaved
2 of 5
DISABLE
0405020
0405010
1D Symbologies –3
ENABLE
EAN-8
DISABLE
0401020
0401010
ENABLE
EAN-13
DISABLE
0402020
0402010
ENABLE
ISSN
DISABLE
0421020
0421010
ENABLE
ISBN
DISABLE
0416020
0416010
ENABLE
GS1-128
UCC/EAN-128
DISABLE
0412020
0412010
ENABLE
Plessey
DISABLE
0419020
0419010
ENABLE
MSI-
Plessey
DISABLE
0420020
0420010
1D Symbologies –4
ENABLE
CODE 11
DISABLE
0415020
0415010
ENABLE
Codabar
DISABLE
0409020
0409010
2D Symbologies
ENABLE
Data
Matrix
DISABLE
0504020
0504010
ENABLE
QR Code
DISABLE
0502020
0502010
ENABLE
Micro
QR Code
DISABLE
0502110
0502100
ENABLE
PDF 417
DISABLE
0501020
0501010
Quick guide is subject to change without notice.
R_180808_01
Table of contents
Other RIOTEC Barcode Reader manuals

RIOTEC
RIOTEC iDC9607L User manual

RIOTEC
RIOTEC FS5103A User manual

RIOTEC
RIOTEC iLS6303ABQ User manual

RIOTEC
RIOTEC LS6307 USB User manual

RIOTEC
RIOTEC iCR6300CBQ User manual

RIOTEC
RIOTEC iLS6303XBU User manual

RIOTEC
RIOTEC DC9258KP User manual

RIOTEC
RIOTEC OM7520M User manual

RIOTEC
RIOTEC LS6322A User manual

RIOTEC
RIOTEC DC9277A User manual

RIOTEC
RIOTEC iLS6300VBU User manual

RIOTEC
RIOTEC iDC9602A User manual

RIOTEC
RIOTEC iLS6300DBQ User manual

RIOTEC
RIOTEC DC9257LP User manual

RIOTEC
RIOTEC iLS6302J/KBU User manual

RIOTEC
RIOTEC FS5108J User manual

RIOTEC
RIOTEC iLS6303ABQ User manual

RIOTEC
RIOTEC iDC9500 User manual

RIOTEC
RIOTEC iDC9608K User manual

RIOTEC
RIOTEC iDC9273A User manual