manuals.online logo
Brands
  1. Home
  2. •
  3. Brands
  4. •
  5. B-K lighting
  6. •
  7. Outdoor Light
  8. •
  9. B-K lighting Brick Star User manual

B-K lighting Brick Star User manual

BQ
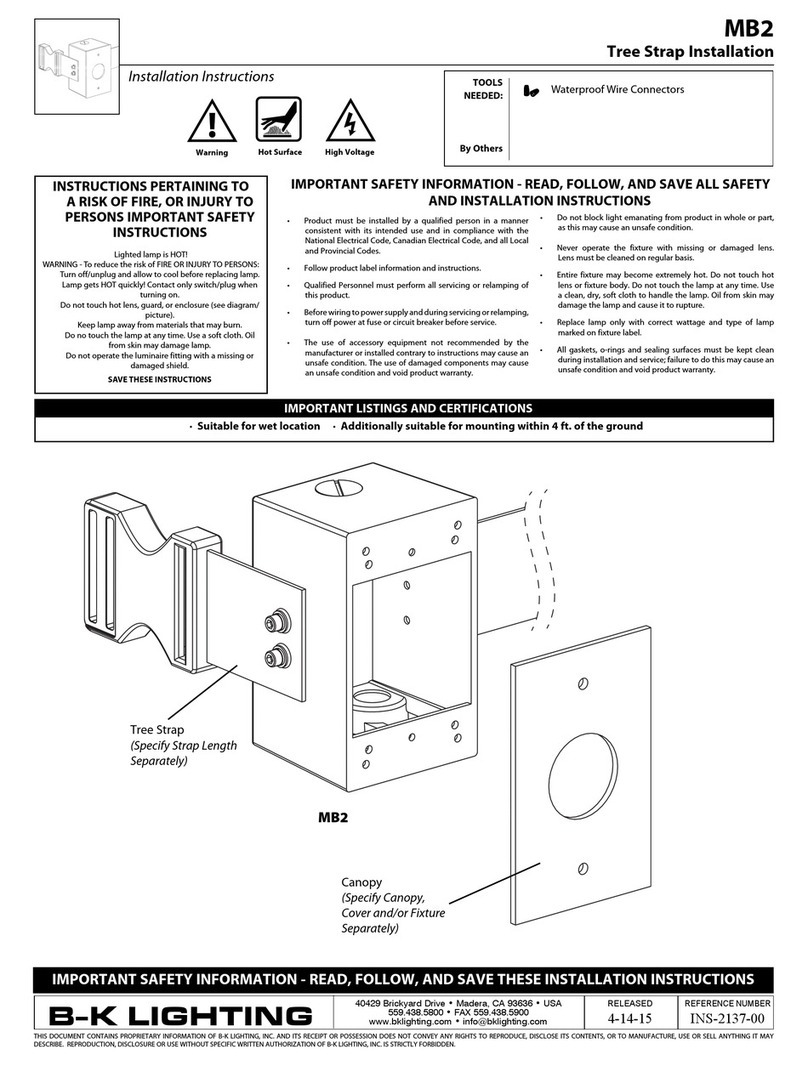
Rectangular Junction Box
(MB2) with Extension
Faceplate
RELEASE DATE
5-18-16
REFERENCE NUMBER
INS001003
40429 Brickyard Drive • Madera, CA 93636 • USA
559.438.5800 • FAX 559.438.5900
www.bklighting.com • [email protected]
B-K LIGHTING
THIS DOCUMENT CONTAINS PROPRIETARY INFORMATION OF B-K LIGHTING, INC. AND ITS RECEIPT OR POSSESSION DOES NOT CONVEY ANY RIGHTS TO REPRODUCE, DISCLOSE ITS CONTENTS, OR TO MANUFACTURE, USE OR SELL ANYTHING IT MAY
DESCRIBE. REPRODUCTION, DISCLOSURE OR USE WITHOUT SPECIFIC WRITTEN AUTHORIZATION OF B-K LIGHTING, INC. IS STRICTLY FORBIDDEN.
IMPORTANT SAFETY INFORMATION - READ, FOLLOW, AND SAVE THESE INSTALLATION INSTRUCTIONS
TOOLS
NEEDED:
By Others
1/8” Allen wrench
Phillips Screwdriver
Waterproof Wire connectors
TECHNOLOGY
with
TECHNOLOGY
Hot Surface
Warning Low Voltage
BACK BOX
Solid State LED
Installation Instructions
IMPORTANT NOTE
VQ and VQL mount in ceiling.
Orientation of installed back
box determines faceplate screw
orientation.
This set of instructions works for:
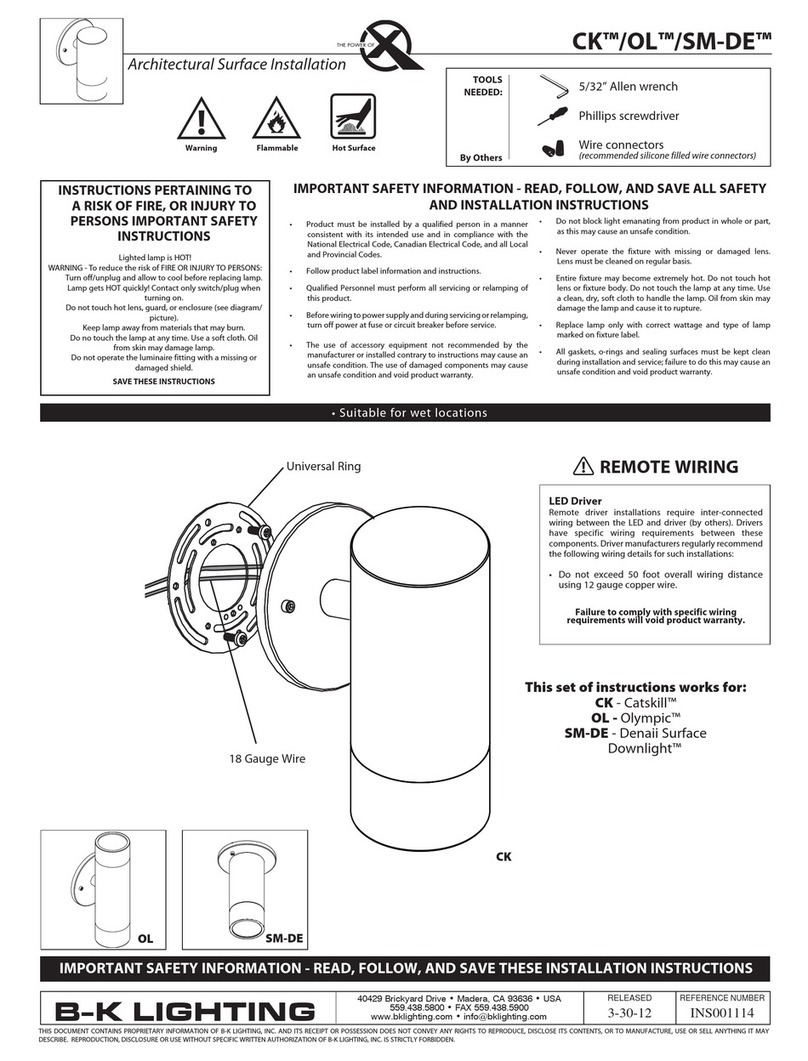
BQ - Brick Star™
BQL - Louvered Brick Star™
SQ - Square Step Star™
SQL - Louvered Square Step Star™
VQ - Square Versa Star™
VQL - Louvered Square Versa Star™
BQL SQ SQL VQ VQLBQ
• Product must be installed by a qualified person in a manner
consistent with its intended use and in compliance with the
National Electrical Code, Canadian Electrical Code, and all Local
and Provincial Codes.
• Followproductlabelinformationandinstructions.
• QualifiedPersonnel mustperform allservicing orrelamping of
this product.
• Beforewiringtopowersupplyandduringservicingorrelamping,
turnoffpoweratfuseorcircuitbreakerbeforeservice.
• The use of accessory equipment not recommended by the
manufacturerorinstalledcontrarytoinstructionsmaycausean
unsafecondition.Theuseofdamagedcomponentsmaycause
anunsafeconditionandvoidproductwarranty.
IMPORTANT SAFETY INFORMATION - READ, FOLLOW, AND SAVE ALL SAFETY
AND INSTALLATION INSTRUCTIONS
• Donotblocklightemanatingfromproductinwholeorpart,
asthismaycauseanunsafecondition.
• Never operate the fixture with missing or damaged lens.
Lensmustbecleanedonregularbasis.
• Entire fixture may become extremely hot. Do not touch hot
lensorfixturebody.Donottouchthelampatanytime.Use
aclean,dry,softclothtohandlethelamp.Oilfromskinmay
damagethelampandcauseittorupture.
• Replace lamp only with correct wattage and type of lamp
markedonfixturelabel.
• All gaskets, o-rings and sealing surfaces must be kept clean
duringinstallationandservice;failuretodothismaycausean
unsafeconditionandvoidproductwarranty.
INSTRUCTIONS PERTAINING TO
A RISK OF FIRE, OR INJURY TO
PERSONS IMPORTANT SAFETY
INSTRUCTIONS
LightedlampisHOT!
WARNING - To reduce the risk of FIRE OR INJURY TO PERSONS:
Turnoff/unplugandallowtocoolbeforereplacinglamp.
LampgetsHOTquickly!Contactonlyswitch/plugwhen
turning on.
Donottouchhotlens,guard,orenclosure(seediagram/
picture).
Keeplampawayfrommaterialsthatmayburn.
Donotouchthelampatanytime.Useasoftcloth.Oil
fromskinmaydamagelamp.
Donotoperatetheluminairefittingwithamissingor
damagedshield.
SAVE THESE INSTRUCTIONS
 ·Suitableforwetlocation·Additionallysuitableformountingwithin4ft.oftheground•TypeNon-IC
IMPORTANT LISTINGS AND CERTIFICATIONS
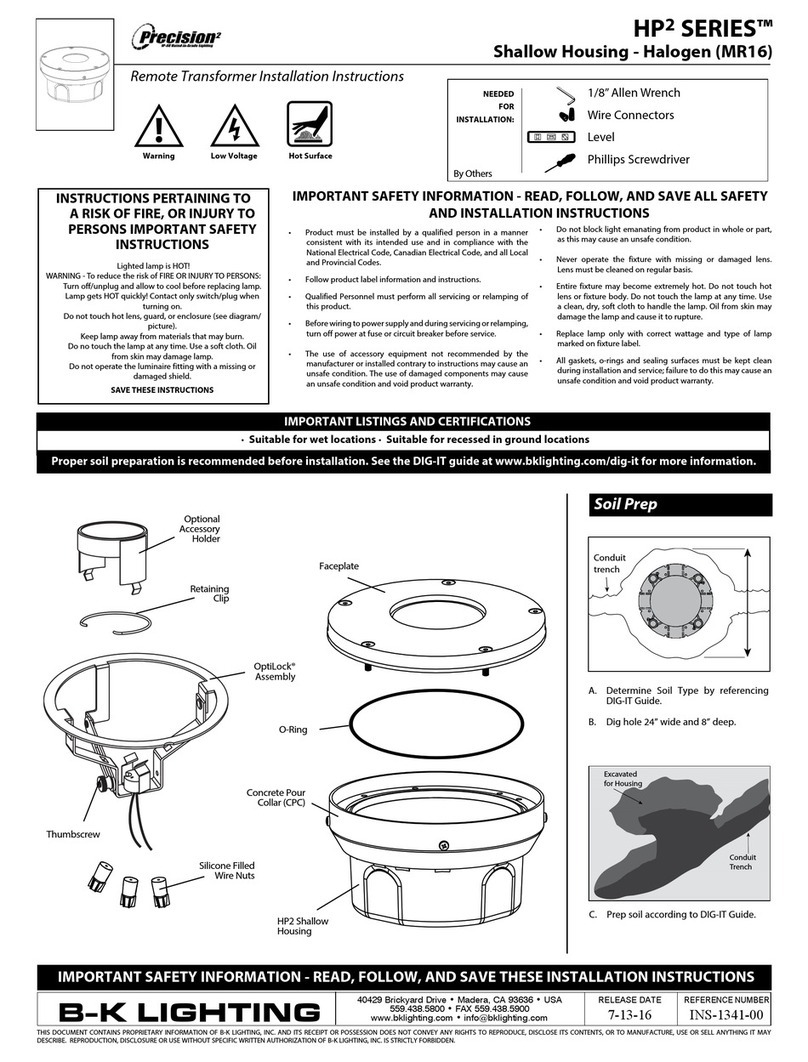
Pleaserefertothelowvoltagedesignguideatwww.bklighting.com/lvguidebeforeinstallationforproperwireselection.
 AdjustableAiming
Bracket
LED and Heatsink
Assembly
Driver
RELEASE DATE
5-18-16
REFERENCE NUMBER
INS001003
40429 Brickyard Drive • Madera, CA 93636 • USA
559.438.5800 • FAX 559.438.5900
www.bklighting.com • [email protected]
B-K LIGHTING
2. To aim, loosen the two (2) Phillips screws
attaching the adjustable bracket to the
faceplate.Aimtodesiredposition.Tightentwo
(2) Phillips screws to lock in place when desired
angle is set.
Phase 2 - Finish Installation of Fixture with Remote Transformer
Phase 1 - Rough In
InstallationofBackbox
2. Install Conduit (By Others) to be used with
this product.
5. Connect box to conduit and pull wires for
connections(SeeWiringdiagram).
Additional Info
• PleasefollowNationalandLocalelectricalcodesforyourarea.
• Suitableforthroughwire.
• Suitableforinstallationintocombustiblematerials.
• Ratedfor90°C.
• Orientation of installed back box determines faceplate screw
orientation.
IMPORTANT SAFETY INFORMATION LISTED ON REVERSE
READ, FOLLOW, AND SAVE ALL SAFETY AND INSTALLATION INSTRUCTIONS
TECHNOLOGY
with
TECHNOLOGY
BACK BOX
Solid State LED
Installation Instructions
LINE 12V
Fixture
COM
Remote
Transformer
COM
WIRING DIAGRAM
LED - For use with 12VAC remote
transformer or magnetic transformers only. B-K
Lighting cannot guarantee performance with
thirdpartymanufacturers’transformers.
3. Mountfaceplateusingtwo(2)#10-24screwswith
1/8” Allen wrench. Tighten evenly to compress
gasket. Do not over tighten.
1. Make watertight connections from remote
transformer  to LED leads using waterproof wire
connectors.(ByOthers)See wiring diagram.
1. Remove canopy and/or fixture from MB2
housing. Ensure unused tapped holes are
pluggedtomaintainseal.Plugsareprovided.
3. To prepare MB2 for mounting, align
mounting brackets on back of box. Brackets
can be aligned to vertical, horizontal or 45°
orientation.  Secure with mounting screw
using screwdriver.
Install back box so that front face is flush
with finished wall or ceiling. Make sure
rectangular back box is plumb before
proceeding.
4. Mount MB2 box to surface using mounting
hardware (Provided) using the mounting
bracketsattachedtobackofMB2box.
Alternative mounting methods may
compromiseintegrityofMB2againstwater
intrusion and will void warranty.
NOTE: Surface conduit is a common entrance
for water if not properly sealed. Seal
connector threads and conduit with a suitable
sealant  (Teflon tape, adhesive, etc.). Sealing
the conduit after knockouts are removed is
required to maintain warranty.
RELEASED
6-8-15
REFERENCE NUMBER
INS000022
40429 Brickyard Drive • Madera, CA 93636 • USA
559.438.5800 • FAX 559.438.5900
www.bklighting.com • [email protected]
B-K LIGHTING
THIS DOCUMENT CONTAINS PROPRIETARY INFORMATION OF B-K LIGHTING, INC. AND ITS RECEIPT OR POSSESSION DOES NOT CONVEY ANY RIGHTS TO REPRODUCE, DISCLOSE ITS CONTENTS, OR TO MANUFACTURE, USE OR SELL ANYTHING IT MAY
DESCRIBE. REPRODUCTION, DISCLOSURE OR USE WITHOUT SPECIFIC WRITTEN AUTHORIZATION OF B-K LIGHTING, INC. IS STRICTLY FORBIDDEN.
TECHNOLOGY
with
TECHNOLOGY
5/64” & 9/64” Allen Wrench
Small Flat Head Screw Driver
Phillips Screwdriver
Warning Low Voltage Hot Surface
LED BOARD / DRIVER / OPTICS
Architectural Recessed - Back Box
Standard Installation/Replacement
IMPORTANT SAFETY INFORMATION - READ, FOLLOW, AND SAVE THESE INSTALLATION INSTRUCTIONS
Replacing LED Board/Driver and Optics
1. Remove fixture by loosening two (2) #10-24
fasteners. Gently pull away from installed back box
enough to expose back of faceplate.
2. Loosen two (2) Phillips head screws holding bracket
to faceplate. Remove bracket from faceplate to
expose optics and LED.
3. Space three fingers evenly around the optic and
gently rock optic to remove.
5. Disengage LED board and driver assembly. Replace
with new board and driver assembly.
6. Reverse install LED board and driver by carefully
re-engaging quick disconnects. Secure LED board
in place with stainless steel screws. Snap optics in
place.
7. With flat head screw driver rotate dial to desired
lumen output.
4. Use 5/64” Allen wrench to remove two (2) #2-56
socket head cap screws on LED board, grasp
LED board and gently pull up to expose quick
disconnect.
8. Attach bracket to faceplate by securing (2) Phillips
screws. Aim to desired position. Tighten two (2)
Phillips screws to lock in place when desired angle
is set.
9. Mount faceplate using two (2) #10-24 screws with
1/8” Allen wrench. Tighten evenly to compress
gasket. Do not over tighten.
TOOLS
NEEDED:
By Others

This manual suits for next models

5

Other B-K lighting Outdoor Light manuals
B-K lighting HP2 SERIES User manual

B-K lighting

B-K lighting HP2 SERIES User manual

B-K lighting CO2 User manual

B-K lighting

B-K lighting CO2 User manual

B-K lighting HP2RM User manual

B-K lighting

B-K lighting HP2RM User manual

B-K lighting ALPINE Series User manual

B-K lighting

B-K lighting ALPINE Series User manual

B-K lighting HP2 SERIES User manual

B-K lighting

B-K lighting HP2 SERIES User manual

B-K lighting Tenaya 2 Series User manual

B-K lighting

B-K lighting Tenaya 2 Series User manual

B-K lighting ARTISTAR UPLIGHT User manual

B-K lighting

B-K lighting ARTISTAR UPLIGHT User manual

B-K lighting HP2 SERIES User manual

B-K lighting

B-K lighting HP2 SERIES User manual

B-K lighting PRECISION2 CO2 Series User manual

B-K lighting

B-K lighting PRECISION2 CO2 Series User manual

B-K lighting BKSSL MINI-MICRO iLUME User manual

B-K lighting

B-K lighting BKSSL MINI-MICRO iLUME User manual

B-K lighting Precision2 DR2 Series User manual

B-K lighting

B-K lighting Precision2 DR2 Series User manual

B-K lighting EC Setup guide

B-K lighting

B-K lighting EC Setup guide

B-K lighting ARTISTAR UPLIGHT User manual

B-K lighting

B-K lighting ARTISTAR UPLIGHT User manual

B-K lighting Yukon Bollard User manual
B-K lighting

B-K lighting Yukon Bollard User manual

B-K lighting MB2 User manual

B-K lighting

B-K lighting MB2 User manual

B-K lighting GARDEN STAR GR-K User manual

B-K lighting

B-K lighting GARDEN STAR GR-K User manual

B-K lighting OLYMPUS Series User manual

B-K lighting

B-K lighting OLYMPUS Series User manual

B-K lighting CK User manual

B-K lighting

B-K lighting CK User manual

B-K lighting SARATOGA Series User manual

B-K lighting

B-K lighting SARATOGA Series User manual

B-K lighting Precision 2 CO2 Series User manual

B-K lighting

B-K lighting Precision 2 CO2 Series User manual

B-K lighting HP2 SERIES User manual

B-K lighting

B-K lighting HP2 SERIES User manual

B-K lighting Precision2 HP2 Series User manual

B-K lighting

B-K lighting Precision2 HP2 Series User manual

B-K lighting DENALI User manual

B-K lighting

B-K lighting DENALI User manual

B-K lighting TENAYA2 Series User manual

B-K lighting

B-K lighting TENAYA2 Series User manual

Popular Outdoor Light manuals by other brands

Kichler Lighting HELEN 37536 instructions

Kichler Lighting

Kichler Lighting HELEN 37536 instructions

Thorn OXANE L installation instructions

Thorn

Thorn OXANE L installation instructions

esotec Solar Globe Light multicolor 20 operating instructions

esotec

esotec Solar Globe Light multicolor 20 operating instructions

mitzi HL200201 ELLIS Assembly and mounting instructions

mitzi

mitzi HL200201 ELLIS Assembly and mounting instructions

HEPER TILA S AFX 3 Module Installation & maintenance instructions

HEPER

HEPER TILA S AFX 3 Module Installation & maintenance instructions

Designplan TRON 180 installation instructions

Designplan

Designplan TRON 180 installation instructions

Sealey LED37 instructions

Sealey

Sealey LED37 instructions

nordlux VEJERS Mounting instruction

nordlux

nordlux VEJERS Mounting instruction

SImx ELITE LED LHTC637 installation instructions

SImx

SImx ELITE LED LHTC637 installation instructions

GEV CAROLINE 10833 manual

GEV

GEV CAROLINE 10833 manual

WE-EF PFL540 LED Installation and maintenance instructions

WE-EF

WE-EF PFL540 LED Installation and maintenance instructions

HEPER DOGO Side LW6048.585-US Installation & maintenance instructions

HEPER

HEPER DOGO Side LW6048.585-US Installation & maintenance instructions

BEGA 84 253 Installation and technical information

BEGA

BEGA 84 253 Installation and technical information

HEPER LW8034.003-US Installation & maintenance instructions

HEPER

HEPER LW8034.003-US Installation & maintenance instructions

HEPER MINIMO Installation & maintenance instructions

HEPER

HEPER MINIMO Installation & maintenance instructions

LIGMAN BAMBOO 3 installation manual

LIGMAN

LIGMAN BAMBOO 3 installation manual

Maretti TUBE CUBE WALL 14.4998.04 quick start guide

Maretti

Maretti TUBE CUBE WALL 14.4998.04 quick start guide

Maxim Lighting Carriage House VX 40428WGOB installation instructions

Maxim Lighting

Maxim Lighting Carriage House VX 40428WGOB installation instructions

manuals.online logo
manuals.online logoBrands
  • About & Mission
  • Contact us
  • Privacy Policy
  • Terms and Conditions

Copyright 2025 Manuals.Online. All Rights Reserved.