manuals.online logo
Brands
  1. Home
  2. •
  3. Brands
  4. •
  5. Bali
  6. •
  7. Indoor Furnishing
  8. •
  9. Bali Classic Roman shade Instruction sheet

Bali Classic Roman shade Instruction sheet

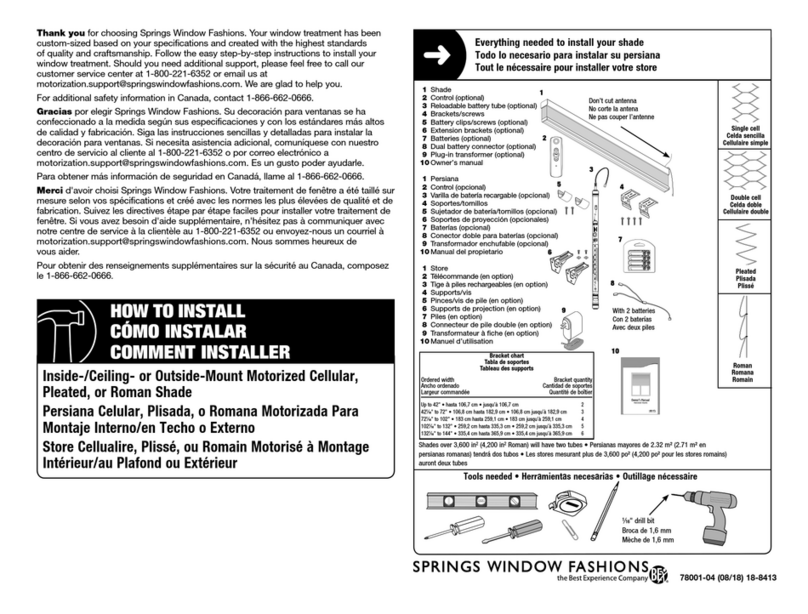
Everything needed to install your shade
Todo lo necesario para instalar su persiana
Tout ce dont vous avez besoin pour installer
votre toile
Inside/ceiling or outside mount motorized cellular, pleated,
or classic Roman shade
Persianas celulares motorizadas, plisadas o romanas
clásicas de montaje interior/en el techo o exterior
Toile romaine classique ou plissée, cellulaire motorisée à
montage intérieur/au plafond ou extérieur
HOW TO INSTALL
CÓMO INSTALAR
COMMENT INSTALLER
1.
Shade
2.
Two-button remote (optional)
3.
Single-channel remote
(optional)
4.
Multi-channel remote (optional)
5.
Brackets/screws
6.
Optional extension brackets
7.
Reloadable battery case
(optional)
8.
Battery hanger/screws (optional)
9.
Plug-in transformer (optional)
10.
8 AA batteries (optional)
11.
Owner’s manual
1.
Persiana
2.
Control remoto de dos botones
(opcional)
3.
Control remoto de un solo canal
opcionales
4.
Control remoto multicanal
(opcional)
5.
Soportes/tornillos
6.
Soportes de extensión opcionales
7.
Caja de batería recargable
(opcional)
8.
Soporte colgante de la batería/
tornillos (opcional)
9.
Transformador enchufable
(opcional)
10.
8 Baterías AA (opcional)
11.
Manual del propietario
1.
Toile
2.
Télécommande à deux boutons
(en option)
3.
Télécommande à un canal
(en option)
4.
Télécommande à plusieurs canaux
(en option)
5.
Supports/vis
6.
Supports d’extension (en option)
7.
Boîtier à piles rechargeable
(en option)
8.
Support à piles/vis (en option)
9.
Transformateur à fiche (en option)
10.
8 Piles AA (en option)
11.
Manuel d’utilisation
5
2
6
1
Shades over 3,600 in²(4,200 Roman) will have 2 battery cases, shades over 7,200 in² will have plug-in transformer • Las
persianas de más de 23,2 cm²(27,1 en el caso de las romanas) tendrán 2 cajas de batería, Más de 46451.52 cm²tendrá un
tapón de transformador • Les toiles mesurant plus de 23,2 cm²(27,1 pour les toiles romaines) auront deux boîtiers à piles,
Nuances plus de 46451.52 cm²aura transformateur enfichable
Single cell
Celda simple
Cellule simple
Double cell
Celda doble
Cellule double
Pleated
Plisada
Plissée
7
3
AA8
AA
AA
AA
AA
AA
AA
AA
AA
Looped
Con pliegues
Bouclée
8
9
10
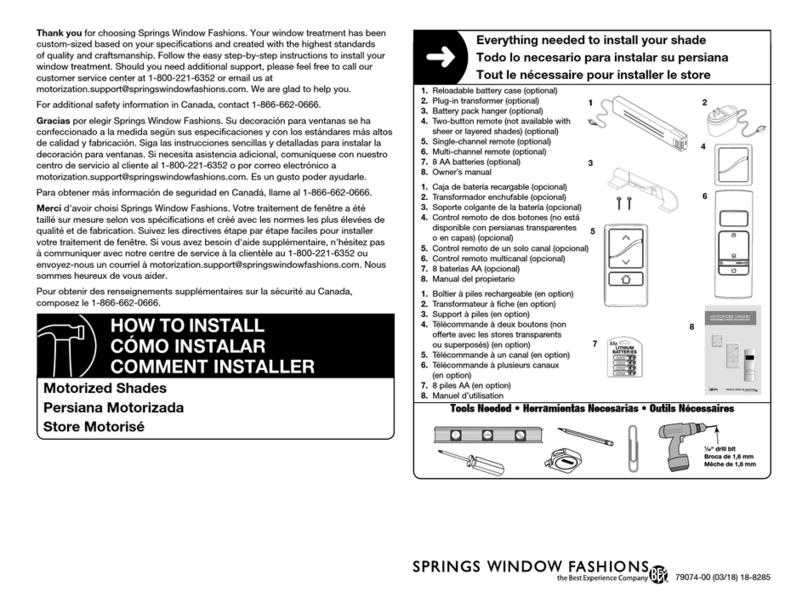
Thank you for choosing Springs Window Fashions. Your window treatment has been
custom-sized based on your specifications and created with the highest standards
of quality and craftsmanship. Follow the easy step-by-step instructions to install your
window treatment. Should you need additional support, please feel free to call our
customer service center at 1-800-221-6352 or email us at
[email protected]. We are glad to help you.
For additional safety information in Canada, contact 1-866-662-0666.
Gracias por elegir Springs Window Fashions. Su decoración para ventanas se ha
confeccionado a la medida según sus especificaciones y con los estándares más altos
de calidad y fabricación. Siga las instrucciones sencillas y detalladas para instalar la
decoración para ventanas. Si necesita asistencia adicional, comuníquese con nuestro
centro de servicio al cliente al 1-800-221-6352 o por correo electrónico a
[email protected]. Es un gusto poder ayudarle.
Para obtener más información de seguridad en Canadá, llame al 1-866-662-0666.
Merci d'avoir choisi Springs Window Fashions. Votre traitement de fenêtre a été
taillé sur mesure selon vos spécifications et créé avec les normes les plus élevées de
qualité et de fabrication. Suivez les directives étape par étape faciles pour installer
votre traitement de fenêtre. Si vous avez besoin d'aide supplémentaire, n'hésitez pas
à communiquer avec notre centre de service à la clientèle au 1-800-221-6352 ou
envoyez-nous un courriel à [email protected]. Nous
sommes heureux de vous aider.
Pour obtenir des renseignements supplémentaires sur la sécurité au Canada,
composez le 1-866-662-0666.
4
Bracket chart (items 5 and 6)
Tabla de soportes (elementos 5 y 6)
Tableau des supports (articles 5 et 6)
Ordered width
(inches)
Ancho pedido
Largeur commandée
(centimeter)
Bracket quantity
Cantidad de soportes
Nombre de supports
Up to 42 Hasta 106,7 • Jusqu’à 106,7 2
42
1
⁄
16
to 72 106,8 hasta 182,9 • 106,8 à 182,9 3
72
1
⁄
16
to 102 83 hasta 259,1 • 183 à 259,1 4
102
1
⁄
16
to 132 259,2 hasta 335,3 • 259,2 à 335,3 5
132
1
⁄
16
to 144 335,4 hasta 365,9 • 335,4 à 365,9 6
MOTORIZED SHADES
FEATURING Z-WAVE TECHNOLOGY
11
Tools Needed • Herramientas Necesarias • Outils Requis
1⁄16" drill bit
Broca de 1,6 mm
Mèche de 1,6 mm
79056-01 (03/18) 18-8283
3
Mark screw locations; center additional brackets, if applicable
Marque la ubicación de los tornillos; centre los soportes
adicionales, si corresponde
Marquer l’emplacement des vis; centrer les supports
supplémentaires, le cas échéant
Inside/ceiling mount
Montaje interior/en el techo
Montage intérieur ou au plafond
Outside mount
Montaje exterior
Montage extérieur
Optional extension bracket
Soporte de extensión opcional
Support d’extension en option
1⁄4"
6,4 mm
1⁄4" to front of bracket for
flush mount
6,4mm desde la parte
frontal del soporte para un
montaje al ras
6,4mm jusqu’à l’avant du
support pour un montage
affleuré
Place shade in desired location, mark corners
Coloque la persiana en la ubicación deseada, marque las esquinas
Placer la toile à l’endroit désiré, marquer les coins
1
Inside/ceiling mount
Montaje interior/en el techo • Montage intérieur ou au
plafond
Outside mount
Montaje exterior • Montage extérieur
2Measure in from both ends and mark
Mida desde los dos extremos y marque
Mesurer vers l’intérieur des deux extrémités et marquer
Inside/ceiling mount
Montaje interior/en el techo • Montage intérieur ou au plafond
Outside mount
Montaje exterior • Montage extérieur
6"
15,2 cm
6"
15,2 cm
Determine inside, inside with space-saving hanger, or outside mount, then
follow directions for that mounting style
Determine si utilizará montaje interno, montaje interno con soporte para
ahorrar espacio o montaje externo y luego siga las instrucciones para ese
estilo de montaje
Choisir le montage intérieur, le montage intérieur avec support compact ou le
montage extérieur, puis suivre les directives pour ce style de montage
79056-01 (03/18) 18-8283
Springs Window Fashions, LLC • Middleton, WI 53562-1096
www.springswindowfashions.com
Reattach the battery case lid to the battery case base by aligning the pegs with
the slots
Vuelva a ensamblar la cubierta de la caja de la batería a la base de la caja de la
batería alineando las chavetas con las ranuras
Replacer le couvercle du boîtier à piles sur la base du boîtier à piles en alignant les
taquets avec les fentes
Shade
Headrail Bracket
Battery Pack Base
Battery Pack Lid
Battery Pack Hanger (optional)
8 AA Lithium Batteries
Screws (optional)
1
2
3
4
5
6
7
No tools required
Tools Needed - Herramientas necesarias - Outillage nécessaire
Hanger Bracket Option Screw Mount Option
1
7
2
1
6
AA
8
AA
AA
AA
AA
AA
AA
AA
AA
Everything needed to install your battery pack
2Remove the Battery Pack Lid from the Battery Pack Base and insert batteries into the Battery Pack Lid
AB
Align battery polarity with
labels on Battery Pack Lid
34
5
3Reattach the Battery Pack Lid to the Battery
Pack Base by aligning the pegs with the
slots 4Slide the Battery Pack Lid into the base
while depressing the button to lock
5Attach the Battery Pack Hanger to the assembled Battery Pack
SNAP
B
A
Battery pack location and installation
Instalación y ubicación del paquete de baterías
Emplacement du boîtier à piles et installation
Shade
Headrail Bracket
Battery Pack Base
Battery Pack Lid
Battery Pack Hanger (optional)
8 AA Lithium Batteries
Screws (optional)
1
2
3
4
5
6
7
No tools required
Tools Needed - Herramientas necesarias - Outillage nécessaire
Hanger Bracket Option Screw Mount Option
1
7
2
1
6
AA8
AA
AA
AA
AA
AA
AA
AA
AA
Everything needed to install your battery pack
2Remove the Battery Pack Lid from the Battery Pack Base and insert batteries into the Battery Pack Lid
AB
Align battery polarity with
labels on Battery Pack Lid
34
5
3Reattach the Battery Pack Lid to the Battery
Pack Base by aligning the pegs with the
slots 4Slide the Battery Pack Lid into the base
while depressing the button to lock
5Attach the Battery Pack Hanger to the assembled Battery Pack
SNAP
B
A
4
Remove battery case lid; insert batteries into lid
Retire la cubierta de la caja de la batería, inserte las baterías en la cubierta
Retirer le couvercle du boîtier à piles, insérer les piles dans le couvercle
Shade
Headrail Bracket
Battery Pack Base
Battery Pack Lid
Battery Pack Hanger (optional)
8 AA Lithium Batteries
Screws (optional)
1
2
3
4
5
6
7
No tools required
Tools Needed - Herramientas necesarias - Outillage nécessaire
Hanger Bracket Option Screw Mount Option
1
7
2
1
6
AA8
AA
AA
AA
AA
AA
AA
AA
AA
Everything needed to install your battery pack
2Remove the Battery Pack Lid from the Battery Pack Base and insert batteries into the Battery Pack Lid
AB
Align battery polarity with
labels on Battery Pack Lid
34
5
3Reattach the Battery Pack Lid to the Battery
Pack Base by aligning the pegs with the
slots 4Slide the Battery Pack Lid into the base
while depressing the button to lock
5Attach the Battery Pack Hanger to the assembled Battery Pack
SNAP
B
A
Shade
Headrail Bracket
Battery Pack Base
Battery Pack Lid
Battery Pack Hanger (optional)
8 AA Lithium Batteries
Screws (optional)
1
2
3
4
5
6
7
No tools required
Tools Needed - Herramientas necesarias - Outillage nécessaire
Hanger Bracket Option Screw Mount Option
1
7
2
1
6
AA
8
AA
AA
AA
AA
AA
AA
AA
AA
Everything needed to install your battery pack
2Remove the Battery Pack Lid from the Battery Pack Base and insert batteries into the Battery Pack Lid
AB
Align battery polarity with
labels on Battery Pack Lid
34
5
3Reattach the Battery Pack Lid to the Battery
Pack Base by aligning the pegs with the
slots 4Slide the Battery Pack Lid into the base
while depressing the button to lock
5Attach the Battery Pack Hanger to the assembled Battery Pack
SNAP
B
A
+
+
-
-
AA
AA
CAUTION:BATTERIESMUST BE INSTALLED AS SHOWN. FAILURE TO DO SO MAY RESULT IN INJURY AND WILL INVALDATEWARRANTY.
USEONLY 8 AA BATTERIES• INSTALL AS SHOWN
AA
AA
CAUTION:BATTERIESMUST BE INSTALLED AS SHOWN. FAILURE TO DO SO MAY RESULT IN INJURY AND WILL INVALDATEWARRANTY.
USEONLY 8 AA BATTERIES• INSTALL AS SHOWN
USE ONLY 8 AA LITHIUM BATTERIES. 12 VOLTS.
CAUTION: BATTERIES MUST BE INSTALLED AS SHOWN. FAILURE TO DO SO MAY RESULT IN INJURY AND WILL
INVALIDATE WARRANTY. DO NOT MIX TYPE, BRAND, OR OLD WITH NEW. DO NOT ATTEMPT TO RECHARGE.
UTILICE ÚNICAMENTE 8BATERÍAS AA DE LITIO. 12VOLTIOS
PRECAUCIÓN: LAS BATERÍAS SE DEBEN INSTALAR COMO SE MUESTRA. DE LO CONTRARIO, SE PUEDEN
PRODUCIR LESIONES Y SE ANULARÁ LA GARANTÍA. NO MEZCLE BATERÍAS DE DISTINTOS TIPOS O MARCAS NI
BATERÍAS USADAS CON BATERÍAS NUEVAS. NO INTENTE RECARGARLAS.
UTILISER UNIQUEMENT HUIT PILES AA AU LITHIUM. 12 VOLTS.
MISE EN GARDE : LES PILES DOIVENT ÊTRE INSTALLÉES COMME IL EST ILLUSTRÉ. LE NON-RESPECT DE CETTE
CONSIGNE PEUT ENTRAÎNER DES BLESSURES ET ANNULERA LA GARANTIE. NE MÉLANGEZ PAS LES TYPES, LES
MARQUES OU DE VIEILLES PILES AVEC DES PILES NEUVES. NE PAS TENTER DE RECHARGER.
5
If mounting the battery case, mark battery screw locations
Si monta la caja de la batería, marque la ubicación de los tornillos
de la batería
En cas d’installation du boîtier à piles, marquer l’emplacement
des vis de pile
Inside/ceiling mount • Montaje interior/en el techo •
Montage intérieur ou au plafond
Outside mount
Montaje exterior • Montage extérieur
On right end of window, hold battery
case base 1" behind and 2" to the left
of the rear bracket screw location and
mark. For a second reloadable battery
case, mount the second battery case
base 5" to the left of the first base
and mark.
En el extremo derecho de la ventana,
sostenga la caja de la batería a 2,5 cm
por detrás y 5,1 cm a la izquierda de la
ubicación del tornillo del soporte trasero
y marque. Para una segunda caja de
batería recargable, monte el segundo
conjunto a 12,7 cm a la izquierda de la
primera base y marque.
À l’extrémité droite de la fenêtre, tenez
le boîtier à piles à une distance de 2,5
cm derrière et 5,1 cm à la gauche de
l’emplacement de la vis du support
arrière et marquez. Pour un second
boîtier à piles rechargeable, installez le
deuxième jeu à une distance de 12,7 cm
à la gauche de la première base
et marquez.
On right end of window, hold battery
case base 1⁄4" above and to 2" the left of
the left bracket screw location and mark.
For a second battery case, position base
5" to the left of the first base and mark
screw locations.
En el extremo derecho de la ventana,
sostenga la caja de la batería a 6,4
mm arriba y 5,1 cm a la izquierda de
la ubicación del tornillo del soporte
izquierdo y marque. Para una segunda
caja de batería, ubique la base a 12,7
cm a la izquierda de la primera base y
marque la ubicación de los tornillos.
À l’extrémité droite de la fenêtre, tenez
le boîtier à piles à une distance de 6,4
mm au-dessus et à une distance de
5,1 cm à la gauche de l’emplacement
de vis du support gauche et marquez.
Pour un deuxième boîtier à piles, placez
la base à une distance de 12,7 cm à la
gauche de la première base et marquez
l’emplacement des vis.
Draft-Image Review Only 141209 (6-1814)
MOTORIZATION ILLUSTRATIONS_Motorized shade install guide
OUTSIDE
MOUNT
INSIDE MOUNT
Draft-Image Review Only 141209 (6-1814)
MOTORIZATION ILLUSTRATIONS_Motorized shade install guide
OUTSIDE
MOUNT
INSIDE MOUNT
If using optional battery hanger, skip ahead to step 7
Si utiliza el soporte colgante de la batería opcional, vaya al paso 7
En cas d’utilisation du support à piles, passez à l’étape 7
79056-01 (03/18) 18-8283
Springs Window Fashions, LLC • Middleton, WI 53562-1096
www.springswindowfashions.com
6Tilt the Headrail Bracket through the slot in the
Battery Hanger and press until snug
A B
SNAP
7Snap the Battery Pack Assembly on the backside of the window
shade
8Connect the wire lead from the
Battery Pack to the motor wire lead
A B
Shade
Headrail Bracket
Battery Pack Base
Battery Pack Lid
Battery Pack Hanger (optional)
8 AA Lithium Batteries
Screws (optional)
1
2
3
4
5
6
7
No tools required
Tools Needed - Herramientas necesarias - Outillage nécessaire
Hanger Bracket Option Screw Mount Option
1
7
2
1
6
AA
8
AA
AA
AA
AA
AA
AA
AA
AA
Everything needed to install your battery pack
2Remove the Battery Pack Lid from the Battery Pack Base and insert batteries into the Battery Pack Lid
AB
Align battery polarity with
labels on Battery Pack Lid
34
5
3Reattach the Battery Pack Lid to the Battery
Pack Base by aligning the pegs with the
slots 4Slide the Battery Pack Lid into the base
while depressing the button to lock
5Attach the Battery Pack Hanger to the assembled Battery Pack
SNAP
B
A
Attach the battery case hanger to the assembled battery case.
Conecte el soporte colgante del paquete de baterías a la caja de la
batería ensamblada.
Fixez la support du bloc-piles au boîtier à piles assemblé.
Tilt the headrail bracket through the slot in the battery hanger and press until snug.
Incline el soporte del riel superior de la ranura en el soporte colgante de la batería y
presione hasta que se ajuste.
Inclinez le support du rail de retenue dans la fente du support à piles et appuyez
jusqu’à ce qu’il soit serré.
Attach bracket with battery case to shade.
Ensamble el soporte con la caja de la batería a la persiana.
Fixez le support avec le boîtier à piles sur la toile.
6Tilt the Headrail Bracket through the slot in the
Battery Hanger and press until snug
A B
SNAP
7Snap the Battery Pack Assembly on the backside of the window
shade
8Connect the wire lead from the
Battery Pack to the motor wire lead
A B
Snap!
¡Conecte!
Snap!
Snap!
¡Conecte!
Snap!
7a Optional battery hanger
Soporte colgante de la batería opcional
Support à piles en option
6
Drill holes, screw brackets into place, and battery case if applicable
Perfore los orificios, atornille los soportes en su lugar y la caja de la
batería, si corresponde
Percer des trous, visser les supports en place et le boîtier à piles,
le cas échéant
I
nside/ceiling mount • Montaje interior/en el techo •
Montage intérieur ou au plafond
Outside mount
Montaje exterior • Montage extérieur
Optional extension bracket
Soporte de extensión opcional • Support d’extension en option
Optional extension bracket: Assemble brackets
Soporte de extensión opcional: Ensamble los soportes • Support d’extension en option: Assemblage des supports
Attach headrail brackets to extension brackets using screws and nuts.
Conecte los soportes del riel superior a los soportes de extensión
utilizando tornillos y tuercas.
Fixez les supports du rail de retenue aux supports d’extension avec les
vis et les écrous.
79056-01 (03/18) 18-8283
Springs Window Fashions, LLC • Middleton, WI 53562-1096
www.springswindowfashions.com
Alternate mount for optional battery hanger • Alterne el montaje para lograr un soporte colgante de
la batería opcional. • Autre montage pour support de piles en option
7b
Mark and predrill screw holes; secure hanger
Marque los orificios para los tornillos, perfore con el taladro y fije
el soporte
Marquer et pré-percer les trous de vis, fixer le support
Rear view • Vista posterior • Vue arrière
7c Snap battery pack into hanger
Fije el paquete de baterías en el soporte
Enclencher le boîtier à piles dans le support
Snap!
¡Conecte!
Snap!
Rear view • Vista posterior • Vue arrière
6Tilt the Headrail Bracket through the slot in the
Battery Hanger and press until snug
AB
SNAP
7Snap the Battery Pack Assembly on the backside of the window
shade
8Connect the wire lead from the
Battery Pack to the motor wire lead
A B
Mount shade and battery case, and connect power cable
Monte la persiana, la caja de la batería y conecte el cable de alimentación
Installer la toile, le boîtier à piles et relier le câble d’alimentation
8
Inside/ceiling mount
Montaje interior/en el techo
Montage intérieur ou au plafond
Outside mount
Montaje exterior
Montage extérieur
Optional extension bracket
Soporte de extensión opcional
Support d’extension en option
Connect battery cable
Conecte el cable de la batería • Reliez le câble de pile
79056-01 (03/18) 18-8283
Springs Window Fashions, LLC • Middleton, WI 53562-1096
www.springswindowfashions.com

This manual suits for next models

2

Other Bali Indoor Furnishing manuals

Bali RTS Motorized Shades User manual

Bali

Bali RTS Motorized Shades User manual

Bali AutoView User manual

Bali

Bali AutoView User manual

Bali B-Bad User manual

Bali

Bali B-Bad User manual

Bali Natural Shades Instruction sheet

Bali

Bali Natural Shades Instruction sheet

Bali Vertical Cellular Shade Instruction sheet

Bali

Bali Vertical Cellular Shade Instruction sheet

Bali Vertical Cellular Shade Instruction sheet

Bali

Bali Vertical Cellular Shade Instruction sheet

Bali Solar Dual Shade Instruction sheet

Bali

Bali Solar Dual Shade Instruction sheet

Bali MOTORIZED SHADES User manual

Bali

Bali MOTORIZED SHADES User manual

Bali Rose TK8117 User manual

Bali

Bali Rose TK8117 User manual

Bali Roller solar shade Instruction sheet

Bali

Bali Roller solar shade Instruction sheet

Bali Cellular Arch Shade Instruction sheet

Bali

Bali Cellular Arch Shade Instruction sheet

Bali MOTORIZED SHADES Instruction sheet

Bali

Bali MOTORIZED SHADES Instruction sheet

Bali Motorized Pleated Shade Instruction sheet

Bali

Bali Motorized Pleated Shade Instruction sheet

Bali Cordless Roman shade Instruction sheet

Bali

Bali Cordless Roman shade Instruction sheet

Bali SHEER MOTORIZED SHADES User manual

Bali

Bali SHEER MOTORIZED SHADES User manual

Bali Layered Shade Instruction sheet

Bali

Bali Layered Shade Instruction sheet

Bali Roller solar shade Instruction sheet

Bali

Bali Roller solar shade Instruction sheet

Bali Natural Drapes Instruction sheet

Bali

Bali Natural Drapes Instruction sheet

Bali Roller solar shade Instruction sheet

Bali

Bali Roller solar shade Instruction sheet

Popular Indoor Furnishing manuals by other brands

Regency LWMS3015 Assembly instructions

Regency

Regency LWMS3015 Assembly instructions

Furniture of America CM7751C Assembly instructions

Furniture of America

Furniture of America CM7751C Assembly instructions

Safavieh Furniture Estella CNS5731 manual

Safavieh Furniture

Safavieh Furniture Estella CNS5731 manual

PLACES OF STYLE Ovalfuss Assembly instruction

PLACES OF STYLE

PLACES OF STYLE Ovalfuss Assembly instruction

Trasman 1138 Bo1 Assembly manual

Trasman

Trasman 1138 Bo1 Assembly manual

Costway JV10856 manual

Costway

Costway JV10856 manual

moss DESIGN Caisson Credenza Assembly instructions

moss DESIGN

moss DESIGN Caisson Credenza Assembly instructions

Aquaglide FULL DECK 15.0 owner's manual

Aquaglide

Aquaglide FULL DECK 15.0 owner's manual

AREBOS AR-HE-SW30 user manual

AREBOS

AREBOS AR-HE-SW30 user manual

Till-Hilft Fulda 87005.330 Assembly instructions

Till-Hilft

Till-Hilft Fulda 87005.330 Assembly instructions

Twoey Outside 2010 quick start guide

Twoey Outside

Twoey Outside 2010 quick start guide

Hettich Easys 200 operating instructions

Hettich

Hettich Easys 200 operating instructions

The bedboss RELAX 404 Series owner's manual

The bedboss

The bedboss RELAX 404 Series owner's manual

Oeseder Möbelindustrie Bern 991 720 Assembly instructions

Oeseder Möbelindustrie

Oeseder Möbelindustrie Bern 991 720 Assembly instructions

Costway HW68469 user manual

Costway

Costway HW68469 user manual

Next ALIX A27743 Assembly instructions

Next

Next ALIX A27743 Assembly instructions

BROSA Hans Assembly guide

BROSA

BROSA Hans Assembly guide

Prodigg MINIKA PBA015T-FUR installation manual

Prodigg

Prodigg MINIKA PBA015T-FUR installation manual

manuals.online logo
manuals.online logoBrands
  • About & Mission
  • Contact us
  • Privacy Policy
  • Terms and Conditions

Copyright 2025 Manuals.Online. All Rights Reserved.