manuals.online logo
Brands
  1. Home
  2. •
  3. Brands
  4. •
  5. Berker
  6. •
  7. Controllers
  8. •
  9. Berker 8526 51 00 User manual

Berker 8526 51 00 User manual

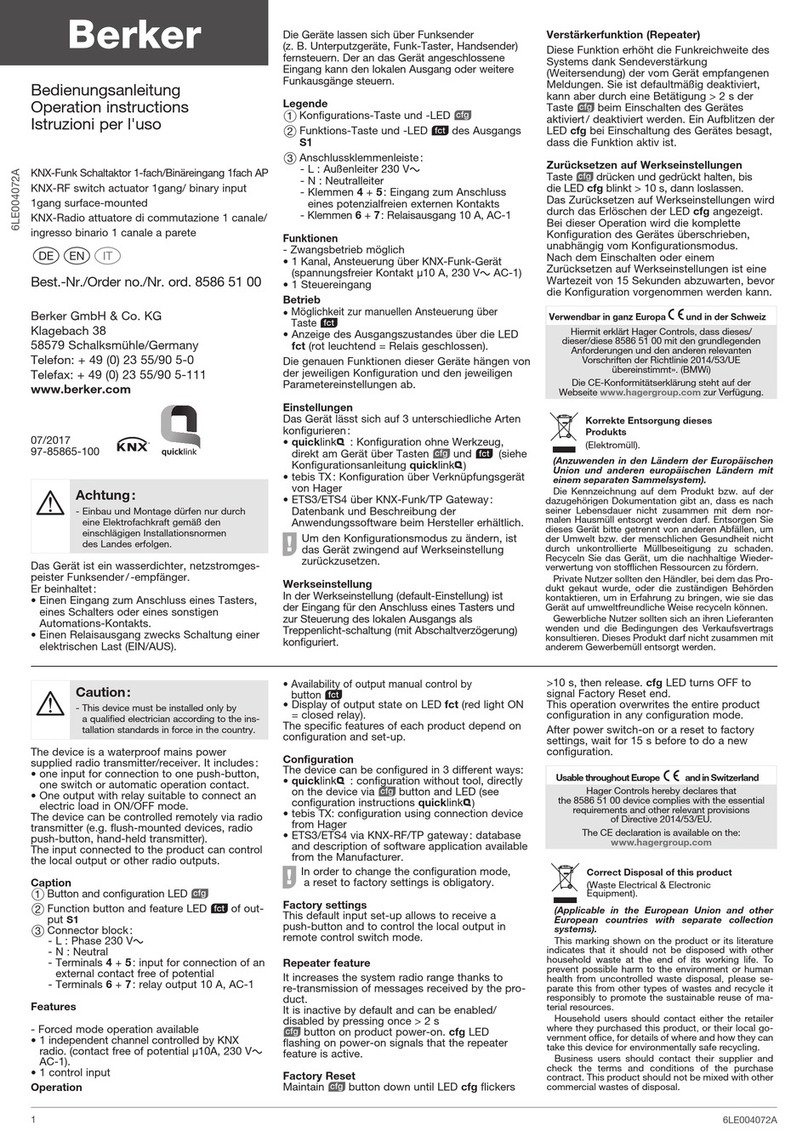
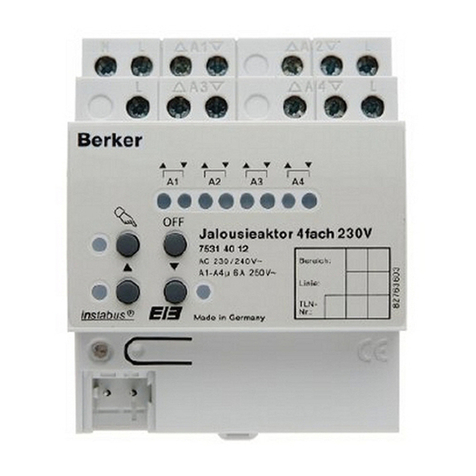
Das Gerät ist ein wasserdichter, netzstromges-
peister Funkempfänger. Es empfängt KNX-Funk-
Steuerbefehle zur Ansteuerung eines am Ausgang
angeschlossenen Jalousie-, Rollladen- oder
Markisenantriebs.
Das Gerät lässt sich über Funksender (z. B.
Unterputzgeräte, Funk-Taster, Handsender)
fernsteuern.
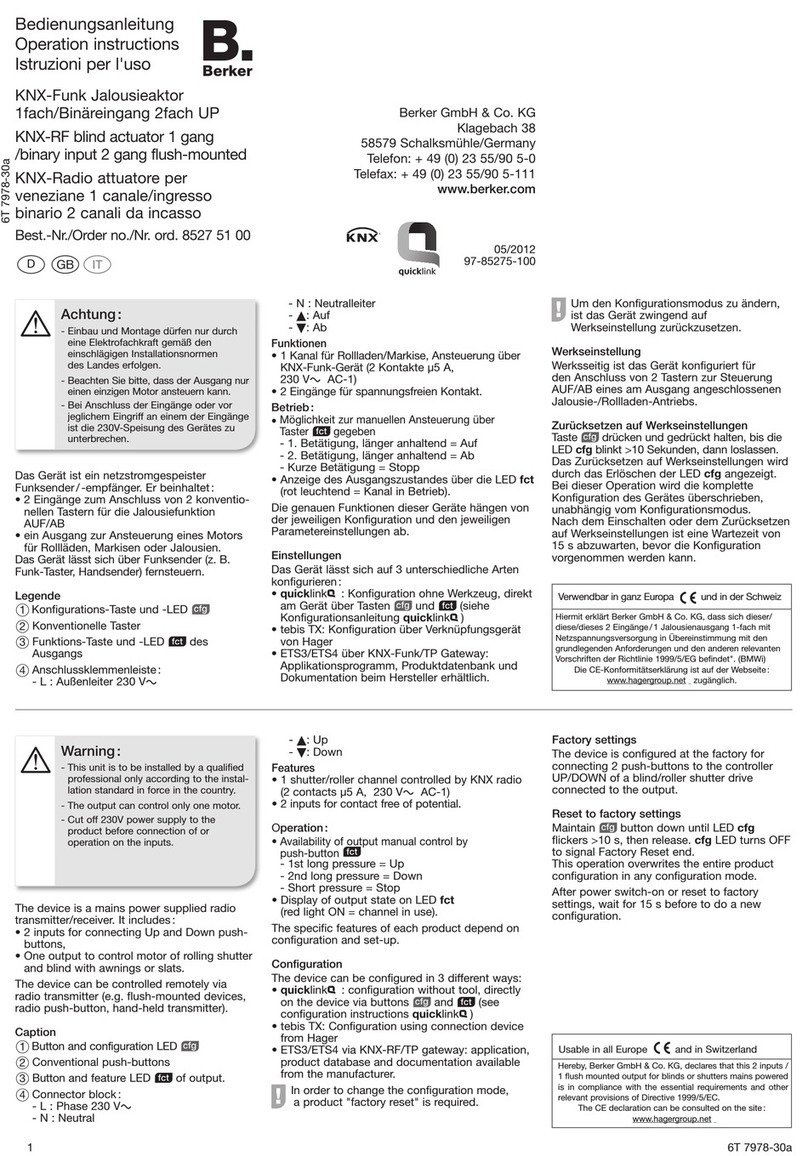
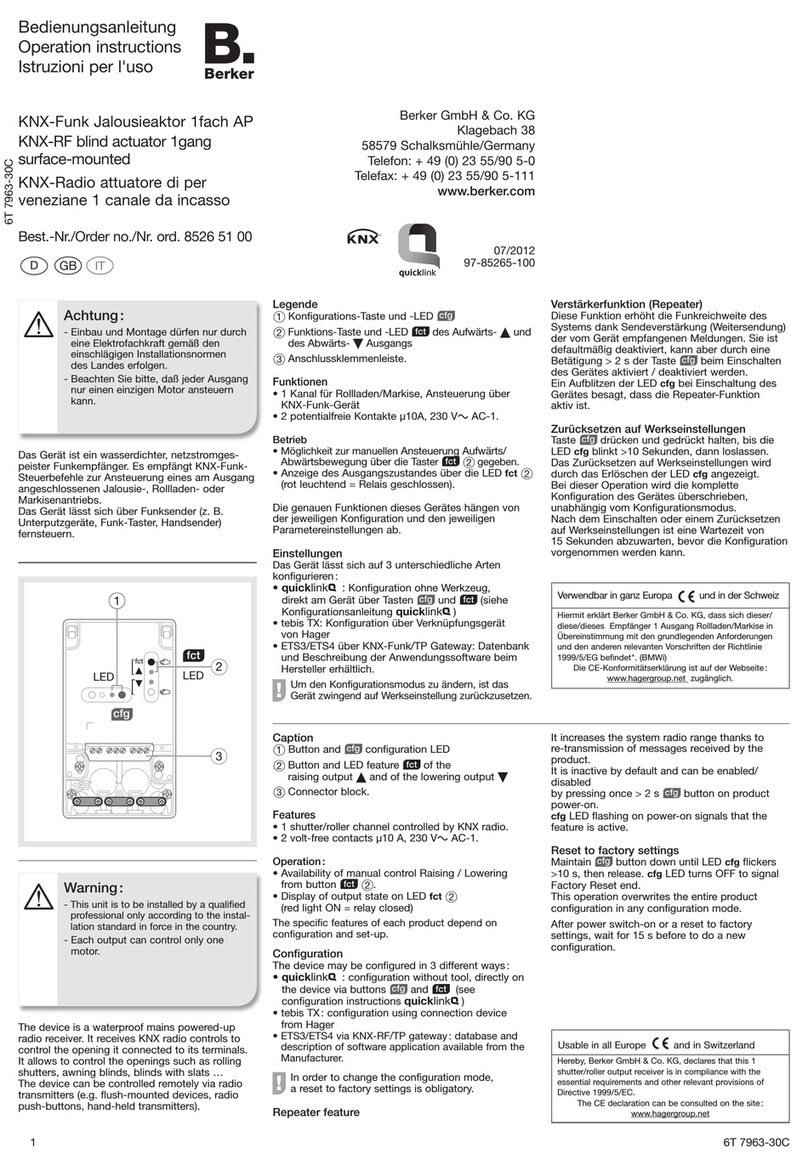
Legende
1Konfigurations-Taste und -LED J
23Funktions-Taste und -LED Kdes Aufwärts- ▲
und des Abwärts- ▼Ausgangs
4Anschlussklemmenleiste.
Funktionen
• 1 Kanal für Rollladen/Markise, Ansteuerung
über KNX-Funk-Gerät
• 2 potentialfreie Kontakte µ10A, 230 V AC-1.
Betrieb
• Möglichkeit zur manuellen Ansteuerung Aufwärts/
Abwärtsbewegung über die Taster K2und 3
gegeben.
• Anzeige des Ausgangszustandes über die LED 2
und 3(rot leuchtend = Relais geschlossen)
Die genauen Funktionen dieses Gerätes hängen
von der jeweiligen Konfiguration und den jeweiligen
Parametereinstellungen ab.
Einstellungen
Das Gerät lässt sich auf 3 unterschiedliche Arten
konfigurieren :
• link& :Konfiguration ohne Werkzeug, direkt
am Gerät über Tasten Jund K(siehe
Konfigurationsanleitung link& )
• tebis TX: Konguration über Verknüpfungsgerät
von Hager
• ETS3/ETS4 über KNX-Funk/TP Gateway: Datenbank
und Beschreibung der Anwendungssoftware beim
Hersteller erhältlich.
OUm den Konfigurationsmodus zu ändern, ist das
Gerät zwingend auf Werkseinstellung zurückzu-
setzen.
Verstärkerfunktion (Repeater)
Diese Funktion erhöht die Funkreichweite des
Systems dank Sendeverstärkung (Weitersendung) der
vom Gerät empfangenen Meldungen. Sie ist default-
mäßig deaktiviert, kann aber durch eine Betätigung >
2 s der Taste Jbeim Einschalten des Gerätes akti-
viert / deaktiviert werden. Ein Aufblitzen der LED bei
Einschaltung des Gerätes besagt, dass die Repeater-
Funktion aktiv ist.
Zurücksetzen auf Werkseinstellungen
Taste Jdrücken und gedrückt halten, bis die LED
blinkt >10 Sekunden, dann loslassen.
Das Zurücksetzen auf Werkseinstellungen wird
durch das Erlöschen der LED angezeigt.
Bei dieser Operation wird die komplette Konfiguration
des Gerätes überschrieben,
unabhängig vom Konfigurationsmodus.
Nach dem Einschalten oder einem Zurücksetzen
auf Werkseinstellungen ist eine Wartezeit von
15 Sekunden abzuwarten, bevor die Konguration
vorgenommen werden kann.
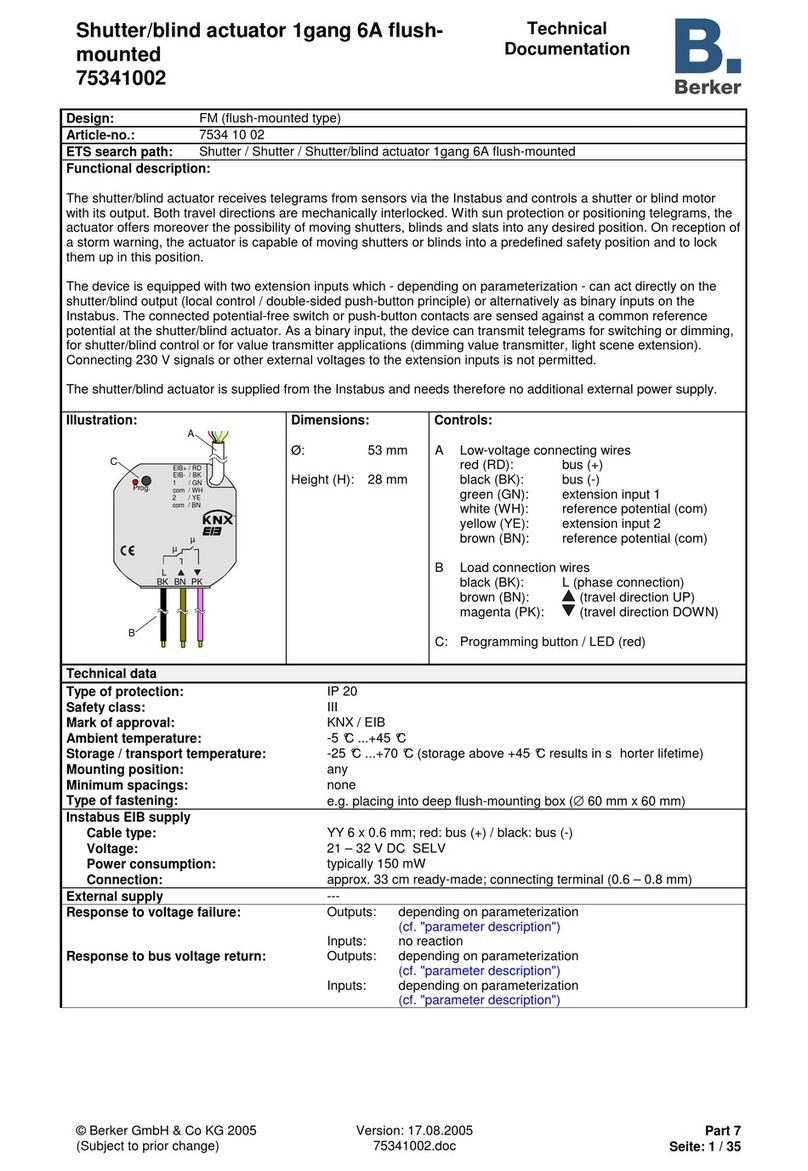
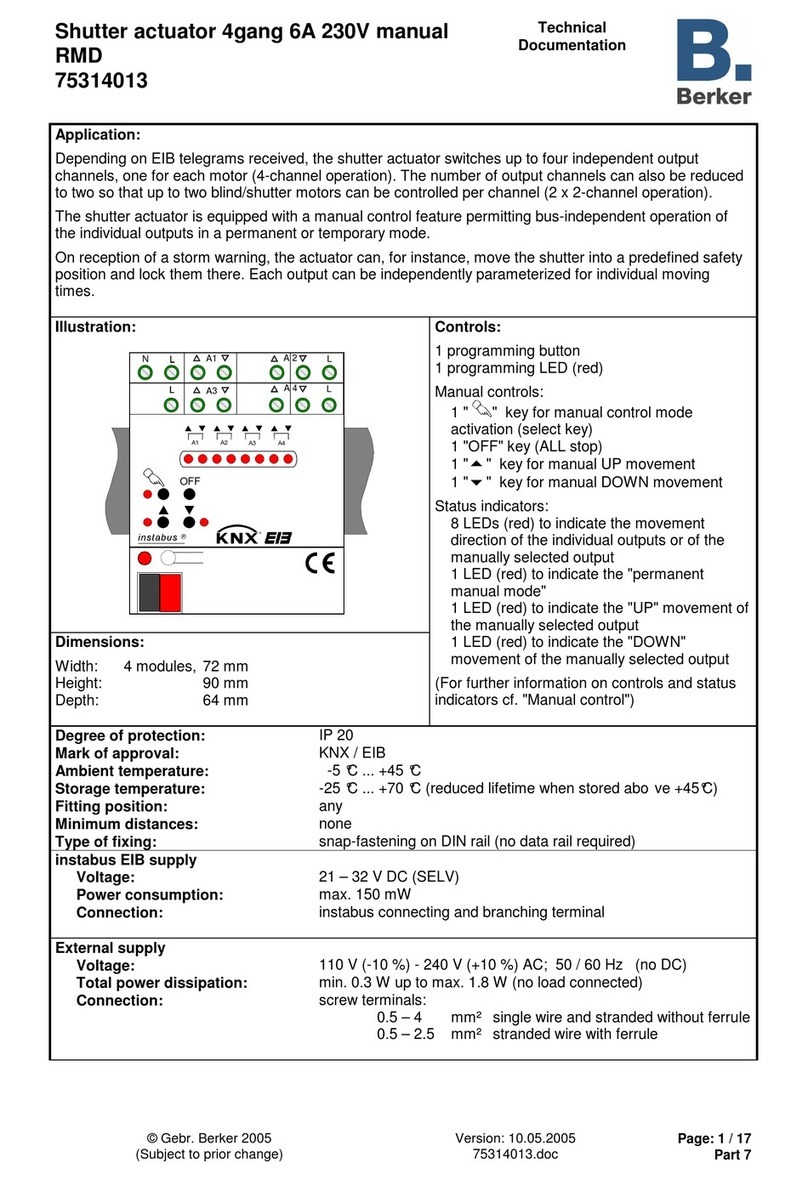
The device is a waterproof mains powered-up
radio receiver. It receives KNX radio controls to
control the opening it connected to its terminals.
It allows to control the openings such as rolling
shutters, awning blinds, blinds with slats …
The device can be controlled remotely via radio
transmitters (e.g. flush-mounted devices, radio
push-buttons, hand-held transmitters)
.
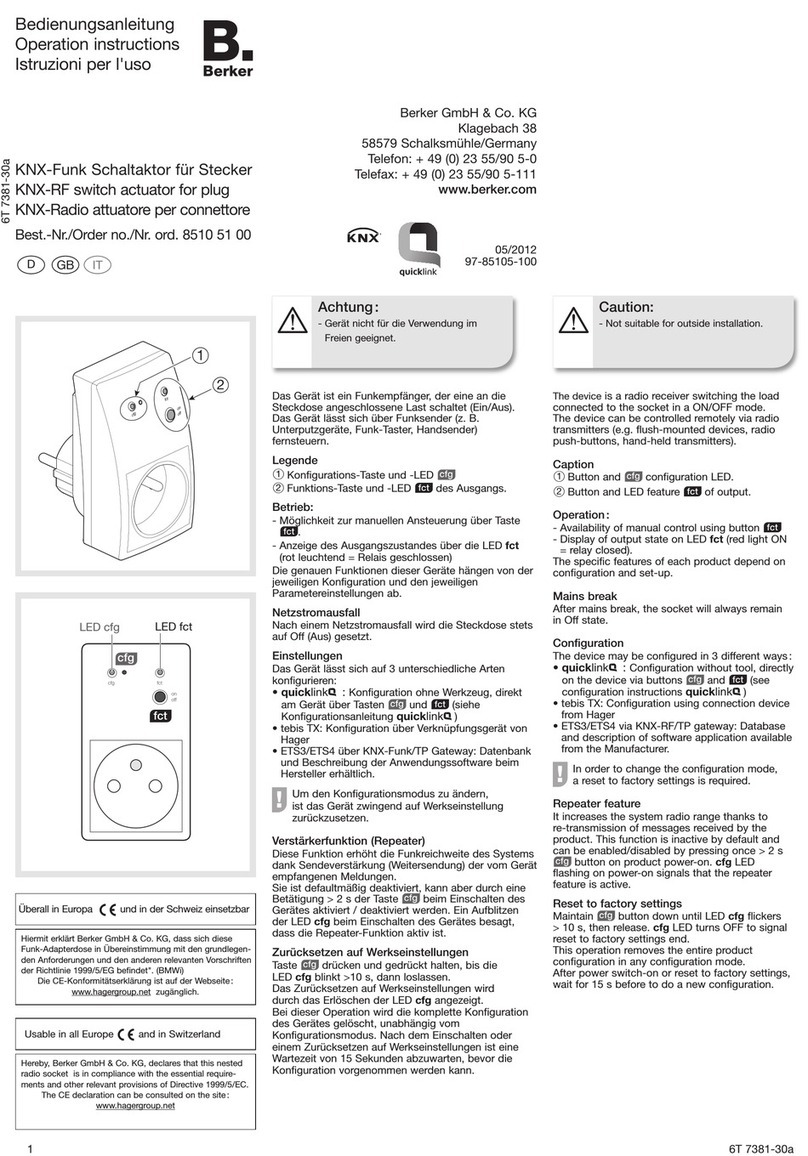
Caption
1Button and Jconfiguration LED
23Button and LED feature Kof the
raising output ▲and of the lowering
output ▼
4Connector block.
Features
• 1 shutter/roller channel controlled by KNX radio.
• 2 volt-free contacts µ10 A, 230 V AC-1.
Operation :
• Availability of manual control Raising / Lowering
from buttons K 2and 3.
• Display of output state on LED fct 2and 3
(red light ON = relay closed)
The specific features of each product depend on
configuration and set-up.
Configuration
The device may be congured in 3 dierent ways :
• quicklink& : conguration without tool, directly
on
the device via buttons Jand K (see
configuration instructions quicklink& )
• tebis TX : conguration using connection device
from Hager
• ETS3/ETS4 via KNX-RF/TP gateway : database
and description of software application available
from the Manufacturer.
OIn order to change the configuration mode,
a reset to factory settings is obligatory.
Repeater feature
It increases the system radio range thanks
to re-transmission of messages received
by the product.
It is inactive by default and can be enabled/
disabled
by pressing once > 2 s Jbutton on product
power-on.
cfg LED flashing on power-on signals
that the feature is active.
Reset to factory settings
Maintain Jbutton down until LED cfg flickers
>10 s, then release. cfg LED turns OFF to signal
Factory Reset end.
This operation overwrites the entire product
conguration in any conguration mode.
After power switch-on or a reset to factory
settings, wait for 15 s before to do a new
configuration.
fct
2
3
1
57832146
L N
fct
cfg
fct
2
4
3
1
LED
fct
LED
cfg
16LE003132A
Bedienungsanleitung
Operation instructions
Istruzioni per l'uso
Best.-Nr./Order no./Nr. ord. 8526 51 00
KNX-Funk Jalousieaktor 1fach AP
KNX-RF blind actuator 1gang surface-mounted
KNX-Radio attuatore di per veneziane 1 canale
da incasso
Berker GmbH & Co. KG
Klagebach 38
58579 Schalksmühle/Germany
Telefon: + 49 (0) 23 55/90 5-0
Telefax: + 49 (0) 23 55/90 5-111
www.berker.com
6LE003132A
ezy
05/2017
97-85265-100
Achtung :
- Einbau und Montage dürfen nur durch
eine Elektrofachkraft gemäß den
einschlägigen Installationsnormen
des Landes erfolgen.
- Beachten Sie bitte, daß jeder Ausgang
nur einen einzigen Motor ansteuern kann.
Caution:
- This unit is to be installed by a qualied
professional only according to the
installation standard in force in the
country.
- Each output can control only one motor.
Usable throughout Europe
å
and in Switzerland
Hager Controls hereby declares that the KNX-RF
blind actuator 1gang surface-mounted
device complies with the essential requirements
and other relevant provisions
of Directive 2014/53/EU.
The CE declaration is available on the:
www.hagergroup.com
V
erwendbar in ganz Europa
å
und in der Schweiz
Hiermit erklärt Hager Controls, dass diese
KNX-Funk Jalousieaktor 1fach AP mit den
grundlegenden Anforderungen und den anderen
relevanten Vorschriften der Richtlinie 2014/53/UE
übereinstimmt». (BMWi)
Die CE-Konformitätserklärung steht auf der Webseite
www.hagergroup.com zur Verfügung. Korrekte Entsorgung dieses Produkts
(Elektromüll).
(Anzuwenden in den Ländern der Europäischen Union und an-
deren europäischen Ländern mit einem separaten Sammelsys-
tem). Die Kennzeichnung auf dem Produkt bzw. auf der da-
zugehörigen Literatur gibt an, dass es nach seiner Lebensdauer
nicht zusammen mit dem normalen Hausmüll entsorgt werden
darf. Entsorgen Sie dieses Gerät bitte getrennt von anderen
Abfällen, um der Umwelt bzw. Der menschlichen Gesundheit
nicht durch unkontrollierte Müllbeseitigung zu schaden. Recy-
celn Sie das Gerät, um die nachhaltige Wiederverwertung von
stoichen Ressourcen zu fördern. Private Nutzer sollten den
Händler, bei dem das Produkt gekaut wurde, oder die zuständi-
gen Behörden kontaktieren, um in Erfahrung zu bringen, wie sie
das Gerät auf umweltfreundliche Weise recyceln können.
Gewerbliche Nutzer sollten sich an ihren Lieferanten wenden
und die Bedingungen des Verkaufsvertrags konsultieren. Dieses
Produkt darf nicht zusammen mit anderem Gewerbemüll ent-
sorgt werden.
Correct Disposal of This product
(Waste Electrical & Electronic
Equipment).
(Applicable in the European Union and other European
countries with separate collection systems).
This marking shown on the product or its literature in-
dicates that it hould not be disposed with other
household wasted at the end of its working life. To
prevent possible harm to the environment or human
health from uncontrolled waste disposal, please sepa-
rate this from other types of wastes and recycle it res-
ponsibly to promote the sustainable reuse of material
resources.
Household users should contact either the retailer
where they purchased this product, or their local go-
vernment oce, for details of where and how they can
take this item for environmentally safe recycling.
Business users should contact their supplier and
check the terms and conditions of the purchase
contract. This product should not be mixed with other
commercial wastes of disposal.
L'apparecchio è un ricevitore radio ermetico
alimentato dalla rete. Riceve i comandi radio KNX
per comandare il battente collegato ai suoi
terminali. Esso consente il comando dei battenti,
come persiane avvolgibili, tendoni a manovella,
veneziane …
L'apparecchio può essere telecomandato tramite
il trasmettitore portatile (ad esempio apparecchi
da incasso, pulsanti radio, trasmettitore portatile).
Legenda
1Tasto e LED di configurazione J
23Tasto e LED funzione Kdell’uscita
ascendente ▲e l’uscita discendente ▼
4Morsettiera di raccordo.
Funzioni
• 1 via persiane/tendoni – comando via radio KNX.
• 2 contatti liberi dal potenziale µ10A, 230 V AC-1.
Funzionamento :
• Possibilità di comando manuale Salita / Discesa
mediante i pulsanti 2e 3.
• Vizualizazione dello stato dell'uscita sul LED 2
e 3(acceso rosso = relè chiuso)
Le funzioni precise dello strumento dipendono dalla
configurazione e dalla parametrizzazione.
Configurazione
E possibile congurare queste apparecchio in 3 modi
diversi :
• quicklink& : configurazione senza utensili,
direttamente sull'apparecchio attraverso i tasti J
e K(si veda il quicklink& relativo alle istruzioni
di configurazione)
• tebis TX: configurazione attraverso il dispositivo
di Hager
• ETS3/ETS4 attraverso KNX-Radio/TP gateway :
base di dati e descrizione del software disponibile
presso il costruttore.
OPer cambiare il modo di configurazione, occorre
tassativamente eettuare un “ripristino delle
impostazioni di fabbrica” del prodotto.
Funzione Ripetitore
Aumenta la portata radio del sistema grazie alla
ri-emissione dei messaggi ricevuti dallo strumento.
Inattiva per difetto, la funzione Ripetitore è dis/
attivabile mediante una pressione > 2 s sul tasto J
in fase di messa sotto tensione dello strumento.
Un flash luminoso del LED cfg alla messa sotto tensione
indica che la funzione è attiva.
Ripristino delle impostazioni di fabbrica.
Premere e mantenere premuto il tasto Jfino
al lampeggio del LED cfg >10 s poi rilasciare.
La fine del ripristino è segnalata dallo spegnimento
del LED cfg. L'operazione provoca la cancellazione
completa della configurazione dello strumento,
qualunque essa sia.
Dopo una messa sotto tensione o un ripristino
fabbrica attendere 15 s prima di procedere
ad una configurazione.
Versorgungs-
spannung
Supply
voltage
Tensione di
alimentazione
230V~ +10%/-15%
240V~ +/-6%
Sendefrequenz Transmission
frequency
Frequenza
portante 868,3 MHz
Abmessungen Dimensions Ingombro 150 x 85 x 35 mm
Verzögerungszeit bei
2 entgegengesetzten
Richtungen
Delay time
between 2 opposite
directions
Temporizzazione tra i due
movimenti in senso
opposto
600 ms
Schutzart Degree of
protection
Grado di
protezione IP 55
Betriebs-
temperatur
Operating
temperature
Temperatura di
funzionamento -10 … +55 °C
Lagertemperatur Storage
temperature
Temperatura
di stoccaggio -20 … +70 °C
Vorsicherung :
Schutzschalter 10A
Upstream protection :
circuit breaker 10A
Protezione a monte :
interruttore 10A
10A
Maximale Betriebshöhe Max operating altitude Altitudine massima
di esercizio 2000m
Sendeleistung Emission power Potenza di trasmissione 25mW max
Transmissionstilstand Transmission mode Modalità di trasmissione KNX RF1.R
Empfänger Kategorie Receiver category Ricevitore categoria 2
Einschaltdauer Sender Transmitter duty cycle Ciclo di lavoro del
trasmettitore 1%
Anschlusskapazität Electric connection /
Collegamenti :V 0,75 … 2,5 mm2
57832146
L N
fct
cfg
L
N
Technische Daten / Technical characteristics / Caratteristiche tecniche
2
04.2017
6LE003132ABerker GmbH & Co. KG - Klagebach 38 - 58579 Schalksmühle/Germany - Tel. + 49 (0) 23 55/90 5-0 Fax + 49 (0) 23 55/90 5-111 - www.berker.com
Utilizzabile in tutta Europa
å
e in Svizzera
Con la presente Hager Controls dichiara che il
dispositivo KNX-Radio attuatore di per veneziane
1 canale da incasso è conforme ai requisiti
essenziali e alle altre disposizioni pertinenti
denite dalla direttiva 2014/53/UE.
La dichiarazione di conformità UE può essere
consultata sul sito Internet:
www.hagergroup.com
Attenzione :
- L'apparecchio va installato solo da
un installatore elettricista secondo
le norme d'installazione vigenti nel
paese.
- Ogni uscita puo’ pilotare un unico
motore.
fct
2
3
1
57832146
L N
fct
cfg
fct
2
4
3
1
LED
fct
LED
cfg
Corretto smaltimento del prodotto
(rifiuti elettrici ed elettronici).
(Applicabile nei paesi dell’Unione Europea e in quelli con
sistema di raccolta dierenziata).
Il marchio riportato sul prodotto o sulla sua documenta-
zione indica che il prodotto non deve essere smaltito con
altri rifiuti domestici al termine del ciclo di vita. Per evitare
eventuali danni all’ambiente o alla salute causati dall’inop-
portuno smaltimento del rifiuti, si invita l’utente a separare
questo prodotto da altri tipi di riuti e di riciclarlo in maniera
responsabile per favorire il riutilizzo sostenibile delle risorse
materiali.
Gli utenti domestici sono invitati a contattare il rivenditore
presso il quale è stato acquistato il prodotto o l’ucio locale
preposto per tutte le informazioni relative alla raccolta die-
renziata e al riciclaggio per questo tipo di prodotto.
Gli utenti aziendali sono invitati a contattare il proprio forni-
tore e verificare i termini e le condizioni del contratto di ac-
quisto. Questo prodotto non deve essere smaltito unita-
mente ad altri rifiuti commerciali.

Other Berker Controllers manuals

Berker 8536 52 00 User manual

Berker

Berker 8536 52 00 User manual

Berker 85865100 User manual

Berker

Berker 85865100 User manual

Berker KNX-RF User manual

Berker

Berker KNX-RF User manual

Berker KNX-RF User manual

Berker

Berker KNX-RF User manual

Berker 9450 0200 User manual

Berker

Berker 9450 0200 User manual

Berker 9450 01 00 Service manual

Berker

Berker 9450 01 00 Service manual

Berker RMD Service manual

Berker

Berker RMD Service manual

Berker KNX-RF 8547 51 00 User manual

Berker

Berker KNX-RF 8547 51 00 User manual

Berker 7531 40 15 User manual

Berker

Berker 7531 40 15 User manual

Berker Radio Push button 1gang quicklink User manual

Berker

Berker Radio Push button 1gang quicklink User manual

Berker 7531 60 03 User manual

Berker

Berker 7531 60 03 User manual

Berker 8510 51 00 User manual

Berker

Berker 8510 51 00 User manual

Berker 7531 31 07 Product guide

Berker

Berker 7531 31 07 Product guide

Berker 7574 01 01 Product guide

Berker

Berker 7574 01 01 Product guide

Berker 8526 51 00 User manual

Berker

Berker 8526 51 00 User manual

Berker 7531 10 1 Series Product guide

Berker

Berker 7531 10 1 Series Product guide

Berker 7531 40 13 User manual

Berker

Berker 7531 40 13 User manual

Berker 7534 10 12 User manual

Berker

Berker 7534 10 12 User manual

Berker 8536 51 00 User manual

Berker

Berker 8536 51 00 User manual

Berker 7534 10 11 User manual

Berker

Berker 7534 10 11 User manual

Berker 85475100 User manual

Berker

Berker 85475100 User manual

Berker 75341002 Guide

Berker

Berker 75341002 Guide

Berker 7531 80 03 User manual

Berker

Berker 7531 80 03 User manual

Berker 8536 52 00 User manual

Berker

Berker 8536 52 00 User manual

Popular Controllers manuals by other brands

Mitsubishi Electric MELSEC iQ-F Series manual

Mitsubishi Electric

Mitsubishi Electric MELSEC iQ-F Series manual

HESCH HE 5697 MFC manual

HESCH

HESCH HE 5697 MFC manual

Franklin Electric SubDrive75 installation manual

Franklin Electric

Franklin Electric SubDrive75 installation manual

Lawler 803 SEA Basic Installation & maintenance manual

Lawler

Lawler 803 SEA Basic Installation & maintenance manual

Martin M6 Series instructions

Martin

Martin M6 Series instructions

Neuralynx SpectraLynx quick start guide

Neuralynx

Neuralynx SpectraLynx quick start guide

Synapse DIM10-087-06-IP quick start guide

Synapse

Synapse DIM10-087-06-IP quick start guide

Kelly KDHE Series user manual

Kelly

Kelly KDHE Series user manual

Bartels Mikrotechnik mpSmart-Flowstop Operator's manual

Bartels Mikrotechnik

Bartels Mikrotechnik mpSmart-Flowstop Operator's manual

Bosch 2 manual

Bosch

Bosch 2 manual

impro technologies ISC960-1-0-GB-XX installation manual

impro technologies

impro technologies ISC960-1-0-GB-XX installation manual

Mitsubishi GOT-F900 installation manual

Mitsubishi

Mitsubishi GOT-F900 installation manual

Siemens TUTORbit POL687 Instructions for installation, use and maintenance manual

Siemens

Siemens TUTORbit POL687 Instructions for installation, use and maintenance manual

Sherline Products CNC Metric Linear Controller Installing and using

Sherline Products

Sherline Products CNC Metric Linear Controller Installing and using

Siemens LME39 Series Basic documentation

Siemens

Siemens LME39 Series Basic documentation

WAREMA KNX SA 2M230 REG installation instructions

WAREMA

WAREMA KNX SA 2M230 REG installation instructions

Nidec Commander C300 Power Installation Guide

Nidec

Nidec Commander C300 Power Installation Guide

MPPT 104714 user manual

MPPT

MPPT 104714 user manual

manuals.online logo
manuals.online logoBrands
  • About & Mission
  • Contact us
  • Privacy Policy
  • Terms and Conditions

Copyright 2025 Manuals.Online. All Rights Reserved.