Beurer BM 49 User manual

G
Speaking upper arm blood pressure monitor
Instructions for use .........................................................2
E
Tensiómetro para brazo con voz
Instrucciones para el uso .............................................15
P
Medidor de tensão arterial falante
Instruções de utilização................................................29
K
Ομιλούσα συσκευή μέτρησης της αρτηριακής πίεσης
Οδηγίες χρήσης .............................................................43
E
lectromagnetic Compatibility
Information .........................................................................58
0483
BM 49

2
Included in delivery
•
Blood pressure monitor
•
Upper arm cuff
•
4 x 1.5 V LR6 AA batteries
•
Storage bag
•
Instructions for use
Dear Customer,
thank you for choosing one of our products. Our name stands for high-
quality, thoroughly tested products for the applications in the areas of
heat, weight, blood pressure, body temperature, pulse, gentle therapy,
massage and air. Please read these instructions for use carefully and
keep them for later use, be sure to make them accessible to other users
and observe the information they contain.
Best regards,
Your Beurer Team
1. Getting to know your device
Check that the packaging of the Beurer BM 49 blood pressure monitor
has not been tampered with and make sure that all the required contents
are present. Before use, ensure that there is no visible damage to the
device or accessories and that all packaging material has been removed.
If you have any doubts, do not use the device and contact your retailer or
the specified Customer Services address.
The upper arm blood pressure monitor is used for non-invasive measure-
ment and monitoring of adults’ arterial blood pressure.
You can use it to measure your blood pressure quickly and easily, storing
the results and displaying the progression of readings together with the
average.
You are also warned of possible existing cardiac arrhythmia.
The recorded values are classified and evaluated graphically.
ENGLISH
Contents
1. Getting to know your device................................................................ 2
2. Important information.......................................................................... 3
3. Unit description ................................................................................... 5
4. Preparing the measurement ................................................................ 6
5. Measuring blood pressure................................................................... 8
6. Evaluating results .............................................................................. 10
7. Saving, displaying and deleting measurements ............................... 11
8. Error message/trouble shooting........................................................ 12
9. Cleaning and storing the device and cuff.......................................... 13
10. Technical specifications .................................................................... 13
11. Mains part.......................................................................................... 14

3
2. Important information
Signs and symbols
The following symbols are used in these instructions for use, on the
packaging and on the type plate for the device and accessories:
Caution
Note
Note on important information
Follow instructions for use
Type BF applied part
Direct current
Disposal in accordance with EC Directive WEEE
(Waste Electrical and Electronic Equipment).
Manufacturer
Storage/Transport
Permissible storage and transport temperature and
humidity
Operating
Permissible operating temperature and humidity
Keep dry
S
N
Serial number
The CE labelling certifies that the product complies
with the essential requirements of Directive 93/42/
EEC on medical products.
Advice on use
•
In order to ensure comparable values, always measure your blood
pressure at the same time of day.
•
Before every measurement, relax for about five minutes.
•
If you want to perform several measurements on the same person, wait
five minutes between each measurement.
•
Do not take a measurement within 30 minutes after eating, drinking,
smoking or exercising.
•
Repeat the measurement if you are unsure of the measured value.
•
The measurements taken by you are for your information only – they
are not a substitute for a medical examination! Discuss the measure-
ments with your doctor, and never base any medical decisions on them
(e.g. medicines and their administration)!
•
This device is not intended for use by people (including children) with
restricted physical, sensory or mental skills or a lack of experience and/
or a lack of knowledge, unless they are supervised by a person who is

4
responsible for their safety or are instructed by such a person in how to
use the device. Supervise children around the device to ensure they do
not play with it.
•
Do not use the blood pressure monitor on newborns, pregnant women
or patients with preeclampsia.
We recommend consulting a doctor before using the blood pressure
monitor during pregnancy.
•
Cardiovascular diseases may lead to incorrect measurements or have
a detrimental effect on measurement accuracy. The same also applies
to very low blood pressure, diabetes, circulatory disorders and arrhyth-
mias as well as chills or shaking.
•
The blood pressure monitor must not be used in connection with a
high-frequency surgical unit.
•
Only use the device on people who have the specified upper arm
measurement for the device.
•
Please note that when inflating, the functions of the limb in question
may be impaired.
•
During the blood pressure measurement, blood circulation must not
be stopped for an unnecessarily long time. If the device malfunctions,
remove the cuff from the arm.
•
Avoid any mechanical restriction, compression or bending of the cuff
line.
•
Do not allow sustained pressure in the cuff or frequent measurements.
The resulting restriction of the blood flow may cause injury.
•
Ensure that the cuff is not placed on an arm in which the arteries or
veins are undergoing medical treatment, e.g. intravascular access or
therapy, or an arteriovenous (AV) shunt.
•
Do not use the cuff on people who have undergone a mastectomy.
•
Do not place the cuff over wounds as this may cause further injury.
•
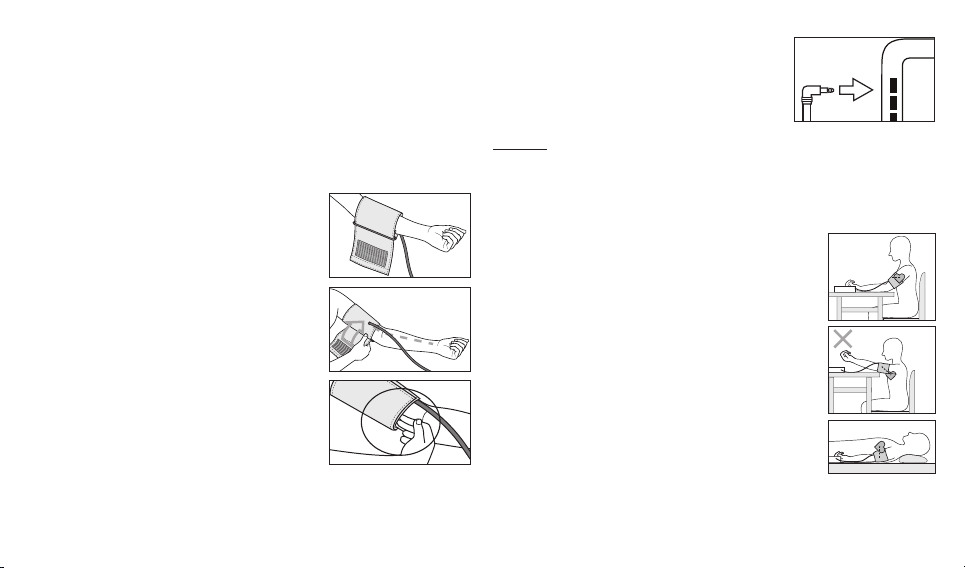
Place the cuff on your upper arm only. Do not place the cuff on other
parts of the body.
•
You can either use the blood pressure monitor with batteries or with
a mains part. Please note that data transfer and data storage is only
possible when your blood pressure monitor is supplied with power. As
soon as the batteries are empty or the mains part is disconnected from
the power supply, the blood pressure monitor loses the date and time.
•
To conserve the batteries, the monitor switches off automatically if no
buttons are pressed for one minute.
•
The device is only intended for the purpose described in these instruc-
tions for use. The manufacturer is not liable for damage resulting from
improper or careless use.
Storage and Care
•
The blood pressure monitor is made up of precision electronic compo-
nents. Accuracy of readings and the instrument’s service life depend
on careful handling.
– You should protect the device from impact, moisture, dirt, major tem-
perature fluctuations and direct exposure to the sun’s rays.
– Never drop the device.
– Do not use near strong electromagnetic fields, i.e. keep it away from
any radio systems and mobile phones.
– Only ever use the cuffs provided with the monitor or original replace-
ment cuffs. Otherwise erroneous results will be recorded.
•
If the instrument is not used for any length of time, we recommend
removing the batteries.

5
Notes on handling batteries
•
If your skin or eyes come into contact with battery fluid, rinse the
affected areas with water and seek medical assistance.
•
Choking hazard! Small children may swallow and choke on batter-
ies. Store the batteries out of the reach of small children.
•
Observe the plus (+) and minus (-) polarity signs.
•
If a battery has leaked, put on protective gloves and clean the battery
compartment with a dry cloth.
•
Protect batteries from excessive heat.
•
Risk of explosion! Never throw batteries into a fire.
•
Do not charge or short-circuit batteries.
•
If the device is not to be used for a relatively long period, take the bat-
teries out of the battery compartment.
•
Use identical or equivalent battery types only.
•
Always replace all batteries at the same time.
•
Do not use rechargeable batteries.
•
Do not disassemble, split or crush the batteries.
Repair and disposal
•
Batteries do not belong in domestic refuse. Used batteries should be
disposed of at the collection points provided.
•
Never open the instrument. If these instructions are not heeded, the
warranty will be null and void.
•
Never attempt to repair the instrument or adjust it yourself. We can no
longer guarantee perfect functioning if you do.
•
Repairs may only be performed by Customer Service or authorized
dealers. However, always check the batteries and replace them if nec-
essary prior to making any complaint.
•
Please dispose of the device in accordance with EC Directive –
WEEE (Waste Electrical and Electronic Equipment).
If you have any questions, please contact the local authorities
responsible for waste disposal.
3. Unit description
1. Cuff
2. Cuff line
3. Cuff connector
4. Display
5. Connection for mains part
6. Memory button
7. START/STOP button
8. Function buttons
9. Risk indicator
10. Connection for cuff connector
2
1
3
10
9
8
7
6
4
5

6
Information on the display:
1. Inflate , release air
2. Systolic pressure
3. Memory display:
average value ( ),
morning ( ), evening ( )
4. Diastolic pressure
5. User memory
6. Calculated pulse value
7. Cardiac arrhythmia symbol
8. Time and date
9. Risk indicator
10. Memory space number
11. Battery replacement symbol
4. Preparing the measurement
Insert the batteries
•
Open the battery compartment lid.
•
Insert four 1.5V AA (alkaline type LR6)
batteries. Make sure that the batteries
are inserted with the correct polarity,
according to the label. Do not use re-
chargeable batteries. The message “The
device is ready for use. You may start
measuring.” is displayed.
•
Close the battery compartment lid again carefully.
•
With inserted batteries, the unit permanently displays the
time and date.
If the the low battery indicator and appear, no further measure-
ments can be performed. The device will announce: “Battery weak.”
Please replace all batteries. Once the batteries have been removed from
the unit, the date, time and language must be set again.
Used batteries should not be disposed of in normal household waste.
Dispose of them via your electronics retailer or your local recycling point.
You are legally obligated to do so.
Battery disposal
•
The empty, completely flat batteries must be disposed of through spe-
cially designated collection boxes, recycling points or electronics retail-
ers. You are legally required to dispose of the batteries.
•The codes below are printed on batteries containing harmful
substances:
Pb = Battery contains lead,
Cd = Battery contains cadmium,
Hg = Battery contains mercury
Set date, time and language
This menu allows you to set the following functions, one after another.
Date Time Language Volume
It is essential to set the date and time. Otherwise, you will not be able to
save your measured values correctly with a date and time and access them
again later.
The time is displayed in 24-hour format.
In addition, the device has 4 language settings. The device is set to Eng-
lish when supplied to the customer.
11
10
9
78
2
3
1
4
5
6
4 x AA (LR6) 1,5 V

7
If you press and hold the function buttons , you can set the values
more quickly.
Voice output
Date/Time
•
Insert the batteries or press and
hold the Memory button for
5 seconds.
The year flashes on the display.
The device is ready for use.
You may start measuring.
•
Set the year with the function
buttons and confirm with the
Memory button .
•
Set the month, day, hour and
minutes and confirm each setting
with the Memory button .
Language
The language will flash on the
display .
•
You can select the following lan-
guages with the function buttons
:
= English
= Spanish
= Portuguese
= Greek
= Language off
English
Español
Português
Ελληνικά
Confirm your selection with the
Memory button .
Voice output
Language
= Language off means
that there is no voice output
and therefore no acoustic
playback.
Volume
Volume level Vo1 flashes on the
display.
•
You can set the volume of the
selected language using the
function buttons :
Vo3 = loud
Vo2 = medium
Vo1 = quiet
Confirm your selection with the
Memory button .
Operation with the mains part
You can also operate this device with a mains part.
When doing so, there must not be any batteries in the battery compart-
ment. The mains part can be obtained from specialist retailers or from the
service address using order number 071.60.
•
To prevent possible damage to the device, the blood pressure monitor
must only be used with the mains part described here.
•
Insert the mains part into the connection provided for this purpose on
the right-hand side of the blood pressure monitor. The mains part must
only be connected to the mains voltage that is specified on the type
plate.
•
Then insert the mains plug of the mains part into the mains socket.

8
•
After using the blood pressure monitor, unplug the mains part from
the mains socket first and then disconnect it from the blood pressure
monitor. As soon as you unplug the mains part, the blood pressure
monitor loses the date and time setting but the saved measurements
are retained.
5. Measuring blood pressure
Please ensure the unit is at room temperature before measuring.
Attach the cuff
Place the cuff on to the bare left upper arm.
The circulation of the arm must not be hin-
dered by tight clothing or similar.
The cuff must be placed on the upper arm so
that the bottom edge is positioned 2–3 cm
above the elbow and over the artery. The line
points to the centre of the palm.
Now tighten the free end of the cuff, but make
sure that it is not too tight around the arm and
close the Velcro fastener. The cuff should be
fastened so that two fingers fit under the cuff.
Now insert the cuff line into the connection for
the cuff connector.
Caution: The unit may only be operated with the original cuff. The cuff is
suitable for an arm circumference of 22 to 36 cm.
A larger cuff for upper-arm circumferences of 35 to 44 cm can be ob-
tained from specialist retailers or from the service address using order
number 163.387.
Adopt the correct posture
•
Rest for approx. 5 minutes before each measure-
ment. Otherwise there may be divergences.
•
You can perform the measurement either sitting or
lying down. Always make sure that the cuff is on a
level with your heart.
•
To carry out a blood pressure measurement, make
sure you are sitting comfortably with your arms and
back leaning on something. Do not cross your legs.
Place your feet flat on the ground.
•
In order not to distort the result, it is important to
keep still during the measurement and not talk.

9
Selecting memory
Voice output when voice function
is active
User memory
•
Switch on the device with the
Start/stop button.
When the device is switched
off, the time and date are per-
manently displayed.
The device is ready for use.
You may start measuring.
•
Select the desired user memory by
pressing the function buttons .
User memory 1
User memory 2
You have 2 memories, each with
60 memory spaces to store the
measurements of 2 different people
separately.
Performing the blood pressure measurement
Voice output when voice function
is active
Measurement
•
As described before, attach the
cuff and adopt the posture in
which you want to perform the
measurement.
•
Switch on the device with the
Start/stop button.
•
Adisplay check is performed, during
which all display segments light up.
•
Start the device with the Start/
stop button. The memory
space that will be used is dis-
played.
The device is ready for use.
You may start measuring.
•
The cuff is inflated to 190 mmHg.
The cuff’s air pressure is slowly
released. If a tendency for high
blood pressure is already recog-
nised, the cuff is reinflated and
the cuff’s pressure is increased
again. As soon as a pulse is de-
tected, the symbol flashes.
Measuring can be cancelled at
any time by pressing the Start/
stop button .

10
Voice output when voice function
is active
Measurement
•
Systolic pressure, diastolic pres-
sure and pulse measurements
are displayed.
Systole ... mmHg
Diastole ... mmHg
Heart rate ... beats per minute
According to the WHO guide-
lines your blood pressure is
– optimal
– normal
– high to normal
– shows slight hypertension
– shows medium hypertension
– shows strong hypertension
Whilst the message is being
displayed, the volume can be
adjusted with the function but-
tons .
•
appears if the measurement
could not be performed properly.
Observe the chapter on error
messages/trouble-shooting in
these instructions for use and
repeat the measurement.
•
The measurement is automati-
cally stored.
Voice output when voice function
is active
Measurement
•
The device switches off auto-
matically after 1 minute.
Wait at least 5 minutes before per-
forming another measurement!
6. Evaluating results
Cardiac arrhythmia:
This unit can identify potential disruption of the heart rhythm when meas-
uring and if necessary, indicates this after the measurement with the
symbol . If the voice function is activated, the device will announce:
“A possible cardiac arrhythmia was found.” This can be an indicator for
arrhythmia. Arrhythmia is an illness in which the heart rhythm is abnormal
because of flaws in the bioelectrical system that regulates the heartbeat.
The symptoms (skipped or premature heart beats, pulse being slow or
too fast) can be caused by factors such as heart disease, age, physical
make-up, excess stimulants, stress or lack of sleep. Arrhythmia can only
be determined through an examination by your doctor. If the symbol
is shown on the display after the measurement has been taken, it
should be repeated. Please ensure that you rest for 5 minutes beforehand
and do not speak or move during the measurement. If the symbol
appears frequently, please consult your doctor. Self-diagnosis and treat-
ment based on the measurements can be dangerous. Always follow your
GP’s instructions.

11
Risk indicator:
The measurements can be classified and evaluated in accordance with
the following table.
Blood pressure value
category Systole
(in mmHg) Diastole
(in mmHg) Action
Setting 3: severe
hypertension ≥180 ≥110 seek medical attention
Setting 2: moderate
hypertension 160–179 100 –109 seek medical attention
Setting 1: mild hyper-
tension 140–159 90–99 regular monitoring by
doctor
High normal 130–139 85–89 regular monitoring by
doctor
Normal 120–129 80–84 self-monitoring
Optimal <120 <80 self-monitoring
Source: WHO, 1999 (World Health Organization)
The bar chart on the display and the scale on the unit show which cat-
egory the recorded blood pressure values fall into.
If the values of systole and diastole fall into two different categories (e.g.
systole in the High normal category and diastole in the Normal category),
the graphical classification on the device always shows the higher cat-
egory; for the example given this would be High normal.
7. Saving, displaying and deleting measurements
Whilst the message is being displayed, the volume can be adjusted
with the function buttons .
Voice output when voice function
is active
User memory
The results of every successful
measurement are stored together
with the date and time. If there are
more than 60 measurements, the
oldest measurements are lost.
•
Switch on the device with the
Start/stop button. The device is ready for use.
You may start measuring.
•
Select the desired user memory
( or ) by pressing the function
buttons .
User memory 1
User memory 2

12
Voice output when voice function
is active
Average values
•
Press the Memory button . The
average value of all saved meas-
ured values in this user memory
is displayed first .
•
If you press the Memory button
again, the average value of
the morning measurements for
the last 7 days will be displayed
(morning: 5 a.m. – 9 a.m., display
).
•
If you press the Memory button
again, the average value of
the evening measurements for
the last 7 days will be displayed
(evening: 6 p.m. – 8 p.m., display
).
Average count:
Systole ... mmHg
Diastole ... mmHg
Heart rate ... beats per minute
According to the WHO guide-
lines your blood pressure is ...
Individual measured values
•
If you continue to press the
Memory button , the most re-
cent individual measured values
are displayed in turn with the
date and time.
Memory space ...
Systole ... mmHg
Diastole ... mmHg
Heart rate ... beats per minute
According to the WHO guide-
lines your blood pressure is ...
Voice output when voice function
is active
Delete measured values
•
The measured values in the cor-
responding user memory can
be deleted by switching on the
device, selecting the desired user
memory and pressing the func-
tion buttons and simultane-
ously for 5 seconds. All the counts in the memory
have been erased.
•
The device will go directly into
standby mode (clock mode).
8. Error message/trouble shooting
In the event of errors, the error message _ appears on the display.
Error messages can occur when
1. it was not possible to record the pulse
(
),
2. you move or speak during the measurement ( ),
3. the cuff is fastened too tightly or loosely ( ),
4. errors occur during the measurement ( ),
5. the pump pressure is higher than 300 mmHg ( ),
6. the batteries are almost empty ( ).
In such cases, repeat the measurement. Ensure that you do not move or
speak.
If necessary, reinsert or replace the batteries.

13
9. Cleaning and storing the device and cuff
•
Clean the device and cuff carefully using a slightly damp cloth only.
•
Do not use any cleaning agents or solvents.
•
Under no circumstances hold the device and cuff under water, as this
can cause liquid to enter and damage the device and cuff.
•
If you store the device and cuff, do not place heavy objects on the
device and cuff. Remove the batteries. The cuff line should not be bent
sharply.
10. Technical specifications
Model no. BM 49
Measurement method Oscillometric, non-invasive blood pressure meas-
urement on the upper arm
Measurement range Cuff pressure 0–300 mmHg,
systolic 50-250 mmHg, diastolic 30-200 mmHg,
Pulse 30–180 beats/minute
Display accuracy Systolic ±3 mmHg, diastolic ±3 mmHg,
pulse ±5% of the value shown
Measurement inac-
curacy Max. permissible standard deviation according
toclinical testing: systolic 8 mmHg/
diastolic 8 mmHg
Memory 2x 60 memory spaces
Dimensions L 145 mm x W 96 mm x H 60 mm
Weight Approx. 264 g (without batteries)
Cuff size 22 to 36 cm
Permissible operating
conditions +10°C to +40°C, ≤85% relative air humidity
(non-condensing)
Permissible storage
and transport con-
ditions
-20°C to +50°C, ≤85% relative air humidity,
800–1050 hPa ambient pressure
Power supply 4x 1,5V AA batteries
Battery life For approx. 250 measurements, depending on
the blood pressure level and/or pump pressure
Accessories Instruction for use, 4x 1.5V AA batteries, stor-
age pouch
Classification Internal supply, IPX0, no AP or APG, continuous
operation, type BF
applied part
The serial number is located on the device or in the battery compartment.
Technical information is subject to change without notification to allow
for updates.
•
This unit is in line with European Standard EN 60601-1-2 and is subject
to particular precautions with regard to electromagnetic compatibil-
ity (EMC). Please note that portable and mobile HF communication
systems may interfere with this unit. More details can be requested
from the stated Customer Service address or found at the end of the
instructions for use.
•
This device is in line with the EU Medical Devices Directive 93/42/
EEC, the „Medizinproduktegesetz“ (German Medical Devices Act) and
the standards EN1060-1 (non-invasive sphygmomanometers, Part 1:
General requirements), EN1060-3 (non-invasive sphygmomanometers,

14
Part 3: Supplementary requirements for electro-mechanical blood
pressure measuring systems) and IEC80601-2-30 (Medical electrical
equipment – Part 2–30: Particular requirements for the safety and es-
sential performance of automated non-invasive blood pressure moni-
tors).
•
The accuracy of this blood pressure monitor has been carefully
checked and developed with regard to a long useful life. If using the
device for commercial medical purposes, it must be regularly tested for
accuracy by appropriate means. Precise instructions for checking ac-
curacy may be requested from the service address.
11. Mains part
Model no. FW 7575M/EU/6/06
Input 100–240V, 50 –60 Hz
Output 6V DC, 600 mA, only in connection with beurer
blood pressure monitor.
Supplier Friwo Gerätebau GmbH
Protection This device is double insulated and protected
against short circuit and overload by a primary
thermal fuse.
Make sure to take the batteries out of the com-
partment before using the mains part.
Polarity of the the DC voltage connection
Double insulated/equipment class 2
Enclosures and
Protective Covers Equipment enclosed to protect against contact
with live parts, and with parts which can become
live (finger, pin, hook test).
The operator shall not contact the patient and the
output plug of AC mains part simultaneously.
Subject to errors and changes

15
Productos suministrados
•
Tensiómetro
•
Brazalete
•
4 pilas de 1,5V AA LR6
•
Bolsa
•
Instrucciones de uso
Estimados clientes:
Es un placer para nosotros que usted haya decidido adquirir un producto
de nuestra colección. Nuestro nombre es sinónimo de productos de alta
y calidad estrictamente controlada en los campos de energía térmica,
peso, presión sanguínea, temperatura del cuerpo, pulso, terapias sua-
ves, masaje y aire. Sírvase leer las presentes instrucciones para el uso
detenidamente; guarde el manual para usarlo ulteriormente; póngalo a
disposición de otros usuarios y observe las instrucciones.
Les saluda cordialmente
Su equipo Beurer
1. Introducción
Compruebe que el embalaje del tensiómetro Beurer BM49 esté intacto
y que su contenido esté completo. Antes de utilizar el aparato deberá
asegurarse de que ni este ni los accesorios presentan daños visibles y de
que se retira el material de embalaje correspondiente. En caso de duda
no lo use y póngase en contacto con su distribuidor o con la dirección
del servicio de atención al cliente indicada.
El tensiómetro para brazo sirve para la medición y el control de los valores
de la presión sanguínea arterial de forma no invasiva en personas adultas.
Con él puede medirse la presión sanguínea de forma rápida y sencilla,
guardar los valores de la medición en la memoria y consultar la evolución
y el promedio de los valores medidos. Además, advierte de eventuales
alteraciones del ritmo cardiaco.
Los valores medidos se clasifican y evalúan de forma gráfica.
ESPAÑOL
Contenido
1. Introducción ...................................................................................... 15
2. Indicaciones importantes .................................................................. 16
3. Descripción del aparato .................................................................... 19
4. Preparación de la medición............................................................... 19
5. Medición de la presión sanguínea..................................................... 21
6. Evaluación de los resultados............................................................. 24
7. Almacenamiento, consulta y borrado de los valores medidos ......... 25
8. Aviso de errores/Solución de problemas........................................... 27
9. Limpiar y guardar la unidad y el brazalete......................................... 27
10. Datos técnicos................................................................................... 27
11. Adaptador.......................................................................................... 28

16
2. Indicaciones importantes
Explicación de los símbolos
En las presentes instrucciones de uso, en el embalaje y en la placa de
características del aparato y de los accesorios se utilizan los siguientes
símbolos:
¡Atención!
Indicación
Indicación de información importante
Tenga en cuenta las instrucciones de uso
Pieza de aplicación tipo BF
Corriente continua
Eliminación de residuos según la Directiva europea
sobre residuos de aparatos eléctricos y electróni-
cos (RAEE).
Fabricante
Storage/Transport
Temperatura y humedad de almacenamiento y trans-
porte admisibles
Operating
Temperatura y humedad relativa de funcionamiento
admisibles
Proteger de la humedad
S
N
Número de serie
El marcado CE certifica que este aparato cumple
con los requisitos establecidos en la directriz 93/42/
EEC sobre productos sanitarios.
Indicaciones para la aplicación
•
Para garantizar que los valores sean comparables, tómese la tensión
siempre a la misma hora del día.
•
Repose unos 5 minutos antes de cada medición.
•
Si desea realizar más de una medición en una misma persona, espere
entre medición y medición 5 minutos.
•
No coma, ni beba, ni fume, ni realice esfuerzos físicos durante un míni-
mo de 30 minutos antes de realizar la medición.
•
Repita la medición en caso de desconfiar de la validez de los valores
medidos.
•
Las mediciones realizadas por usted solo tienen carácter informativo,
en ningún caso pueden reemplazar un examen médico. Hable de los
valores que obtenga con su médico. Bajo ningún concepto debe tomar
usted mismo decisiones médicas (p.ej. sobre medicamentos y su do-
sificación).

17
•
Este aparato no debe ser utilizado por personas (niños incluidos) con
facultades físicas, sensoriales o mentales limitadas, o con poca expe-
riencia o conocimientos, a no ser que los vigile una persona respon-
sable de su seguridad o que esta persona les indique cómo se debe
utilizar la unidad. Se debe vigilar a los niños para asegurarse de que no
jueguen con la unidad.
•
No utilice el tensiómetro en recién nacidos o pacientes con preeclamp-
sia. Si va a utilizar el tensiómetro durante el embarazo, es recomenda-
ble que consulte previamente a su médico.
•
Las enfermedades cadiovasculares.pueden producir errores de medi-
ción o afectar a la precisión de la medición. Esto también es aplicable
en caso de tener la presión sanguínea muy baja, padecer diabetes,
problemas circulatorios, alteraciones del ritmo cardiaco, así como es-
calofríos o temblores.
•
El tensiómetro no debe utilizarse conjuntamente con un equipo quirúr-
gico de alta frecuencia.
•
Solo las personas que tengan el diámetro de brazo indicado para el
aparato pueden usarlo.
•
Tenga en cuenta que durante el inflado puede sufrir cierta limitación
funcional en la extremidad en cuestión.
•
La medición de la presión sanguínea no debe interrumpir la circulación
sanguínea más tiempo del necesario. En caso de que el aparato no
funcione correctamente, retire el brazalete del brazo.
•
Evite apretar, estrangular o doblar el tubo flexible del brazalete median-
te medios mecánicos.
•
Evite exponerse a la presión continuada del brazalete y no realice
mediciones frecuentes. La disminución del flujo sanguíneo que se pro-
duce puede causar lesiones.
•
Cerciórese de que no ha colocado el brazalete en un brazo cuyas
arterias o venas están sometidas a algún tipo de tratamiento médico,
p.ej. acceso por vía endovascular, administración de tratamiento por
vía endovascular o un shunt arteriovenoso (A-V-).
•
No coloque el brazalete a personas a las que se les haya practicado
una mastectomía.
•
No coloque el brazalete sobre heridas, ya que pueden producirse más
lesiones.
•
Coloque el brazalete exclusivamente en el brazo. No coloque el braza-
lete en otras zonas del cuerpo.
•
Il misuratore di pressione può essere utilizzato esclusivamente a batterie.
•
La desconexión automática apaga el tensiómetro para conservar las
pilas si no se pulsa ninguna tecla durante 1 minuto.
•
Este aparato solo está diseñado para el fin descrito en estas instruccio-
nes de uso. Por lo tanto, el fabricante declinará toda responsabilidad
por los daños y perjuicios debidos a un uso inadecuado o incorrecto.
Indicaciones de conservación y cuidado
•
El aparato de medición está compuesto por elementos electrónicos
y de precisión. Tanto la exactitud de los valores de medición como la
vida útil del aparato dependen de la correcta utilización del mismo:
– Proteja el aparato de impactos, humedad, suciedad, grandes oscila-
ciones térmicas y exposición directa a la luz solar.
– Evite que el aparato se caiga.
– No utilice el aparato en las inmediaciones de campos electromag-
néticos de gran intensidad y manténgalo alejado de instalaciones de
radio y de teléfonos móviles.

18
– Solo pueden utilizarse los brazaletes de repuesto o los brazaletes
originales que acompañan al aparato. De lo contrario, se obtendrán
valores de medición erróneos.
•
Si no se va a utilizar el aparato durante un periodo de tiempo prolonga-
do, se recomienda retirar las pilas.
Indicaciones para el manejo de las pilas
•
En caso de que el líquido de una pila entre en contacto con la piel o los
ojos, lave la zona afectada con agua y busque asistencia médica.
•
¡Peligro de asfixia! Los niños pequeños podrían tragarse las pilas
y asfixiarse. Guarde las pilas fuera del alcance de los niños.
•
Respete los símbolos más (+) y menos (-) que indican la polaridad.
•
Si se derrama el líquido de una pila, póngase guantes protectores y
limpie el compartimento de las pilas con un paño seco.
•
Proteja las pilas de un calor excesivo.
•
¡Peligro de explosión! No arroje las pilas al fuego.
•
Las pilas no se pueden cargar ni cortocircuitar.
•
Si no va a utilizar el aparato durante un periodo de tiempo prolongado,
retire las pilas de su compartimento.
•
Utilice únicamente el mismo tipo de pila o un tipo equivalente.
•
Cambie siempre todas las pilas a la vez.
•
No utilice baterías.
•
No despiece, abra ni triture las pilas.
Indicaciones acerca de reparaciones y eliminación de residuos
•
No deseche las pilas con la basura doméstica. Lleve las pilas usadas a
los puntos de recogida dispuestos para tal finalidad.
•
No abra el aparato. El incumplimiento de esta norma anula la garantía.
•
No repare ni ajuste el aparato usted mismo. Si lo hace, no se garantiza
un funcionamiento correcto.
•
Las reparaciones solo deben dejarse en manos del servicio al cliente o
de distribuidores autorizados. Antes de realizar cualquier reclamación,
compruebe el estado de las pilas y sustitúyalas si es necesario.
•
Deseche el aparato según la Directiva europea sobre residuos
de aparatos eléctricos y electrónicos (RAEE).
Para más información, póngase en contacto con la autoridad
municipal competente en materia de eliminación de residuos.

19
3. Descripción del aparato
1. Brazalete
2. Tubo flexible del brazalete
3. Conector del brazalete
4. Pantalla
5. Conexión para la fuente de alimentación
6. Tecla de memorización
7. Tecla de inicio/parada
8. Teclas de función
9. Indicador de riesgos
10. Conexión para el conector del brazalete
Indicaciones en la pantalla:
1. Inflar , Desinflar
2. Presión sistólica
3. Indicaciones de la memoria:
valor promedio ( ),
mañana ( ), tarde ( ),
4. Presión diastólica
5. Memoria del usuario
6. Pulso medido
7. Símbolo de alteración del ritmo
cardiaco
8. Hora y fecha
9. Indicador de riesgos
10. Número de espacio en la memoria
11. Símbolo de cambio de pilas
4. Preparación de la medición
Colocación de las pilas
•
Abra la tapa del compartimento para
pilas.
•
Coloque cuatro pilas de tipo 1,5V AA
(alcalinas tipo LR6). Compruebe que
las pilas se hayan colocado según la
polaridad correcta indicada. No utilice
baterías recargables. La indicación “El
aparato está preparado.” aparece.
•
Vuelva a cerrar la tapa del compartimento para pilas con
cuidado.
2
1
3
10
9
8
7
6
4
5
11
10
9
78
2
3
1
4
5
6
4 x AA (LR6) 1,5 V

20
•
Una vez colocadas las pilas, el aparato indica la hora y la fecha de
forma permanente.
Cuando aparecen el símbolo de cambio de pilas y , no se puede
realizar ninguna medición. El aparato indica: “Pila débil”. Sustituya todas
las pilas. En cuanto se retiran las pilas del aparato, se debe volver a ajus-
tar la hora, la fecha y el idioma.
No deseche las pilas usadas con la basura doméstica. Deséchelas a
través de su distribuidor de productos electrónicos o en su punto de
recogida de desechos reciclables. Está obligado por ley.
Eliminación de las pilas
•Las pilas usadas, completamente descargadas, deben eliminarse a
través de contenedores de recogida señalados de forma especial, los
puntos de recogida de residuos especiales o a través de los distribui-
dores de equipos electrónicos. Los usuarios están obligados por ley a
eliminar las pilas correctamente.
•Estos símbolos se encuentran en pilas que contienen
sustancias tóxicas:
Pb = la pila contiene plomo,
Cd = la pila contiene cadmio,
Hg = la pila contiene mercurio.
Configurar fecha, hora e idioma
Desde este menú podrá ajustar las funciones que se mencionan a con-
tinuación:
Fecha Hora Idioma Volumen
En primer lugar, debe ajustar la fecha y la hora del aparato, ya que solo
así se podrán almacenar los datos de sus mediciones con la fecha y hora
correctas para su posterior consulta.
La hora se muestra en formato de 24 horas.
El aparato se puede configurar en 4 idiomas. En el estado de suministro,
el aparato está ajustado para funcionar en inglés.
Si mantiene pulsadas las teclas de función , podrá ajustar los
valores con más rapidez.
Función de voz
Fecha / Hora
•
Inserte las pilas o mantenga pul-
sada la tecla de memorización
durante 5 segundos.
El indicador del año parpadea en
pantalla.
El aparato está preparado.
•
Ajuste el año con las teclas de
función y confírmelo con la
tecla de memorización .
•
Ajuste el mes, el día, la hora y el
minuto, y confirme cada uno de
ellos con la tecla de memoriza-
ción .
Other manuals for BM 49
7
Table of contents
Languages:
Other Beurer Blood Pressure Monitor manuals
Popular Blood Pressure Monitor manuals by other brands

A&D
A&D SMARTMETER iBloodPressure 2.0 instruction manual

MHC Medical Products
MHC Medical Products SureLife Classic SL-BW101 user manual

F.Bosch Medizintechnik
F.Bosch Medizintechnik Praktisch instruction manual

Microlife
Microlife BP AG1-20 manual

Citizen
Citizen CH-432BS instruction manual

Mescomp Technologies
Mescomp Technologies AC 229 manual