Beurer BM 81 easyLock User manual

EN Upper arm blood pressure monitor
Instructions for use
BM 81 easyLock
18
Model: MD6000

ENGLISH
1. Included in delivery
Check that the exterior of the cardboard delivery packaging is intact and make sure that all contents are pre
sent. Before use, ensure that there is no visible damage to the device or accessories and that all packaging
material has been removed. If you have any doubts, do not use the device and contact your retailer or the
specied Customer Service address.
1x upper arm blood pressure monitor with integrated easyLock universal cuff (24 – 40 cm)
1x instructions for use
1x brief instructions
4x 1.5 V AAA LR03 batteries
2. Signs and symbols
The following symbols are used on the device, in these instructions for use, on the packaging and on the
type plate for the device:
WARNING
indicates a hazardous situation which, if not avoided, could result in death or serious injury.
CAUTION
indicates a hazardous situation which, if not avoided, may result in minor or moderate injury.
Contents
Read these instructions for use carefully and keep them for
later use, be sure to make them accessible to other users and
observe the information they contain.
Dear customer,
Thank you for choosing a product from our range. Our name stands for high-quality, thoroughly tested prod -
ucts for applications in the areas of heat, weight, blood pressure, body temperature, pulse, gentle therapy,
massage, beauty, air and baby.
With kind regards
Your Beurer team
1. Included in delivery ............................................
2. Signs and symbols ............................................
3. Intended use ......................................................
4. Warnings and safety notes ................................
5. Device description .............................................
6. Initial use ...........................................................
7. Usage ................................................................
8. Cleaning and maintenance ..............................
9. Accessories and replacement parts ................
10. What if there are problems? ............................
11. Disposal ..........................................................
12. Specications ..................................................
13. Warranty / service .............................................

Product information
Note on important information
Observe the instructions
Read the instructions before starting work and/or operating devices or machines
Isolation of applied parts, type BF
Galvanically isolated application part (F stands for “floating”); meets the requirements for
leakage currents for type BF
Direct current
The device is suitable for use with direct current only
Disposal
Disposal in accordance with EC Directive WEEE (Waste Electrical and Electronic Equipment)
Battery disposal
Do not dispose of batteries containing hazardous substances with household waste
21
PAP
Packaging disposal
Dispose of packaging in an environmentally friendly manner
Manufacturer
Authorized representative in the European Community
Distributor
Temperature limit
The temperature limit values to which the medical device can safely be exposed are
indicated.
Humidity, limit
Indicates the humidity range to which the medical device can safely be exposed.
Atmospheric pressure, limit
Indicates the range of atmospheric pressures to which the medical device can be safely ex -
posed
IP22 IP class
Device protected against foreign objects ≥ 12.5 mm and against water dripping at an angle
S
N
Serial number
Batch code
Item number
Medical device
20

CE labelling
This product satisfies the requirements of the applicable European and national directives
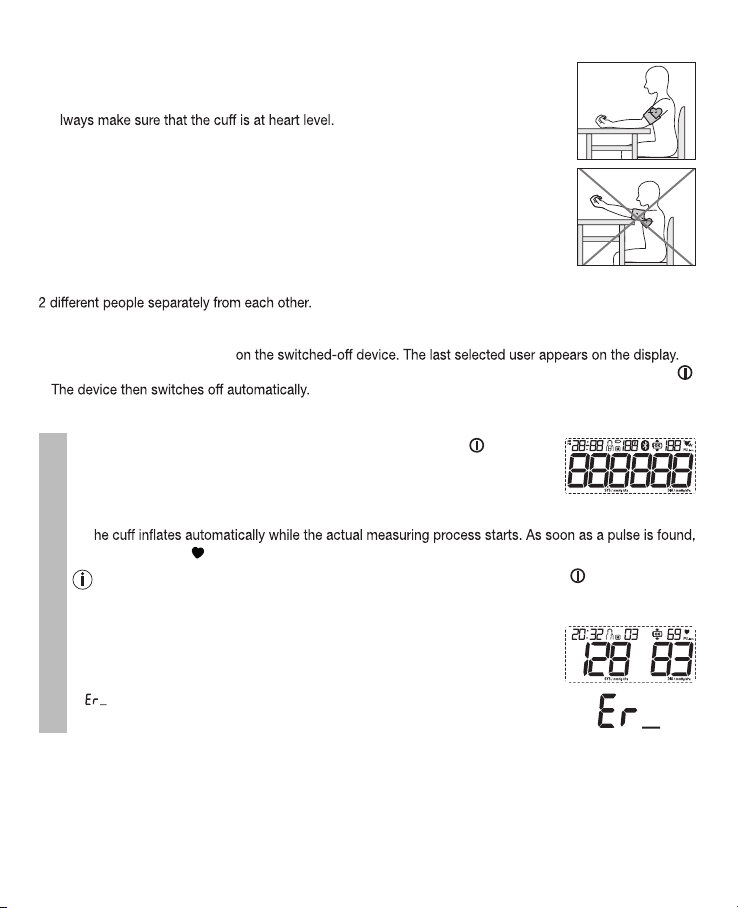
3. Intended use
Intended use
The blood pressure monitor is intended for the fully automatic, non-invasive measurement of arterial blood
pressure and pulse values on the upper arm.
Target group
It is designed for self-measurement by adults in the home environment and is suitable for users whose upper
Indication/clinical benefits
The user can record their blood pressure and pulse values quickly and easily using the device. The recorded
values are classified according to internationally applicable guidelines and evaluated graphically. Furthermore,
the device can detect any irregular heart beats that occur during measurement and inform the user via a
symbol in the display. The device saves the recorded measurements and can also output average values of
previous measurements. The recorded data can provide healthcare service providers with support during the
diagnosis and treatment of blood pressure problems, and therefore plays a part in the long-term monitoring
of the user’s health.
4. Warnings and safety notes
Contraindications
• D
• This device is not intended to be used as an Ambulatory Blood Pressure Monitor. Please do not apply the cuff for a long period of time
o not use the blood pressure monitor on newborns, children or pets.
• P eople with restricted physical, sensory or mental skills should be supervised by a person responsible for
their safety and receive instructions from this person on how to use the device.
• If you have any of the following conditions, it is essential you consult your doctor before using the device:
cardiac arrhythmia, circulatory problems, diabetes, pregnancy, pre-eclampsia, hypotension, chills, shaking.
• P eople with pacemakers or other electrical implants should consult their doctor before using the device.
• T he blood pressure monitor must not be used in connection with a high-frequency surgical unit.
• D
• D
• M -
ment, e.g. intravascular access or intravascular therapy, or an arteriovenous (AV) shunt.
General warnings
• T he measured values taken by you are for your information only – they are no substitute for a medical exam -
ination. Discuss the measured values with your doctor and never make your own medical decisions based
on them (e.g. regarding dosages of medicines).
• T he device is only intended for the purpose described in these instructions for use. The manufacturer is not
liable for damage resulting from improper or incorrect use.
• U
• The PATIENT is an intended OPERATOR
sing the blood pressure monitor outside your home environment or whilst on the move (e.g. whilst travelling
in a car, ambulance or helicopter, or whilst undertaking physical activity such as playing sport) can influence
the measurement accuracy and cause incorrect measurements.
• C
accuracy.

• Do not use the device at the same time as other medical electrical devices (ME equipment). This could lead
to a malfunction of the device and/or an inaccurate measurement.
• Do not use the device outside of the specied storage and operating conditions. This could lead to incorrect
measurements.
• O
• P
• Do not perform measurements more frequently than necessary. Due to the restriction of blood ow, some
bruising may occur.
• During the blood pressure measurement, the blood circulation must not be stopped for an unnecessarily
• P
• Small parts may present a choking hazard for small children if swallowed. They should therefore always be
supervised.
General precautions
• T he blood pressure monitor is made from precision and electronic components. The accuracy of the meas -
urements and service life of the device depend on its careful handling.
• P rotect the device from impacts, humidity, dirt, marked temperature fluctuations and direct sunlight.
• E nsure the device is at room temperature before measuring. If the measuring device has been stored close
to the maximum or minimum storage and transport temperatures and is placed in an environment with a
• D o not drop the device.
• D o not use the device in the vicinity of strong electromagnetic fields and keep it away from radio systems
or mobile telephones.
• W
• The temperature of cuff may reached to 42.1°C during normal operation at 40.0°C environment
e recommend that the batteries be removed if the device is not to be used for a prolonged period of time.
• A
Measures for handling batteries
• I
medical assistance.
• C hoking hazard! Small children may swallow and choke on batteries. Therefore, store batteries out of
the reach of small children.
• R isk of explosion! Do not throw batteries into a fire.
• If a battery has leaked, put on protective gloves and clean the battery compartment with a dry cloth.
• D o not disassemble, open or crush the batteries.
• O bserve the plus (+) and minus (-) polarity signs.
• P rotect the batteries from excessive heat.
• D o not charge or short-circuit batteries.
• If the device is not to be used for a relatively long period, take the batteries out of the battery com -
partment.
• U se identical or equivalent battery types only.
• A lways replace all batteries at the same time.
• D o not use rechargeable batteries!
22

Notes on electromagnetic compatibility
•The device is suitable for use in all environments listed in these instructions for use, including domestic
environments.
•The use of the device may be limited in the presence of electromagnetic disturbances. This could result in
issues such as error messages or the failure of the display/device.
• A void using this device directly next to other devices or stacked on top of other devices, as this could lead
to faulty operation. If, however, it is necessary to use the device in the manner stated, this device as well as
the other devices must be monitored to ensure they are working properly.
•The use of accessories other than those specified or provided by the manufacturer of this device can lead to
an increase in electromagnetic emissions or a decrease in the device’s electromagnetic immunity; this can
result in faulty operation.
•Failure to comply with the above can impair the performance of the device.
5. Device description
Blood pressure monitor and cuff
M
3
7
2
1
8
6
5
4
1. Display
2. Upper arm cu
3. easyLock locking button
4. Start/stop button
5. Setting buttons +/-
6. Memory buttons M
7. LED risk indicator
8. Battery compartment lid
Display
9 10
87654321
1. Date /time
2. User memory
3. Battery replacement symbol
4. Number of memory space/memory display aver -
age value ( ), morning ( ), evening ( )
5. Symbol for Bluetooth
®
transfer
6. Cu position control
7. Calculated pulse value incl. unit
8. Pulse symbol
Cardiac arrhythmia symbol
9. Systolic pressure incl. unit
10. Diastolic pressure incl. unit

6. Initial use
Inserting the batteries
• R emove the battery compartment lid on the rear of the device.
• Insert four 1.5 V AAA (alkaline type LR03) batteries. Make sure that the batter -
ies are inserted the correct way round.
• C lose the battery compartment lid again carefully.
• All display elements are briey displayed, ashes in the display. Set the
date and time as described below.
If the battery replacement symbol is permanently displayed, you can no longer perform any measure -
ments and must replace all batteries. Once the batteries have been removed from the device, the date and
time must be set again. Any saved measurements are retained.
Making settings
You must make sure that the device has the correct settings before use in order to be able to make full use of
all functions. Only by doing so can your measurements with associated date and time be saved and accessed
later by you.
Set the hour format, date, time and Bluetooth ®settings
It is essential to set the date and time. Otherwise, you will not be able to save your measured values correctly
with a date and time and access them again later.
• B efore initial us e and after each tim e you replace the ba ttery:
• When inserting batteries into the device, you will be taken to the relevant menu automatically.
• If the batteri es have already been inserted:
• Press and hold the memory button M on the device when for approx. 5 seconds.
In this menu you can adjust the following settings in succession:
Hour format ➔Date ➔Time ➔Bluetooth
®
➔User
Hour format
The hour format now flashes on the display.
• Using the +/- setting buttons, select your desired hour format and conrm with the M
memory button.
Date
The year ashes on the display .
• Using the +/- setting buttons, select your desired number for the year and conrm with
the M memory button.
The month ashes on the display .
• Using the +/- setting buttons, select your desired month and conrm with the M memory
button.
The day ashes on the display .
• Using the +/- setting buttons, select your desired day and conrm with the M memory
button.

Date
If the hour format is set as 12h, the day/month display sequence is reversed.
Time
The hour ashes on the display .
• Using the +/- setting buttons, select your desired number for the hour and conrm with
the M memory button.
The minute ashes on the display .
• Using the +/- setting buttons, select your desired number for the minute and conrm with
the M memory button.
Bluetooth
®
settings
The Bluetooth
®
symbol ashes on the display.
• Using the +/- setting buttons, select whether automatic Bluetooth
®
data transfer is to be activated
(Bluetooth
®
symbol ashes) or deactivated ( Bluetooth
®
symbol is not shown) and conrm with the M
memory button.
Bluetooth
®
transfers will reduce the battery life.
User
The user memory symbol ashes in the display.
• Using the +/- setting buttons, select your desired user and conrm your selection with the M memory
button.
•
The device then switches o automatically.
7. Usage
General rules when measuring blood pressure yourself
• In order to generate as informative a profile of the progression of your blood pressure as possible and ensure
that the measured values can be compared, you should measure your blood pressure regularly and always
at the same times of day. It is recommended that you measure your blood pressure twice a day: once in the
morning after getting up and once in the evening.
• Y -
fore avoid taking measurements during stressful periods.
• Do not take a measurement within 30 minutes of eating, drinking, smoking or exercising.
• B
• Furthermore, if you want to take several measurements in succession, make sure always to wait for at least
1 minute between the individual measurements.
• R epeat the measurement if you are unsure of the measured value.
• Fundamentally, blood pressure can be measured on both arms. Certain deviations between the measured
blood pressure on the right arm and left arm are due to physiological causes and completely normal. You
should always perform the measurement on the arm with the highest blood pressure values. Before starting
self-measurement, consult your doctor in this regard. From this point on, always take measurements on the
same arm.

• T
with your upper arm circumference. The fit should be checked before measurement using the index mark
described below.
Ref. no. Designation Arm c ircumference
164.290* easyLock- Universal cu 24-40 cm
* Included in standard delivery
• P The circulation of the arm
must not be hindered by tight clothing or similar.
• The device must be placed on the upper arm so that the bottom edge is positioned
approx. 2–3 cm above the elbow. Adjust the device so that the “ARTERY ” mark
is directly over the artery.
•Now press the easyLock locking button until it clicks into place to activate the lock-
ing mechanism.
• A -
Lock locking button.
• T
• T
Cu position control
The device has a cu position control function. Using this feature, the device automatically checks the
correct positioning of the cu on your upper arm during measurement. If the cu is correctly positioned, the
symbol will appear on the display during ination. It will remain there until the measurement has been suc -
cessfully completed and will then be displayed together with the determined measured values.
In the event that the cu has been positioned incorrectly, the measurement is cancelled and an error mes -
sage appears in the display. In this case, please observe the information in the section “What if there are
problems?”.

Adopting the correct posture
• To carry out a blood pressure measurement, make sure you are sitting upright and
comfortably. Lean back and place your arm on a surface. Do not cross your legs. Place
your feet next to each other flat on the floor.
• A
• To avoid distorting the measurement, you should remain as still as possible during the
measurement and not speak.
Selecting the user
This device has 2 user memories with 120 memory spaces each in order that you can save measurements from
If multiple people are using the device, make sure that the relevant user is set before each measurement.
To do so, proceed as follows:
• Press the setting button +or -
• Using the +/- setting buttons, set the desired user and confirm your selection with the Start/stop button .
Performing the blood pressure measurement
Measurement
• To start the blood pressure monitor, press the Start/stop button . A ll display
elements are briey displayed.
•
T
he blood pressure monitor will begin the measurement automatically after approx. 3 seconds.
•
T
the pulse symbol is displayed.
You can cancel the measurement at any time by pressing the Start/stop button . The remaining air
is released quickly once the measurement is complete. The remaining air is released quickly once
the measurement is complete.
• The systolic pressure, diastolic pressure and pulse measurements are dis-
played, and the LED risk indicator gives you a classication of your measured
values using various colours.
•
appears if the measurement could not be performed properly. I n this case,
please read the section “What if there are problems?”.

Measurement
• If the
Bluetooth
®
function has been activated, the data transfer to the “beurer HealthManager” app
starts automatically after the measurement.
• The
Bluetooth
®
symbol ashes on the display. The device now attempts to connect to the app for
approx. 30 seconds.
• The
Bluetooth
®
symbol stops ashing as soon as the connection is established. All measurement data
is transferred to the apps. Once the data transfer is successfully complete, the device switches o
automatically.
• If a connection to the app cannot be established after 30 seconds, the
Bluetooth
®
symbol goes out
and the device switches o automatically after 1 minute.
• If you forget to turn o the device, it switches o automatically after approximately 1 minute. In this
case too, the value is stored in the selected or most recently used user memory.
Unlocking the cu and removing the device
After the measurement has been taken successfully, you can take o the device again. To do so, proceed as
follows:
• P
• Y
Transfer of measurements via Bluetooth ®
In addition to displaying and saving your measurements locally on the device, you have the option of trans -
ferring your measurements to your smartphone using Bluetooth ®low energy technology.
For this you need the “beurer HealthManager Pro” or “beurer HealthManager” app. These apps are available
for free in the Apple App Store and from Google Play.
System requirements:
– iOS ≥ 12.0, Android
TM
≥ 8.0
– Bluetooth ®≥ 4.0
List of compatible devices:
To transfer the measured values, proceed as follows:
Step 1:
Activate the Bluetooth
®
function on your device as described in section “Setting
the hour format, date, time and Bluetooth
®
”.
Step 2: “beurer HealthManager Pro” or “beurer HealthManager” app
In the „beurer HealthManager Pro“ or „beurer HealthManager“ app, add the BM 81
under Settings / Devices and follow the instructions.

Step 3:
Take a measurement.
Step 4:
(Data transfer immediately following the measu -
rement): If the Bluetooth
®
function has been activa -
ted, the data transfer to the „beurer HealthManager
Pro“ or the „beurer HealthManager“ app starts
automatically after the measurement.
Step 4:
(Data transfer at a later point in time): Go into
the memory recall mode for the desired user me -
mory (see “Saving, accessing and deleting measu -
red values”). The data transfer starts automatically.
Also note the following information:
• Ensure that the „beurer HealthManager Pro“ or „beurer HealthManager“ app on your smartphone is always
activated and open when you start the data transfer on the device.
• You can tell that the data transfer is in progress by the Bluetooth ®symbol shown on the display.
• If your smartphone has a protective cover, remove it to ensure that there is no interference during the trans -
fer.
Evaluating the results
General information about blood pressure
• B lood pressure is the force with which the bloodstream presses against the arterial walls. Arterial blood
pressure constantly changes in the course of a cardiac cycle.
• B lood pressure is always stated in the form of two values:
– The highest pressure in the cycle is called systolic blood pressure . This arises when the heart muscle
contracts and blood is pumped into the blood vessels.
– The lowest is diastolic blood pressure , which is when the heart muscle has completely stretched back
out and the heart lls with blood.
• F -
information about the actual blood pressure. Reliable assessment is only possible when you perform the
measurement regularly under comparable conditions.
Irregular Heartbeat
This device can identify any Irregular Heartbeat disturbances as part of the analysis of your recorded pulse signal
during blood pressure measurement. In this case, after the measurement, the device will indicate any irreg-
ularities in your pulse by displaying the
symbol in the display. This can be an indicator for Irregular Heartbeat
Irregular Heartbeat is an illness in which the heart rhythm is abnormal because of aws in the bioelectrical system that
regulates the heartbeat. The symptoms (skipped or premature heart beats, pulse being slow or too fast) can be
caused by factors such as heart disease, age, physical disposition, excess alcohol and tobacco, stress or lack
of sleep. If the
symbol appears on the display after the measurement, the measurement must be repeated
as the measurement accuracy may be impaired. To assess your blood pressure, only use the results that
have
been recorded without corresponding irregularities in your pulse. If the
symbol appears frequently,
please consult your doctor. Only they can establish the existence of Irregular Heartbeat during a checkup,
using their
means of diagnosis.

LED risk indicator
The World Health Organization (WHO) has dened the internationally recognised classication for the evalua-
tion of measured blood pressure values listed in the table below:
Measured blood pressure value range
Classification Colour of the risk
indicator
Systole (in mmHg) Diastole (in mmHg)
≥ 180 ≥ 110 High blood pressure stage 3 (severe) Red
160 – 179 100 –109 High blood pressure stage 2 (moderate) Orange
140 – 159 90 –99 High blood pressure stage 1 (mild) Yellow
130 – 139 85 – 89 High normal Green
120 – 129 80 – 84 Normal Green
< 120 < 80 Optimal Green
Source: WHO, 1999 (World Health Organization)
The LED risk indicator (coloured LED on the device to the left of the display) shows which category the re -
high normal category and diastole in the normal category), the risk indicator then always shows you the higher
category – “high normal” in the example described.
Please be aware that these standard values can only serve as a general guideline, as the individual blood
Furthermore, it must be noted that measurements taken yourself while at home are generally lower than those
that are taken by the doctor. For this reason, it is important that you regularly consult your doctor for advice.
Only they are able to give you your personal target values for controlled blood pressure – in particular if you
receive medicinal therapy.
Displaying and deleting measurements
User memory
The results of every successful measurement are stored together with the date and time. If there are
more than 120 measurements, the oldest measurements are lost.
• First select the desired user memory that you want to view the data for as described in the chapter on
selecting a user.
• Then press the memory button Mon the switched-o device.
Average values
A
ashes on the display.
The average value of all saved measured values in this user memory is displayed.
• Press the memory button M.
AM
ashes on the display.
The average value of the morning measurements for the last 7 days is displayed
(morning: 5.00 a.m. – 9.00 a.m.).
• Press the memory button M.
30

Average values
PM
ashes on the display.
The average value of the evening measurements for the last 7 days is displayed
(evening: 6.00 p.m. – 08.00 p.m.).
Individual measured values
• When you press the memory button Magain, the last individual measurement
is displayed (in this example, measurement 03).
• When the memory button Mis pressed again, you can view your individual measured values.
•
T
o switch the device o again, press the Start/stop button or wait 30 sec.
You can exit the menu at any time by pressing the Start/stop button .
Deleting measured values
• In order to delete all saved measurements from a user, rst select it as described.
•
A
ashes on the display and the average value of all saved measured values in this user memory is
displayed.
• Press and hold both setting buttons +and -
•
CL 00
appears on the display. All the values in the current user memory are
deleted. Das Gerät schaltet sich im Anschluss automatisch ab.
8. Cleaning and maintenance
• C lean the device and cu carefully using a slightly damp cloth only.
• Do not use any cleaning agents or solvents.
• Under no circumstances hold the device and cu under water, as this can cause liquid to enter and dam -
age the device and cu.
• If you store the device and cu, do not place heavy objects on the device and cu. Remove the batteries.
The cu line should not be bent sharply .
9. Accessories and replacement parts
Accessories and replacement parts are available from the corresponding service address (according to the
service address list). Please state the corresponding order number.
Designation Item number and/or order number
easyLock- Universal cu (24-40 cm) 164.290

10. What if there are problems?
Error
message
Possible cause Solution
Er1 Unable to record a pulse. Please wait one minute and repeat the mea -
surement.
Ensure that you do not speak or move during
the measurement.
Er2 You moved or spoke during the measure -
ment.
Er3 The cu is not attached correctly. Please observe the information in chapter
„Attaching the cu“ and take another measu -
rement after one minute.
Er4 The measured values are outside the speci -
ed measurement range.
Please wait one minute and repeat the mea -
surement.
Ensure that you do not speak or move during
the measurement.
If the error occurs repeatedly, consult a doc -
tor to check you are healthy.
An error occurred during the measurement.
Er5 The ination pressure is higher than 300
mmHg.
Please take another measurement to check
whether the cu can be correctly inated.
Make sure that neither your arm nor other
heavy objects are pressing on the line, and
that the line is not bent.
Er6 The batteries are almost empty. Insert new batteries into the device.
ER7 Unable to transfer the data via Bluetooth
®
. Please observe the information in chapter
“Transfer of measurements via Bluetooth
®
”.
11. Disposal
Repairing and disposing of the device
• Do not repair or adjust the device yourself. Proper operation can no longer be guaranteed in this case.
• Do not open the device. Failure to comply will invalidate the warranty.
• R epairs must only be carried out by Customer Services or authorised retailers. Before making a claim,
please checkthe batteries first and replace them if necessary.
• For environmental reasons, do not dispose of the
device in household waste at the end of its service life. Dispose of the device at a suitable local
collection or recycling point in your country. Dispose of the device in accordance with EC Directive
– WEEE (Waste Electrical and Electronic Equipment). If you have any questions, please contact the local
authorities responsible for waste disposal.
Disposing of the batteries
• The empty, completely flat batteries must be disposed of through specially designated collection boxes,
recycling points or electronics retailers. You are legally required to dispose of the batteries.
32

• The codes below are printed on batteries
containing harmful substances:
Pb = Battery contains lead,
Cd = Battery contains cadmium,
Hg = Battery contains mercury.
12. Specications
Device
Model no.
BM 81
Type
MD6000
Measurement method Oscillometric, non-invasive blood pressure measurement on the
upper arm
Measurement range Cu pressure 0 – 300 mmHg,
systolic 50 – 250 mmHg,
diastolic 30 – 200 mmHg,
Pulse 40 –180 beats/minute
Display accuracy Systolic ± 3 mmHg, diastolic ± 3 mmHg,
pulse ± 5 % of the value shown
Measurement inaccuracy Max. permissible standard deviation according to clinical testing:
systolic 8 mmHg /diastolic 8 mmHg
Memory 2 x 120 memory spaces
Dimensions L 175 mm x W 117 mm x H 50 mm
Weight Approx. 518 g (without batteries, with cu)
Cu size 24 to 40 cm
Permissible operating conditions +5 °C to + 40 °C,
15 % – 90 % relative air humidity (non-condensing)
Permissible storage and transport
conditions
- 25 °C to + 70 °C,
up to 90%, non-condensing Atmospheric pressure: 700 hPa to 1060 hPa
Power supply 4 x 1,5 V AAA batteries
Battery life For approx. 120 measurements, depending on the blood pressure
level and/or pump pressure
Classication Internal supply, IP22 , no AP or APG, continuous operation, applica -
tion part type BF
Data transfer via Bluetooth
®
wireless
technology
The blood pressure monitor uses Bluetooth
®
low energy techno -
logy,
2402MHz – 2480MHz frequency band,
Transmission power max. 4 dBm,
Compatible with Bluetooth
®
4.2 smartphones/tablets
The serial number is located on the device or in the battery compartment.
Technical information is subject to change without notication to allow for updates.
Service life 10,000 measurement at least.

• This unit is in line with European Standard EN 60601-1-2 (i n accordance with CISPR 11, IEC61000-3-3,
IEC61000-4-2, IEC61000-4-3, IEC61000-4-4, IEC61000-4-5, IEC61000-4-6, IEC61000-4-8,
IEC61000-4-11 ) and is subject to particular precautions with regard to electromagnetic compatibility (EEC).
Please note that portable and mobile HF communication systems may interfere with this unit.
• This device is in line with the EU Medical Devices Directive 93/42/EEC, the “Medizinproduktegesetz” (Ger -
man 1: Gen -
3: Supplementary requirements for
– Part 2 –30: Particular requirements for the safety and essential performance of automated non-invasive
blood pressure monitors).
• The accuracy of this blood pressure monitor has been carefully checked and developed with regard to a
long useful life. If using the device for commercial medical purposes, it must be regularly tested for accu -
racy by appropriate means. Precise instructions for checking accuracy may be requested from the service
address.
• We hereby conrm that this product complies with the European RED Directive 2014/53/EU.
The CE Declaration of Conformity for this product can be found under:
13. Warranty / service
warranty for this product, subject to the requirements below and to the extent described as follows.
from the sales agreement with the buyer.
The warranty shall apply without prejudice to any mandatory statutory provisions on liability.
Beurer guarantees the perfect functionality and completeness of this product.
The worldwide warranty period is 5 years, commencing from the purchase of the new, unused product from
the seller.
The warranty only applies to products purchased by the buyer as a consumer and used exclusively for perso -
nal purposes in the context of domestic use.
German law shall apply.
During the warranty period, should this product prove to be incomplete or defective in functionality in accor -
dance with the following provisions, Beurer shall carry out a repair or a replacement delivery free of charge, in
accordance with these warranty conditions.
If the buyer wishes to make a warranty claim, they should approach their local retailer in the first
instance: see the attached “International Service” list of service addresses.
The buyer will then receive further information about the processing of the warranty claim, e.g. where they
can send the product and what documentation is required.
A warranty claim shall only be considered if the buyer can provide Beurer, or an authorised Beurer partner,
with
– a copy of the invoice/purchase receipt, and
– the original product.

The following are explicitly excluded from this warranty:
– deterioration due to normal use or consumption of the product;
– accessories supplied with this product which are worn out or used up through proper use (e.g. batteries,
rechargeable batteries, cus, seals, electrodes, light sources, attachments and nebuliser accessories);
– products that are used, cleaned, stored or maintained improperly and/or contrary to the provisions of the
instructions for use, as well as products that have been opened, repaired or modied by the buyer or by a
service centre not authorised by Beurer;
– damage that arises during transport between manufacturer and customer, or between service centre and
customer;
– products purchased as seconds or as used goods;
– consequential damage arising from a fault in this product (however, in this case, claims may exist arising
from product liability or other compulsory statutory liability provisions).
Repairs or an exchange in full do not extend the warranty period under any circumstances.
Subject to errors and changes

Appendix I
The Sphygmomanometer (MD6000) is intended for use in the electromagnetic environment specified below. The customer
or the user of the Sphygmomanometer (MD6000) should assure that it is used in such an environment.
RF emissions
CISPR11
RF emissions
CISPR11
Harmonic emissions
IEC 61000-3-2
Voltage fluctuations/ flicker
emissions IEC 61000-3-3
Group 1
Class B
Class A
Compliance
Emissions test Compliance
Guidance and manufacturer’s declaration - electromagnetic emissions

Appendix II
The Sphygmomanometer (MD6000) is intended for use in the electromagnetic environment specified below. The customer
or the user of the Sphygmomanometer (MD6000) should assure that it is used in such an environment.
Electrostatic discharge (ESD)
IEC 61000-4-2
±8 kV contact
±2 kV, ±4 kV, ±8 kV, ±15 kV air
±8 kV contact
±2 kV, ±4 kV, ±8 kV, ±15 kV air
Electrical fast transient/burst
IEC 61000-4-4
Power supply lines: ±2 kV Power supply lines: ±2 kV
Surge
IEC 61000-4-5
line(s) to line(s): ±1 kV
100 kHz repetition frequency
line(s) to line(s): ±1 kV
100 kHz repetition frequency
Power frequency magnetic field
IEC 61000-4-8
NOTE UTis the a.c. mians voltage prior to application of the test level.
30 A/m
50Hz/60Hz
30 A/m
50Hz/60Hz
Radiated RF
IEC 61000-4-3
10 V/m
80 MHz - 2,7 GHz
80% AM at 1 kHz
10 V/m
80 MHz - 2,7 GHz
80% AM at 1 kHz
Conduced RF
IEC 61000-4-6
150KHz to 80MHz:
3Vrms
6Vrms (in ISM and amateur radio
bands) 80% Am at 1kHz
150KHz to 80MHz:
3Vrms
6Vrms (in ISM and amateur radio
bands) 80% Am at 1kHz
Voltage dips, short interruptions
and voltage variations on power
supply input lines
IEC 61000-4-11
0% 0.5 cycle
At 0˚, 45˚, 90˚, 135˚, 180˚, 225˚, 270˚ and
315˚ 0% 1 cycle And 70% 25/30 cycles
Single phase: at 0
0% 300 cycle
0% 0.5 cycle
At 0˚, 45˚, 90˚, 135˚, 180˚, 225˚, 270˚ and
315˚ 0% 1 cycle And 70% 25/30 cycles
Single phase: at 0
0% 300 cycle
Immunity test IEC 60601-1-2 Test level Compliance level
Guidance and manufacturer’s declaration - electromagnetic Immunity
Other manuals for BM 81 easyLock
1
This manual suits for next models
1
Table of contents
Other Beurer Blood Pressure Monitor manuals

Beurer
Beurer BC 58 User manual

Beurer
Beurer BM 47 User manual

Beurer
Beurer DM 49 User manual

Beurer
Beurer BM 75 User manual

Beurer
Beurer BM 55 User manual

Beurer
Beurer BC 08 User manual

Beurer
Beurer BM 55 User manual

Beurer
Beurer BM 45 User manual

Beurer
Beurer BM 58 User manual

Beurer
Beurer BC 44 User manual

Beurer
Beurer BM 60 User manual

Beurer
Beurer BM 44 User manual

Beurer
Beurer BM 58 User manual

Beurer
Beurer bm 40 User manual

Beurer
Beurer BC 54 User manual

Beurer
Beurer BC 18 User manual

Beurer
Beurer BM 55 User manual

Beurer
Beurer BC 32 User manual

Beurer
Beurer BM 28 User manual

Beurer
Beurer BC 21 User manual