BEYES ApexPilot G2 User manual
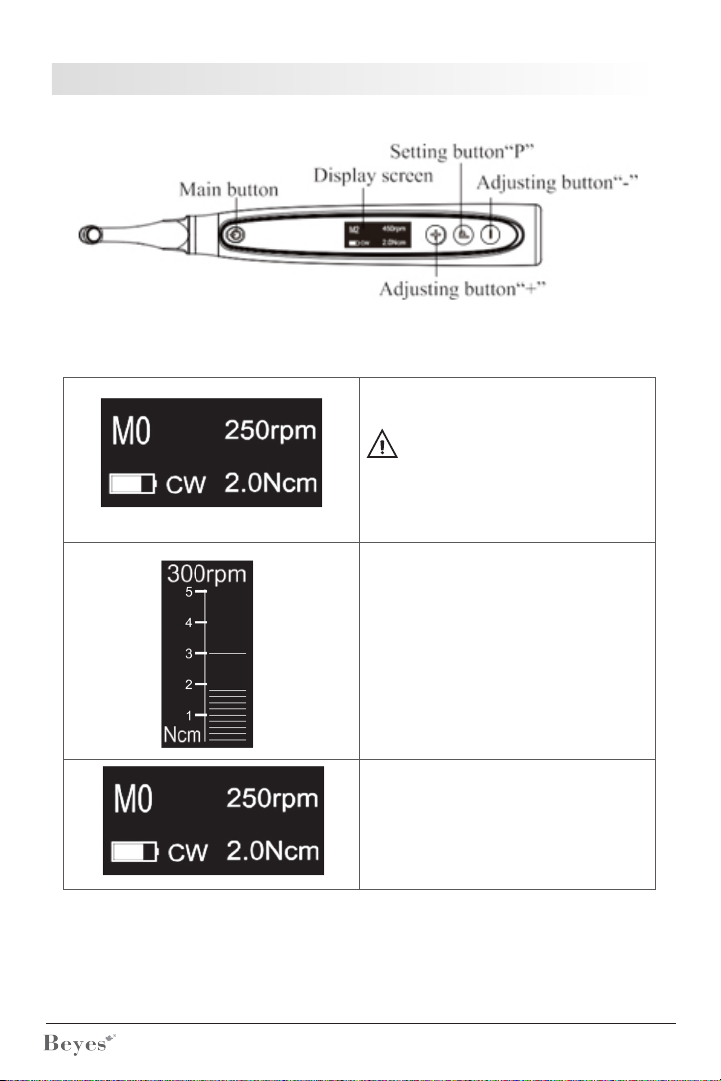
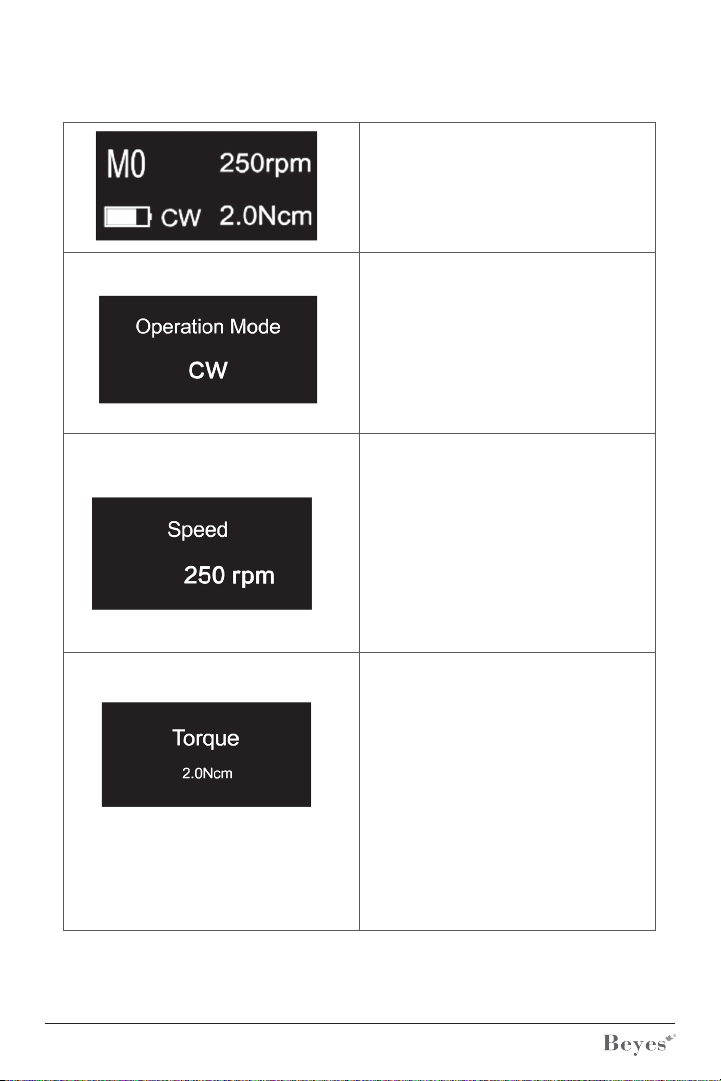
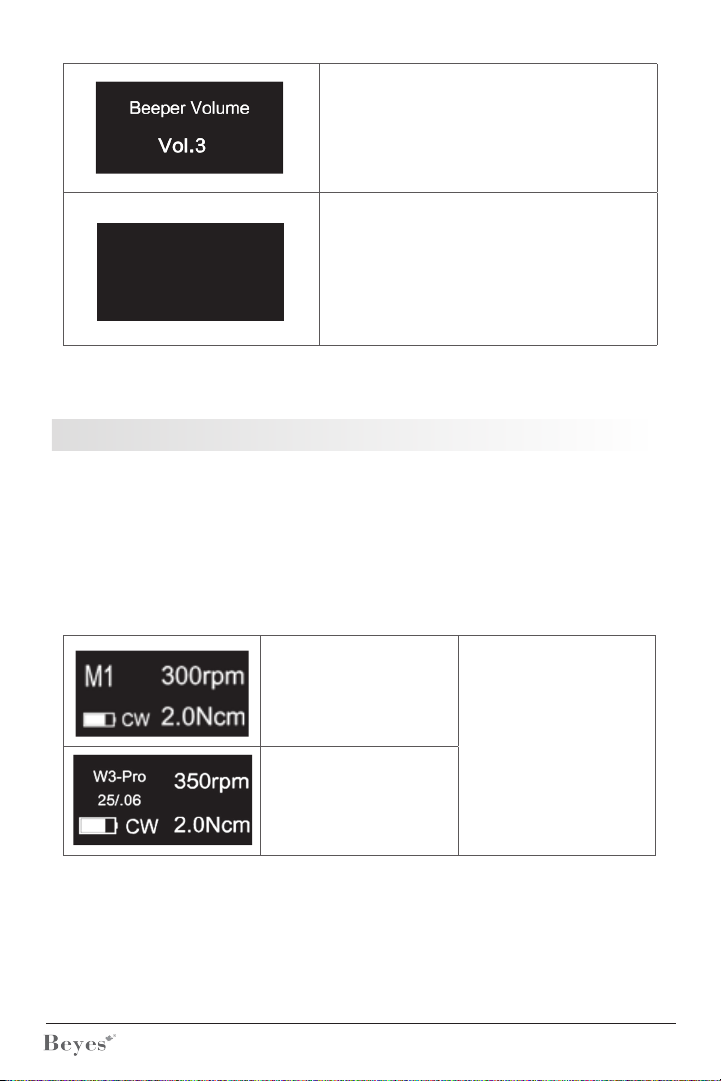
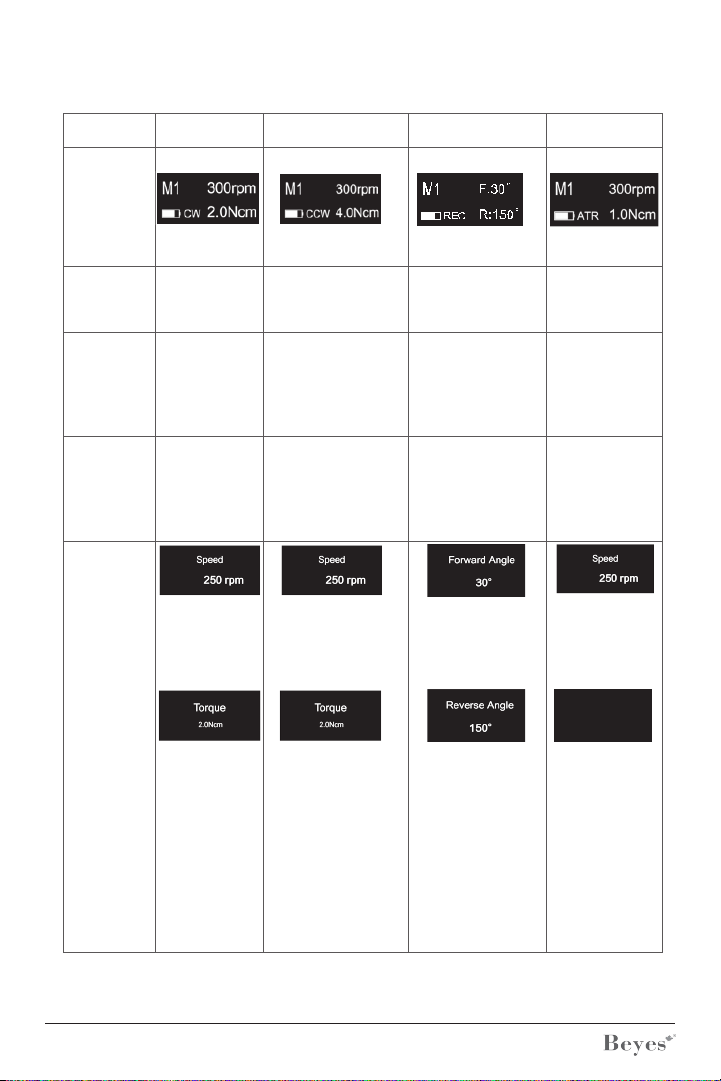
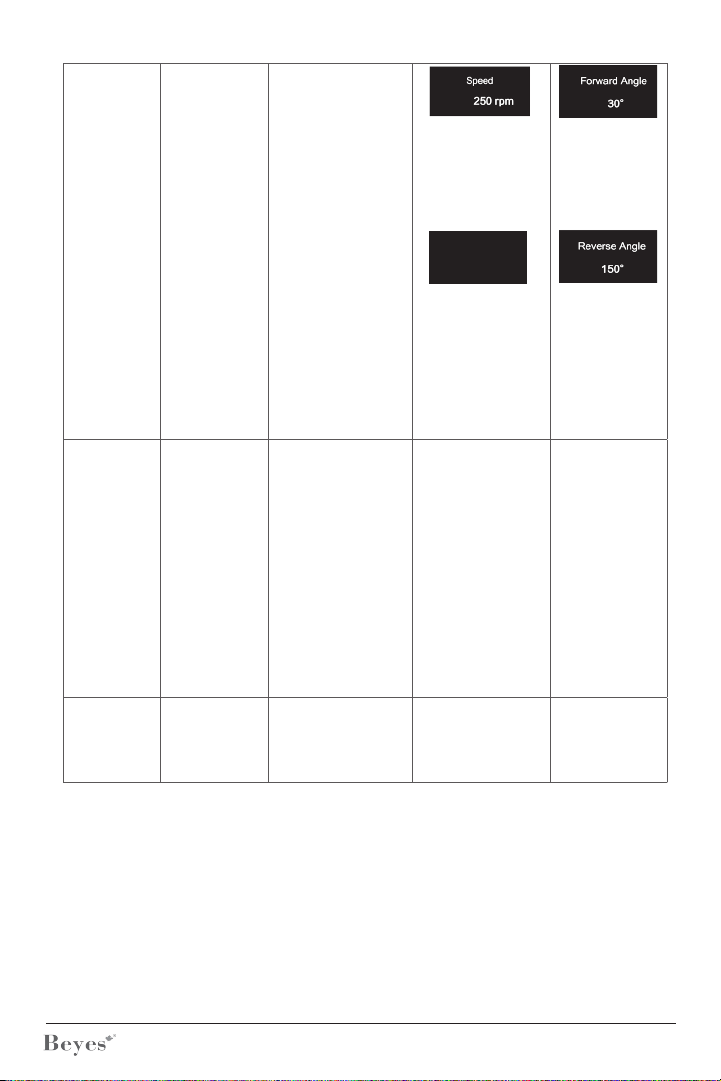
Cordless Endo Motor
Instruction for Use

2
Note: The description on reciprocating mode is only applicable for the
device that has reciprocating mode.
1. Introduction
1.1 Features
• Use of brushless motor - low noise and long lifetime
• Cordless
• Contra angle with 360° rotation
• Built-inleparameters
• 15 memory setting
• Auto apical reverse/stop
• Large LCD display
• Connectable to Accurator A2, apex locator
1.2 Intended use
1.2.1 This device can be used for preparation and enlargement of root canals.
1.2.2 This device should only be operated by licensed dental professionals
ApexPilot G2 is mainly used for Endodontic treatments. It can be used as an endo
motor for preparation and enlargement of root canals.
1.3 Contraindication
• Patient or doctor with a pacemaker
• Patient with hemophilia
• Patient with heart disease
• Pregnant women or young
Table of Contents
1. Introduction.......................................................................................... 2
2. Warning and Safety............................................................................. 4
3. Installation ........................................................................................... 5
4. Operation............................................................................................. 7
5. Screen Display .................................................................................... 11
6. Automatic Reverse Function ............................................................... 14
7. Apex Locator ....................................................................................... 15
8. Troubleshooting................................................................................... 20
9. Cleaning, Disinfection and Sterilization ............................................... 20
10. Storage, maintenance and transportation ......................................... 22
11. Environmental Protection .................................................................. 23
12. Signs.................................................................................................. 23
13. Statement .......................................................................................... 24
14. Beyes Limited Warranty Statement................................................... 24
15.TechnicalSpecication...................................................................... 26
16. EMC-Declaration of conformity.......................................................... 27

3
1.4 Package includes
Motor handpiece Contra angle
Charging base Nozzle Power adapter
• O-ring
• Silicon cover
• Mini 8P cable
• Instruction manual
Diagram of components and control buttons

4
2. Warning and safety
Warning
• First read this instruction manual before operating this device
• This device should only be operated by licensed dental professionals
• Do not directly or indirectly place this device near heat source.
• Operate and store this device in reliable environment.
• This device requires special precautions regarding electromagnetic compatibility
(EMC) and must be in strict accordance with the EMC information for installation
anduse.Donotusethisequipmentespeciallyinthevicinityofuorescentlamps,
radio transmitting devices, remote control devices, handheld and mobile high-
frequency communication devices.
• Extended time use of Reciprocating Mode may result in motor overheat
• Use the original contra angle
• Do not make any changes to the device. Any changes may violate safety
regulations, causing harm to the patient
• Use original power adapter. Other power adapter will result in damage to lithium
battery and control circuit.
• The motor handpiece cannot be autoclaved. Use disinfectant of neutral pH value
or ethyl alcohol to wipe its surface.
• Do not remove contra angle before motor stops. It would cause damage to
handpiece and contra angle.
• Securethelebeforestarting
• Settorqueandspeedaspertherecommendedspecicationsofle
manufacturer.
• Follow instruction in this manual to replace battery and only replace with original
lithium battery.
• Remove battery from the handpiece before long-term storage
• Do not touch handpiece or charging base for more than 10 sec during charging.
Heat builds up while charging.
Safety
• Donotusedeviceinthepresenceofaammableanestheticmixturewithair,
oxygen, or nitrous oxide.
• Do not continuously use contra angle with patient longer than 10 minutes. The
temperature of contra angle may reach 46.6°C. Allow time to cool down before
further use.

5
3. Installation
3.1 Battery
Handpiece has built-in lithium battery. Battery charges wirelessly through the base.
• Plug in power adapter and connect it to the charging base
• Seat handpiece on the charging base
• Bluelightwillbeashingwhiledeviceischarging
• Blue light will stay on when fully charged
3.2 Contra angle
• The contra angle adopts precision gear transmission, and the transmission ratio
is 6:1.
• CleananddisinfectwithdisinfectantofneutralPHvaluebeforetherstuse.
• Clean and disinfect after each patient use
• Sterilize under 134°C, 2.0~2.3bar (0.20~0.23MPa).
• ContraangleinpackageonlytsApexPilotG2.Itdoesnottotherhandpieces.
Installation of contra angle
• Align any locating pin of the contra
angle with the positioning slot on the
motor handpiece and push in the
contra angle horizontally.
• The three locating pins on the
contra angle are inserted into the
three positioning slots on the motor
handpiece.
• A “click” sound indicates that the
installation is in place.
• The contra angle can be rotated 360°
freely.
Removal of contra angle
Pull out the contra angle horizontally when the motor handpiece is turned off.
Warning
After installation, give the contra angle a light tug to make sure that it is securely
attached before starting motor.
Stop the motor before plugging in or pulling out the contra angle.

6
3.3 File
Installationofle
1.Insertleintothechuck
2. Push button
3.Rotateletotthelatchgrooveandslipin
4.Releasepushbuttontolockle
5.Pullletoensuresecurity
Note:
OnlyuseleswithshanksthatmeettheISOstandard.(ISOstandard:Ø2.334–
2.350 mm)
Warning
Insertandremovelewithoutholdingthepushbuttonmaydamagethechuckof
contra angle.
Removal of le
1. Press and hold the push button
2.Pulloutthele
Warning
•Stopmotorbeforepluggingandpullingoutthele.
•Removingleswithoutholdingthepushbuttonwilldamagethechuckofcontra
angle.
•Usecautionwheninsertingandremovinglestoavoidinjurytongers

7
4. Operation
Press Main to turn on device to
Standby screen
Warning:
In custom setting, all parameters
shouldfollowthelerequirementfor
proper operation.
Press Main to start motor
Operating screen
Motor runs with set speed and torque
Moving bars from bottom up shows the
letorque.
Press Main to stop motor
Standby screen
Hold “P” and press Main to turn off
device
4.1 Start and stop operation

8
Standby screen
Press “+”/”-“ to change screen among
M0-9
Press “P” to show operating mode and
available parameter.
Operating Mode
Blinking is the current mode and ready
to change
Press “+”/”-“ to change among
CW, CCW, REC, ATR
Press “P” to show available parameters
for selected mode
Or press Main to exit to accept the
mode without changing the parameters
Parameter 1
Blinking is the current setting Press
“+”/”-“ to change number
(Press and hold “+”/”-“ speed up the
number changing)
Number reaching highest goes back to
lowest. Vice versa.
Press “P” to accept and go to the next
available parameter
Or press Main to accept and exit
without going to next parameter
Parameter 2
Blinking is the current setting Press
“+”/”-“ to change number
(Press and hold “+”/”-“ speed up the
number changing)
Number reaching highest goes back to
lowest. Vice versa.
Press “P” to accept and go to the next
available parameter
If no more available parameter, the
screen goes back to mode screen.
Steps can be repeated.
Press Main to accept and exit without
going to next parameter
4.2 Store setting on M0-9
M0-M9 is a memory program to store Operation mode and associated parameter.

9
Standby screen
Press “+”/”-“ to change screen passing
M0 or M9
Thescreenshowslenameandsize
instead of M0-9
Keep pressing “+”/”-“ to show 5 storage
locations.
Select the location to make change
Pressandhold“P”toenterlelist
File list
Press“+”/”-“toscrollandselectthele
Press “P” to show list of pre-set
parameters
Or press Main to accept and exit
without selecting parameters
Pre-set parameters
Press“+”/“-“toscrollandselectle
size
Press “P” to accept and back to File
lists
Or press Main to accept and back to
standby
Standby screen
Parametersissettoledefault
parameter
Warning:
Changing the default parameter for
selectedleisnotrecommended.
In the case that any parameter is
changed, press and hold “P” to repeat
stepstore-selectthele.
4.3 Store setting with build-in le system

10
4.4 Set handpiece functions
Turn off device
Hold “P” and press Main to enter function setting
Software version (unchangeable)
Screen show Auto Power Off in 2 sec
Auto Power Off
Press “+”/”-“ to change between 3 to 30 min
Press “P” to accept and go to next setting
or Press Main to accept and exit
Auto Standby Scr
Press “+”/”-“ to change between 3 to 30 min
Press “P” to accept and go to next setting
or Press Main to accept and exit
Dominant Hand
Press “+”/”-“ to switch between Left and Right
Press “P” to accept and go to next setting
or Press Main to accept and exit
Calibration
Note:
Calibration should be performed when
replacing contra angle
Press “+”/”-“ to switch between ON and OFF
Pluginoriginalcontraanglewithoutle.
Warning:
Use original contra angle only.
Any load applied to contra angle will be
offset. And calibration will not be correct.
Press “P” to accept and go to next setting
or Press Main to accept and exit
If set ON, calibration will be performed when
exiting. And setting will then switch back to
OFF.

11
Beeper Volume
Press “+”/”-“ to change volume between 0
(mute) and 3 (loudest)
Press “P” to accept and go to next setting
or Press Main to accept and exit
Restore Defaults
Press “+”/”-“ to switch between ON and OFF
Press “P” to accept and go to next setting
or Press Main to accept and exit
If set ON, screen show OK and device reset
to factory setting and setting will then switch
back to OFF.
Restore Defaults
OFF
Location M0-9 battery level
operating mode
displayed setting
displayed setting
Locationwithlename
and size
5. Screen display
5.1 Standby Screens
There are a total of 15 standby screens.
Press “P” to select different standby screen: M0-9 and another 5 with no
designation.
Standby screen M0-9, setting can be changed based on operating mode and
parameters.
StandbyscreenafterM9,additional5standbyscreensshowssettingsbasedonle
system.

12
CW CCW REC ATR
Mode Clockwise Counterclockwise Reciprocating Adaptive
Torque
Reverse
Motor
direction
Clockwise
only
Counterclockwise
only
Clockwise and
counterclockwise
with set angle
Clockwise
If torque
exceed
set limit,
reciprocating
Applied
le
Rotary Special
injectcalcium
hydroxide and
other solutions
Reciprocating
path rotary
Reciprocating
Displayed
setting
Speed:
rpm
100–1200
@step50
Torque:
Ncm
0.4 0.6 0.8
1.0 1.2 1.5
1.8
2.0 2.2 2.4
2.5 2.8
3.0 3.5
4.0 4.5
5.0
Speed:
rpm
100–1200
@step50
Torque:
Ncm
Forward angle:
Fº
20-400
@step10
Reverse angle:
Rº
20-400
@step10
Speed:
rpm
100–500
@step50
Trigger
Torque:
Ncm
0.4 0.6 0.8
1.0 1.2 1.5
1.8
2.0 2.2 2.4
2.5 2.8
3.0 3.5
4.0
5.2 Mode setting screen
There are 4 operation modes.
Trigger Torque
2.0Ncm

13
Setting
Speed:
rpm
100-500
@step50
Torque limit:
Ncm
2.0 2.2 2.4 2.5
2.8
3.0 3.5
4.0 4.5
5.0
Forward
angle:
F º
60-400
@step10
Reverse
angle:
Rº
(default 90 º ,
<= F º)
20-400
@step10
Note Forinjecting
calcium hydroxide
and other
medicant
Recommend the
difference
between
F.angle and
R.angle
at least 120 º
if F.angle
> R.angle,
effective cutting
angle on
Forward angle
Vice versa
Reverse
angle cannot
be set larger
than Forward
angle
Continuous
double beeping
during motor
running
Torque limit:
2.0Ncm

14
5.3 File setting screen
5.4 Operating Screen
Standby screen File list Default le size
When motor is running,
screen will show the set
speed and set torque. The
moving bars indicate the
actualtorqueonthele
during operation.
Listofavailablelefor
selection
Listoflesizefor
selectedle.
Parameters are pre-set
6. Automatic Reverse Function
Automatic reverse is only available in CW mode.
During operation, the motor is in clockwise rotation.
Iftheloadatleexceedsthepresettorque,motorwillautomaticallyreverseto
counterclockwise.
Motor will resume clockwise rotation when torque is below preset torque.
Load < preset torque
Clockwise
Load > preset torque
Counterclockwise
Load < preset torque
Clockwise resume
Warning:
In low battery, motor cannot execute automatic reverse. It is advised that the
handpiece should always be charged.
If automatic reverse is triggered frequently in the same operation, motor will overload
and stop. If this occurs, please turn off device and allow motor to cool down.

15
Connect A2 and G2 with USB cable
from package
ApexPilot G2 shows connected when
Accurator A2 is on and connected.
Disconnected
Plugtheliphookintothewhitejack
Touchthehookwiththeleinthe
contra angle
Accurator A2 alarm goes off
ApexPilot G2 screen shows AP and
barsllingfromtoptobottom
7. Apex Locator
ApexPilot G2 can be connected to Beyes Accurator A2, apex locator. During
operation,aslereachescanalnerve,apexlocatoralarmwillgooffandG2can
stoporreversemotoraccordingtodenedsetting.
Connecting to Accurator A2
Test connection

16
Canal length indicator bar shows
progression towards the apex.
Aslereachestheapicalforamen,the
indicator will show full bars and “00”.
Note: Indicator and number do not
representtheactuallengththelefrom
the apical foramen
Operation
When working with Accurator A2, ApexPilot G2 motor will respond differently
according to the setting.
Apical Action
OFF–motorstayssameoperating
mode
Reverse–motorturnsCCW
Stop–motorstops
Auto Start
Motor initially stops
When apex alarm goes off, motor starts
according to operating mode
Auto Stop
When apex alarm goes off and turns
off, motor stop in 1 sec.
This function only works when Auto
Start is ON
Apical Action
OFF
Apical Action
Reverse
Auto Start
ON
Auto Stop
ON
Apical Action
Stop
Auto Start
OFF
Auto Stop
OFF

17
Apical Slow Down
Motor speed slow down when apex
alarm goes off
Apical Slow Down
OFF
Apical Slow Down
ON
Table shows G2 responses to apex alarm for different mode and settings.
Mode Aprical
Action
Auto
Start
Auto
Stop
Apical
Slow
Dwn
Motor Status
Initial Apex alarm
on
Apex alarm
off
CW
OFF
* * CW CW CW
* * √CW
low speed
CW
√
Stop
CW CW
√ √ CW
low speed
CW
√ √ √ CW CW
stop in 1 sec
√ √ √ CW
low speed
CW
stop in 1 sec
Reverse
* *
CW
CCW double
beeping
CW
* * √CCW double
beeping
low speed
CW
√
Stop
CCW double
beeping
CW
√ √ CCW double
beeping
CW
stop in 1 sec
√ √ CCW double
beeping
low speed
CW
CW
stop in 1 sec
√ √ √ CCW double
beeping
low speed
CW
stop in 1 sec

18
CW Stop
* * * CW stop CW
√*
Stop
stop CW
√ √ * stop CW
stop in 1 sec
CCW CCW
CCW double
beeping
CCW
√CCW double
beeping
low speed
CCW
REC
OFF
* * REC REC REC
√
Stop
REC REC
√ √ REC REC
stop in 1 sec
Reverse
* * REC CCW
double
beeping
REC
√
Stop
CCW
double
beeping
REC
√ √ CCW
double
beeping
REC
stop in 1 sec
Stop
* * REC Stop REC
√
Stop
Stop REC
√ √ Stop REC
stop in 1 sec

19
ATR
OFF
* * ATR ATR ATR
√
Stop
ATR ATR
√ √ ATR ATR
stop in 1 sec
Reverse
* * ATR CCW double
beeping
ATR
√
Stop
CCW double
beeping
ATR
√ √ CCW double
beeping
ATR
stop in 1 sec
Stop
* * ATR Stop ATR
√
Stop
Stop ATR
√ √ Stop ATR
stop in 1 sec
√on (Blank) off * on/off

20
8. Troubleshooting
Failure Possible cause Solutions
Continuous beeping
after starting the motor
handpiece
The continuous beeping
indicates that the motor
handpiece is under CCW
mode.
Stop the motor
handpiece and change
the operating mode to
CW Mode.
Contra angle calibration
failure
Calibration failure caused
by strong resistance of
contra angle
Clean the contra angle,
and recalibrate after
lubricating
Motor handpiece heating Extended usage of
Reciprocating Motion
Mode
Stop usage and wait
until temperature of
handpiece cools down
The time of endurance
becomes shorter after
charging
Battery capacity is
reduced
Please contact
local distributor or
manufacturer
No sound Beeper Volume set to 0.
Vol.0: Mute.
Set Beeper Volume to
1,2,3.
The continuously rotating
leisstuckattheroot
canal
Incorrectspecication
setting.
Theloadtorqueofleis
too high.
Choose CCW Mode,
start the motor
handpiece, and take the
leout.
9. Cleaning, Disinfection and Sterilization
9.1 Foreword
For hygiene and sanitary safety purposes, the contra angle must be cleaned,
disinfected and sterilized before each usage to prevent any contamination. This
concernstherstuse,aswellasallsubsequentuses.
9.2 General recommendations
6.1.1Useonlyadisinfectingsolutionwhichisapprovedforitsefcacy(VAH/
DGHM-listing, CE marking, FDA and Health Canada approval) and in accordance
with the DFU of the disinfecting solution manufacturer.
6.2.3 Do not place the contra angle in a disinfectant solution or in an ultrasonic
bath.
6.2.4 Do not use chloride detergent materials.
6.2.5 Do not use bleach or chloride disinfectant materials.
6.2.6 For your own safety, please wear personal protective equipment (gloves,
glasses, mask).
Table of contents
Other BEYES Dental Equipment manuals

BEYES
BEYES APEXPILOT ALL-IN-ONE User manual

BEYES
BEYES Comfort-Sonic P6 Plus User manual

BEYES
BEYES Accurator A2 User manual

BEYES
BEYES AirLight M800 User manual

BEYES
BEYES Maxso High Speed M200 User manual

BEYES
BEYES Comfortek User manual

BEYES
BEYES GPRO P1 User manual

BEYES
BEYES Maxso X200 User manual

BEYES
BEYES AirLight M800 User manual

BEYES
BEYES Maxso X99 Series User manual
Popular Dental Equipment manuals by other brands

Dexcowin
Dexcowin iRay D3 Quick start instructions

KaVo
KaVo ORTHOPANTOMOGRAPH OP 3D user manual

Elements
Elements SybronEndo Instructions & guidelines

StarDental
StarDental DentalEZ 430 Series manual

Renfert
Renfert SYMPRO 65000450 Important operating instructions

Dabi Atlante
Dabi Atlante COBRA CONTRA ANGLE Series owner's manual