Bio-Tek OM-1000 User manual

Please read this manual carefully before starting operation.
Dissolved Ozone Monitor
Owner’s Manual
www.biotek-ozone.com
distributor
OM-1000
table of contents
introduction
external features
LCD display
button functions
assembly instructions
operation instructions
maintenance
concentration setting
safety precautions
trouble shooting
technical information
product specifications
1
1
2
3
4
4
5-8
9
9
10
10
11-13
14
141
Thank you for purchasing our powerful ozone monitor. This instrument measures the
concentration of ozone in water. The ozone monitor is easy to use and displays test
readings fast.
specifications
specifications
Product Dissolved Ozone Monitor
Model No. OM-1000
9V battery*1
25 mW
0 - 6.0 ppm
10oC-35oC
10oC-30oC
0 - 1.0 ppm:±0.2 ppm
1.0 - 6.0 ppm:±20%
Voltage
Power consumption
Power
Concentration measurement range
Ambient air temperature range
Ozonated water temperature range
Accuracy
OM -1000
Table of contents
Introducon
introducon
installaon
service
operaon
technical
informaon
professional dissolved ozone monitor
professional dissolved ozone monitor
OM-1000
213
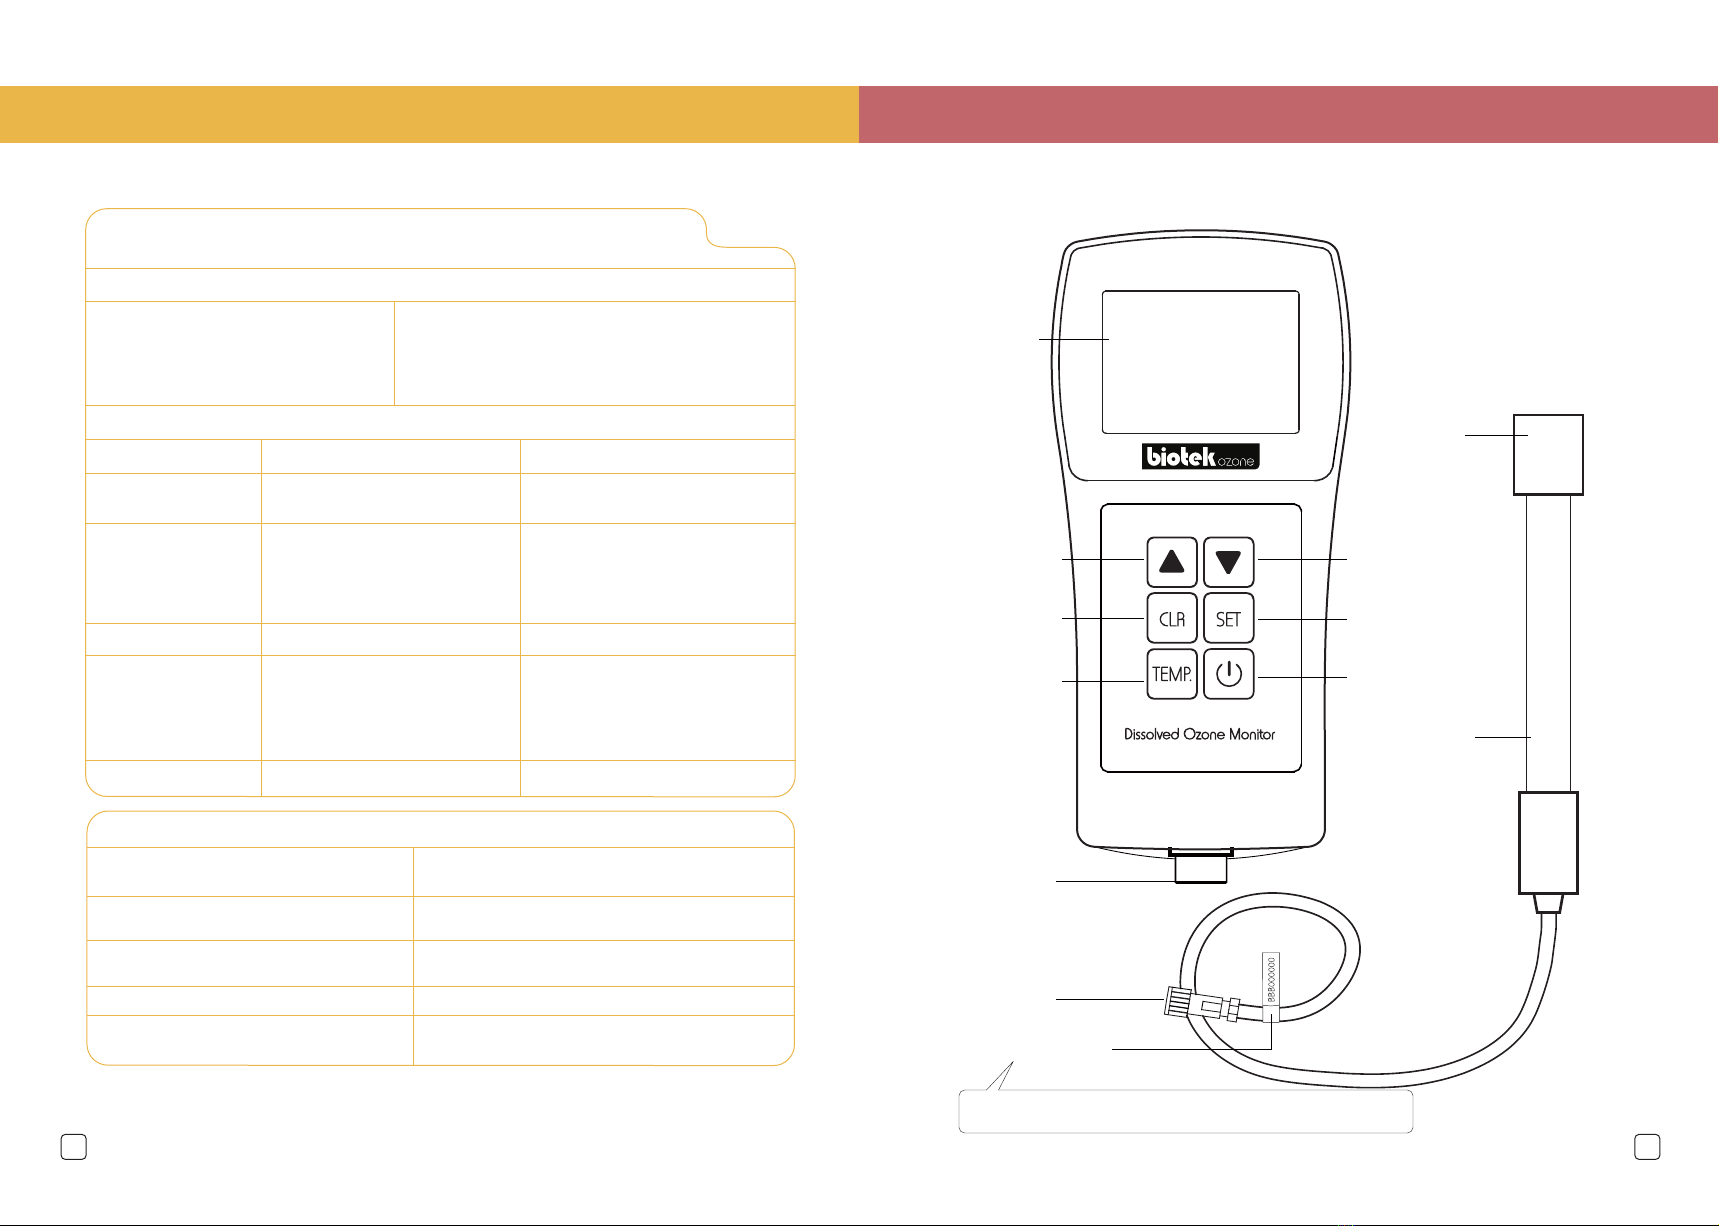
Plug
Serial number label
Sensor
Protector
LCD Display
Socket
Temperature Power On/Off
Upwards
Clear
Downwards
Set
external features
external features
exposure control /personal protecon
technical information
technical information
Engineering Controls Ozone equipment should be operated
with an ozone off-gas destruct process.
Ventilation Ozone off gas should be collected and
destroyed prior to release.
Handling Not applicable
Respiratory Respirator or self-contained breathing apparatus
for concentrations greater than 0.1ppm.
Storage Ozone gas cannot be stored. Ambient ozone
gas monitors should be used for detection.
Note
: Both serial number on the monitor and sensor
must match in order to ensure accurate data reading.
material safety data sheet for ozone gas (cont.)
health hazard data (cont.)
emergency first aid
symptom /prevenonexposure first aid
Effects of Single Overexposure
Emergency
Overview
Ensure adequate ventilation in
the area where ozone is present.
Remove from the presence of air
containing ozone.
Inhalation Irritating to respiratory
system. Cough, headache,
shortness of breath.
/ Ventilation.
Remove from the presence of air
containing ozone.
Administer oxygen if necessary.
If breathing is difficult or discomfort
persists, obtain medical attention.
Eyes Irritating to eyes.
/ Ventilation. Face shield
or eye protection with
breathing protection.
Remove from the presence of air
containing ozone.
Rinse with water for several
minutes and seek medical
attention if necessary.
Ingestion Not an expected route of entry.
Skin Not an expected route of entry.
May cause irritation of the respiratory tract experi-
enced as nasal discomfort, dryness, irritation of the
throat, pain or congestion of the chest, difficult
breathing or coughing. Irritation of the eyes,
headache, nausea and drowsiness may also occur.

123
LCD display
LCD display
Battery Alarm
Clean Icon
(illuminates if sensor
needs to be cleaned)
Concentration Mode
Temperature Mode
Digit Display
Concentration
Setting
The water temperature will be displayed in the temperature mode (°C is
illuminated). Unit of measurement is either degrees Celsius or Fahrenheit.
The ozone concentration in water will be displayed as ppm in the concentration
mode (ppm is illuminated).
The numerical values of the test readings are shown in the digit display.
Users will be reminded to replace batteries by a blinking light when the voltage
gets low in order to ensure accuracy of test readings.
Concentration Setting: set before testing
Cleaning warning: After a total measurement time of more than three hours, the
“clean” icon will illuminate, alarming the user that the sensor needs to be
thoroughly cleaned according to the steps described in “Maintenance” on page 8.
1
2
3
4
5
6
technical information
technical information
material safety data sheet for ozone gas (cont.)
fire and explosion hazard (cont.)
reacvity data
health hazard data
Extinguishing Media Use extinguishing media appropriate for
the fuel source.
Special Fire Fighting Procedures Use self-contained breathing apparatus.
Ozone is an oxidizer.
Unusual Fire and Explosion Hazards Ozone can react explosively with readily
oxidizable substances and reducing agents.
Stability Unstable. Decomposes to form oxygen under
ordinary conditions thus is not encountered
except in the immediate area where it is formed.
Reactivity Reacts with any materials that can oxidize.
Reactions with some materials such as alkenes,
ether and other compounds are highly unstable
and explosive.
Hazardous Decomposition None. Ozone decomposes rapidly to oxygen (O2).
Conditions to Avoid Do not concentrate to high levels(>17%/wt.).
The decomposition of ozone at high
concentrations can become explosive.
Incompatibility Avoid contact with materials that can oxidize.
Incompatibility The Occupational Safety and Health
Administration (OSHA) requires that workers
not be exposed to an average concentration
of more than 0.10 ppm (of ozone gas) for 8 hours.
The shorttermexposure limit of 15-minutes is
0.30 ppm.
Primary Route of Entry Pulmonary system

411
button functions
assembly instructions
To turn the power on and off. After turn on the system, it will automatically turn off
every 10 minutes.
Common Mode: Increase range
Memory Mode: Update the test result number
Query Mode: Query the test result
Common Mode: Reduce range
Memory Mode: Update the test result number
Query Mode: Query the test result
Press to enter the Temperature Mode, which will display the water temperature.
CLR Waring: Cancel the cleaning warning
The test result memory is full: Clean the memory
For choosing the appropriate mode: Press the SET button one time on the common
mode into the appropriate mode. Press the SET button a second time to return to
the common mode.
Memory Mode: Press the set button for 2 seconds under the common mode.
Quit:Press the set button under the memory mode or query mode.
technical information
Match the two red points on
both socket and plug parts,
connect them tightly.
Open the back of the monitor
and insert a 9 Volt battery.
Close the monitor shell.
9V
( When replacing the battery, use
one hand to hold the snap connector
and the other to carefully remove the
battery. Do NOT pull on the wire as
this may loosen connections.)

Trouble shoong
Issue Cause Soluon
Start up failure.
Device does not power on.
Button defective or
misplaced
Reading is 0 ppm
regardless of actual
concentration
Reading seems too low,
actual concentration
suspected to be higher
Battery is low
Water getsinto keyset
1.Battery voltage low
2.Sensor needs to
be cleaned
Plug not correctly
connected to socket
1.Change battery
2.Clean sensor as
described on page 8
Replace battery.
*When replacing the battery,
use one hand to hold the snap
connector and the other to
carefully remove the battery.
Do NOT pull on the wire as this
may loosen connections.
Switch off monitor
immediately, place it in good
ventilation while keeping the
upper part higher (To avoid
water during usage)
Check the connection
of cable plug with socket
When the ozone concentration in water is suspected to lie between 0 to 2 ppm, the test
steps are as follows: (If the actual concentration is higher than 2 ppm, the monitor will
indicate this by showing “EPP” on the display. If “EPP” is shown for at least 3 seconds, follow
the measurement steps described on page 6)
Prepare a clean beaker that can hold at least 1000 ml with a diameter of about 8 cm.
(Do not use the small beaker provided with the monitor, it is for fluid level measuring
only). Fill the beaker with ozonated water, remove the protector from the sensor and
immerse 5 cm of the sensor.
Press the "ON / OFF" button.
Press the "TEMP." button to display the water temperature (the default display unit is ℃,
press the “down” key ▼ to switch to ℉). At this important step the monitor will take the
water temperature into account for the ozone concentration measurement.
Wait about 60 seconds, until the temperature display does not change any more, then
press "TEMP." button again to go back to the concentration mode.
If the monitor has not been used for more than one day, leave the sensor in the beaker
with ozonated water for another 2 minutes and press the "ON / OFF" button.
Alternatively, rinse the sensor with ozonated water for 2 minutes and press the "ON /
OFF" button. (This step 5) can be omitted if the monitor has been used within 24 hours)
Press the "SET" button.
Press the arrow keys until the numerical value displayed next to the small cup at the
bottom left of the display (Concentration Setting) shows 0.
Press the "SET" button again to exit.
Once again, fill the 400 ml beaker up with fresh ozonated water.
Completely submerge the sensor in the fresh ozonated water and rapidly shake the
sensor back and forth 5 cm (six to eight times per second) without letting it touch the
beaker wall. Make sure that the sensor is submerged at least 2 cm at all times. The
concentration will be shown on the display.
Leave the sensor inside the beaker until the display shows a concentration of 0. Do not
move on to 12) before the display is 0.
Repeat steps 9), 10), and 11) to do a second measurement.
Repeat steps 9), 10), and 11) to do a third measurement. Read the display for about 15
seconds while shaking the sensor as described in 10). The greatest value shown on the
display during the third measurement is the ozone concentration reading in parts per
million (ppm). (Note: Ignore the readings shown during the two previous measurements).
Press the "ON / OFF" button, remove the sensor from the beaker, put the protector on,
and put the equipment back into the case.
1
2
3
4
5
6
7
8
9
10
11
12
13
14
Common test mode

69
operation instructions
operation instructions
Prepare a clean beaker of at least 1000 ml with a diameter of about 8 cm and put
200 ml tap water inside.
Add 200 ml ozonated water into the beaker.
Measure the water temperature of the mixture by pressing the "TEMP." button. Then
pour the beaker content away.
Press the "SET" button.
Press the arrow keys ▲ ▼ until the numerical value displayed next to the small cup at
the bottom left of the display (Concentration Setting) shows 1.
Press the "SET" button again to exit.
Once again, first put 200 ml tap water into the beaker and then add 200 ml ozonated
water.
Completely submerge the sensor in the fresh ozonated water and rapidly shake the
sensor back and forth 5 cm (six to eight times per second) without letting it touch the
beaker wall. Make sure that the sensor is submerged more than 2 cm at all times. The
concentration will be shown on the display.
Leave the sensor inside the beaker until the display shows a concentration of 0.
If the LCD display shows "EPP" for more than three seconds during step 8) or 9), then
the ozone concentration is above 4.0 ppm.
If no "EPP" is shown, pour the beaker content away and test a second time according
to steps 7), 8), and 9) above. Then, test a third time according to steps 7), 8), and 9)
and take the maximum reading of the third test as measurement result. Then, Press the
"ON / OFF" button, remove the sensor from the beaker, put the protector on, and put
the equipment back into the case.
If display shows "EPP" for more than three seconds, pour the beaker content away and
put 400 ml tap water into the clean beaker. Then, add 200 ml ozonated water. Measure
the water temperature of the mixture by pressing the "TEMP." button. Then pour the
beaker content away. Press the "SET" button. Press the arrow keys until the numerical
value displayed next to the small cup at the bottom left of the display (Concentration
Setting) shows 2. Press the "SET" button again to exit. First put 400 ml tap water into
the beaker and then add 200 ml ozonated water. Completely submerge the sensor in
the fresh ozonated water and rapidly shake the sensor back and forth 5 cm (six to eight
times per second) without letting it touch the beaker wall. Make sure that the sensor is
submerged more than 2 cm at all times. The concentration will be shown on the display.
Leave the sensor inside the beaker until the display shows a concentration of 0. Accord-
ing to the above-mentioned steps, do test 2 times more .Take the maximum reading of
the third test as the final test result. Press the "ON / OFF" button, remove the sensor
from the beaker, put the protector on, and put the equipment back into the case.
1
2
3
4
5
6
7
8
9
10
11
Recommended Cleaning Procedure:
Follow method 1 when “clean” is prompted for the first time. Follow method 2
when “clean” is prompted for the second time. Redo the process for subsequent
cleanings.
If method 1 cannot be carried out, an alternative
method 2 may be used: Use the small blade provided
with the monitor to carefully scrape the two golden
electrodes at the bottom of the sensor as pictured on
the left. Scrape upwards, away from the sensor.
Scrape each electrode from 4 different sides. Scrape
each side 2-3 times.
Clean the sensor with tap water and put the protector
back on.
Pour 30 ml of fresh 36% acetic acid (CH3COOH) in a
clean 100 ml beaker. Remove the protector from the
sensor and immerse the bottom of the sensor as
pictured on the left. Leave the sensor immersed for 12
hours. Make sure that the temperature of the acetic
acid is above 16oC.
Clean the sensor with tap water and put the protector
back on.
Method 1:
Method 2:
100
80
60
40
20
Concentraon Seng
When the ozone concentration in water is suspected to be more than 2 ppm, the test
steps are as follows:
Prepare a clean 200 ml beaker with a diameter of about 7 cm. (Do not use the small
beaker provided with the monitor, it is for fluid level measuring only). Fill the beaker with
ozonated water, remove the protector from the sensor and immerse 5 cm of the sensor.
Press the "ON / OFF" button.
Press the "TEMP." button to display the water temperature (the default display unit is ℃,
press the “down” key ▼ to switch to ℉). At this important step the monitor will take the
water temperature into account for the ozone concentration measurement.
Wait about 60 seconds, until the temperature display does not change any more, then
press "TEMP." button again to go back to the concentration mode.
If the monitor has not been used for more than one day, leave the sensor in the beaker
with ozonated water for another 2 minutes and press the "ON / OFF" button. Alterna-
tively, rinse the sensor with ozonated water for 2 minutes and press the "ON / OFF"
button. (This step 5 can be omitted if the monitor has been used within 24 hours)
Press the "SET" button for 2 seconds under the common mode.
Press the arrow keys until the numerical value displayed next to the small cup at the
bottom left of the display (Concentration Setting) shows 0.
Press the "SET" button again to exit.
Once again, fill the 200 ml beaker up with fresh ozonated water.
Completely submerge the sensor in the fresh ozonated water and rapidly shake the
sensor back and forth 5 cm (six to eight times per second) without letting it touch the
beaker wall. Make sure that the sensor is submerged at least 2 cm at all times. The
concentration will be shown on the display.
Leave the sensor inside the beaker until the display shows a concentration of 0. Do not
move on to 12) before the display is 0.
Repeat steps 9), 10), and 11) to do a second measurement.
Repeat steps 9), 10), and 11) to do a third measurement. Read the display for about 15
seconds while shaking the sensor as described in.
The greatest value shown on the display during the third measurement is the ozone
concentration reading in parts per million (ppm). At the same time press the " ▼ " button
to memory the test result.(Note: Ignore the readings shown during the two previous
measurements).
After testing press the "set "button again to quit the memory mode.
Press the "ON / OFF" button, remove the sensor from the beaker, put the protector on,
and put the equipment back into the case.
1
2
3
4
5
6
7
8
9
10
11
12
13
14
15
16
When the ozone concentration in water is suspected to lie between 0 to 2 ppm, the
test steps are as follows: (If the actual concentration is higher than 2 ppm, the monitor
will indicate this by showing “EPP” on the display. If “EPP” is shown for at least 3
seconds, follow the measurement steps described on page 8)
Prepare a clean 300 ml beaker with a diameter of about 8 cm and put 100 ml tap water
inside.
Add 100 ml ozonated water into the beaker.
Measure the water temperature of the mixture by pressing the "TEMP." button. Then
pour the beaker content away.
Press the "SET" button.
Press the arrow keys "▲""▼"until the numerical value displayed next to the small cup at
the bottom left of the display (Concentration Setting) shows 1.
Press the "SET" button again to exit.
Press the "set" button for 2 seconds.
Once again, first put 100 ml tap water into the beaker and then add 100 ml ozonated
water.
Completely submerge the sensor in the fresh ozonated water and rapidly shake the
sensor back and forth 5 cm (six to eight times per second) without letting it touch the
beaker wall. Make sure that the sensor is submerged more than 2 cm at all times. The
concentration will be shown on the display.
Leave the sensor inside the beaker until the display shows a concentration of 0.
If the LCD display shows "EPP" for more than three seconds during step 9) or 10), then
the ozone concentration is above 4 ppm.
If no "EPP" is shown, pour the beaker content away and test a second time according
to steps 8), 9), and 10) above. Then, test a third time according to steps 8), 9), and 10)
and take the maximum reading of the third test as measurement result. Then, Press the
"ON / OFF" button, remove the sensor from the beaker, put the protector on, and put
the equipment back into the case.
If display shows "EPP" for more than three seconds, pour the beaker content away and
put 200 ml tap water into the clean beaker. Then, add 100 ml ozonated water. Measure
the water temperature of the mixture by pressing the "TEMP." button. Then pour the
beaker content away. Press the "SET" button. Press the arrow keys until the numerical
value displayed next to the small cup at the bottom left of the display (Concentration
Setting) shows 2. Press the "SET" button again to exit. First put 200 ml tap water into
the beaker and then add 100 ml ozonated water. Completely submerge the sensor in
the fresh ozonated water and rapidly shake the sensor back and forth 5 cm (six to eight
times per second) without letting it touch the beaker wall. Make sure that the sensor is
submerged more than 2 cm at all times. The concentration will be shown on the display.
Leave the sensor inside the beaker until the display shows a concentration of 0. Accord-
ing to the above-mentioned steps, do test 2 times more .Take the maximum reading of
the third test as the final test result.
After testing press the "set "button again to quit the memory mode.
Press the "ON / OFF" button, remove the sensor from the beaker, put the protector on,
and put the equipment back into the case.
1
2
3
4
5
6
7
8
9
10
11
12
13
Under common mode ,press "▲" or "▼" to display the last test result.
Press "▲" to show the test result
Press "▼" to show the test result
Press "set" to quit the query mode
1
2
3
4
Query test result:
Memory test mode
When the ozone concentration in water is suspected to be more than 2 ppm, or when
“EPP” is shown on the display for at least 3 seconds, the test steps are as follows:
Table of contents
Other Bio-Tek Laboratory Equipment manuals

Bio-Tek
Bio-Tek MultiFlo FX User manual

Bio-Tek
Bio-Tek 405 TS User manual

Bio-Tek
Bio-Tek Synergy HT User manual

Bio-Tek
Bio-Tek ELx50 User manual

Bio-Tek
Bio-Tek Epoch 2 User manual

Bio-Tek
Bio-Tek Synergy HTX User manual

Bio-Tek
Bio-Tek ELx800 User manual

Bio-Tek
Bio-Tek Synergy H1 User manual

Bio-Tek
Bio-Tek ELx808 User manual

Bio-Tek
Bio-Tek Epoch User manual


