Biobase BKMZB User manual

Table-Top Autoclave
BKMZB
User Manual
BIOBASE GROUP
Version 2021.02

1
Preface
Thank you for choosing our autoclave, please read the operation manual carefully before using it.
Safety Tips:
This sign indicates internal earthing protection of the machine.
Scald-proof
This sign can be seen after opening the door.
Important safety tip
This prompts the operator this part is the important safety information.
Security considerations:
Please read the safety warnings and precautions provided in this user guide to ensure that you use
the autoclave safely. If you do not follow the instructions provided in the manual, the protection
offered by the equipment may be damaged.
1. Use a separate protective earthing power socket of three holes 220V/10A, and make sure the
protective earthing terminal to a reliable connection.
2. Insert the autoclave power plug completely into the power socket, and do not use the power other
than those specified.
3. Do not use wet hands to pull the plug.
4. Do not damage, modify, stretch, or excessively bend or twist the power cord, but also do not put
heavy objects on the power cord.
5. Do not place the autoclave on an unstable table, such as a shaky table, ramps or the will-shake
position.
6. Do not block or cover the autoclave door, air vents,or heat-sink window.
7. Do not put anything on the autoclave.
8. If you find autoclave is smelly or unusual noisy in the using process, immediately turn off the
power. Then please contact your local dealer or our sales and service department
9. If the autoclave is not to be used for a period of time, the power cord plug should be power off
and remove the battery of the main board.
10. Do not place the autoclave near the heat source.
11. The LCD screen may work unstably if there is interference in the power grid when the equipment
is in use. The operator can equip it with a voltage regulator in order to solve the above problems.
12. Autoclave package (or product) must be accompanied by chemical indicator.
13. Autoclave is not suitable for sealing liquid, the product that is not resistant to high temperature
and high pressure.
14. Users should confirm the local altitude when using for the first time. If the altitude is more than
200 meters, the highland setting should be modified. Detailed operation please check the 6.3.2

2
Content
Preface.................................................................................................................................................... 1
Content................................................................................................................................................... 2
1.Introduction......................................................................................................................................... 1
2.Technical parameters...........................................................................................................................2
3.Package................................................................................................................................................3
4.Installation........................................................................................................................................... 4
5.Operation............................................................................................................................................. 5
5.1 Preparation......................................................................................................................................5
5.1.1 Open the door............................................................................................................................ 5
5.1.2 Connect the power ...................................................................................................................5
5.1.3 Turn on the power......................................................................................................................5
5.1.4 Adding distilled water............................................................................................................... 6
5.2 Preparation of the equipment......................................................................................................... 6
5.3 Sterilization procedure choice........................................................................................................ 6
5.3.1 Interface display........................................................................................................................ 6
5.3.2 TEMP Button.............................................................................................................................7
5.3.3 PROGRAM Button................................................................................................................... 7
5.3.4 START/STOP Button................................................................................................................ 7
5.3.5 choosing program...................................................................................................................... 7
5.4 Program operation.......................................................................................................................... 7
5.4.1 Close the door............................................................................................................................7
5.4.2 Start the sterilization process.....................................................................................................7
5.4.3 Sterilization finished..................................................................................................................8
5.5.4 Drain Valve................................................................................................................................9
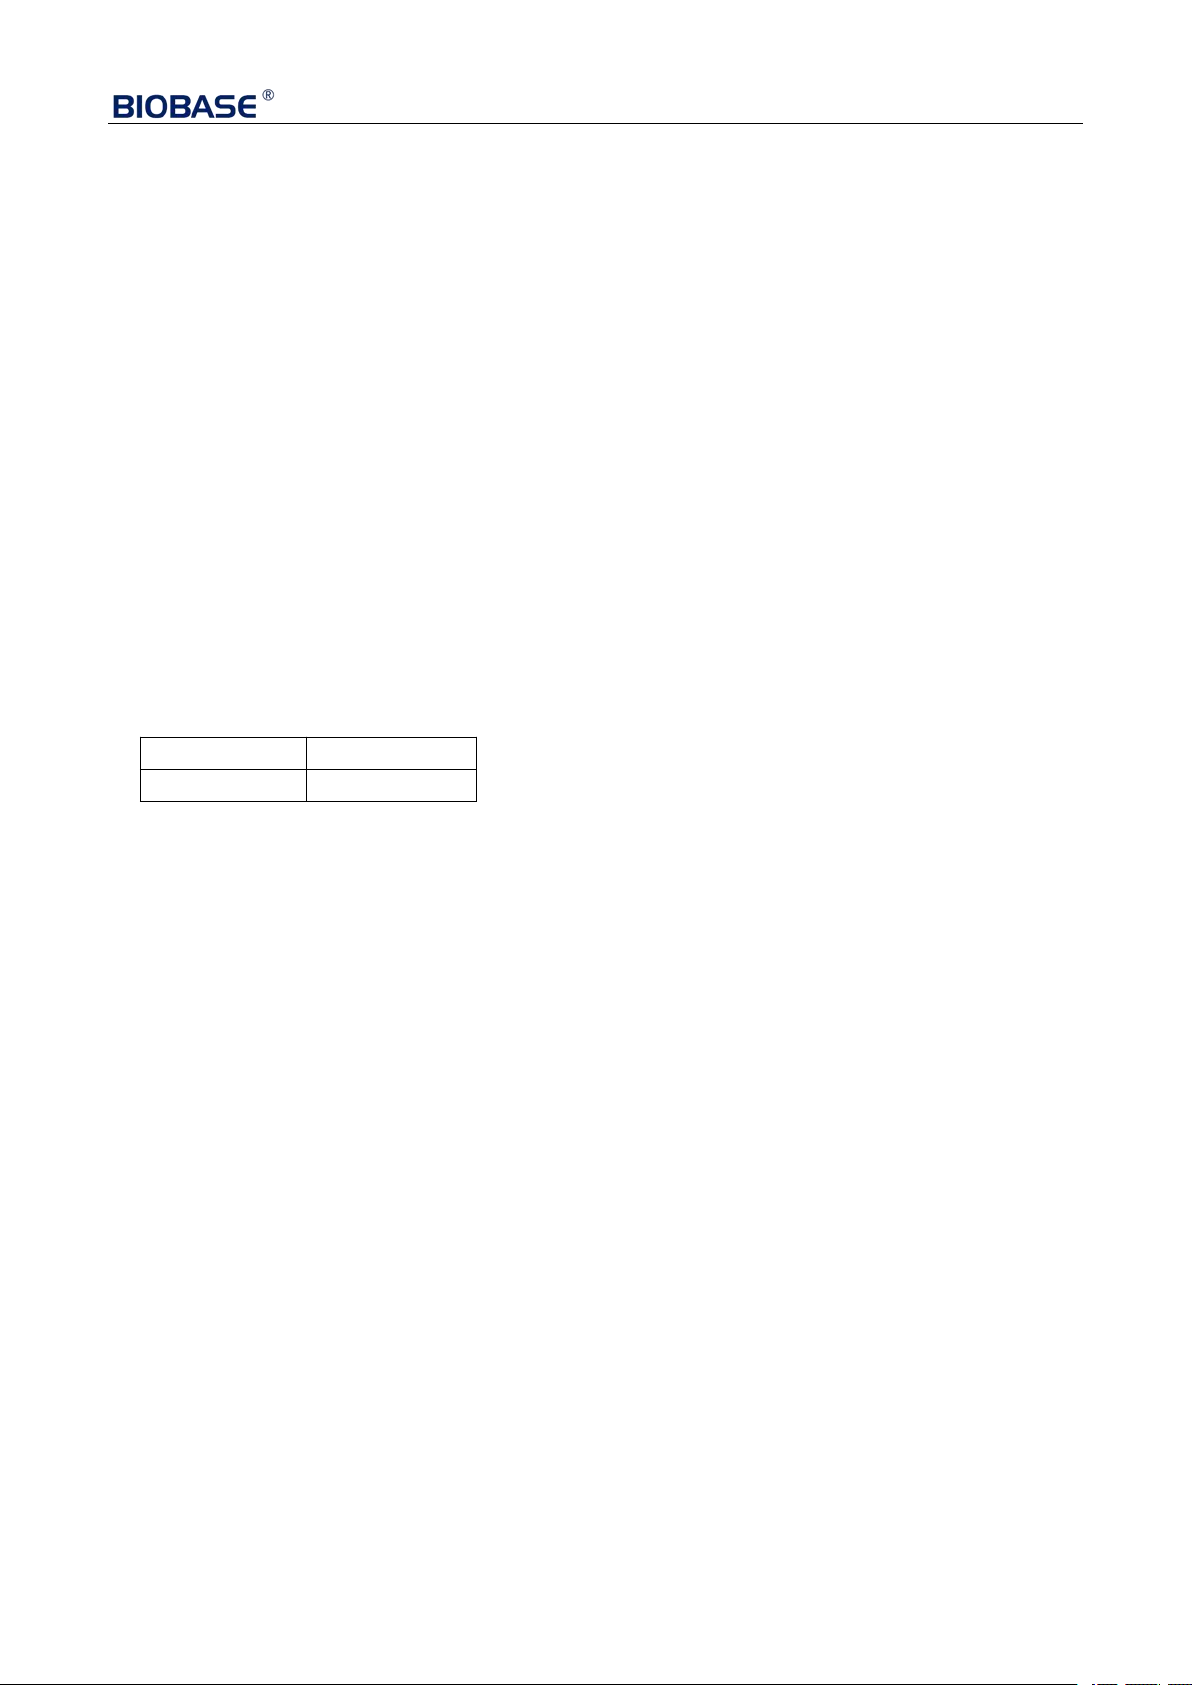
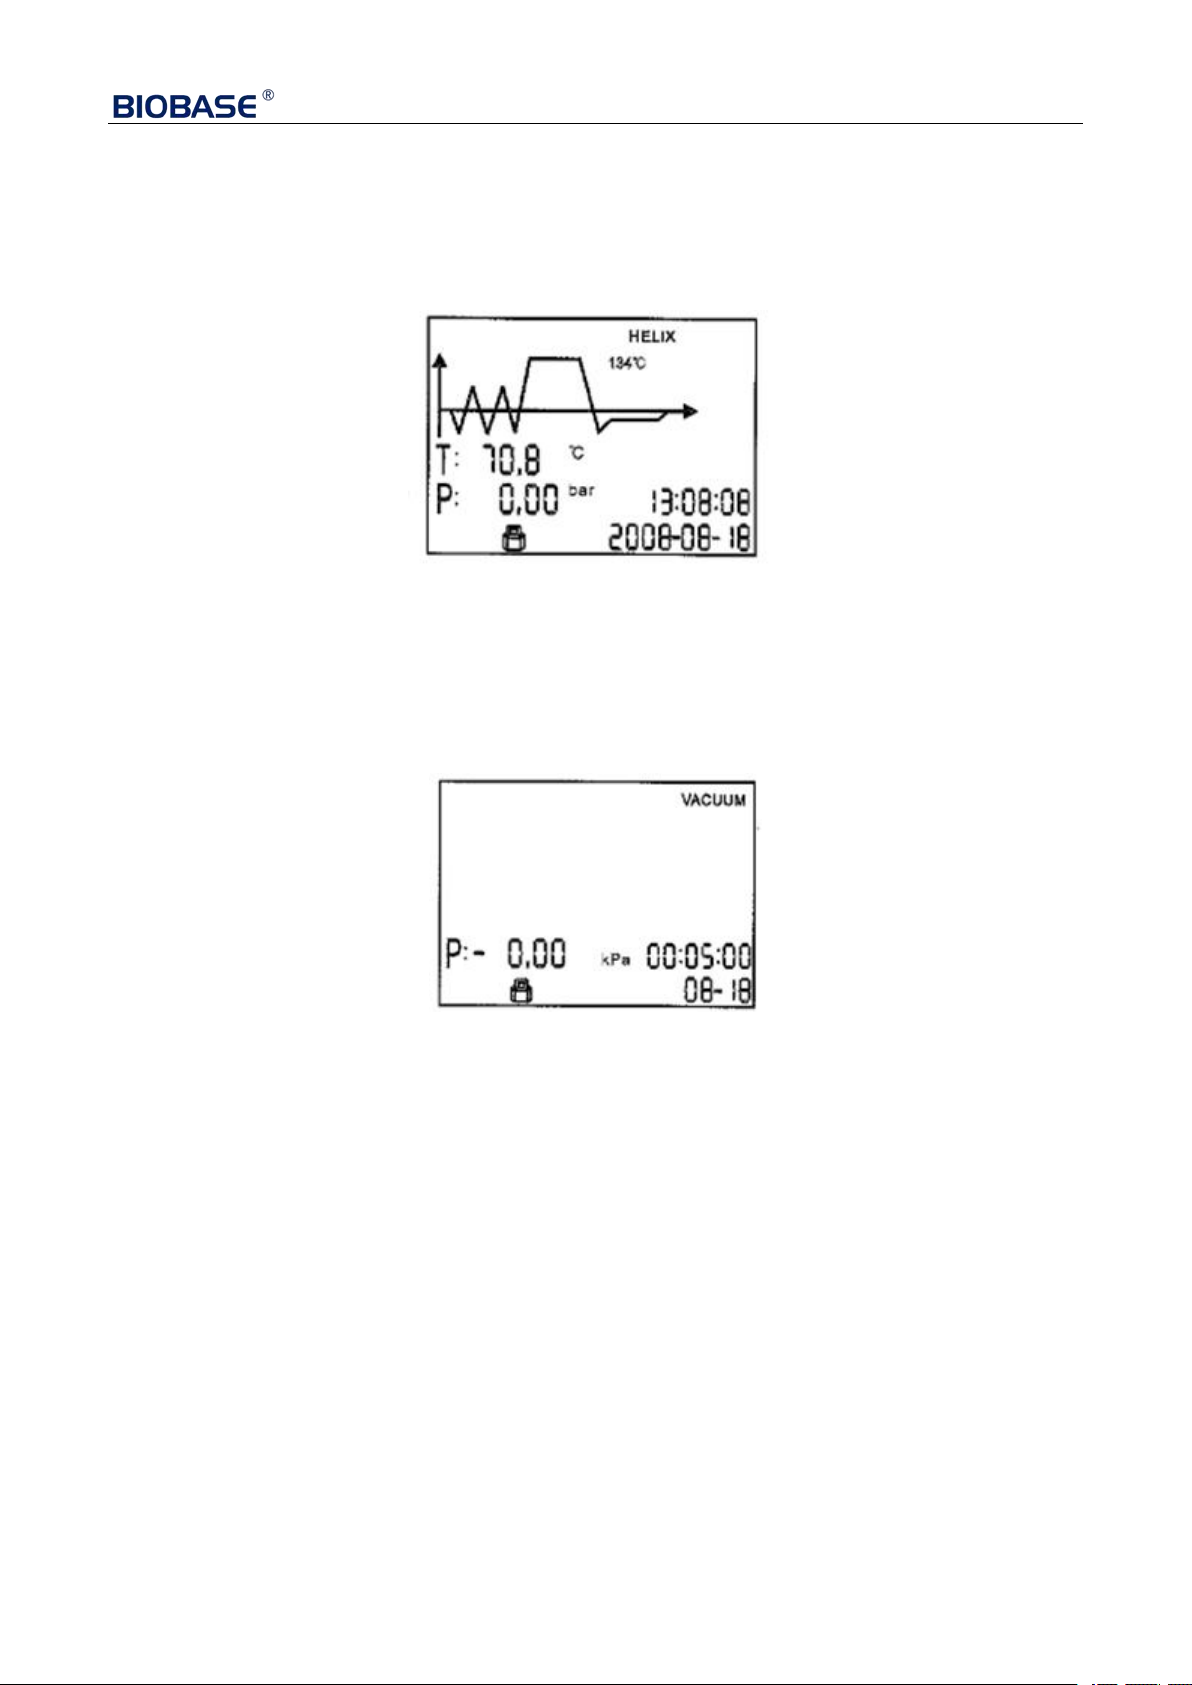
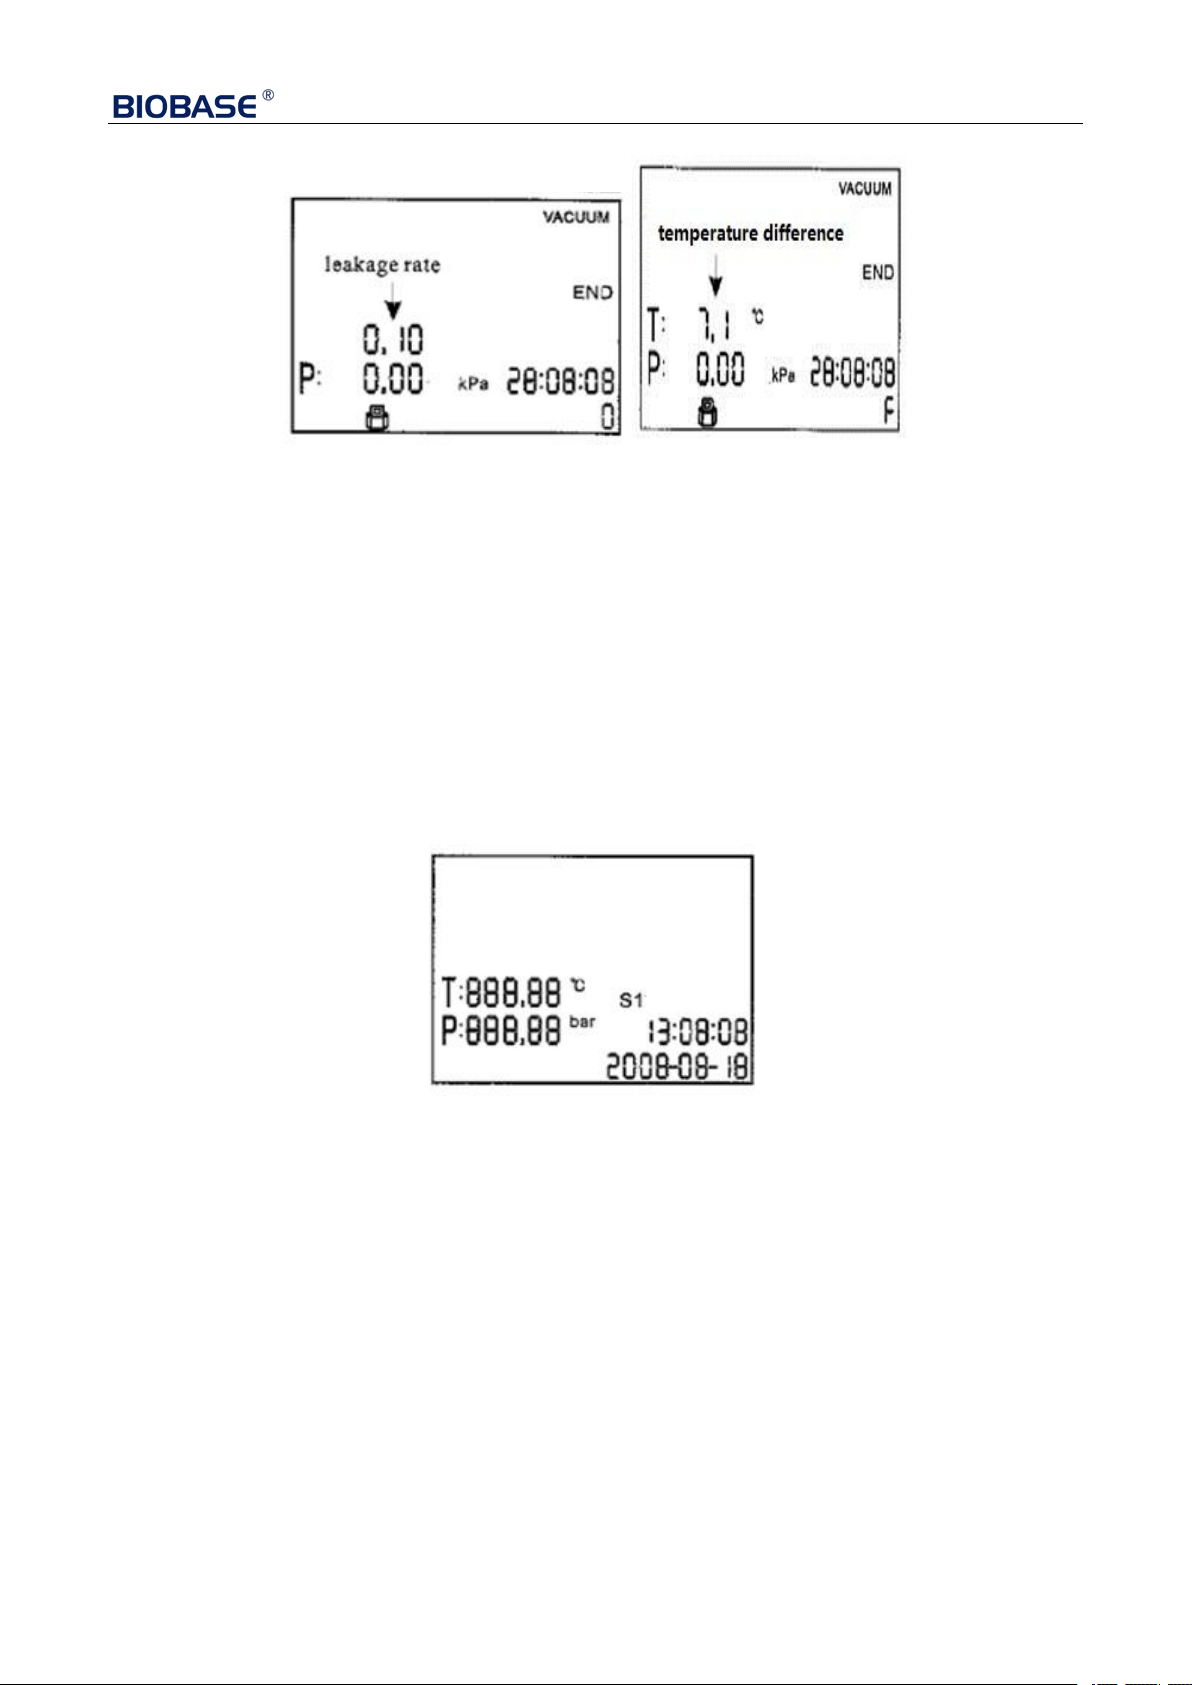
5.5 Test Program...................................................................................................................................9
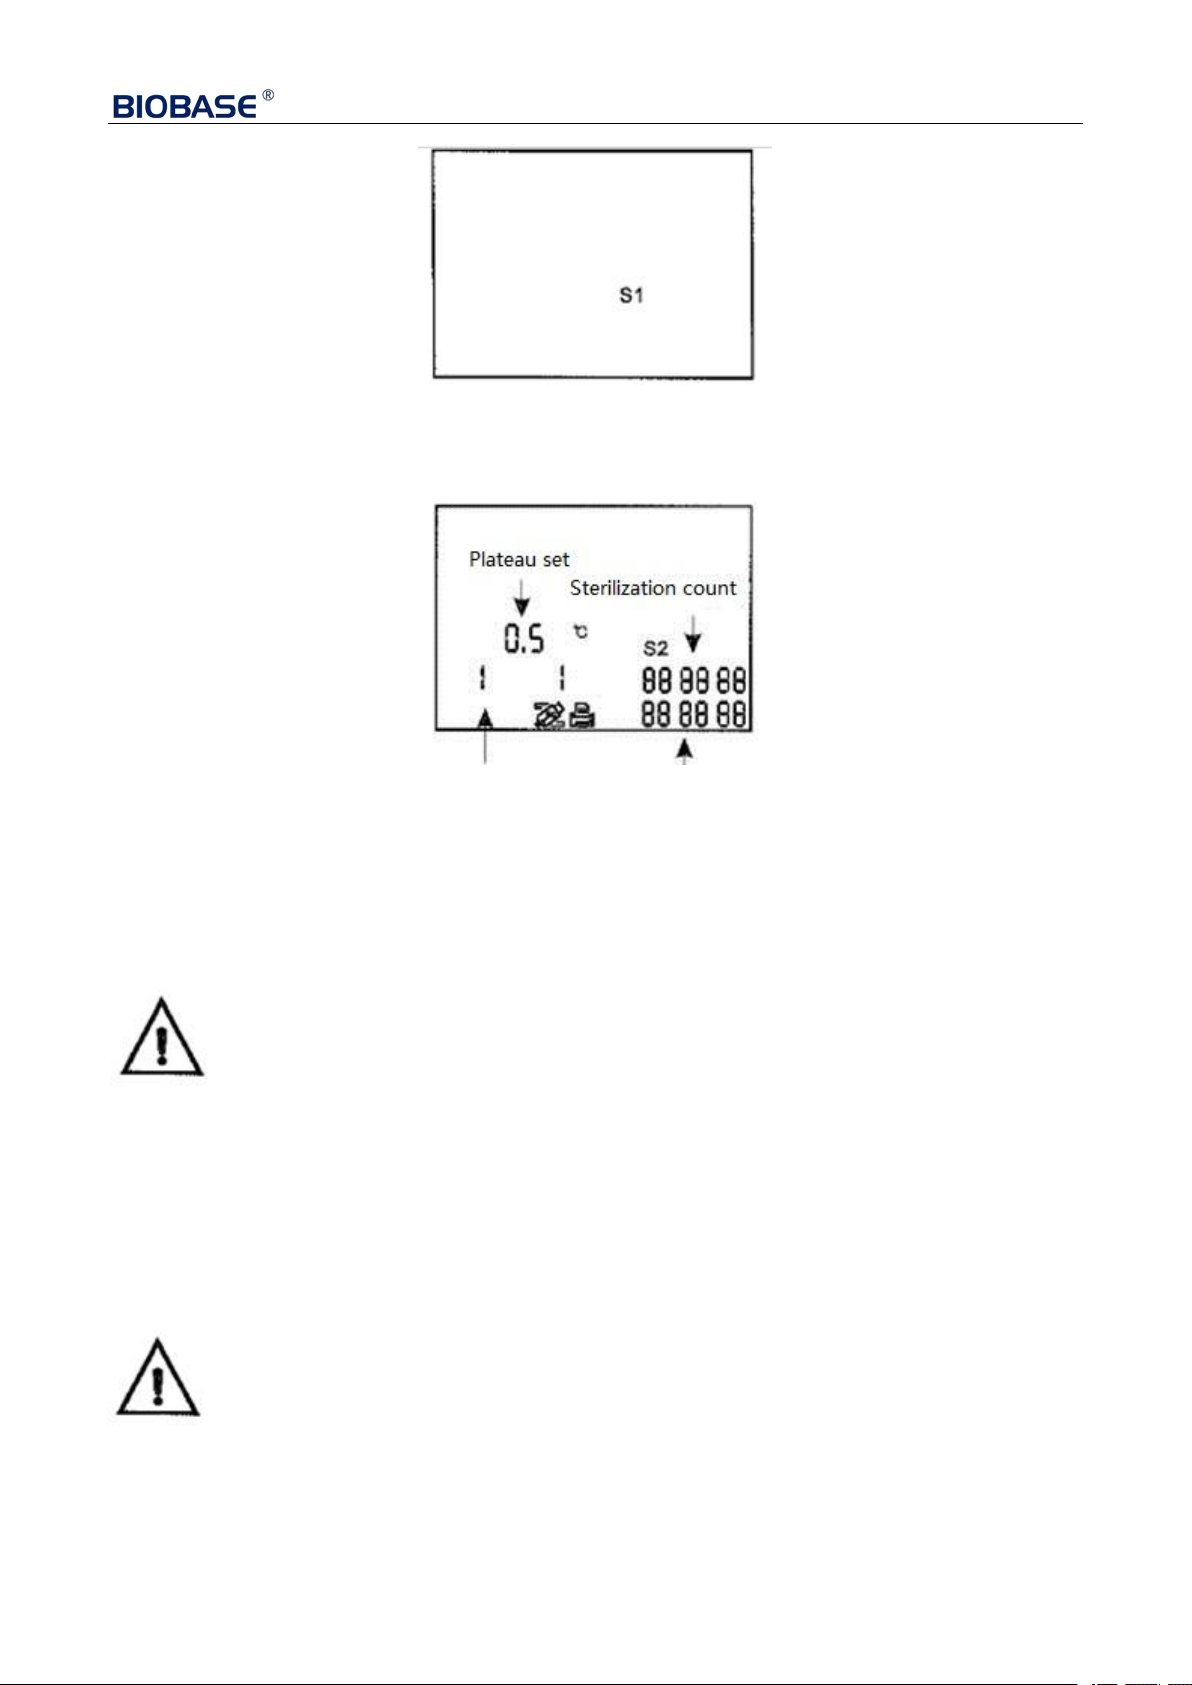
6. Advanced Settings............................................................................................................................ 11
6.1 Enter setup interface..................................................................................................................... 11
6.2 S1 State.........................................................................................................................................11

3
6.3 S2 State.........................................................................................................................................12
6.4 S3 state......................................................................................................................................... 13
6.5 S4 State.........................................................................................................................................13
6.6 Printer(Optional)..................................................................................................................... 13
6.7 USB Port.......................................................................................................................................15
7.Maintenance...................................................................................................................................... 16
7.1 Cleaning the distilled water reservoir...........................................................................................16
7.2 Cleaning inner chamber................................................................................................................16
7.3 Changing air filter........................................................................................................................ 16
7.4 Cleaning door gasket and the mating surface...............................................................................17
7.5 Changing door gasket...................................................................................................................17
7.6 Replacing Fuse............................................................................................................................. 18
8.Transportation and Storage................................................................................................................19
9. Alarm................................................................................................................................................ 20
10.Safety Device.................................................................................................................................. 21
Appendix I............................................................................................................................................22
Appendix II...........................................................................................................................................23
Appendix III......................................................................................................................................... 29
Appendix IV.........................................................................................................................................30
Appendix V.......................................................................................................................................... 31
Appendix VI......................................................................................................................................... 32

1
1.Introduction
This sterilizer is composed of control panel, sterilization chamber, sealing door.
In the sterilization process, the temp. error is 0~3℃ between Max temp. and preset temp. The timing
error should be less than 10% of the preset value.The sterilizer has 121 or 134℃set program.
This sterilizer has good sealing effect, the sterilization effect is accord with the standard 4.15 terms.
The electrical safety performance should be accord with the requirements of the registration product
standard appendix H & J.
The pressure volume is accord with the national standard GB 150 requirements.
Accord with the registration standards of BKM series small steam sterilizer.
Classify
By anti electric shock type: I equipment
Equipment is not AP or APG type
By running pattern: continuous operation
Application range
It is mainly used in medical institution where users need to sterilize various surgical instruments,
dressings, glassware, and injection equipment.
Note: make sure the sterilizer is well grounded when using
Model
BKMZB
Capacity(L)
23

2
2.Technical parameters
(1) Chamber Size: Φ247mm×470mm
(2) Power: AC220V±10% 50/60Hz
(3) Consumption: 1950VA
(4) Sterilization Temp: 121℃/134℃
(5) Power Fuse: F10A/250V
(6) Water Consumption: 0.16L~0.18L in one cycle
(7) Ambient Temp.: 5~40℃
(8) External Size (W*H*D): 700x495x410mm
(9) Net Weight: 53Kg
(10) Noise: <60dB
Use Environment
(11) Relative Humidity: Max 80%, no condensation
(12) Atmospheric Pressure: 76Kpa-106kpa
1. Distilled water tank 2. LCD screen 3. Button panel 4. Printer
5. USB data hole 6. Power switch 7. Distilled water outlet 8. Door handle
9. Condensate tank drain 10. Air filter 11. Safety valve 12.Power socket
13. Insurance tube 14. Condenser 15. Label

3
3.Package
Number
Name
Quantity
1
BKMZB Autoclave
1
2
Instrument tray
3
3
Instrument rack
1
4
Instrument tray disk folder
1
5
Drain(Each 60cm)
1
6
User manual
1
7
Fuse(F10A/AC250V)
1
8
Solenoid Fuse(F3A/AC250V)
1
9
Board Fuse(F1A/AC250V)
1
10
Door seals
1

4
4.Installation
* The autoclave must be placed in a horizontal work surface
* Leave at least 10cm around the autoclave, at the top of at least 30cm, around maintain good
ventilation
* Don’t cover the sterilizer doors or vents, don’t place near the source of radiation
* Don’t put in the liquid splashing place
* Don’t be near any heat source

5
5.Operation
5.1 Preparation
5.1.1 Open the door
When the first time use, remove the instrument tray,instrument rack and other accessories from the
chamber, then remove the packaging.
5.1.2 Connect the power
Insert one end of the wire in the power socket and connect the other end to the socket on the back of
the autoclave
Note:The power supply outlet must be reliably grounded,connecting wires must be
reliable and secure.
5.1.3 Turn on the power
Press the power switch, after power is connected, LCD will show.
The system will display the position of the door, the water level, the current program, date, time,etc.
If the system self-test found the problem, the alarm will be issued.
Picture description
Sterilization Procedure
Alarm code
Running curve
Temp.
Set code
Pressure Time
Date

6
Flashing indicates water tank lack water
Flashing indicates water tank exceeds the max level
Flashing indicates condensate water tank exceeds the max level
Twinkling shows door unlocked, constant lighting shows door locked
Constant lighting indicates the output function of USB is working
Constant lighting indicates the print function is working
5.1.4 Adding distilled water
Removing the water storage cover of autoclave from its top as shown, you can directly pour water
into it as you can see water storage. When reach the highest water level, Will twinkle with
beep. Please stop adding water.
Attention: water level should not over the vents of water storage.
5.2 Preparation of the equipment
In order to get a better effect of sterilization and protect sterilization items, please operate as follows:
1、make sure that different mental instrument puts on different mechanical disk, or isolate them
totally.
2、You’d better to insert sterilization paper and medical cotton between instruments and mechanical
disk in order to avoid being touch directly, if the material is not stainless steel.
3、Ensure every instrument get sufficient space
4、Containers like glass cup and tube etc should put down or invert for avoiding water
accumulation.
5、Every mechanical disk is not supposed to overload(please find in appendix)
6、Do not fold up mechanical disk for using, or place it directly in the cavity of the sterilizer
7、Please use handheld instrument every time you fetch instrument
8、Every instruments should be packed independently, if several devices must be packed in a bag
9、Each package bag to be sealed
10、Ensure that sterilization with the paper side up, the plastic side down
Please try to sterilize after using sterilized package for extending storage time
5.3 Sterilization procedure choice
5.3.1 Interface display
Interface displays real-time temperature, pressure Sterilization status,
time, and The alarm code.

7
5.3.2 TEMP Button
Choose the temperature of sterilization
5.3.3 PROGRAM Button
Choose the program of sterilization
5.3.4 START/STOP Button
Using this button to start sterilization procedure, if push this button in 3second, you can terminate the
program. Pushing this button in 10 seconds after trouble solved can delete the display of wrong
equipment information.
5.3.5 choosing program
Pushing TEMP button to choose the temperature of sterilization, and PROGRAM button for
choosing the way the sterilization. The procedure can be seen in appendix 2.
Solid instrument
Packaging instrument
Fabric
Enhanced sterilization
B&D B&D TEST
HELIX HELIX TEST
VACUUM VANCUUM TEST
5.4 Program operation
Put items need to be sterilized into the cavity of sterilizer, please use handheld instrument
5.4.1 Close the door
Close the door after items is in, then revolving door handle clockwise to the maximum position
ATTENTION: Door handle must be to the right of the maximum position, otherwise the
door may be opened and the emergence of the door is forced to open
5.4.2 Start the sterilization process
The sterilizer will start to work automatically when start button pushed.
Total time is about 15-60minutes(please find in appendix 2)

8
Hereby display total Time for
sterilization, When entering the
sterilization holding time or the
drying process, display the
countdown
Attention: when the door is not closed to its right position, will twinkle, at this time, the
starting program won’t work although starting button is pushed.
5.4.3 Sterilization finished
At the end of a sterilization, program will display END. If you are already connected to the printer,
then the printer will print sterilization information. When the screen displays the pressure to "0", you
can open the sterilizer door and remove sterilized items.
Make sure to use a handheld instrument tray gripping items from being burned.

9
5.5.4 Drain Valve
Waste
Water Tank
joints
Water
Tank joints
Note: Ensure that the drainage pipe at the lowest position of the equipment when draining,
otherwise the water tank will not drain the water
5.5 Test Program
5.5.1 Press PROGRAM key,choose“B&D”test program.
5.5.1.1 put ”B&D”test paper into the chamber of autoclave
5.5.1.2 Start the program and start working, at the end, check the test paper to see whether reached
sterilization.
1、Insert the drain plug
into the drain connector
2、After the drain plug is inserted, turn the
drain connector counterclockwise and the
water is automatically discharged.
3、After the drainage, turn the drain joint
clockwise to seal the drain.

10
5.5.2 Choose HELIX test program
5.5.2.1 put HELIX test paper into HELIX test tube。
5.5.2.2 Put HELIX test tube into the chamber of autoclave,and press START to start program.
5.5.2.3 After sterilization is complete, check the test paper to see whether it reach requirements
5.5.3 choose VACUUM test program
5.5.3.1 close the door,start program。
5.5.3.2 Results will be displayed after the sterilization.
5.5.3.3 According YY0646 requirements, within 10 minutes, the air leakage rate of no more than
0.13kpa / min, if meets the requirements, the interface will show "O", Otherwise, it displays "FAIL4",
indicates failure.
5.5.3.4 If during the test, the temperature fluctuations more than 3 degrees ,"FAIL2" will show,
representing the void.
You need to wait for sterilization chamber to cool, and then doing it again.

11
Note:Vacuum test program must be run when the sterilization chamber is in cold state . Otherwise
there will be running more than 3 degrees temperature fluctuations Situation.
6. Advanced Settings
6.1 Enter setup interface
6.1.1 Press on START,open the main power.
After the buzzer sounds, Enter the setting interface.
6.1.2 press PROGRAM,choose setup state S1,S2,S3,S4
Press START to enter the relevant setup state。
6.2 S1 State
On S1 state,you can adjust time and date.
6.2.1 After entering the state, the default selected hours of high, the bit display, press the PROGRAM
key, the selected flash will move to the next number.
6.2.2 Press TEMP, number flashing will add 1, and 0-9 cycles.
6.2.3Adjustment is completed, press the START button, the adjusted value is saved.

12
6.3 S2 State
6.3.1 In this state, you can view Sterilization count and equipment number, but you can't change it
6.3.2 Set the highland set
If you use at high altitudes, you need to set the following highland setting parameters:
1.0>h>0.5km, 0.5;1.5>h<1.0km,1.0
2.0>h>1.5km,1.5;2.5>h>2.0km,2.0
3.0>h>2.5km,2.5;3.5>h>3.0km,3.0
4.0>h>3.5km,3.5;4.5>h>4.0km,4.0
Note:Standard atmosphere 100 KP, every rise by 0.5 km above sea level, the pressure drop 5 kpa.
If you set parameter value exceeds 2.0, you need to re-evaluate the sterilizing effect,
you can extend the time to improve sterilization Sterilization.
USB The factory code
6.3.3 Print and USB Settings
1 open the function,
0 close the function。
To the left of the parameter indicates USB。
The right of the
parameters indicates the printer.
Users must not modify the factory code, the code set up and follow up by manufacturer,
for the maintenance

13
6.4 S3 state
6.4.1 This state is to adjust the sterilization time and drying time
Press PROGRAM to choose program.
Press TEMP to choose sterilization temperature.
Press START again to adjust the sterilization time and drying time
6.4.2 Press TEMP to change value
Press PROGRAM to choose the value need to change.
6.4.3 press START to save and out.
6.4.4 Sterilization time range 1-60
Drying time range 0-20
The adjustment of the drying time is refers to the adjustable part of the drying time.
Drying time points fixed drying time and adjustable drying time . Fixed time of about 7 minutes.
Note: Unless it is necessary, we do not recommend users to easily adjust parameters.
6.5 S4 State
S4 is set up for the manufacturer, the user must not to adjust the Settings.
6.6 Printer(Optional)
6.6.1 The printer is installed in the front of the autoclave.
6.6.2 The sterilization data will be printed automatically upon the selected program finishes.

14
Sample of the printed sterilization data
Program:WRAPPED Program:Vacuum test
Temperature:134 Tp: 1 °C
Pressure:210.0kpa P1:-70kpa
Vacuum Num:3 P2:-69.0kpa
Dry Time:10Min rate of pressure rise:0.1kpa
Ster Time:4.0Min Start Time:08:22
Start Time:05:38:12/88.1°C End Time:09:01
T1:05:40:03/84.7°C/-70.0kpa Date:2011-06-30
T2:05:42:23/101.8°C、52.0kpa Test Value :Success
T3:05:44:15、79.4 °C/-70.0kpa S/N: BK000010
T4:05:46:21/108.5°C/50.3kpa Operator
T5:05:49:49/91.6°C/-70.0kpa
T6:05:57:34/134.5°C/229.3kpa
TS:134.5°C/225.2kpa ( Average temperature/ Average pressure )
MAX.Temperature:135.0°C ( Maximum temperature )
MIN.Temperature:134.0°C ( Minimum temperature )
MAX.Pressure:230.4kpa (Maximum pressure )
MIN.Pressure:220.4kpa (Minimum pressure )
T7:06:00:10/134.5°C/223.8kpa
T8:06:03:36/110.7°C/-60.2kpa
T9:06:06:22/102.3°C/-60.2kpa
End Time:06:10:34/71.3°C
Cyele No:0015 (Times of Sterilization)
Ster Value:Success (Sterilization Result)
Date:2011-06-30
S/N:BK000010

15
Operator
6.7 USB Port
6.7.1 Plug the USB disk to the port on the front of the autoclave
6.7.2 Data transfer is completed when the screen indicates “END”.
Note: The disk must adopt FAT32. Hard disks are not accepted.

16
7.Maintenance
Maintenance Required
Operation
Daily
Cleaning the door gasket and the mating surface
Cleaning the outside of the door
Weekly
Cleaning the water reservoir
Cleaning the inner chamber
Every 3 to 6 months
(Every 200 operations)
Changing the air filter
Yearly
Changing the door gasket
7.1 Cleaning the distilled water reservoir
Cleaning the distilled water reservoir by using medical disinfectant or distilled water
1.Drain the water reservoir out and wipe out the fouling by using no-shedding cloth dipped with
medical disinfectant or distilled water.
7.2 Cleaning inner chamber
7.2.1 Remove trays and racks
7.2.2 Clean up by using no-shedding cloth dipped with distilled water or medical disinfectant.
7.2.3 Clean the trays and racks using the same method as mentioned in 7.2.2
7.3 Changing air filter
7.3.1 Air filter is in the back of the autoclave (as shown in the picture)
7.3.2 Pull out the filter
7.3.3 Change the filter
7.3.4 Connect the new filter to the tube and push it back to the hole.
Table of contents
Other Biobase Laboratory Equipment manuals

Biobase
Biobase BSC-4FA2-GL User manual

Biobase
Biobase BBS-V1300 User manual

Biobase
Biobase BCBL-207 User manual

Biobase
Biobase BSC-3FA2-NA User manual

Biobase
Biobase BK-DH2000 User manual

Biobase
Biobase BBS-DDC User manual

Biobase
Biobase BCI-I User manual

Biobase
Biobase BSC-4FA2-HA User manual

Biobase
Biobase BK-HS32 User manual

Biobase
Biobase BBS-V800 User manual