manuals.online logo
Brands
  1. Home
  2. •
  3. Brands
  4. •
  5. Biohort
  6. •
  7. Outdoor Storage
  8. •
  9. Biohort WoodStock 150 User manual

Biohort WoodStock 150 User manual

Other manuals for WoodStock 150

2

This manual suits for next models

5

Other Biohort Outdoor Storage manuals

Biohort WOODSTOCK 300 User manual

Biohort

Biohort WOODSTOCK 300 User manual

Biohort Europa User manual

Biohort

Biohort Europa User manual

Biohort Alex User manual

Biohort

Biohort Alex User manual

Biohort PP4000 User manual

Biohort

Biohort PP4000 User manual

Biohort AvantGarde M User manual

Biohort

Biohort AvantGarde M User manual

Biohort HighLine User manual

Biohort

Biohort HighLine User manual

Biohort WoodStock 230 User manual

Biohort

Biohort WoodStock 230 User manual

Biohort WoodStock User manual

Biohort

Biohort WoodStock User manual

Biohort HighLine Series User manual

Biohort

Biohort HighLine Series User manual

Biohort WoodStock 150 User manual

Biohort

Biohort WoodStock 150 User manual

Biohort HighBoard SE 160 User manual

Biohort

Biohort HighBoard SE 160 User manual

Biohort AvantGarde User manual

Biohort

Biohort AvantGarde User manual

Biohort Europa User manual

Biohort

Biohort Europa User manual

Biohort LEISURE TIME BOX 100 User manual

Biohort

Biohort LEISURE TIME BOX 100 User manual

Biohort StoreMax 120 User manual

Biohort

Biohort StoreMax 120 User manual

Biohort StoreMax 190 User manual

Biohort

Biohort StoreMax 190 User manual

Biohort WoodStock Gr. 150 User manual

Biohort

Biohort WoodStock Gr. 150 User manual

Biohort MiniGarage User manual

Biohort

Biohort MiniGarage User manual

Biohort CasaNova User manual

Biohort

Biohort CasaNova User manual

Biohort HighBoard 160 User manual

Biohort

Biohort HighBoard 160 User manual

Biohort HighLine Series User manual

Biohort

Biohort HighLine Series User manual

Biohort MiniGarage L User manual

Biohort

Biohort MiniGarage L User manual

Biohort StoreMax 190 Use and care manual

Biohort

Biohort StoreMax 190 Use and care manual

Biohort StoreMax 160 User manual

Biohort

Biohort StoreMax 160 User manual

Popular Outdoor Storage manuals by other brands

USP DURAMAX 10 Ft x 8 Ft StoreMax Plus owner's manual

USP

USP DURAMAX 10 Ft x 8 Ft StoreMax Plus owner's manual

TYGO Nyland Building Instruction

TYGO

TYGO Nyland Building Instruction

Duratuf GL105 Assembly instructions

Duratuf

Duratuf GL105 Assembly instructions

Viking SD5300SS Use & installation guide

Viking

Viking SD5300SS Use & installation guide

USP DURAMAX Apex Pro 10.5 Ft x 8 Ft 40116 owner's manual

USP

USP DURAMAX Apex Pro 10.5 Ft x 8 Ft 40116 owner's manual

ModuLaro Lojo WC202200 manual

ModuLaro

ModuLaro Lojo WC202200 manual

Lifetime 6418 owner's manual

Lifetime

Lifetime 6418 owner's manual

rollaway container ARPCA24 manual

rollaway container

rollaway container ARPCA24 manual

Duratuf Havelock Assembly instructions

Duratuf

Duratuf Havelock Assembly instructions

X-METAL 4065 owner's manual

X-METAL

X-METAL 4065 owner's manual

Outdoor Life Products FP2030 F Assembly instructions

Outdoor Life Products

Outdoor Life Products FP2030 F Assembly instructions

Royalcraft Faro 295L Storage Box Assembly instructions

Royalcraft

Royalcraft Faro 295L Storage Box Assembly instructions

Riverlea Duratuf KIWI KS3 Assembly instructions

Riverlea

Riverlea Duratuf KIWI KS3 Assembly instructions

Rubbermaid 5L45 manual

Rubbermaid

Rubbermaid 5L45 manual

garofalo TUSCANY EVO user manual

garofalo

garofalo TUSCANY EVO user manual

OLT GS84D-FJ-Plywood Assembly manual

OLT

OLT GS84D-FJ-Plywood Assembly manual

Duratuf Kiwi MK1 Assembly instructions

Duratuf

Duratuf Kiwi MK1 Assembly instructions

Eden CA2988 Assembly instructions

Eden

Eden CA2988 Assembly instructions

manuals.online logo
manuals.online logoBrands
  • About & Mission
  • Contact us
  • Privacy Policy
  • Terms and Conditions

Copyright 2025 Manuals.Online. All Rights Reserved.

BIOHORT Gartengeräte GmbH, A-4120 Neufelden
www.biohort.at
Aufbauanleitung WoodStock
silber-metallic, dunkelgrau-metallic
Assembly manual for WoodStock
metallic silver, metallic dark grey
Instruction de montage Woodstock
argent métallique, girs foncé métallique
Opbouwbeschrijving WoodStock
zilver metallic, donkergrijs metallic
für Größe 150 und 230 | for size 150 and 230
pour taille 150 et 230 | voor grootte 150 en 230
Option
GB
F
NL
D
Ihre Zufriedenheit ist uns wichtig!
www.biohort.at/garantieschein
2
GB F NLD
Important Details
regarding assembly:
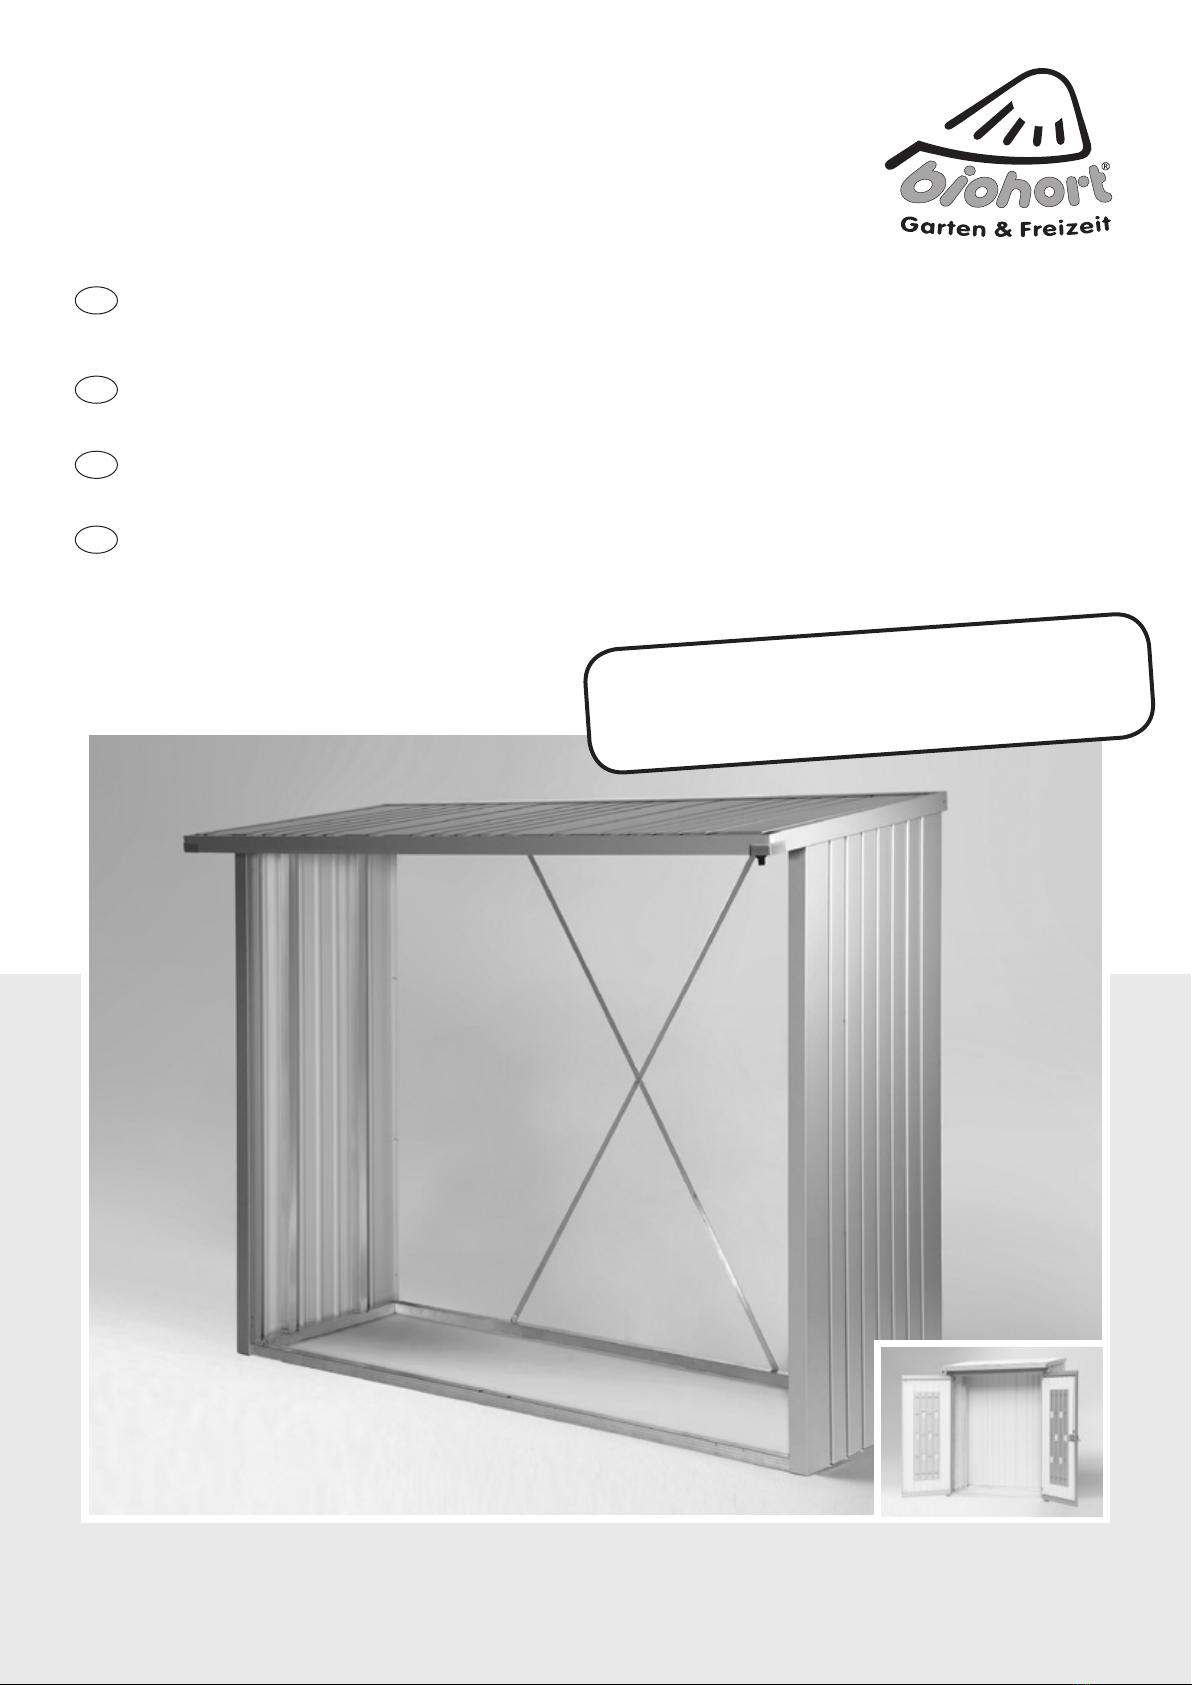
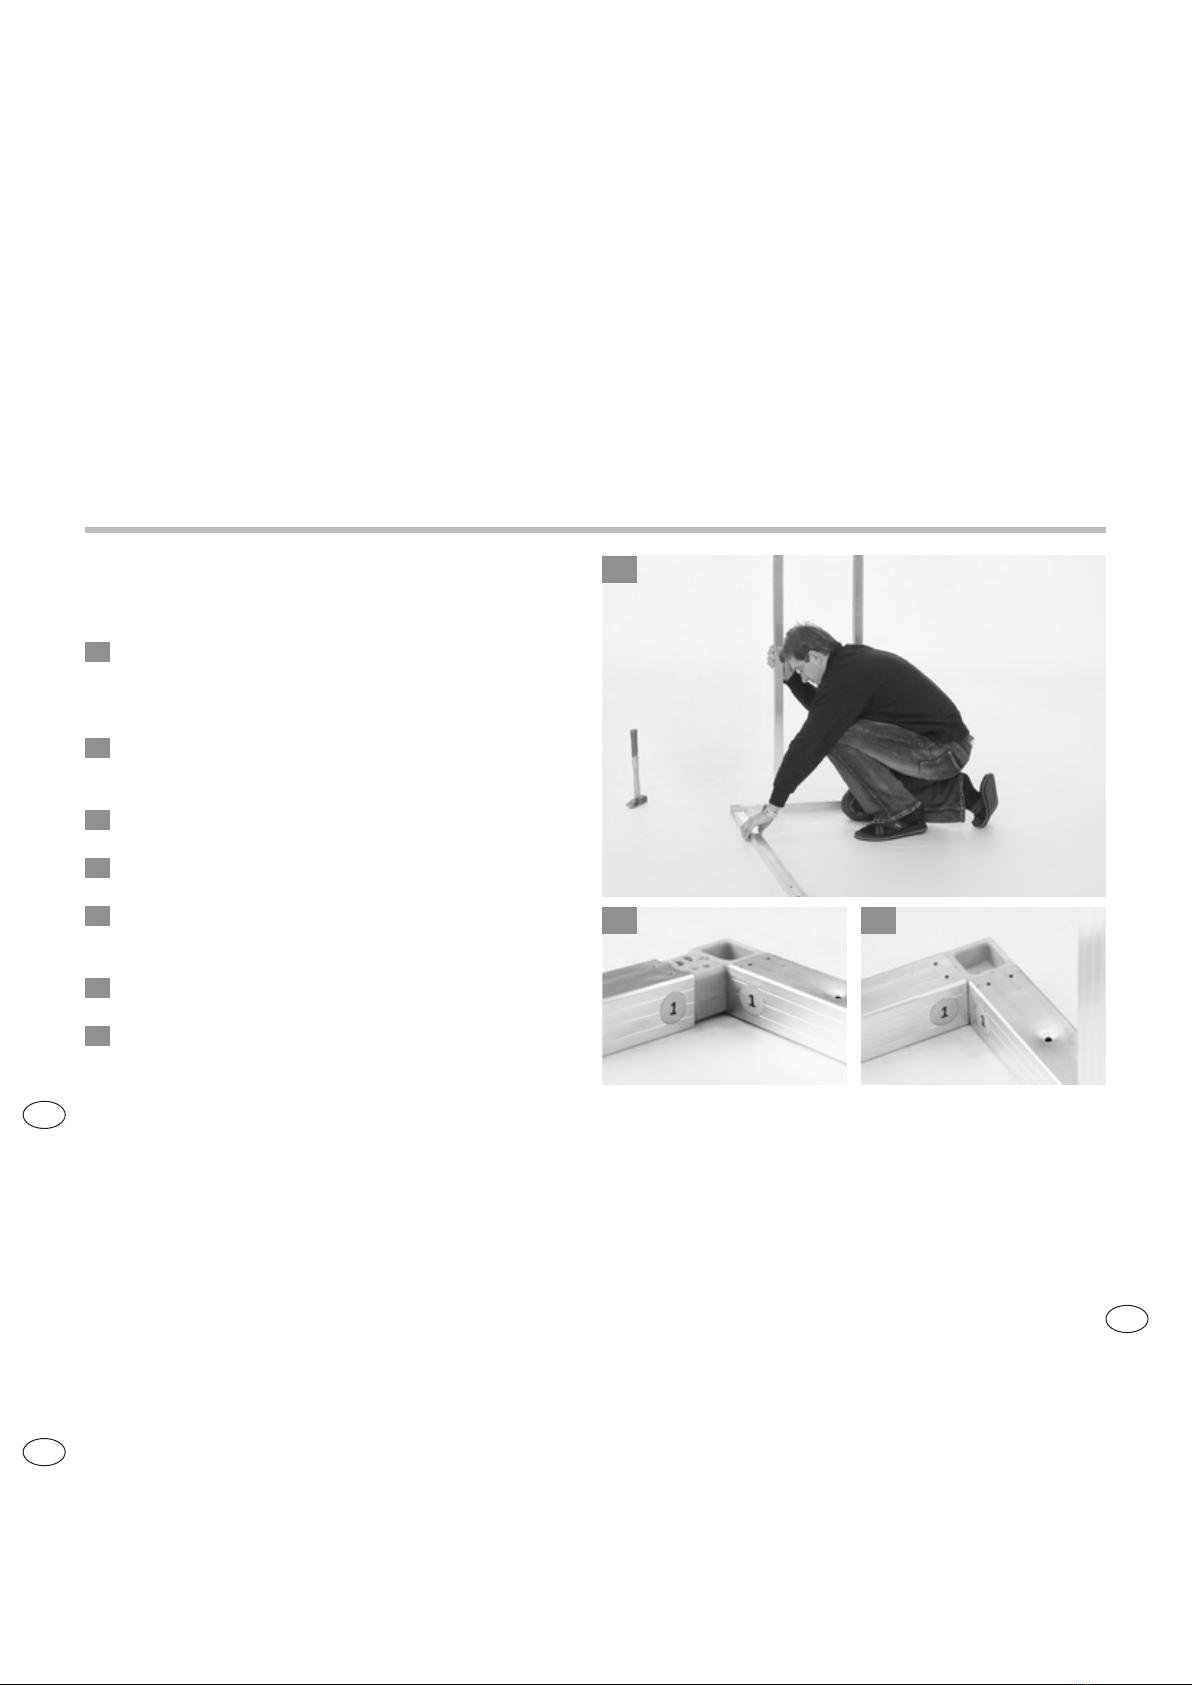
• This assembly manual shows
how to assemble “Wood-
Stock”, size “230”; it is also
valid for size “150”.
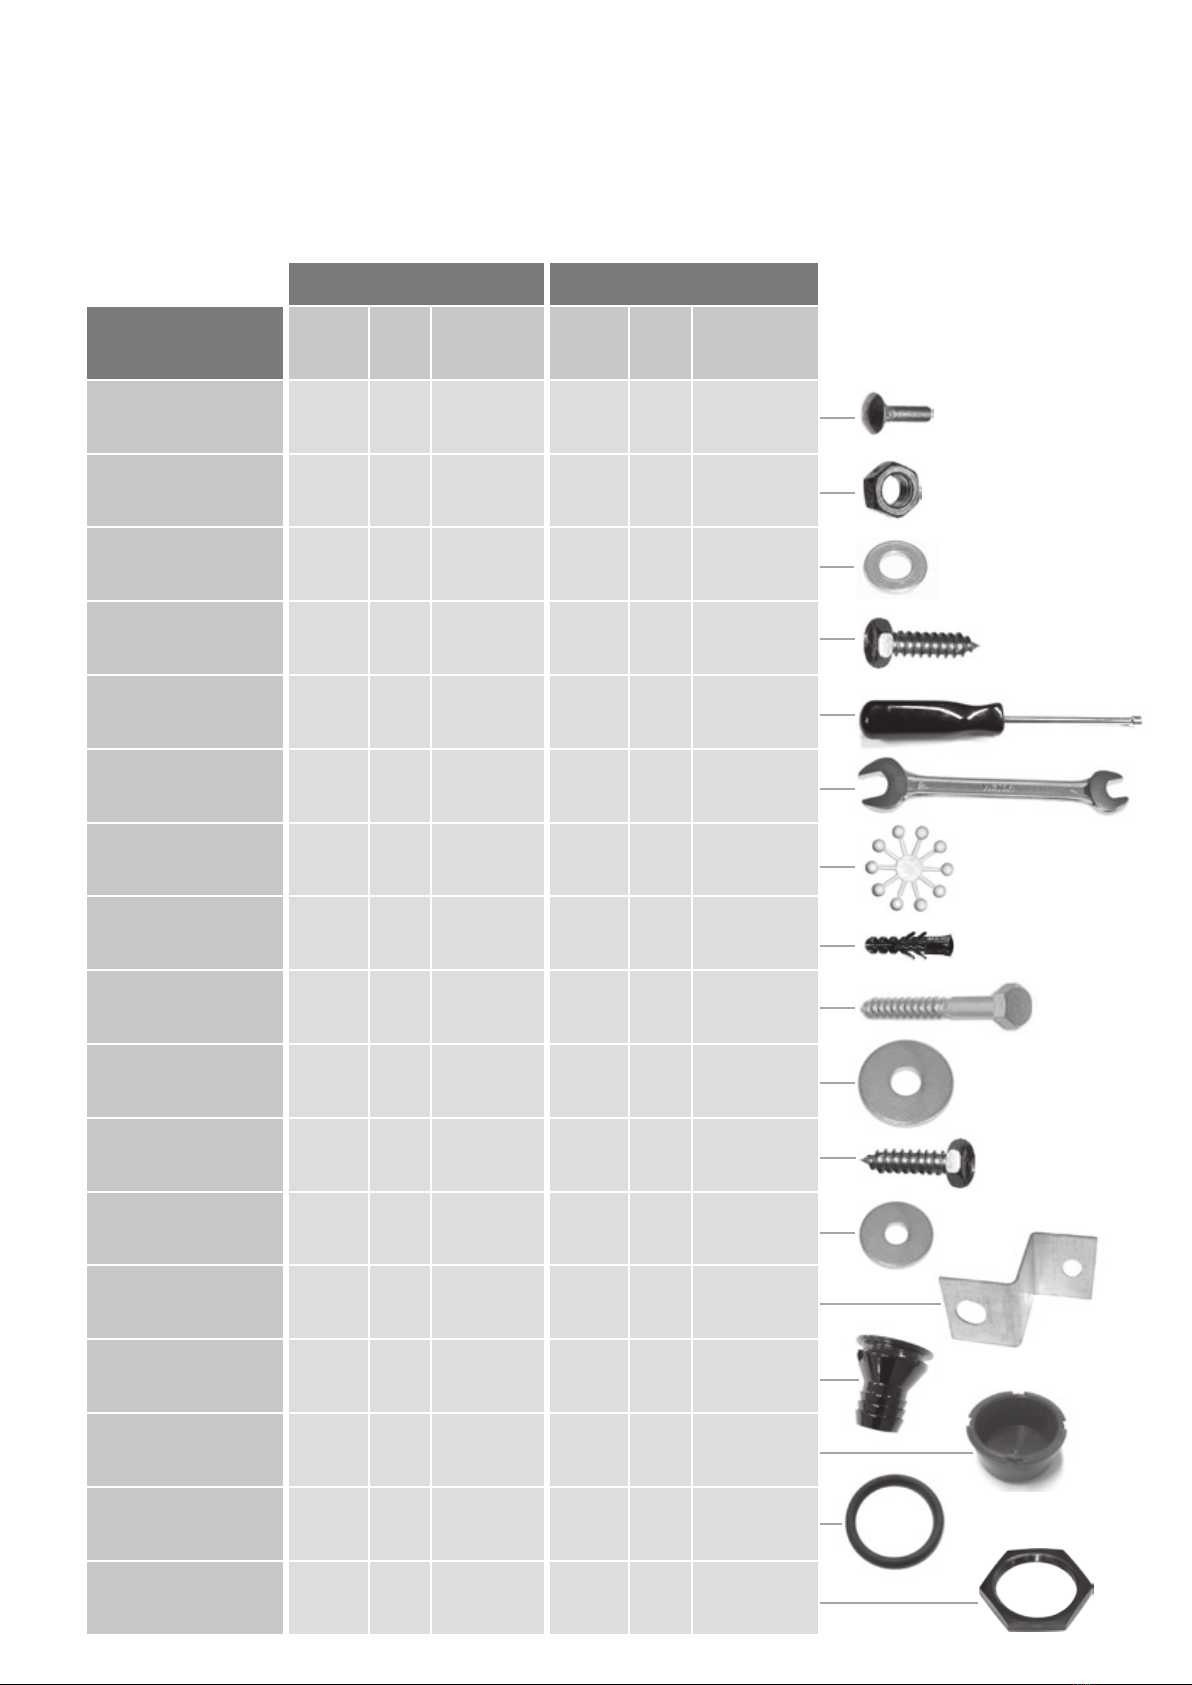
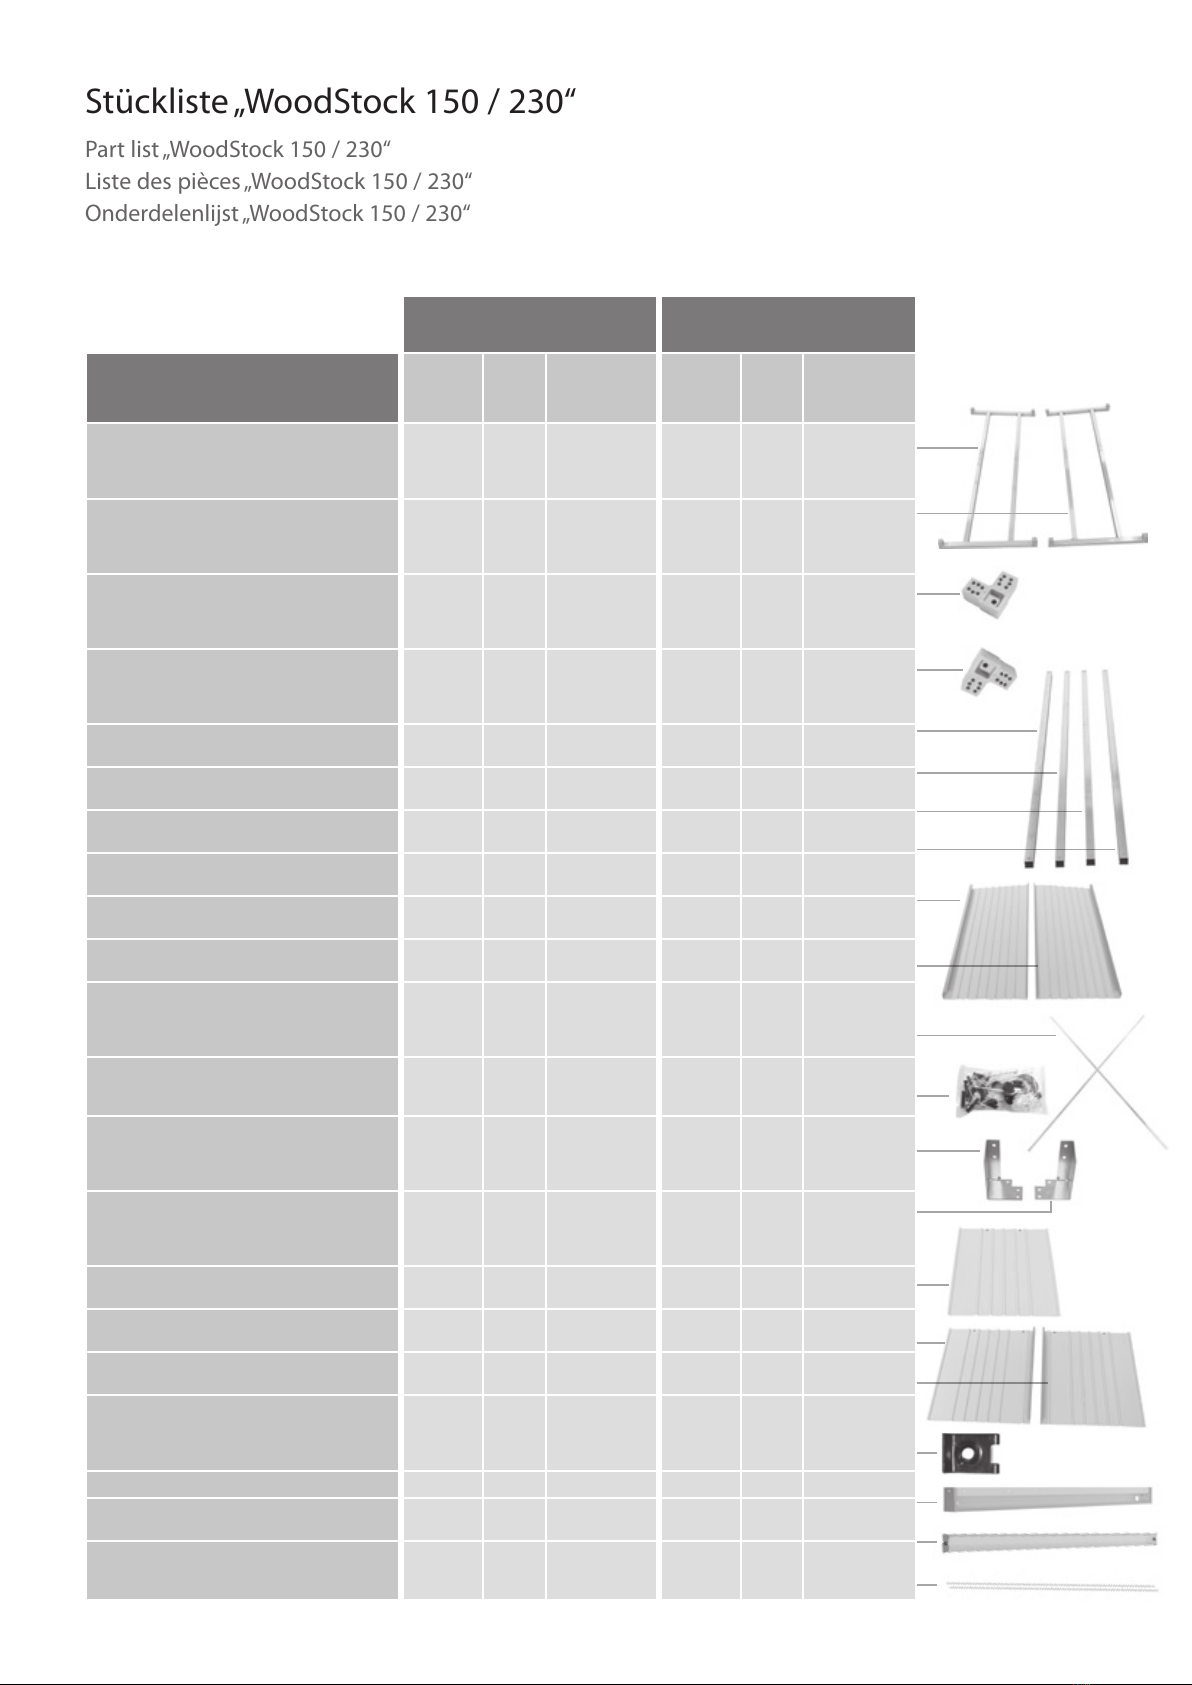
• A parts list and plan view is
also included.
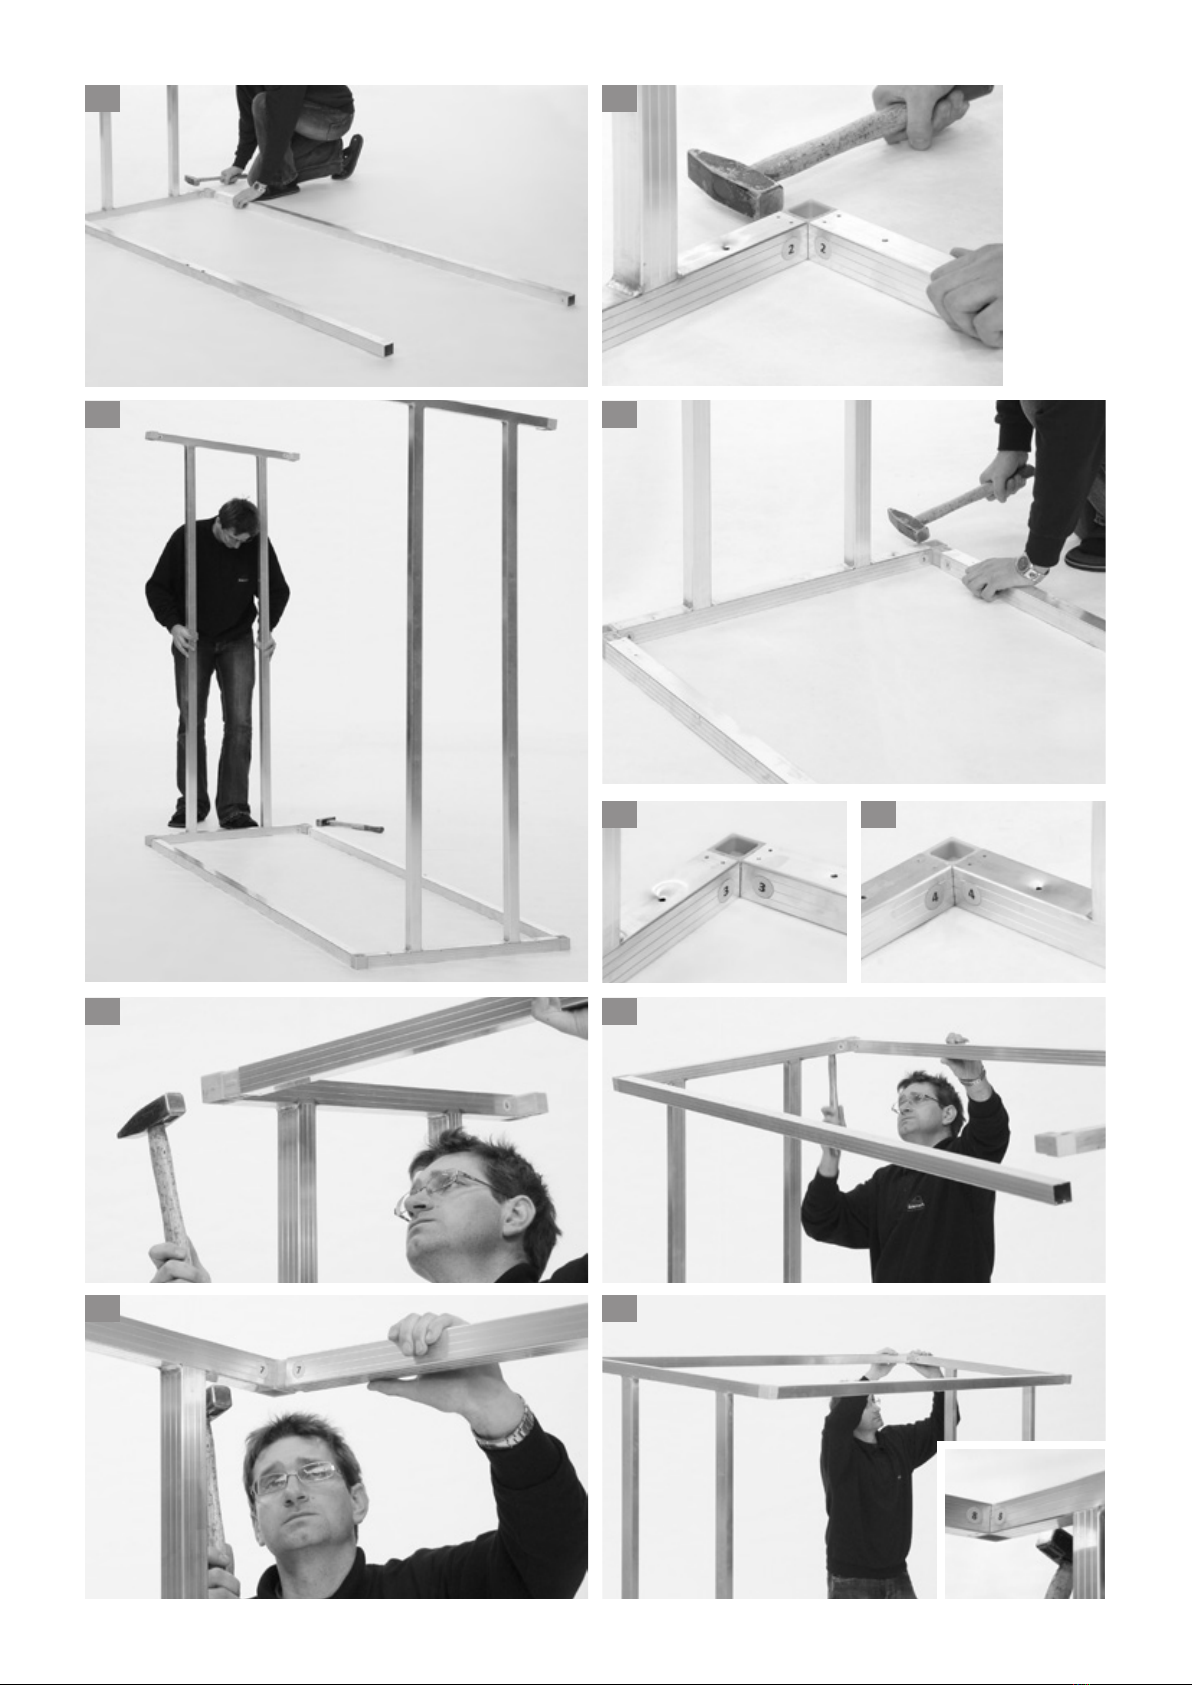
• For several assembly steps
the additional assistance of
one person will be required.
• This assembly manual also
shows how to install the
optional back wall and door.
Conseils pour
le montage :
• La présente instruction de
montage montre l‘assemblage
de „WoodStock“ taille „230“,
mais peut tout aussi bien être
utilisée avec les adaptations
nécessaires pour la taille „150“.
• Ci-joint la liste des pièces et
un plan.
• Vous aurez besoin de l’aide
d’une personne pour certaines
étapes du montage.
• Cette instruction de montage mon-
tre également comment ajouter
un panneau arrière et une porte.
Belangrijke tips
voor montage:
• Deze opbouwbeschrijving toont
de opbouw van de “Wood-
Stock” grootte 230; deze geldt
ook voor de grootte 150.
• De onderdelenlijst en een
plattegrond zijn bijgesloten.
• Voor enige montage stappen
heeft u de hulp van een person
nodig.
• Deze opbouwbeschrijving toont
ook het inbouwen van de opti-
onele achterwand en door.
Hinweise zur
Montage:
• Vorliegende Aufbauanleitung
zeigt den Zusammenbau von
„WoodStock“ Größe „230“,
sie gilt sinngemäß auch für die
Größe „150“.
• Die Stückliste und ein
Grundrissplan liegen bei.
• Für einige Montageschritte
benötigen Sie einen Helfer.
• Vorliegende Aufbauanleitung
zeigt auch den Einbau der opti-
onalen Rückwand und Tür.
Pflege und Wartung
• Ölen Sie das Schloss und
die Scharniere jährlich
(bei optionaler Tür)!
• Dach von Laub freihalten, keine
Chemikalien lagern!
Care and maintenance
• Lubricate the lock and the
hinges once a year -
(when door option is fitted)!
• Keep the roof free of leaves, do
not store chemicals inside!
Entretien et
maintenance
• Tous les ans, veillez à graisser la
serrure et les charnières (en pré-
sence de la porte optionnelle) !
• Débarrassez le toit des feuilles
tombées et ne stockez pas de
produits chimiques !
Onderhoud
• Geef het slot en scharnieren
jaarlijks olie!
• Hou het dak vrij van bladeren;
geen chemicaliën opslaan!
ATTENTION
• Do not assemble WoodStock
on a windy day!
• Wear working gloves – some
of the metal pieces may have
sharp edges!
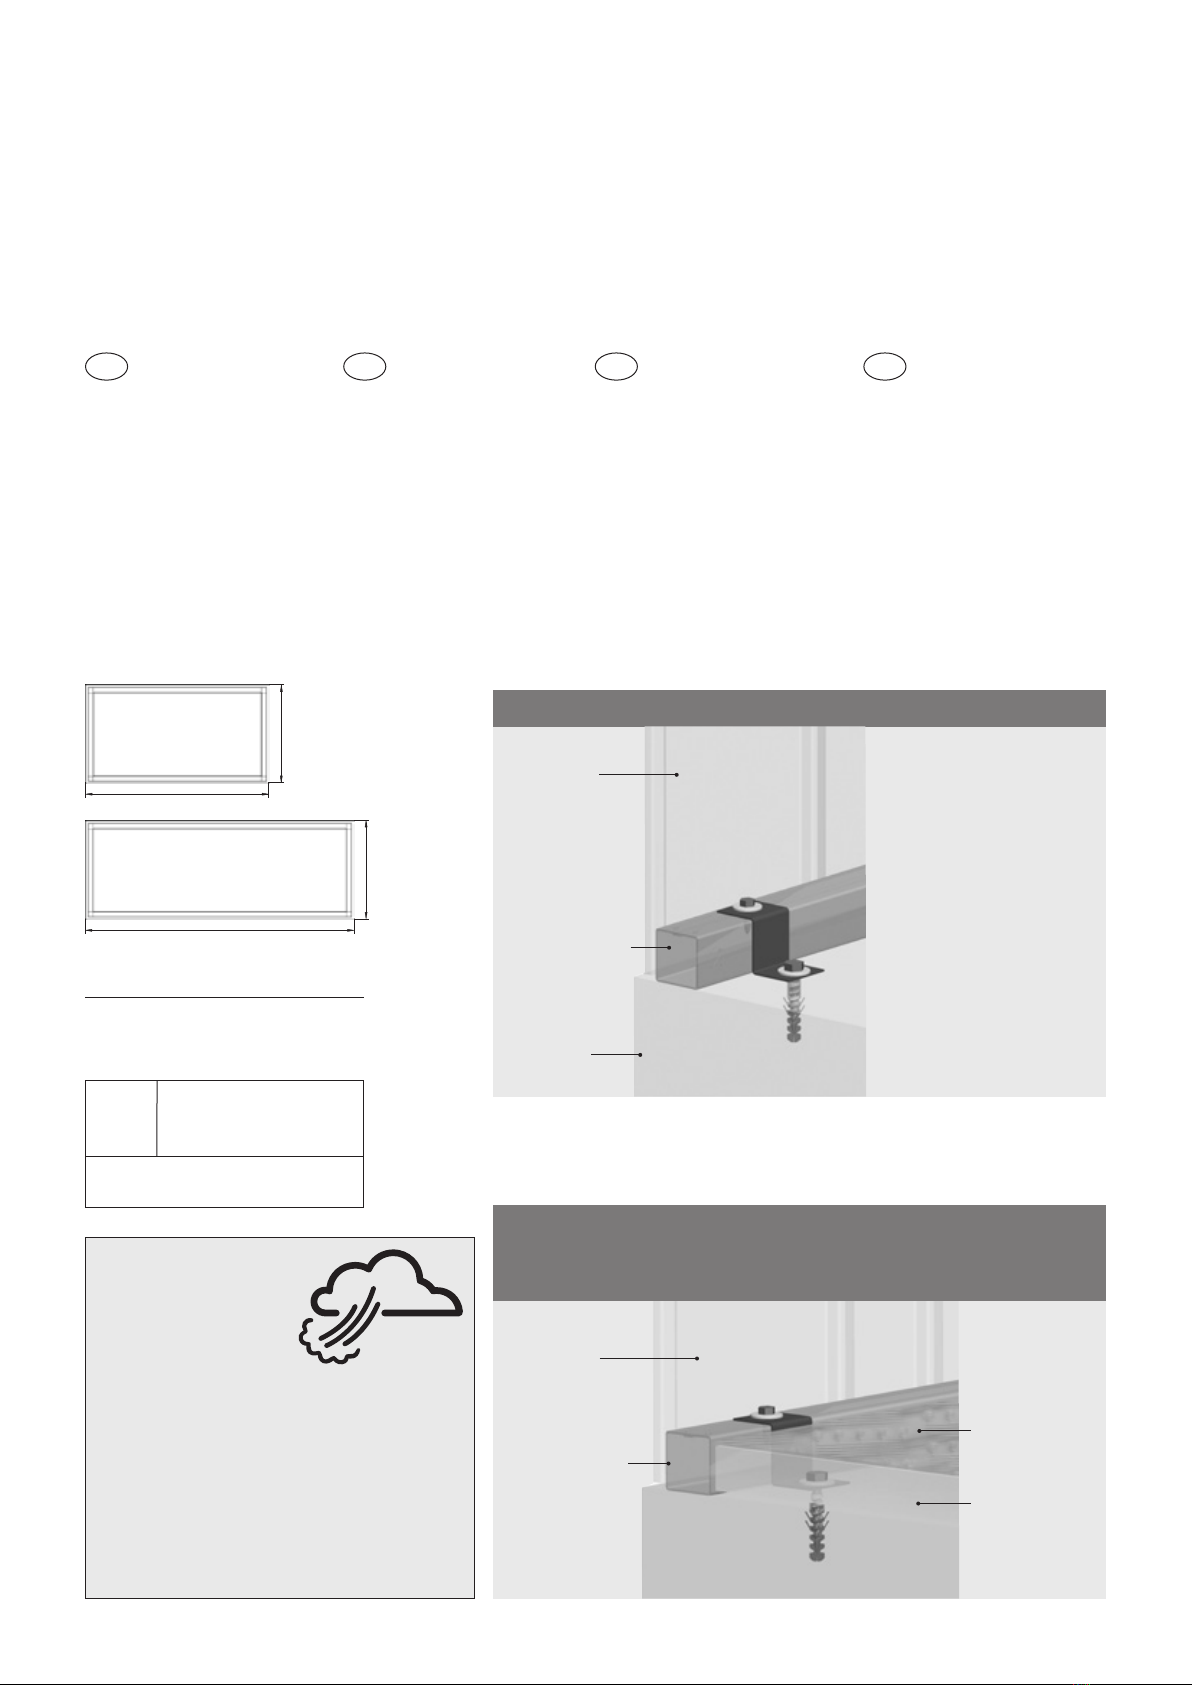
• During assembly consider the
possibility of heavy rainfall and
take precautions to ensure that
water cannot leak in under the
aluminium frame (i.e. a raised
foundation).
• Do not forget to anchor the
shed against gale force wind!
ATTENTION
• Ne procédez pas au montage de
WoodStock quand il y a du vent !
• Portez des gants de travail
– certaines tôles peuvent pré-
senter des arêtes tranchantes !
• Lors de l‘installation, tenez
compte du fait qu‘en cas de
fortes pluies, de l‘eau de sur-
face peut pénétrer sous les
cadres en aluminium (fondation
rehaussée, par exemple).
• N‘oubliez pas l‘ancrage contre
la tempête !
LET OP
• WoodStock niet bij wind
opbouwen!
• Gebruik werkhandschoenen –
sommige metalen onderdelen
kunnen scherpe kanten hebben!
• Denk bij het plaatsen van de
fundering aan de mogelijk-
heid van sterke regenval; het
oppervlaktewater mag niet
onder het bodemprofiel in de
berging kunnen binnendringen
(bijv. een verhoogd fundament).
• Denkt u aan een stormzekere
verankering!
ACHTUNG
• WoodStock nicht bei Wind auf-
bauen!
• Arbeitshandschuhe verwen-
den – einige Blechteile können
scharfkantig sein!
• Berücksichtigen Sie beim Auf-
stellen, dass bei starken Regen-
fällen Oberflächenwasser unter
die Alurahmen eindringen kann
(z.B. erhabenes Fundament).
• Sturmfeste Verankerung
nicht vergessen!
3
GB F NLD
• Bitte achten Sie beim Aufstellen
darauf, dass Niederschlags-
wasser nicht seitlich unter die
Alurahmen in den WoodStock
eindringen kann (speziell bei
Ausführung mit Tür).
• Das passende Befestigungsma-
terial (Schrauben und Dübel)
finden Sie im Kleinteile-Päckchen.
(Bohrloch tief genug bohren und
Bohrstaub entfernen)
• During assembly please take
precations to ensure that rain
water cannot enter WoodStock
under the sides of the alumini-
um frame! (pay special attenti-
on when doors are fitted)
• The appropriate mounting parts
(screws and dowels) are included
in the small parts packet.(Drill the
hole deep enough and remove
the bore dust.)
• Lors de l‘installation, veillez à ce
qu‘aucune eau de pluie ne pénètre
dans WoodStock par les côtés, en
s‘infiltrant sous les cadres en alumi-
nium (notamment si une porte est
montée).
• Vous trouverez le matériel de fixation
(vis et chevilles) dans le paquet de
petites fournitures. (Forer un trou
de perçage suffisamment profond
et enlever la poussière.)
• Let er bij het plaatsen van de
fundering op, dat regenwater
niet aan de zijkant van het
bodemprofiel in de WoodStock
kan binnendringen (specifiek
bij de variant met deur).
• Het passende bevestigingsmateri-
aal (schroeven en moeren) vindt
u in het kleine onderdelenpakket.
(Boorgat diep genoeg boren en
boorsel opruimen)
Maße und Vorschläge für die
Befestigung am Boden
Dimensions and proposals for fastening to the ground
Dimensions et propositions pour la fixation au sol
Maten en voorstellen voor de fundatie
Die Verankerung ist
wichtig, denken Sie an Sturmböen!
Secure anchoring is very important,
consider the eects of stormy weather!
L‘ancrage est important,
pensez aux rafales de vent !
De verankering is belangrijk,
denkt u aan de mogelijkheid op storm!
ACHTUNG
ATTENTION
ATTENTION
ATTENTIE
Größe Maß für Fundament
size foundation dimensions
taille dimensions de fondation
grootte afmeting fundament
150 B 155 x L 83 cm
230 B 227 x L 83 cm
B:
Fundamentbreite
foundation width
longueur de fondation
breedte van het fundament
L:
Fundamentlänge
foundation length
largeur de fondation
lengte van het fundament
L
B
230
WOODSTOCK
L
B
150
WOODSTOCK
Seitenwand
Side wall
Panneau latéral
Zijwand
Seitenwand
Side wall
Panneau latéral
Zijwand
VARIANTE 1 · OPTION 1 · VARIANTE 1 · VARIANT 1
ggf. Folie ca. 15 µm als
Dampfsperre gegen aufstei-
gende Bodenfeuchtigkeit
einbauen (bei Ausführung
mit Tür)
where applicable: insert a plastic
sheet ca. 15 μm thick as moisture
barrier to protect against rising
damp (when doors are tted).
au besoin (dans le cas d‘un modèle
avec porte), étalez un lm plastique
d‘environ 15 μm comme écran
pare-vapeur contre l‘humidité du sol
bijv. Folie van ca. 15 μm als
vochtblokkade tegen opstijgend
bodemvocht inbouwen
(bij de uitvoering met deur)
Bodenplatte
Floor panel
Plaque de fond
Bodemplaat
Styropor
Polystyrene panels
Styropor
Polystyreen
Fundament*
Foundation*
Fondation*
Fundament*
* mögliche Bodenausführungen: Asphalt, Betonfundament, Betonplatten, Holzkonstruktion
* possible oor construction: asphalt, concrete foundation, paving slabs, wooden construction
* diérentes variantes pour le sol : asphalte, fondation en béton, plaques de béton, construction en bois
* mogelijke fundering: asfalt, betonnen fundament, betonplaten, houten constructie
Alurahmen
Aluminium Frame
Cadre en aluminium
Aluminium frame
Alurahmen
Aluminium Frame
Cadre en aluminium
Aluminium frame
VARIANTE 2: mit optionaler Bodenplatte (Zubehör)
OPTION 2: with optional oor panels (accessories)
VARIANTE 2: avec plaque de fond optionnelle (accessoires)
VARIANT 2: met optionele bodemplaat (toebehoren)
4
Kleinteile- Päckchen für „WoodStock 150 / 230“
Small parts packet for “WoodStock 150 / 230”
Paquet de petites fournitures pour „WoodStock 150 / 230“
Onderdelenpakket voor „WoodStock 150 / 230“
Größe 150
size 150 | taille 150 | grootte 150 Größe 230
size 230 | taille 230 | grootte 230
Benennung
Description
Désignation
Benaming
Art.-Nr.
Article No.
N° article
Art.Nr.
Stück
Quantity
Pièce
Stuks
Maße / mm
Dimensions / mm
Mesure / mm
Maten / mm
Art.-Nr.
Article No.
N° article
Art.Nr.
Stück
Quantity
Pièce
Stuks
Maße / mm
Dimensions / mm
Mesure / mm
Maten / mm
Flachrundschraube
Mushroom head bolt
Vis ronde à tête plate
Vlakrond schroeven
A52001 20 M4 x 10 A52001 20 M4 x 10
Mutter
Nut
Ecrou
Moer
A2000029 20 M4 A2000029 20 M4
Beilagscheibe
Washer
Rondelle
Ringen
A2000027 100 ø 4,3 x 9 mm A2000027 100 ø 4,3 x 9 mm
Sechskantblechschraube
Hexagon head self tapping screw
Vis à tôle à tête hexagonale
Zeskant verzinkte schroeven
A4002014 80 4,2 x 13 mm A4002014 80 4,2 x 13 mm
Steckschlüssel mit Griff
Socket wrench 7mm
Tournevis à embout spécial
Steeksleutel met handsvat
X2000060 1 SW7 X2000060 1 SW7
Gabelschlüssel
Flat spanner
Clé plate
Steeksleutel
X2000061 1 SW7 X2000061 1 SW7
Abdeckkappen weiß
White cover caps
Capuchon de protection blanc
Afdekkappen wit
X2700217 20 ø 5 x 8 mm X2700217 20 ø 5 x 8 mm
Dübel F10 schwarz
Dowel F10 black
Cheville F10 noire
Moeren F10 zwart
A51050 6 ø 10 mm A51050 6 ø 10 mm
Sechskantholzschraube
Hexagon head wood screw
Vis à bois à tête six pans
Zeskant houtschroeven
A50076 6 ø 8 x 60 mm A50076 6 ø 8 x 60 mm
Beilagscheibe
Washer
Rondelle
Ringen
A4005014 6 ø 8,4 x 24 mm A4005014 6 ø 8,4 x 24 mm
Sechskantblechschraube
Hexagon head self tapping screw
Vis à tôle à tête six pans
Zeskant verzinkte schroeven
A51043 6 ø 6,3 x 22 mm A51043 6 ø 6,3 x 22 mm
Beilagscheibe
Washer
Rondelle
Ringen
A4005010 6 ø 6,6 x 22 mm A4005010 6 ø 6,6 x 22 mm
Bodenbefestigungswinkel
Floor attaching bracket
Equerre de fixation au sol
Bodembevestigingshaak
X4000611 6 X4000611 6
Dachrinnenauslauf
Gutter outlet
Décharge de gouttière
Dakgoot uitloop
X4000417 1 X4000417 1
Dachrinnenstopfen
Gutter plug
Bouchon de gouttière
Dakgoot stop
X4000416 1 X4000416 1
O-Ring
O-Ring
Joint torique
O-Ring
X4000415 1 X4000415 1
Sechskantmutter
hex-nut
écrou hexagonal
zeskantmoer
X4000414 1 M30 x 1,5 X4000414 1 M30 x 1,5
5
Stückliste „WoodStock 150 / 230“
Part list „WoodStock 150 / 230“
Liste des pièces „WoodStock 150 / 230“
Onderdelenlijst „WoodStock 150 / 230“
ANMERKUNG zu Artikelnummern:
silber-metallic / metallic silver X83...
dunkelgrau-metallic / metalic dark-grey X84...
Größe 150
size 150 | taille 150 | grootte
150
Größe 230
size 230 | taille 230 | grootte
230
Benennung
Description
Désignation
Benaming
Art.-Nr.
Article No.
N° article
Art.Nr.
Stück
Quantity
Pièce
Stuks
Maße / mm
Dimensions / mm
Mesure / mm
Maten / mm
Art.-Nr.
Article No.
N° article
Art.Nr.
Stück
Quantity
Pièce
Stuks
Maße / mm
Dimensions / mm
Mesure / mm
Maten / mm
Alurahmen links komplett
Aluminium frame left complete
Cadre en aluminium gauche complet
Aluminium frame links compleet
X8000130 1 1970 x 700 x 40 X8000130 1 1970 x 700 x 40
Alurahmen rechts komplett
Aluminium frame right complete
Cadre en aluminium droit complet
Aluminium frame rechts compleet
X8000140 1 1970 x 700 x 40 X8000140 1 1970 x 700 x 40
Eckverbindung (am Alurahmen vormontiert)
Corner connector (pre-fitted to aluminium frame)
Cornière d‘angle (prémontée sur le cadre en aluminium)
Hoekverbinding (voorgemonteerd aan aluminium frame)
X8000160 4 X8000160 4
Eckverbindung (am Alurahmen vormontiert)
Corner connector (pre-fitted to aluminium frame)
Cornière d‘angle (prémontée sur le cadre en aluminium)
Hoekverbinding (voorgemonteerd aan aluminium frame)
X4000610 4 X4000610 4 2140
Formrohr unten-vorne • Square pipe lower front
Tube de moulage bas-avant • Frame onder-voor X8001151 1 1420 X8002151 1 2140
Formrohr unten-hinten • Square pipe lower rear
Tube de moulage bas-arrière • Frame onder-achter X8001152 1 1420 X8002152 1 2140
Formrohr oben-vorne • Square pipe upper front
Tube de moulage haut-avant • Frame boven-voor X8001153 1 1420 X8002153 1 2140
Formrohr oben-hinten • Square pipe upper rear
Tube de moulage haut-arrière • Frame boven-achter X8001154 1 1420 X8002154 1 2140
Seitenwandblech links • Side wall panel left
Tôle pour paroi latérale gauche • Zijwand links X8*00105 1 1966 x 802 x 82,5 X8*00105 1 1966 x 802 x 82,5
Seitenwandblech rechts • Side wall panel right
Tôle pour paroi latérale droite • Zijwand rechts X8*00106 1 1966 x 802 x 82,5 X8*00106 1 1966 x 802 x 82,5
Alu-Flachstange für Diagonalverbindung
Flat aluminium bar for diagonal bracing
Barre plate en alu. pour raccordement diagonal
Aluminium stangen voor diagonale versteviging
X8000161 2 2210lg X8000161 2 2210lg
Kleinteilepäckchen • Small parts packet
Paquet de petites fournitures •
Onderdelenpakket
X8002550 1 X8002550 1
Verbindungswinkel für Seitenwand links
Attaching bracket for left side panel
Cornière de raccordement pour paroi latérale gauche
Verbindingshoek voor zijwand links
X8000107 1 X8000107 1
Verbindungswinkel für Seitenwand rechts
Attaching bracket for right side panel
Cornière de raccordement pour paroi latérale droite
Verbindingshoek voor zijwand rechts
X8000108 1 X8000108 1
Dachblech mitte • Roof panel middle
Tôle de toit partie centrale • Dak centraal X8*00300 1 970 x 734 x 11
Dachblech links • Roof panel left
Tôle de toit gauche • Dak links X8*00301 1 970 x 786 x 61 X8*00301 1 970 x 786 x 61
Dachblech rechts • Roof panel right
Tôle de toit droite • Dak rechts X8*00302 1 970 x 790 x 61 X8*00302 1 970 x 790 x 61
Schnappmutter (an den Dachblechen vormontiert)
Snap nut (pre-fitted to roof panels)
Ecrou à déclic (prémonté sur les toits en tôle)
Tapschroeven (aan de dakplaten voorgemonteerd)
A4001009 8 A4001009 10
Dachrinne • Gutter unit • Gouttière • Dakgoot X8*01303 1 1561 x 95 x 60 X8*02303 1 2261 x 95 x 60
Dachblecheinfassung • Roofing panel border
Bordure de tôle de toit • Dakdragers X8*01305 1 1561 x 48 x 61 X8*02305 1 2281 x 48 x 62
Kantenschutzprofil • Corner protection profiles
Profil de protection des arêtes •
Kantbeschermingsprofiel
X8000109 2 1885 x 10 x 3 X8000109 2 1885 x 10 x 3
6
1.1
1.2 1.2
Zusammenbau der
Alurahmen-Formrohre
1.1 Stellen Sie den linken Alurahmen auf den Boden
(die Eckverbinder sind bereits vormontiert). Die einzel-
nen Teile sind durch Aufkleber gekennzeichnet – gleiche
Nummern bedeuten zueinander gehörende Teile.
1.2 Fügen Sie das Aluformrohr unten vorne Nr. 1 mit
Hilfe eines Hammers an den Eckverbinder am Alurah-
men links Nr. 1.
1.3 Gleiches praktizieren Sie mit dem Aluformrohr Nr. 2
am Eckverbinder Nr. 2.
1.4 Montieren Sie nun den rechten Alurahmen an den
beiden Formrohrpositionen Nr. 3 und 4.
1.5 Fahren Sie nun mit der Montage der oberen Form-
rohre fort. Beginnen Sie mit dem Aluformrohr oben vorne
Nr. 5 und dem entsprechenden Eckverbinder Nr. 5.
1.6 Das hinter Aluformrohr oben montieren Sie am
Eckverbinder Nr. 6.
1.7 Zum Abschluss verbinden Sie die Formrohre Nr. 7
und Nr. 8 gleichzeitig.
Assembly of the aluminium framework
1.1 Place the left side aluminium frame on the floor (the corner
connectors are pre-fitted). The individual parts are marked with
labels – identical numbers indicate where parts fit together.
1.2 With the assistance of a hammer, fit the front lower square pipe
No. 1 onto the left front corner connector No. 1 (ensure that the lower
square pipes are positioned with pre-drilled holes on top).
1.3 Repeat the above step and fit the lower rear square pipe No. 2 to
the corner connector No. 2.
1.4 Now fit the right side aluminium frame to the lower square pipes
ensuring that the positions No’s. 3 & 4 are correctly matched up.
1.5 Continue the assembly with the upper square pipes. Start by con-
necting upper front pipe No. 5 with its matching corner connector No. 5.
1.6 Now fit the upper rear square pipe No. 6 to corner connector No. 6.
1.7 Complete the assembly of the framework by simultaneously con-
necting positions 7 & 8 with the matching corner connectors.
Montage des tubes de moulage du cadre en aluminium
1.1 Placez le cadre en aluminium gauche sur le sol (les cornières
d‘angle sont déjà prémontées). Les différents éléments portent des
étiquettes distinctives – les même numéros signifient qu‘il s‘agit de
pièces correspondantes.
1.2 En vous servant d‘un marteau, introduisez le tube moulé en alumini-
um bas devant N°1 dans la cornière d‘angle sur le cadre alu gauche N°1.
1.3 Renouvelez l‘opération avec le tube moulé en aluminium N° 2
1.
Vorbemerkungen:
- falls nicht ausdrücklich anders beschrieben,
Schrauben und Muttern erst am Ende der
Montage fest anziehen!
- „linke Seite“ bedeutet: vor dem fertigen
WoodStock aus gesehen die linke Seite
- „rechte Seite“ bedeutet: vor dem fertigen
WoodStock aus gesehen die rechte Seite
Preliminary note:
- Unless otherwise stated, do not tighten the bolts/nuts/screws
until the shed is finally erected!
- “Left side” means: left side as seen when standing in front of the
finished WoodStock.
- “Right side” means: right side as seen when standing in front of the
finished WoodStock.
Remarques préliminaires :
- sauf indication contraire exprès, ne serrez les vis et les écrous
qu‘à la fin du montage.
- „côté gauche“ signifie : le côté gauche lorsque l‘on se tient devant
le Woodstock monté.
- „côté droit“ signifie : le côté droit lorsque l‘on se tient devant le
Woodstock monté.
Opmerkingen:
- Indien niet uitdrukkelijk anders beschreven, schroef pas op het
einde van de montage alles vast!
- Linker zijde betekent: voor de gerede Woodstock gezien de linker zijde
- Rechter zijde betekent: voor de gerede Woodstock gezien de rech-
ter zijde
GB
F
NL
Zusammenbauschritte
Assembly sequence
Plan d‘assemblage
Opbouwstappen
dans la cornière d‘angle N° 2.
1.4 Montez à présent le cadre en aluminium droit aux deux emplace-
ments N° 3 et 4 des tubes moulés.
1.5 Continuez en montant les deux tubes moulés supérieurs. Com-
mencez avec le tube moulé en aluminium haut avant N° 5 et la cor-
nière d‘angle correspondante N° 5.
1.6 Montez ensuite le tube moulé en aluminium arrière haut sur la
cornière d‘angle N° 6.
1.7 Pour terminer, raccordez simultanément les tubes moulés N° 7 et N° 8.
Opbouw van de aluminium frames
1.1 Zet het linker aluminium frame op de grond (de hoekverbinding
is reeds voorgemonteerd). De individuele onderdelen zijn door sti-
ckers gekenmerkt – dezelfde nummers betekenen bij elkaar horende
onderdelen.
1.2 Zet het aluminium frame onder en voor nr. 1 met hulp van een
hamer aan de hoekverbindingen links nr. 1.
1.3 Hetzelfde doet u voor aluminium frame nr. 2 aan de hoek-
verbinding nr. 2.
1.4 Monteer het rechter alu. frame aan de beide frameposities nr. 3 en 4.
1.5 Begin nu met de montage van de bovenste frames. Begin met de alu-
minium frame boven voor nr. 5 en de bijbehorende hoekverbinding nr. 5.
1.6 Het achterste aluninium frame boven wordt aan de hoekverbin-
ding nr. 6 gemonteerd.
1.7 Tot slot wordt frame nr. 7 en nr. 8 tegelijkertijd verbonden.
7
1.3
1.4
1.3
1.4
1.4
1.6
1.7
1.5
1.7
1.4
8
Montage der
optionalen Rückwand
2.1 Für die Montage der Rückwand legen Sie den
Korpus auf die Vorderseite.
2.2 Legen Sie die Rückwände (beim WS-150 2 Stk.,
beim WS-230 3 Stk. Rückwände) auf den Korpus.
Achten Sie bitte auf die Überlappung der Bleche
(siehe Detail).
2.3 Verschrauben Sie die Rückwände mit den Sechs-
kantblechschrauben 4,2 x 13 mm und Beilagscheiben
4,3 x 9 mm nur locker am Korpus.
2.4 Die Rückwände verschrauben Sie miteinander mit
den Flachrundschrauben/Muttern/Beilagen.
Installation of the optional back wall
2.1 To install the back wall, first lay the framework on its front upon
the floor.
2.2 Place the back wall (for WoodStock 150 two panels / WoodStock
230 three panels) onto the frame. Pay particular attention to the over-
lapping of each panel (see detail below).
2.3 Fasten the panels loosely onto the frame with the self tapping
hexagonal screws 4,2 x 13 mm and the washers 4,3 x 9 mm.
2.4 Fasten the overlapping back wall panels together with mushroom
head bolts/nuts/washers.
Montage du panneau arrière en option
2.1 Pour le montage du panneau arrière, couchez la structure sur sa
face avant.
2.2 Placez ensuite les panneaux arrière (2 dans le cas du WS-150 / 3
dans le cas du WS-230) sur la structure. Veillez à ce que les tôles se
recouvrent correctement (cf. détails ci-dessous).
2.3 Fixez, sans trop serrer, les parois sur la structure, en vous servant
des vis à tôle à tête six pans 4,2 x 13 mm et
des rondelles 4,3 x 9 mm.
2.4 Vissez ensuite les parois les unes aux autres en vous servant des
vis rondes à tête plate/écrous/rondelles de calage.
Montage van de optionele achterwand
2.1 Voor de montage van de achterwand legt u de romp op de voorkant.
2.2 Leg de achterwanden (bij WS 150 2 stuks / bij WS 230 3 stuks)
op de romp. Let op de overlappingen van de wanden.
2.3 Schroef de achterwanden met de zeskantschroeven 4,2 x 13 mm
en ringen 4,3 x 9 mm losjes aan de romp vast.
2.4 De achterwanden kunnen met elkaar worden verbonden met de
vlakrond schroeven / moeren / bijlagen.
2.
GB
F
NL
EXKURS:
Nur wenn Sie eine Rückwand gekauft haben
Digression: Only applies when a back wall has been purchased
Montage supplémentaire :
uniquement si vous avez acheté un panneau arrière
Aanvulling: alleen wanneer u een achterwand heeft gekocht
2.1
2.2
2.3
2.4
2.3
Prinzip Schraubverbindung
bolt connection principle
principe de fixation vis
principe schroefverbinding
innen
inside
intrieur
binnen
außen
outside
extrieur
buiten
9
Montage der
Seitenwände
3.1 und 3.1.1 Bringen Sie die linke Seitenwand
(Ausklinkung unten links vorne) am Korpus in Position.
3.2 Setzen Sie nun alle Schrauben/Beilagen der Seiten-
wand locker an. 3.2.1 ACHTUNG: die doppelt mar-
kierten Schraubverbindungen VORSICHTIG festziehen.
Danach ziehen Sie die restlichen Schraubverbindungen fest.
3.3 Gleichermaßen montieren Sie die rechte Seitenwand.
Installation of the side wall panels
3.1 and 3.1.1 Bring the left side panel (with notch bottom left at the
front) into position on the frame.
3.2 Now loosely attach the side wall panel with all the screws/washers.
3.2.1 ATTENTION: carefully tighten all the positions marked with
a double circle. Afterwards the rest of the screw connections may be
tightened.
3.3 Now repeat the above procedure to attach the right side panel to
the frame.
Montage des parois latérales
3.1 et 3.1.1 Placez la paroi latérale gauche (mortaise bas gauche
avant) de manière adéquate sur la structure.
3.2 Serrez à présent légèrement toutes les vis/rondelles de calage
de la paroi latérale. 3.2.1 ATTENTION : resserrez tout d‘abord soi-
gneusement les raccords à vis à double marquage, puis resserrez
tous les autres raccords à vis.
3.3 Montez ensuite la paroi latérale de droite de la même manière.
Montage van de zijwanden
3.1 en 3.1.1 Plaats de linker zijwand (aansluitpunt onder links voor)
aan de romp.
3.2 Plaats de schroeven/bijlagen van de zijwand en draai deze los-
jes aan. Draai daarna de schroefverbindingen vast. 3.2.1 LET OP:
de schroefverbindingen met de dubbele markering voorzichtig
aandraaien. Pas dan de overblijvende verbindingen vastdraaien.
3.3 Op dezelfde wijze plaatst u de rechter zijwand.
3.
GB
F
NL
3.2.1 3.2.1
3.1.1 3.2
3.1
3.3
10
Montage der optionalen
Vorderwand
4.1 Legen Sie das Abschlussblech oben auf das Formrohr.
4.2 Verschrauben Sie das Abschlussblech an der linken
und rechten Seitenwand vorerst nur locker mit Schrau-
be/Mutter/Beilage.
4.3 Beim WS-230 montieren Sie zusätzlich die beiden
Vorderwandelemente links und rechts mit den Sechs-
kantblechschrauben/Beilagen.
4.3.1 Sechskant-Blechschrauben/Beilagen verbinden
die Seitenwand und das Vorderwandelement 4.3.2.
NUR bei WS-230:
4.4 Montieren Sie die Windhaken und Halter.
4.4.1 Schieben Sie den Schutzschlauch auf.
Installation of the optional front wall panels
4.1 Position the top edge of the covering panel onto the upper edge
of the upper front square pipe.
4.2 At first loosely attach the covering panel to the left and right side
panels with screws/washers.
4.3 For WoodStock 230, attach both of the additional front panels to
the left and right with self tapping screws/washers.
4.3.1 Using screws/nuts/washers connect the side walls with the
front panels 4.3.2.
ONLY for WS-230:
4.4 Install the retaining hooks and brackets.
4.4.1 Push the protecting sleeves onto the hooks.
Montage de la paroi avant en option
4.1 Placez la tôle maîtresse en haut sur le tube moulé.
4.2 Vissez tout d‘abord légèrement la tôle maîtresse sur les parois
latérales gauche et droite, en vous servant des vis/écrous/rondelles.
4.3. Dans le cas du WS-230, montez également les deux éléments
de paroi avant droite et gauche au moyen des vis à tôle à tête six
pans/rondelles.
4.3.1 Les vis/écrous/rondelles fixent la paroi latérale et l‘élément de
la paroi avant 4.3.2.
UNIQUEMENT dans le cas du WS-230 :
4.4 Montez les crochets contre le vent et les supports.
4.4.1 Enfilez la gaine de protection sur le crochet.
Montage van de optionele voorwand
4.1 Plaats de afsluitplaat boven op het frame.
4.2 Schroef de afsluitplaat aan de linker en rechter zijwand eerst
losjes met schroeven/moeren/bijlagen vast.
4.3 Bij de WS-230 monteert u verder de beide voorwandelementen
links en rechts met zeskantschroeven/bijlagen.
4.3.1 Schroeven/moeren/bijlagen verbinden de zijwand en het
voorwandelement 4.3.2.
Alleen bij WS-230:
4.4 Monteer de windhaken en houders.
4.4.1 Schuif de beschermhoes erop.
4.
EXKURS:
Nur wenn Sie eine Vorderwand/Tür gekauft haben
Digression: Only applies when a front wall/door has been purchased
Montage supplémentaire :
uniquement si vous avez acheté une paroi avant/porte
Toevoeging: alleen wanneer u een voorwand / deur gekocht heeft
GB
F
NL
4.1
4.2
4.3 4.3.1
4.3.2
4.4.14.4