manuals.online logo
Brands
  1. Home
  2. •
  3. Brands
  4. •
  5. Biohort
  6. •
  7. Outdoor Storage
  8. •
  9. Biohort WoodStock Gr. 150 User manual

Biohort WoodStock Gr. 150 User manual

Aufbauanleitung Türpaket „WoodStock®“ Gr. 150/230
(bei nachträglichem Einbau)
Assembly manual for door package „WoodStock®“ - size 150/230
(for additional assembling)
Notice de montage pour le kit de porte „WoodStock®“ - taille 150/230
(pour le montage après coup)
Opbouwbeschrijving deurenpakket „WoodStock®“ - grootte 150/230
(bij inbouw achteraf)
Instrucciones de montaje de paquete de puertas - tam. 150/230
(para montaje posterior)
Istruzioni di montaggio per set di porte - misura 150/230
(quando retrofitting)
GB
FR
NL
DE
IT
ES
BIOHORT GmbH
www.biohort.com
Paket 1 Art.-Nr. Stück Maße/mm Art.-Nr. Stück Maße/mm
package 1 / paquet 1 item numb. / no. Ref. piece dimens./mesure item numb. / no. Ref. piece dimens./mesure
pakket 1 art. Nr. stuck matem art. Nr. stuck matem
Paket 2 Art.-Nr. Stück Maße/mm Art.-Nr. Stück Maße/mm
package 2 / paquet 2 item numb. / no. Ref. piece dimens./mesure item numb. / no. Ref. piece dimens./mesure
pakket 2 art. Nr. stuck matem art. Nr. stuck matem
onderdelenpakket voor deurenpakket voor "Woodstock"
X4000204 2
liste des pièces pour le kit de porte pour le "WoodStock"
part list for door packa
g
e for "WoodStock"
Stückliste Türenpaket zu "WoodStock"
Verbindungswinkel
attaching brackets / cornières de raccordement
verbindungshoek
X8000103 4
2105
Abschlussblech
covering panel / tôle maîtresse
afsluitplaat
850 X4000204 2 850
Schlossstange
locking bar / tige de la serrure
slotstange
X8*01110 1 1385 X8*02110 1
X8*00101 1 1750
Vorderwandelement links
front wall panel left / paroi avant gauche
Voorwand links
Deurvleugel links
X 4*00210
X 4*00220
Türflügel rechts
right door/ Porte droite
Deurvleugel rechts
left door / Porte gauche 1 X 4*00210 1 1725
X 4*300220 1 1725
Vorderwandelement rechts
front wall panel right / paroi avant droite
Benennung
description / dèsignation
beschrijving
Türflügel links
Voorwand rechts
1750
Größe 150 Größe 230
X8*00102 1
size 150 size 230
1725
1 1725
Hinweise/ImportentDetails/Conseils/Belangrijketips:
Vorliegende Aufbauanleitung gilt in erster Linie für den nachträglichen Einbau einer Vorderwand/Tür im WoodStock 150. Für
den WoodStock 230 beachten Sie bitte die
g
esonderten Hinweise!
The present assembly manual is valid primarily for the additional installation of a front wall/door in the WoodStock 150. For
the WoodStock 230
p
lease consider the se
p
arate instructions!
Cette instruction de montage vaut principalement pour I`installation supplèmentaire d`une paroi avant/porte dans le
WoodStock 150. Pour le WoodStock 230
,
veuillez considèrer les indications sè
p
arèes!
Deze opbouwbeschrijving geldt in de eerste plaats voor de inbouw achteraf van een voorwand/deur in de WoodStock 150.
Voor de Woodstock 230 dient u de se
p
arate beschri
j
vin
g
te hanteren!
X8000551 1 X8000552 1
Kleinteilepäckchen
small parts packet / paquet de petites fournitures
onderdelenpakket
1.1 Entfernen Sie die Sechskantblechschrauben im vorderen Dachbereich und schieben Sie das Abschlussblech oben zwischen die
Dachbleche und das obere Alu-Formrohr. Verschrauben Sie dann die Dachbleche, das Abschlussblech oben und das obere Alu-
Formrohr wieder locker.
1.2 Verschrauben Sie das Abschlussblech an der linken und rechten Seitenwand vorerst nur locker mit Schraube/Mutter/Beilage. An
der Pfeilposition verwenden Sie eine Sechskantblechschraube/Beilage.
NUR bei WS 230: 1.3 Setzen Sie die Vorderwandelemente links und rechts ein und verschrauben Sie diese locker mit den Sechskant-
blechschrauben/Scheiben. 1.3.1 Mit Schrauben/Muttern/Beilagen verbinden Sie die Seitenwand und das Vorderwandelement. 1.4.
Montieren Sie die Windhaken mit Halter und schieben Sie die Schutzschläuche auf.
1.1 Remove the self tapping screws at the front roof area and put the covering panel above between the roof panels and the upper profiled pipe.
Than screw the roof panels, the covering panel and the upper profiled pipe again loose together.
1.2 At first loosely attach the covering panel to the left and right side panels with screws/washers. At the positions shown by the arrows please use a
self tapping screw/washer.
ONLY for WS 230: 1.3 Insert the front wall panels on the left and on the right side and screw them with self tapping screws/washers. 1.3.1 Using
screws/nuts/washers connect the side walls with the front panels. 1.4. Install the retaining hooks and brackets and push the protecting sleeves onto
the hooks.
1.1 Enlevez les vis hexagonales de la avant région du toit et mettez le tôle maîtresse en haute entre les tôles du toit et le plus haut carneau. Puis
vissez les tôles du toit, la tôle maîtresse et le plus haut carneau lâchement.
1.2 Vissez tout d'abord légèrement la tôle maîtresse sur les parois latérales gauche et droite, en vous servant des vis/écrous/rondelles. Aux positions
de flèche veuillez utiliser une vis hexagonale p. tôle/rondelle.
UNIQUEMENT dans le cas du WS 230: 1.3 Installez les éléments de la paroi avant à gauche et à droite et vissez les éléments lâchement avec des vis
hexagonales p. tôle/rondelles. 1.3.1 Les vis/écrous/rondelles fixent la paroi latérale et l'élément de la paroi avant. 1.4. Montez les crochets contre le
vent et les supportset enfilez la gaine de protection sur le crochet.
1.1 Verwijder de zeskant verzinkte schroeven aan de voorzijde van het dak en schuif het bovenstuk van de voorwand tussen de dakplaten en het
bovenste aluminium frame. Zet de dakplaten, het bovenstuk van de voorwand en het bovenste aluminium frame weer losjes vast.
1.2 Schroef de afsluitplaat aan de linker en rechter zijwand eerst losjes met schroeven/moeren/bijlagen vast. Op de posities van de pijl dient u een
zeskant verzinkte schroef en toebehoren te gebruiken.
Alleen bij WS 230: 1.3 Plaats de voorwand elementen links en rechts en zet deze losjes vast met de zeskant verzinkte schroeven en toebehoren.
1.3.1 Schroeven/moeren/bijlagen verbinden de zijwand en het voorwandelement. 1.4. Monteer de windhaken en houders en schuif de
beschermhoes erop.
1.2
1.3
1.3.1
1.4
1.1
1.3
1.4
2.1 Verschrauben Sie den Scharnierunterteil (Prägung R) samt dem Versteifungsplättchen an der
rechten Seitenwand (bzw. beim WS-230 am rechten Vorderwandelement).
2.2 Beim WoodStock 230 verschrauben sie zusätzlich die Verbindungswinkel für Vorderwand.
2.3 Gleiches praktizieren Sie mit dem Scharnier links (Prägung L) samt Versteifungsplättchen an der
linken Seitenwand (bzw. beim WS-230 am linken Vorderwandelement).
2.4 Bringen Sie am linken Türflügel (=ohne Loch für Drehgriffzylinderschloss) oben und unten die
Scharnieroberteile (Prägung L beachten) samt den Versteifungsplättchen an.
2.5 Hängen Sie nun den linken Türflügel vorsichtig ein.
2.6 Pressen Sie oben und unten die Kunststoff-Führungen für die Verriegelungsstifte wie dargestellt
ein.
2.7 Führen Sie die Verriegelungsstifte ein und bringen Sie die weißen Gummipuffer am Türflügel
oben und unten (siehe Pfeile) an.
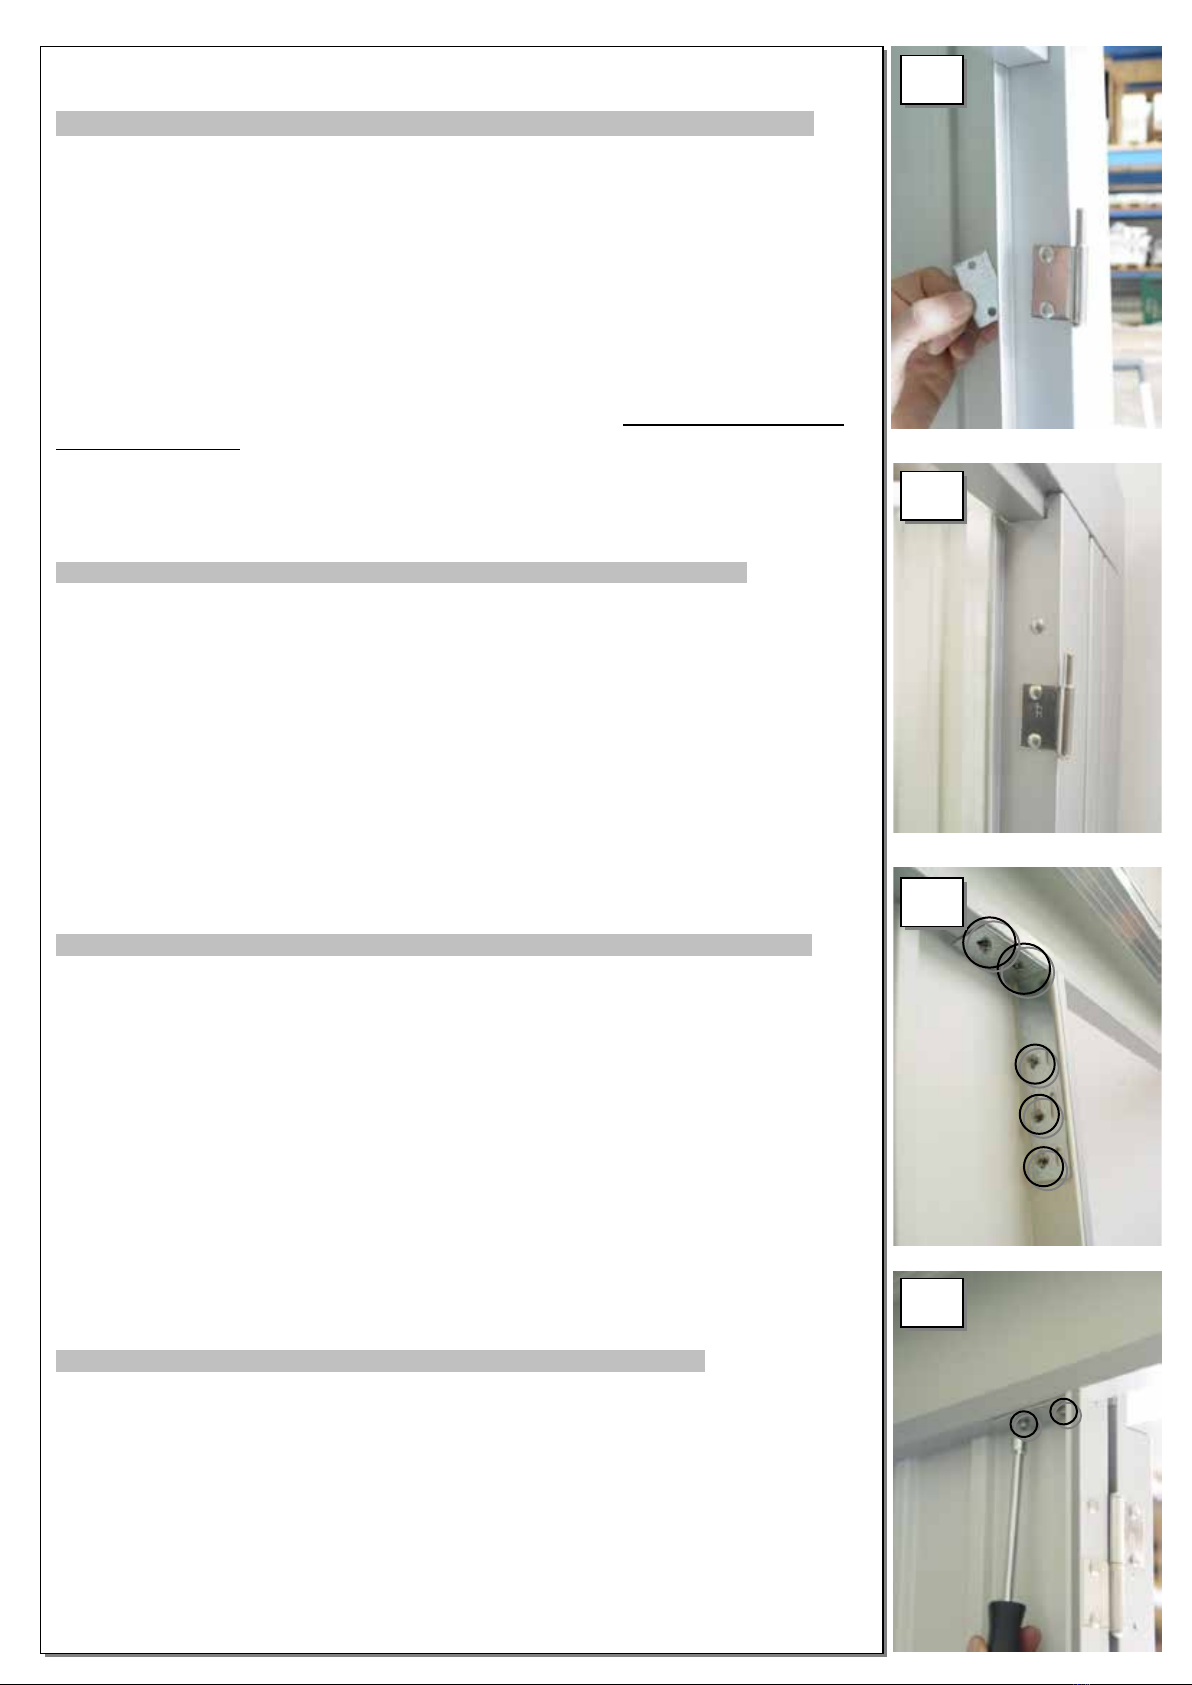
2.8 Verschrauben Sie nun noch das innenseitige Türversteifungsblech an den 4 Ecken mit Schrau-
ben/Beilagen/Muttern fest. Ziehen Sie die Muttern fest an –sie verleihen dem Türflügel die nötige
Steifigkeit (siehe Ringe).
2.1 Attach the lower hinge parts (stamped R) including reinforcement plates onto the top and bottom of the
right-hand side wall (or the right front panel element in the case of WoodStock 230).
2.2 In the case of the WoodStock 230 attach the ‘L’ shaped bracket provided for the front wall.
2.3 Now repeat the above steps to attach the lower hinge parts (stamped L) and reinforcement plates onto the
left hand side wall (in the case of WoodStock 230 the front wall element).
2.4 Now attach the upper hinge parts (stamped L) including reinforcement plates to the top and bottom of the
left door wing (door without hole for cylinder lock).
2.5 Hang the left door wing carefully onto the left lower hinges.
2.6 Push the plastic guides for the locking pins into the top and bottom of the door frame as shown.
2.7 Insert the locking pins into the guides and then insert the white rubber stops into the top and bottom of
the inside of the door (see circles).
2.8 Now firmly attach the door reinforcement plate to the inside of the door with bolts/nuts/washers at each
corner. Fasten the bolts tightly –the reinforcement plate provides the door with necessary rigidity (see circle).
2.1 Vissez la partie inférieure de la charnière (repère R - droite) avec son renforcement sur la paroi latérale de
droite (ou, dans le cas du WS-230, sur l'élément de droite de la paroi avant).
2.2 Dans le cas de WoodStock 230, vissez également les cornières de raccordement pour la paroi avant.
2.3 Répétez l’opération avec la charnière de gauche (repère L - gauche) avec son renforcement sur la paroi
latérale de gauche (ou, dans le cas du WS-230, sur l'élément de gauche de la paroi avant).
2.4 Fixez à présent, en haut et en bas, les parties supérieures des charnières (en respectant le repère L) avec
les renforcements sur le battant gauche de la porte (= sans évidement pour la serrure cylindrique à poignée
tournante).
2.5 Vous pouvez à présent suspendre le battant gauche de la porte.
2.6 En haut et en bas, enfoncez les tubes de guidage en plastique prévus pour les chevilles de verrouillage,
comme illustré sur la photo.
2.7 Introduisez les chevilles de verrouillage et placez les tampons blancs en caoutchouc sur le battant de la
porte en haut et en bas (voir flèches).
2.8 Vissez à présent la tôle de renforcement interne de la porte en ses 4 coins avec les vis/écrous/rondelles.
Serrez les écrous à fond : ils confèrent la stabilité nécessaire au battant de la porte (cf. cercles).
2.1 Schroef de scharnieren onderdeel (met R erop) samen met de ijzeren plaatjes aan de rechter zijwand (bijv.
Bij Ws 230 aan de rechter voorwandelement).
2.2 Bij Woodstock 230 schroeft u aanvullend de verbindingshaak voor de voorwand vast.
2.3 Hetzelfde doet u met de scharnier links (met L erop) samen met de ijzeren platen aan de lnker zijwand (of
bij de WS 230 aan de linker voorwandelement).
2.4 Plaats nu aan de linker deurvleugel (zonder gat voor de draaigreep cilinderslot) boven en onder de
scharnier bovenstuk (label L) samen met de ijzeren platen.
2.5 Hang nu de linker deurvleugel voorzichtig op.
2.6 Druk boven en onder de kunststof geleidingen voor de vergrendelingsstang, zoals getoond, erin.
2.7 Breng de vergrendelingspen aan en breng de witte kunststof stops aan de deurvleugel boven en onder (zie
pijl) aan.
2.8 Schroef nu de deurverstevigingsblik aan de binnenzijde op aan de 4 hoeken. Draai de moeren vast –dit
geeft de deur de nodige stevigheid (zie ringen).
2.1
2.1
2.2
2.2
Versteifungsplättchen für Scharnier-Oberteile (oben und unten mitverschrauben)
Reinforcement plate for upper hinge parts (attached top and bottom with screws)
Renforcements pour les parties supérieures des charnières (à visser en même temps en haut et en bas)
Verstevigingsplaten voor scharnier bovenstukken (boven en onder meeschroeven)
2.7
2.8
2.7
2.7
2.8
2.3
2.3
2.4
2.4
2.4
2.6
2.5
2.5
2.8
3.1
3.2
3.3
3.3
3.3
3.1 Die Scharnieroberteile für den rechten Türflügel (=mit Loch für Drehgriffzylin-
derschloss) montieren Sie ebenfalls mit den Scharnierversteifungsplättchen. Hän-
gen Sie den rechten Türflügel vorsichtig ein.
3.2 Nun pressen Sie oben und unten die Kunststoff-Führungen für die Schlossstan-
gen ein und bringen ebenfalls wieder die beiden Gummipuffer oben und unten an
(siehe Pfeil). Verschrauben Sie wieder das innenseitige Türversteifungsblech fest an
den 4 Ecken.
3.3 Montieren Sie nun das Schloss wie abgebildet mit den beiden Universalschrau-
ben. Achten Sie darauf, dass das BIOHORT-Logo nicht auf dem Kopf steht.
3.4 Hängen Sie die Schlossstangen in den Übersetzungshebel des Schlosses ein und
führen Sie die Schlossstangen oben und unten durch die Kunststoff-Führung.
3.5 Sichern Sie den Übersetzungshebel am Schloss mit einer Universalschraube.
3.1 Attach the upper hinge parts including reinforcement plates to the top and bottom of
the right door wing (door with hole for cylinder lock) and hang the door carefully onto the
right lower hinges.
3.2 Now insert the plastic guides for the locking bars and the white rubber stops (see cir-
cles) into the top and bottom of the inside of the door frame.
Finally firmly attach the door reinforcement plate to the inside of the door and fasten the
bolts tightly at each corner.
3.3 Now install the lock as illustrated with the slotted screws and ensure that the lock is
positioned with the Biohort-Logo is right. (as indicated in photo).
3.4 Hang the locking bars into the holes in the rotating lever of the lock and insert the lock-
ing bars into the plastic guides at the top and bottom of the door.
3.5 Secure the rotating lever onto the cylinder lock with a slotted screw.
3.1 Montez également avec leurs renforcements les parties supérieures des charnières
pour le battant droit de la porte (= avec évidement pour la serrure cylindrique à poignée
tournante. Suspendez avec précaution le battant droit de la porte.
3.2 Enfoncez maintenant, en haut et en bas, les tubes de guidage en plastique pour les tiges
de la serrure et placez également en haut et en bas les deux tampons en caoutchouc (voir
flèche). Vissez à nouveau à fond la tôle de renforcement interne de la porte en ses 4 coins.
3.3 Comme illustré sur la photo, montez la serrure avec les deux vis à fente, ainsi que leurs
rondelles d'arrêt.
3.4 Faites passer les tiges de verrouillage dans les leviers de transmission de la serrure puis
faites-les glisser en haut et en bas dans les tubes de guidage.
3.5 Fixez le levier de transmission sur la serrure à l'aide de la goupille de la serrure et des
rondelles.
3.1 De scharnier bovenstukken voor de rechter deurvleugel (met gat voor draaigreep
cilinderslot) monteert u eveneens met de scharnier verstevigingsplaten. Hang de rechter
deurvleugel voorzichtig op.
3.2 Druk nu boven en onder de kunststof geleidingen voor de slotstangen erin en breng
eveneens de beide kunststof stops boven en onder aan (zie pijl). Schroef weer de
deurversteviging aan de binnenzijde vast aan de 4 hoeken.
3.3 Monteer nu het slot, zoals afgebeeld, met beide borgpennen en veiligheidsringen.
3.4 Hang de slotstangen in de overheveling van het slot in en voer de slotstangen boven en
onder door de kunststof leidingen.
3.5 Zet de overheveling vast aan het slot met pen.
3.4
3.5
Fertigstellung: Zum Abschluss kontrollieren sie den festen Halt aller Schrauben und Muttern.
Completion: Make a final examination and check that all screws, bolts and nuts are tightly fitted.
Finition : A la fin du montage, contrôlez que toutes les vis et tous les écrous ont été serrés à fond.
Afwerking: Tot slot controleer of alle schroeven en moeren stevig zijn aangedraaid.
3.4
offen geschlossen
open closed
ouvert fermé
open gesloten
Version 09 / 2018
AvantGarde®
Passt bestens zu moderner
Architektur und macht
lebenslang Freude.
HighLine®
Das ultimative Gerätehaus, das
hinsichtlich Sicherheit und
Funktionalität
alle Anforderungen
erfüllt.
Geräteschrank
Wo Raum knapp ist, zeigt er
seine Klasse – im Garten, auf der
Terrasse, in der Garage.
Komposter MonAmi®
Vereint Zweckmäßigkeit mit
stilvollem Auftreten.
WoodStock®
Kaminholzlager und Geräteschrank
in einem, auch zum einfachen
Wand-Anbau geeignet.
MiniGarage
Multifunktionales Stauraumwunder
ohne Genehmigungspflicht.
HighBoard
Das formvollendete Multitalent
zum Aufbewahren. Mit Flügeltüren
und Deckelöffnung.
StoreMax®
Funktionelles Design für maximalen
Stauraum auf wenig Platz.
CornerBoard
Bietet wertvollen Platz auf Balkon
und Terrasse.
LoungeBox®
Die Design-Box für gehobene
Ansprüche - ein Schmuckstück
für Terrasse und Garten.
Panorama®
Dieses Satteldachmodell passt in jedes
Gartenpanorama. Stabilität und Design
für höchste Ansprüche.
Europa
Alles in bester Ordnung und
lebenslange Wartungsfreiheit
mit dem Biohort-Klassiker.
Biohort GmbH
Pürnstein 43, 4120 Neufelden, Österreich
Tel.: +43-7282-7788-0, Fax-DW: 190
E-Mail: offi[email protected], www.biohort.com
Ihr Fachhändler:
PEFC/06-39-28
5
Nebengebäude CasaNova®
Design, das sich Ihren Wünschen
anpasst.
HochBeet
Schönste Aussicht auf beste Ernte.
Pflanzbeet Belvedere®
Der Blickfang für die Terrasse.
NEU
FreizeitBox
Ideal zum Verstauen von Sitzkissen,
Sonnenliegen und Spielzeug.
EXTRA
PROSPEKT
anfordern unter
www.biohort.com
NEU
Y3535111

This manual suits for next models

1

Other Biohort Outdoor Storage manuals

Biohort HighBoard 160 User manual

Biohort

Biohort HighBoard 160 User manual

Biohort HighLine Series User manual

Biohort

Biohort HighLine Series User manual

Biohort Alex User manual

Biohort

Biohort Alex User manual

Biohort MiniGarage L User manual

Biohort

Biohort MiniGarage L User manual

Biohort WoodStock 230 User manual

Biohort

Biohort WoodStock 230 User manual

Biohort StoreMax 190 Use and care manual

Biohort

Biohort StoreMax 190 Use and care manual

Biohort HighBoard SE 160 User manual

Biohort

Biohort HighBoard SE 160 User manual

Biohort WoodStock 150 User manual

Biohort

Biohort WoodStock 150 User manual

Biohort Europa User manual

Biohort

Biohort Europa User manual

Biohort LEISURE TIME BOX 100 User manual

Biohort

Biohort LEISURE TIME BOX 100 User manual

Biohort GS 90 User manual

Biohort

Biohort GS 90 User manual

Biohort StoreMax 120 User manual

Biohort

Biohort StoreMax 120 User manual

Biohort AvantGarde User manual

Biohort

Biohort AvantGarde User manual

Biohort AvantGarde M User manual

Biohort

Biohort AvantGarde M User manual

Biohort LeisureTime Box 100 User manual

Biohort

Biohort LeisureTime Box 100 User manual

Biohort StoreMax 190 User manual

Biohort

Biohort StoreMax 190 User manual

Biohort HighLine Series User manual

Biohort

Biohort HighLine Series User manual

Biohort NEO 1A User manual

Biohort

Biohort NEO 1A User manual

Biohort Europa User manual

Biohort

Biohort Europa User manual

Biohort StoreMax 160 User manual

Biohort

Biohort StoreMax 160 User manual

Biohort MiniGarage User manual

Biohort

Biohort MiniGarage User manual

Biohort WOODSTOCK 300 User manual

Biohort

Biohort WOODSTOCK 300 User manual

Biohort PP4000 User manual

Biohort

Biohort PP4000 User manual

Biohort GS 150 User manual

Biohort

Biohort GS 150 User manual

Popular Outdoor Storage manuals by other brands

Palram CANOPIA RUBICON 6x10 / 2x3 How to assemble

Palram

Palram CANOPIA RUBICON 6x10 / 2x3 How to assemble

Asgard ACCESS quick start guide

Asgard

Asgard ACCESS quick start guide

Hoggar MALMO II user guide

Hoggar

Hoggar MALMO II user guide

Norbec ExSPACE installation guide

Norbec

Norbec ExSPACE installation guide

US Polymers Duramax 10 Ft Eco owner's manual

US Polymers

US Polymers Duramax 10 Ft Eco owner's manual

Forest garden WLSTOREFP quick start guide

Forest garden

Forest garden WLSTOREFP quick start guide

Lifetime 60012 manual

Lifetime

Lifetime 60012 manual

USP DuraMax 8 Ft x 8 Ft DuraPlus owner's manual

USP

USP DuraMax 8 Ft x 8 Ft DuraPlus owner's manual

SmartStore SM2520 Assembly instructions

SmartStore

SmartStore SM2520 Assembly instructions

Arrow Storage Products CLG1217CC Owner's manual & assembly guide

Arrow Storage Products

Arrow Storage Products CLG1217CC Owner's manual & assembly guide

Arrow Storage Products EP104AN Owner's manual & assembly guide

Arrow Storage Products

Arrow Storage Products EP104AN Owner's manual & assembly guide

Arrow Storage Products EP84 Owner's manual & assembly instructions

Arrow Storage Products

Arrow Storage Products EP84 Owner's manual & assembly instructions

Lifetime 60190 Assembly instructions

Lifetime

Lifetime 60190 Assembly instructions

garofalo TUSCANY user manual

garofalo

garofalo TUSCANY user manual

Rubbermaid 3746 Assembly instructions

Rubbermaid

Rubbermaid 3746 Assembly instructions

Backyard Products HEARTLAND CORONADO 12x8 Assembly manual

Backyard Products

Backyard Products HEARTLAND CORONADO 12x8 Assembly manual

Arrow Storage Products SFA105AN Owner's manual & assembly guide

Arrow Storage Products

Arrow Storage Products SFA105AN Owner's manual & assembly guide

Arrow Storage Products EG1014AB Owner's manual & assembly guide

Arrow Storage Products

Arrow Storage Products EG1014AB Owner's manual & assembly guide

manuals.online logo
manuals.online logoBrands
  • About & Mission
  • Contact us
  • Privacy Policy
  • Terms and Conditions

Copyright 2025 Manuals.Online. All Rights Reserved.