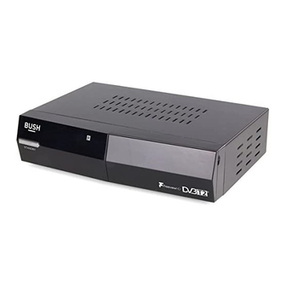
Bush DFTA46R User manual

INSTRUCTION MANUAL
Toll FreeWarranty and Service: 1800 509394
The Gold Technical Support Line:1902 215 259
(Charges will applyat $2.95 per minute for gold
technical support only)
DFTA46R
High Definition
Digital Set Top Box
With USB Record

Important Safety Instructions
Disclaimer
Information in this document is subject to change without notice.
The manufacturer does not make any representations or warranties
(implied or otherwise) regarding the accuracy and completeness of this
document and shall in no event be liable for any loss of profit or any
commercial damage, including but not limited to special, incidental,
consequential, or other damage.
Always read the safety instructions carefully
Keep this Instruction Manual for future reference
Keep this device away from humidity
Lay this device on a reliable flat surface before setting it up
Do not stand it on soft furnishings
If any of the following situation arises, get the Set Top Box checked by
a service technician:
It has been exposed to moisture
It has been dropped and damaged
It has obvious sign of breakage
It has not been working well or you cannot get it to work according
to the Instruction Manual
Warning
Toprevent the risk of electric shock, do not open the cover or the
back of the receiver.
Do not block the ventilation holes of the device. Leave appropriate
gap above and around it to allow for adequate ventilation.
Do not place the device in an unventilated cabinet or on top of a unit
which emits heat.
Copyright Statement
No part of this publication may be reproduced in any form by any means
without the prior written permission. Other trademarks or brand names
mentioned herein are trademarks or registered trademarks of their
respective companies.
1

The symbol indicatesthat dangerous voltagesconstituting a riskof
electric shock arepresent within thisunit.
The symbol indicatesthat there areimportant operating and
maintenance instructions inthe literature accompanyingthis unit.
This symbol indicatesthat this productincorporates double insulation
between hazardous mainsvoltage and useraccessible parts.when
servicing use onlyidentical replacement parts.
CAUTION:
When the apparatuswas in electrostaticcircumstance, it maybe
malfunction and needto reset byuser.
The USB memorystick should beplug in theunit directly. USB
extension cable shouldnot be usedto avoid failingof data transferring
and interference caused.
This marking indicates that this product should not be disposed with
other household wastes throughout the EU. To prevent possible harm
to the environment or human health from uncontrolled waste disposal,
recycle it responsibly to promote the sustainable reuse of material
resources. To return your used device, please use the return and
collection systems or contact the retailer where the product was
purchased. They can take thisproduct for environmentalsafe recycling.
2

Thank you for buying this Bush product, which is designed to give you many
years of trouble-free service.
You may already be familiar with using a similar unit, but please take time to
read these instructions. They are designed to familiarise you with the unit s
many features and to ensure you get the very best from your purchase.
Safety is important
Your safety and the safety of others is important. Please therefore, ensure you
read the Safety Instructions before you operate this unit.
Warranty
In the unlikely event that your product fails to work normally, please call the
below Bush warranty number for support.
Australia
Bush Warranty: 1800 509 394
New Zealand
Bush Warranty: 0800 450 259
Introduction
3

About the Set Top Box
An easyto use on-screeninstallation guide isprovided. In addition,
a fully featuredRemote Control isincluded that offers you access
to every featurewith a simplepress of abutton.
Main Features
Compliant withAustralian DVB-T Standards
Full MPEG2 ISO/IEC13818 TransportStream CompliantAudio/
Video Decoding
Bandwidth of 7/8MHzSupported
COFDM Demodulator
Automatic/Manual ChannelSearch
Channel Edit, Movingand Deletion
Parental Lock Control
EPG (Electronic ProgramGuide) and TeletextFunction (where
available)
HDMI Output
Multiple-Language OSD
Supports Multi-Subtitle
USB Input SupportsJPEG Files, MusicFiles, Video Files for
Recording and SoftwareUpgrade
Timeshift
Tuner RFIn/Loop Through
Full Function RemoteControl
Package Contents
Before installation, pleasecheck the itemsof the package.
The package should contain thefollowing items:
~ Set TopBox x1 pc
~ Remote Control x1 pc
~ AAABattery for theRemote Control x1pair
~ Instruction Manual x1 pc
~ Composite RCACable x1 pc
Component, Video output
Digital audio viacoaxial output
4
Thank you forchoosing this BushHigh Definition DigitalSet Top Box
with USB Record.As wellas receiving allstandard and highdefinition
digital free toair channels, youcan also recordyour favourite TV
programs via anexternal USB orHard Disk Drivedevice whilst
watching TV or pause andtime-shift live TV for aconvenient TV
experience.

Table of Contents
Front and Rear Panel .......................................................................... 6
Remote Control...................................................................................7
Connections..................................................................................9
First Time Installation........................................................................12
Troubleshooting......................................................................22
Technical Specifications....................................................................23
Warranty............................................................................................24
5

Front and Rear Panel
1. Front panel
1 STANDBY INDICATOR: Shows you the power state of the set top box,
the LED will turn red if the set top box is in standby mode and Green if it
is on.
2 REMOTE CONTROL SENSOR: Used to receive the signal from the
remote control.
3 USB Input: Allows you to connect your USB device to record or play
files.
4 LED DISPLAY WINDOW:Used to displaycurrent channel number.
1 RF IN:This socket connects to your external aerial.
2 RF LOOPTHROUGH: This socket willbypass the RFsignal to either
your TV or another videosystem.
3 COAXIAL: This socket connectsto a coaxialsocket on yoursurround
sound system.
4 HDMI OUT: This socket connectsto HDMI deviceto allow high
definition output.
5 VIDEO: This socket allows you toconnect your SetTop Box via
Composite Video Signal.
6These sockets connectto your TV
component input terminals.
7 AUDIO L/R: This socket allows you toconnect your SetTop Box to
receive theAudio L/R signal.
8 MAINS CABLE:This is usedto connect toyour main powersupply.
COMPONENT VIDEO OUT:
2. Rear panel
6
4
POWER SUPPLY: AC 230V ~50Hz
MAX POWER CONSUMPTION: 6 WATTS
BUSH WARRANTY: 1800 509 394 AUSTRALIA
BUSH WARRANTY: 0800 450 259 NEW ZEALAND
Serial No.:
DFTA46R/A
N14119
MADE IN PRC
AC 230V
~50Hz
2011/10

Remote Control
7
1. LIST: Press the List Button to displayyour recorded
programs list.
2. MUTE: Press the MuteButton to switchoff the
Sound only.Press again torestore audio output.
3. INFO: Press the INFOButton to displaythe current
channel information.
4. TTX: Press the TTXto enter the TeletextMenu.
5. SUBTITLE: Press the SubtitleButton to selectthe
subtitle setting.
6. EXIT: Press the Exit button to exitthe current Menu
or return tothe previous Menu.
7. OK: Press the OKButton to confirmsettings or menu
selections. Alsopress to displaythe channel list.
8. RIGHT/LEFT: Press the Navigate Buttons to move
through the Menuoptions or toincreases or decreases
the volume.
9. TV/RADIO: Press the TV/RadioButton to switch
between from TVand Radio mode.
10. RECALL: Press the RecallButton to goback to the
previous channel youwere watching.
11. GOTO:Press the GOTOButton to select the
multimedia option.
12. PREV:Press the PrevButton to skip to the
previous track inmultimedia mode ortimeshift in DTV
mode.
13. NEXT: Press the Next Button to skipto the Nexttrack in multimediamode or
timeshift in DTVmode.
14. REPEAT: Press the Repeat Button to repeatplay in multimediamode.
15. STOP: Press the StopButton to stopplay in Multimedia.
16. REC: Press the RecButton to recordthe program youare watching.
17. STANDBY: Press the StandbyButton to turnthe unit tostandby.
18. EPG: (Electronic Program Guide)Press the EPGButton to enterthe EPG
menu.
19. AUDIO: Press theAudio Button tochange the audiosettings.
20. UP /DOWN: Press the NavigateButtons to scroll through the Menu or to
scroll through thechannel list.
21. MENU: Press the MenuButton to enterthe Main Menu.
22. FAVOURITE: Press the FavouriteButton to enter the Menu.
23. 0-9 (NumericButtons): Press the Numeric Buttons to enter a channel
directly or settinginformation.
24. FWD: Press the FWDButton to FastForward in Multimediaor timeshift mode.
25. REV:Press the RevButton to Rewind in Multimedia or timeshift mode.
26. PLAY: Press the PlayButton to beginor resume play in multimedia mode.
27. PAUSE:Press the PauseButton to pauseplay in multimediamode or to
pause live TV.
28. COLOUR BUTTONS:Press the ColourButtons to selectdifferent options in
the menu, EPGand Teletext modes.
Installing the Batteries
Remove the battery cover from the Remote Control and put 2xAAA size
batteries inside thecompartment.
The diagram insidethe Battery Compartmentshows the correct way to install
the batteries.
1.Open the cover 2.Install batteries 3.Closethe cover
Using the RemoteControl
To use the Remote Control, point it towards the front of the Digital Set Top
Box. The Remote Control has a range of up to 7 metres from the Set Top Box
at an angleof up to60 degrees.
The Remote Controlwill not operateif its pathis blocked.
Sunlight or verybright light willdecrease the sensitivityof the
Remote Control.
8

AC 230V
~50Hz
Connecting to a Television
Caution: Make sure tocheck the voltage specification of the wall outlet is
the same ratingwith the receiver. To prevent therisk of electric shock, do
not open thecover or the back of the receiver.
Note: When connecting thereceiver to otherequipment, e.g., TV, VCR and
amplifier, makesure to referto relevant user manual for instruction.Also, make
sure you disconnectall the equipmentsfrom the mains supply before the
connection.
Composite Audio Connection.
For a basicconnection from yourSet Top Box tothe television, usethe
Composite connection outlinedbelow. Fora higher quality connection, use the
Component Video connectionoutlined with the
For the highestquality connection usea direct HDMI connection.
9
TV Aerial
Cr
Cb
Composite
HDMI
YELLOW
VIDEO IN
(Audio) (Video)

AC 230V
~50Hz
TV Aerial
10
Connecting to a DVD Recorder or VCR

11
Connecting to an Audio System
BASS
TREBLE
ECHO
DOWN UP
VOLUME
INPUT SELECTOR
MUTE
KARAOKE
CHANNEL
TEST
MODE
3STEREO
PROLOGIC
BYPASS
EXCITE
POWER
MIC
2
1
1
MICVOL
2
MIC
Amplifier
Coaxial
Coaxial cable
AC 230V
~50Hz

12
(1) Select [OSDLanguage] and
(2) Select [Country]and
(3) Select [ChannelSearch] and pressRIGHT or OK key tobegin
Automatic channel search
(4) Once channeltuning is complete,
Press the NavigateButtons to selectyour
desired language.
Press the NavigateButtons to selectyour desired
country.
can begin watchingTV.
First Time Installation
Installation Guide
OSD Language English
Country Australia
Channel Search
EXIT Confirm
EXIT OK
After all connectionshave been madeproperly, switch on TV and make
sure the receiveris connected tothe Main Power. Press thePower button
to switch receiveron. If youare using thereceiver for thefirst time orhave
restored to FactoryDefault, the will appear onyour TV
screen.
Installation Guide
Basic Operation
(1) Program ManageSettings
Toaccess the Menu,press the MENUbutton and select[Program]. The
Menu provides optionsto adjust theProgram Manage Settings.Select an
option and pressOK or RIGHTto adjust that setting. Press the EXIT button
to exit theMenu.

13
(2) Program Edit
Toedit your programpreferences (lock, skip,favourite, move ordelete), you
will need toenter the ProgramEdit Menu. ThisMenu requires a password to
access. Enter thedefault password '000000'.
Programme Edit
ALL TV
Move Skip Lock Delete FAV
FAV
001 TV3
003 3/24
004 K3/300
002 33
SKIP
Searching...
To cancel the skip, pres the GREEN button again and the skip
symbol will betaken off.
, or pressLeft/right
button to selectyour favourite type.

14
Move a TVor Radio Program/s
1. Select thepreferred program thenpress the REDbutton. A move symbol
will appear
2. Press UP/DOWNto move theprogram
3. Press OKto confirm
4. Repeat theabove steps tomove more channels
Lock Program/s
You can lock selected programs for restricted view.
Lock a TV or RadioProgram:
1.Select the preferredprogram then pressthe YELLOW button. Alock-shaped
symbol is displayed.The program is now markedas locked
2. Repeat theprevious step toselect more programs
3. To confirm andexit the menu, press the EXITbutton
4. Press theYELLOW button to disable thelocked program
5. To view thelocked program, you will be require to enter either the default
password '000000' oryour last setpassword.
(3) EPG (Electronicprogram guide)
The EPG is an on-screen TV guide that shows scheduled programs seven
days in advancefor every tunedchannel.
1. Press the[EPG] button.
2. Press [up]or [down] tomove through the programmes.
3. To move through the list ofchannels press [left]and [right].
4. To move forwards one day,press [RED]. To move backwards, press [GREEN]
5. To set a book list, press[INFO] then press[RED], follow theon screen
instructions to scrollthe programme youwant to set as a reminderto watch.
When the programmeis about tostart a reminder window will beshown.
6. Press [OK]to enter schedulebook, like schedule view and schedule
recording.

15
(1). Aspect Ratio
You must set thedisplay format toeither 4:3 PanScan, 4:3 Letter Box,16:9
Full Screen or4:3 Full, 16:9 Pillar Box, 16:9PanScan Auto to get the
maximum display when watching TV.
(2). Resolution
If the videodoes not appearcorrectly, change the setting.This setting is to
match the mostcommon setting forHDMI.
[480i]: for NTSCsystem TV.
[480P]: for NTSCsystem TV.
[576i] for PAL system TV.
[576P]: for PAL system TV.
[720P]: for NTSCor PAL system TV.
[1080I]: for NTSCor PAL system TV.
[1080P]: for NTSCor PAL system TV.
(3). TV format
If the videodoes not appearcorrectly, you need tochange the settings.
This should matchthe most commonsetting for TVs in yourcountry.
[NTSC]: for NTSCsystem TV.
[PAL]: for PAL system TV.
(6) Video Setting
To access the Menu,press MENU thenselect [Picture]. The Menu
provides options to adjust the videosettings. Press UP/DOWNto select an
option and pressRIGHT/LEFT to adjust that setting.Press EXIT to exit the
menu.
(7) Channel Search
and M
SC
s
to exit M
Toaccess the menu,press MENU select [Search Channel].The enu
provides options toadjust the earch hannel settings.
Select an optionand press RIGHT/LEFTto adjust thesetting .
Press EXIT the enu
(4) Sort
Sort your channelsfrom the following options:
[LCN] - Sortthe channels in ascending order
[Name] - Sortthe channels in alphabetical order
[Service ID] -Sort the channels according to thestation
(5) LCN (Logicalchannel number)
Set LCN onor off.

16
1 . Auto Search
Search and installall channels automatically. This option overwrites all
preset channels.
1. Select [AutoSearch] and pressOK or RIGHTto start channel search.
2. To cancel channelsearch, press EXIT.
2. Manual Search
Install new channelsmanually. This option adds new channels without
changing the currentchannels list.
1. Select [ManualSearch] then press OK or RIGHT. The channel search
screen will appear.
2. Press theRIGHT/LEFT key to select thechannel frequency
Manual Search
Frequency channel
Frequency(MHz)
Bandwidth:
EXIT Confirm
EXIT OK
10
212.5
7M
Quality
Channel Search
498.0MHz/8MHz
001 TVE1
002 La 2
003 24H TVE
004 CLAN TVE
001 RNE1
002 RNEC
003 RNE3
Radio: 003DTV:004
Progress
EXIT
EXIT MENU
Skip
3. Press OKto start searchingchannels
If a channelis found, itis saved andadded to thechannels list. Ifchannels
can’t be found,then exit themenu.
(3) Country
Select your countryof residence.
(4) Antenna power
Enable Antenna Power if anexternal active antennais connected.

17
(8) Time Setting
M then M
Press UP/DOWN tos
s .
To access the enu, press MENU select [Time]. The enu provides
options to adjustthe time settings.
elect an optionand press RIGHT/LEFTto adjust the
setting . Press EXIT to exit themenu
(1) Timeoffset
(2) Country Region
Select the CountryRegion when [Time Offset] is set toAuto.
Auto Standby (inactivitysetting) is usedto put theSet Top Box intostandby
if a buttonhasn't been pressedfor 3 hours.The default setting of theSet Top
Box is Off.
Toaccess the enu, press MENU select [Option]. The menu provides
options to adjustthe
Select an optionand press to adjust thesetting.
Press EXIT the enu
Select auto ormanual for GMToffset adjustments.
(3) TimeZone
Select the Time Zone Offset when [Time Offset] is set to Manual.
(9) Option
M and
OSD Language, SubtitleLanguage andAudio
Language. RIGHT/LEFT
to exit M
Auto Standby
(1). OSDLanguage
(2). SubtitleLanguage
(3). AudioLanguage
Select an OSDlanguage
Select the preferredsubtitle language.
Select the preferredaudio language forwatching TV channels.
If the languageis not available,the default programlanguage will beused.

18
(1) Parental Guidance
You can restrict access to channels that are unsuitable
for children. Torestrict/lock the channel you will needto enter eitherthe
default password '000000'or your ownpassword.
(2) Set Password
Set or changethe password forlocked programs. Enteryour old password
or the defaultpassword '000000'. You will then beasked to enter your new
password. To confirm re-enteryour new password.Once it isconfirmed,
press EXIT to exit theMenu.
Set Parental guidance
Press Menu buttonto access menuand Select System,choose parental
guidance, input yourpassword and setthe level. Then icon ofthe PG level
will be shownin the infobar of theprogram.
(3) Restore FactoryDefault
Reset your SetTop Box tothe Default FactorySettings.
In Main Menuselect [Restore FactoryDefault] and pressOK or RIGHTto
select. Enter yourpassword or thedefault password '000000'and press OK
to confirm. This option willdelete all presetchannels and settings.
(10) System Setting
M and
Press the UP/DOWNkey to s
M
To access the enu, press MENU select [System]. The menu
provides options toadjust the systemsettings.
elect an optionand press RIGHT/LEFTto
adjust the setting.
Press EXIT to exit the enu .

19
(4) Information
View model, hardware and softwareinformation.
(5) Software Update
1.OAD
When this optionis set to"On", the SetTop Box willbegin to searchfor new
software automatically, from overair broadcasts basedon your settime in
"Start Time".
2. USB upgrade
(11)USB
Toaccess the Menu,press the MENU button and select [USB]. The menu
provides options toplayback Music andPhoto files, itcan support
MP3,WMA,JPEG,BMP files, The unit will only supportUSB device with
FAT and FAT32 file system.It will notsupport NTFS filesystem.
(1) Multimedia: Once yourUSB is pluggedin, you canselect the Musicor
Photo type inthe multimedia menu.Press OK toenter the filebrowser and
select the fileyou wish toplay.
Please note: Ifno USB deviceis plugged in,a warning message"No USB
Device is Found"will be displayed.
New software updatedvia the USBport.
Table of contents
Other Bush Set-top Box manuals

Bush
Bush BU10FVZS1 User manual

Bush
Bush FVPZAPPER100 User manual

Bush
Bush DFTA52DAB User manual

Bush
Bush DFTA16HD User manual

Bush
Bush DFTA2 User manual

Bush
Bush BFSAT02SD User manual

Bush
Bush DFTA42FV User manual

Bush
Bush FREEVIEWHD DV3 T2 User manual

Bush
Bush BFSAT01HD User manual

Bush
Bush DFTA60BR User manual