CAS RW Series User manual

Road Weigher
-----------------------------------------------
MODEL : RW SERIES
-----------------------------------------------
OWNER'S MANUAL
(kg/lb Version)

Road Weigher
▩▩▩▩▩▩▩▩▩▩▩▩▩▩▩▩▩▩▩▩▩▩▩▩▩▩▩▩▩▩▩▩▩▩▩▩▩▩
- 2 -
Table of Contents
1. Introduction
·····················
······················
1
2. Feature
························
···························
2
3. Technical Specification
············
···········
3
◆ Overview
◆ Dimension
◆ Specification
◆ product
4. Connection for Scales
·············
···········
5
5. Charging
·························
·························
···
6
6. Front Panel Description
···········
··········
7
7. Test Mode
·······················
·······················
····
9
8. Set Mode
·······················
·······················
····
12
9. Calibration Mode
··············
15
10. Error Message and
Trouble Shooting
··············
··············
··
18

Road Weigher
▩▩▩▩▩▩▩▩▩▩▩▩▩▩▩▩▩▩▩▩▩▩▩▩▩▩▩▩▩▩▩▩▩▩▩▩▩▩
- 3 -
1. Introduction
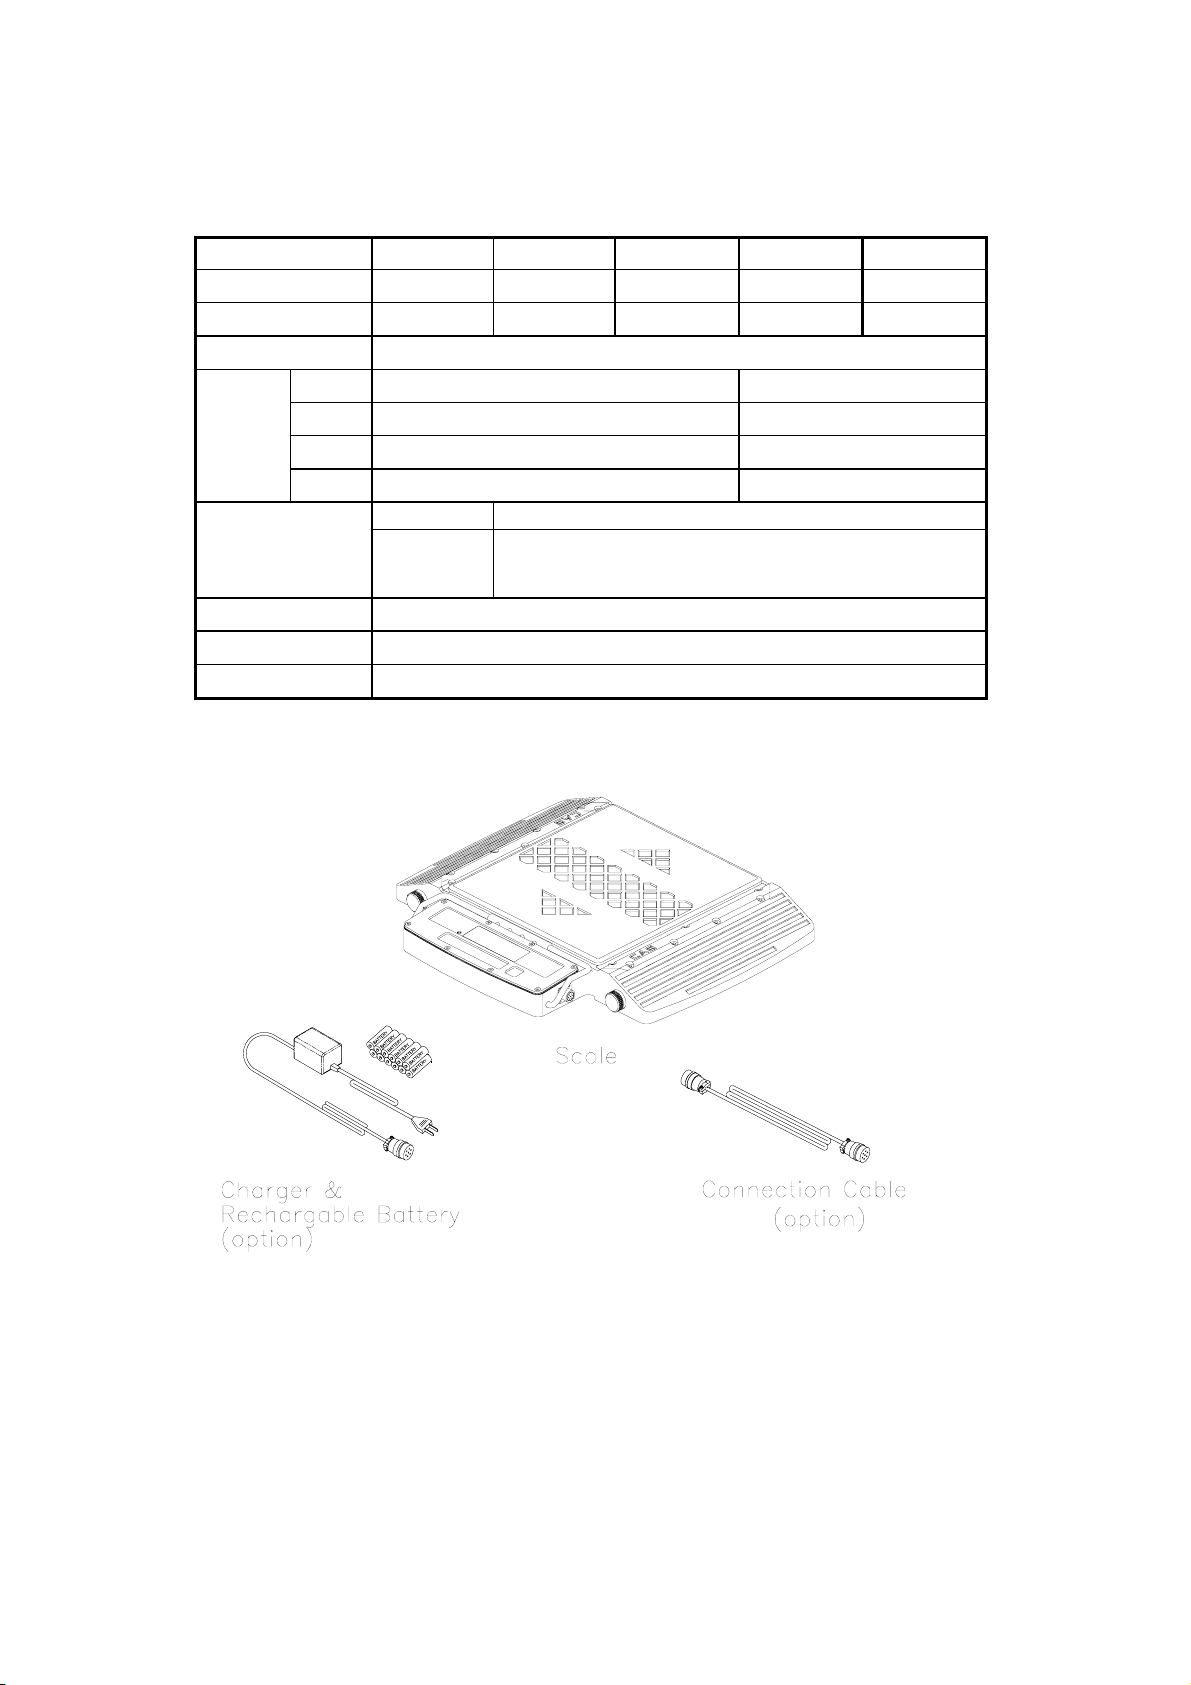
We greatly appreciate your purchase of CAS Road Weigher, which is used for
displaying the value of weight loaded on each shaft of vehicle.
These goods have hold excellent performance and
splendid properties through strike tests as well as devoting
ourselves under severe quality management.
Also, it is programmed on the basic of the user's convenience help display
functions to be used easily.
Before using road Weigher, It is recommended to read this manual
carefully and to apply the function application fully.
■ CAUTIONS
◆ Do not press the keys hardly, for the keys are in operation
with soft touch.
◆ Do not use ignitable material for cleaning.
◆ Avoid sudden temperature change.
◆ Do not install Road Weigher in a place with high voltage and
excessive electrical noises.
◆ Keep it in dry place.
◆ Do not use at the place with excessive electrical noises and
vibration.

Road Weigher
▩▩▩▩▩▩▩▩▩▩▩▩▩▩▩▩▩▩▩▩▩▩▩▩▩▩▩▩▩▩▩▩▩▩▩▩▩▩
- 4 -
2. Feature
◆ small size & Slim(height 60mm) type
◆ built in high accuracy load cell

Road Weigher
▩▩▩▩▩▩▩▩▩▩▩▩▩▩▩▩▩▩▩▩▩▩▩▩▩▩▩▩▩▩▩▩▩▩▩▩▩▩
- 5 -
3. Technical Specification
◆ Overview
RW-S TYPE
RW-L TYPE
◆ Dimension

Road Weigher
▩▩▩▩▩▩▩▩▩▩▩▩▩▩▩▩▩▩▩▩▩▩▩▩▩▩▩▩▩▩▩▩▩▩▩▩▩▩
- 6 -
◆ Specification
◆ Product
MODEL RW-02S RW-05S RW-10S RW-05L RW-10L
MAX. CAPACITY 2,000kg 5,000kg 10,000kg 5,000kg 10,000kg
MIN. DIVISION 1kg 2kg 5kg 2kg 5kg
ACCURACY 1%
P×P' 340×310 340×600
W 458 718
L 536 566
SIZE
H 60 60
NORMAL 1.5V AA size 12EA
POWER OPTION DC7.2V 2.6Ah BATTERY (AA size 12EA)
(AC 110V/220V Include Charger)
RUNING TIME 20hour (only charging battery,charging time 8hour)
DISPLAY 5digit LCD (height 25mm)
TEMPERATURE -10℃ ∼40℃

Road Weigher
▩▩▩▩▩▩▩▩▩▩▩▩▩▩▩▩▩▩▩▩▩▩▩▩▩▩▩▩▩▩▩▩▩▩▩▩▩▩
- 7 -
4. Connection for scales
for 2 scales for 4 scasles
for 6 scales

Road Weigher
▩▩▩▩▩▩▩▩▩▩▩▩▩▩▩▩▩▩▩▩▩▩▩▩▩▩▩▩▩▩▩▩▩▩▩▩▩▩
- 8 -
5. Charging
◆ changing battery
◆ Charger
Connection

Road Weigher
▩▩▩▩▩▩▩▩▩▩▩▩▩▩▩▩▩▩▩▩▩▩▩▩▩▩▩▩▩▩▩▩▩▩▩▩▩▩
- 9 -
■ DISPLAY
Road Weigher
CAPACI TY : 5, 0 0 0 x 2 k g
M ODEL : RW- 0 5 S
STABLE : lights up when the
weight to be in stable
condition.
ZERO :lights up when current
weight is 0 kg.
TOTAL : lights up when
press
ZERO
lb : current weight is lb
kg : current weight is kg

Road Weigher
▩▩▩▩▩▩▩▩▩▩▩▩▩▩▩▩▩▩▩▩▩▩▩▩▩▩▩▩▩▩▩▩▩▩▩▩▩▩
- 10 -
■ KEY
* How to enter TEST mode
Turn on the Power while pressing the
key and TEST mode starts
* How to enter SET mode
Turn on the Power while pressing the
key and SET mode starts
ZERO key : Used to return the display to the center of ZERO when the
platform is empty
kg/lb key : Display kg/lb by turn (U.S.A version)
PRINTER key : Print the current total weight
(the weight is added to the total weight of a vehicle)
TOTAL PRINT key: Display the total weight of a vehicle for a second
Print the total weight of a vehicle(summing each axle)
LOCAL/TOTAL key : Display local weight / current total weight in turn
LIGHT key : ON or OFF light in turn
ON/OFF key : Power on or off

Road Weigher
▩▩▩▩▩▩▩▩▩▩▩▩▩▩▩▩▩▩▩▩▩▩▩▩▩▩▩▩▩▩▩▩▩▩▩▩▩▩
- 11 -
7. Test Mode
(1) HOW TO ENTER
Press the "ON/OFF" key while pressing the
key and TEST menu starts.
(2) AVAILABLE KEYS
Key : Move to the left by 1 place of the set value.
Key
: Increase the first place set value to 1
Key : Move into next menu.
(3) Test Menu(TEST 1 - TEST 5)
Test 1 : Key test
Test 2 : LCD display test
Test 3 : Load cell test and A/D conversion test
Test 4 : Serial interface test(RS-232)
Test 5 : Printer test
T
TE
ES
ST
T
1
1
< Key Code >
FUNCTION : Key test
KEY LCD DISPLAY DESCRIPTION
LIGHT key :
Next menu
Other key :
Perform test
tESt1
1
Test 1 condition
Press the key to be test and the no.
and code of the key is displayed.
key CODE KEY CODE KEY CODE
ZERO 6 * 5 PRINT 4
TOTAL PRINT 3 LOCAL PRINT 2 LIGHT 1

Road Weigher
▩▩▩▩▩▩▩▩▩▩▩▩▩▩▩▩▩▩▩▩▩▩▩▩▩▩▩▩▩▩▩▩▩▩▩▩▩▩
- 12 -
T
TE
ES
ST
T
2
2
REF 1. Program is automatically shifted to menu selection mode after completing
T
TE
ES
ST
T
3
3
REF 1. Check whether digital value is changing
If the digital value is fixed or zero is displayed, please check the
connection of the load cell.
T
TE
ES
ST
T
4
4
FUNCTION : LCD display test
KEY LCD DISPLAY DESCRIPTION
tESt2
88888
Test 2 condition
Test 2 is performed automatically.
FUNCTION : Load cell test and A/D conversion
KEY LCD DISPLAY DESCRIPTION
LIGHT key:
Next menu
tESt3
5500
Test 3 condition
Display digital value of current
weight This value means converted
digital value.
FUNCTION : Serial interface test
KEY LCD DISPLAY DESCRIPTION
LIGHT key : Next menu
Other key :
Perform Test
tESt4
0---0
0---1
13--01
Test 4 condition
Wait for transmission and reception
transmit : 1, Receive : none
transmit : 1, Receive : 13

Road Weigher
▩▩▩▩▩▩▩▩▩▩▩▩▩▩▩▩▩▩▩▩▩▩▩▩▩▩▩▩▩▩▩▩▩▩▩▩▩▩
- 13 -
REF 1 Do this test after the connection between serial port of computer and
serial port of indicator
REF 2 Send no. 1 in computer keyboard and check if indicator receive no. 1
Send no. 1 in indicator keyboard and check if computer receive no. 1
T
TE
ES
ST
T
5
5
REF 1. "GOOD" message is displayed if the printer connector and specification
os done correctly. if not, " error 06" message is displayed.
REF 2. The test output format of printer is like follows.
* PRINTER FORM *
FUNCTION : Printer test
KEY LCD DISPLAY DESCRIPTION
LIGHT key :
Exit test mode
Other key :
Perform
tESt5
GOOD
ERR06
Test 5 condition
No error in printer
Check printer connector
TEST OK
1999. 3. 1 10:15:20
WEIGHT 1 1200 kg
WEIGHT 2 1200 kg
WEIGHT 3 1100 kg
WEIGHT 4 1100 kg
----------------------------
TOTAL 4600 kg

Road Weigher
▩▩▩▩▩▩▩▩▩▩▩▩▩▩▩▩▩▩▩▩▩▩▩▩▩▩▩▩▩▩▩▩▩▩▩▩▩▩
- 14 -
8. Set Mode
(1) HOW TO ENTER
Press the "ON/OFF" key while pressing the
key and TEST menu starts.
(2) AVAILABLE KEYS
Key : Increase the first place set value to 1
Key
: Move to the left by 1 place of the set value.
Key : Move into next menu.
(3) SET MENU(F01 - F14)
F01 : Select primary base unit (kg/lb)-U.S.A version
F02 : Designation of serial port usage(RS-232C)
F03 : Automatic Zero Tracking
F04 : Digital filter
F07 : Weight Back-up
F09 : Select the Back Light Mode
F10 : Device ID
F13 : Quantity of scales
F14 : Select option Clock

Road Weigher
▩▩▩▩▩▩▩▩▩▩▩▩▩▩▩▩▩▩▩▩▩▩▩▩▩▩▩▩▩▩▩▩▩▩▩▩▩▩
- 15 -
Select the primary base unit
0
Primary unit is kg
F01
1
Primary unit is lb
Serial port usage
0
Not used
F02
1
Connection with Serial printer
Automatic Zero Tracking
0
Not used.
F03
1
~
9
1 : 0.5 digit
~
9 : 4.5 digit
Auto zero tracking will automatic-
ally bring the displayed back to
"0" when there are small
deviations
Digital Filter
F04
1
~
9
1 : Less Vibration
~
9 : Much Vibration
Adjust the set value according
to the condition.
Select the wight Back-Up mode
0
Weight Back-up is off
F07
1
Weight Back-up is on

Road Weigher
▩▩▩▩▩▩▩▩▩▩▩▩▩▩▩▩▩▩▩▩▩▩▩▩▩▩▩▩▩▩▩▩▩▩▩▩▩▩
- 16 -
Select the Back Light mode
0
Manual Back Light Mode
F09
1
Automatic Back Light Mode
Device ID
F10
01
~
99
01 :
Device ID 01
~
99 :
Device ID 99
It is used the no. of
indicator when system
is connected.
Ouantity of scales
1 one scale
2 two scales
4 four scales
F13
6 six scales
Select option Clock
0 Not used
F14
1 Used

Road Weigher
▩▩▩▩▩▩▩▩▩▩▩▩▩▩▩▩▩▩▩▩▩▩▩▩▩▩▩▩▩▩▩▩▩▩▩▩▩▩
- 17 -
Change Date/Time (Ex. 1999/12/11 13:10:01)
LCD Display DESCRIPTION
C1 99 YEAR : 99
C2 12 MONTH : 12
C3 11 DAY : 11
C4 13 HOUR : 13
C5 10 MINUTE : 10
▲ : Increase of no.
◀ : Shift of digit
LIGHT : Store and
move into next menu
C6 01 SECOND : 01

Road Weigher
▩▩▩▩▩▩▩▩▩▩▩▩▩▩▩▩▩▩▩▩▩▩▩▩▩▩▩▩▩▩▩▩▩▩▩▩▩▩
- 18 -
9. Calibration Mode
(1) HOW TO ENTER
Open the front cover of RW and Press the "ON/OFF" key while pressing the
CAL s/w on the Display PCB.
Another : Turn on the Power while pressing the
key and press
key and CAL mode starts
(2) AVAILABLE KEYS
Key : Move to the left by 1 place of the set value.
Key
:Increase the first place set value to 1
Key : Move into next menu.
(3) Calibration Menu(CAL 1 - CAL 5)
CAL 1 : Maximum capacity setting
CAL 2 : Minimum division setting
CAL 3 : Span weight setting
CAL 4 : Zero calibration
CAL 5 : Span calibration
C
CA
AL
L
1
1
REF 1. The maximum capa. means the maximum weight that scale can measure.
ZERO
FUNCTION : Maximum Capacity SET
RANGE ---> 1 ∼ 99,999 kg/lb
KEY LCD DISPLAY DESCRIPTION
▲: Increase of no.
◀: Shift of digit
LIGHT : Store and
move into next menu
CAL 1
100
10000
CAL 1 condition
100 kg/lb
10000 kg/lb

Road Weigher
▩▩▩▩▩▩▩▩▩▩▩▩▩▩▩▩▩▩▩▩▩▩▩▩▩▩▩▩▩▩▩▩▩▩▩▩▩▩
- 19 -
C
CA
AL
L
2
2
REF 1. The minimum division means the value of one division.
REF 2. External resolution is obtained by division the min. division by the
maximum capacity. Set the resolution to be within 1/10,000.
C
CA
AL
L
3
3
REF 1. The weight shall be within the range of 10 % ∼ 100 % of maximum weight.
REF 2. If the Setting Weight is under the 10% of the Maximum Capacity,
Error message ("ERR 22") will occur.
REF 3. If the Setting Weight over the Maximum Capacity,
Error message ("ERR 23") will occur.
FUNCTION : Minimum Division SET
RANGE ---> 0.0005 ∼ 100 kg/lb
KEY LCD DISPLAY DESCRIPTION
▲: Input the next
division.
LIGHT : Store and
move into next menu
CAL 2
1
0.01
CAL 2 condition
1 kg/lb
0.01 kg/lb
FUNCTION : Setting Weight In Span CALIBRATION
RANGE ---> 1 ~ 99,999 kg/lb
KEY LCD DISPLAY DESCRIPTION
▲: Increase of no.
◀: Shift of digit
LIGHT :Store and
move into next menu
CAL 3
100
10000
CAL 3 condition
100 kg/lb
10000 kg/lb

Road Weigher
▩▩▩▩▩▩▩▩▩▩▩▩▩▩▩▩▩▩▩▩▩▩▩▩▩▩▩▩▩▩▩▩▩▩▩▩▩▩
- 20 -
C
CA
AL
L
4
4
REF 1. If Zero calibration is done without any error, GOOD message is displayed
and program moves into CAL 5 automatically.
C
CA
AL
L
5
5
REF 1. If Span calibration is done without any error, GOOD message is displayed
The weight of setting weight is displayed on LCD screen.
Check the weight.
REF 2. If the span is low, Error message (ERR 24) is displayed.
Calibrate with lower resolution.
FUNCTION : Zero Calibration
KEY LCD DISPLAY DESCRIPTION
LIGHT:
Zero calibration and
Move into next menu.
CAL 4
ULoAd
- - -
GOOD
CAL 4 condition
Unload the tray and press ENTER
Under zero calibration
Zero calibration is completed.
FUNCTION : Span Calibration
KEY LED DISPLAY DESCRIPTION
LIGHT:
Span calibration and
Move into next menu.
CAL 5
LoAd
- - -
GOOD
CAL 5 condition
Load the weight which was set in
CAL 3 and press LIGHT.
Under span calibration.
Span calibration is completed.
Press LIGHT key.
(Save & Exit CAL Mode)
Other manuals for RW Series
1
This manual suits for next models
2
Table of contents
Other CAS Scale manuals

CAS
CAS PR-II User manual

CAS
CAS PR Series User manual

CAS
CAS CL7200 series User manual

CAS
CAS DB-II series User manual

CAS
CAS RW-2000Z User manual

CAS
CAS CCB Series User manual

CAS
CAS LP-II Installation and maintenance instructions

CAS
CAS SW-1S Series User manual

CAS
CAS AP Series User manual

CAS
CAS HE-13 User manual