CAS CL7200 series User manual

1
CAS
ELECTRICS CO.,LTD
CL7200 Series
Service Munual
Rev. 2014. 12. 17

2
CAS
ELECTRICS CO.,LTD
1. Proper Operation
1.1 Introduction
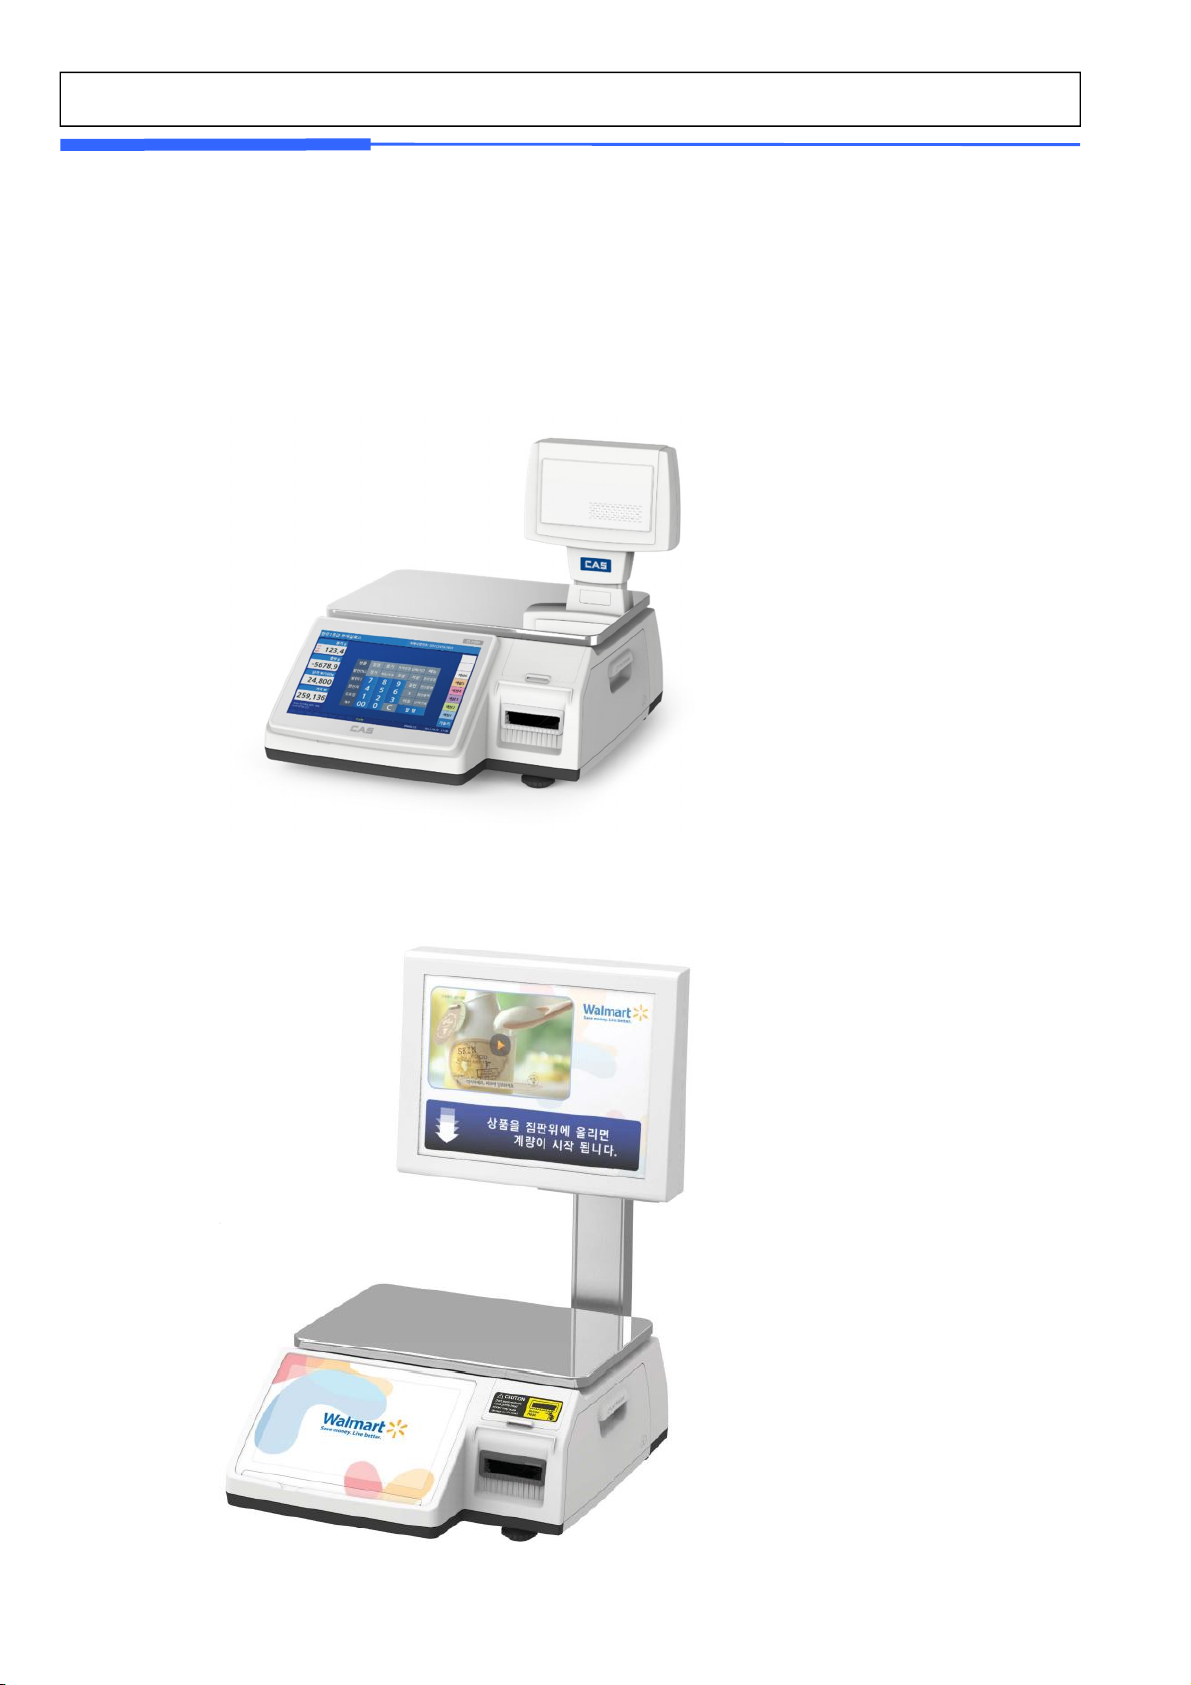
Thank you for purchasing the CAS CL7200 series price computing printer scale. We have designed
this equipment with advanced features, high quality construction, and user-friendly menu driven
programming. We are confident that you will find the CAS CL7200 series scale will meet all of your most
demanding needs.
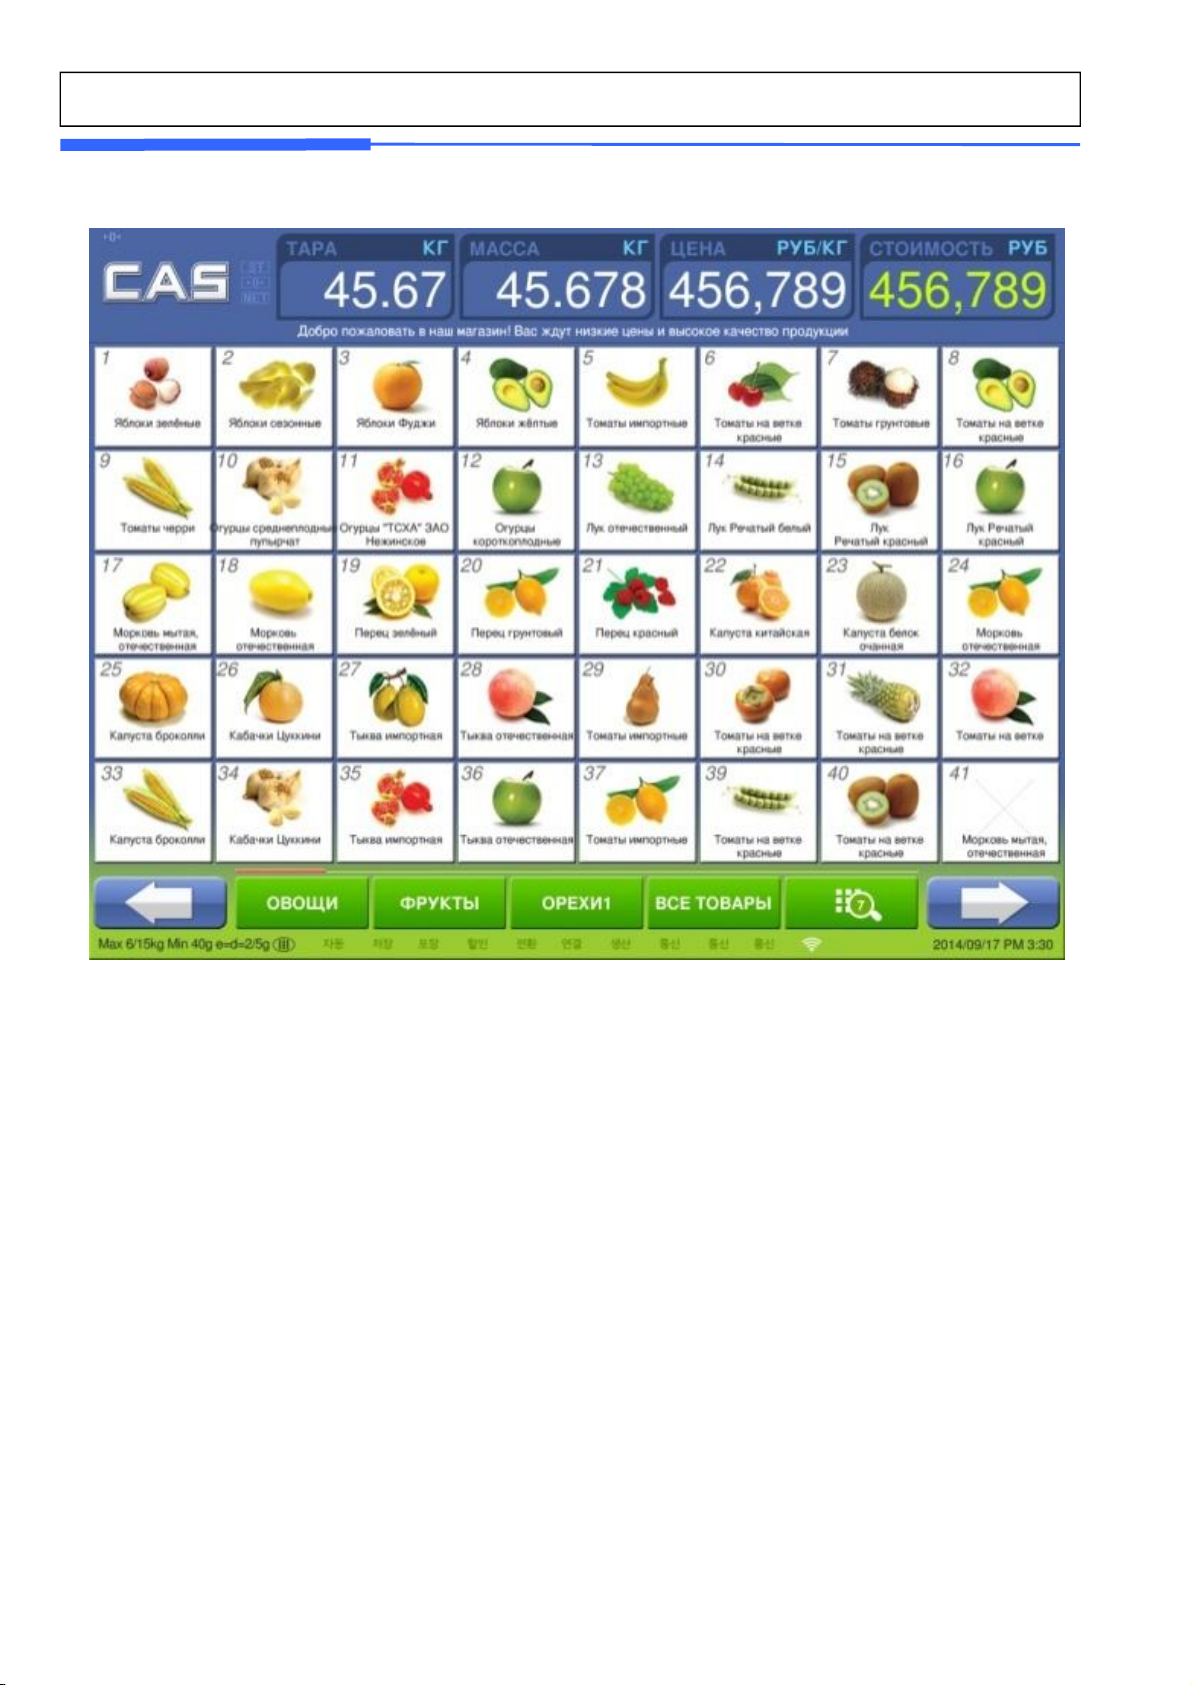
Sales data is easily acquired through many of the available reports which are quickly accessible through
the on-screen menus. Also available: High speed printer (4 inch per second), 53 preset keys (106 using
the SHIFT key or double click) per department, and several operation modes that enable you to control &
access to the scale.
For larger operations, CL7200 series has in-store network that can link-up to 32 scales. RS-232 port,
ethernet port, and wireless connection enable to export and import program data for time-save
mangement. On-time operation possible because of PLU and all other data files are kept locally in each
scale’s memory bank; the scale’s speed is the same as a stand-alone unit in a network.
The CL7200 series can use with both ticket and label. Auto measuring system enhances use any types
of roll paper. (Just entering a label’s length and width dimensions, you can use practically any roll) Also
cartridge loading mechanism helps to refill the label roll easyly. Also you can print logos, templates, Nutri-
Facts panels, ingredient messages, advertisement lines, and more to promots your store.
Remember, for proper installation and maintenance please read the CL7200 series Manual before use.
A wide variety of supplies, accessories, and expansion options are available through CAS Corporation for
whatever your new and increasing demands may require
The CL7200 series also comes with the SP-2 software package. This software runs on any PC using
the 95/98/2000/XP Windows OS. You can design your own label formats on your computer screen and
save them to your hard drive. With this percise interface, the labels you see on-screen appear exactly
on the printer. You can also manage all of the CL7200’s programs and options like pricing, PLU
programming, etc. You can upload data from a CL300 series or download data. This is ideal solution for
an emergency scale backup system. All this and many more features are packed into the SP-2 software
package. SP-2 software package enhances your business next level.

3
CAS
ELECTRICS CO.,LTD
1.2 Model and Specificationl
Model CL7200 Series
Capacity 15Kg 30Kg
Interval 2g/5g 5g/10g
Max Tare -5.998Kg -9.995Kg
Display
U-Type S-Type
Fornt : 10.2”TFT LCD (800x480)
Rear : 7” TFT LCD (800x480) 15” TFT LCD (1024x768)
Zero Pass Range 1~50% (default 10%)
Re-Zero Range 1~50% (default 2%)
Overload Range Max Capa. ~ Max Capa. + 255d (default Max+9d)
A/D Conversion Rate Approx. 8/sec
Measurement type Load cell
Platter type SUS
Key U-Type
PLU Key : 72
Function Key: 36 S-Type
PLU Key : 72,
Function Key: 36
Speed Key PLU Key : 144 PLU Key : 144
Data Table
PLU
1~99999 3000
Ingredient 510 Char
1~999 999
user defined Barcode Format
1~99 99
Department
1~99 99
Tax Type
1~9 9
Group
1~99 99
Clerk
1~99 99
Discount
- 99
Origin
1~499 499
Traceability
1~99 99
Slaughter House
1~99 99
Cutting Hall
1~99 99
Traceability Country
1~99 99
Label Format
Default :45, User:20
Bitmap
14 14
Customer
1~99 99
Quantity Symbol
1~8 8
Scroll Message
1~9 9
Pay Type
0~8 8
Sales Message
1~99 99
Nutrifact
1~500 500
Tare Table
1~99 99
Currency
1~4 4
Report X1/X2, Z1/Z2, Scale, PLU, Misc. PLU, Group, Department, Hourly, Clerk Report
Printing Resolution 202 dpi
Label Size Width: 40mm ~ 60mm, Length: 20mm ~ 200mm
Barcode Type EAN13, EAN13A5, EAN8, I2OF5, UPCA, UPC13, CODE39, CODE93, CODE128, CODABAR,
Font
Offer varoius sizes of label format, e.g Small, Middle, Large Size, and on the label format, also offers
varioous types of fonts, such as Italic,Bold,Underline,Throgh Line, Double through line, Reverse,shadow,
outline etc.
Printer Type Direct Thermal Print
Dimensions
U-Type 409 x 500 x 370 mm
U,S TYPE Tray : 380 x 250 mm
P-Type 409 x 486 x 545 mm

4
CAS
ELECTRICS CO.,LTD
1.3 Environmental Conditions & Safety
1) Please avoid the following hostile conditions
2) Environmental Protection
The scale should be installed in a dry and liquid free environment. When the scale is installed in a
high humidity or wet-type environment, be sure to avoid spilling or spraying directly on any surface
of the scale.
3) Personal Safety
It is very important to be aware of personal safety whenever maintaining or operating this equipment.
We have tried to place warning labels and other indicators at the actual location on the equipment
where the danger is most likely to occur. Warnings and cautions that are necessary for the safe
operation of the scale are contained in this manual. Please, make sure to read carefully ALL
warnings and cautions before operating the scale.
4) Observe the following safety precautions
Shut the scale OFF and unplug the scale whenever you are changing the label roll or whenever
working in the printer bay.
The outlet that the scale is plugged into, should be properly grounded.
Whenever connecting or disconnecting ANY cables from the scale, be sure to hold the cables by
the end connector. Failure to do so may cause a short circuit.
Maintain a static-free work area.
The outlet used must have the proper voltage ratings.
Temperatures below or exceeding:
-10° C ~ 40° C (14° F ~ 104° F)
Ungrounded electrical outlet
Excessive vibration Unstable or flimsy surface
Wind or fans functioning in direct
contact with weighing platform.
Shared electrical outlet
Direct sunlight Dust or dirt
High humidity Poor ventilation

5
CAS
ELECTRICS CO.,LTD
1.4 Leveling and Footer Location
1) Location
This scale must be placed on a flat and stable surface. Please keep the scale away from the
direct path of oscillating fans, ventilation systems, or strong drafts as these air disturbances can be
picked-up by the scale’s very sensitive weighing platform and may cause incorrect weight
readings.
1.1) General Footer
Factory setting (Footer location is following picture)
1.2) Short Case Footer
Unscrow the footer and place in center hole for narrow place.

6
CAS
ELECTRICS CO.,LTD
2) Leveling
If the scale is not properly leveled, please adjust the 4 adjustable legs at the bottom of the scale.
Turn the legs clockwise or counterclockwise so as to center the bubble of the leveling gauge inside
the indicated circle. Turning the adjustable legs counter-clockwise (viewed from top of scale) will
lower that part of the scale. Turning the adjustable legs clockwise (viewed from top of scale) will
raise that part of the scale. (See Fig.)

7
CAS
ELECTRICS CO.,LTD
1.5 Power Outlet and Requirements
Power Source : AC 100~240V, 50/60Hz, 1.5A
Power consumption : Max 90W
CL7200 series’s outlet is on bottom of scale.
The CL7200 series is designed to be used almost anywhere in the world! Like the many appliances of
today, the CL7200 series is designed with an automatically switching power supply. This allows
operation when connected to an AC source from 100V to 240V at 50/60Hz with 5% tolerance.
NOTE: Please make sure that the power lines used for the CL7200 series are dedicated lines with
No high-noise devices (such as compressors, motors, etc) running on it.
Also, make sure that the wiring to the electrical socket is correct.
If you are uncertain as to the state of your work’ electrical lines,
please contact a certified electrician.) Once you are sure as to the safety of the electrical line,
make sure to ONLY plug the scale into a 3- prong outlet. The third prong is a safety ground and an
electrician should properly wire this if it is not correct or if you are unsure. Failure to this CAN result in
electrical shock from use of this or any electronic scale.
3) Do not use any 3-prong to 2-prong adapters or break-off the third prong from the CLP power cord.
The third prong is necessary and must be properly connected.
4) If you have any problems or questions regarding this matter, make sure to contact the CAS Service
Department.
Power Outlet
Power Switch

8
CAS
ELECTRICS CO.,LTD
2. Classification
2.1 Scale Overview
CL7200 has 2 differrnt type Standard Type, Self Type.
■ Standard U-Type
■ Self-Type

9
CAS
ELECTRICS CO.,LTD
2.2 Display and Key
There is LCD(Front:800x480, Rear: 800x480) display on CL7200. LCD display indicates program tare,
weight, unit price, total price. Underbar inicates stable, net, zero, auto, save, prepack, D/C, shift, data
transfer.
LCD display shows menu massages for program mode.
■ CL7200-U
- CL7200 Sale mode(Operator View)
- Rear

10
CAS
ELECTRICS CO.,LTD
■ CL7200-S

11
CAS
ELECTRICS CO.,LTD
■ Indicators
SYMBOLS
DESCRIPTION
B, P, R, H
-
TYPE
G
-
TYPE
D
-
TYPE
ST ST STABLE Stable weight indicator
▶0◀ ZR ▶0◀ Zero weight indicator
NET NET NET Net weight indicator
AUTO AT AUTO Print Mode indicator
SAVE SV SAVE Auto clearing status indicator
PREPACK PRK PREPACK Auto clearing status and Print mode indicator
D/C DC D/C Discount status indicator
SHIFT SH SH Speed key shift status indicator
TR TR
Data transmission status indicator
M Master status indicator
S Slave status indicator
LN Ethernet Connection Status

12
CAS
ELECTRICS CO.,LTD
2.3 Printer
•Cartridge type print mechanism
•High quality ROHM printer
head (50km/5x107pulses)
•Improved a rotating force by
using 2 independent motors
•Large compartment for 120mm
paper roll
•High speed at 100 mm/sec.
•5 speed ranges for paper roll
quality adjustment
•Supports Paper
•Labels,
•Continuous strip labels,
•Lineless paper

13
CAS
ELECTRICS CO.,LTD
2.4 Commuication
■ Standard
① RS232
② Cash Drawer
③ Ethernet
④ USB Device
⑤ USB Host x 2
■ Options
⑥ Wireless Ethernet Module
① RS232
③ Ethernet
②Cash Drawer
⑤ USB Host x 2
④ USB Device

14
CAS
ELECTRICS CO.,LTD
3. Getting Started
3.1 Sealing Method
■ Method 1
■ Method 2
■ Method 3
■ Method 4

15
CAS
ELECTRICS CO.,LTD
3.2 Installation of the Label Roll
■ Label Specifications
Outer diameter of roll : 100mm
Inner diameter of roll : 40mm
Width of receipt roll : 40, 50, 60mm
Width of label roll : 60mm(MAX)
■ Print Area
Width of label : 60mm(MAX)
Length of label : 120mm(MAX)
To install the label roll at ANY time you must follow the directions in this section:
1) Press the ON/OFF key and make sure that the display is completely off. Open the printer’s side-
access panel. (See fig.1)
2) Lift up TPH lever as fig 2.

16
CAS
ELECTRICS CO.,LTD
3) Remove cartridge as fig. 3.
4) Remove Pick-Up Spool assembley and paper guide from the cartridge as fig. 4.
4
5) Place the label in the scale as fig. 5
5
6) Press the FEED key.
NOTE: For auto label calibration press FEED key two or three times
* If label position is not correct, you have to check the followings:
a. Label size (Label setting menu)
b. Feed Adjustment (Feed adjustment menu)
c. Senseor calibration (Sensor Calibration menu)

17
CAS
ELECTRICS CO.,LTD
3.3 Program Menu and Tree
3.3.1 How to access PROGRAM MODE
You can see the Program Menu screen by pressing the MENU key.
- Lower end of left number represents the Page number of Main Menu and Lower end of right number
represents the Page number of Sub Menu.
- Left number, based on “/”, means Present Page and Right means the number of total pages. You can
enter the page where you want by pressing the arrow keys.

18
CAS
ELECTRICS CO.,LTD
3.3.2 Program Menu Tree
CODE Menu CODE Sub Menu І CODE Sub Menu Ⅱ
1100 PLU
1110 Change Price
1120
New/Edit
1130 Discount
1131 New/Edit
1132
List
1133 Delete 1137 Delete by PLU(DC)
1138
Delete by Dept(DC)
1139
Delete All
1140 Management
1141 Copy
1142 Delete 1147 Delete by PLU No.
1148
Delete by Dept. No.
1149
Delete All
1143 Move
1144 Inhibit
1145 PLU Sale Count
1150 List
1160 Speed Key 1161 Edit Speed Key
1162 Reset all setting
1170 Sample Printing
1200 PLU data table
Ⅰ
1210 Department
1211 New/Edit department
1212 List department
1213 Delete department
1220 Group
1221 New / Edit group
1222 List group
1223 Delete group
1240 Sales Message
1241 New / Edit Sales Message
1242 List Sales Message
1243 Delete Sales Message
1250 Origin
1251 New / Edit origin
1252 List origin
1253 Delete origin
1260 Barcode
1261 New / Edit barcode
1262 List barcode
1263 Delete barcode
1270 Tare
1271 New / Edit tare
1272 List tare
1273 Delete tare
1274 Tare key
1280 Unit Symbol
1281 New / Edit Unit Symbol
1282 List Unit Symbol
1283 Delete Unit Symbol
1300 PLU data table
Ⅱ
1310 Ingredient
1311 New / Edit Ingredient
1312 List Ingredient
1313 Delete Ingredient
1320 Nutrition facts
1321 New / Edit Nutrifact
1322 List Nutrifact
1323 Delete Nutrifact
1330 Traceability
1331 New / Edit traceability
1332 List traceability
1333 Delete traceability

19
CAS
ELECTRICS CO.,LTD
CODE Menu CODE Sub Menu І CODE Sub Menu Ⅱ
1300 PLU data table
Ⅱ
1340 Country
1341 New / Edit country
1342 List country
1343 Delete country
1350 Slaughter House
1351 New / Edit slaughter house
1352 List slaughter house
1353 Delete slaughter house
1360 Cutting Hall
1361 New / Edit cutting hall
1362 List cutting hall
1363 Delete cutting hall
1400 Store data table
1410 Store
1411 New / Edit Store
1412 List Store
1413 Delete Store
1420 Customer
New / Edit Customer
List Customer
Delete Customer
1430 Scroll Message
1431 Configuration
1432 Edit Scroll Message
1433 List Scroll Message
1440 Currency
1441 New / Edit Currency
1442 List Currency
1443 Delete Currency
1450 Job Batch Schedule
1451 New / Edit Schedule
1452 List Schedule
1453 Delete Schedule
1460 Scanner
1461 New / Edit Conv Table
1462 List Conv Table
1463 Delete Conv Table
1464 Scanner Config
1470 Label Format Key Table
1500 Global setting
1510 Label Format
1520 Barcode
1530 Discount
1531 Priority setting
1532 Weight discount
1533 Count discount
1534 PCS discount
1540 Tax 1541 Set Global Tax
1542 Global Tax No.
1600 Report
1610 X1 report
1611 Scale
1612 PLU
1613 Misc. PLU
1614 Group
1615 Department
1616 Hourly
1617 Clerk
1620 Z1 report
1630 X2 report
1631 Scale
1632 PLU
1633 Misc. PLU
1634 Group

20
CAS
ELECTRICS CO.,LTD
1635 Department
1636 Hourly
1637 Clerk
1640 Z2 report
1650 Clear All
1660 Non-sending Report
Other manuals for CL7200 series
3
This manual suits for next models
4
Table of contents
Other CAS Scale manuals