CBX AURA-FIX User manual

CY_171_2993_A1217

AURA / AURA-FIX
USER GUIDE
AURA-FIX
USER GUIDE
SOLUTION 2-FIX
ECE R44/04 Gr. 2/3 | 15 – 36 kg
AURA-FIX
ECE R44/04 Gr. 1 | 9 – 18 kg
FRES NL DEENPT PLDK ITNOSE

2
121110987
1 2 3 4 5 6
> 24 M
max.
EN - WARNING! Without the approval of the certication ofce, the child car seat may not be modied or added to in any way. Repairs may only be performed by person authorised to this effect.
Only original parts and accessories may be used for repairs. Failure to comply with the above will result in the protective function of the child car seat no longer being guaranteed.
WARNING! The child car seat only offers optimum protection for your child if you follow the usage instructions precisely.
NO – Kort veiledning gruppe 1 (9-18 kg) | SV – Korta instruktioner grupp 1 (9-18 kg)
DE – Kurzanleitung Gruppe 1 (9-18 kg) | EN – Brief instructions Group 1 (9-18 kg) | IT – Istruzioni brevi Gruppo 1 (9-18 kg)
FR – Brèves consignes Groupe 1 (9-18 kg) | NL – Korte handleiding Groep 1 (9-18 kg) | PL – Skrócona instrukcja grupa 1 (9-18 kg)
DE - WARNUNG! Ohne vorherige Zustimmung der Zulassungsstelle dürfen keine Modikationen am Kindersitz vorgenommen und keine Teile hinzugefügt werden. Reparaturarbeiten dürfen ausschließlich
von entsprechend befugten Personen ausgeführt werden. Zur Reparatur dürfen nur Originalteile und Originalzubehör verwendet werden. Bei Nichtbeachtung der vorstehenden Hinweise kann die
Schutzfunktion des Kindersitzes nicht mehr gewährleistet werden.
WARNUNG! Sicherheit und optimaler Schutz für Ihr Kind mit diesem Kindersitz sind nur gewährleistet, wenn Sie die Bedienanweisungen genau beachten.
IT - AVVERTIMENTO! Senza l'approvazione dell'ufcio di certicazione il seggiolino auto non può subire modiche o aggiunte di alcun genere. Le riparazioni possono essere effettuate esclusivamente da
personale autorizzato in tal senso. È consentito l’uso solamente di parti e accessori originali per le riparazioni. Nel caso in cui non ci si attenga a quanto sopra, non potrà più essere garantita la funzione protettiva
del seggiolino auto per bambini.
ATTENZIONE! Il seggiolino auto per bambini offre il massimo della protezione per il proprio bambino solamente se si seguono scrupolosamente le istruzioni d’uso.
ES – Instrucciones abreviadas Grupo 1 (9-18 kg) | PT – Instruções breves, Grupo 1 (9-18 kg) | DA – Kort instruktion gruppe 1 (9-18 kg)
FR - AVERTISSEMENT ! Toute modication de ce siège auto pour enfant ou tout ajout est interdit sans l'approbation préalable du bureau de certication. Les réparations ne peuvent être effectuées que par une
personne autorisée à cet effet. Seuls les pièces et accessoires d'origine peuvent être utilisés pour les réparations. En cas de non-respect des consignes données ci-dessus, la fonction protectrice du siège auto pour
enfant ne sera plus garantie.
AVERTISSEMENT ! Le siège auto pour enfant offre une protection optimale pour votre enfant si vous suivez avec précision les consignes d'utilisation.
NL - BELANGRIJK! Zonder de goedkeuring van de certiceringsinstelling mag het autozitje niet worden aangepast en mag er niets aan worden toegevoegd. Reparaties mogen alleen worden uitgevoerd
door personen die daartoe bevoegd zijn. Er mogen uitsluitend originele onderdelen en accessoires worden gebruikt voor reparaties. Niet-naleving van het bovenstaande resulteert erin dat de beschermende
functie van het autozitje niet langer gegarandeerd is.
BELANGRIJK! Het autozitje biedt uw kind alleen optimale bescherming als u de handleiding precies volgt.

3
1 2 3 4 5
109876
max.
NO – Kort veiledning gruppe 2/3 (15-36 kg) | SV – Korta instruktioner grupp 2/3 (15-36 kg)
NO - ADVARSEL! Barnesetet får ikke endres eller tilleggs på noen måte før det er godkjent av statlig godkjennelsesinstans. Reparasjoner får kun utføres av personer som har godkjennelse for dette.
Man får kun benytte originaldeler og tilbehør ved reparasjoner. Hvis man ikke overholder dette vil garantien for barnesetets beskyttelsesfunksjon bortfalle.
ADVARSEL! Barnesetet gir kun best mulig beskyttelse for barnet ditt hvis du følger bruksanvisningen nøye.
SV - VARNING! Utan godkännande från certieringskontoret får bilbarnstolen inte ändras eller förses med extrautrustning på något sätt. Reparationer får endast utföras av personer som är auktoriserade för detta.
Det får endast användas originala komponenter och tillbehör för reparationer. Åsidosättande av ovanstående leder till att bilbarnstolens skyddsfunktion inte längre kan garanteras.
VARNING! Bilbarnstolen skyddar endast ditt barn optimalt om du följer bruksanvisningarna exakt.
DA - ADVARSEL! Uden godkendelse fra certiceringskontoret, må autostolen ikke forandres eller forsynes med ekstraudstyr på nogen måde. Reparationer må kun udføres af personer, der er autoriserede til dette.
Der må kun bruges originale dele og tilbehør til reparationer. Hvis ovenstående ikke overholdes medfører det, at autostolens beskyttende funktion ikke længere kan garanteres.
ADVARSEL! Autostolen beskytter kun dit barn optimalt, hvis du følger brugsanvisningen eksakt.
DE – Kurzanleitung Gruppe 2/3 (15-36 kg) | EN – Brief instructions Group 2/3 (15-36 kg) | IT – Istruzioni brevi Gruppo 2/3 (15-36 kg)
FR – Brèves consignes Groupe 2/3 (15-36 kg) | NL – Korte handleiding Groep 2/3 (15-36 kg) | PL – Skrócona instrukcja grupa 2/3 (15-36 kg)
ES – Instrucciones abreviadas Grupo 2/3 (15-36 kg) | PT – Instruções breves, Grupo 2/3 (15-36 kg) | DA – Kort instruktion gruppe 2/3 (15-36 kg)
ES - ¡ADVERTENCIA! La silla de coche infantil no puede ser modicada ni se le pueden añadir componentes sin la aprobación de la ocina de certicación. Las reparaciones las realizará únicamente una
persona autorizada para ello. Solo se utilizarán piezas y accesorios originales en las reparaciones. Si se incumple lo expuesto anteriormente, la función de protección de la silla ya está garantizada.
¡ADVERTENCIA! La silla de coche solo ofrecerá una protección óptima para el niño si usted sigue con precisión las instrucciones de uso.
PT - ATENÇÃO! Sem expressa autorização, a cadeira auto de criança não pode ser modicada ou complementada de nenhuma maneira. As reparações apenas devem ser efetuadas por pessoal autorizado.
Só podem ser utilizados acessórios e peças originais nas reparações. Em caso de incumprimento das especicações descritas em cima, não se poderá continuar a assegurar a função protetora da cadeira auto.
ATENÇÃO! A cadeira auto só oferece a melhor proteção à sua criança se seguir expressamente as instruções de utilização.
PL - OSTRZEŻENIE! Bez zatwierdzenia instytucji certykującej fotelika samochodowego nie wolno modykować ani rozbudowywać w żaden sposób. Naprawy mogą być wykonywane tylko przez osobę do tego
uprawnioną. Do napraw należy stosować wyłącznie oryginalne części i akcesoria. Nieprzestrzeganie powyższych zasad spowoduje, że nie będzie można zapewnić funkcji ochronnej fotelika samochodowego.
OSTRZEŻENIE! Fotelik samochodowy zapewnia optymalną ochronę dziecka tylko wtedy, gdy precyzyjnie przestrzegane są instrukcje użytkowania.

4
CERTIFICATION
CBX AURA-FIX
Recommended for:
Age: Approx. 9 months to 4 years
Weight: 9-18 kg
Only suitable for vehicle seats with automatic
three-point belts approved in accordance with
ECE regulation 16 or a comparable standard
ECE R-44/04,
CBX AURA-FIX - group 1, 9 to 18 kg
CBX SOLUTION 2-FIX - group 2/3, 15 to 36 kg
ECE R 44/04
____________
UNIVERSAL
SEMI-UNIVERSAL
9 - 18 kg
04301292
CYBEX GmbH
Riedingerstr. 18, 95448 Bayreuth
Germany
AURA-FIX
ECE R 44/04
____________
UNIVERSAL
SEMI-UNIVERSAL
15-36 kg
04301293
CYBEX GmbH
Riedingerstr. 18, 95448 Bayreuth
Germany
SOLUTION 2-FIX
APPROVAZIONE
CBX AURA-FIX
Raccomandato per:
Età: dai 9 mesi ai 4 anni ca.
Peso: 9-18 kg
Adatto esclusivamente ai sedili dei veicoli con cinture
automatiche a tre punti approvate ai sensi del rego-
lamento ECE 16 o di uno standard equivalente ECE
R 44/04,
CBX AURA-FIX - gruppo 1, da 9 a 18 kg
CBX SOLUTION 2-FIX - gruppo 2/3, da 15 a 36 kg
ZULASSUNG
CBX AURA-FIX
Empfohlen für:
Alter: ca. 9 Monate bis 4 Jahre
Gewicht: 9-18 kg
nur geeignet für Fahrzeugsitze mit Dreipunkt-Automa-
tik-Gurt, der nach ECE Regelung Nr. 16 oder gleich-
wertigem Standard zugelassen ist ECE R-44/04,
CBX AURA-FIX - Gruppe 1, 9 bis 18 kg
CBX SOLUTION 2-FIX - Gruppe 2/3, 15 bis 36 kg
SEHR GEEHRTE KUNDIN, SEHR GEEHRTER KUNDE!
Vielen Dank, dass Sie sich bei der Wahl eines Kindersitzes für den CBX AURA-
FIX entschieden haben. Bei der Entwicklung des CBX Kindersitzes AURA-FIX
haben Sicherheit, Komfort und Bedienfreundlichkeit im Vordergrund gestanden.
Das Produkt wird unter besonderer Qualitätsüberwachung hergestellt und erfüllt
strengste Sicherheitsanforderungen.
HINWEIS! Bewahren Sie die Anleitung immer griffbereit auf (z. B. im dafür vorge-
sehenen Fach an der Rückseite der Rückenlehne).
HINWEIS! Durch länderspezische Anforderungen (z. B. Farbkennzeichnungen
am Kindersitz) können Produktmerkmale in ihrer äußeren Erscheinung variieren.
Die korrekte Funktionsweise des Produktes wird davon jedoch nicht beeinusst.
WARNUNG! Um den optimalen Schutz für Ihr Kind zu gewährleisten, muss
der CBX AURA-FIX unbedingt so verwendet werden, wie es in dieser
Anleitung beschrieben wird.
!

5
ATTENZIONE! Utilizzare CBX AURA-FIX come descritto nelle presenti
istruzioni per assicurare la massima protezione del bambino.
DEAR CUSTOMER!
Thank you for choosing the CBX AURA-FIX child car seat. Safety, comfort and
ease of use were the foremost principles applied to the development of the CBX
AURA-FIX child car seat. This product is manufactured subject to special quality
assurance measures and satises the most stringent of safety requirements.
NOTE! Always keep these instructions to hand (e.g. in the designated compart-
ment on the rear of the backrest).
NOTE! Country-specic regulations (e.g. regarding colour-coding on child car
seats) may mean that product features may vary in appearance. This will, howe-
ver, not affect the product in its correct function.
WARNING! To ensure optimum protection for your child, the CBX AURA-
FIX must be used as described in these instructions.
! !
GENTILE CLIENTE!
Grazie per aver scelto il seggiolino auto CBX AURA-FIX per bambini. La sicurez-
za, il comfort e la semplicità d’uso sono stati i principi fondamentali applicati per
la progettazione del seggiolino auto per bambini CBX AURA-FIX. Questo prodot-
to è stato realizzato conformemente a speciali misure per assicurarne la qualità e
soddisfare le più rigorose norme di sicurezza.
NOTA! Tenere sempre a portata di mano le presenti istruzioni di sicurezza (per
es. nell'apposito scomparto nella parte posteriore dello schienale).
NOTA! Le norme nazionali (ad esempio rispetto alla codica cromatica dei
seggiolini) possono implicare che le caratteristiche esteriori del prodotto possano
variare. Ciò comunque non inuisce sul corretto funzionamento del prodotto.

INHALT
KURZANLEITUNG ...................................................................................................2
ZULASSUNG............................................................................................................4
ERSTMONTAGE ......................................................................................................8
DER RICHTIGE PLATZ IM FAHRZEUG ................................................................10
BEFESTIGEN DES KINDERSITZES
MIT DEM ISOFIX CONNECT SYSTEM .................................................................12
AUSBAU DES CBX AURA-FIX ..............................................................................14
DEN SITZ INS FAHRZEUG STELLEN ..................................................................16
ANPASSEN AN DIE KÖRPERGRÖSSE ...............................................................18
ENTNEHMEN DER ZUSÄTZLICHEN SITZEINLAGE ............................................18
ANSCHNALLEN MITTELS FANGKÖRPERS ........................................................20
ANSCHNALLEN OHNE FANGKÖRPER................................................................22
IST IHR KIND RICHTIG GESICHERT? .................................................................24
PFLEGE .................................................................................................................24
ENTFERNEN DES BEZUGES ...............................................................................26
REINIGUNG ...........................................................................................................26
VERHALTEN NACH EINEM UNFALL ....................................................................28
PRODUKTLEBENSDAUER ...................................................................................28
ENTSORGUNG ......................................................................................................28
GARANTIEBESTIMMUNGEN ................................................................................30

CONTENT
SHORT INSTRUCTION ...........................................................................................2
CERTIFICATION ......................................................................................................4
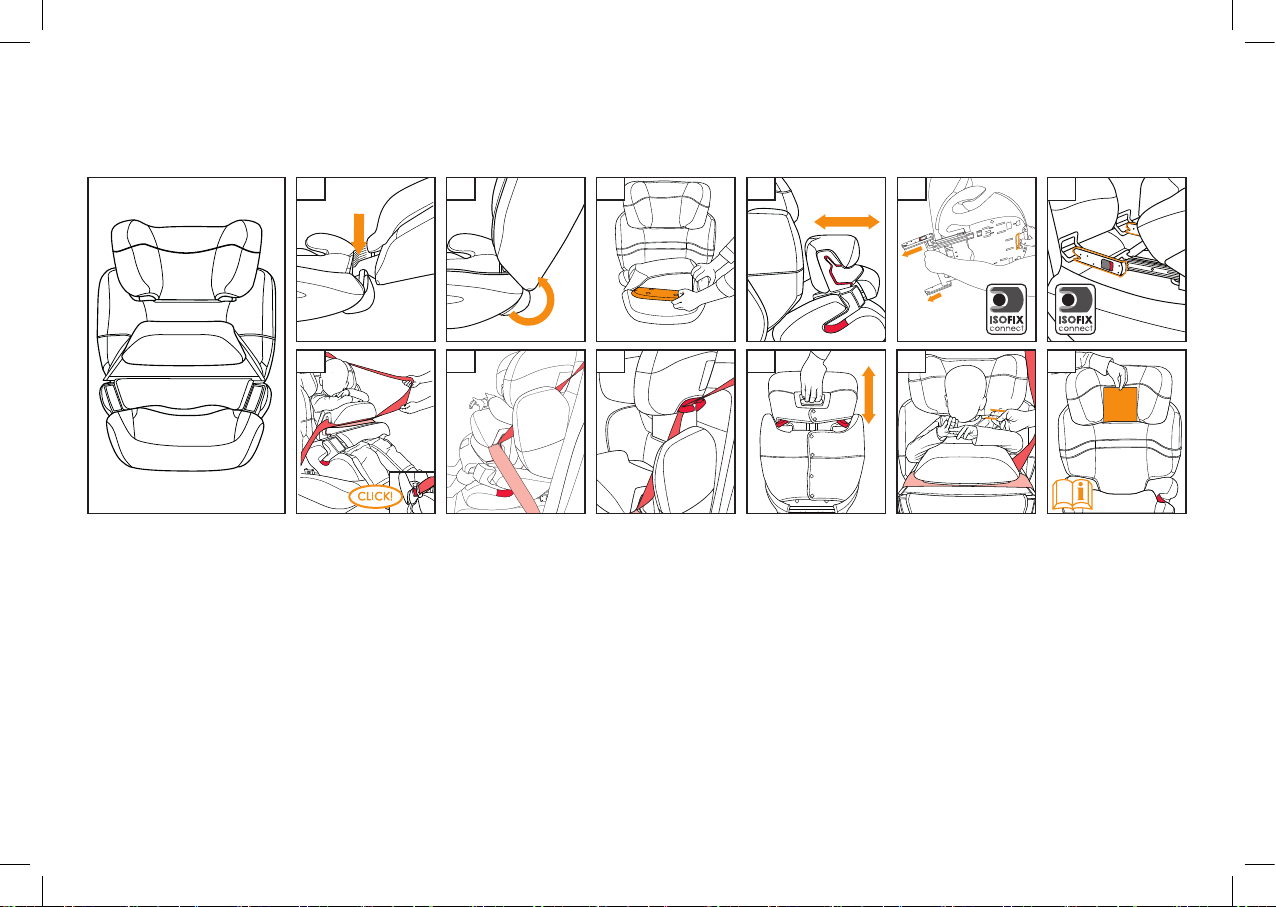
FIRST INSTALLATION .............................................................................................9
POSITIONING THE SEAT CORRECTLY IN THE VEHICLE ..................................11
SECURING THE CHILD CAR SEAT USING
THE ISOFIX CONNECT SYSTEM .........................................................................13
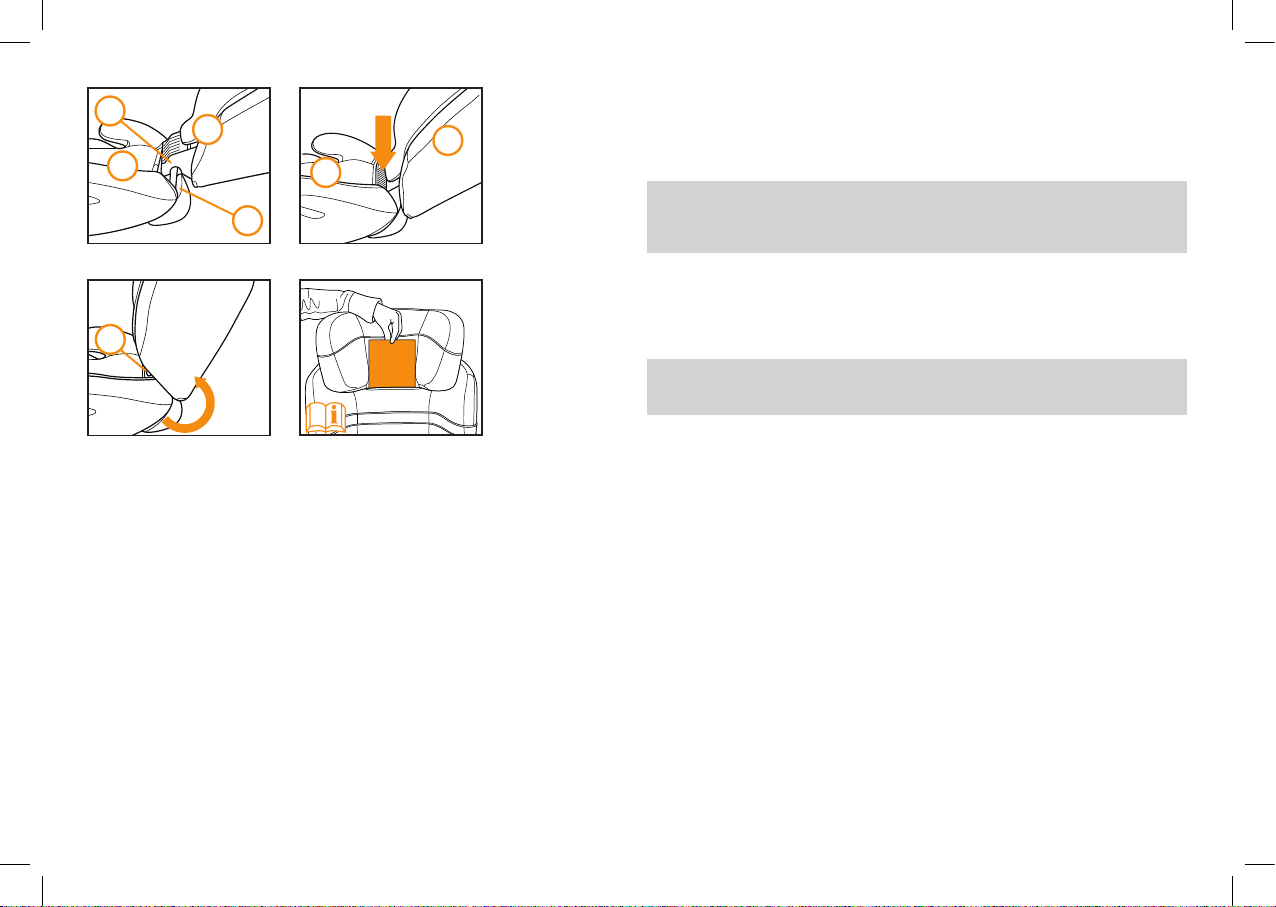
REMOVAL OF THE CBX AURA-FIX ......................................................................15
PLACING THE SEAT IN THE VEHICLE ...............................................................17
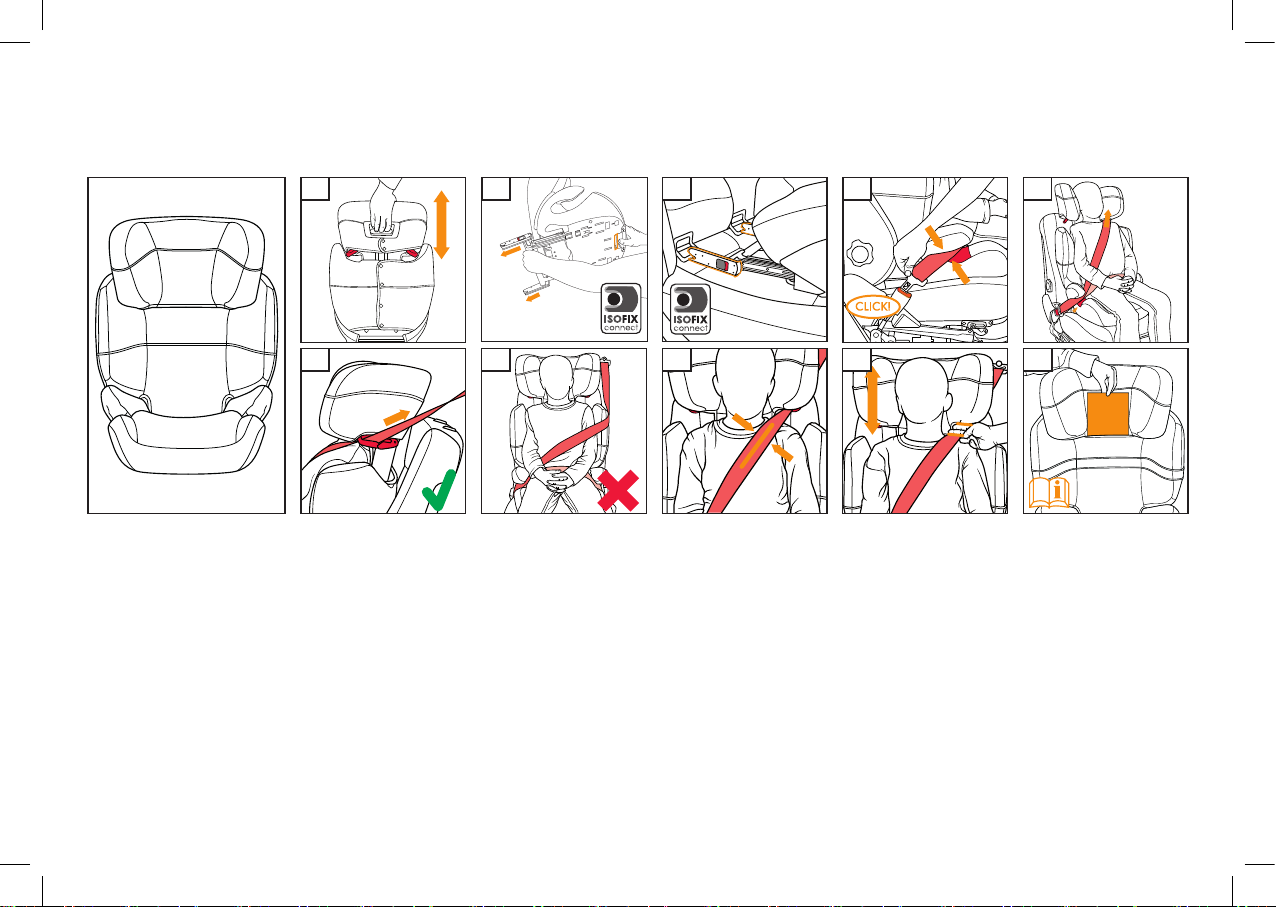
ADAPTING TO BODY SIZE ..................................................................................19
REMOVING THE ADDITIONAL SEAT INSERT .....................................................19
SECURING THE CHILD WITH THE IMPACT SHIELD .........................................21
SECURING THE CHILD WITHOUT THE IMPACT SHIELD .................................23
IS YOUR CHILD CORRECTLY SECURED?..........................................................25
CARE & MAINTENANCE .......................................................................................25
REMOVING THE SEAT COVER ............................................................................27
CLEANING .............................................................................................................27
HOW TO ACT FOLLOWING AN ACCIDENT .........................................................29
PRODUCT SERVICE LIFE ....................................................................................29
DISPOSAL ..............................................................................................................29
WARRANTY CONDITIONS ....................................................................................31
CONTENUTO
ISTRUZIONI BREVI .................................................................................................2
APPROVAZIONE .....................................................................................................4
PRIMA INSTALLAZIONE ..........................................................................................9
POSIZIONAMENTO CORRETTO DEL SEGGIOLINO AUTO NEL VEICOLO .......11
FISSAGGIO DEL SEGGIOLINO PER AUTO
CON IL SISTEMA ISOFIX CONNECT ....................................................................13
RIMOZIONE DI CBX AURA-FIX .............................................................................15
COLLOCAZIONE DEL SEGGIOLINO NEL VEICOLO ..........................................17
REGOLAZIONE IN BASE ALLA CORPORATURA ...............................................19
RIMOZIONE DELL’INSERTO AGGIUNTIVO PER LA SEDUTA.............................19
ALLACCIAMENTO UTILIZZANDO IL CUSCINO DI SICUREZZA .........................21
ALLACCIAMENTO SENZA IL CUSCINO DI SICUREZZA .....................................23
AVETE ASSICURATO CORRETTAMENTE IL VOSTRO BAMBINO? ...................25
CURA E MANUTENZIONE ....................................................................................25
RIMOZIONE DELLA FODERA DEL SEGGIOLINO ................................................27
PULIZIA ..................................................................................................................27
COME COMPORTARSI A SEGUITO DI UN INCIDENTE ......................................29
VITA UTILE DEL PRODOTTO ................................................................................29
SMALTIMENTO ......................................................................................................29
CONDIZIONI DI GARANZIA ...................................................................................31

8
3
3
11
22
4
ERSTMONTAGE
Der Kindersitz besteht aus einem Sitzkissen (1) und einer Rückenlehne (2) mit
höhenverstellbarer Kopfstütze. Nur die Kombination der beiden Teile bietet Ihrem
Kind den bestmöglichen Schutz und Komfort.
!WARNUNG! Die Bestandteile des CBX AURA-FIX dürfen weder einzeln, noch
in Verbindung mit Sitzkissen, Rückenlehnen oder Kopfstützen anderer Hersteller
oder einer anderen Baureihe verwendet werden. Die Zulassung würde in einem
solchen Fall sofort erlöschen.
Die Rückenlehne (2) wird mit der Führungsnase (3) auf der Achse (4) des
Sitzkissens (1) eingehakt.
Hinweis! Bitte bewahren Sie die Gebrauchsanleitung in Reichweite (z. B. unter dem
Bezug an der Vorseite der Rückenlehne) auf.
!WARNUNG! Achten Sie immer darauf, dass die Einzelteile des Kindersitzes
niemals gestaucht oder eingeklemmt werden (z. B. durch die Fahrzeugtür oder
durch Verstellen der Rückbank).

DEENIT
9
FIRST INSTALLATION
The child seat consists of a booster seat (1) and a backrest (2) with height
adjustable headrest. Only the combination of both parts provides best protection and
comfort for your child.
!WARNING! The parts of the CBX AURA-FIX must not be used alone or in com-
bination with boosters, backrests or headrests from other manufacturers or of a
different product series. In such cases, the homologation expires immediately.
Connect the backrest (2) to the booster (1) by hooking the guide lug (3) on the axis
(4) of the booster (1).
Note! Please keep the user guide close by for future reference (e.g. by storing it
under the cover at the front side of the backrest).
!WARNING! Please make sure that the plastic parts of the child seat never get
jammed (e.g. in the car door or by adjusting the back seat).
PRIMA INSTALLAZIONE
Il seggiolino è formato da una base seduta (1) e uno schienale (2) con un
poggiatesta regolabile in altezza. Solo la combinazione delle due parti fornisce la
migliore protezione e il massimo comfort per il vostro bambino.
!ATTENZIONE! Le componenti di CBX AURA-FIX non devono essere usate sepa-
ratamente o assieme a basi seduta, schienali o poggiatesta di altri produttori o di
altre serie di prodotti. In tal caso l’omologazione decade immediatamente.
Collegare lo schienale (2) alla base seduta (1) agganciando il binario di ancoraggio
(3) sull’asse (4) della seduta (1).
Nota! Tenere il manuale sempre a portata di mano per ogni futura consultazione
(per es. nella fodera della parte frontale dello schienale).
!ATTENZIONE! Assicurarsi che le componenti plastiche del seggiolino non siano
mai compresse (per es. dalla portiera o quando viene regolato lo schienale).

10
5
6
Der CBX AURA-FIX ist mit eingeklapptem ISOFIX Connect System auf
allen Fahrzeugplätzen mit Dreipunkt-Automatikgurt verwendbar, die im
Fahrzeughandbuch für die „universale“ Verwendung zugelassen sind.
WARNUNG! Gepäckstücke oder andere Gegenstände im Fahrzeug, welche
bei einem Unfall Verletzungen verursachen können, müssen immer gut
befestigt werden. Sie können zu tödlichen Geschossen im Fahrzeug werden.
!
Für die Befestigung mit den ISOFIX Connect Rastarmen (5) besteht eine
„semi-universale“ Genehmigung. Aus diesem Grund kann ISOFIX Con-
nect nur in bestimmten Fahrzeugen eingesetzt werden. Die zugelassenen
Fahrzeuge entnehmen Sie bitte der beigelegten Fahrzeugtypenliste. Die
aktuelle Version erhalten Sie auf www.mycbx.com.
In Ausnahmefällen kann der Kindersitz auch vorne am Beifahrersitz verwendet
werden. Beachten Sie dabei die folgenden Punkte:
• Bei Fahrzeugen mit Airbag sollten Sie den Beifahrersitz so weit wie möglich
nach hinten schieben. Beachten Sie jedoch, dass der obere Anlenkpunkt des
Fahrzeuggurtes hinter der Gurtführung des Kindersitzes bleibt.
• Die Empfehlungen des Fahrzeugherstellers sind unbedingt zu befolgen.
HINWEIS! Bitte lassen Sie Ihr Kind nie unbeaufsichtigt im Fahrzeug zurück.
WARNUNG! Der Diagonalgurt (6) muss schräg nach hinten verlaufen und
darf nie nach vorn zum oberen Gurtpunkt in Ihrem Fahrzeug führen. Sollte
dies nicht einzustellen sein z. B. durch Vorschieben des Autositzes oder
Verwendung auf einem anderen Sitzplatz, so ist der Kindersitz für dieses
Fahrzeug nicht geeignet.
!
WARNUNG! Auf Fahrzeugplätzen, die quer zur Fahrtrichtung angeordnet
sind, ist die Verwendung des Sitzes nicht zulässig. Auf rückwärtsgerichteten
Fahrzeugsitzen, wie z. B. in einem Van oder Minibus, ist die Verwendung
zulässig, sofern der Fahrzeugsitz für die Beförderung eines Erwachsenen
zugelassen ist. Zu beachten ist, dass die Fahrzeugkopfstütze bei
rückwärtsgerichtetem Einbau nicht entfernt werden darf! Der Kindersitz
muss auch dann, wenn er nicht benutzt wird, immer mit dem Fahrzeuggurt
befestigt sein. Dies gilt auch, wenn der Kindersitz bereits über das ISOFIX
Connect System mit dem Fahrzeug verbunden ist.
Bereits bei einer Notbremsung oder einem geringen Aufprall kann ein
unbefestigter Sitz andere Mitfahrer und Sie selbst verletzen.
!
WARNUNG! Der Sitz ist nicht für die Verwendung mit einem 2-Punkt- oder
Beckengurt geeignet. Wird der Sitz mit einem 2-Punkt-Gurt gesichert, kann
es bei einem Unfall zu schweren oder gar tödlichen Verletzungen des Kindes
kommen.
!
DER RICHTIGE PLATZ IM FAHRZEUG

DEENIT
11
The CBX AURA-FIX with retracted ISOFIX Connect system can be
used on all vehicle seats with automatic three-point safety belts ap-
proved in the vehicle manual for ‘universal’ use.
WARNING! Luggage or other objects present in the vehicle that may cause
injury in the event of an accident must always be firmly secured. Otherwise,
they may be thrown, causing fatal injuries.
!
A ‘semi-universal’ certication is given to restraint systems that are
connected to the car through ISOFIX Connect (5). For this reason,
ISOFIX Connect can only be used in certain vehicles. Please refer to the
enclosed vehicle type list for approved vehicles. You can obtain the most
up-to-date version from www.mycbx.com
In exceptional cases, the child car seat may also be used on the front passenger
seat. Please note the following in this case:
• In cars with airbags, you should push the passenger seat back as far as
possible. When doing so, however, ensure that the upper pivot point of the
safety belt is behind the belt feed point of the child car seat.
• Always comply with the recommendations of the vehicle manufacturer.
NOTE! Never leave your child unattended in the vehicle.
WARNING! The diagonal belt (6) must run back at a recline and must
never run forward to the upper belt point in your vehicle. If it is not possible
to adjust the seat in this way, e.g. by pushing the car seat forward or using
it on another seat, this child car seat is not suitable for your vehicle.
!
WARNING! The child car seat may not be used on car seats facing to the
side of the direction of travel. Use of the child car seat is permitted on rear-
facing seats, e.g. in a van or minibus, provided that the seat is permitted
for transporting an adult. Please note that the vehicle headrest must not be
removed when fitting on a rear-facing seat! Even if not in use, the child car
seat must always be secured with the safety belt. This applies even if the
child set has already been secured to the vehicle using the ISOFIX Connect
system.
An unsecured child car seat can injure other passengers and yourself even
when just performing an emergency brake or in the event of a minor collision.
!
WARNING! The seat is not suitable for use with a two-point or lap belt. If
the seat is secured using a two-point belt, an accident may result in severe
or even fatal injuries to the child.
!
CBX AURA-FIX con sistema di ancoraggio retraibile ISOFIX Connect
può essere utilizzato su tutti i veicoli con sedili dotati di cinture di
sicurezza automatiche a tre punti di ancoraggio indicati nel manuale
dell’autoveicolo come “universali”.
ATTENZIONE! Bagagli o altri oggetti presenti nel veicolo che possono
causare lesioni in caso di incidente devono essere fissati saldamente. In
caso contrario potrebbero essere scagliati e causare lesioni mortali.
!
Per i ssaggi con i bracci di bloccaggio (5)ISOFIX Connect è fornita
un'approvazione "semi-universale". Per questo motivo ISOFIX Connect
può essere usato solamente in certi veicoli. Fare riferimento alla lista
allegata per conoscere i veicoli approvati. La versione più aggiornata è
disponibile su www.mycbx.com.
In casi eccezionali, il seggiolino auto può essere usato sul sedile del passeggero
anteriore. In tal caso attenersi a quanto segue:
• Nei veicoli con airbag, posizionare il sedile del passeggero il più distante
possibile. Nel farlo accertarsi però che il punto di snodo superiore della cintura
di sicurezza sia dietro alla guida della cintura del seggiolino.
• Attenersi sempre alle raccomandazioni del produttore del veicolo.
NOTA! Non lasciare mai il bambino incustodito nel veicolo.
ATTENZIONE! La cintura diagonale (6) deve scorrere indietro inclinata e
non deve mai scorrere in avanti verso il punto superiore della cintura nel
veicolo. Se non è possibile regolare il sedile in questo modo, ad esempio
spingendo avanti il sedile o usando un altro sedile, il seggiolino per auto
non è adatto al vostro veicolo.
!
ATTENZIONE! Il seggiolino non è utilizzabile sui sedili rivolti lateralmente
rispetto alla direzione di marcia. L‘uso del seggiolino è ammesso sui sedili
orientati contro il senso di marcia, ad esempio nei furgoncini o minibus,
sempre che il sedile sia abilitato al trasporto di adulti. Notare che il
poggiatesta del veicolo non va rimosso in caso di montaggio su un sedile
rivolto indietro! Il seggiolino deve sempre essere assicurato con la cintura
di sicurezza, anche quando non è usato. Questo vale anche se il seggiolino
è già assicurato al veicolo con il sistema ISOFIX Connect.
Un seggiolino non assicurato può ferire gli altri passeggeri anche solo in
caso di frenata d‘emergenza o di collisione non grave.
!
ATTENZIONE! Il seggiolino auto non è adatto per l'uso con una cintura
subaddominale o a due punti di ancoraggio. Se il seggiolino viene
assicurato utilizzando una cintura a due punti di ancoraggio, in caso di
incidente il bambino sarebbe esposto a lesioni gravi o anche mortali.
!
POSITIONING THE SEAT CORRECTLY IN THE VEHICLE POSIZIONAMENTO CORRETTO DEL SEGGIOLINO AUTO NEL
VEICOLO

12
5
1
7 8
9
10 11
BEFESTIGEN DES KINDERSITZES MIT DEM ISOFIX CONNECT
SYSTEM
HINWEIS! Die ISOFIX Befestigungspunkte (8) sind zwei Metalllaschen pro
Sitzplatz und benden sich zwischen Rückenlehne und Sitzäche des Fahrzeug-
sitzes. Im Zweifelsfall nehmen Sie die Bedienungsanleitung Ihres Fahrzeuges zu
Hilfe.
HINWEIS! Überprüfen Sie vor dem Verbinden der ISOFIX Connect Rastarme (5)
mit den ISOFIX Befestigungspunkten (8) deren Entriegelungstasten (10). Sind
die grünen Sicherheitsindikatoren (11) zu sehen, müssen Sie vor dem Verbinden
zunächst die ISOFIX Connect Rastarme entriegeln, indem Sie die Entriegelungs-
taste (10) drücken und zurückziehen. Wiederholen Sie den Vorgang gegebenen-
falls auch beim zweiten Rastarm.
Ein vernehmbares Klickgeräusch ist bei korrekter Verbindung der ISOFIX
Connect Rastarme mit den ISOFIX Befestigungspunkten zu hören.
HINWEIS! Beachten Sie dazu den Abschnitt „Den Sitz ins Fahrzeug stellen“.
• Schieben Sie die beiden Rastarme (5) in die Einführhilfen (7), bis diese mit
einem hörbaren „KLICK“ an den ISOFIX Befestigungspunkten einrasten.
• Vergewissern Sie sich, dass der Sitz gut hält, indem Sie versuchen, ihn aus
den Einführhilfen (7) herauszuziehen.
• Der grüne Sicherheitsindikator (11) muss nun an den beiden
Entriegelungstasten (10) gut sichtbar sein.
• Mit dem Verstellgriff (9) am Sitzkissen (1) des CBX AURA-FIX Kindersitzes
können Sie nun die Position des Sitzes einstellen.
• Sie können jetzt Ihr Kind anschnallen; siehe Abschnitt „ANSCHNALLEN
MITTELS FANGKÖRPERS“.
• Hängen Sie die mitgelieferten Einführhilfen (7) mit der längeren Lasche
nach oben in den beiden ISOFIX Befestigungspunkten (8) ein. In manchen
Fahrzeugen eignet sich eine entgegengesetzte Einbaurichtung der
Einführhilfen (7) besser.
• Betätigen Sie den Verstellgriff (9) unter dem Sitzkissen (1).
• Ziehen Sie die beiden ISOFIX Connect Rastarme (5) bis zum Endanschlag.
• Drehen Sie nun die ISOFIX Connect Rastarme (5) um 180°, damit diese in
Richtung der Einführhilfen (7) zeigen.
Mit dem ISOFIX Connect System können Sie den CBX AURA-FIX mit
dem Fahrzeug verbinden und so die Sicherheit Ihres Kindes erhöhen. Ihr
Kind muss weiterhin mit dem 3-Punkt-Gurt Ihres Fahrzeuges angeschnallt
werden.

DEENIT
13
SECURING THE CHILD CAR SEAT USING
THE ISOFIX CONNECT SYSTEM
NOTE! The ISOFIX xture points (8) are two metallic clips for each seat and are
positioned between the backrest and the seating surface of the vehicle seat. In
case of doubt, please refer to the driver’s manual of your vehicle.
NOTE! Before clicking the ISOFIX Connect locking arms (5) into the ISOFIX
xture points (8), check the release buttons (10). If the green safety indicators
(11) are visible, you must rst release the ISOFIX Connect locking arms before
joining by pressing and pulling back the release button (10). Repeat the process
if necessary with the second locking arm.
A perceptible click will be heard when the ISOFIX Connect locking arm correctly
locks into place with the ISOFIX xture points.
NOTE! Note the information in the section “PLACING THE SEAT IN THE VEHICLE”.
• Push the two locking arms (5) into the ISOFIX guides (7) until these lock into
place in the ISOFIX fixture points with an audible ‘click’.
• Ensure that the seat is secure by trying to pull it out of the ISOFIX guides (7).
• The green safety indicator (11) must now be clearly visible on the two
release buttons (10).
• You can now use the adjustment lever (9) on the booster seat (1) of the CBX
AURA-FIX child car seat position.
• You can now strap in your child; refer to the section “STRAPPING IN USING
Impact shield”.
• Insert the supplied ISOFIX guides (7) with the longer strap upwards into the
two ISOFIX fixture points (8). In some vehicles, it is better to mount the ISOFIX
guides aids (7) in the opposite direction.
• Use the adjustment lever (9) under the seat cushion (1).
• Pull the two ISOFIX Connect locking arms (5) as far as they will go.
• Now twist the ISOFIX Connect locking arms (5) 180° so that they are facing
the direction of the ISOFIX guides (7).
Using the ISOFIX Connect system, you can x the CBX AURA-FIX to the
vehicle, thereby increasing your child’s safety. The child still needs to be
secured with the three-point belt of your vehicle.
FISSAGGIO DEL SEGGIOLINO PER AUTO CON IL SISTEMA
ISOFIX CONNECT
NOTA! I punti di ssaggio ISOFIX (8) sono due linguette metalliche per ogni sedi-
le, posizionate tra lo schienale e la supercie della seduta del sedile del veicolo.
In caso di dubbio consultare il manuale utente del proprio veicolo.
NOTA! Prima di unire i bracci di bloccaggio ISOFIX Connect (5) ai punti di ssag-
gio ISOFIX (8), controllare i pulsanti di rilascio (10). Se gli indicatori di sicurezza
verdi (11) sono visibili, prima dell’unione è necessario rilasciare i bracci di bloc-
caggio ISOFIX Connect premendo e tirando indietro il pulsante di rilascio (10). Se
necessario ripetere la procedura con il secondo braccio di bloccaggio.
Quando il braccio di bloccaggio ISOFIX Connect si unirà correttamente ai punti di
ssaggio ISOFIX si udirà un chiaro “clic”.
NOTA! Consultare la sezione “COLLOCAZIONE DEL SEGGIOLINO NEL
VEICOLO”.
• Inserire i due bracci di bloccaggio (5) nelle guide ISOFIX (7) fino a quando
non scattano nei punti di fissaggio ISOFIX, si udirà chiaramente un ‘clic’.
• Accertarsi che il seggiolino sia in sicurezza cercando di tirarlo fuori dalle guide
ISOFIX (7).
• L’indicatore di sicurezza verde (11) deve essere ora chiaramente visibile sui
due pulsanti di rilascio (10).
• Usare la leva di regolazione (9) sulla base seduta (1) del seggiolino per auto
CBX AURA-FIX per regolare la posizione.
• Ora è possibile allacciare il bambino; consultare la sezione “ALLACCIAMENTO
USANDO IL CUSCINO DI SICUREZZA”.
• Inserire le guide ISOFIX in dotazione (7) con la linguetta più lunga in alto nei
due punti di ancoraggio ISOFIX (8). In alcuni veicoli è preferibile montare gli
ausili delle guide ISOFIX (7) in direzione opposta.
• Usare la leva di regolazione (9) sotto il cuscino di seduta (1).
• Tirare quanto più possibile i due bracci di bloccaggio ISOFIX Connect (5).
• Ruotare poi di 180° i bracci di bloccaggio ISOFIX Connect (5) in modo che
siano rivolti verso le guide ISOFIX (7).
Con il sistema ISOFIX Connect è possibile ssare CBX AURA-FIX al
veicolo, aumentando così la sicurezza per il bambino. Il bambino va
comunque assicurato utilizzando la cintura a tre punti del veicolo.

14
5
10
11 5
1
9
7
AUSBAU DES CBX AURA-FIX
Führen Sie die Einbauschritte in umgekehrter Reihenfolge durch.
HINWEIS! Durch das Einklappen der Rastarme (5) schonen Sie nicht nur den
Fahrzeugsitz, sondern schützen auch die Rastarme des ISOFIX Connect Sys-
tems vor Verunreinigung und Beschädigung.
• Entriegeln Sie die ISOFIX Rastarme (5) beidseitig, indem Sie die
Entriegelungstasten (10) drücken und gleichzeitig zurückziehen.
• Ziehen Sie den Sitz aus den Einführhilfen (7).
• Drehen Sie die Rastarme (5) um 180°.
• Betätigen Sie den Verstellgriff (9) am Rahmen (1) des CBX AURA-FIX
Kindersitzes und schieben Sie die Rastarme bis zum Anschlag hinein.
WARNUNG! Bitte lassen Sie Ihr Kind nie unbeaufsichtigt im Fahrzeug
zurück. Die Kunststoffteile des Kindersitzes heizen sich in der Sonne
auf. Ihr Kind kann sich daran verbrennen. Schützen Sie Ihr Kind und den
Kindersitz vor intensiver Sonneneinstrahlung (z. B. indem Sie ein helles
Tuch über den Sitz legen).
!

DEENIT
15
REMOVAL OF THE CBX AURA-FIX
Perform the installation steps in the reverse order.
NOTE! By folding in the locking arms (5), you are not just protecting the vehicle
seat but also the locking arms of the ISOFIX Connect system from dirt and
damage.
• Unlock the ISOFIX locking arms (5) on both sides by pushing the
release buttons (10) and pulling them back simultaneously.
• Pull the seat out of the ISOFIX guides (7).
• Rotate the locking arms (5) 180°.
• Operate the adjustment lever (9) on the frame (1) of the CBX AURA-FIX and
push the locking arms in as far as they will go.
WARNING! Never leave your child unattended in the car. The plastic
parts in the child restraint system heat up in sun and the child may sustain
burns. Protect your child and the car seat from direct sun exposure (e.g. by
covering it with a light colored cloth).
!
RIMOZIONE DI CBX AURA-FIX
Eseguire i passi della procedura di montaggio nella sequenza inversa.
NOTA! Piegando all’interno i bracci di bloccaggio (5), si proteggono da sporco
e danni sia il sedile del veicolo che i bracci di bloccaggio del sistema ISOFIX
Connect.
• Sbloccare i bracci di bloccaggio ISOFIX (5) su entrambi i lati premendo
e tirando indietro simultaneamente i pulsanti di rilascio (10).
• Estratte il seggiolino dalle guide ISOFIX (7).
• Ruotare di 180° i bracci di bloccaggio (5).
• Azionare la leva di regolazione (9) sul telaio (1) di CBX AURA-FIX e spingere
all’interno i bracci di bloccaggio al massimo.
ATTENZIONE! Non lasciare mai il bambino incustodito nel veicolo. Le
parti in plastica del sistema di ritenuta del bambino si riscaldano al sole
e il bambino è esposto al rischio di ustioni. Proteggere il bambino e il
seggiolino auto dall'esposizione diretta al sole (ad es. coprendolo con un
telo chiaro).
!

16
2
DEN SITZ INS FAHRZEUG STELLEN
HINWEIS! An einigen Autositzen aus empndlichem Material (z. B. Velours,
Leder etc.) können durch die Benutzung von Kindersitzen mögliche Gebrauchs-
spuren und/oder Abfärbungen auftreten. Um das zu vermeiden, können Sie z. B.
eine Decke oder ein Handtuch unterlegen. Ferner weisen wir in diesem Zusam-
menhang auf unsere Reinigungshinweise in dieser Gebrauchsanleitung hin, die
vor der ersten Verwendung des Sitzes unbedingt beachtet werden sollten.
Stellen Sie den Kindersitz auf den entsprechenden Fahrzeugsitz im Auto.
• Achten Sie unbedingt darauf, dass die Rückenlehne (2) des CBX
AURA-FIX vollflächig an der Rückenlehne des Fahrzeugsitzes anliegt.
Der Kindersitz darf sich auf keinen Fall in einer Liegeposition befin-
den. Gegebenenfalls können Sie den Abstand mit dem Verstellgriff (9)
einstellen.
• Sollte die Kopfstütze des Fahrzeuges störend sein, ziehen Sie diese ganz
heraus oder nehmen Sie diese ganz ab (Ausnahme siehe Abschnitt „DER
RICHTIGE PLATZ IM FAHRZEUG“). Die Rückenlehne (2) passt sich optimal
stufenlos nahezu jeder Neigung des Fahrzeugsitzes an.
WARNUNG! Die Rückenlehne des CBX-Kindersitzes muss an der Lehne
des Fahrzeuges flächig aufliegen. Um den größtmöglichen Schutz für das
Kind zu gewährleisten, muss sich der Sitz in einer normalen aufrechten
Position befinden!
!

DEENIT
17
PLACING THE SEAT IN THE VEHICLE
NOTE! On some car seats made of sensitive materials (e.g. suede, leather
etc.), the use of child car seats may leave marks and/or cause discolouration. To
prevent this, you can place a blanket or towel underneath it, for example. Please
also refer in this connection to our cleaning advises in these usage instructions;
these cleaning instructions must be observed prior to using the seat for the rst
time.
Place the child car seat on the appropriate seat in the car.
• Always ensure that the entire surface of the backrest (2) of the CBX
AURA-FIX is placed fully against the backrest of the vehicle seat.
The child car seat must never be in a lying position. If necessary,
you can adjust the distance using the adjustment lever (9).
• If the headrest of the vehicle is in the way, pull it out all the way
or remove it completely (for exceptions to this, please refer to the section
“POSITIONING THE SEAT CORRECTLY IN THE VEHICLE”) The backrest (2)
will perfectly adapt to practically any recline of the vehicle seat.
WARNING! The full surface of the backrest of the CBX child car seat must
be against the backrest of the vehicle. To ensure maximum protection for
your child, the seat must be in a normal upright position!
!
COLLOCAZIONE DEL SEGGIOLINO NEL VEICOLO
NOTA! L'uso del seggiolino su alcuni sedili realizzati in materiali delicati (come
pelle scamosciata, pelle, ecc.) può lasciare tracce e/o causare scoloriture. Per
prevenire tale fenomeno utilizzare per esempio una coperta o un asciugamano
come appoggio. Al riguardo attenersi anche alle istruzioni di pulizia delle presenti
istruzioni per l'uso; le istruzioni di pulizia devono essere consultate prima del
primo uso del seggiolino.
Posizionare il seggiolino auto nel sedile dell’auto.
• Assicurarsi sempre che l’intera superficie dello schienale (2) di CBX
AURA-FIX poggi completamente contro lo schienale del sedile del
veicolo. Il seggiolino non deve mai essere usato in posizione stesa.
Se necessario è possibile regolare la distanza usando la leva di
regolazione (9).
• Se il poggiatesta del veicolo è di ingombro, alzarlo del tutto o rimuoverlo
completamente (per eccezioni fare riferimento alla sezione “POSIZIONAMENTO
CORRETTO DEL SEGGIOLINO NEL VEICOLO”). Lo schienale (2) si adatterà
perfettamente a qualsiasi reclinazione del sedile del veicolo.
ATTENZIONE! L'intera superficie dello schienale del seggiolino CBX
deve poggiare contro lo schienale del veicolo. Per assicurare la massima
protezione per il bambino, il sedile deve trovarsi nella normale posizione
eretta!
!

18
14
12
13 13
115
16
max.
Um den CBX AURA-FIX optimal an die Körpergröße anzupassen ist werkseitig
eine Sitzeinlage (12) mitgeliefert und bereits unter dem Bezug eingelegt.
HINWEIS! Nur eine in optimaler Höhe eingestellte Kopfstütze (13) bietet den
größtmöglichen Schutz und Komfort für Ihr Kind.
Die Höhenverstellung kann beim CBX AURA-FIX in 7 Positionen erfolgen.
ANPASSEN AN DIE KÖRPERGRÖSSE
ENTNEHMEN DER ZUSÄTZLICHEN SITZEINLAGE
• Wir empfehlen diese zusätzliche Sitzeinlage (12) für Kinder vom 9. bis zum 24.
Lebensmonat zu verwenden.
• Ab dem 25. Lebensmonat ist keine Sitzeinlage (12) mehr notwendig.
• Danach ist die Größenanpassung ausschließlich über die verstellbare
Kopfstütze (13) vorzunehmen. Ziehen Sie dazu den Verstellgriff (14) nach
oben, um die Kopfstütze (13) zu entriegeln.
• Die Anpassung hat so zu erfolgen, dass zwischen der unteren Kante der
Kopfstütze (13) und der Schulter des Kindes noch 2 Fingerbreit Platz (ca.
2 cm) ist.
1. Lösen Sie die vorderen Druckknöpfe des Sitzbezuges vom Sitzkissen (1).
2. Ziehen Sie den Stoffbezug aus den Bezugsführungen vorn hoch, bis Sie die
Sitzeinlage herausziehen können.
3. Die Entnahme der Sitzeinlage hat entsprechend der obigen Altersangabe zu
erfolgen.
4. Bringen Sie den Sitzbezug wieder in den ursprünglichen Zustand und
befestigen Sie diesen anschließend wieder.
Durch das gleichzeitige Betätigen der beiden Verstelltasten (15) gleitet der
Fangkörper (16) automatisch in seine vorderste Position. Durch Loslassen der
Verstelltasten (15) wird der Fangkörper (16) in seiner Position xiert.
Die seitlichen Flügel des Fangkörpers (16) passen exakt zwischen Armlehnen
und Sitzäche (1) und dienen der Abstützung des Fangkörpers (16) am Sitz.
Stellen Sie den Fangkörper (16) so ein, dass er am Kind anliegt, jedoch ohne auf
den Körper des Kindes zu drücken.
EINSTELLEN DES FANGKÖRPERS – ECE GRUPPE 1 (9-18 KG)

DEENIT
19
In order to optimally adapt the CBX AURA-FIX to your child’s body size,
a seat insert (12) has been provided as standard and is already inserted under
the seat cover.
NOTE! Only an optimally adjusted headrest (13) can offer your child maximum
protection and comfort.
The height of the CBX AURA-FIX can be adjusted to one of 7 positions.
ADAPTING TO BODY SIZE
REMOVING THE ADDITIONAL SEAT INSERT
• We recommend using this additional seat insert (12) for children aged 9 to
24 months.
• From the age of 25 month, the seat insert (12) is no longer necessary.
• The seat can then be adjusted to your child’s body simply by using the
adjustable headrest (13). To do this, pull the adjustment level (14) upwards to
unlock the headrest (13).
• Adjust it so that there is space for two fingers (ca. 2 cm) between the lower
edge of the headrest (13) and the shoulder of the child.
1. Release the front push buttons of the seat cover from the seat cushion (1).
2. Pull the fabric cover from the cover guides up and forward until you can pull
out the seat insert.
3. The seat insert must be removed in accordance with the age specifications
stated above.
4. Restore the seat insert to its original state and fix it in place again.
By pushing the two buttons (15) the impact shield (16) will slide into the widest
position. By releasing the buttons (15) the impact shield (16) will be locked in
position.
The side aps of the impact shield (16) t exactly between the arm rests and boost-
er (1) and are used to support the impact shield (16) on the seat.
Adjust the impact shield (16) so that it rests against the child without pushing
against the child’s body.
ADJUSTING THE IMPACT SHIELD – ECE GROUP 1 (9-18 KG)
Per adattare al meglio CBX AURA-FIX alla corporatura del bambino, viene fornito
di serie e già inserito sotto la fodera della seduta un inserto per sedili (12).
NOTA! Solo un poggiatesta (13) regolato al meglio, offre al bambino il massimo
in fatto di protezione e comfort.
L’altezza di CBX AURA-FIX è regolabile in 7 posizioni.
REGOLAZIONE IN BASE ALLA CORPORATURA
RIMOZIONE DELL’INSERTO AGGIUNTIVO PER LA SEDUTA
• Si raccomanda di usare questo inserto aggiuntivo per il seggiolino (12) per
bambini da 9 a 24 mesi.
• Dai 25 mesi l’inserto per il seggiolino (12) non è più necessario.
• Il seggiolino può poi essere adattato al corpo del bambino semplicemente
usando il poggiatesta (13). A tal fine tirare in alto la leva di regolazione (14) per
sbloccare il poggiatesta (13).
• Regolarlo in modo che vi siano due dita (ca. 2 cm) tra il bordo inferiore del
poggiatesta (13) e le spalle del bambino.
1. Sganciare i bottoni automatici anteriori della fodera del seggiolino dal cuscino (1).
2. Sollevare e tirare in avanti la fodera di tessuto dalle rispettive guide fino a
poter estrarre l'inserto per seggiolino.
3. L’inserto per seggiolino deve essere rimosso conformemente con le
specifiche relative all’età sopra indicate.
4. Riposizionare correttamente la fodera nella sua posizione originale e fissarla
nuovamente.
Premendo i due pulsanti (15) il cuscino di sicurezza(16) scorrerà nella posizione
di massima ampiezza. Rilasciando i pulsanti (15) il cuscino di sicurezza (16) si
bloccherà nella posizione.
Le alette laterali del cuscino di sicurezza (16) entrano precisamente tra i braccioli
e la supercie della seduta (1) e supportano il cuscino di sicurezza (16) sul
seggiolino.
Regolare il cuscino di sicurezza (16) di modo che poggi addosso al bambino
senza comprimerne il corpo.
REGOLAZIONE DEL CUSCINO DI SICUREZZA, GRUPPO ECE 1
(9-18 KG)
Other manuals for AURA-FIX
1
Table of contents
Other CBX Car Seat manuals