CEBEK I-302 User manual

TECHNICAL CARACTERISTICS
Voltage .............................................. 12-24 V DC.
Maximum consumption ....................... 65 my
Output Relay/Maximum load .............. 2 0 V A max
Minimum time ON/OFF....................... 0.1 seconds
Maximum time .ON/OFF...................... 60 minutes
Net weight .......................................... 54 g.
Dimensions ........................................ 87 X 72x 26 mm
Recommended power supply…….….. FE-10
DIN RAIL (option) ............................... C-7566
Digital timer with 2 adjustable times with
potentiometers
Temporisateur digital 2 temps ajustable a ec
potentiomètre
Temporizador digital 2 tiempos ajustables con
poenciometro
I-302
GENERAL CHARACTERISTICS
It offers 8 operating modes.
It has 8 adjustable time scales in ON and in OFF
ON/OFF Times adjustment with separated potentiometers.
POWER Led lighted on when the timer is supplied
RLY Led when the timer is activated
TEMPO TYPE Dips to select the required timer model.
ON and OFF TIME SCALES Dips to select time margins
of the timer.
ADJUSTMENT potentiometers to adjust ON and OFF
times
START button input allowing to start the timer (according
to models)
RESET button input allowing to the timer anytime.
RELAY output with Open/closed free voltage contacts.
CARACTÉRISTIQUES GÉNÉRALES
Il dispose de 8 modes de fonctionnement Il dispose de 8 échelles
de temps aussi bien en ON qu’en OFF
Ajustement temps ON/OFF avec potentiomètres séparés
Led POWER allumé quand le temporisateur sera alimenté
Led RLY allumé quand le relais sera activé
Dips TYPE TEMPO pour sélectionner le modèle de temporisateur
souhaité
Dips ECHELLES TEMPS de ON et OFF pour sélectionner les
marges de temps du temporisateur Potentiomètres AJUSTEMENT
pour ajuster les temps ON et OFF du temporisateur
Entrée bouton START permet le démarrage du temporisateur (selon
des modèles)
Entrée bouton RESET permet d'arrêter le temporisateur à tout
moment Sortie RELAY avec des contacts Ouvert/fermé libres de
tension
CARACTERISTICAS GENERALES
Dispone de 8 modos de funcionamiento
Dispone de 8 escalas de tiempo tanto en ON como en OFF
Ajuste tiempos ON OFF con potenciómetros separados
Led POWER encendido cuando el temporizador esta
alimentado
Led RLY encendido cuando el relé esta activado
Dips TIPO TEMPO para seleccionar el modelo de temporizador
que desea
Dips ESCALAS TEMPOS de ON y de OFF para seleccionar los
margenes de tiempos del temporizador
Potenciómetros AJUSTE para ajustar los tiempos ON y OFF
del temporizador
Entrada pulsador START permite el arranque del temporizador
( según modelos)
Entrada pulsador RESET permite parar el temporizador en
cualquier momento
Salida RELAY con contactos Abierto/cerrado libres de tensión
Start / Stop Relay Output
Dips tempo type Power
www.cebek.com - sat@cebek.com

www.cebek.com - sat@cebek.com
I-302
TIMER TYPES - TYPES DE TEMPORISATEUR - TIPOS DE TEMPORIZADOR
FUNCTIONS
Cyclic / Voltage / ON/OFF
Cyclic / Voltage / OFF/ON
Cyclic / Push button / ON/OFF
Cyclic / Push button / OFF/ON
Timered / With Delay / ON/OFF
Timered / With Delay / OFF/ON
Reactivation – OFF Delalay / Push button
Reactivation – ON Delalay / Push button
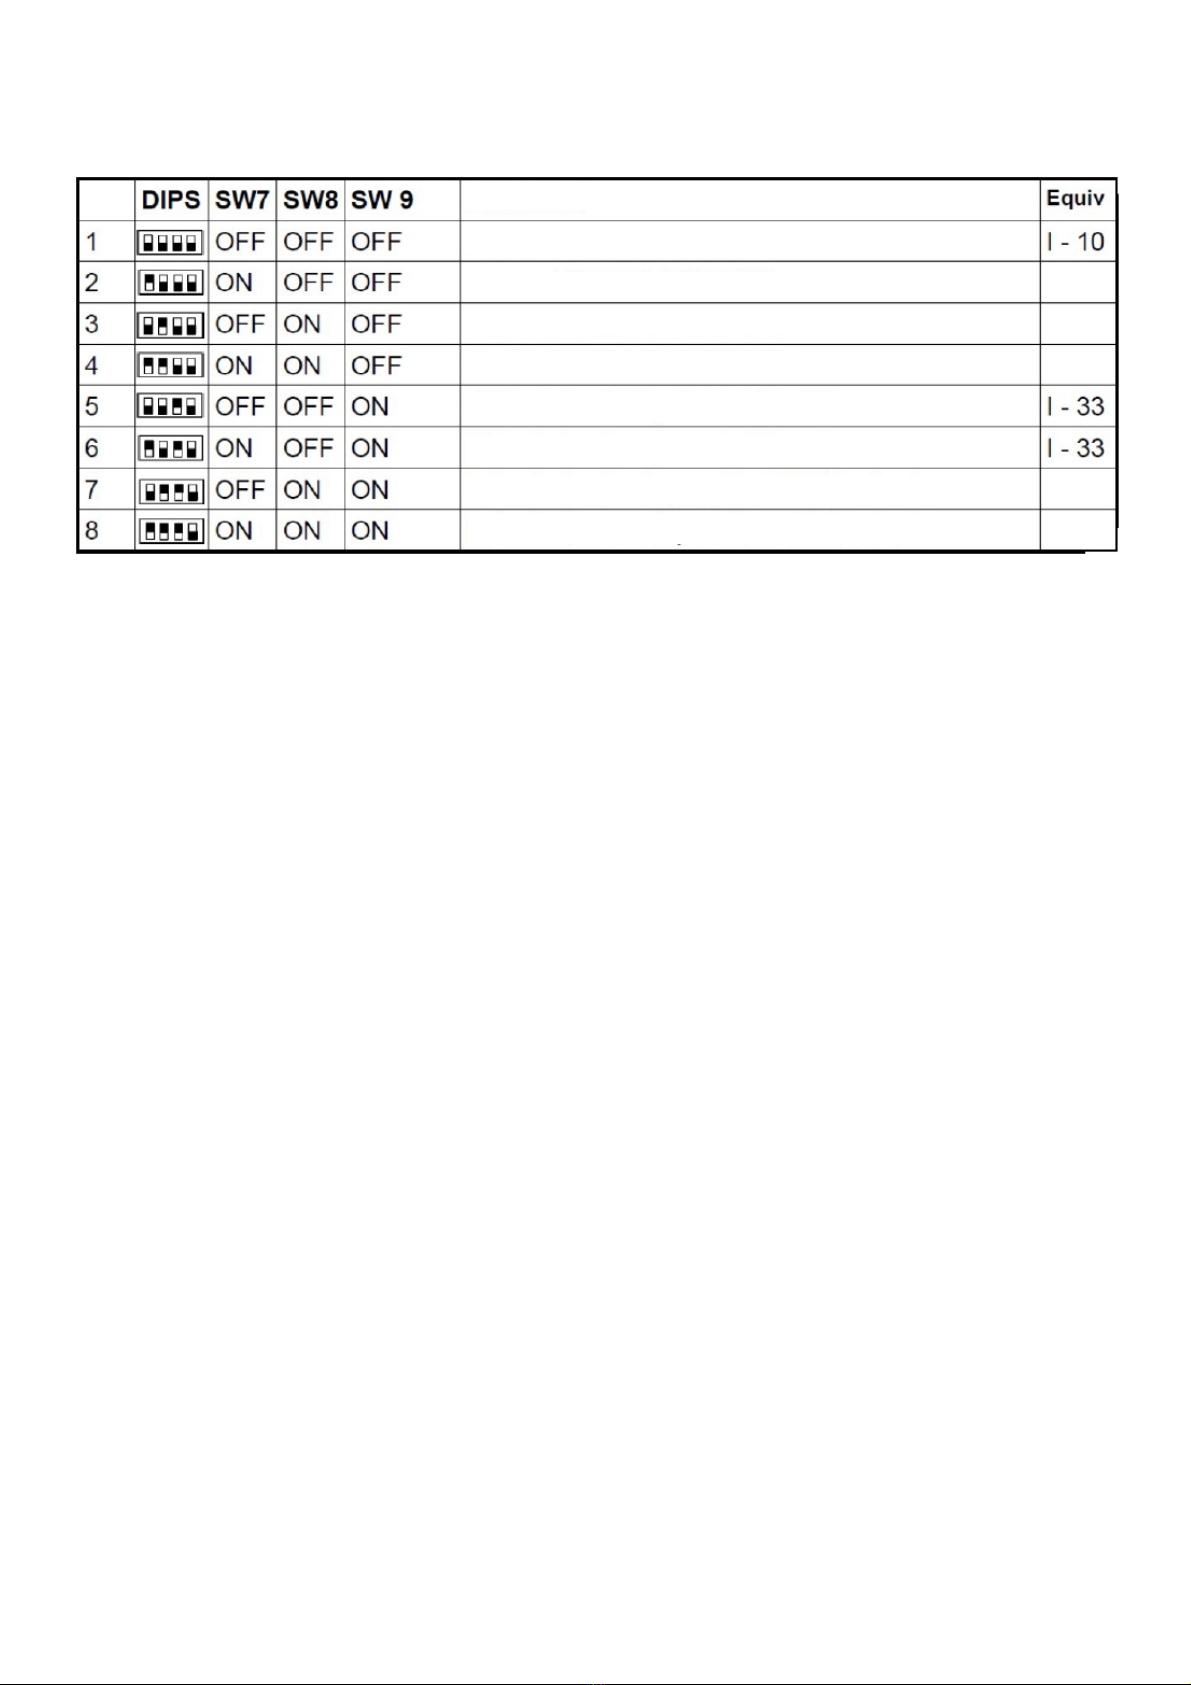
1 - Cyclic through oltage ON/OFF (Equi alent to I-10, I-11 et I-12)
Connecting the power supply, the relay will be activated during the ON time and it will be deactivated during the OFF time. At the end of the OFF time,
the ON time start again.
2 - Cyclic through oltage OFF/ON
Connecting the power supply, the relay will be activated during the OFF time and it will be deactivated during the ON time. At the end of the ON time,
the OFF time start again.
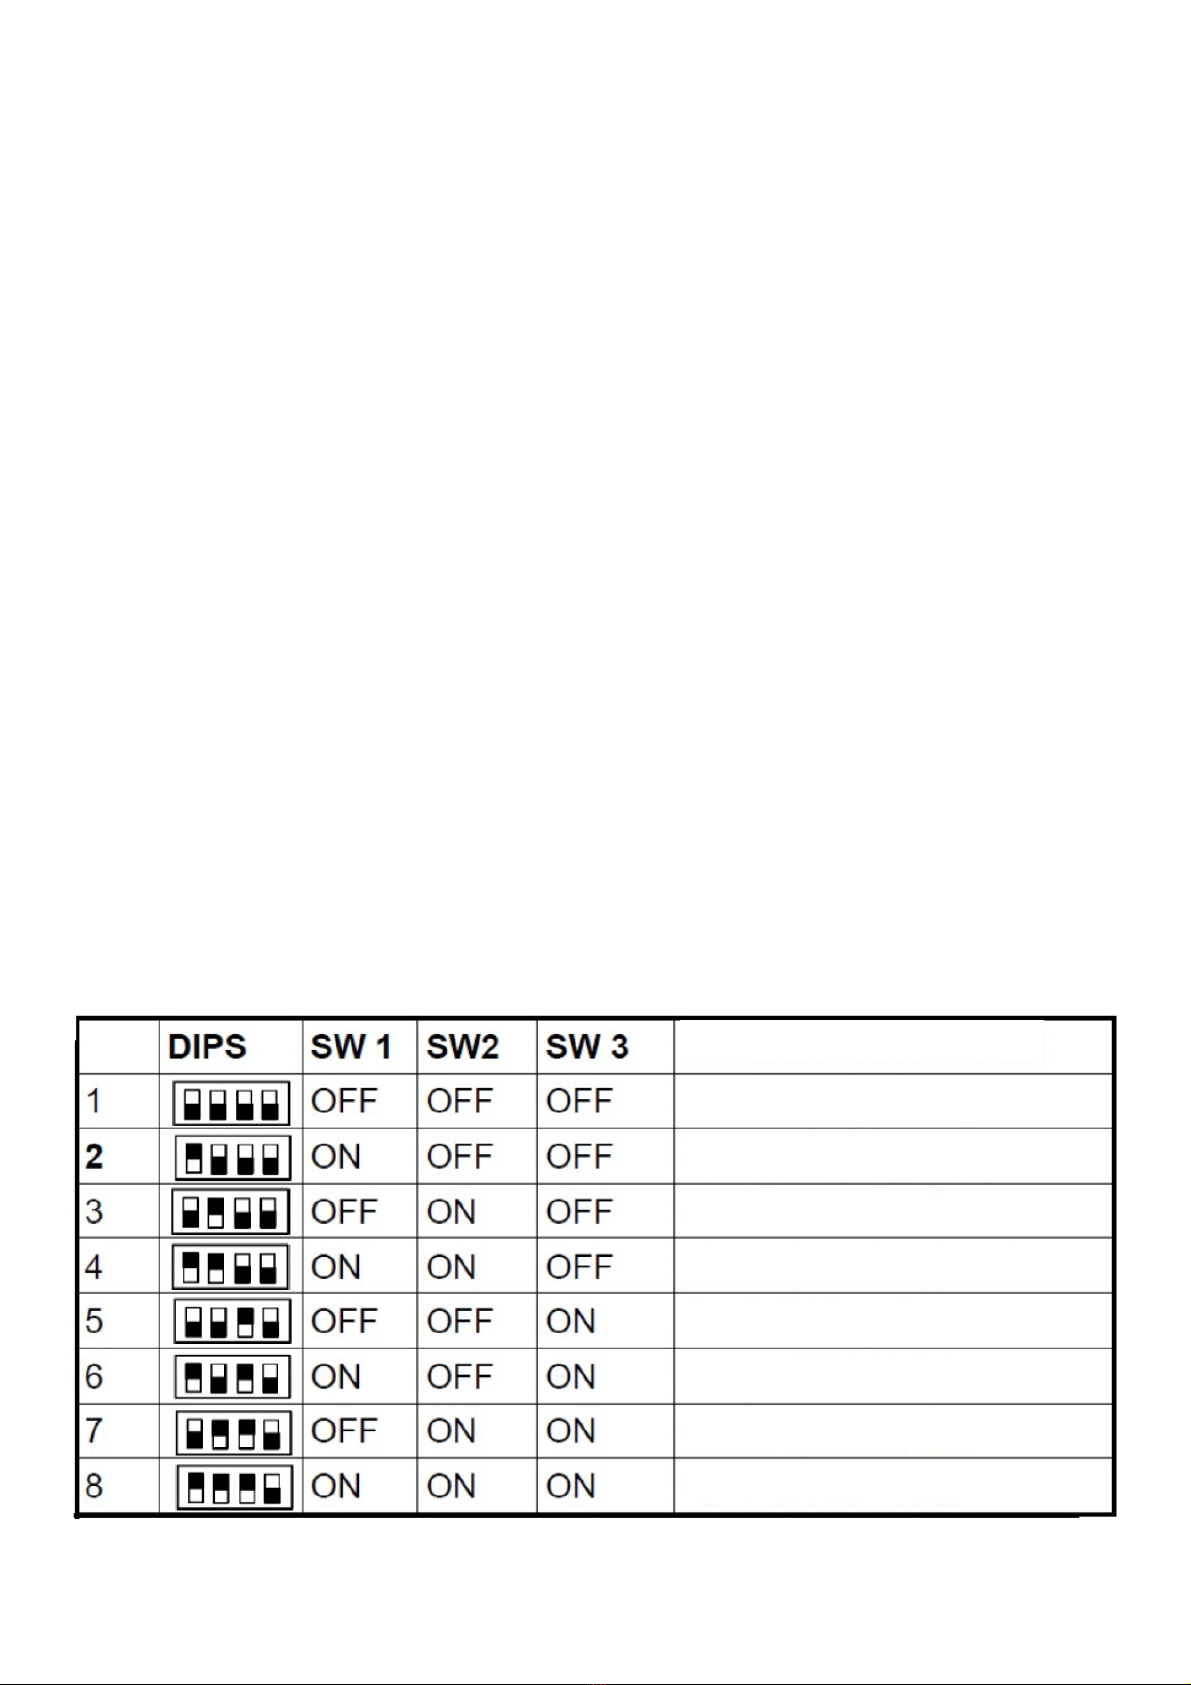
3 - Cyclic through push button ON/OFF
Closing the START button, the relay will be activated during the ON time. At the end of the ON time, the relay will be deactivated during the OFF time.
At the end of the OFF time, the ON time start again.
4 - Cyclic through push button OFF/ON
Closing the START button, the relay will be activated during the OFF time. At the end of the OFF time, the relay will be deactivated during the ON
time. At the end of the ON time, the OFF time start again.
5 - Timing with Delay through oltage (Equi alent to I-33 and I-34)
Connecting the power supply, the OFF timing will be activated without connecting the relay. At the end of the OFF time, the relay is connected during
the ON time.
6 - Timing with Delay through push button (Equi alent to I-33 and I-34)
Closing the START button, the OFF timing will be activated without connecting the relay. At the end of the OFF time, the relay is connected during the
ON time.
7 – Timing with Delay and Reacti ation OFF through push button
Closing the START button, the OFF timing will be activated without connecting the relay. At the end of the OFF time, the relay is connected during the
ON time. If during the ON timing the push button is closed, the timing is reset and the OFF time start again. It doesn’t affect the ON time.
8 – Timing with Delay and Reacti ation ON through push button
Closing the START button, the OFF timing will be activated without connecting the relay. At the end of the OFF time, the relay is connected during the
ON time. If during the ON timing the push button is closed, the timing is reset and the ON time start again. It doesn’t affect the OFF time.
1 – Cyclique par tension N / FF (Équivalent I-10, I-11 et I-12)
En connectant l’alimentation le relais sera activé pendant le temps ON. A la fin du temps ON, le relais se désactivera durant le temps OFF. A la fin du
temps OFF, le temps ON recommence à nouveau.
2 – Cyclique par tension FF / N En connectant l’alimentation le relais sera activé pendant le temps OFF A la fin du temps OFF, le relais se
désactivera durant le temps ON. A la fin du temps ON, le temps OFF recommence à nouveau.
3 - Cyclique par bouton poussoir N/ FF
En fermant le bouton START le relais sera activé durant le temps ON. A la fin du temps ON, le relais se désactivera durant le temps OFF. A la fin du
temps OFF, le temps ON recommence à nouveau.
4 - Cyclique par bouton poussoir FF/ N
En fermant le bouton START le relais sera activé durant le temps OFF. . A la fin du temps OFF, le relais se désactivera durant le temps ON. A la fin
du temps ON, le temps OFF recommence à nouveau.
5 - Temporisation avec Retard par tension (Équivalent I-33 et I-34)
En connectant l’alimentation la temporisation OFF commence mais sans connecter le relais. A la fin du temps OFF le relais est connecté durant le
temps ON.

www.cebek.com - sat@cebek.com
I-302
6 - Temporisation avec Retard par bouton poussoir (Équivalent I-33 et I-34)
En fermant le bouton START la temporisation OFF commence mais sans connecter le relais. A la fin du temps OFF le relais est connecté durant le
temps ON.
7- Temporisation avec Retard et Re-activation FF par bouton poussoir En fermant le bouton START la temporisation OFF commence mais sans
connecter le relais. A la fin du temps le relais est connecté durant le temps ON. Si durant la temporisation OFF le bouton poussoir START est fermé, la
temporisation est réinitiée et le temps OFF commence à nouveau. N’agit pas sur le temps ON.
8- Temporisation avec Retard et Re-activation N par bouton poussoir En fermant le bouton START la temporisation OFF commence mais sans
connecter le relais. A la fin du temps OFF le relais est connecté durant le temps ON. Si durant la temporisation ON le bouton poussoir est fermé, la
temporisation est réinitiée et le temps ON commence à nouveau. N’agit pas sur le temps OFF.
1 - Cíclico por tensión ON / OFF ( Equi alente I 10 / 11 / 12 )
Al conectar la alimentación se activa el Relé durante tiempo de ON . Al acabar el tiempo de ON se desactiva el relé durante el tiempo de OFF . Al
acabar el tiempo de OFF empieza de nuevo el tiempo ON.
2 - Cíclico por tensión OFF / ON
Al conectar la alimentación empieza el tiempo de OFF sin activar el relé. Al acabar el tiempo de OFF se activa el relé durante el tiempo de ON . Al
acabar el tiempo de ON empieza de nuevo el tiempo de OFF
3 - Cíclico por pulsador ON / OFF
Al cerrar el pulsador STAR se activa el Relé durante tiempo de ON . Al acabar el tiempo de ON se desactiva el relé y empieza el tiempo de OFF . Al
acabar el tiempo de OFF empieza de nuevo el tiempo ON.
4 - Cíclico por pulsador OFF / ON
Al cerrar el pulsador START empieza el tiempo de OFF sin activar el relé. Al acabar el tiempo de OFF se activa el relé durante el tiempo de ON . Al
acabar el tiempo de ON empieza de nuevo el tiempo de OFF
5 - Retardador temporizado por tensión ( Equi alente I 33 / 34 )
Al conectar la alimentación se inicia la temporización OFF sin conectar el relé . Al acabar el tiempo de OFF se conecta el relé durante el tiempo de
ON .
6 - Retardador temporizado por pulsador ( Equi alente I 33 / 34 )
Al cerrar el pulsador STAR se inicia la temporización OFF sin conectar el relé . Al acabar el tiempo de OFF se conecta el relé durante el tiempo de ON .
7 - Retardador temporizado redisparable OFF por pulsador
Al cerrar el pulsador STAR se inicia la temporización OFF sin conectar el relé . Al acabar el tiempo se conecta el relé durante el tiempo ON .Si durante
la temporización OFF se cierra el pulsador STAR se resetea la temporización y empieza de nuevo el tiempo de OFF . Al acabar el tiempo de OFF se
conecta al relé durante el tiempo ON. No actúa sobre el tiempo de ON
8 - Retardador temporizado redisparable ON por pulsador
Al cerrar el pulsador STAR se inicia la temporización OFF sin conectar el relé . Al acabar el tiempo de OFF se conecta el relé durante el tiempo de
ON .Si durante la temporización ON se cierra el pulsador STAR se resetea la temporización y empieza de nuevo el tiempo de ON. No actúa sobre el
tiempo de OFF
ON TIME SCALES - ECHELLES DES TEMP RISATI NS N - ESCALAS DE TIEMP S N
ON TIME SCALES
From 0 to 10 sec
From 10 to 0 sec
From 10 sec to 1 min
From 1 to 2 min
From 2 to 5 min
From 5 to 10 min
From 10 to 0 min
From 0 to 60 min

www.cebek.com - sat@cebek.com
I-302
OFF TIME SCALES - Échelles de temps OFF - ESCALAS DE TIEMPOS OFF
OFF TIME SCALES
From 0 to 10 sec
From 10 to 0 sec
From 0 sec to 1 min
From 1 to 2 min
From 2 to 5 min
From 5 to 10 min
From 10 to 0 min
From 0 to 60 min
TIMING PROGRAM - PROGRAMMATION TEMPORISATEUR - PROGRAMACION TEMPORIZADOR
IMPORTANT. From our factory, the timer is supplied without any type of preregistered timing, neither operating time. You will have to program the
timing before using it for the first time.
By not making any programming, the timer will function in mode type 1, time 1 second ON/OFF.
IMP RTANT. Le temporisateur tel et comme il est fourni d’origine ne dispose d’aucun type de temporisation préenregistrée, ni temps de travail. Vous
devrez le programmer avant de l'utiliser pour la première fois. En ne faisant aucune programmation, le temporisateur fonctionnera en mode type 1,
temps 1 seconde ON/OFF.
IMP RTANTE El temporizador tal como se suministra de fábrica no tiene grabado ningún tipo de temporizador, ni tiempo de trabajo ,
deberá programarlo antes de usar por primera vez.
En caso de no hacer programación actuará como tipo 1 , tiempo 1 segundo ON /OFF
STEPS TO PROGRAM THE TIMER - ETAPES POUR PROGRAMMER LE TEMPORISATEUR -
PASOS PARA PROGRAMAR EL TEMPORIZADOR
Disconnect the power supply,
Select through TEMPO TYPE Dips the required model.
Select through TIME SCALES Dips the required time interval for ON and for OFF.
Select with ADJUSTMENT potentiometers the required time for ON and for OFF
Once these steps done, connect the power supply and the timer will be programmed and ready to operate.
NOTE : If you ha e selected a model starting though oltage, as soon as you will connect the power supply, the module will be acti ated.
Déconnectez l'alimentation,
Sélectionnez à tra ers des Dips TYPE TEMPO le modèle souhaité.
Sélectionnez à tra ers des Dips ECHELLES TEMPS l’inter alle de temps souhaité en ON et en OFF.
Sélectionnez a ec les potentiomètres AJUSTEMEMT le temps souhaité en ON et en OFF. Une fois réalisées ces 3 étapes, connectez
l’alimentation et le temporisateur sera programmé et prêt pour tra ailler.
NOTE : Si vous avez sélectonné un modèle avec démarrage par tension, en connectant l'alimentaton il démarrera
Desconectar la alimentación
Seleccione en los Dips TIPO TEMPO el modelo deseado
Seleccione en los Dips ESCALAS TEMPOS el intervalo tiempo deseado en ON y en OFF
Seleccione en los potenciómetros AJUSTE el tiempo deseado en On y en OFF
Una vez hechos estos pasos conecte la alimentación y el temporizador quedara programado y listo para trabajar .
NOTA : .Si ha elegido un modelo arranque por tensión al conectar la alimentación arrancara .

www.cebek.com - sat@cebek.com
I-302
OPERATION : With the timer already programmed, it is ready to operate. Connect the power supply.
To start the timing press START button-
To stop/reset timing at any time press the STOP button
Note : During the operating time programming Dips as time potentiometer will be ignored by the timer, for this reason you will not be able to
reprogram a function till the operating time is finished.
REPROGRAM. Disconnect the power and perform the same steps as those given in the previous section TIMER PROGRAMMING
OUTPUT CONNECTION. LOAD. The output is via a relay device that supports any type of load does not exceed A. The relay has three output
terminals. The rest normally open (NO), the normally closed (NC) and the Joint Operation of this mechanism is identical to a switch whose two
terminals NA and Common
To perform the inverse function must be used NC and Common terminals Figure the typical connection for devices operating at 12VDC shown and
another operated at 2 0 V AC
FONCTIONNEMENT : Avec le temporisateur déjà programmé, il est prêt pour fonctionner. Connectez l'alimentation Pour commencer la temporisation
pressez le bouton START Pour arrêter/reset la temporisation à tout moment pressez le bouton STOP
N TE : Pendant le temps de travail aussi bien les DIPS de programmation que le potentiomètre de temps seront ignorés par le temporisateur, ce
pourquoi vous ne pourrez pas reprogrammer une fonction jusqu'à ce que le temps travail ne soit terminé.
REPR GRAMMER. Déconnectez l'alimentation et exécutez les mêmes étapes que ceux indiqués dans le paragraphe précédent PROGRAMMER le
TEMPORISATEUR
CONNEXION DE LA SORTIE. CHARGE. La sortie du module est par relais, dispositif qui admet tout type de charge inférieure à A. Le relais dispose
de trois terminaux de sortie : le Normalement Ouvert en repos (NO), le Normalement Fermé en repos (NC), et le Commun. Le fonctionnement est
identique à celui d'un interrupteur dont les deux terminaux seront le Commun et le NO. Sur le schéma « Connexion de la Charge » il est indiqué une
connexion typique pour un fonctionnement à 12 VDC ou à 2 0 V AC.
FUNCIONAMIENTO : Con el temporizador ya programado esta listo para trabajar conecte la alimentación
Para empezar la temporización pulse botón STAR
Para parar/resetear la temporización en cualquier momento pulse botón STOP
IMPORTANTE : Durante el tiempo de trabajo tanto los DIPS de programación como los potenciómetros de tiempo son ignorados por el temporizador
,por lo cual no podrá volver a reprogramar cualquier función hasta que el tiempo de trabajo acabe.
REPROGRAMAR . Desconecte la alimentación y ejecute los mismos pasos que los indicados en el apartado anterior PROGRAMACION
TEMPORIZADOR
C NEXI N DE LA SALIDA. CARGA. La salida se realiza mediante un relé, dispositivo que admite cualquier tipo de carga que no supere los A. El
relé dispone de tres terminales de salida. El Normalmente abierto en reposo (NA), el Normalmente cerrado en reposo (NC), y el Común. El
funcionamiento de este mecanismo es idéntico a un interruptor, cuyos dos terminales serán el NA y el Común.
Para realizar la función inversa deberán utilizarse los terminales NC y Común. En la figura se muestra el conexionado típico para un aparato con
funcionamiento a 12 V. C.C. y otro con funcionamiento a 2 0 V. C.A.
ABOUT THE OUTPUT. During operation of the circuit, and according to its load, a fluctuation or malfunction output may occur. If this happens, install
an anti-spark circuit between the two contacts of the relay used in the connection, as shown in the drawing
SUR LA SORTIE. Pendant le fonctionnement du circuit, et en fonction de sa charge, une sortie de fluctuation ou de mauvais fonctionnement peut se
produire. Si cela se produit, l'installation d'un circuit anti-étincelle entre les deux contacts du relais utilisé dans la connexion.
CONSIDERACIONES SOBRE LA SALIDA. Durante el funcionamiento del circuito, y según sea su carga, podrá producirse una fluctuación o un
incorrecto funcionamiento de la salida. Si esto ocurre, instale un circuito antichispas entre los dos contactos del relé utilizados en la conexión.
NOTE: To connect loads to 12 V DC, remove add strength and single capacitor.
NOTE: Pour connecter des charges de 12 V DC, enlever ajouter de la résistance
et du condensateur unique.
NOTA: para conectar cargas a 12 V. C.C., eliminar resistencia y poner solo
condensador
Table of contents
Other CEBEK Timer manuals