10
risultino bloccate nella posizione di utilizzo.
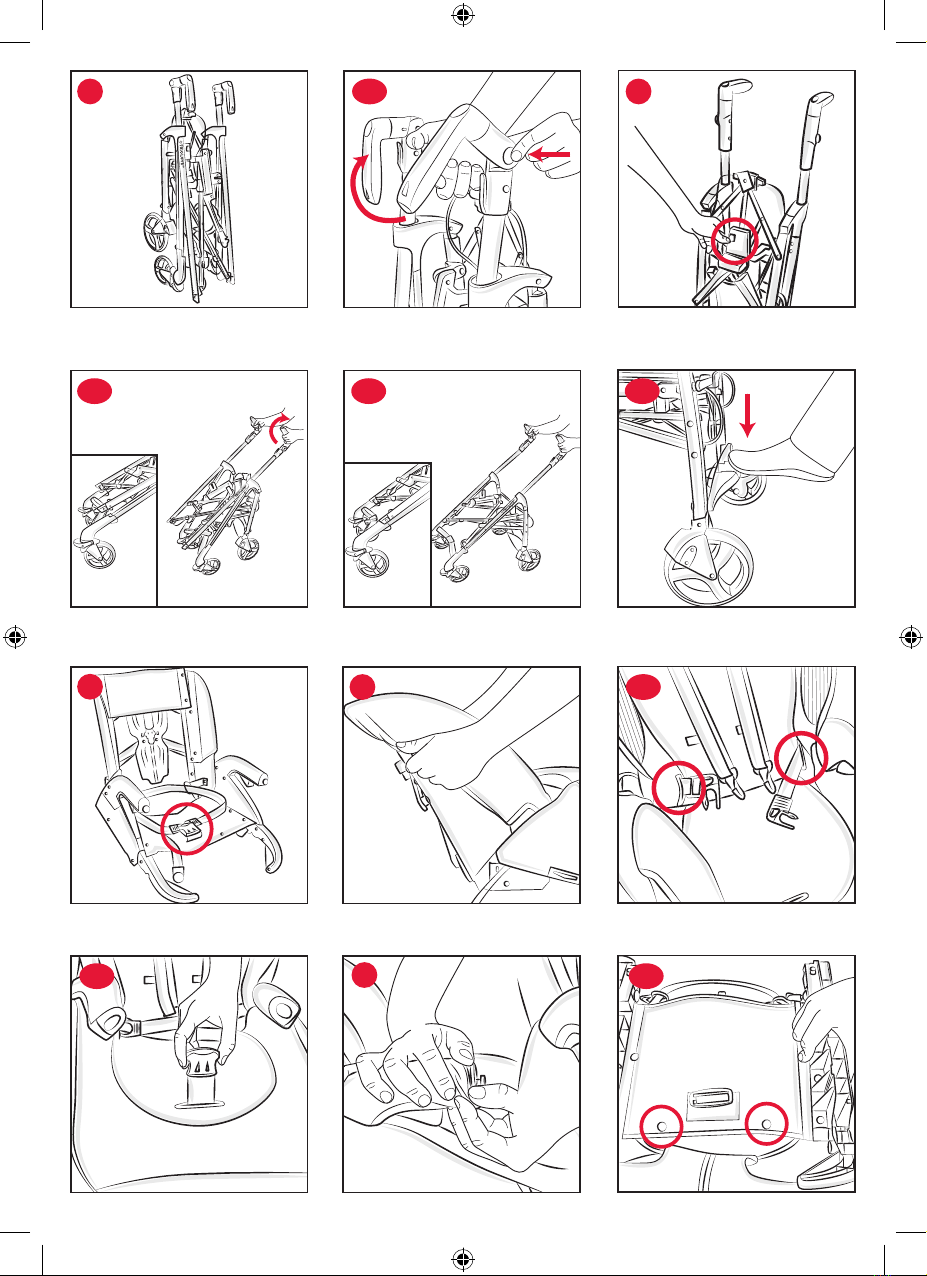
2. Per aprire il telaio è necessario premere il tasto indicato
in gura 2 (1-push). Successivamente impugnare i manici
del passeggino e sollevare il passeggino verso l’alto per
facilitare l’apertura (g. 2A). L’apertura del passeggino è
completa quando i tubi sono innestati correttamente
nella parte anteriore (g. 2B). Per completare l’apertura
del passeggino premere sulla crociera posteriore (g. 2C).
VESTIZIONE/SVESTIZIONE SEDUTA
3. L’operazione di vestizione deve essere fatta con la sedu-
ta staccata dal passeggino; prima di iniziare è necessario
aprire la bbia girovita indicata in gura 3.
4. Inlare il vestito facendo calzare prima il tessile sullo
schienale (g. 4), e far passare la cinghia girovita nelle ap-
posite asole posizionate nella parte inferiore dello schie-
nale (g. 4A). Successivamente inserire lo spartigambe
nell’asola posizionata sulla seduta (g. 4B).
5. Inlare il tessile sul bracciolo facendo attenzione a posi-
zionarlo correttamente nell’apposita sede (g. 5), e ssare
il tessile alla base della seduta agganciando i due bottoni
posti in corrispondenza dei cerchietti (g. 5A).
6. Inserire i supporti poggia gambe all’interno della parte
inferiore del tessile (g. 6).
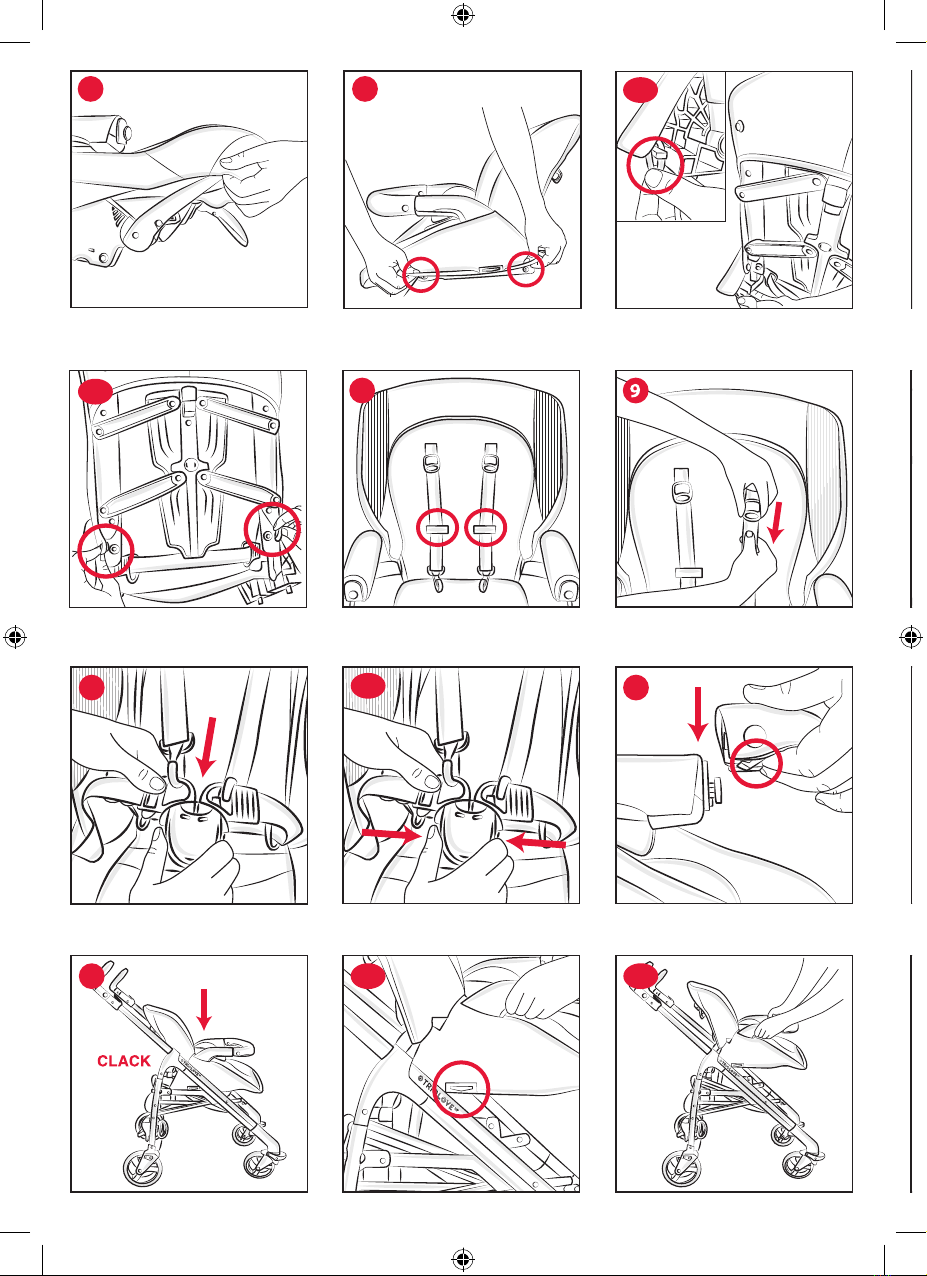
7. Per completare la vestizione della seduta è necessario ag-
ganciare i due bottoni laterali (g. 7), posizionare nell’apposi-
ta sede l’elastico indicato in gura 7A e agganciare i bottoni
posizionati nella parte inferiore dello schienale (g. 7B).
Per svestire la seduta eseguire le operazioni appena descrit-
te in senso inverso.
CINTURE DI SICUREZZA
Il passeggino è dotato di sistema di ritenuta a cinque punti
di ancoraggio costituito da due spallacci, una cintura giro-
vita ed uno spartigambe con bbia.
8. ATTENZIONE: per l’utilizzo con bambini dalla nascita no
a circa 6 mesi può essere necessario ridurre la lunghezza
delle cinture per adattarle alla corporatura del bambino; in
questo caso, utilizzare gli spallacci facendoli passare prima
attraverso le due asole di regolazione (g. 8).
9. Vericare che gli spallacci siano all’altezza ideale per il vo-
stro bambino: in caso contrario regolarne l’altezza (g. 9).
10. Dopo aver adagiato il bambino, inlare le 2 forchette
nella bbia (g. 10) e regolare, se necessario, la larghezza
del girovita agendo sulle bbie. Per sganciare la cintura
girovita, premere contemporaneamente le due forchet-
te laterali (g. 10A).
ATTENZIONE: per garantire la sicurezza del bambino è in-
dispensabile utilizzare contemporaneamente spartigambe,
cintura girovita e cinture di sicurezza.
ATTENZIONE: dopo la rimozione delle cinture di sicurezza
(es. per il lavaggio), assicurarsi che le cinture siano riassem-
blate correttamente usando i punti di ancoraggio. Le cin-
ghie devono essere nuovamente regolate.
MANICOTTO PARACOLPI
11. La seduta è dotata di manicotto paracolpi. Per agganciare
il manicotto è necessario premere i due tasti posti nella
parte inferiore delle due estremità ed inlare lo stesso
negli appositi perni situati alla parte terminale dei brac-
cioli (g. 11). Per estrarre il manicotto paracolpi eseguire
le operazioni appena descritte in senso contrario. Per fa-
cilitare l’alloggiamento del bambino è possibile sganciare
solo un lato del manicotto. Il manicotto è utilizzabile sia in
congurazione fronte strada sia fronte mamma.
ATTENZIONE: Allacciare sempre il bambino con le cinture
di sicurezza. Il manicotto NON è un dispositivo di ritenuta
del bambino.
ATTENZIONE: il manicotto non deve essere utilizzato per
sollevare il prodotto con il bambino all’interno.
MONTAGGIO SEDUTA AL PASSEGGINO
12. Per montare la seduta del passeggino sul telaio occorre
inserire la stessa sugli appositi innesti verticali, no ad udi-
re il clack di avvenuto aggancio (g. 12). Per facilitare l’ag-
gancio della seduta al passeggino, sui lati del tessile sono
presenti delle etichette guida che indicano il corretto al-
lineamento della seduta con i ganci degli innesti (gura
12A). La seduta può essere montata sia in congurazione
fronte strada (g. 12B) sia fronte mamma (g. 12C).
ATTENZIONE: prima dell’utilizzo assicurarsi che la seduta
sia ben agganciata tirandola verso l’alto.
ATTENZIONE: Nel caso non fosse agganciata corretta-
mente, premere entrambi i pulsanti bianchi presenti sui
dispositivi di aggancio della struttura e ripetere la procedu-
ra di aggancio vericando il completo bloccaggio. In caso
contrario rivolgersi al servizio assistenza Chicco.
13. Per sganciare la seduta premere contemporaneamente
i due tasti posti sotto i braccioli (g. 13) e sollevarla.
ATTENZIONE: le operazioni di sgancio/aggancio della se-
duta devono essere effettuate senza il bambino all’interno.
CAPOTE
14. La seduta è dotata di due innesti posizionati sulle an-
cate della base della seduta che permettono il ssaggio
della capotta. Per ssare la capotta inserire il sistema
di aggancio negli innesti come indicato in gura 14.
Essendo ssata alla seduta, la capotta segue la seduta sia
nella congurazione fronte-strada, che fronte-mamma,
senza bisogno di essere ogni volta girata. Per comple-
tare il montaggio della capotta alla seduta, agganciare
la parte posteriore della capotta al retro dello schienale
del passeggino, tramite gli appositi bottoni (g 14A).
15. Per aprire la capotta spingere in avanti l’archetto ante-
riore (g. 15).
16. La capotta è dotata una rete estraibile che contribuisce
a proteggere il bambino da luce eccessiva (g. 16)
17. Per rimuovere la patella posteriore e trasformare la capot-
ta in parasole estivo aprire la cerniera posteriore (g. 17) e
sganciare i bottoni sul retro dello schienale della seduta.
18. Per togliere la capotta è sufficiente tirare la stessa verso
l’alto in prossimità degli innesti e far scorrere gli agganci
verso l’alto (g. 18).
ATTENZIONE: L’operazione di ssaggio della capotta deve
avvenire su entrambi i lati del passeggino. Vericare il cor-
retto bloccaggio della stessa.
REGOLAZIONE SCHIENALE
19. Premendo il tasto posto sullo schienale del passeggino, è
possibile regolarne l’inclinazione no al raggiungimento
dell’inclinazione desiderata (g. 19). Rilasciando il tasto, lo
schienale si blocca nella posizione più vicina. Per sollevare
lo schienale è sufficiente spingerlo verso l’alto.
ATTENZIONE: con il peso del bambino le operazioni pos-
sono risultare più dicoltose.
REGOLAZIONE POGGIAGAMBE
20. Il poggiagambe è regolabile in due posizioni. Per re-
golarlo agire sui due tasti posti sotto il poggiagambe
(g. 20).
IMPUGNATURA ERGONOMICA REGOLABILEDOUBLETWIST
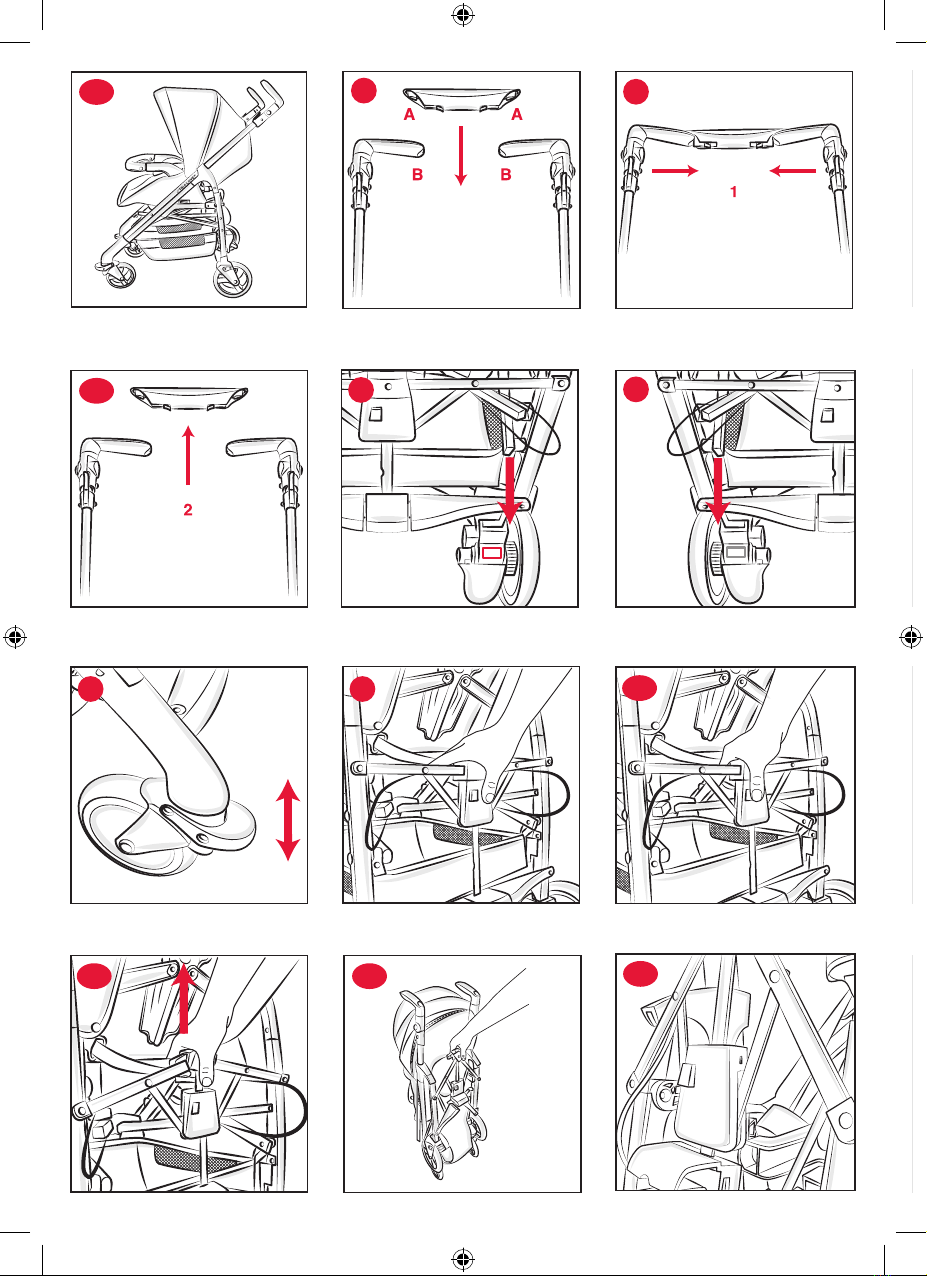
21. Premendo il tasto posto sull’impugnatura, è possibile
ruotare la stessa nella posizione desiderata, adattandola
all’altezza ed alla posizione più comoda per l’utilizzatore
(g. 21). L’impugnatura può essere posizionata in 8 po-
sizioni diverse.
22. ATTENZIONE: durante l’utilizzo, l’impugnatura non
deve essere utilizzata in posizione abbassata (g. 22). Le
impugnature in fase di utilizzo devono essere in posizio-
ne alta, come illustrato in gura 22A.
MANICO UNITO
23. Per agganciare il manico unito, far coincidere i perni A
e B con i rispettivi fori (g. 23), no ad avvenuto click.
24. Per togliere il manico unito, premere contemporanea-
mente le due leve centrali verso l’interno (g. 24) e sla-
re il manico tirandolo verso l’alto (g. 24A).
ATTENZIONE: prima di utilizzare il prodotto nella congura-
zione “manico unito”, vericarne sempre il corretto montaggio.
ATTENZIONE: non utilizzare mai il manico unito per solle-
vare il passeggino con dentro il bambino.
FRENO DI STAZIONAMENTO
Il freno di stazionamento agisce contemporaneamente su
entrambe le ruote posteriori del passeggino. Per semplicare
l’utilizzo del passeggino, è stato introdotto un sistema frenante
STOP & GO, contrassegnato da apposite etichette adesive
colorate poste sulle leve freno posteriori.
25. Per frenare il passeggino, premere verso il basso la leva
di destra (g. 25). Automaticamente apparirà un’etichet-
ta rossa STOP e la leva opposta scatterà verso l’alto.
26. Per sbloccare il passeggino, premere verso il basso la
leva di sinistra (g. 26). Automaticamente apparirà una
etichetta verde GO e la leva opposta scatterà verso l’alto.
ATTENZIONE: Utilizzare sempre il freno quando si sosta.
Non lasciare mai il passeggino su un piano inclinato con den-
tro il bambino, anche se il freno di stazionamento è inserito.
ATTENZIONE: dopo aver azionato la leva del freno assicu-
rarsi che i freni siano correttamente innestati su entrambi i
gruppi ruota posteriori.
RUOTE PIROETTANTI
Il passeggino è dotato di ruote anteriori piroettanti/sse.
Si consiglia di utilizzare le ruote sse quando si percorrono
terreni particolarmente accidentati. Le ruote in modalità pi-
roettante, invece, sono consigliate per aumentare la mano-
vrabilità del passeggino su fondo stradale normale.
27. Per rendere le ruote anteriori piroettanti, spingere verso
il basso con il piede la leva anteriore, come indicato in
gura 27. Per rendere le ruote anteriori sse, alzare con
il piede la leva. Indipendentemente dalla posizione in
cui si trova la ruota, essa si bloccherà in posizione dritta.
ATTENZIONE: Entrambe le ruote devono essere sempre
contemporaneamente bloccate o sbloccate.
CHIUSURA DEL PASSEGGINO
ATTENZIONE: eettuare questa operazione facendo at-
tenzione che il bambino ed eventuali altri bambini siano a