10
ni dal bambino per evitare rischi di
soffocamento.
• I prodotti lasciati al sole si surriscal-
dano; lasciarli raffreddare prima di
mettervi il bambino.
• Non utilizzare la sacca per far dor-
mire il bambino per tempi prolun-
gati: questo prodotto non può so-
stituire un lettino.
• Si raccomanda di far aerare la sacca
dopo un utilizzo prolungato.
• Prima di sollevare o trasportare la
sacca, la base deve essere regolata
nella posizione più bassa.
• La testa del bambino nella sacca
non dovrebbe mai esser più bassa
rispetto al corpo.
• Il sistema di ritenuta deve essere
coperto quando il prodotto viene
usato al di fuori della macchina.
CONSIGLI PER LA PULIZIA E LA MANUTENZIONE
Questo prodotto necessita di manutenzione periodica. Le
operazioni di pulizia e manutenzione devono essere eet-
tuate da un adulto.
PULIZIA
Pulire le parti in tessuto mediante una spugna umida e del
sapone neutro. Pulire le parti in plastica periodicamente
con un panno umido. Asciugare le parti in metallo, dopo
un eventuale contatto con acqua, al ne di evitare il for-
marsi di ruggine.
LAVAGGIO
Il rivestimento esterno/interno della sacca e il materassino
sono sfoderabili e lavabili; per rimuoverli, fare riferimento al
paragrafo SVESTIZIONE SACCA.
Si raccomanda di seguire attentamente le istruzioni di la-
vaggio riportate sull’etichetta inserita sul capo.
Di seguito sono riportati i simboli di lavaggio ed i relativi
significati:
Lavare a mano in acqua fredda
Non candeggiare
Non asciugare meccanicamente
Non stirare
Non lavare a secco
MANUTENZIONE
Asciugare le parti in metallo, al ne di evitare il formarsi di
ruggine. Non immergere in acqua. Pulire le parti in plasti-
ca periodicamente, con un panno umido. Tenere pulite da
polvere e sabbia le parti di aggancio della sacca e della car-
rozzina, onde evitare attriti. Non lasciare i prodotti per lun-
go tempo al sole; i tessuti potrebbero scolorirsi. Lubrificare
solo in caso di necessità con olio secco al silicone.
CARATTERISTICHE DELLA SACCA
La sacca comprende i seguenti elementi: rivestimento tes-
sile, capotte, copertina, materassino, kit comfort (due spal-
lacci e uno sparti gambe), kit per il trasporto in auto.
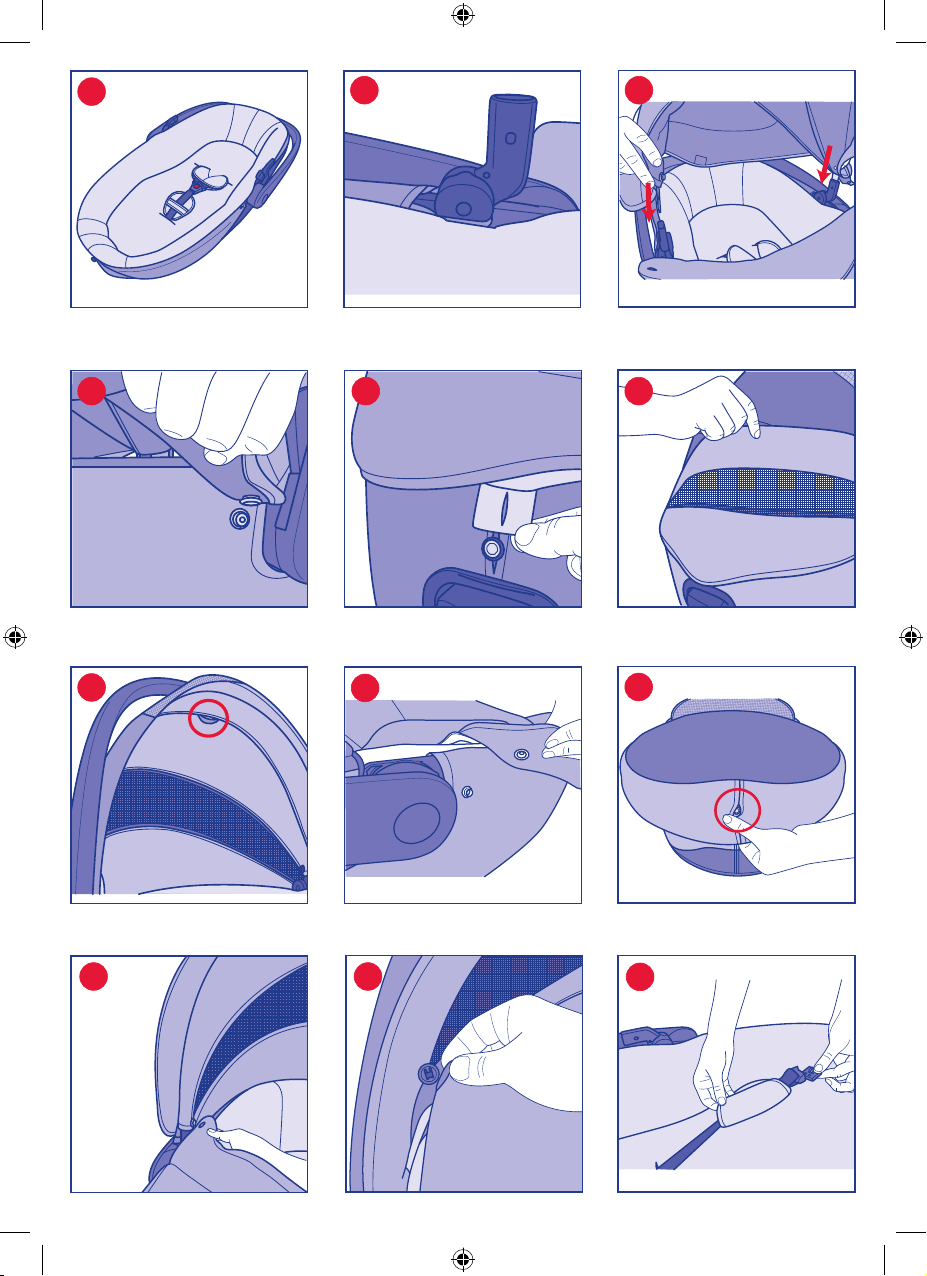
1. La sacca viene fornita con il rivestimento tessile già mon-
tato (g. 1) (ad eccezione di capote e copertina).
CAPOTE
La sacca è dotata di capotta parasole e paravento regolabi-
le in più posizioni.
MONTAGGIO E SMONTAGGIO
2. Per montare la capote sulla sacca è necessario posizio-
nare in verticale gli snodi presenti sui lati della sacca (g.
2A), ed inserire le due estremità plastiche nelle apposite
fessure, come indicato in gura 2B.
3. Per completare il montaggio della parte tessile della ca-
potte occorre agganciare i due bottoni a scatto posizio-
nati su entrambi i lati della sacca (g. 3).
4. Inne è necessario far passare il pin metallico nell’asola tes-
sile posta sulla parte interna del retro della capotte (g. 4).
APERTURA POSTERIORE
5. Per garantire una perfetta aerazione la capote è dotata di
una apertura posteriore; per aprirla è sufficiente ripiegare
la patella di stoa sulla parte alta della capote (g. 5).
VISIERA
6. Nella parte interna della visiera è presente un anello tessi-
le che permette di appendere dei giochi morbidi (g. 6).
COPERTINA
7. Per fissare la copertina agganciare i due bottoni auto-
matici laterali (g. 7) e inlare l’asola nell’apposito per-
no in corrispondenza dei piedi del bambino (g. 7A).
Successivamente ssare la patella tessile della copertina
alla capote utilizzando i due bottoni automatici (g. 7B).
Per assicurare maggior protezione al bambino è possibile
utilizzare la patella tessile in posizione verticale, ssando-
la con le apposite asole (g. 7C).
KIT COMFORT
Il Kit Comfort è comprensivo di 2 spallacci ed uno spartigambe.
8. Per montare il Kit Comfort, inlare gli spallacci nelle bre-
telle, come indicato in gura 8 e far passare lo spartigam-
be nell’apposita imbottitura (g. 8A).
SCHIENALE REGOLABILE - COMFORT SYSTEM
9. Lo schienale della sacca è regolabile in modo graduale. Per
alzare ed abbassare lo schienale agire sulla ruota posta sull’e-
sterno della sacca nella zona dei piedi del bambino (g. 9).
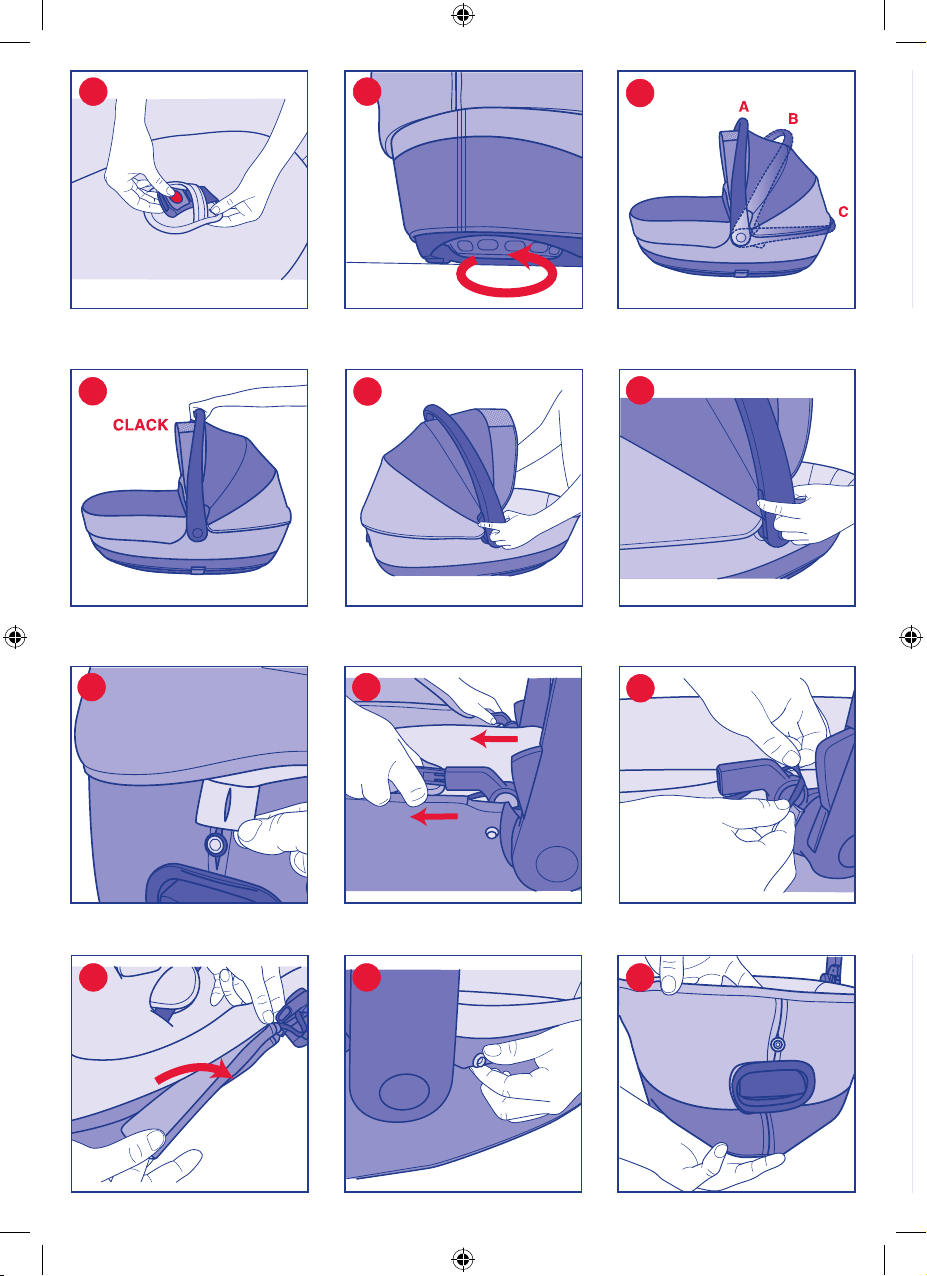
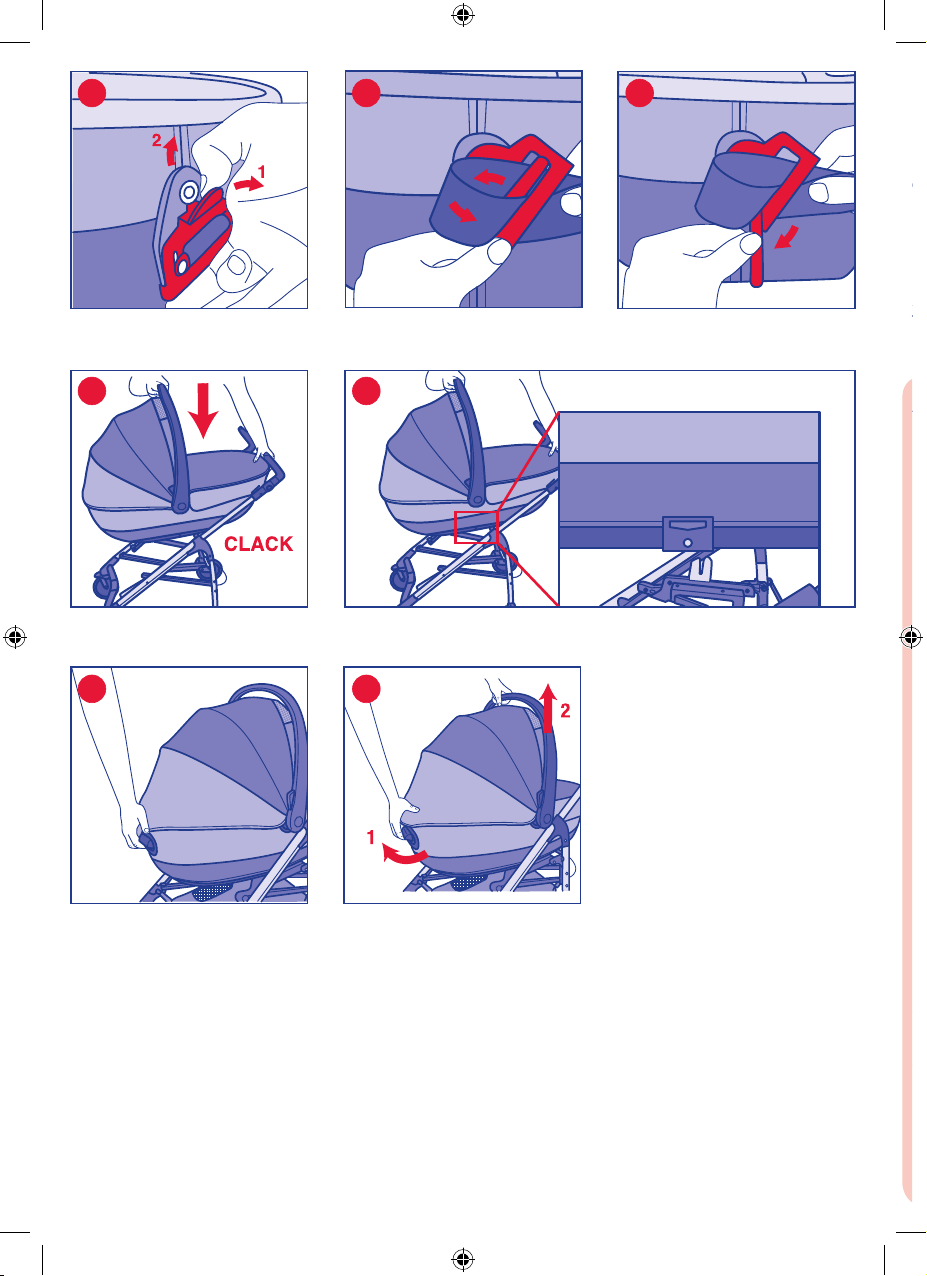
MANIGLIA DI TRASPORTO
10. La sacca è dotata di un comoda maniglia di trasporto
regolabile in tre posizioni (g. 10):
A) Trasporto
B) Intermedia
C) Riposo
11. Per portare la maniglia in posizione verticale, impu-
gnarla centralmente e tirarla verso l’alto no a sentire
il clack di bloccaggio (g. 11); per riportare la maniglia
in posizione di riposo, premere contemporaneamente i
due tasti posti sulla base della maniglia e quindi ruotare
verso il basso (g. 11A – 11B).
ATTENZIONE: la sacca non deve essere trasportata con la
maniglia in posizione intermedia o di riposo, ma soltanto
con la maniglia in posizione di trasporto (verticale).
SVESTIZIONE SACCA
Prima di iniziare le operazioni di svestizione della sacca è
necessario slacciare le cinture di sicurezza (vedi paragrafo
“Utilizzo cinture sacca”) e rimuovere il kit comfort.
12. Per rimuovere la capotta sganciare i bottoni laterali e toglie-
re il tessile dal pin nella parte posteriore della sacca (g. 12);
inne slare gli archetti dalle apposite sedi (g. 12A).
13. Slare gli elastici dagli snodi della capotte (g. 13), ri-
muovere le due patelle plastiche presenti sul lato della
sacca (g. 13A). Sganciare i bottoni posti ai lati della sac-
ca (g. 13B), slare il tessile esterno dal pin e dal tasto di
sgancio della struttura (g. 13C) e farlo scorrere sotto la
struttura della sacca (g. 13D). Rimuovere il rivestimento
interno tirandolo verso l’alto (g. 13E). Per completare la
svestizione della sacca occorre slare le cinture di sicu-
rezza dalle apposite asole presenti sulla base del rivesti-
mento interno (g. 13F).
VESTIZIONE SACCA
14. Inserire gli spallacci e lo sparti gambe nelle apposite
asole del rivestimento tessile (g. 14); inserire la patel-
la plastica nella fessura compresa tra le protezioni in
polistirolo e la struttura della sacca (g. 14A). Calzare
la parte anteriore del tessile avendo cura di posiziona-
re l’asola in concomitanza del pin (g. 14B); ripetere la
stessa operazione anche sul lato opposto della sacca
(g. 14C). Posizionare le patelle plastiche del rivestimen-
to esterno nelle apposite fessure (g. 14D) e far passare
gli elastici intorno agli snodi della capottina (g. 14E).
Inserire il materassino all’interno della sacca facendo
scorrere le cinture nelle apposite asole. Per completare
la vestizione, agganciare la capotta e la copertina come
precedentemente descritto.
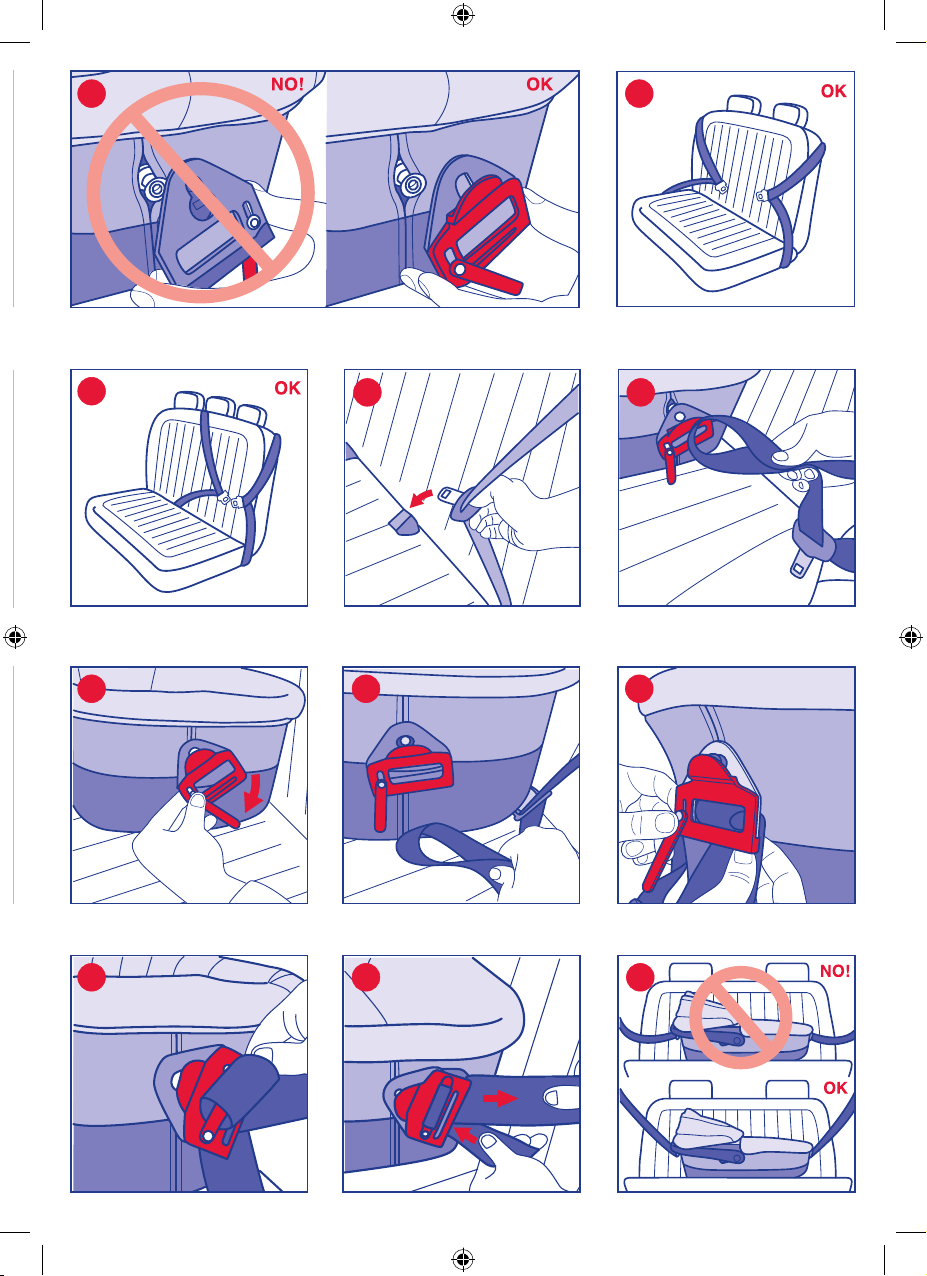
CINTURE DI SICUREZZA SACCA
Sulla sacca è presente un sistema di ritenuta a tre punti
composto da due spallacci e uno spartigambe.
ATTENZIONE: le cinture di sicurezza devono essere
utilizzate solo ed esclusivamente per il trasporto in
auto del bambino.
15. Per tutti gli altri utilizzi è necessario posizionare le cintu-
re di sicurezza sotto il materassino negli appositi spazi,
come indicato nelle figure 15 e 15A.
16. Per posizionare gli spallacci nelle apposite sedi occor-
re allentarli agendo sul tasto posto nella zona piedi del
bambino, all’interno della tasca tessile. (g. 16).
UTILIZZO CINTURE SACCA
17. Se le cinture sono allacciate, aprire la fibbia premendo il