Circutor Raption 50 HV User manual

Raption Series
INSTALLATION GUIDE
(M186A01-03-21D)

2
Raption
Installation Guide

Revision log
Date Revision Description
09/17 M186A01-03-17A Initial Version
01/18 M186A01-03-18A Changes in the following sections:
4.E.- 5.
03/18 M186A01-03-18B Changes in the following sections:
1.- 2.A.- 2.B.- 3.A.- 4.B.- 4.D.- 4.E.- 4.F.- 5.
04/18 M186A01-03-18C Changes in the following sections:
4.E.- 5.
10/19 M186A01-03-19A Changes in the following sections:
4.F.- 4.G.- 5.A.- 5.B.- 5.C.
10/20 M186A01-03-20A
Changes in the following sections:
1.- 2.C.- 2.D.- 2.E.1.- 2.E.2.- 4.B - 4.D.- 4.E.- 4.H.-
4.I.- 5.A.- 5.C.
02/21 M186A01-03-21A Changes in the following sections:
1.- 2.B.- 2.C.- 2.E.- 3.B.- 4.B.- 4.E.- 5.A.- 5.B.
06/21 M186A01-03-21B Changes in the following sections:
1.- 2.A.- 2.D.- 2.E.- 4.D.- 4.E.- 5.
09/21 M186A01-03-21C Changes in the following sections:
1.- 4.E.- 5.
11/21 M186A01-03-21D Changes in the following sections:
4.E.
Disclaimer
CIRCUTOR, SA reserves the right to make modifications to the device or the unit specifications set
out in this instruction manual without prior notice.
CIRCUTOR, SA on its web site, supplies its customers with the latest versions of the device specifica-
tions and the most updated manuals.
www.circutor.com
3
Installation Guide
Raption

Raption Series
Installation Guide
COPYRIGHT INFORMATION
This document is copyrighted, 2021 by CIRCUTOR, S.A. All rights are reserved. CIRCUTOR,
S.A. reserves the right to make improvements to the products described in this manual at
any time without notice.
No part of this manual can be reproduced, copied, translated or transmitted in any form or
by any means without the prior written permission of the original manufacturer. Information
provided in this manual is intended to be accurate and reliable. However, the original
manufacturer assumes no responsibility for its use, or for any infringements upon the rights
of third parties that may result from its use.
All other product names or trademarks are properties of their respective owners.
4
Raption
Installation Guide

Here’s your guide
to install a Raption
Disclaimer ..........................................................................................................................................................3
Revision log........................................................................................................................................................3
Here’s your guide to install a Raption .......................................................................................................5
1.-So, hello .........................................................................................................................................................6
2.-Before the installation.................................................................................................................................8
A. Important safety instruction...................................................................................................................8
B. Electrical wiring consideration .............................................................................................................9
C. Important electrical Safety Instruction..........................................................................................10
D EVSE Classification .................................................................................................................................11
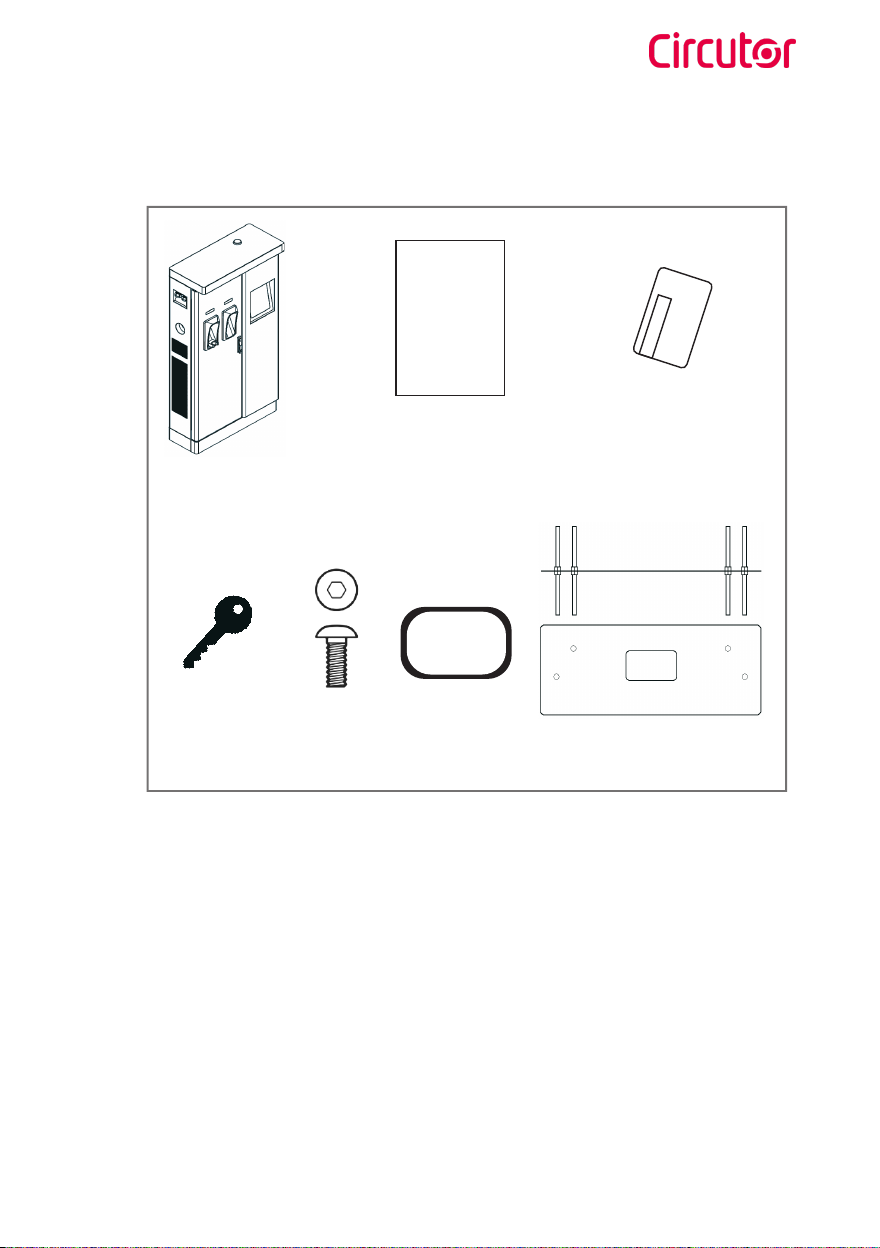
E. Supply and storage ...............................................................................................................................12
F. Unloading and handling .......................................................................................................................14
3.-Dimensionsandoverview...........................................................................................................................16
A. Dimensions..............................................................................................................................................16
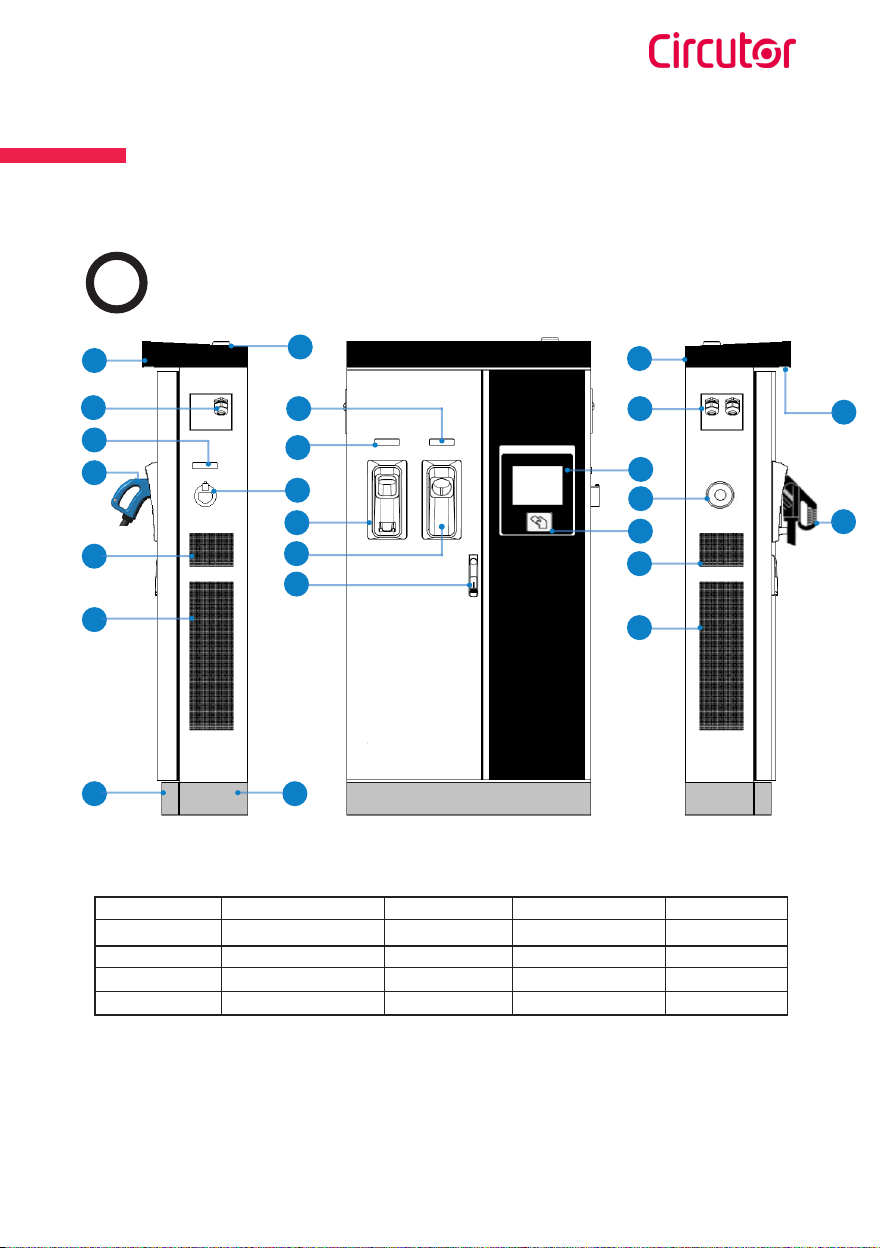
B. Overview .................................................................................................................................................17
4.- Installation..................................................................................................................................................18
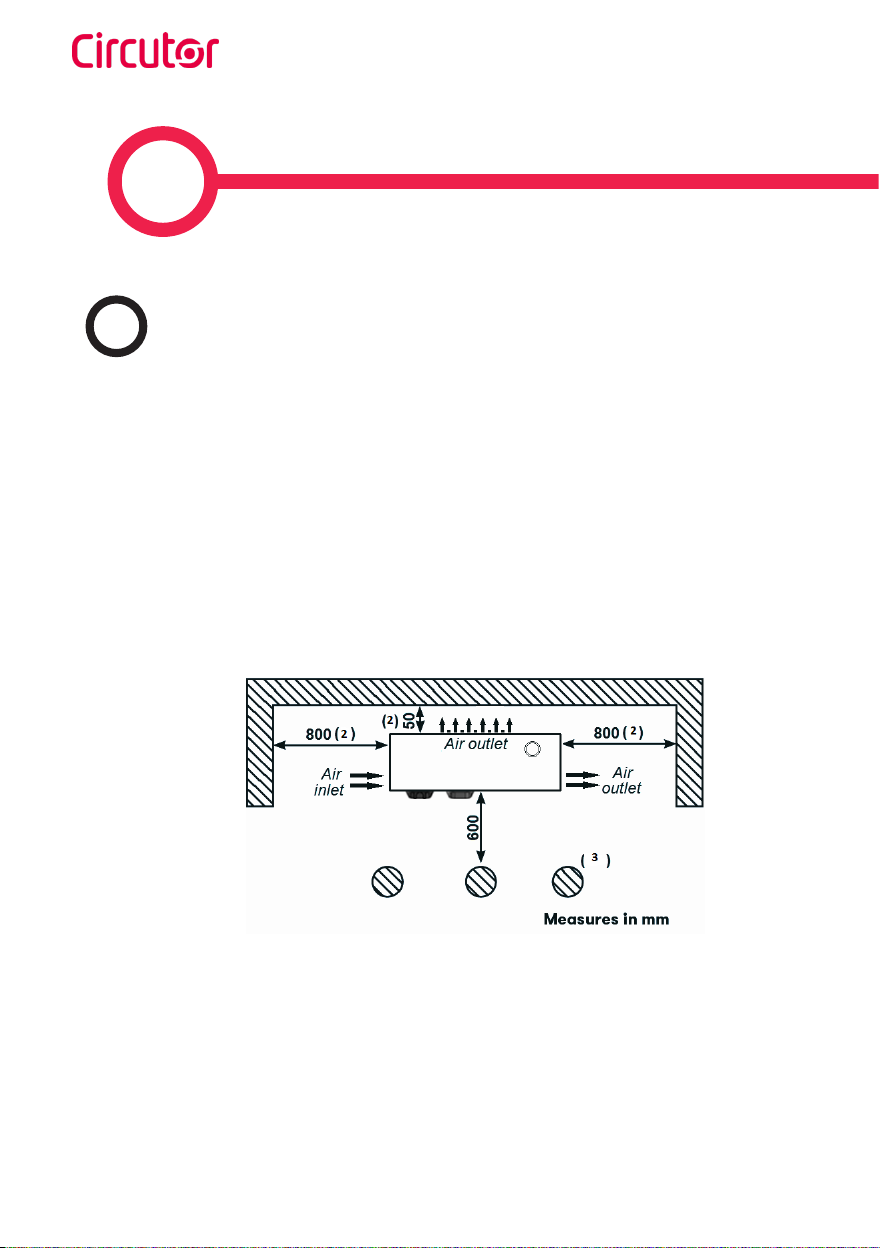
A. Minimum distances................................................................................................................................18
B. Foundation..............................................................................................................................................19
C.Opening.....................................................................................................................................................24
D. Placing.....................................................................................................................................................26
E. Wiring.......................................................................................................................................................30
F. How to use and configure it................................................................................................................41
G.Verification...............................................................................................................................................41
5. Technical data ........................................................................................................................................... 42
A. Raption 50......................................................................................................................................... ....42
B. Raption 50 HV / Raption 50 EVO / Raption 100 ............................................................................48
Need help?.................................................................................................................................................57
Guarantee...................................................................................................................................................57
5
Installation Guide
Raption

This manual provides information for installing the Charge point, which has been designed
and tested to allow charging electric vehicles, as specified at IEC 61851 standards.
This document has different sections describing electrical components inside the Charge
point and a step-by-step installation procedure.
It is mandatory to follow the basic security information supplied in this manual to ensure
safe and proper installation.
Failure to follow safety instructions may involve personal injury, equipment damage and
danger of death. CIRCUTOR is not responsible for events arising from such breach.
ELECTRIC RISK
- This symbol indicates a potentially hazardous situation which, if not
avoided may result in a risk of fire, serious injury or death.
- The Charge point must be disconnected from any power source before
performing any maintenance, repair or electrical manipulation inside.
ATTENTION!
- Follow the instructions preceded by this symbol, if not respect them or
perform them correctly, may result in minor or moderate injury to the user,
damage to equipment, damage to facilities or other property.
- Handling the equipment can cause injuries as result of the dimension
and weight. Persons handling the unit must wear safety shoes and gloves.
1
THE FOLLOWING SYMBOLS ARE USED FOR IMPORTANT
SAFETY INFORMATION IN THIS DOCUMENT
6
Raption
Installation Guide

So, hello!
General
• Compliant with IEC 61851; Electric vehicle conductive charging system (IEC
61851-1, IEC 61851-21-2 and IEC 61851-23).
• Compliant with IEC 62196; Plugs, sockets-outlets, vehicle connectors and
vehicles inlets, Conductive charging of electric vehicles (IEC 62196-1, IEC
62196-2 and IEC 62196-3).
• Compliant with CHAdeMO certification.
• Meets the CCS specification, DIN 70121. ISO 15118 ready.
• Directives: 2014/53/UE, Radio and Telecommunication Terminal
equipment; 2014/30/UE, Electromagnetic Compatibility (EMC);
2014/35/UE, Low Voltage directive.
• Complies with Radio Equipment Regulations 2017, Electromagnetic
compatibility regulations 2016 and Electrical equipment (safety)
regulations 2016.
• RFID complies with ISO 14443A/B
• Modem 4G complies with CE/RED
Applies to Raption 100, Raption 50 EVO and Raption 50 HV:
• Meter complies with 2014/32/UE.
7
Installation Guide
Raption

The charge point is designed for installation in indoor and outdoor areas. For each of the
different conditions of installation, the unit must be installed safely and ensure adequate
protection.
• Charge point must not be installed in
areas where there is potential risk of
explosion or any salinity level.
• Charge point must not be installed
in industrial areas with high level of
humidity or pollutants.
• Do not install the Charge point where
falling objects may damage the
equipment.
• The surface where the Charge point is
placed must withstand the mechanical
forces.
• Do not use this unit for anything other
than electric vehicle charging modes
are expected in IEC 61851.
• Do not modify this unit. If modified,
CIRCUTOR will reject all responsibility
and the warranty will be void.
• Comply strictly with electrical safety
regulations according to your country.
• Do not make repairs or manipulations
with the unit energized.
• Only trained and qualified personnel
should have access to the electrical
parts inside the Charge point.
• Check the installation annually by
qualified technician.
• Remove from service any item that
has a fault that could be dangerous
for users (broken plugs, caps that don’t
close...).
• Use only CIRCUTOR supplied spare
parts.
• Do not use this unit if the enclosure or
the EV connector is broken, cracked,
open, or shows any other indication of
damage.
Read carefully all the instructions before starting in
order to ensure properly installation of the charge
point.
2
AImportant safety instruction
8
Raption
Installation Guide

1 INPUT POWER SUPPLY
The input power supply line for the Charge Point must be hardwired from a dedicated
power transformer or generator and not by LV overhead power lines. It has to done
under electrical safety regulations according to your country.
Additionally, only for Raption 100 case, installation must be physically separated from
residential environments by distance greater than 30m or by a structure which acts
as a barrier to radiated phenomena.
2 POWER SUPPLY LINE DIMENSIONING
The dimensioning of the input power supply line of the Charge point must be checked
by a qualified electrician. Note that various factors, such as, cable length between
distribution board and Charge point, maximum input current of the Charge point; the
installation way may have influence of the selected cable. The installation company
will be responsible for dimensioning the wires cross section and the electrical
protections, taking into account the conditions above.
3 MAXIMUM CURRENT OUTPUT
Depending on the input power line, you can carry out the charging sessions to the
electric vehicle with different power output level, it is possible to limit the maximum
output power by software limitation so as not to exceed the available input power.
In order to implement this limitation by software, please, refer to the INSTRUCTION
MANUAL (M186B01-03-xxx).
Note: In the Chapter 4, subsection E, you are going to find more electrical instructions
so as to implement a secure POWER SUPPLY LINE.
Take into consideration this section before start wir-
ing connections of the charge point.
Before the installation
BElectrical wiring considerations
9
Installation Guide
Raption

• Avoid contact with energized
electrical circuits.
• Disconnect the power source
before servicing or repairing
electrical equipment.
• Use only tools and equipment with
non-conducting handles when
working on electrical devices.
• Never use metallic pencils or
rulers, or wear rings or metal
watchbands when working with
electrical equipment.
• Enclose all electric contacts and
conductors so that no one can
accidentally come into contact.
• When it is necessary to handle
equipment that is plugged in, be
sure hands are dry and, when
possible, wear nonconductive
gloves, protective clothes and
shoes with insulated soles.
• Never handle electrical equipment
when hands, feet, or body are wet
or perspiring, or when standing on
a wet floor.
Important electrical Safety Instructions
Read carefully all the instructions before starting in
order to ensure properly handling of electrical parts.
A safe work environment is not enough to control all potential electrical hazards. It is
recommended to be very cautious and work safely. So, the safety rules shown below
could help to control risks of injury or death from workplace hazards.
C
10
Raption
Installation Guide

DEVSE Classification
Classification of the unit according to the IEC 61851-1:2017:
1 — Power supply Input
• EV supply equipment connected to AC
supply network
• Permanently connected
2 — Power supply Output • AC and DC EV supply equipment
3 — Environmental conditions • Indoor and outdoor
4 — Access
• Equipment for locations with restricted
access .
• Equipment for locations with non-
restricted access.
5 — Mounting method
• Stationary equipment
- Ground mounted; floor mounted
6 — Protection against electric shock • Class I
7 — Charging models • Mode 3 and Mode 4
11
Installation Guide
Raption

1 SUPPLY
All the units pass their correspondent quality test and are properly packaged for safe
transportation ensuring thus their correct operation.The proper transport of the unit is
responsibility of the freight forwarder.
Upon receipt of the Charge point make a careful inspection to verify that there is no
shipping damage.
Note: If any damage caused by the forwarder is not indicated in the delivery note
during the receipt of Charge point, CIRCUTOR will not be held responsible for the cost
of repair/replacement.
You must find inside on the box, the foundation kit, the decorative front and rear
panels and two cardboard box, one of then with the connectors inside and the other
with the rest of material, such as keys, identification cards, installation manual, etc.
ESupply and storage
12
Raption
Installation Guide

2 STORAGE
Whenever possible, the Charge point must be unloaded in their place of installation and
operation. In case of unloaded to a temporary location for storage, it is convenient to not
remove the packaging and store them meeting the following minimum requirements:
Safety: Charge point must be protected against negative elements such as heat
radiation, direct solar radiation, mechanical damage, organic dissolvent impacts, etc.
Temperature: for temperatures below -20 ºC and over 60º C special attention must be
paid to the storage and handling.
Environment: Charge Point must be stored in a dry and dust-free location.The distance
from a heat source must be 1 m away. Outdoor storage of the unit has to be avoided.
Charge Point
Installation
Guide
CirCarLife RFID
Mifare Card
Acces door
Key Foundation Kit
What’s included:
Installation guide
4x Allen
screw
Isolation top hat
seal (spare)
13
Installation Guide
Raption

All processes of unloading and handling of the Charge point must be executed and
monitored by qualified personnel attending to the significant weight of the unit,
complying with safety rules and using the appropriate points of support. Important
notes:
- The delivery truck only unloads the pallet carrying the Charge point
- The delivery truck does not have the lifting facilities to move the Charge point to its
final location
- The placement of the Charge point to its final location is the responsibility of the
contractor
Once the Charge point is already unloading from the truck, move it to its final location
with a fork lift.
FUnloading and handling
14
Raption
Installation Guide

15
Installation Guide
Raption

3
ADimensions
• Units specified in millimeters:
16
Raption
Installation Guide

Dimensions
and Overview
BOverview
1
3
2
5
6
7
16
8
4
9
10
11
12
13
14
15
18
19
20
17
21
22
23
24
1- Cover 2- exit AC cable 3- AC light beacon 4- CHAdeMO connector 5- Air inlet unit
6- Power M. air outlet 7- Decorative front panel 8- Decorative rear panel 9- Handle 10- CHAdeMO holder
11- CCS holder 12- AC holder or socket 32A (1) 13- CCS light beacon 14- CHAdeMO light beacon 15- 4G Antenna
16- Air outlet unit 17- exit DC cable 18- Touch screen 19- Emergency button 20- RFID reader
21- Air inlet unit 22- Power M. air inlet 23- CCS connector 24- Courtesy light
(1) Depending of the model, the components can vary.
17
Installation Guide
Raption

4
AMinimum distances
When installing the Charge point, respect the minimum distances space for maintenance
and safety reasons.
Please comply accordingly to your country specifications.
The next picture shows how it should be installed.
• Do not install near areas where water or fluids can penetrate into the unit.
• Do not install the unit on unstable terrain.
(2) Respects the minimum lateral distance to allow proper circulation of air flow. This unit has forced
ventilation.
(3) If Bollard Impact Protector is installed, keep 600 mm as a minimum distance in order to give enough
space to open the frontal door of the Charge point for maintenance tasks.
18
Raption
Installation Guide

Installation
BFoundation
Foundation rod
435 mm x M16
16x
4x
2x
Nuts M16
Template
The purpose of this chapter is the technical definition and basic requirements for implement
the base and fixing the Charge point.
• The unit is adequate for indoor and outdoor installation
• A foundation kit with a mounting template is provided to ensure the distances between
the foundation bolts.
Washers M16
4x
19
Installation Guide
Raption

• Place the foundation bolts into the template using provided nuts with the help of a
24mm open-end wrench. Take into consideration the following measures.
20
Raption
Installation Guide
This manual suits for next models
2
Table of contents
Other Circutor Automobile Accessories manuals

Circutor
Circutor Raption 150C Series User manual

Circutor
Circutor URBAN Series User manual

Circutor
Circutor Wallbox eNext Series User manual

Circutor
Circutor Raption Series User manual

Circutor
Circutor URBAN WB DC Series User manual

Circutor
Circutor Wallbox ePark Series User manual

Circutor
Circutor Raption 150 Series User manual

Circutor
Circutor URBAN Series User manual

Circutor
Circutor ePARK M-S2 User manual

Circutor
Circutor Raption 50 Series User manual