Using the 3D
USER INFORMATION
User Information shall be provided to the user of the product. NFPA Standard 1983, incorporated into the 2022
edition of NFPA 2500 recommends separating the User Information from the equipment and retaining the
information in a permanent record. The standard also recommends making a copy of the User Information to keep
with the equipment and that the information should be referred to before and after each use.
Additional information regarding life safety equipment can be found in NFPA 1500 and NFPA 1858 and NFPA 1983,
incorporated in the 2022 edition of NFPA 2500.
LIFESPAN / INSPECTION / RETIREMENT
CMC does not specify an expiration date for hardware because the service life depends greatly on how and where
it is used. The type of use, intensity of use, and environment of use are all factors in determining serviceability of
the equipment. A single exceptional event can be cause for retirement after only one use, such as exposure to
sharp edges, extreme temperatures, chemicals, or harsh environments.
A device must be retired when:
• It fails to pass inspection.
• It fails to function properly.
• It has illegible product markings.
• It shows signs of damage or excessive wear.
• It has been subjected to shock loads, falls, or abnormal use.
• It has been exposed to harsh chemical reagents.
• It has an unknown usage history.
• You have any doubt as to its condition or reliability.
• When it becomes obsolete due to changes in legislation, standards, technique or incompatibility with other
equipment.
Remove retired equipment from service and destroy it to prevent further use.
Inspect the equipment according to your department’s policy for inspecting life safety equipment. CMC
recommends a detailed inspection by a competent person at least once every 12 months depending on current
regulations and conditions of use. Record the date, inspector name, and inspection results in the equipment log as
well as any other relevant information to track the
usage history.
Before each use, the user should:
• Conrm the device is functioning properly.
• Verify the presence and legibility of the product markings.
• Verify there is no excessive wear or indications of damage such as deformation, corrosion, sharp edges,
cracks, or burrs. Minor nicks or sharp spots may be smoothed with emery cloth or similar.
• Check for the presence of dirt or foreign objects that can affect or prevent normal operation such as grit, sand,
rocks, and debris.
During each use, the user should:
• Conrm all pieces of equipment in the system are correctly positioned with respect to each other.
• Monitor the condition of the device and its connections to other equipment in the system.
• Do not allow anything to interfere with the operation of the device or its components.
• Keep foreign objects out of the device.
LIMITATIONS AND PROPER USE
The 3D features two sliding bars for optimum friction control and efciency. The horn design works well with 13
mm rope and smaller, making it easy to add or subtract friction as needed throughout the evolution. The frame
dimensions allow for larger rescue-sized carabiners to be used without any contact or friction with the rope. The
descender can be loaded or unloaded while connected to your harness for rappelling or to an anchor for one- or
two-person rescue lowers.
The 3D Descender allows the user to control a wide range of loads by varying the path of the rope through the
device as well as increasing and decreasing the space between the bars to control friction. It is important that
before commencing a lowering operation, all bars and horns be engaged and the descender be securely tied off.
After loading the system, slowly untie the descender and begin with the maximum friction obtained by having the
rope running over at least two of the horns. See opposite page for rigging diagrams.
When rigging the descender, always make sure that the center bar is securely engaged to the frame and the
locking button is fully extended to the end of the center bar. The center bar should not disengage from the frame
without depressing the locking button. See below for additional product-specic guidance.
• Friction will vary depending on rope size, type, and condition. Test with your rope in a safe manner to determine
compatibility and the particular wrap(s) you will use. Remember that rope weight adds friction and will become
less as you get closer to the end of the rope.
• Have a rescue plan in place to deal with any emergencies that could arise during use of the device.
• When using Prusik as a backup, make sure it will catch on the rope and prevent a fall. Do not inadvertently pull
down the Prusik.
• Must be free to align with the load, any restraint is dangerous. Do not allow any bending force on the 3D or it
may break or break the connectors. Keep equipment properly positioned to avoid inward forces on gates.
• Monitor for wear. Dirty ropes can be very abrasive and quickly wear out a friction device.
• Use a stopper knot on the free end of the rope to prevent it from pulling through.
• Do not lose control of the lower or rappel. Always grip and maintain control of the free end of the rope.
• Be aware that descent control devices can get hot on long lowers and rappels.
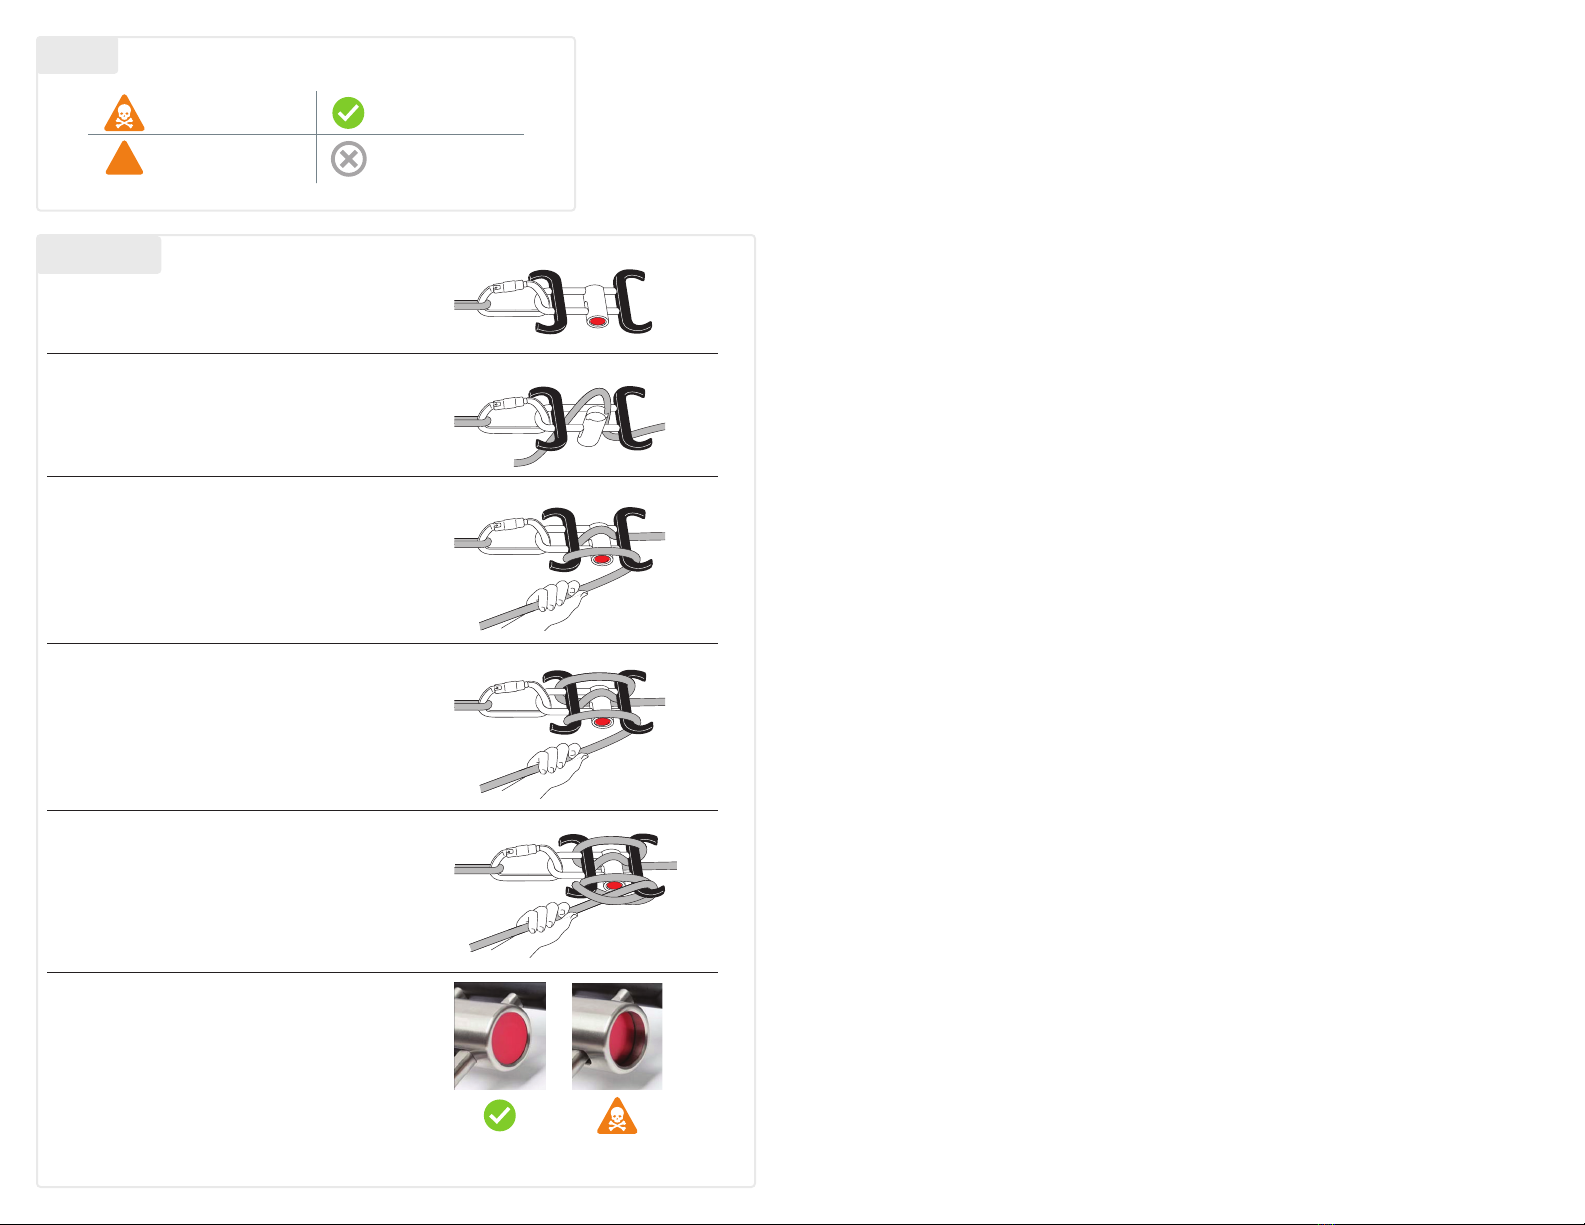
Legend
Imminent risk of serious
injury or death. Appropriate function or use.
Imminent risk of accident
or injury. Equipment incompatibility.
1Push and hold red button to unlock.
2
Push center bar toward button and rotate, then push bight
of rope up between horns and rotate bar back into lock
position
.
3For rappel applications, or for lowering light to moderate
loads, the rope should engage the top and bottom horns
as shown
4For maximum friction, engage the top and bottom horns on
one side then cross it over to engage the top and bottom
horns on the opposite side. We recommend this reave prior
to tying off the descender.
5To tie off, twist a half hitch around an upper horn as shown.
For added security you may cross to the other side and add
tie an additional half hitch.
WARNING: Ensure center bar locking button is fully
extended to end of center bar prior to placing a load on the
3D. If the button is not fully extended the center bar is not
locked!


