Contex HD Ultra Series User manual

Model: HD Ultra series
User’s Guide
Wide Format Scanners

Contents
Table of Contents
About This Guide 2
Overview of Scanner 3
Scanner Front View: 3
Scanner Rear View: 4
Installation 5
System requirements 5
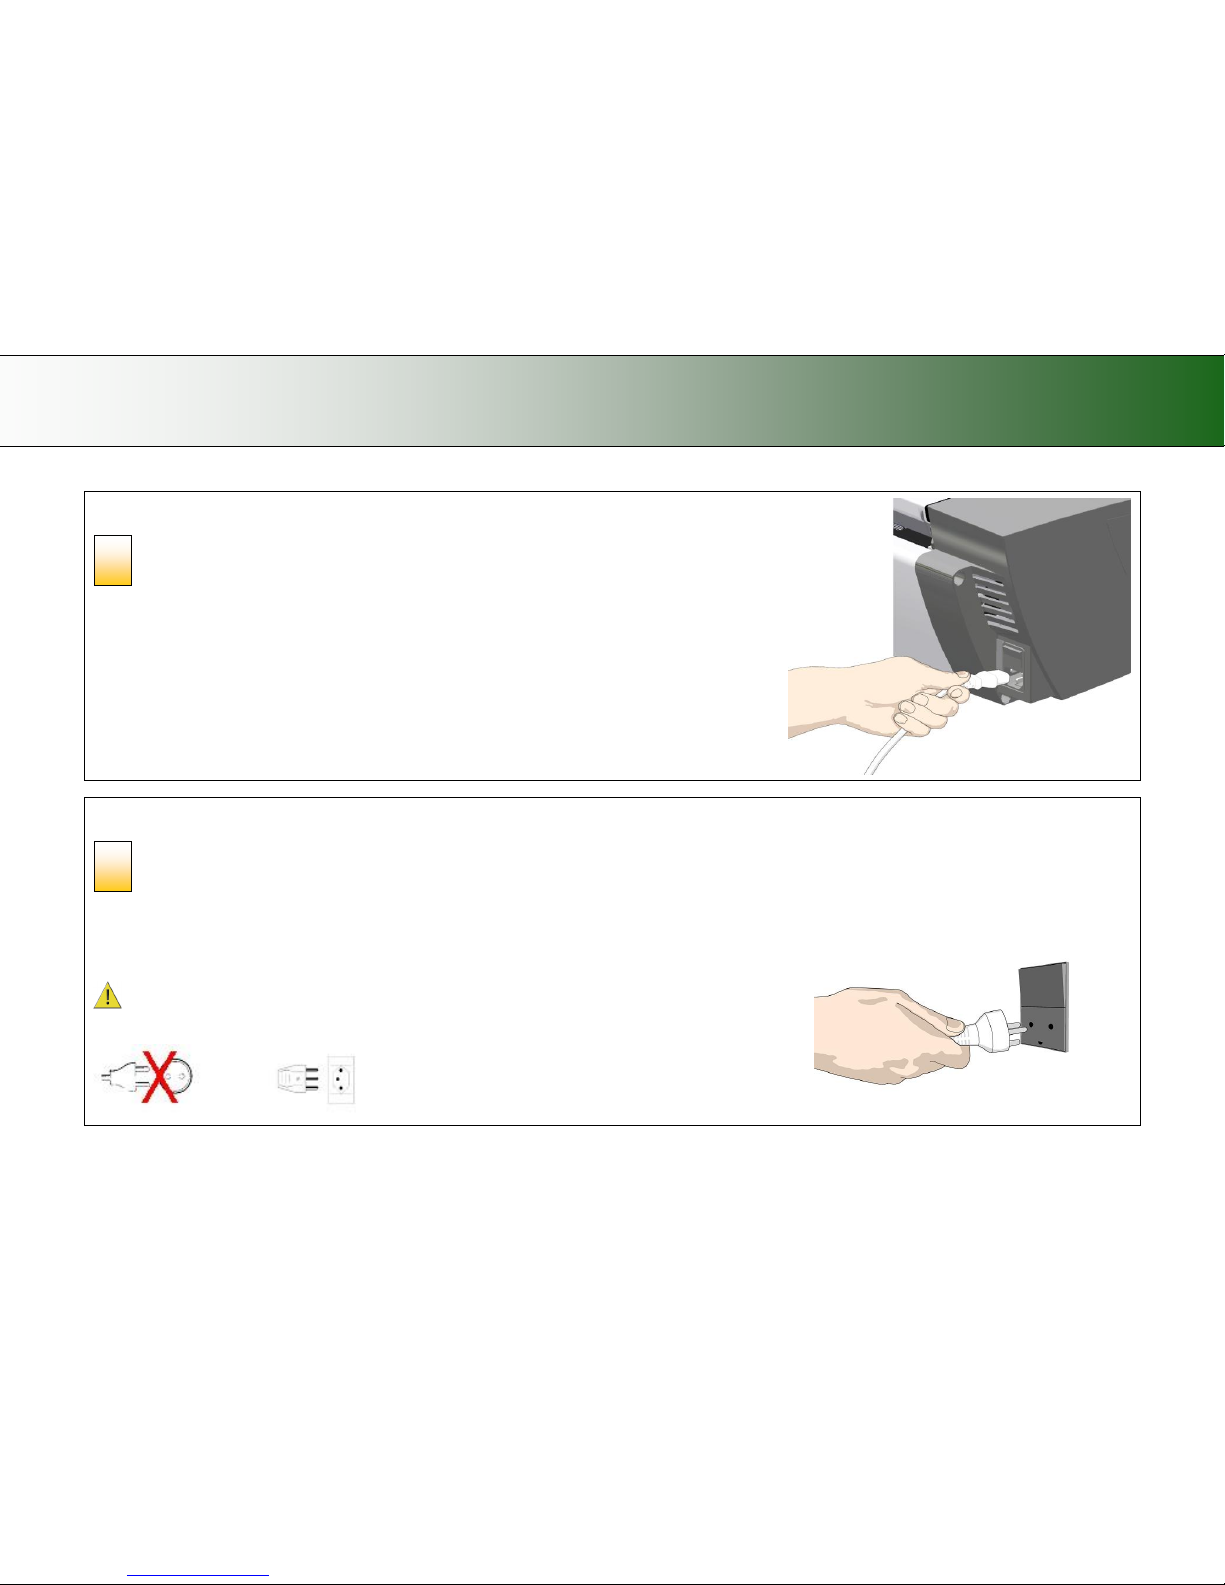
Installation Steps 5
Turning Power ON/OFF 21
Main power switch 21
The scanner‟s Self Test Procedure 21
Scanner ready to scan 21
Wake and Sleep modes 22
Sleep/Wake mode options –automatic power management 23
Timer Function –Scheduling ON/OFF Times 23
Automatic shut down after idle time 24
Loading Originals into the Scanner 26
Load, face down, at the scanner‟s right side 26
Paper-guides 27
Scanning oversize documents 27
Automatic loading 28
Manual loading 28
Using the paper-return guides 28
Unloading the original after scan 29
Fast-loading 29
Soft-handling 29
Paper Pressure Adjustment –for thin media 30
Setting the input size 30
Scanning 31
Software applications for scanning 31
Running applications from the scanner panel 31
Batch scanning 31
Monitoring your scanner with WIDEsystem 32
Scanning Thick Media 34
Automatic Thick Media Adjustment (ATAC) 34
When Scanning in Thick Media Positions 35
Maintenance 36
About scanner maintenance 36
Overview –key maintenance points 37
Cleaning the scan area 38
Camera Alignment and Calibration 43
Replacing Scanner Parts 46
Replacing the Glass-plate 47
Replacing the White-Background-Platen 51
Replacing the Scanner Lamp-Unit 56
Downloading New Firmware 60
What is Firmware? 60
When do I need new firmware? 60
How to identify the firmware version running in the scanner? 60
How to install new firmware? 60
Trouble Shooting 61
How are errors reported on your system 61
Correcting common errors 61
Technical assistance 61
Problems Related to Scanner Installation 62
Problems Related to Operation of the Scanner 63
Problems Related to the Scanning Results 67
Appendix B: Important Safety Instructions 68
Appendix C: Regulations 69
FCC Regulations 69
CE Regulations 69
VCCI Regulations 69
Toxic or Hazardous Substances or Elements 70

About This Guide 2
About This Guide
This guide explains how to operate and maintain your wide format scanner.
This user’s guide covers:
HD Series Scanner models
The guide assumes basic knowledge of your computer and operating
system and does not repeat material from their documentation.
Be sure to refer to:
1. The Installation section –describes correct installation of your
scanner drivers.
2. The readme.htm file in the ws folder on the WIDEsystem TOOLS CD-
ROM. Contains the most current installation and OS compatibility
issues.
3. WIDEsystem TOOLS Help –After installing your drivers, open
WIDEsystem and press F1. Contains information on using the
WIDEsystem software.
IMPORTANT: Be sure to use the WIDEsystem TOOLS CD-ROM that
came with your scanner or a newer version. Out-of-date versions of
WIDEsystem software may not detect your scanner model.
NOTE: Windows Compatibility - Your scanner and drivers are tested
and developed to support the most current active Microsoft Windows
version OS systems. Drivers and interface support in regard to specific
Windows versions will follow the Microsoft Support Lifecycle Policy. The
compatibility specifications can therefore change accordingly. The most
current OS compatibility specifications and drivers will be available on your
manufacturer‟s website.

Overview of Scanner 3
Overview of Scanner
Scanner Front View:
Parts, you need to recognize when installing and using the scanner
Paper ready indicator
Power button and indicator
ATAC up button (Thick media)
Paper Forward button
Error indicator
Paper backwards button
ATAC down button (Thick media)
Scan Application
Email Application
Copy Application
One-touch buttons:
Paper return guides
Release buttons for opening scanner lid (for maintenance)
Paper feeding guides
Insertion slot –document feeding
Operator’s panel

Overview of Scanner 4
Scanner Rear View:
Parts you need to recognize when installing and using the scanner
Paper return guides
Paper Pressure Adjustment lever
Main Power switch and power socket
Interface connections –USB, Gigabit

Installation 5
Installation
System requirements
PC or supported workstation. Recommended requirements: 1.6GHz Dual Core processor or better, 2 GB RAM, 5 GB of available hard drive space,
USB 2.0 interface.
Compatible Windows operating system –View the ws/readme.htm file on the WIDEsystem TOOLS CD-ROM.
The WIDEsystem TOOLS CD supplied with your scanner.
Scanning software or compatible third party software.
Grounded power outlet.
PC with USB port or enabled Gigabit port.
NOTE: Gigabit interface compatibility and speeds depend on your scanner model.
Installation Steps
To get your scanner up and running, follow the steps below in their written order.
Set up the scan station
Your scanner should be placed either on the specially designed stand-alone floor
stand or on a sturdy table. Make sure there is enough space behind the scanner to
allow you to access to plug in cables.
IMPORTANT: DO NOT YET CONNECT THE SCANNER TO
POWER OR PC.
See the Safety Instructions at the end of this operator‟s guide
1

Installation 6
Installing scanner software –WIDEsystem, drivers, and Scan/Copy software
Install WIDEsystem and scan/copy software on your PC
IMPORTANT: WIDEsystem contains your essential scanner drivers. You must install WIDEsystem
before you connect the scanner or install any scanner software applications.
1. Insert the WIDEsystem TOOLS CD-ROM into your PC. Normally the setup program interface will start
automatically. If it does not, locate the setup.exe file on the CD and start it manually.
2. Follow the instructions on your screen to install the WIDEsystem software and scanner drivers. Reboot the
PC when asked to do so to complete installation.
3. Remove the CD when done with installation.
4. To verify correct installation of WIDEsystem: the WIDEsystem icon will be visible in your system tray.
5. After installing WIDEsystem, install the Scan & Copy software you will be using with the scanner. Select
the required installation options for the Scan & Copy software from the WIDEsystem TOOLS CD or from a
third-party installation CD.
IMPORTANT: During all installation steps, be sure to select “YES” if Windows asks you to allow the
software to access the network.
CAUTION: DO NOT YET CONNECT THE SCANNER TO POWER OR TO THE PC. This is to
ensure your own personal safety and to help protect your device from potential damage during
cleaning in the next steps
6. After installing software, leave the PC ON as you perform the next steps to prepare and setup the scanner.
2

Installation 7
Cleaning the scanner
Clean the scanner feeding bed
Lightly clean the scanner exterior and interior to remove any dust accumulated
during transportation. Start with the feeding bed.
The feeding bed is the flat surface in front of the insertion slot. Wipe the feeding
bed thoroughly so dirt and dust are not dragged into the scan area with the
original.
Cleaning the scanner
Open the scanner lid –
Press the lid release buttons upwards
The internal scan area should be wiped clean for any dust accumulated during
packaging and shipping. The scan area is under the scanner lid so you have to
open it. The scanner lid release buttons are at each side of the scanner lid.
1. Stand at the front of the scanner.
2. Simultaneously place a thumb under each lid release button and push
them upwards until you feel the lid‟s latch unlock. .
1 and 2. Push the two release buttons upwards
4
3

Installation 8
Cleaning the scanner
Open the scanner lid –
Pull the lid all the way back
1. The lid is on springs and will pop upwards when released..
2. Hold the lid as you ease it all the way back to expose the scan area.
Cleaning the scanner
Clean the internal scan area
Lightly wipe the internal scan area‟s glass plate free of dust. Use a dry lint-free cloth.
If you detect difficult smudges on the glass that cannot be wiped clean with a dry cloth,
refer to this guide‟s section Cleaning the scan area for instructions on thoroughly cleaning
the scan area.
Close the lid after cleaning the internal scan area.
1. Push the scanner lid back all the way down until you hear the lid latches click.
2. Gently try to pull the lid open to ensure that it is locked in its “closed” position.
6
5

Installation 9
Connect power cable
Connect the power cable to the scanner
Connect the scanner power cable to the scanner„s main power connection
socket. The main power connection socket is at the scanner‟s back.
Connect power cable
Connect the scanner to a power outlet.
Connect the power plug end of the scanner power cable to a power outlet.
CAUTION: The scanner is equipped with a three-wire (pin) grounding type plug. If you cannot insert the
plug into your outlet, contact your electrician to replace the plug or outlet to ensure a grounded power
connection. Do not try to defeat or ignore the purpose of the grounding-type plug.
8
7

Installation 10
Power ON the scanner
Turn ON scanner power
Turn on the main power switch at the back of the scanner
Connect Cables
Connect the USB interface cable to the scanner
Initial installation and activation of the scanner is easiest using the USB connection.
This applies also for Gigabit enabled models.
1. The interface-connection-panel is found at the back of the scanner –on its left side when facing
the back.
2. Connect the B-connector end (square shaped) end to a USB port on the scanner.
NOTE: For Gigabit enabled scanner models: The installation wizard will instruct you on
installation and activation of the gigabit interface later in the installation process. For now –only connect
the USB.
Regulatory Notice: Your scanner product has been tested to comply with the EMC Standards EN55022 and
FCC, Part 15. To maintain compliance, only use the interface cables supplied with the scanner.
IMPORTANT: Do not yet connect the other end of the USB to the PC.
10
9

Installation 11
Connect USB cable to PC
Connect the USB interface cable to the PC
1. On the PC, verify that WIDEsystem is running –the WIDEsystem icon should be visible in
your system tray.
2. If WIDEsystem is not running, locate the WIDEsystem entry under your Programs menu
and start it manually.
3. Make sure the USB cable is connected to the scanner as instructed in a previous step.
4. Connect the A-connector end (flat end) to a USB port on your computer.
NOTE: It is recommended to use an available USB port on the back of the PC. Using USB
ports on the front can affect performance on some PC models.
Scanner installation
The Installation Wizard starts up
1. The driver will detect the scanner and start the scanner installation wizard.
2. On first time installations, the WIDEsystem Scanner Installation Wizard should start after 20
seconds.
3. If the installation wizard does not start up, perform one or more of the following:
a. Unplug and reinsert the USB connections to scanner and PC.
b. Ensure the USB cable is connected firmly at both ends.
c. Try a different USB port on the PC.
d. Make sure the USB is inserted into the port marked for USB at the back of the
scanner (and not, for example, the Ethernet port).
12
11

Installation 12
Scanner installation
Windows installs the scanner
1. Click Next and follow the instructions on your screen to install the scanner on
your PC.
2. Most of the scanner installation process is automatic.
3. Wait until the completion message appears
4. Press Next when done.
IMPORTANT: During all installation steps, be sure to select “YES” if Windows
asks you to allow the software to access the network.
Scanner Installation
Set energy-star idle time preference
On delivery, the scanner is set for automatic entry into sleep mode after a
preset idle time, i.e., the length of time the scanner is not active. The default
idle time setting for energy star compliancy is 15 minutes.
You may wish to prolong it to avoid frequent automatic shutdowns.
Set a new idle time or select do not sleep to deactivate automatic entry into
sleep mode.
14
13

Installation 13
Scanner Activation
Activate the scanner
You must activate your scanner with its licence before you can use it.
Please follow the Scanner Activation Wizard’s instructions.
NOTE: Your supplier may have pre-activated the scanner for you. If the scanner is pre-
activated, the wizard will skip this step and following steps 16a, 16b.
About license keys and activation codes:
You will need to enter your license key that came with your scanner.
Contact you dealer if you do not have a license key.
Online activation will only require the license key.
Manual activation will additionally require an activation code. Activation codes can be
obtained from your dealer or through the manufacturer‟s License website. Follow the
instructions Manual Activation (below) to obtain an activation code through the
manufacturer‟s License website.
To activate the scanner:
1. Press the Activate button to start the activation wizard.
2. You are presented with 2 ways to activate the scanner –Online and Manual.
3. If your PC is connected to the Internet, choose Online activation, otherwise choose
Manually
4. If you chose Online, proceed to the instructions in step 16a (and skip 16b). If you chose
Manual, proceed to the instructions in step 16b (skip 16a).
IMPORTANT: During all installation steps, be sure to select “YES” if Windows asks you to
allow the software to access the network.
15

Installation 14
Scanner Activation - Online
Online activation
Online activation is very easy. You only need your license key.
When you choose Online as the activation method, the dialog shown on the top right appears.
1. Enter you license key in the designated field.
2. The key will be authenticated online right after it is entered and if valid, a green
tick will appear as shown in the dialog shown on the right-middle.
3. Press the Activate button to continue.
4. The Success dialog will indicate successful activation.
16a

Installation 15
Scanner Activation - Manual
Manual activation
Have your license key ready before proceeding. If you don‟t have
one, contact you dealer.
Manual activation uses an Activation Code. To produce an activation
code, you will need your license key and the scanner‟s ID which is a
serial number or hardware ID. The scanner‟s ID is read off the
scanner and displayed by the wizard (*1).
You will need to access the internet (from any device). Here you can
enter the 2 values - license key and ID to get an activation code.
Follow the instructions below:
1. When you choose Manual as the activation method, you will
be asked to enter an activation code in the empty field. Click
Next to obtain an activation code.
2. The Manual activation wizard will display instructions. Please
note the actual scanner‟s ID - hardware ID or S/N (serial
number) supplied by the wizard (*1). You will need this ID to
obtain the activation code in the next steps.
3. Go to www.Licenseactivate.com.
4. In the web interface titled License Activation, enter your
license key in the designated field.
5. Enter the scanner‟s ID - hardware ID or S/N that is supplied by
the wizard as describe in step 2.
6. Note or copy the Activation Code produced by the
Licenseactivate.com website (*2).
7. Enter or paste the activation code in the manual activation
wizard dialog (*3) and press Next.
8. The system will activate the scanner. Upon completion, the
system will display the success message.
*1
*2
*3
16a

Installation 16
Scanner Installation –Change network name
Change the scanner’s network name (optional)
NOTE: This step only appears with licensed Ethernet supported scanners as
detected during activation.
You may wish to change the default name of the scanner to comply with your
organization.
Click Next when done.
17

Installation 17
Scanner Installation
Calibrate the scanner –camera alignment
Transportation of your scanner could have slightly moved the cameras and they need to be
realigned.
1. Press Calibrate to start the wizard.
2. Follow the wizard‟s instructions to perform camera alignment.
3. If you did not clean the internal scan area/glass as instructed in the previous installation
steps, then do so now.
4. You will be asked to insert your calibration sheet that came with the scanner.
5. Be sure to align the sheet arrow with the scanner middle arrow.
6. Press the Camera Alignment button. The system will do the rest.
7. The wizard will notify you when calibration has completed successfully.
8. Upon successful completion, remove the calibration sheet.
9. See also the Scanner Maintenance and Calibration Guide for complete and illustrated
instructions.
18

Installation 18
Scanner Installation
Installation complete
The scanner has been installed correctly when you see this message.
For models that supports Gigabyte, proceed to the steps for enabling gigabyte on
the scanner plus sharing it on the network.
For USB only scanners - you can also choose to share the scanner on the network.
Instructions for sharing USB scanners on the network follow below.
19

Installation 19
Enabling Gigabit Interface
Enable Gigabit Ethernet Interface (optional)
For scanner models with gigabit interface support
For gigabit enabled scanners - Optimal speed according to specifications will require you connect the
scanner to a gigabit connection.
To enable gigabit interfacing:
1. Disconnect the USB connection to your PC
2. Connect an approved gigabit cable to the scanner Ethernet interface socket at the scanner‟s back.
3. Connect the other end of the gigabit cable to your LAN.
4. Open WIDEsystem –if not already open, double--click the WIDEsystem icon in the system tray.
5. Press the Refresh Scanner List button
6. The system will automatically include and share the scanner on the network and enable scanning at
gigabit speeds.
NOTE: Use only an approved gigabit cable. Full specified performance cannot be guaranteed with other
cables or normal LAN cables.
NOTE: WIDEsystem will provide a warning if you are running on a gigabit scanner without a gigabit
connection.
20
Table of contents
Other Contex Scanner manuals

Contex
Contex SD One+ User manual

Contex
Contex SD 3600 series User manual

Contex
Contex IQ Quattro X Series User manual

Contex
Contex HD Ultra X Series Guide

Contex
Contex AA51A Manual

Contex
Contex FLEX50i User manual

Contex
Contex XD2490 User manual

Contex
Contex IQ FLEX How to use

Contex
Contex IQ 4400 Series User manual

Contex
Contex Chroma 8040 Manual

Contex
Contex SD One MF Assembly instructions

Contex
Contex HD iFLEX User manual

Contex
Contex HD Ultra X 6000 Series User manual

Contex
Contex SD One+ How to use

Contex
Contex HD5450 User manual

Contex
Contex AB51A Manual

Contex
Contex Wide Format Color Manual

Contex
Contex HD Ultra X 6000 Series How to use

Contex
Contex GX67D Manual

Contex
Contex SD One MF 44 User manual