manuals.online logo
Brands
  1. Home
  2. •
  3. Brands
  4. •
  5. CRU
  6. •
  7. Enclosure
  8. •
  9. CRU DataPort 2 Bay User manual

CRU DataPort 2 Bay User manual

Rugged, Reliable, Mobile, SecureTM
1-800-260-9800 www.CRU-DataPort.com
DataPort 2 Bay or 4 Bay SATA or SAS Enclosures
with Removable Drive Carriers
Package Contents
DataPort 2 Bay Enclosure
1 - DataPort 2 Bay Enclosure
2 - Carrier & Frame Assemblies
2 - Key Sets
2 - Screw Kits
1 - Power Cable
The DataPort Enclosures with removable drive carriers support up to
four (4) SATA or SAS hard drives. The DataPort Enclosures require a
multi-lane cable with an SFF-8470 InfiniBand connector.
NOTE: The DataPort Enclosure does not include the required
external enclosure to host cable.
The DataPort Enclosure supports two different multi-lane cables, the
SFF-8470 (InfiniBand) to SFF-8470 (InfiniBand) cable (CRU PN 7366-700-
03) or the SFF-8470 (InfiniBand) to SFF-8088 (Mini-SAS) cable (CRU PN
7366-701-01). Consult your host bus adapter manual to determine which
interface it supports.
For internal host support CRU offers a cable assembly kit. The 4x SATA
to SFF-8470 (InfiniBand) PCI host adapter with four (4) SATA data cables
and SFF-8470 (InfiniBand) to SFF-8470 (InfiniBand) external cable (CRU
part number 7100-800-10) will provide the end to end cabling required
to set up the DataPort Enclosure.
These cables are available through CRU’s authorized resellers or direct
from CRU at www.CRU-DataPortStore.com.
Hard Drive Installation
1. Remove the drive cover from the carrier.
2. Carefully insert the drive into the carrier. Slide the drive towards the
Drive Carrier Board, so that the I/O connector on the drive mates with
the connector on the Drive Carrier Board. Hold the drive in place and
turn the drive/carrier assembly over.
3. Fasten the drive into place with four (4) provided screws. Some drives
may require minor adjustment before securing into carrier with screws.
4. Install the drive cover and secure with two (2) provided screws.
Figure 1: Installing Hard Drive (DE110 carrier shown)
SAS or SATA
Drive
(not included)
Drive Carrier
Drive Board
Carrier
Hard Drive
Mounting
Screws (4 each)
DataPort 4 Bay Enclosure
1 - DataPort 4 Bay Enclosure
4 - Carrier & Frame Assemblies
4 - Key Sets
4 - Screw Kits
1 - Power Cable
0043-7120-5240 4 Bay SAS/SATA Enclosure w/ DataPort 10s
0023-7120-5220 2 Bay SAS/SATA Enclosure w/ DataPort 10s
0043-7180-5240 4 Bay SAS/SATA Enclosure w/ Data Express DX115s
0023-7180-5220 2 Bay SAS/SATA Enclosure w/ Data Express DX115s
0043-5960-5240 4 Bay SATA Enclosure w/ Data Express DE110s
This install guide is intended to support DataPort 2 Bay or 4 Bay
Multi-lane Enclosures in the following configurations:
Rugged, Reliable, Mobile, SecureTM
1-800-260-9800 www.CRU-DataPort.com
Product Warranty
CRU-DataPort (CRU) warrants the DataPort 2 Bay or 4 Bay SATA or SAS Enclosures with Removable Drive Car-
riers to be free of significant defects in material and workmanship for a period of one year from the original
date of purchase. CRU’s warranty is nontransferable and is limited to the original purchaser.
Limitation of Liability
The warranties set forth in this agreement replace all other warranties. CRU expressly disclaims all other
warranties, including but not limited to, the implied warranties of merchantability and fitness for a particular
purpose and non-infringement of third-party rights with respect to the documentation and hardware. No CRU
dealer, agent or employee is authorized to make any modification, extension, or addition to this warranty. In
no event will CRU or its suppliers be liable for any costs of procurement of substitute products or services,
lost profits, loss of information or data, computer malfunction, or any other special, indirect, consequential, or
incidental damages arising in any way out of the sale of, use of, or inability to use any CRU product or service,
even if CRU has been advised of the possibility of such damages. In no case shall CRU’s liability exceed the
actual money paid for the products at issue. CRU reserves the right to make modifications and additions to
this product without notice or taking on additional liability.
FCC Certification
This device has been tested and found to comply with the limits for a Class B digital device, pursuant to Part
15 of the FCC rules.
Operation is subject to the following two conditions:
1. This device may not cause harmful interference, and
2. This device must accept any interference received; including interference that may cause undesired operation.
IT Power Systems
This enclosure is intended for use on a TN power system. This enclosure was evaluated for use on an IT
power system in accordance with Norway National Differences to IEC60950-1.
Register your product at www.CRU-DataPort.com.
A5-024-0007 Rev. 3.0
Enclosure Setup Instructions
1. Power off the host computer.
2. Connect the host computer to the DataPort Enclosure with an exter-
nal multi-lane cable (not provided).
NOTE: CRU 2 Bay Enclosures only use two (2) of the four (4)
multilane host bus adapter connections.
3. Install hard drives in the removable carriers. See hard drive installa-
tion instructions for more details.
4. Insert the removable carriers into the enclosure and engage the lock
on the receive frames.
NOTE: The lock on both the DE110 and DP10 receiving frames
functions as both a lock and a DC power switch for the carrier
unit. The lock MUST be engaged in order to supply power to the
carrier and installed drive unit.
5. Power on the DataPort Enclosure with the power button located on
the lower right corner on the front of the enclosure. For best results
power on the enclosure prior to powering on the host system.
NOTE: The DataPort Enclosure supports hot swapping provided
the host bus adapter also supports that feature. When hot swap-
ping drives, ensure drive activity has stopped before powering
down the removable carrier.
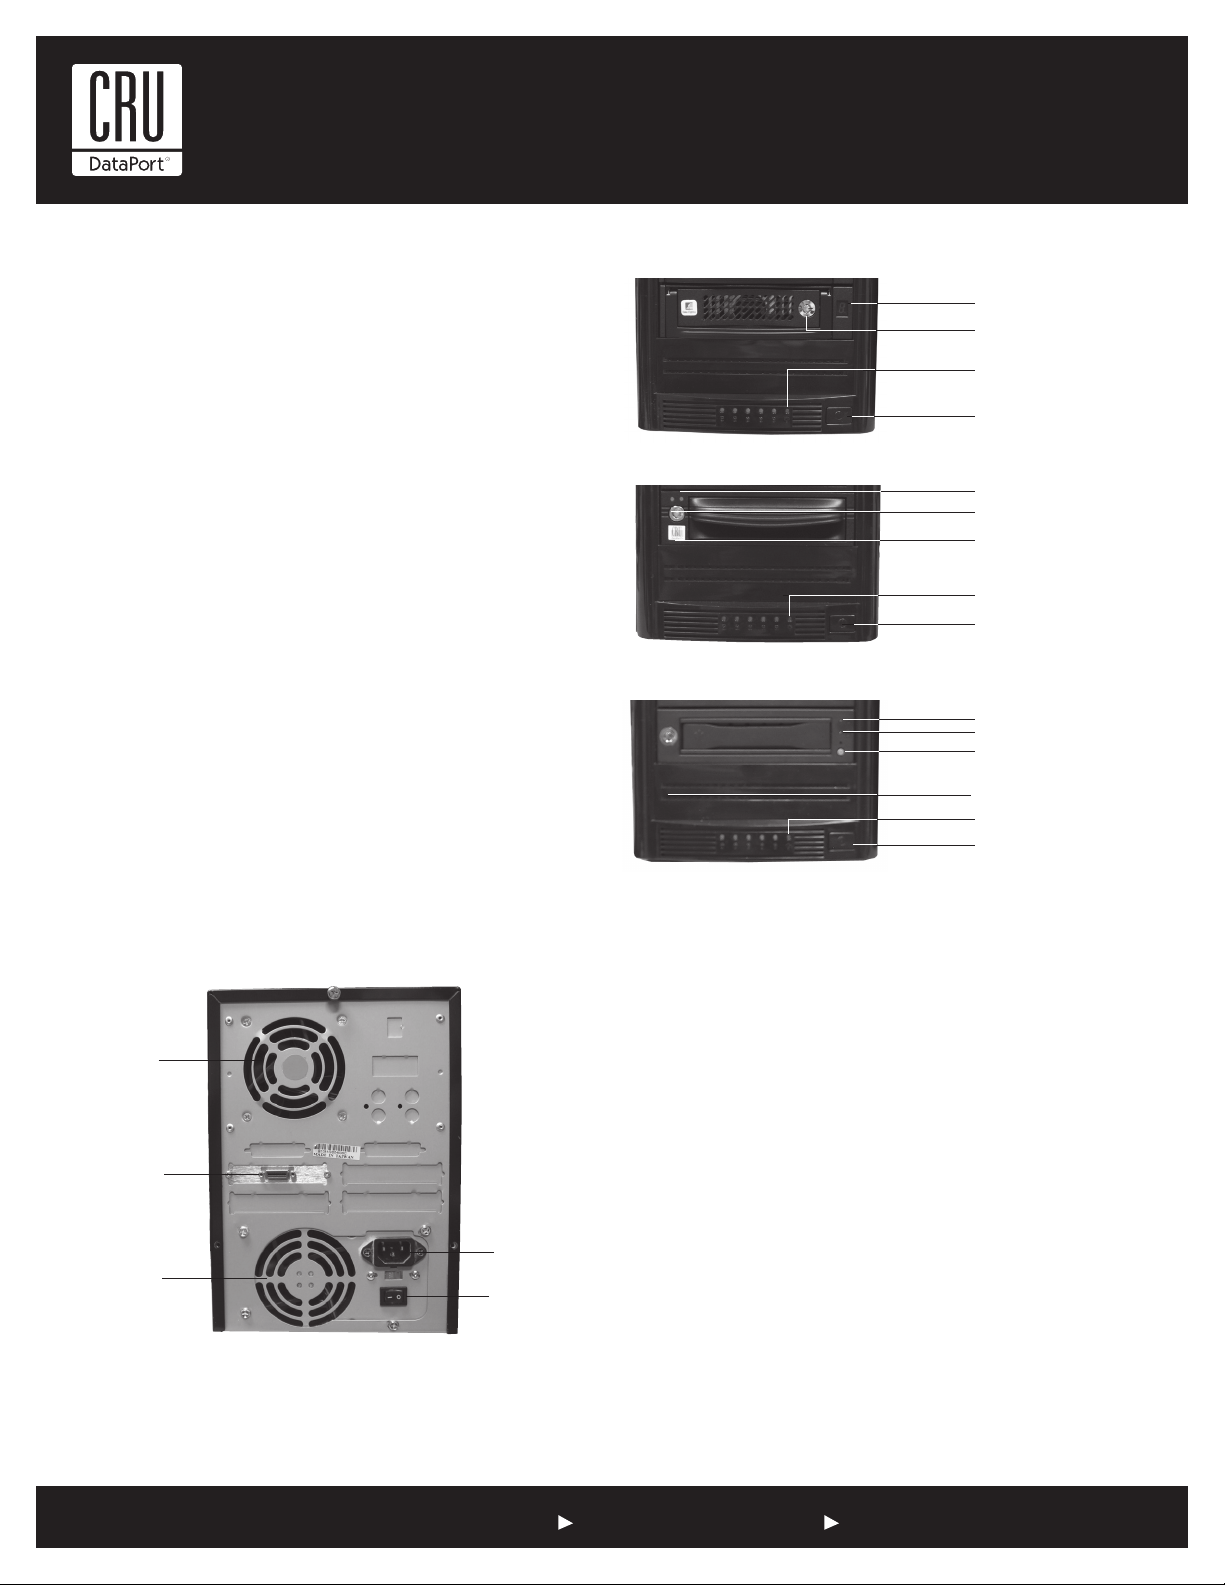
Figure 2: Enclosure Rear View
A/C Power Plug
Power Supply
Cooling Fan
Enclosure
Cooling Fan
SFF-8470
Connector
Power Supply
Power Switch
Drive ID LED
Drive Activity LED
Power Switch Lock
Enclosure Power Switch
Enclosure Power LED
Power LED
Activity LED
Power Switch Lock
Enclosure Power LED
Enclosure Power Switch
Power LED
Activity LED
Power Button
Key Lock
Enclosure Power LED
Enclosure Power Switch
Enclosures with LED Functions
Enclosure with DX115s
Enclosure with DP10s
Enclosure with DE110s

This manual suits for next models

1

Other CRU Enclosure manuals

CRU Data Express 200i-SWU2 User manual

CRU

CRU Data Express 200i-SWU2 User manual

CRU DataPort 20 User manual

CRU

CRU DataPort 20 User manual

CRU Rhino Jr RJ400 User manual

CRU

CRU Rhino Jr RJ400 User manual

CRU DataPort DP10 User manual

CRU

CRU DataPort DP10 User manual

CRU Rhino Jr RJ34S User manual

CRU

CRU Rhino Jr RJ34S User manual

CRU DE100 Ultra 160 User manual

CRU

CRU DE100 Ultra 160 User manual

CRU NVMe WriteBlocker User manual

CRU

CRU NVMe WriteBlocker User manual

CRU RAX Secure 212-3QJ User manual

CRU

CRU RAX Secure 212-3QJ User manual

CRU DataPort 4-Bay SATA Hard Drive Enclosure User manual

CRU

CRU DataPort 4-Bay SATA Hard Drive Enclosure User manual

CRU Rhino Jr RJ110 User manual

CRU

CRU Rhino Jr RJ110 User manual

CRU DataPort DP25 SATA 6G User manual

CRU

CRU DataPort DP25 SATA 6G User manual

CRU RAX 3QJ Series User manual

CRU

CRU RAX 3QJ Series User manual

CRU RAX 215DC-3QJ User manual

CRU

CRU RAX 215DC-3QJ User manual

CRU Rhino Jr RJ32T User manual

CRU

CRU Rhino Jr RJ32T User manual

CRU RTX430-3QR User manual

CRU

CRU RTX430-3QR User manual

CRU DataPort 25 Dual Port SAS User manual

CRU

CRU DataPort 25 Dual Port SAS User manual

CRU RAX Secure 212-3QR User manual

CRU

CRU RAX Secure 212-3QR User manual

CRU Data Express QX310 User manual

CRU

CRU Data Express QX310 User manual

CRU Data Express 50 User manual

CRU

CRU Data Express 50 User manual

CRU DataPort 22 User manual

CRU

CRU DataPort 22 User manual

CRU MoveDock USB 3.0 User manual

CRU

CRU MoveDock USB 3.0 User manual

CRU DataPort 41 User manual

CRU

CRU DataPort 41 User manual

CRU Rhino Jr RJ33S User manual

CRU

CRU Rhino Jr RJ33S User manual

CRU RAX211-3QR User manual

CRU

CRU RAX211-3QR User manual

Popular Enclosure manuals by other brands

SICK C4000 Select operating instructions

SICK

SICK C4000 Select operating instructions

FS FHD-FWME4 quick start guide

FS

FS FHD-FWME4 quick start guide

Trimm Technologies UR8J2-4 Series installation guide

Trimm Technologies

Trimm Technologies UR8J2-4 Series installation guide

Jumpking Fun Ring user manual

Jumpking

Jumpking Fun Ring user manual

LaCie d2 Thunderbolt 2 user manual

LaCie

LaCie d2 Thunderbolt 2 user manual

peerless-AV HDS-OWK Series Installation and assembly

peerless-AV

peerless-AV HDS-OWK Series Installation and assembly

AZZA Bastion user manual

AZZA

AZZA Bastion user manual

L-Acoustics 12XT user manual

L-Acoustics

L-Acoustics 12XT user manual

Alto ELVIS 15.2XL owner's manual

Alto

Alto ELVIS 15.2XL owner's manual

UTC Fire and Security interlogix 60-928 installation instructions

UTC Fire and Security

UTC Fire and Security interlogix 60-928 installation instructions

Bull Escala E5-700 Installing

Bull

Bull Escala E5-700 Installing

Hatco Flav-R-Savor LFST-48-1X Installation and operating manual

Hatco

Hatco Flav-R-Savor LFST-48-1X Installation and operating manual

Macally G-S350SUAB user manual

Macally

Macally G-S350SUAB user manual

Hartmann Trove1HC1R installation guide

Hartmann

Hartmann Trove1HC1R installation guide

nvent schroff Interscale C user manual

nvent

nvent schroff Interscale C user manual

Sony SPORTS PACK SPK-HCD Service manual

Sony

Sony SPORTS PACK SPK-HCD Service manual

Buffalo DriveStation Quattro user guide

Buffalo

Buffalo DriveStation Quattro user guide

Diablotek EN25288 user manual

Diablotek

Diablotek EN25288 user manual

manuals.online logo
manuals.online logoBrands
  • About & Mission
  • Contact us
  • Privacy Policy
  • Terms and Conditions

Copyright 2025 Manuals.Online. All Rights Reserved.