manuals.online logo
Brands
  1. Home
  2. •
  3. Brands
  4. •
  5. Dell
  6. •
  7. Projector
  8. •
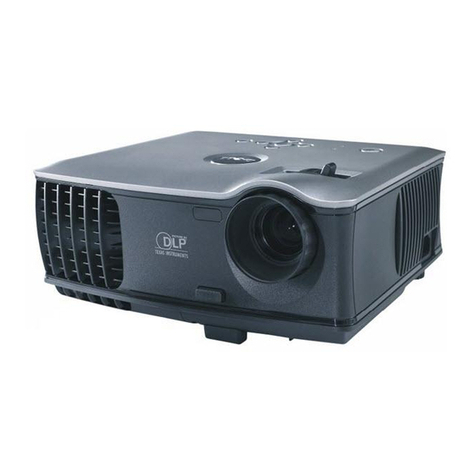
  9. Dell S320 User manual

Dell S320 User manual

Other manuals for S320

6

Other Dell Projector manuals

Dell 1409X User manual

Dell

Dell 1409X User manual

Dell S718QL User manual

Dell

Dell S718QL User manual

Dell 2300MP User manual

Dell

Dell 2300MP User manual

Dell 3300MP User manual

Dell

Dell 3300MP User manual

Dell S520 Quick start guide

Dell

Dell S520 Quick start guide

Dell PowerEdge 4220 User manual

Dell

Dell PowerEdge 4220 User manual

Dell 1410X - XGA DLP Projector User manual

Dell

Dell 1410X - XGA DLP Projector User manual

Dell PowerEdge 4220 User manual

Dell

Dell PowerEdge 4220 User manual

Dell 1201MP User manual

Dell

Dell 1201MP User manual

Dell 1200MP User manual

Dell

Dell 1200MP User manual

Dell 3200MP - XGA DLP Projector Installation instructions

Dell

Dell 3200MP - XGA DLP Projector Installation instructions

Dell PowerEdge 4220 User manual

Dell

Dell PowerEdge 4220 User manual

Dell 5100MP - SXGA+ DLP Projector User manual

Dell

Dell 5100MP - SXGA+ DLP Projector User manual

Dell 2400MP - XGA DLP Projector User manual

Dell

Dell 2400MP - XGA DLP Projector User manual

Dell 1210S - DLP Projector - 2500 ANSI Lumens User manual

Dell

Dell 1210S - DLP Projector - 2500 ANSI Lumens User manual

Dell 2400MP - XGA DLP Projector User manual

Dell

Dell 2400MP - XGA DLP Projector User manual

Dell 1200MP User manual

Dell

Dell 1200MP User manual

Dell 1610HD User manual

Dell

Dell 1610HD User manual

Dell S520 User manual

Dell

Dell S520 User manual

Dell 3400MP - XGA DLP Projector User manual

Dell

Dell 3400MP - XGA DLP Projector User manual

Dell S500 User manual

Dell

Dell S500 User manual

Dell S320 User manual

Dell

Dell S320 User manual

Dell 1800MP User manual

Dell

Dell 1800MP User manual

Dell S500 Quick start guide

Dell

Dell S500 Quick start guide

Popular Projector manuals by other brands

Eiki LC-X985 Specification sheet

Eiki

Eiki LC-X985 Specification sheet

InFocus LitePro 610 quick start

InFocus

InFocus LitePro 610 quick start

Epson EH-TW5900 datasheet

Epson

Epson EH-TW5900 datasheet

FOREVER MLP-100 manual

FOREVER

FOREVER MLP-100 manual

Toshiba TDP-MT8U Specifications

Toshiba

Toshiba TDP-MT8U Specifications

Mitsubishi XD500U specification

Mitsubishi

Mitsubishi XD500U specification

Kodak Ektapro 3020 Illustrated parts list

Kodak

Kodak Ektapro 3020 Illustrated parts list

Toshiba TDP-EW25U Specifications

Toshiba

Toshiba TDP-EW25U Specifications

Barco iQ PRO G500 supplementary guide

Barco

Barco iQ PRO G500 supplementary guide

NEC Showcase Series HT1100 user manual

NEC

NEC Showcase Series HT1100 user manual

Philips LC1341 user guide

Philips

Philips LC1341 user guide

Epson PowerLite 1266 user guide

Epson

Epson PowerLite 1266 user guide

MAGINON DLP 1400S user manual

MAGINON

MAGINON DLP 1400S user manual

Toshiba TLP-380 owner's manual

Toshiba

Toshiba TLP-380 owner's manual

Philips PicoPix PPX2480/EU user manual

Philips

Philips PicoPix PPX2480/EU user manual

Hitachi CP-X605 Series Specifications

Hitachi

Hitachi CP-X605 Series Specifications

Optoma TW1692 user manual

Optoma

Optoma TW1692 user manual

Kodak EKTAPRO instruction manual

Kodak

Kodak EKTAPRO instruction manual

manuals.online logo
manuals.online logoBrands
  • About & Mission
  • Contact us
  • Privacy Policy
  • Terms and Conditions

Copyright 2025 Manuals.Online. All Rights Reserved.

Connect the power cable and the appropriate signal cables
Conecte el cable de alimentación y los cables de señal
apropiados
Connecter le câble d’alimentation et les câbles de signal
appropriés
Conecte o cabo de alimentação e os cabos de sinal apropriados
2Remove the lens cap
Quite la tapa de la lente.
Retirer le couvre-objectif.
Remova a tampa da lente.
Ajuste el tamaño de la imagen y el enfoque
Régler la taille de l’image et la mise au point
Ajuste o tamanho e o foco da imagem
Adjust the image size and focus
Pulse el botón de encendido
Appuyer sur le bouton Marche/Arrêt
Pressione o botão liga/desliga
Press the power button
NOTE:
If nothing appears on the screen, press <Fn><F8> or
<Fn><F1> for video redirection (Dell laptops only).
It may take several seconds for the image to appear.
NOTA:
Si nada aparece en la pantalla, pulse <Fn><F8>o
<Fn><F1> para redirección de vídeo (Sólo portátiles de
Dell).
Puede que la señal tarde unos segundos en aparecer.
REMARQUE:
Si rien n’apparaît sur l’écran, appuyez sur <Fn><F8> ou
<Fn><F1>pour la redirection vidéo (pour les ordinateurs
portables Dell uniquement).
Il peut falloir quelques secondes pour que l’image apparaisse.
NOTA:
Caso nada apareça na tela, pressione <Fn><F8>o
<Fn><F1> para redirecionamento de vídeo (apenas laptops
da Dell).
Pode demorar vários segundos até que a imagem apareça.
Inserte las baterías en el control remoto.
Insérez les piles dans la télécommande.
Insira as baterias no controle remoto.
Insert the batteries into the remote
control
For more information about your projector, see your User's Guide.
Para más información sobre su proyector, consulte su Guía de
Usuario.
Pour obtenir plus d’informations concernant votre projecteur,
consultez votre Guide Utilisateur.
Para mais informações sobre o projetor, consulte o Guia do
usuário.
Press Auto Adjust to re-sync your computer to the projector for
proper image if necessary.
Pulse Auto Adjust (Ajuste automático) para volver a
sincronizar su equipo con el proyector si es necesario y ver
correctamente la imagen.
Appuyez sur Auto Adjust (Réglage auto) pour re-sync votre
ordinateur au projecteur pour une meilleure image si besoin.
Pressione Auto Adjust (Auto Ajuste) para re-sincronizar
seu computador ao seu projetor para a imagem adequada se
necessário.
NOTE:
Connect the Mini USB cable (not included) to use the Page Up
and Page Down options on your remote control.
NOTA:
Conecte el cable Mini USB (no incluido) para usar las opciones de
Retroceder Página y Avanzar Página en su mando a distancia.
REMARQUE:
Connectez le câble Mini USB (non fourni) pour utiliser les options
Page Haut et Page Bas sur votre télécommande.
NOTA:
Conecte o cabo Mini USB (não incluído) para usar as opções Page
Up e Page Down no controle remoto.
31
4 5
Focus Adjust
Ajuste del Enfoque
Réglage de la mise au point
Ajuste do foco
Dell S320_QSC-DAO.indd 1 2012/7/25 上午 05:14:34
first
fold
first
fold
Dell™ S320 Projector
Quick Setup Guide
Guía de Configuración
Guide d’Installation
Guia de instalação
www.dell.com | support.dell.com
Printed in China
Impreso en China.
Imprimé en Chine
Impresso na China
About Your Projector
Acerca de su Proyector |A propos de Votre Projecteur | Sobre o projetor
CAUTION: Before you setup and operate your Dell projector, follow the safety information that
shipped with your projector.
PRECAUCIÓN: Antes de configurar y operar su proyector Dell, consulte la información de
seguridad que fue enviado con su proyector.
MISE EN GARDE : Avant de régler et d’utiliser votre projecteur Dell, observez les informations
de sécurité fournies avec votre projecteur.
PRECAUÇÃO: Antes de instalar e usar o projetor Dell, siga as instruções de segurança que
acompanham o produto.
September 2012 Septiembre de 2012 Septembre 2012 Setembro de 2012
Information in this
document is subject
to change without
notice.
© 2012 Dell Inc. All
rights reserved.
Reproduction of these
materials in any manner
whatsoever without
the written permission
of Dell Inc. is strictly
forbidden.
Dell and the DELL logo
are trademarks of
Dell Inc.
Dell disclaims any
proprietary interest in
the marks and names
of others.
La información
presente en este
documento se
encuentra sujeta a
cambios sin previo
aviso.
© 2012 Dell Inc.
Todos los derecho
sreservados.
Queda terminantemente
prohibida la reproducción
de estos materiales
de cualquier forma sin
el consentimiento por
escrito de Dell Inc.
Dell y el logotipo DELL
son marcas comerciales
de Dell Inc.
Dell renuncia a cualquier
interés de propiedad
sobre las marcas y
nombres de otros.
Les informations
contenues dans le
présent document
sont susceptibles de
modification sans
préavis.
© 2012 Dell Inc. Tous
droits réservés.
La copie de ces
documents, sous quelque
forme que ce soit, sans
l’autorisation écrite de
Dell Inc. est strictement
interdite.
Dell et le logo DELL
sont des marques
commerciales de Dell Inc.
Dell réfute tout autre
intérêt propriétaire dans
les marques et noms des
autres constructeurs.
As informações
contidas neste
documento estão
sujeitas a alteração
sem aviso prévio.
© 2012 Dell
Inc. Todos
osdireitosreservador.
É estritamente proibida
a reprodução destes
materiais de qualquer
modo sem a permissão
por escrito da Dell Inc.
Dell e o logotipo DELL
são marcas comerciais
da Dell Inc.
A Dell nega qualquer
interesse de propriedade
de marcas e nomes de
terceiros.
Projector Control Panel
1. Power
2. Up/Keystone adjustment
3. LAMP warning light
4. TEMP warning light
5. Enter
6. Right/Auto adjust
7. Down/Keystone adjustment
8. Left / Source
9. Menu
Remote Control
10. Power button
11. Enter button
12. Right button
13. Down button
14. Aspect Ratio
15. Mute
16. Video Mode
17. Mouse Up / Down
18. Blank
19. Information
20. S-Video Source
21. Freeze
22. Video Source
23. Zoom -
24. VGA Source
25. Zoom +
26. Auto Adjust
27. Keystone adjustment Up / Down
28. Volume -
29. Source
30. Volume +
31. Menu
32. Left Button
33. Up button
Panel de control de proyector
1. Alimentación
2. Ajuste Arriba / Corrección de
distorsión trapezoidal
3. Luz de advertencia LÁMPARA
4. Luz de advertencia TEMPERATURA
5. Aceptar
6. Derecha / Ajuste automático
7. Abajo / Ajuste de clave
8. Izquierda / Fuente
9. Menú
Mando a distancia
10. Botón de Encendido
11. Botón Aceptar
12. Botón Derecha
13. Botón Abajo
14. Relación de aspecto
15. Silencio
16. Modo Vídeo
17. Ratón hacia arriba / abajo
18. Pantalla en blanco
19. Información
20. Señal S-Video
21. Pausar
22. Señal Vídeo
23. Zoom -
24. Señal VGA
25. Zoom +
26. Ajuste automático
27. Ajuste de clave arriba / abajo
28. Volume -
29. Fuente
30. Volume +
31. Menú
32. Botón Izquierda
33. Botón Arriba
Panneau de contrôle du projecteur
1. Marche
2. Haut / Réglage de la déformation
3. Voyant d'avertissement LAMPE
4. Voyant d'avertissement TEMP
5. Entrée
6. Droite / Réglage auto
7. Bas / Réglage de la déformation
8. Gauche / Source
9. Menu
Télécommande
10. Bouton Marche/Arrêt
11. Bouton Entrée
12. Bouton droit
13. Bouton Bas
14. Ratio d’image
15. Muet
16. Mode Vidéo
17. Souris haut / bas
18. Écran vide
19. Information
20. Source S-Vidéo
21. Figer
22. Source Vidéo
23. Zoom-
24. Source VGA
25. Zoom+
26. Réglage auto
27. Réglage de la deformation haut /
bas
28. Volume -
29. Source
30. Volume +
31. Menu
32. Bouton gauche
33. Bouton Haut
Painel de Controle do Projetor
1. Funcionamento
2. Para cima / Ajuste de distorção
trapezoidal
3. Luz de advertência LAMP
4. Luz de advertência TEMP
5. Enter
6. Direita / Ajuste automático
7. Para cima / Ajuste de distorção
trapezoidal
8. Esquerda / Origem
9. Menu
Controle remoto
10. Botão de alimentação
11. Botão Enter
12. Botão direito
13. Botão Para baixo
14. Proporção
15. Mudo
16. Modo Vídeo
17. Mouse par cima / baixo
18. Tela vazia
19. Informação
20. Fonte de S-Vídeo
21. Congelar
22. Fonte de Vídeo
23. Zoom -
24. Fonte de VGA
25. Zoom +
26. Ajuste Automático
27. Ajuste de distorção trapezoidal cima
/ baixo
28. Volume -
29. Origem
30. Volume +
31. Menu
32. Botão esquerdo
33. Botão Acima
6
1 2 3 4
5
7
8
9
14
16
20
10
11
12
13
15
17
18
19
212223
26
25
24
27
28
29
30
31
32
33
Dell S320_QSC-DAO.indd 2 2012/7/25 上午 05:14:36
0RP3T9A00