DeLOCK 62438 User manual

Converter IDE > SATA / SATA > IDE
Product-No:62438
User manual no:62438-a
www.delock.com
User manual
Mode d’emploi
Uživatelská příručka
Manuale utente
Manual de utilizare
Korisnički priručnik
Bedienungsanleitung
Manual del usuario
Instrukcja obsługi
Bruksanvisning
Használati utasítás
Εγχειρίδιο χρήστη

-2-
English
*Switch:
Set the switch to the required Master / Slave / Cable Select mode on the
converter.*

-3-
English
Description
This converter by Delock enables to convert the interface of IDE drives into SATA
or the interface of SATA drives into IDE 40 pin.
Specication
• Connectors:
1 x IDE 40 pin female
1 x SATA 7 pin plug (yellow - host)
1 x SATA 7 pin plug (black - device)
1 x 4 pin power connector female
• SATA 1.5 Gb/s and Ultra ATA 133 specication
• IDE supports PIO mode and UDMA mode
• IDE settings via switch for Master / Slave / Cable Select mode
• Suitable for hard drives or optical drives
• LED indicator for power and access
• OS independent, no driver installation necessary
System requirements
• A free IDE 40 pin or SATA port
Package content
• Converter IDE > SATA / SATA > IDE
• 7 pin SATA cable
• Power cable
• User manual
Safety instructions
• Protect the product against moisture
• Avoid anti-static electricity when installing the product

-4-
English
Hardware Installation
1. Turn off your PC and unplug the power cord.
2. Open the housing.
Connect an IDE device to a motherboard with SATA interface:
3. Connect your IDE device to the converter.
4. Connect an optional SATA cable to the yellow SATA port of the converter and
to a free SATA port of your motherboard.
5. Connect a power cable of your power supply to the converter.
Or connect a SATA device to a motherboard with IDE interface:
6. Use an optional SATA cable to connect your SATA device to the black SATA
connector of the converter.
7. Set the switch to the required Master / Slave / Cable Select mode on the
converter.*
8. Connect the converter to a free IDE port of your motherboard.
9. Connect a power cable of your power supply to the converter.
10. Reattach the housing and connect the power cord to the AC adapter.
Support Delock
If you have further questions, please contact our customer support
You can nd current product information on our homepage: www.delock.com
Final clause
Information and data contained in this manual are subject to change without
notice in advance. Errors and misprints excepted.
Copyright
No part of this user manual may be reproduced, or transmitted for any purpose,
regardless in which way or by any means, electronically or mechanically, without
explicit written approval of Delock.
Edition: 03/2018

-5-
Deutsch
Kurzbeschreibung
Mit diesem Konverter von Delock kann man die Schnittstelle von IDE Laufwerken
in SATA umwandeln oder die Schnittstelle von SATA Laufwerken in IDE 40 Pin.
Spezikation
• Anschlüsse:
1 x IDE 40 Pin Buchse
1 x SATA 7 Pin Stecker (Gelb - Host)
1 x SATA 7 Pin Stecker (Schwarz - Gerät)
1 x 4 Pin Stromanschlussbuchse
• SATA 1,5 Gb/s und Ultra ATA 133 Spezikation
• IDE unterstützt PIO Mode und UDMA Mode
• IDE Einstellungen per Schiebeschalter für Master / Slave / Cable Select Modus
• Geeignet für Festplatten oder optische Laufwerke
• LED Anzeige für Power und Zugriff
• OS unabhängig, keine Treiberinstallation erforderlich
Systemvoraussetzungen
• Ein freier IDE 40 Pin oder SATA Port
Packungsinhalt
• Konverter IDE > SATA / SATA > IDE
• 7 Pin SATA Kabel
• Stromkabel
• Bedienungsanleitung
Sicherheitshinweise
• Produkt vor Feuchtigkeit schützen
• Vermeiden Sie antistatische Auadung beim Einbau des Produktes

-6-
Deutsch
Hardware Installation
1. Schalten Sie Ihren PC aus, ziehen Sie das Netzkabel.
2. Öffnen Sie das Gehäuse.
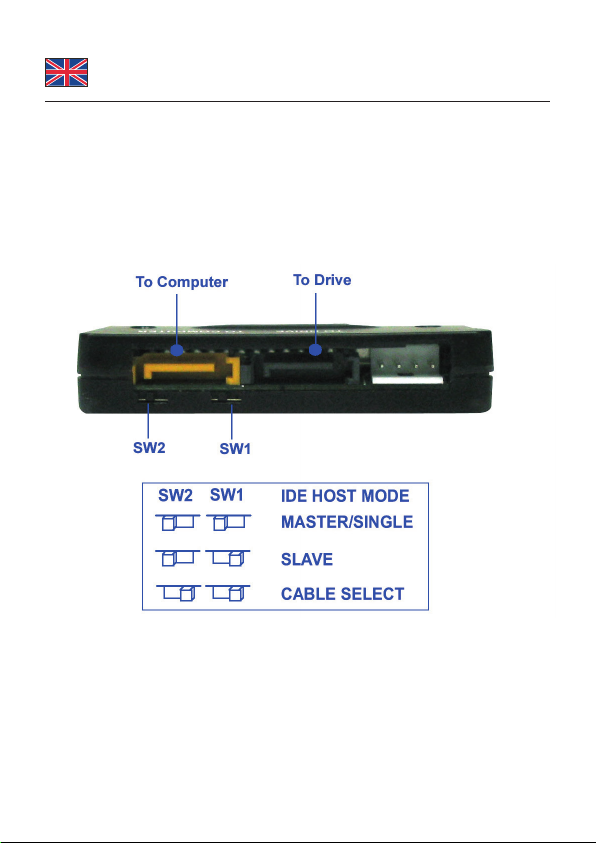
Schließen Sie ein IDE Gerät an ein Mainboard mit SATA Anschluss an:
3. Schließen Sie Ihr IDE Gerät an den Konverter an.
4. Verbinden Sie den gelben SATA Anschluss mit einem optionalem Kabel und
Ihren freien SATA Anschluss am Mainboard.
5. Verbinden Sie ein Stromkabel Ihres Netzteils mit dem Konverter.
Oder schließen Sie ein SATA Gerät an ein Mainboard mit IDE Anschluss an:
6. Schließen Sie Ihr SATA Gerät mit Hilfe eines optionalen Kabels an den
schwarzen SATA Anschluss des Konverters an.
7. Stellen Sie mit dem Schiebeschalter den gewünschten Master / Slave /
Cable Select Modus am Konverter ein.*
8. Verbinden Sie den Konverter mit Ihrem freien IDE Anschluss am Mainboard.
9. Verbinden Sie ein Stromkabel Ihres Netzteils mit dem Konverter.
10. Schließen Sie das Gehäuse wieder und verbinden Sie das Netzkabel mit
dem Netzteil.
Support Delock
Bei weitergehenden Supportanfragen wenden Sie sich bitte an
Aktuelle Produktinformationen und Treiber Downloads nden Sie auch auf
unserer Homepage: www.delock.de
Schlussbestimmung
Die in diesem Handbuch enthaltenen Angaben und Daten können ohne vorherige
Ankündigung geändert werden. Irrtümer und Druckfehler vorbehalten.
Copyright
Ohne ausdrückliche schriftliche Erlaubnis von Delock darf kein Teil dieser
Bedienungsanleitung für irgendwelche Zwecke vervielfältigt oder übertragen
werden, unabhängig davon, auf welche Art und Weise oder mit welchen Mitteln,
elektronisch oder mechanisch, dies geschieht.
Stand: 03/2018

-7-
Français
Description
Ce convertisseur proposé par Delock vous permet de convertir l’interface de vos
lecteurs IDE en SATA ou l’interface de vos lecteurs SATA en IDE 40 broches.
Spécications techniques
• Connecteurs :
1 x IDE femelle 40 broches
1 x SATA 7 broches mâle (jaune - hôte)
1 x SATA 7 broches mâle (noir - appareil)
1 x connecteur d’alimentation 4 broches femelle
• Spécications SATA 1,5 Go/s et Ultra ATA 133
• L’IDE prend en charge le mode PIO et le mode UDMA
• Réglages IDE via commutateur pour la sélection du mode Master / Slave /
Cable Select
• Compatible avec les disques durs et les disques optiques
• Indicateur LED pour l'alimentation et l'accès
• Indépendant du système d’exploitation, pas besoin d’installer un pilote
Conguration système requise
• Un port IDE 40 broches ou port SATA disponible
Contenu de l’emballage
• Convertisseur IDE > SATA / SATA > IDE
• Câble SATA 7 broches
• Câble d’alimentation
• Mode d’emploi
Instructions de sécurité
• Protéger le produit contre l’humidité
• Evitez l’électricité électrostatique lorsque vous installez le produit

-8-
Français
Installation matérielle
1. Eteignez votre PC et débranchez le cordon d'alimentation.
2. Ouvrez le boîtier.
Branchez un appareil IDE sur une carte mère à interface SATA:
3. Branchez un appareil IDE sur le convertisseur.
4. Branchez un câble SATA optionnel sur le port SATA jaune du convertisseur
et sur un port SATA libre de votre carte mère.
5. Branchez le cordon d’alimentation de votre source d’alimentation sur le
convertisseur.
Ou branchez un appareil SATA sur une carte mère à interface IDE:
6. Utilisez un câble SATA optionnel pour relier votre appareil SATA sur le
connecteur SATA noir du convertisseur.
7. Utilisez le commutateur pour sélectionner le mode Master / Slave / Cable
Select sur le convertisseur.*
8. Branchez le convertisseur sur un port IDE libre de votre carte mère.
9. Branchez le cordon d’alimentation de votre source d’alimentation sur le
convertisseur.
10. Remontez le boîtier et branchez le cordon d'alimentation et l'adaptateur AC.
Assistance Delock
Si vous avez d'autres questions, veuillez contacter notre assistance client :
Vous pouvez trouver les informations sur nos produits actuels sur notre page
d'accueil : www.delock.fr
Clause nale
Les informations et données contenues dans ce manuel sont sujettes à
modications sans préavis. Sont exclues les erreurs et les fautes d'impression.
Copyright
Aucune partie de ce manuel d'utilisation ne peut être reproduite ou transmise,
quel qu'en soit le but, et sous quelque moyen que ce soit, électronique ou
mécanique, sans l'approbation écrite expresse de Delock.
Version : 03/2018

-9-
Español
Descripción
Este convertidor de Delock permite convertir la interfaz de sus unidades IDE en
SATA o la interfaz de las unidades SATA en IDE de 40 contactos.
Especicación técnica
• Conectores:
1 x IDE hembra de 40 contactos
1 x SATA de 7 pines macho (amarillo - host)
1 x SATA de 7 pines macho (negro - dispositivo)
1 x conector de alimentación hembra de 4 contactos
• Especicación SATA 1,5 Gb/s y Ultra ATA 133
• IDE admite los modos PIO y UDMA
• Conguración IDE a través de conmutador para el modo Master (Maestro) /
Slave (Esclavo) / Cable Select (de selección Cable)
• Adecuado para unidades de disco duro o unidades ópticas
• Indicador LED para alimentación y acceso
• SO independiente, no es necesaria la instalación de controladores
Requisitos del sistema
• Un puerto IDE de 40 contactos o SATA disponible
Contenido del paquete
• Convertidor IDE > SATA / SATA > IDE
• Cable SATA de 7 pines
• Cable de alimentación
• Manual del usuario
Instrucciones de seguridad
• Proteja el producto contra el polvo
• Evite la electricidad antiestática al instalar el producto

-10-
Español
Hardware Instalación
1. Apague su equipo y desconecte el cable de alimentación.
2. Abra la carcasa.
Conecte un dispositivo IDE a una placa base con interfaz SATA:
3. Conecte el dispositivo IDE al convertidor.
4. Conecte un cable SATA opcional al puerto SATA amarillo del convertidor y a
un puerto SATA disponible de la placa base.
5. Conecte un cable de alimentación desde la fuente de alimentación al
concentrador.
O bien, conecte un dispositivo SATA a una placa base con interfaz IDE:
6. Utilice un cable SATA opcional para conectar el dispositivo SATA al conector
SATA negro del convertidor.
7. Establezca el conmutador en el modo Master (Maestro) / Slave (Esclavo) /
Cable Select (de selección Cable).*
8. Conecte el convertidor a un puerto IDE de la placa base.
9. Conecte un cable de alimentación desde la fuente de alimentación al
concentrador.
10. Vuelva a colocar la carcasa y conecte el adaptador de CA del cable de
alimentación.
Soporte técnico Delock
Si tiene alguna pregunta, póngase en contacto con nuestro servicio de atención
al cliente [email protected]
Puede encontrar información actual del producto en nuestra página Web:
www.delock.es
Cláusula nal
La información y los datos contenidos en este manual están sujetos a cambios
sin previo aviso. Exceptuando errores y erratas.
Copyright
Queda prohibida la reproducción o transmisión para cualquier n de parte alguna
de este manual del usuario, independientemente de la forma en que se realice,
ya sea, electrónicamente o mecánicamente, sin el consentimiento escrito de
Delock.
Versión: 03/2018

-11-
České
Popis
Tento adaptér od Delocku umožňuje konvertovat rozhraní vaší IDE jednotky na
SATA nebo rozhaní SATA jednotky na IDE 40 pin.
Specikace
• Konektor:
1 x IDE 40 pin samice
1 x SATA 7 pin samec (žlutý - host)
1 x SATA 7 pin samec (černý – device - zařízení)
1 x 4 pin napájecí konektor samice
• SATA 1,5 Gb/s a Ultra ATA 133 specikace
• IDE podporuje PIO mód a UDMA mód
• IDE nastavení přes propojku Master / Slave / Cable Select mode
• Vhodné pro harddisky nebo DVD mechaniky
• LED indikující napájení a přístup
• Nezávislé na operačním systému, nevyžaduje instalaci žádných ovladačů
Systémové požadavky
• Volný IDE 40 pin nebo SATA port
Obsah balení
• Adaptér IDE > SATA / SATA > IDE
• 7 pin SATA kabel
• Napájecí kabel
• Uživatelská příručka
Bezpečnostní pokyny
• Chraňte produkt před vlhkostí
• Při instalaci produktu se vyvarujte antistatické elektřině

-12-
České
Instalace hardware
1. Vypněte PC a odpojte přívodní šňůru napájení.
2. Otevřte kryt PC.
Připojení IDE zařízení k základní desce se SATA rozhraním:
3. Připojte vaše IDE zařízení ke k adaptéru.
4. Připojte vhodný SATA kabel ke žlutému SATA portu konvertoru a druhý
konec k volnému SATA portu vaší základní desky.
5. Připojte napájecí kabel napájecího zdroje k adaptéru.
Nebo připojení SATA zařízení k základní desce s IDE rozhraním:
6. Použijte vhodný SATA kabel k připojení vašeho SATA zařízení k černému
SATA konektoru adaptéru.
7. Nastavte přepínač do potřebné polohy Master / Slave / Cable Select mode
na adaptéru.*
8. Připojte adaptér k volnému IDE portu vaší základní desky.
9. Připojte napájecí kabel napájecího zdroje k adaptéru.
10. Nasaďte zpět kryt a připojte napájecí šňůru.
Podpora Delock
S dalšími technickými otázkami můžete kontaktovat naše středisko podpory:
Aktuální informace o produktu můžete nalézt i na našich webových stránkách
www.delock.cz
Závěrečné upozornění
Informace a data obsažená v této příručce mohou být změněny bez předchozího
upozornění. Za tiskové chyby neručíme.
Copyright
Žádná část této uživatelské příručky nesmí být reprodukována, přenášena ani
pro jakýkoli účel, bez ohledu na to, jakým způsobem nebo jakými prostředky,
elektronicky nebo mechanicky, bez výslovného písemného souhlasu Delock.
verze: 03/2018

-13-
Polsku
Opis
Ten konwerter rmy Delock umożliwia konwersję interfejsu dysków IDE na SATA
lub interfejsu dysków SATA na 40-pinowy IDE.
Specykacja
• Złącze:
1 x 40-pinowe żeńskie złącze IDE
1 x 7-pinowe SATA męskie (żółty - host)
1 x 7-pinowe SATA męskie (czarny - urządzenie)
1 x 4-pinowe żeńskie złącze zasilania
• Specykacja SATA 1,5 Gb/s i Ultra ATA 133
• Interfejs IDE obsługuje tryb PIO i UDMA
• Ustawienia IDE — przełącznik trybu Master / Slave / Cable Select
• Odpowiedni do dysków twardych lub stacji dysków optycznych
• Wskaźnik LED zasilania i dostępu
• Kompatybilny z każdym systemem operacyjnym, do instalacji nie wymaga się
żadnych sterowników
Wymagania systemowe
• Wolny 40-pinowy port IDE lub port SATA
Zawartość opakowania
• Konwerter IDE > SATA / SATA > IDE
• 7-pinowy kabel SATA
• Kabel zasilający
• Instrukcja obsługi
Instrukcje bezpieczeństwa
• Produkt należy zabezpieczyć przed wilgocią
• Podczas instalacji produktu należy unikać elektryczności statycznej

-14-
Polsku
Instalacja sprzętu
1. Wyłącz komputer i odłącz kabel zasilania.
2. Otwórz obudowę.
Podłącz urządzenie IDE do płyty głównej z interfejsem SATA:
3. Podłącz urządzenie IDE do konwertera.
4. Podłącz opcjonalny kabel SATA do żółtego portu SATA konwertera i do
wolnego portu SATA na płycie głównej.
5. Podłącz kabel zasilający źródła zasilania do konwertera.
Lub podłącz urządzenie SATA do płyty głównej z interfejsem IDE:
6. Za pomocą opcjonalnego kabla SATA podłącz urządzenie SATA do czarnego
złącza SATA konwertera.
7. Ustaw przełącznik w pozycji żądanego trybu konwertera: Master / Slave /
Cable Select.*
8. Podłącz konwerter do wolnego portu IDE na płycie głównej.
9. Podłącz kabel zasilający źródła zasilania do konwertera.
10. Zamknij z powrotem obudowę i podłącz kabel do zasilacza.
Wsparcie Delock
W przypadku dodatkowych pytań proszę skontaktować się z naszym Biurem
Obsługi Klienta pod adresem [email protected]
Aktualną informację o produktach można znaleźć na naszej stronie internetowej:
www.delock.pl
Zastrzeżenia końcowe
Zawarte w niniejszej instrukcji informacje i parametry mogą ulec zmianie bez
wcześniejszego uprzedzenia. Błędy i pomyłki w druku zastrzeżone.
Copyright
Żadna z części niniejszej instrukcji nie może być kopiowana lub przesyłana
do jakichkolwiek celów, niezależnie od tego jaką drogą lub w jakim znaczeniu,
elektronicznie lub mechanicznie, bez specjalnej pisemnej zgody rmy Delock.
Wydanie: 03/2018

-15-
Italiano
Descrizione
Questo convertitore Delock consente di convertire i dischi IDE in SATA o i dischi
con interfaccia SATA in IDE a 40 pin.
Speciche
• Connettori:
1 x IDE a 40 pin femmina
1 x SATA a 7 pin maschio (giallo - host)
1 x SATA a 7 pin maschio (nero - periferica)
1 x 4 pin connettore di alimentazione femmina
• SATA 1,5 Gb/s e Ultra ATA 133 specica
• IDE supporta la modalità PIO e la modalità UDMA
• Impostazioni IDE tramite lo switch per modalità di selezione Master / Slave /
Cavo
• Adatto per dischi rigidi o unità ottiche
• Indicatore LED per alimentazione e accesso
• Sistema operativo indipendente, non è necessaria l'installazione del driver
Requisiti di sistema
• Una porta libera IDE a 40 pin o SATA
Contenuto della confezione
• Convertitore IDE > SATA / SATA > IDE
• Cavo SATA a 7 pin
• Cavo di alimentazione
• Manuale utente
Istruzioni per la sicurezza
• Proteggere il prodotto dall'umidità
• Evitare l'elettricità antistatica durante l'installazione del prodotto

-16-
Italiano
Installazione dell'hardware
1. Spegnere il PC e scollegare il cavo di alimentazione.
2. Aprire l'alloggiamento.
Collegare una periferica IDE alla scheda madre con interfaccia SATA:
3. Collegare la periferica IDE al convertitore.
4. Collegare un cavo opzionale SATA alla porta SATA gialla del convertitore e a
una porta SATA della scheda madre.
5. Collegare un cavo di alimentazione dell'alimentatore al convertitore.
Oppure collegare una periferica SATA a una scheda madre con interfaccia IDE:
6. Utilizzare un cavo opzionale SATA per collegare la periferica SATA al
connettore nero SATA del convertitore.
7. Impostare lo switch sulla modalità di Selezione richiesta Master / Slave /
Cavo del convertitore.*
8. Collegare il convertitore a una porta IDE libera della scheda madre.
9. Collegare un cavo di alimentazione dell'alimentatore al convertitore.
10. Reinserire l'alloggiamento e collegare il cavo di alimentazione all'adattatore
CA.
Supporto Delock
Per ulteriori domande, contattare la nostra assistenza clienti sul sito
È possibile trovare le informazioni attuali sul prodotto nella nostra homepage:
www.delock.com
Clausola nale
Le informazioni e i dati contenuti in questo manuale sono soggetti a modiche
senza preavviso. Errori e refusi esclusi.
Copyright
Nessuna parte di questo manuale può essere riprodotta o trasmessa per
qualsiasi scopo, indipendentemente dal modo o i mezzi, elettronici o meccanici,
senza l'esplicita autorizzazione scritta da parte di Delock.
Edizione: 03/2018

-17-
Svenska
Beskrivning
Denna omvandlare från Delock låter dig konvertera gränssnittet för dina IDE-
enheter till SATA, eller gränssnittet för SATA-enheter till IDE 40-stifts.
Specikationer
• Anslutning:
1 x IDE 40-stifts, hona
1 x SATA 7-stifts hane (gul - värd)
1 x SATA 7-stifts hane (svart - enhet)
1 x 4-stifts nätkontakt, hona
• SATA 1,5 Gb/s och Ultra ATA 133 specikationer
• IDE stöder PIO- och UDMA-läge
• IDE-inställningar via switch för Master / Slave / Cable Select
• Lämplig för hårddiskar eller optiska enheter
• LED-indikator för ström och tillgång
• Oberoende av operativsystem, ingen drivrutinsinstallation krävs
Systemkrav
• En ledig IDE 40-stifts eller SATA-port
Paketets innehåll
• Omvandlare IDE > SATA / SATA > IDE
• 7-stifts SATA-kabel
• Strömsladd
• Bruksanvisning
Säkerhetsinstruktioner
• Skydda produkten mot fukt
• Undvik antistatisk elektricitet när du installerar produkten

-18-
Svenska
Hårdvaruinstallation
1. Stäng av datorn och koppla ifrån strömsladden.
2. Öppna höljet.
Anslut en IDE-enhet till ett moderkort med SATA-gränssnitt:
3. Anslut din IDE-enhet till omvandlaren.
4. Anslut en extra SATA-kabel till den gula SATA-porten på omvandlaren och till
en ledig SATA-port på ditt moderkort.
5. Anslut en strömkabel till din strömförsörjning för omvandlaren.
Eller anslut en SATA-enhet till ett moderkort med IDE-gränssnitt:
6. Använd en extra SATA-kabel för att ansluta din SATA-enhet till den svarta
SATA-kontakten på omvandlaren.
7. Ställ in brytaren till önskat läge för Master / Slave / Cable Select på
omvandlaren.*
8. Anslut omvandlaren till en ledig IDE-port på ditt moderkort.
9. Anslut en strömkabel till din strömförsörjning för omvandlaren.
10. Sätt tillbaka höljet och anslut strömsladden till eluttaget.
Support Delock
Om du har ytterligare frågor, kontakt vår kundtjänst på [email protected]
Du hittar aktuell produktinformation på vår hemsida: www.delock.com
Slutparagraf
Information och data som nns i denna manual kan ändras utan vidare
meddelande. Fel och tryckfel undantagna.
Upphovsrätt
Ingen del av denna manual får reproduceras eller sändas för något syfte oavsett
på vilket sätt eller i vilket syfte, elektroniskt eller mekaniskt utan uttryckligt skriftligt
godkännande av Delock.
Utgåva: 03/2018

-19-
Română
Descriere scurta
Acest convertor de la Delock permite convertirea interfeței unităților IDE în SATA
sau interfața unităților SATA în IDE 40 pin.
Specicatii
• Conectori:
1 x IDE cu 40 de pini mamă
1 x SATA 7 pin tată (galben - gazda)
1 x SATA 7 pin tată (negru - dispozitivul)
1 x conector alimentare de 4 pin
• SATA 1,5 Gb/s și Ultra ATA specicație 133
• IDE acceptă modul PIO și UDMA
• Setări IDE cu ajutorul comutatorului pentru modul Master / Slave / Cablu
selectat
• Potrivit pentru hard diskuri sau unități optice
• Indicator cu LED pentru alimentare şi acces
• Independent de SO, nu este necesară instalarea de drivere
Cerinte de sistem
• Un port liber IDE 40 pin sau SATA
Pachetul contine
• Convertor IDE > SATA / SATA > IDE
• Cablu SATA 7 pin
• Cablu de alimentare
• Manual de utilizare
Instrucţiuni de siguranţă
• Protejaţi produsul împotriva umidităţii
• Evitaţi electricitatea antistatică atunci când instalaţi produsului

-20-
Română
Instalarea componentelor hardware
1. Închideţi PC-ul şi deconectaţi cablul de alimentare.
2. Deschideţi carcasa.
Conectarea unui dispozitiv IDE la o placă de bază cu interfață SATA:
3. Conectați dispozitivul IDE la convertor.
4. Conectați un cablu SATA opțional la portul SATA galben al convertorului și la
un port SATA liber al plăcii de bază.
5. Conectaţi un cablu de alimentare al sursei de alimentare la convertor.
Sau conectarea unui dispozitiv SATA la o placă de bază cu interfață IDE:
6. Utilizați un cablu SATA opțional pentru a conecta dispozitivul SATA la
conectorul negru SATA al convertorului.
7. Setați comutatorul la modul Master / Slave / Cablu selectat necesar de pe
convertor.*
8. Conectați convertorul la un port IDE liber al plăcii dvs. de bază.
9. Conectaţi un cablu de alimentare al sursei de alimentare la convertor.
10. Reataşaţi carcasa şi conectaţi cablul de alimentare la adaptorul de c.a.
Asistenţă Delock
Dacă aveţi întrebări, contactaţi departamentul nostru de asistenţă pentru clienţi
Puteţi găsi informaţii actuale despre produs pe pagina noastră de pornire:
www.delock.com
Clauză nală
Informaţiile şi datele din acest manual pot modicate fără o noticare prealabilă.
Erorile şi greşeli de tipar sunt exceptate.
Drept de autor
Nicio parte a acestui manual de utilizare nu poate reprodusă sau transmisă în
niciun scop, indiferent în ce mod, sau prin niciun mijloc, electronic sau mecanic,
fără aprobarea explicită în scris a Delock.
Ediţie: 03/2018
Table of contents
Languages:
Other DeLOCK Media Converter manuals

DeLOCK
DeLOCK 91624 User manual

DeLOCK
DeLOCK 63913 User manual

DeLOCK
DeLOCK 62510 User manual

DeLOCK
DeLOCK 87768 User manual

DeLOCK
DeLOCK 64221 User manual

DeLOCK
DeLOCK 62783 User manual

DeLOCK
DeLOCK 95272 User manual

DeLOCK
DeLOCK 64069 User manual

DeLOCK
DeLOCK 91620 User manual

DeLOCK
DeLOCK 62551 User manual

DeLOCK
DeLOCK 61511 User manual

DeLOCK
DeLOCK 64081 User manual

DeLOCK
DeLOCK 87754 User manual

DeLOCK
DeLOCK 63468 User manual

DeLOCK
DeLOCK 87805 User manual

DeLOCK
DeLOCK 95232 User manual

DeLOCK
DeLOCK 86440 User manual

DeLOCK
DeLOCK 86441 User manual

DeLOCK
DeLOCK 62500 User manual

DeLOCK
DeLOCK 88014 User manual