DeLOCK 61769 User manual

USB 2.0 Video Grabber
Product-No:61769
User manual no:61769-a
www.delock.com
Gebrauchsanweisung
User manual
Manuel d'utilisation
Manual del usuario
Příručka uživatele
Instrukcja obsługi

-1-
Description
The Video Grabber enables you to save your movies from the video recorder,
camcorder, etc. via USB to your PC, so that you can edit and burn your movies on
DVD. Thus you convert the analogue Video signal into a digital data format and
receive a high quality MPEG format (4/2/1). Furthermore your Audio signal will be
digitized. The included software provides by request a YouTube™ compatible le.
Specication
• USB 2.0 interface
• Composite and S-Video interface
• Start/Stop button to activate the capture function
• Real-Time MPEG 4/2/1 encoding
• Capture video source from VHS, V8 and Hi8
• Video resolution: NTSC: 720 x 480 @ 30FPS
PAL: 720 x 576 @ 25FPS
• Burn edited les on DVD/VCD/SVCD
System requirements
• Windows XP/Vista/7
• PC or Notebook with a free USB 2.0 Port
• Pentium 4, 1.4 GHz CPU or above
• VGA card supports DirectX9.0
• 256MB RAM
• Minimum 300MB free HDD space
Package content*
• USB 2.0 Video Grabber
• AV cable
• CD ROM with driver and software
• User manual
*Make sure that the product package contains all items before operation. If any
item is missing or damaged, please contact your dealer immediately.

-2-
Driver Installation
1. Switch on your computer.
2. Connect the USB cable of the adapter with an available USB port of your
computer.
3. The assistant for the Software Installation will appear.
4. Click on "Cancel".
5. Put the driver CD in the CD ROM drive.
6. Setup Program will open automatically.
7. Choose "Driver Install". Click on "Next".
8. Click "Install". When driver is located, click "Continue installation".
9. Click "Software Install".
10. Choose your language and click "OK".
11. Please make sure DirextX9.0 installed before application installation. If not,
system will prompt install it automatically.
12. Click each time on "Next".
13. Your computer will ask to reboot. Click on "Finish".
14. After restart you need to install the Honestech Software.
15. Click on "Honestech VHS to DVD".
16. Choose your language and click "Next".
17. Click on "Next".
18. Read the license agreement and conrm it by "I accept the terms in the
license agreement" and click on "Next".
19. Choose "Install the components", and click on "Next".
20. Click on "Next".
21. Click on "Finish".
22. You can now start to use the device.
Using the device
1. On your desktop you will nd now the icons EZ Grabber and honestech VHS.
2. As soon as you connect a device to the Video Grabber, you can start to edit
the movie immediately by using the software.

-3-
Grabber Application
NO Description NO Description
1Status 9Play recorded les
2 Setting Setup menu 10 Status window
3 Snapshot 11 Stop playing les
4 Start to record 12 Fast forward
5 Stop record 13 Back forward
6Fast forward 14 Open the recorded le
7Back forward
15
Minimize
Full screen: Window and video desk-
top switch
About: Show version and copyright.
Exit
8Pause

-4-
Support Delock
If you have further questions, please contact our customer support
You can nd current product information on our homepage:
www.delock.com
Final clause
Information and data contained in this manual are subject to change without
notice in advance. Errors and misprints excepted.
Copyright
No part of this user manual may be reproduced, or transmitted for any purpose,
regardless in which way or by which means, electronically or mechanically,
without explicit written approval of Delock.
Edition: 05/2010

-5-
Kurzbeschreibung
Mit diesem Video Grabber können Sie Ihre Filme vom Videorecorder, Camcorder,
etc. über USB auf Ihrem PC speichern, bearbeiten, auf DVD brennen und vieles
mehr. Somit wandeln Sie das analoge Videosignal in ein digitales Dateiformat
um und erhalten hochwertige MPEG Formate (4/2/1). Ebenso wird hierbei das
Audiosignal digitalisiert. Die beiliegende Software stellt auf Wunsch YouTube™
kompatible Dateien bereit.
Technische Daten
• USB 2.0 Anschluss
• Composite und S-Video Anschluss
• Start/Stop Taste zum Aktivieren der Aufnahme Funktion
• Echt-Zeit MPEG 4/2/1 Verschlüsselung
• Verarbeitet Videoquellen von VHS, V8 und Hi8
• Video Auösung: NTSC: 720 x 480 @ 30FPS
PAL: 720 x 576 @ 25FPS
• Brennt Videos als DVD/VCD/SVCD
Systemvoraussetzung
• Windows XP/Vista/7
• PC oder Notebook mit einem freien USB 2.0 Port
• Pentium 4, 1.4 GHz CPU oder höher
• Grakkarte mit DirectX9.0 Unterstützung
• 256MB Arbeitsspeicher
• Mindestens 300MB freier Festplattenspeicher
Packungsinhalt*
• USB 2.0 Video Grabber
• AV Kabel
• CD ROM mit Treiber und Software
• Bedienungsanleitung
*Überzeugen Sie sich vor Inbetriebnahme, dass alle Bestandteile des
Lieferumfangs in der Verpackung enthalten sind. Sollte etwas fehlen oder
beschädigt sein, wenden Sie sich bitte umgehend an Ihren Fachhändler.

-6-
Treiber Installation
1. Schalten Sie den Computer ein.
2. Verbinden Sie das USB Kabel mit einem freien USB Port Ihres Computers.
3. Danach erscheint der Assistent für die Software Installation.
4. Klicken Sie auf "Abbrechen".
5. Legen Sie die Treiber CD in Ihr Laufwerk.
6. Das Setup Programm wird geöffnet.
7. Wählen Sie "Driver Install". Klicken Sie dann auf "Weiter".
8. Klicken Sie auf "Install". Der Treiber wird gefunden, auf "Installation
fortsetzen" klicken.
9. Klicken Sie auf "Software Install".
10. Wählen Sie Ihre Sprache aus und klicken Sie auf "OK".
11. Stellen Sie sicher das Sie noch kein DirextX9.0 installiert haben. Falls nicht,
wird es automatisch installiert.
12. Klicken Sie jeweils auf "Weiter".
13. Danach fragt der Rechner nach Neustart. Klicken Sie auf "Fertig stellen".
14. Nach dem Neustart müssen Sie die Honestech Software installieren.
15. Klicken Sie auf "Honestech VHS to DVD".
16. Wählen Sie Ihre Sprache aus und klicken Sie auf "Weiter".
17. Klicken Sie auf "Weiter".
18. Lesen Sie die Lizenzbedingungen und bestätigen diese mit "Ich akzeptiere
die Bedingungen der Lizenzvereinbarungen" und dann klicken Sie auf
"Weiter".
19. Wählen Sie "Installieren der Komponenten", und klicken Sie auf "Weiter".
20. Klicken Sie auf "Weiter".
21. Klicken Sie auf "Fertig stellen".
22. Sie können nun das Gerät verwenden.
Nutzung des Gerätes
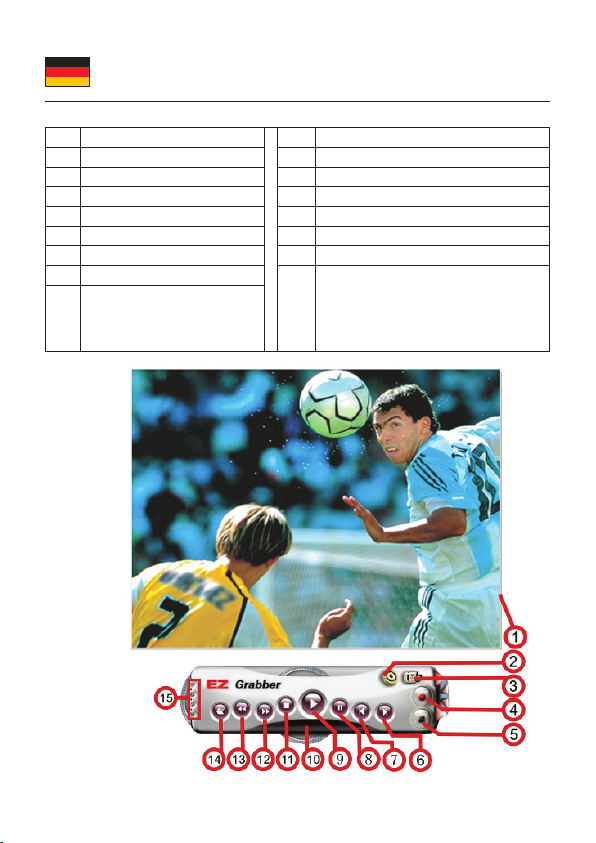
1. Auf Ihrem Desktop benden sich nun die Icons EZ Grabber, sowie honestech
VHS.
2. Sobald Sie ein Gerät an dem Video Grabber angeschlossen haben, können
Sie den Film mit Hilfe der Software sofort bearbeiten.

-7-
Grabber Funktionen
Nr Beschreibung Nr Beschreibung
1Status 9 Play
2 Menü Einstellungen 10 Status
3 Schnappschuss 11 Stop
4 Start - Aufnahme 12 Vorspulen
5 Stop - Aufnahme 13 Zurückspulen
6Vorspulen 14 Öffnen der Dateien
7Zurückspulen
15
Minimieren
Vollbild: Fenstergröße und Desktop
Größe
Über: Anzeige der Version/Copyright.
Beenden
8Pause

-8-
Support Delock
Bei weitergehenden Supportanfragen wenden Sie sich bitte an
Aktuelle Produktinformationen und Treiber Downloads nden Sie auch auf
unserer Homepage: www.delock.de
Schlussbestimmung
Die in diesem Handbuch enthaltenen Angaben und Daten können ohne vorherige
Ankündigung geändert werden. Irrtümer und Druckfehler vorbehalten.
Copyright
Ohne ausdrückliche schriftliche Erlaubnis von Delock darf kein Teil dieser
Bedienungsanleitung für irgendwelche Zwecke vervielfältigt oder übertragen
werden, unabhängig davon, auf welche Art und Weise oder mit welchen Mitteln,
elektronisch oder mechanisch, dies geschieht.
Stand: 05/2010

-9-
Description
L’extracteur vidéo vous permet d’enregistrer vos lms d’un magnétoscope,
d’un caméscope, etc. via une connexion USB à votre PC. Vous pouvez aussi
éditer et graver vos lms sur des DVD. Vous pouvez ainsi convertir un signal
vidéo analogique au format numérique. Vous obtiendrez un signal MPEG (4/2/1)
de haute qualité et le signal audio sera numérisé. Le logiciel inclus fournit sur
demande, un chier compatible YouTube™.
Spécications techniques
• Interface USB 2.0
• Interface composite et S-vidéo
• Encodage MPEG 4/2/1 en temps réel
• Capture de sources vidéo de VHS, V8 et Hi8
• Résolution vidéo: NTSC: 720* 480 @ 30 images/s
PAL: 720* 576 @ 25 images/s
• Gravez les chiers édités sur des DVD/VCD/SVCD
Conguration système requise
• Windows XP/Vista/7
• PC ou portable avec un port USB 2.0 disponible
• Pentium 4, 1.4 GHz CPU ou supérieur
• Carte VGA compatible avec DirectX9.0
• 256 Mo RAM
• Au minimum 300Mo d’espace HDD libre
Contenu de l’emballage*
• Extracteur vidéo USB 2.0
• Câble AV
• CD ROM avec pilote et logiciel
• Mode d’emploi
*Assurez-vous que l'emballage du produit contient tous les éléments avant de
procéder. Si un quelconque élément venait à manquer ou était endommagé,
veuillez contacter immédiatement votre revendeur.

-10-
Installation du pilote
1. Allumez vôtre ordinateur.
2. Reliez le câble USB entre l’Extracteur vidéo et un port USB disponible de
votre ordinateur.
3. Ensuite, Windows afche l'assistant matériel.
4. Cliquez sur "Annuler".
5. Mettez le CD pilote dans le lecteur CD ROM.
6. Le programme d'installation s'ouvre automatiquement.
7. Choisissez "Driver Install". Cliquez sur "Suivant".
8. Choisissez "Install". Une fois le pilote repéré, cliquez sur "Continuer
l'installation".
9. Choisissez "Software Install".
10. Choisissez votre langue et cliquez sur "OK".
11. Veuillez vous assurer que DirectX9.0 soit déjà installé sur le système. Si ce
n'est pas le cas, il sera automatiquement installé sur l'ordinateur.
12. Cliquez à chaque fois sur "Suivant".
13. Votre ordinateur demande à redémarrer. Cliquez sur "Terminer".
14. Après le redémarrage, installez le logiciel Honestech.
15. Choisissez "Honestech VHS to DVD".
16. Choisissez votre langue et cliquez sur "Suivant".
17. Cliquez sur "Suivant".
18. Lisez l'accord de licence, conrmez par "J'accepte les termes de l'accord de
licence" et cliquez sur "Continuer".
19. Choisissez "Installer les component", et cliquez sur "Suivant".
20. Cliquez sur "Suivant".
21. Cliquez sur "Terminer".
22. Vous pouvez à présent commencer à utiliser le périphérique.
Utilisation du périphérique
1. Sur votre Bureau, vous trouverez maintenant les icônes EZ Grabber et
honestech VHS.
2. Il suft de brancher un périphérique sur l’Extracteur vidéo. Vous pouvez
commencer à éditer un lm immédiatement, en utilisant le logiciel.

-11-
Application de l’extracteur
1Statut 9Lecture des chiers enregistrés
2 Menu d’installation 10 Fenêtre statut
3 Instantané 11 Interrompre la lecture des chiers
4 Lancer un enregistrement 12 Avance rapide
5 Interrompre un enregistrement 13 Retour rapide
6Avance rapide 14 Ouvrir le chier enregistré
7Retour rapide
15
Réduire
Plein écran: passer de Window au bureau
vidéo, et vice versa
À propos: informations relatives à la version
et au copyright.
Quitter
8Pause

-12-
Assistance Delock
Si vous avez d'autres questions, veuillez contacter notre assistance client:
Vous pouvez trouver les informations sur nos produits actuels sur notre page
d'accueil: www.delock.fr
Clause nale
Les informations et données contenues dans ce manuel sont sujettes à
modications sans préavis. Sont exclues les erreurs et les fautes d'impression.
Copyright
Aucune partie de ce manuel d'utilisation ne peut être reproduite ou transmise,
quel qu'en soit le but, et sous quelque moyen que ce soit, électronique ou
mécanique, sans l'approbation écrite expresse de Delock.
Version: 05/2010

-13-
Descripción
El Convertidor de Formatos le permite guardar sus películas desde un aparato
de vídeo, una cámara de vídeo, etc. a través del USB a su PC. Más aún, podrá
editar y quemar sus películas en DVD. Por lo tanto, convierte la señal analógica
de vídeo en un formato de datos digitales. Obtendrá un MPEG (4/2/1) de alta
calidad y la señal de Audio será digitalizada. Si se solicita, el software incluido
proporciona un archivo compatible con YouTube™.
Especicación técnica
• Interfaz USB 2.0
• Interfaz de Vídeo-S y Compuesto
• Codicado MPEG 4/2/1 en tiempo real
• Fuente de captura de vídeo desde VHS, V8 y Hi8
• Resolución de Vídeo: NTSC: 720 x 480 @ 30FPS
PAL: 720 x 576 @ 25FPS
• Quemar archivos editados en DVD/VCD/SVCD
Requisitos del Sistema
• Windows XP/Vista/7
• PC o equipo portátil con un puerto USB 2.0 disponible
• Pentium 4, 1.4 GHz CPU o superior
• La tarjeta VGA es compatible con DirectX9.0
• 256 MB de memoria RAM
• 300 MB de espacio disponible en disco duro
Contenido del paquete*
• Convertidor de Formatos USB 2.0
• Cable AV
• CD ROM con el controlador y el software
• Manual del usuario
*Asegúrese de que el paquete del producto contenga todos los elementos antes
de su funcionamiento. Si falta o hay algo dañado, por favor póngase en contacto
con su distribuidor inmediatamente.

-14-
Instalación del controlador
1. Encienda su PC.
2. Conecte el cable USB a la Convertidor de Formatos y a un puerto USB
disponible de su PC.
3. A continuación, Windows mostrará el asistente para hardware.
4. Haga clic en "Cancelar".
5. Inserte el CD del controlador en la unidad de CD ROM.
6. El programa de instalación se abrirá automáticamente.
7. Elija "Driver Install". Haga clic en "Siguiente".
8. Elija "Install". Cuando se haya encontrado el controlador, haga clic en
"Continuar instalación".
9. Elija "Software Install".
10. Elija su idioma y haga clic en "Aceptar".
11. Por favor asegúrese de tener instalado DirextX9 antes de la instalación de la
aplicación. Si no, el sistema lo instalara automáticamente.
12. Haga clic continuamente en "Siguiente".
13. Su PC le pedirá reiniciarse. Haga clic en "Finalizar".
14. Después de reiniciar es necesario instalar el software Honestech.
15. Elija "Honestech VHS to DVD".
16. Elija su idioma y haga clic en "Siguiente".
17. Haga clic en "Siguiente".
18. Lea el contrato de licencia y confírmelo seleccionando la opción "Acepto los
términos del Contrato de licencia"; a continuación, haga clic en "Siguiente".
19. Elija "Instalar los componentes", y haga clic en "Siguiente".
20. Haga clic en "Siguiente".
21. Haga clic en "Finalizar".
22. Ahora ya puede utilizar el dispositivo.
Utilizarel dispositivo
1. En el escritorio ahora encontrará los iconos EZ Grabber y Honestech VHS.
2. Tan pronto como conecte un dispositivo Video Grabber, podrá comenzar a
editar la película inmediatamente utilizando el software.

-15-
Aplicación Grabber
1Estado 9Reproducir archivos grabados
2 Denir el menú Conguración 10 Ventana de estado
3 Instantánea 11 Detener la reproducción de archivos
4 Iniciar la grabación 12 Avance rápido
5 Detener grabación 13 Retroceder
6Avance rápido 14 Abrir el archivo grabado
7Retroceso rápido
15
Minimizar
Pantalla completa: cambiar entre la ventana y
el escritorio de vídeo
Acerca de: mostrar información de versión y
de copyright.
Salir
8Pausar

-16-
Soporte técnico Delock
Si tiene alguna pregunta, póngase en contacto con nuestro servicio de atención
al cliente [email protected]
Puede encontrar información actual del producto en nuestra página Web:
www.delock.es
Cláusula nal
La información y los datos contenidos en este manual están sujetos a cambios
sin previo aviso. Exceptuando errores y erratas.
Copyright
Queda prohibida la reproducción o transmisión para cualquier n de parte alguna
de este manual del usuario, independientemente de la forma en que se realice,
ya sea, electrónicamente o mecánicamente, sin el consentimiento escrito de
Delock.
Versión: 05/2010

-17-
Popis
Video konvertor Delock umožňuje uložení lmú z videopřehrávače, kamery a
podobných zařízení do vašeho PC přes USB rozhraní. Dále vám umožňuje
editaci videosnímků a jejich vypalování na DVD. Zařízení provádí konverzi
analogového videosignálu do digitálního formátu. Získáte vysoce kvalitní
digitalizovaný záznam ve formátu MPEG (4/2/1) a digitalizovaný audio záznam.
Software, který je součástí produktu, vytváří v případě potřeby soubory
kompatibilní s YouTube™.
Specikace
• USB 2.0 rozhraní
• Kompozitní a S-Video rozhraní
• MPEG 4/2/1 kódování v reálném čase
• Záznam videosignálu z VHS, V8 a Hi8
• Video rozlišení: NTSC: 720 x 480 @ 30FPS
PAL: 720 x 576 @ 25FPS
• Vypalování editovaných snímků na DVD/VCD/SVCD
Systémové požadavky
• Windows XP/Vista/7
• PC nebo notebook s USB 2.0 portem
• Pentium 4, 1.4 GHz CPU nebo vyšší
• VGA karta podporující DirectX9.0
• 256MB RAM
• Minimálně 300MB volného místa na disku
Obsah balení*
• USB 2.0 Video konvertor
• AV kabel
• CD ROM s ovladači a software
• Uživatelská příručka
*Před použitím se ujistěte, zda balení obsahuje všechny položky. Pokud něco
chybí nebo je poškozeno, kontaktujte prosím svého prodejce.

-18-
Instalace ovladače
1. Zapněte počítač.
2. Připojte USB kabel k volnému USB rozhraní počítače.
3. Windows zobrazí hlášku Pomocníka instalace.
4. Klikněte na "Cancel" ("Zrušit").
5. Vložte CD s ovladači do mechaniky.
6. Automaticky je spuštěn instalační program.
7. Zvolte "Driver Install". Klikněte na "Next" (Pokračovat).
8. Klikněte na "Install". Po nalezení ovladače klikněte na "Continue installation"
(Pokračovat v instalaci).
9. Klikněte na "Software Install".
10. Zvolte jazyk a klikněte na "Next" (Pokračovat).
11. Před instalací aplikace se ujistěte, že je nainstalován DirextX 9.0. Pokud
není, systém automaticky vyzve k jeho instalaci.
12. Klikněte postupně několikrát na "Next" (Pokračovat).
13. Budete vyzvání k restartu počítače. Klikněte na "Finish" (Ukončení instalace).
14. Po restartu nainstalujte software Honestech.
15. Klikněte na "Honestech VHS to DVD".
16. Zvolte jazyk a klikněte na "Next" (Pokračovat).
17. Klikněte na "Next" (Pokračovat).
18. Přečtěte si licenční ujednání a potvrďte je pomocí "I accept the terms in the
license agreement" (Souhlasím s licenčním ujednáním) a klikněte na "Next"
(Pokračovat).
19. Zvolte "Install the components", a klikněte na "Next" (Pokračovat).
20. Klikněte na "Next" (Pokračovat).
21. Klikněte na "Finish" (Ukončení instalace).
22. Zařízení můžete začít používat.
Používání zařízení
1. Na vašem desktopu naleznete nové ikony EZ Grabber a Honestech VHS.
2. Po spojení počítače s video konvertorem můžete okamžitě začít editovat
video za pomocí software.

-19-
Grabber Application
1Stav 9Přehrání nahraných souborů
2 Nastavení Setup menu 10 Stavové okno
3 Snímek 11 Ukončení přehrávání
4 Začátek nahrávání 12 Rychlé převíjení dopředu
5 Konec nahrávání 13 Zpětné převíjení
6Rychlé převíjení dopředu 14 Otevření nahraného souboru
7Zpětné převíjení
15
Minimalizace
Celá obrazovka: přepínač okna a celé
obrazovky
O produktu: Zobrazení verze a copyright.
Konec
8Pauza
Table of contents
Languages:
Other DeLOCK Media Converter manuals

DeLOCK
DeLOCK 62551 User manual

DeLOCK
DeLOCK 61042 User manual

DeLOCK
DeLOCK 86215 User manual

DeLOCK
DeLOCK 62696 User manual

DeLOCK
DeLOCK 62783 User manual

DeLOCK
DeLOCK 62510 User manual

DeLOCK
DeLOCK 95272 User manual

DeLOCK
DeLOCK 64221 User manual

DeLOCK
DeLOCK 64051 User manual

DeLOCK
DeLOCK 86440 User manual

DeLOCK
DeLOCK 63343 User manual

DeLOCK
DeLOCK 88014 User manual

DeLOCK
DeLOCK 62590 User manual

DeLOCK
DeLOCK 62438 User manual

DeLOCK
DeLOCK 91624 User manual

DeLOCK
DeLOCK 87768 User manual

DeLOCK
DeLOCK 61971 User manual

DeLOCK
DeLOCK 62495 User manual

DeLOCK
DeLOCK 61511 User manual

DeLOCK
DeLOCK 62500 User manual