DEMA SQUIRT DRAIN UNIT User manual

I-984 Page 1 of 5
Rev. M-43434 11/10/17
DEMA
SQUIRT DRAIN UNIT
Overview
The Squirt is a chemical dispenser with a programmable timer designed primarily for dispensing chemicals into
drains. Its most clear intended use is for drain applications when a degreaser is needed in the drain daily, or every
other day. The timer is programmable to run up to 8 events that can be set for a specified amount of time to run the
pump.
Warnings
Installation of DEMA products must meet all applicable electrical codes and regulations established
by national, city, county, parish, provincial or other agencies. It is possible that electrical codes and
regulations require that a certified electrical contractor or engineer perform the electrical installation.
For questions, contact a certified electrician.
ALL ELECTRICAL POWER MUST BE TURNED OFF TO THE DISPENSER AND TO
THE APPLIED MACHINE.
All installations must conform to local plumbing codes and use approved backflow prevention
devices. A pressure indicating tee is to be installed with existing faucets according to local
plumbing codes in the state of Wisconsin and any other state that requires the use of a pressure
indicating tee.
ALWAYS WEAR PROTECTIVE CLOTHING AND EYEWEAR WHEN WORKING WITH
CHEMICAL PRODUCTS.

I-984 Page 2 of 5
Rev. M-43434 11/10/17
Specifications
Packing List
25.20.1
SQUIRT
DRAIN
UNIT
25.69.8
SWITCHING
POWER
SUPPLY
(115-240
VAC)
20’ ¼”
OD
TUBING
30.41
SCREW
AND
ANCHOR
KIT
81.312.1
TUBE
STIFFENER
POWER
ADAPTER
I984
INST.
SHEET
SQ.
TUBE
2500 1 1 25.68.20 1 1 OMIT 1 81.231.1
2501 1 1 25.160.20 1 1 25.236.02 1 81.231.4
2502 1 1 25.68.20 1 1 25.19.2 1 81.231.1
2503 1 1 25.68.20 1 1 OMIT 1 81.231.1
Operational Requirements For indoor use only
Main Power 120-240 VAC 50-60 HZ
Case Material ABS
Product Weight .5 kg 1.15 LBS
The integrity and operational characteristics of this unit are not guaranteed outside the above
mentioned parameters. Use of this unit outside of these parameters nullifies warranty.
Overall Size & Weight
Parts List
NO. PART NO. DESCRIPTION
1 25.21.1 PUMP, MOTOR, HOUSING
REPLACEMENT KIT
2 25.21.2 TIMER AND BOOT REPLACEMENT
KIT
3 25.21.3 PUMP REPLACEMENT KIT
4
25.21.4 SQUEEZE TUBE SINGLE
REPLACEMENT KIT
25.21.5 SQUEEZE TUBE REPLACEMENT
BULK (5) KIT
6 25.21.6 BRACKET AND BOOT
REPLACEMENT KIT
7 25.21.7.US POWER SUPPLY KIT FOR US
25.236.02 POWER SUPPLY KIT FOR UK,
EUROPEAN & AUSTRALIAN

I-984 Page 3 of 5
Rev. M-43434 11/10/17
Installation
Mount the unit no higher than 6 feet from the chemical container. Take into account the proximity to the chemical,
drain, and power for the unit. Use the included screw and anchor kit to secure the mounting bracket to the wall and
then mount the unit on the wall. Then cut the tubing to the proper length to reach from the chemical container to the
unit and the unit to the drain where the chemical is being dispensed.
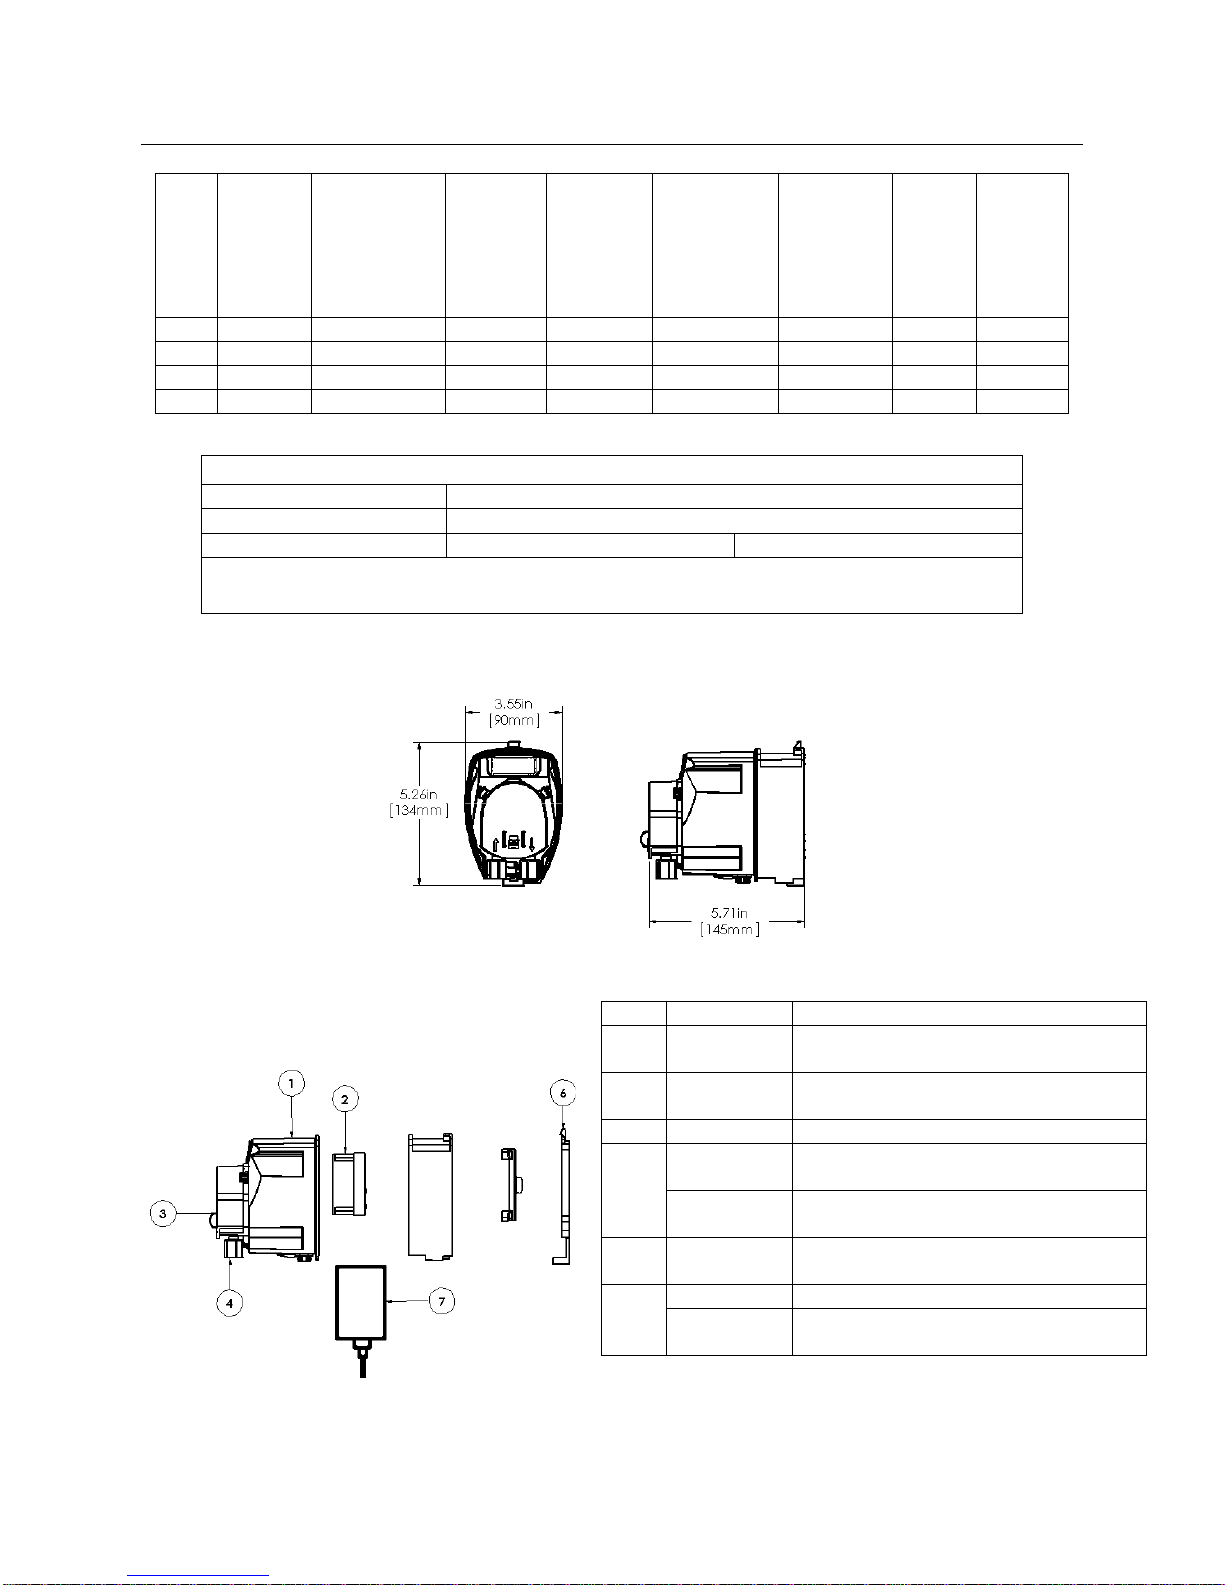
Squeeze Tube Installation
Install the squeeze tube by
removing the pump cover by
depressing the tab on the
front of the unit. (1) Place
one end of the squeeze tube
on the left side of the pump
in the slot provided. (2)
Wrap the squeeze tube
around the rollers of the
pump. (3) Then stretch the
squeeze tube so that the end
of the tube goes into the slot
provided. (4) Replace the
cover on the pump. (1) (2) (3) (4)
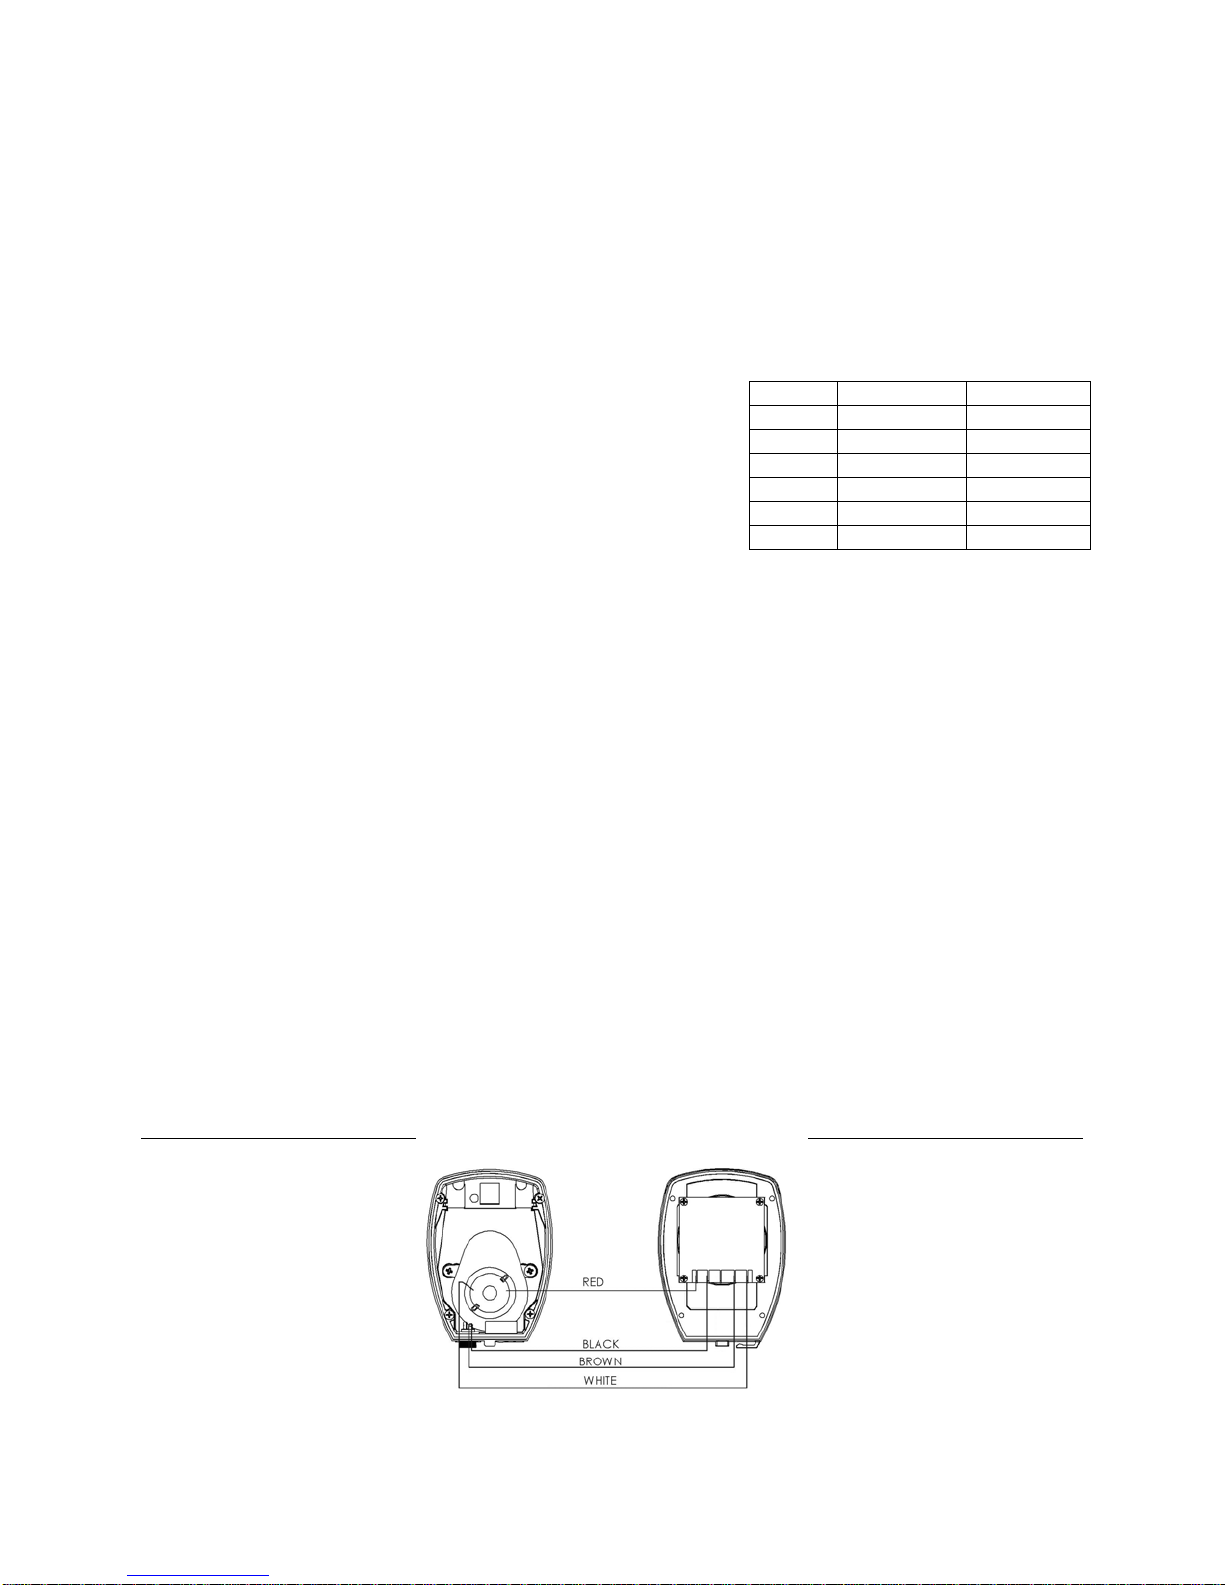
Retaining Clip
There is a clip on the bottom of the unit. This is to help relieve strain on
the power cord. Place the power cord through this strain relief to help the
power cord from coming unplugged from the unit.
Clasp Close Pump Heads
The pump heads have an added feature which will
help to ensure the pump head is installed properly.
When pushing the pump head on be sure to see the
clip is fully covering the notch as seen in the first
picture. If the tab is not fully engaged, there is a
possibility of it popping off the pump head as seen in
the second picture.
Operation
Programming the Dispenser - Reset timer before programming.
Note: If a mistake is made during the programming, simply push the
reset button and start over.
A. 12 Hour or 24 Hour (Military) Mode
Hold the “Clock” button down for 5 seconds or more to change back &
forth to between the 12 & 24 hour modes.
B. Set the Time and Day
When the unit arrives the display may be blank or may display a time. Plug the
unit into an outlet before programming.
NOTE: Make sure that the bar in the bottom of the display is over the word
OFF – if it isn’t, press the MANUAL button until it is.
1. To set the time and day of the week, hold the CLOCK button in and press the day, hour, and minute buttons
until the proper day, hour, and minute is achieved.
Note: The days will be across the top of the screen and will advance as the button is hit. The time
must be set to AM and PM it is in the left top corner of the display. By holding in the Day, Hour, or
Minute button for three seconds the setting will continue to advance until the button is released.

I-984 Page 4 of 5
Rev. M-43434 11/10/17
B. Programming the Dispensing Events: Up to 8 independent dispensing events can be programmed
1. Press and release the TIMER button to enter the programming mode. The event number will be in the
bottom left corner. Note: To program a full event, a pump start time and stop time will have to be
programmed.
NOTE: THE PUMP WILL RUN FOR 23 HRS 59 MIN IF A START TIME IS SET BUT NOT A
STOP TIME.
a) Press the “DAY” button until all of the days are shown that the first event should be turned on.
b) Press the “HOUR” and “MINUTE” buttons until the time is reached when the pump should turn on.
Note: AM or PM in top left corner of screen.
2. Press and release the TIMER button again to move to programming the pump to turn off.
a) This program will be used to turn the pump off. Use the
pump’s output to determine how long the pump must run to
dispense the desired amount.
b) Press the “DAY” button until the days match the days
programmed in the pump on portion of the programming.
c) Press the “HOUR” and “MINUTE” buttons until the
desired run time is reached.
3. To program another event, press TIMER button again for
Programs 2-8 and follow Programming Steps 1 and 2 above. Every ON function needs a corresponding
OFF function in order to turn the pump off.
4. When finished programming, push the CLOCK button again to return to time of day (normal) display.
C. Priming the Pump
1. To prime the pump, press the MANUAL button – the bar at the bottom of the display will move from right
to left from OFF to AUTO to ON. When it reaches ON, the pump will run until the MANUAL button is
pressed again. Use this position to prime the pump as well as to calibrate the pump. To stop priming press
the MANUAL button – the bar at the bottom of the display will move from left to right from ON to AUTO
to OFF.
Note: The unit may continue to run in the AUTO position and the MANUAL button must be pressed
until the bar at the bottom of the display is over the OFF position to stop the unit fully.
D. Setting into Programmed Position
1. Press the MANUAL button until the bar in the bottom of the display moves from the OFF to the AUTO
position. If the unit is not in the AUTO position, the program will not be executed.
Specifications: When the unit is powered the first time, the rechargeable display back up battery begins charging.
When fully charged it provides approximately 200 hours of reserve time before the display and program may be lost.
If the unit loses power, it will not lose the program for 200 hours, but it will not run the pump from the rechargeable
display back up battery and will not dispense chemical. If the unit becomes unplugged from the wall for a short
amount of time, plugging the unit back in will not affect the programming done to the unit.
Wiring Diagram
The wires are labeled with the colors and clearly connect to the timer for proper operation.
TIME ml pumped oz pumped
1 min 110 ml 3.5 oz
3 min ~295 ml ~10 oz
5 min 550 ml 17.5 oz
6 min ~590 ml ~20 oz
10 min 1100 ml 35 oz
20 min 2200 ml 70 oz

I-984 Page 5 of 5
Rev. M-43434 11/10/17
Troubleshooting
Symptom Probable Cause Remedy
Pump running when it is not
programmed to. 1. The program, date, and time are set
wrong.
2. Did not program an off time.
1. Check the program, date, and time to make sure
they are set properly. A common mistake could be
where an AM is supposed to be a PM.
2. Check the programs for an off time for each
program.
Pump is not priming like it
should be or not holding a
prime.
1. Hole in the tubing from the chemical
container to the pump head.
2. Hole in the squeeze tube in the pump
head.
3. Pick up tubing is not sealed to the
squeeze tube fitting.
1. Check the tubing from the chemical container to
the pump head for leaks by feeling the tubing for
chemical that has leaked out. Replace the tube if
necessary.
2. Replace the squeeze tube after inspecting it for a
possible hole or leak.
3. Tighten the nuts on the squeeze tube fitting.
Pump over feeding (using
too much chemical). Pump
under feeding (not enough
chemical).
1. The programs entered in the unit were
set wrong.
1. Check the program(s) to make sure they are set
properly. A common mistake could be where an
AM is supposed to be a PM.
Pump runs constantly. 1.Did not match the Event #, Days or
AM/PM for the off time. 1. Check the programs for an off time for each
program; make sure the events are matched up.
Warranty
Merchandise Returns
No Merchandise will be Returned for Credit Without DEMA’S Written Permission. Returned
Merchandise Authorization Number is Required in Advance of Return.
Product Warranty
DEMA products are warranted against defective material and workmanship under normal use and service
for one year from the date of manufacture. This limited warranty does not apply to any products that have
a normal life shorter than one year or failure and damage caused by chemicals, corrosion, physical abuse,
or misapplication. Rubber and synthetic rubber parts such as “O”-rings, diaphragms, PVC tubing, and
gaskets are considered expendable and are not covered under warranty. This warranty is extended only to
the original buyer of DEMA products. If products are altered or repaired without prior approval of DEMA,
this warranty is void.
Defective units or parts should be returned to the factory with transportation prepaid. If inspection shows
them to be defective, they will be repaired or replaced without charge, F.O.B. factory. DEMA assumes no
liability for damages. Return merchandise authorization number must be granted in advance of returned
units for repair or replacement (See “Merchandise Returns” above).
Table of contents
Other DEMA Dispenser manuals

DEMA
DEMA 607T-MC User manual

DEMA
DEMA 607-3 User manual

DEMA
DEMA 801GAP User manual

DEMA
DEMA Olympian O-PDV User manual

DEMA
DEMA Titan EP Installation guide

DEMA
DEMA Extreme 4 User manual

DEMA
DEMA Master Nitro Express User manual

DEMA
DEMA 301B-SY User manual

DEMA
DEMA TITAN II User manual

DEMA
DEMA TITAN II Assembly instructions