manuals.online logo
Brands
  1. Home
  2. •
  3. Brands
  4. •
  5. Dension
  6. •
  7. Automobile Accessories
  8. •
  9. Dension ice-Link:Plus User manual

Dension ice-Link:Plus User manual

User’s Manual
Ice>Link Plus
V2.x
Car intergration kit for iPod
icelink_plus_user_manual_210
Introduction
ice>Link Plus from Dension is a vehicle-specific kit that
enables iPod control by emulating an external CD changer
and connects directly to the back of the car radio (or
entertainment control box) or to pre-wired factory harnesses.
This hard-wired solution delivers CD-quality audio and safe
control of the iPod from the vehicle’s entertainment system
controls.
ice>link Plus supports all iPod generations currently available
at time of writing. For latest information please visit
www.dension.com. Classic (1st or 2nd generation) iPod
variants are supported with a lower functionality feature set
than the 3rd & 4th generation, iPod Photo and iPod mini
models. For details see the Operating modes section and
owners of 1st or 2nd generation iPod models may disregard all
the references to ice-link Menu and other advanced features.
This manual assumes that ice>Link Plus is already installed
in your vehicle. For assistance with installation please refer to
the installation guide.
Regarding the general use of iPod, iTunes and your car’s
entertainment system please consult the related operating
manuals.
If you need any assistance in using this product, please
contact your supplier or visit http://support.dension.com,
where you find comprehensive and up to date Knowledge
Base support on FAQs, Trouble Shooting, error messages,
etc.
In order to get the best technical support and keep you up to
date on latest Dension product information, please register
your ice>Link Plus at http://register.dension.com
Warning!
Do not allow the Apple iPod to distract you from driving! Only
operate the unit when stationary or ask passengers to operate
it for you.
Neither Dension Audio Systems, nor Apple Computer, Inc, its
regional offices, distributors or resellers accept any
responsibility for any damage or injury as a result of using
ice>Link with the iPod !
Exercise good judgment and keep your eyes
on the road at all times!
Page 2
Getting started
Is your iPod up-to-date?
Before you start, please check your iPod Firmware, and make
sure it is upgraded to the latest version available on
http://www.apple.com/support/ipod.
Dension only guarantees proper ice>Link functionality with the
latest version of iPod firmware.
We recommend setting up playlists on the iPod for easier
navigation of music with the car radio or steering wheel
controls.
Study your Radio Manual!
Please study the owner’s manual for your radio. This guide
cannot provide detailed and specific support regarding the
various system specific features, like:
•Source selection (CD-changer mode)
•Disc selection
•Fast Forward and Rewind
•Repeat, Random (aka Shuffle or Mix), Scan
•Display and CD-text configuration options, automatic
scroll, etc.
Setup ice>Link Plus
To get maximum performance from your ice>Link installation it
is strongly recommended to set up key options during first
use. You can set the following features:
•Volume
•iPod charging mode
•Disc selection method on the car radio
•Language
Please consider your application and change factory settings
as necessary.
See details in ice>Link Plus Menu/Setup chapter on page 7.
Page 3
General Operation
Connect the iPod to the ice>Link via the docking cable or by
inserting it into the active cradle –depending on your choice
at purchase.
Turn on the radio, and select CD
Changer as the source.
The iPod will start to play the
previously played song. 3rd or
later generation iPods display
show a logo and a warning
message for a few seconds.
To confirm logo and warning just press Next Track on the
radio.
Deselecting the CD Changer source or switching off the radio
will pause the iPod, it will then turn off automatically after few
minutes. During playback the Track#
and Elapsed Time data is
transferred to the radio
display, while the song
information (Album, Artist,
Track Name) and playback
status appears on the iPod
screen, surrounded by the
iPod user interface header
and footer.
The “OK to Disconnect” message indicates that you may
disconnect the iPod at any time.
Notes:
•Track number on the radio is limited to 2 digits; the iPod
track number is always truncated as such.
•ice>Link Plus can provides ID3 information to certain car
radios brands. Please check the list at
http://support.dension.com . If you have a compatible
radio, you can see artist and song information on the
radio as well. “Disc name” data is not supported.
•Most OEM radios cannot display ID3 information, even
thought they have a good display and can display RDS
messages in FM mode. This is because they have not
implemented CD Text functions.
Page 4
Playback, selection of music
During playback the Next Back Fast Forward
Rewind functions work as you would expect.
For faster selection of music, the first five playlists (in
alphabetical order) may be activated directly by selecting
Discs 1-5. (Hint: Prefix your playlists with numbers to get them
associated with the desired direct access button, eg. 1Rock,
2Pop, 3Classic, etc.)
When using more than 5 playlists, please use the playlist
browser function in the
ice>link Plus Menu
To select a particular Album, Artist or Song, the easiest way
is:
•remove (disconnect) the iPod from the cradle
•wait until iPod User interface retains
•select whatever you wish to listen to
•reconnect iPod
Repeat, Random and Scan
If your car radio supports repeat, random and scan, you may
select/deselect Repeat, Random and Scan functions. Mode
indicators are shown on iPod display as follows:
Repeat iPod is set to repeat mode
Random iPod is set to random mode
Scan iPod plays 10 sec of a song, than skip
to the next one.
Press key to revert to normal play
If car radio does not support above features, use the iPod to
set random or repeat mode, before you connect it to ice>Link
Changing modes on iPod while not connected to ice>Link
Plus may not be recognized automatically by the head unit.
Page 5
Operating modes
ice>Link Plus has two operating modes:
Both User Interfaces have their benefits. You can select
either at any time to best fit your application and current
needs. Please see Access iPod UI section on how to change
the User Interface mode.
Please note, that Classic iPod connections can use the iPod
UI mode only.
AUX mode
When you disconnect the iPod, ice>Link Plus goes
automatically to AUX mode. (Head unit displays Track#99,
time counter circulating from 1 to 9).
With the help of an optional Source Selector Accesory, you
can add 3 audio inputs to the system for DVD player,
notebook, or any other audio source.
For further information contact your local Dension support
centre or see www.dension.com
Page 6
Dension User Interface
(default)
iPod User Interface
No control on iPod keys
Full control on iPod
Extended radio or steering
wheel control (including IPod
content browsing, and Menu)
Limited radio or steering
wheel control (Next/Back,
FF/REW only)
iPod displays song
information (and menu)
iPod displays standard
content
Time counter and track
information on radio
NO Time counter and track
information
ID3 information on radio (if
supported)
NO ID3 information
Text Display on car display
area (if supported by the
entertainment system)
NO Text Display
ice>link Plus Menu
The ice>Link Plus Menu gives you a
comprehensive feature set in order to
maximise the use of the iPod in your car.
Enter the Menu select Disc#6
Navigate and scroll in Menu Next/Back track
Select the highlighted option Fast Forward (FF)
Return to the previous level Rewind (REW)
Exit the Menu select Disc#1-5
After 30 seconds of inactivity ice>Link will exit Menu
automatically.
Note: Disc_select / Next / Back / FF / REW functions may
have different interpretation in different cars. Please
consult the operating manual of your car’s
entertainment system to learn the exact details.
Main Menu Options
Access iPod UI
If you prefer direct control of your iPod via it’s front panel keys
and display, select this option by activating FF. The display
will instruct you:
When you disconnect the iPod, the original iPod User
Interface (UI) will be restored after a few seconds. If you wait
10 seconds, than reinsert the iPod, ice>Link will retain iPod Ui
mode, so you can control the iPod directly from its keypad.
To return to Dension User Interface Mode select Disc#6 and
wait for the Dension logo. Please note, that re-establishing
data connection with the iPod may take up to 20 seconds. If
the connection still fails, please disconnect iPod and power
cycle the radio.
In iPod UI Mode no information is transmitted to the radio, so
your radio’s track timer and counter or CD-Text display will not
give valid values. Only basic control is available from the
radio, like Play/Pause (by selecting the CD-changer source),
Next/Previous track and FF/REW.
Page 7
Playlists
ice>Link Plus supports direct access to the first 5 playlists
stored on the iPod by selecting Disc#1-5.
More playlists (as many you like) or the overall content of the
iPod can be selected in the ice>Link Menu’s playlist browser.
Entering the browser you can navigate and scroll with the
Next / Back functions, and start the highlighted playlist with
FF.
Selecting the name of your iPod starts playing all the songs
stored on the iPod.
Notes:
•iPod and iTunes may generate some standard playlist
items such as On-the-go, Recently Played, Top 25 Most
Played, 60’s Music, etc. For a tutorial on how to create
playlists please visit http://www.apple.com/support/ipod/
•If the first playlist is empty then you will hear no music
until a playlist with songs is selected.
AlbumPlay
Browsing a large music on the iPod can take some time!
We’ve assumed, that users may
•Store entire albums on iPod
•Organise playlist by styles and
favourites, or
•Frequently listen to iPod in shuffle
mode
If so, AlbumPlay is a great feature for adding more control to
your in-car listening:
If you hear a song that you like and want to hear every song
from that album, just select AlbumPlay. All songs from that
album will be played in sequence.
The iPod will stop playing when the end of the Album is
reached. To resume playing the album please select another
playlist.
Page 8
Setup ice>Link ice>Link setup menu allows you to set
the iPod to best suit your car, radio
specific environment, and your
personal preferences. Enter this
submenu by activating FF.
Language
You can select your preferred language by repeated activation
of FF function.
Charge
You can select your preferred iPod charging option by
repeated activation of FF function.
Play charges iPod while playing only
+2hr charges iPod while playing, plus 2hrs extended charge
fter radio is turned off
Off never charges iPod
Warning: the iPod may eventually deplete its battery
reserves in this mode. If this occurs, you will have to
charge it from a separate power source before you
can alter the charge control option in the Menu.
Audio Level
You can select four different audio output level options to
match the iPod with your car’s other audio sources. Set the
level by repeated activation of FF function.
Disc Change
Please set the disc change method used by your car’s
entertainment system by activation of FF function.
1-6 setting will cause disc change to take effect
immediately
+/-setting will introduce a 2 sec delay before ice>Link
acting upon the selected disc number
Page 9
BMW Special Edition
Dension created a BMW Special Edition Firmware (2.Bx) in
order to utilize the text display capability of most BMW head
units and maximize the integration level with your iPod.
Due to the variations in cars and head units, you have to
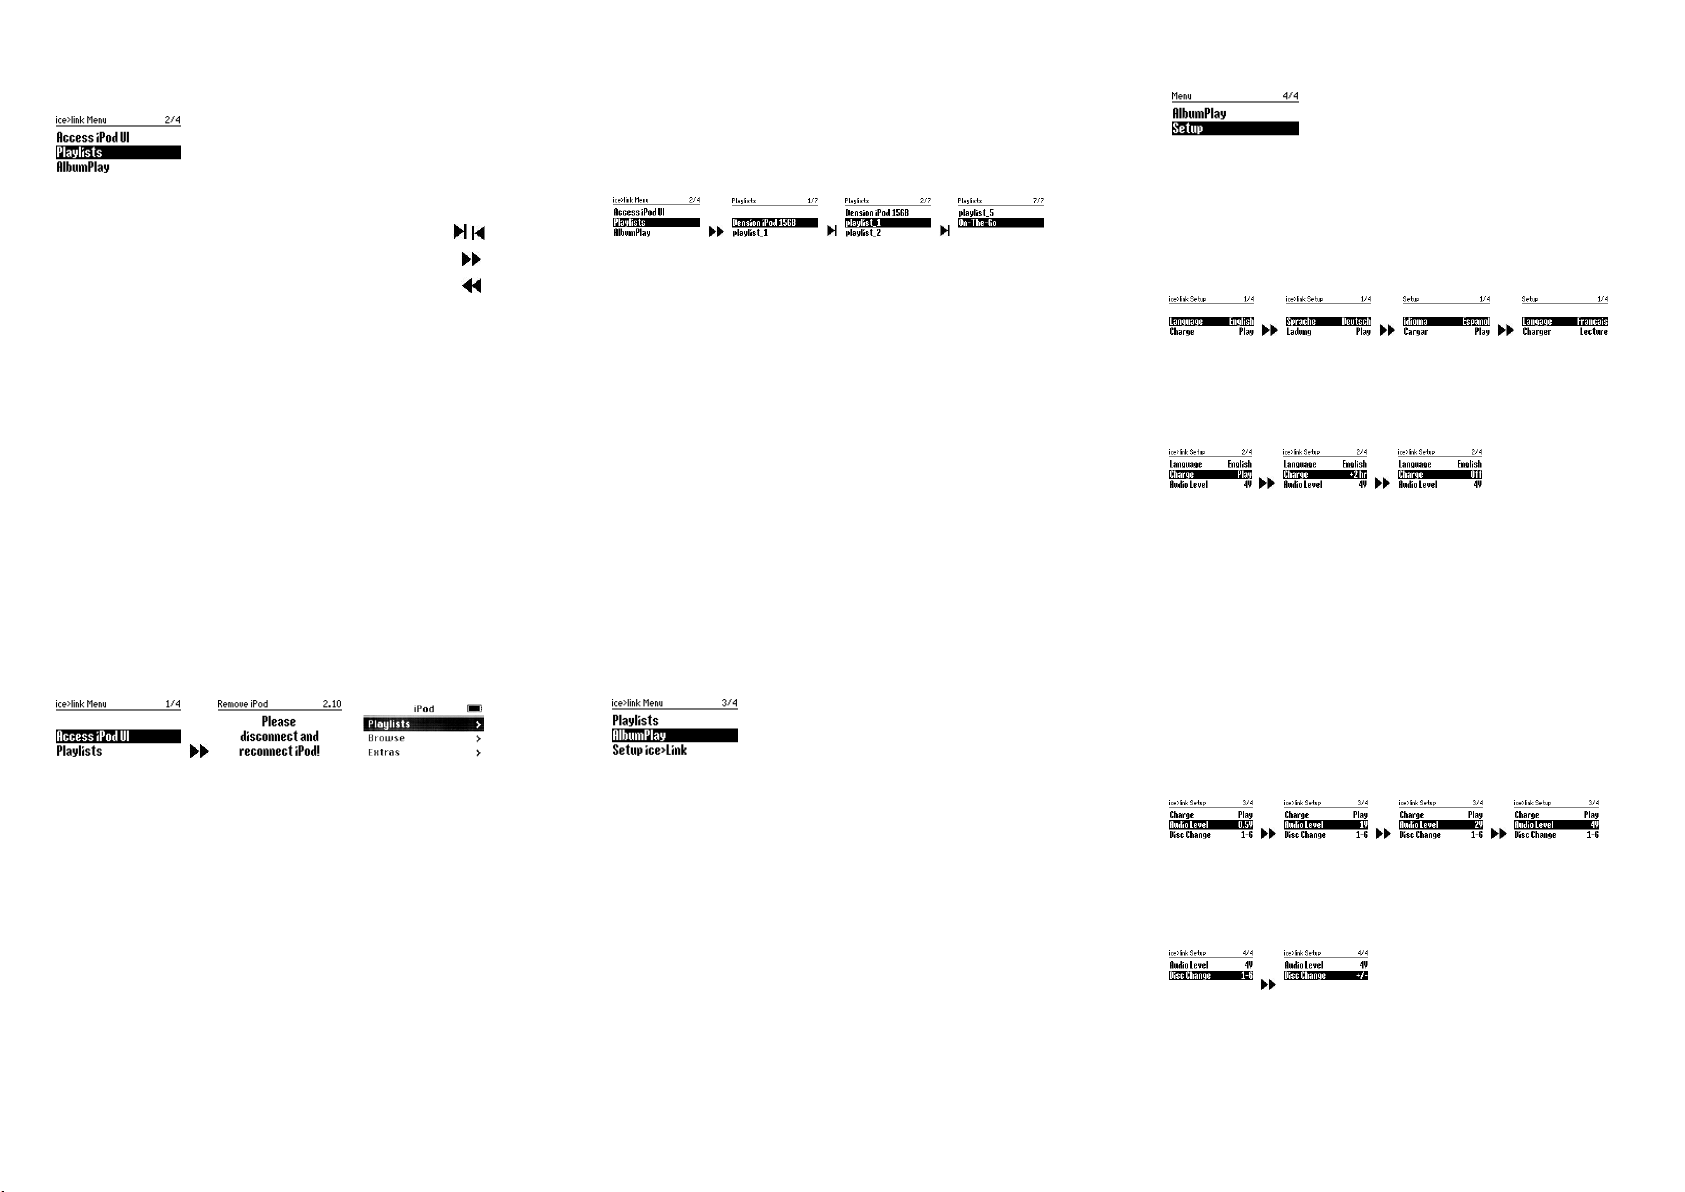
configure ice>Link Plus to match your model.
Enter ice>Link Plus Menu and chose BMW specific item:
Setup / Text selector
Ice>Link will send various “Select CD#” messages to all the
supported BMW display devices, like: Navigation Screen,
Multi Information Display and Business Radio Display.
Press the requisted Disc# button to select the display device.
“Accepted…” message on the device will confirm selection.
If no “Select CD#” message displayed, this feature is not
supported in your head unit or car. In this case wait 30
seconds or exit by pressing button.
Using BMW text display the ice>Link Plus MENU will be
shown on the radio instead of iPod’s screen. The navigation in
the Menu uses the same functions as described before:
Next/Back to advance the items, FF/REW to select and return.
You can disable BMW text in the Setup MENU at any time.
Using the BMW text display the ice>Link Plus supports two
more browser options in the Main Menu: Artists and Albums.
Notes:
•If no target display selected during 30 seconds, the
“Select CDx” message will stay on the display. Press
any button to clear.
•Do not change source during the selection period, this
will cancel the selection. You can restart it any time later.
•Use the BMW_Text_nothing.mp3 config file to disable
the BMW text display. The file and instructions available
at support.dension.com. This can be helpful if you made
a wrong selection and nothing displayed, or you can not
access the Menu due to any reason.
•Unfortunatly Certain head units require a double
keypress for normal operation. The first press erases the
text from the display; the second sends the command.
This is not a bug, rather an inherent behaviour of the
head unit. If you dislike, please deselect BMW text mode.
•Certain head units reuire to push ’M’ button to activate
the FF / REW function.
Page 10
Troubleshooting
You cannot switch your radio to CD changer mode:
1. Check cables to make sure everything is tight.
2. Remove the fuse of the radio, wait for 30 seconds, and
then reinsert the fuse. This will reset your radio and
the interface. You may have to enter the radio security
code, so please keep it handy.
3. Consult with your installer or contact your local
Dension support centre.
You cannot hear music playing:
1. Make sure CD changer, SAT mode, or AUX is
selected on your radio. Please study the owner’s
manual for your radio to learn the correct key.
2. Make sure that iPod is playing something by its own.
You cannot control the iPod from the radio:
1. Make sure the firmware on your iPod is the most
recent. For updates please visit www.apple.com/ipod
2. Reset the iPod. On the click-wheel iPods hold the
centre button and the Menu buttons. On the 3rd
generation models hold Menu and Play/Pause buttons
until iPod reboots. (Resetting will not erase your
music, it will only restart the operating system of iPod.)
iPod does not turn on:
1. Verify that the iPod’s battery is not depleted by
attempting to turn it on without connecting it to the car.
2. Turn off both your car stereo, and the iPod before
inserting it to the cradle. Power on your radio and
select the appropriate source.
iPod does not charge:
1. Check all connections.
2. Make sure that charge control is not turned off (see
Setup section).
3. Connect the iPod to a computer to see if it will charge
from there.
Music is distorted or the sound level is too low:
1. Check and make sure all EQ and BASS boost options
are turned OFF on your iPod.
2. Make sure the Gain control is adjusted properly on the
ice>Link, located under ice>Link setup.
For more information visit Dension’s Online Support Center at
//support.dension.com
Page 11
Warranty
The Dension ice>Link Plus carries a one year limited warranty that
protects you from defects in material and workmanship of products sold
by Dension or its authorised agents, distributors and dealers. We do
not warrant any installation. If you experience any problem or need
help, please contact your local dealer or visit support.dension.com.
Proof of purchase is required.
Warranty does not cover normal tear and wear, damages due to
negligence, improper installation or operation.
Page 12

Other manuals for ice-Link:Plus

1

Other Dension Automobile Accessories manuals

Dension Gateway Five User manual

Dension

Dension Gateway Five User manual

Dension Car Dock 2 User manual

Dension

Dension Car Dock 2 User manual

Dension 500S User manual

Dension

Dension 500S User manual

Dension Power Booster User manual

Dension

Dension Power Booster User manual

Dension IPH1CR0 User manual

Dension

Dension IPH1CR0 User manual

Dension Gateway Five User manual

Dension

Dension Gateway Five User manual

Dension Smartlink MHL-9202-1 User manual

Dension

Dension Smartlink MHL-9202-1 User manual

Dension WiRC User manual

Dension

Dension WiRC User manual

Dension Power Booster User manual

Dension

Dension Power Booster User manual

Dension IPH-9201-5 User manual

Dension

Dension IPH-9201-5 User manual

Dension ICE>LINK LITE User manual

Dension

Dension ICE>LINK LITE User manual

Dension ice-Link: Plus User manual

Dension

Dension ice-Link: Plus User manual

Dension ice>Link Gateway 500 User manual

Dension

Dension ice>Link Gateway 500 User manual

Dension Gateway Pro BT User manual

Dension

Dension Gateway Pro BT User manual

Dension iCon Drive User manual

Dension

Dension iCon Drive User manual

Dension ice-Link: Plus User manual

Dension

Dension ice-Link: Plus User manual

Popular Automobile Accessories manuals by other brands

Thule 276 manual

Thule

Thule 276 manual

iArmor EDGE IA-W208 manual

iArmor

iArmor EDGE IA-W208 manual

Mazda BDEL-V7-410 operating instructions

Mazda

Mazda BDEL-V7-410 operating instructions

EUFAB 11241 quick start guide

EUFAB

EUFAB 11241 quick start guide

Yenkee YAC 450 user manual

Yenkee

Yenkee YAC 450 user manual

Fiamma CARRY-BIKE Installation and usage instructions

Fiamma

Fiamma CARRY-BIKE Installation and usage instructions

Jaeger 21500516J manual

Jaeger

Jaeger 21500516J manual

STO N SHO SNS 14 Installation procedures

STO N SHO

STO N SHO SNS 14 Installation procedures

Conrad 85 64 39 operating instructions

Conrad

Conrad 85 64 39 operating instructions

Volvo 31269619 installation instructions

Volvo

Volvo 31269619 installation instructions

ARB 2237010 Fitting instructions

ARB

ARB 2237010 Fitting instructions

Pyle PLCM7500 owner's manual

Pyle

Pyle PLCM7500 owner's manual

DEFA Warm Up 411156 Fitting instructions

DEFA

DEFA Warm Up 411156 Fitting instructions

Prorack K621 Fitting instructions

Prorack

Prorack K621 Fitting instructions

Jabra GN 4170 user guide

Jabra

Jabra GN 4170 user guide

SPEC-D Tuning 2LHP-ITRE98-TM installation instructions

SPEC-D Tuning

SPEC-D Tuning 2LHP-ITRE98-TM installation instructions

Edge Juice/Attitude installation instructions

Edge

Edge Juice/Attitude installation instructions

Movon MK50 user manual

Movon

Movon MK50 user manual

manuals.online logo
manuals.online logoBrands
  • About & Mission
  • Contact us
  • Privacy Policy
  • Terms and Conditions

Copyright 2025 Manuals.Online. All Rights Reserved.