DeWalt EV CHARGER DXPAEV048 User manual

DXPAEV048
48 Amp Smart Electric Vehicle Charging Station
Estación de Carga Inteligente de 48Amp para Vehículos
Eléctricos
Borne de Recharge Intelligente 48A pour Véhicules Électriques
INSTRUCTION MANUAL
MANUAL DE INSTRUCCIONES
MANUEL D’INSTRUCTIONS

WARNING: Read all instructions before operating
product. Failure to follow all instructions listed below may
result in electric shock, fire and/or serious injury.
WARNING: This product or its power cord contains lead, a
chemical known to the State of California to cause cancer and birth
defect or other reproductive harm. Wash hands after handling. For
more information go to www.P65Warnings.ca.gov
ADVERTENCIA: Lea todas las instrucciones antes
de usar el producto. Si no sigue todas las instrucciones
que se enumeran a continuación, puede provocar una
descarga eléctrica, un incendio y/o lesiones graves.
ADVERTENCIA: Este producto, o su cable de alimentación,
contiene plomo, un químicos que, según los conocimientos
que maneja el estado de California, provoca cáncer y defectos
de nacimiento u otro daño reproductivo. Lávese las manos
después del manejo. Para obtener más información, visite
www.P65Warnings.ca.gov
AVERTISSEMENT : Veuillez lire l’intégralité des
consignes avant toute utilisation de ce produit. Le non-
respect de l’intégralité des consignes énumérées ci-
dessous peut entraîner des risques d’électrocution,
d’incendie et/ou de blessures graves.
AVERTISSEMENT : Ce produit, ou son cordon d’alimentation,
contient du plomb, un produit chimique connu de l’État de la
Californie pour être à l’origine de cancers, de malformations
congénitales ou de toutes autres lésions de l’appareil reproducteur.
Lavez-vous les mains après la manipulation. Pour de plus amples
informations, veuillez consulter le site www.P65Warnings.ca.gov

3
English
Español Français
Important Safety Instructions � � � � � � � � � � � � � � � � � � � � � � � � � � � � � � � � � � � � � � � � � � � � � � � � � � � � � � � � � 4
Before First Use � � � � � � � � � � � � � � � � � � � � � � � � � � � � � � � � � � � � � � � � � � � � � � � � � � � � � � � � � � � � � � � � � � � � � � � � � � 5
Main Unit Components� � � � � � � � � � � � � � � � � � � � � � � � � � � � � � � � � � � � � � � � � � � � � � � � � � � � � � � � � � � � � � � � � � 5
Wall Mounting Hardware � � � � � � � � � � � � � � � � � � � � � � � � � � � � � � � � � � � � � � � � � � � � � � � � � � � � � � � � � � � � � � � 5
Display � � � � � � � � � � � � � � � � � � � � � � � � � � � � � � � � � � � � � � � � � � � � � � � � � � � � � � � � � � � � � � � � � � � � � � � � � � � � � � � � � � � � � � 5
Installation Instructions � � � � � � � � � � � � � � � � � � � � � � � � � � � � � � � � � � � � � � � � � � � � � � � � � � � � � � � � � � � � � � � � 5
Wall Bracket Installation for Concrete Walls � � � � � � � � � � � � � � � � � � � � � � � � � � � � � � � � � � � � � � � � � � � � � � � � � � � 6
Wall Bracket Installation for Drywall or Studs� � � � � � � � � � � � � � � � � � � � � � � � � � � � � � � � � � � � � � � � � � � � � � � � � � 7
Hardwire Installation� � � � � � � � � � � � � � � � � � � � � � � � � � � � � � � � � � � � � � � � � � � � � � � � � � � � � � � � � � � � � � � � � � � � � � � � 7
Operating Instructions � � � � � � � � � � � � � � � � � � � � � � � � � � � � � � � � � � � � � � � � � � � � � � � � � � � � � � � � � � � � � � � � � � 8
Display� � � � � � � � � � � � � � � � � � � � � � � � � � � � � � � � � � � � � � � � � � � � � � � � � � � � � � � � � � � � � � � � � � � � � � � � � � � � � � � � � � � � 8
Automatic Charging � � � � � � � � � � � � � � � � � � � � � � � � � � � � � � � � � � � � � � � � � � � � � � � � � � � � � � � � � � � � � � � � � � � � � � � � 8
Registering and Connecting the Charger � � � � � � � � � � � � � � � � � � � � � � � � � � � � � � � � � � � � � � � � � � � � � � � � � � � � � 8
Connectivity � � � � � � � � � � � � � � � � � � � � � � � � � � � � � � � � � � � � � � � � � � � � � � � � � � � � � � � � � � � � � � � � � � � � � � � � � � � � � � � 9
Quick Setup for the APP� � � � � � � � � � � � � � � � � � � � � � � � � � � � � � � � � � � � � � � � � � � � � � � � � � � � � � � � � � � � � � � � � � � � 9
Network Information and Local Data Reset � � � � � � � � � � � � � � � � � � � � � � � � � � � � � � � � � � � � � � � � � � � � � � � � � � � 9
User Maintenance Instructions � � � � � � � � � � � � � � � � � � � � � � � � � � � � � � � � � � � � � � � � � � � � � � � � � � � � � � � 9
Moving and Storage Instructions � � � � � � � � � � � � � � � � � � � � � � � � � � � � � � � � � � � � � � � � � � � � � � � � � � � � � 9
Free Warning Label Replacement � � � � � � � � � � � � � � � � � � � � � � � � � � � � � � � � � � � � � � � � � � � � � � � � � � � � 9
Troubleshooting� � � � � � � � � � � � � � � � � � � � � � � � � � � � � � � � � � � � � � � � � � � � � � � � � � � � � � � � � � � � � � � � � � � � � � � � � � 10
Error Codes� � � � � � � � � � � � � � � � � � � � � � � � � � � � � � � � � � � � � � � � � � � � � � � � � � � � � � � � � � � � � � � � � � � � � � � � � � � � � � � 10
Accessories� � � � � � � � � � � � � � � � � � � � � � � � � � � � � � � � � � � � � � � � � � � � � � � � � � � � � � � � � � � � � � � � � � � � � � � � � � � � � � � 10
FCC Statement� � � � � � � � � � � � � � � � � � � � � � � � � � � � � � � � � � � � � � � � � � � � � � � � � � � � � � � � � � � � � � � � � � � � � � � � � � � 10
FCC Supplier's Declaration of Conformity � � � � � � � � � � � � � � � � � � � � � � � � � � � � � � � � � � � � � � � � � � � � � � � � � � � 10
FCC Interference Statement � � � � � � � � � � � � � � � � � � � � � � � � � � � � � � � � � � � � � � � � � � � � � � � � � � � � � � � � � � � � � � � 10
Canada IC Notice� � � � � � � � � � � � � � � � � � � � � � � � � � � � � � � � � � � � � � � � � � � � � � � � � � � � � � � � � � � � � � � � � � � � � � � � 10
Service Information� � � � � � � � � � � � � � � � � � � � � � � � � � � � � � � � � � � � � � � � � � � � � � � � � � � � � � � � � � � � � � � � � � � � � 10
Three Years Limited Warranty� � � � � � � � � � � � � � � � � � � � � � � � � � � � � � � � � � � � � � � � � � � � � � � � � � � � � � � � 11
90 DAYS Refund Policy� � � � � � � � � � � � � � � � � � � � � � � � � � � � � � � � � � � � � � � � � � � � � � � � � � � � � � � � � � � � � � � � � � � � 11
Specifications � � � � � � � � � � � � � � � � � � � � � � � � � � � � � � � � � � � � � � � � � � � � � � � � � � � � � � � � � � � � � � � � � � � � � � � � � � � � 11

4
Français Español
English
g� Do not operate the product in temperatures outside its operating
range of -22°F to + 122°F (-30°C to + 50°C)�
h� Do not put inflammable, explosive or combustible materials,
chemicals, combustible steam or other dangerous goods near
the product�
i� The electric vehicles can only be charged with the engine off and
stationary� Do not start the engine when the charging handle is
still connected�
j� Do not touch the terminals or other current-carrying parts when
your hands are wet�
k� Installation work and electrical wiring must be done by qualified
person(s) in accordance with all applicable codes and standards,
including fire-rated construction�
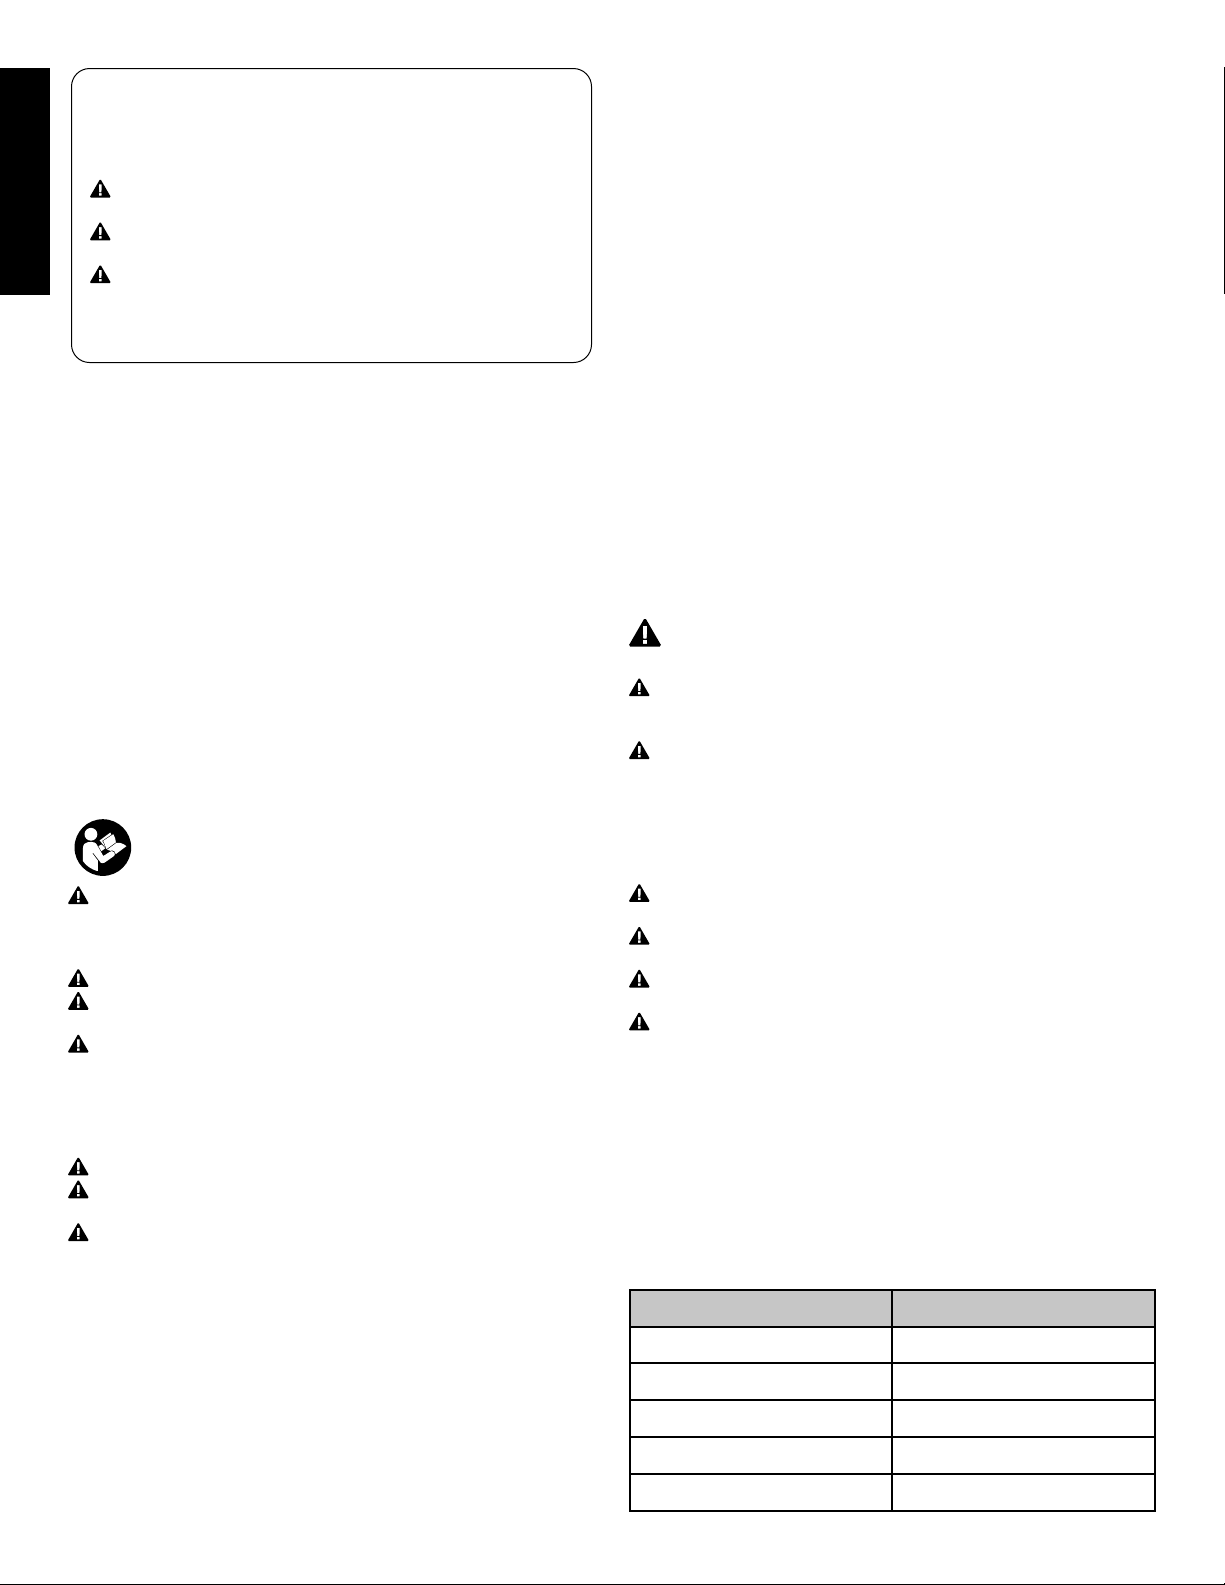
l� Take care not to drill into any pipes or power lines beneath the
surface during mounting holes preparation� Use a power line /
metal detector�
m� Do not trample or drive over the product’s cables�
n� Do not put any foreign objects into the enclosure�
o� Do not use power generators as a power source for charging
electric vehicles�
p� Do not use the product when either you, the vehicle or the
product is exposed to severe rain, snow, electrical storm or other
inclement weather�
q� Do not use or store the product in a recessed area or below the
floor level� Position the product main unit at least 18" (46 cm)
above the floor level�
WARNING - Specific Safety Instructions
for Permanently Connected Product
DANGER: High voltage is present in your electric meter housing
and electrical panel� Contact with high voltage can cause death or
serious personal injury�
WARNING: Permanent (hardwired) connection of the product
and/or installation of electrical circuits, conduit and NEMA receptacles
must only be performed by a licensed and qualified electrician� To
avoid serious injury or death, the connection and installation must
comply with the provisions of the National Electrical Code (NEC) and
all local codes� In case of any conflict between the local codes and
the NEC, local codes shall take precedence�
WARNING: The product must be grounded through a permanent
wiring system or an equipment-grounded conductor�
WARNING: Do not touch the product's end terminals with fingers
or sharp metallic objects, such as wire, tools or needles�
WARNING: Switch off power at the circuit breaker before
installing or cleaning the product�
CAUTION: To reduce the risk of fire, connect only to a circuit
provided with the following maximum branch circuit overcurrent
protection in accordance with the National Electrical Code and ANSI/
NFPA 70 and the Canadian Electrical Code, Part I, C22�1�
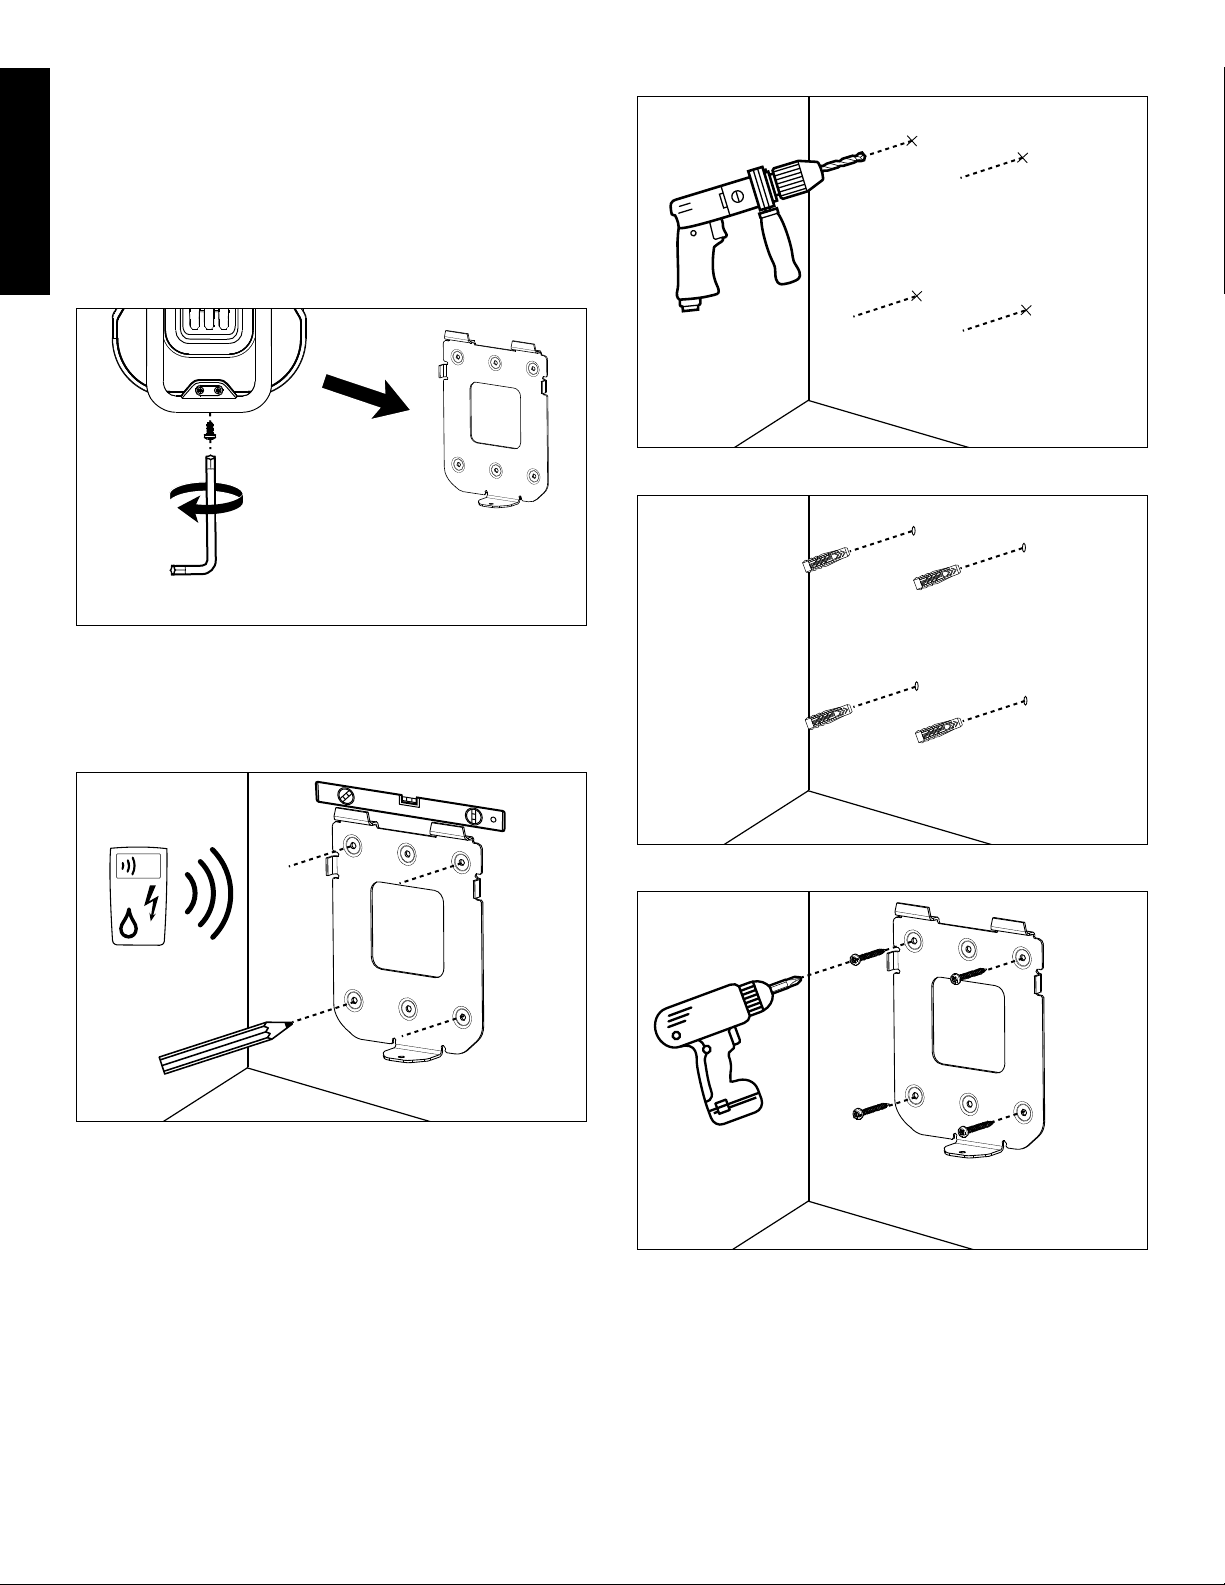
• It is recommended to utilize copper wire with a minimum rating
of 8 AWG and a temperature rating of 194°F (90 °C) for the
conductors� Keep in mind that the lower the gauge, the larger
the wire� Upsize the conductors if the power supply cord exceed
131�2' (40m)�
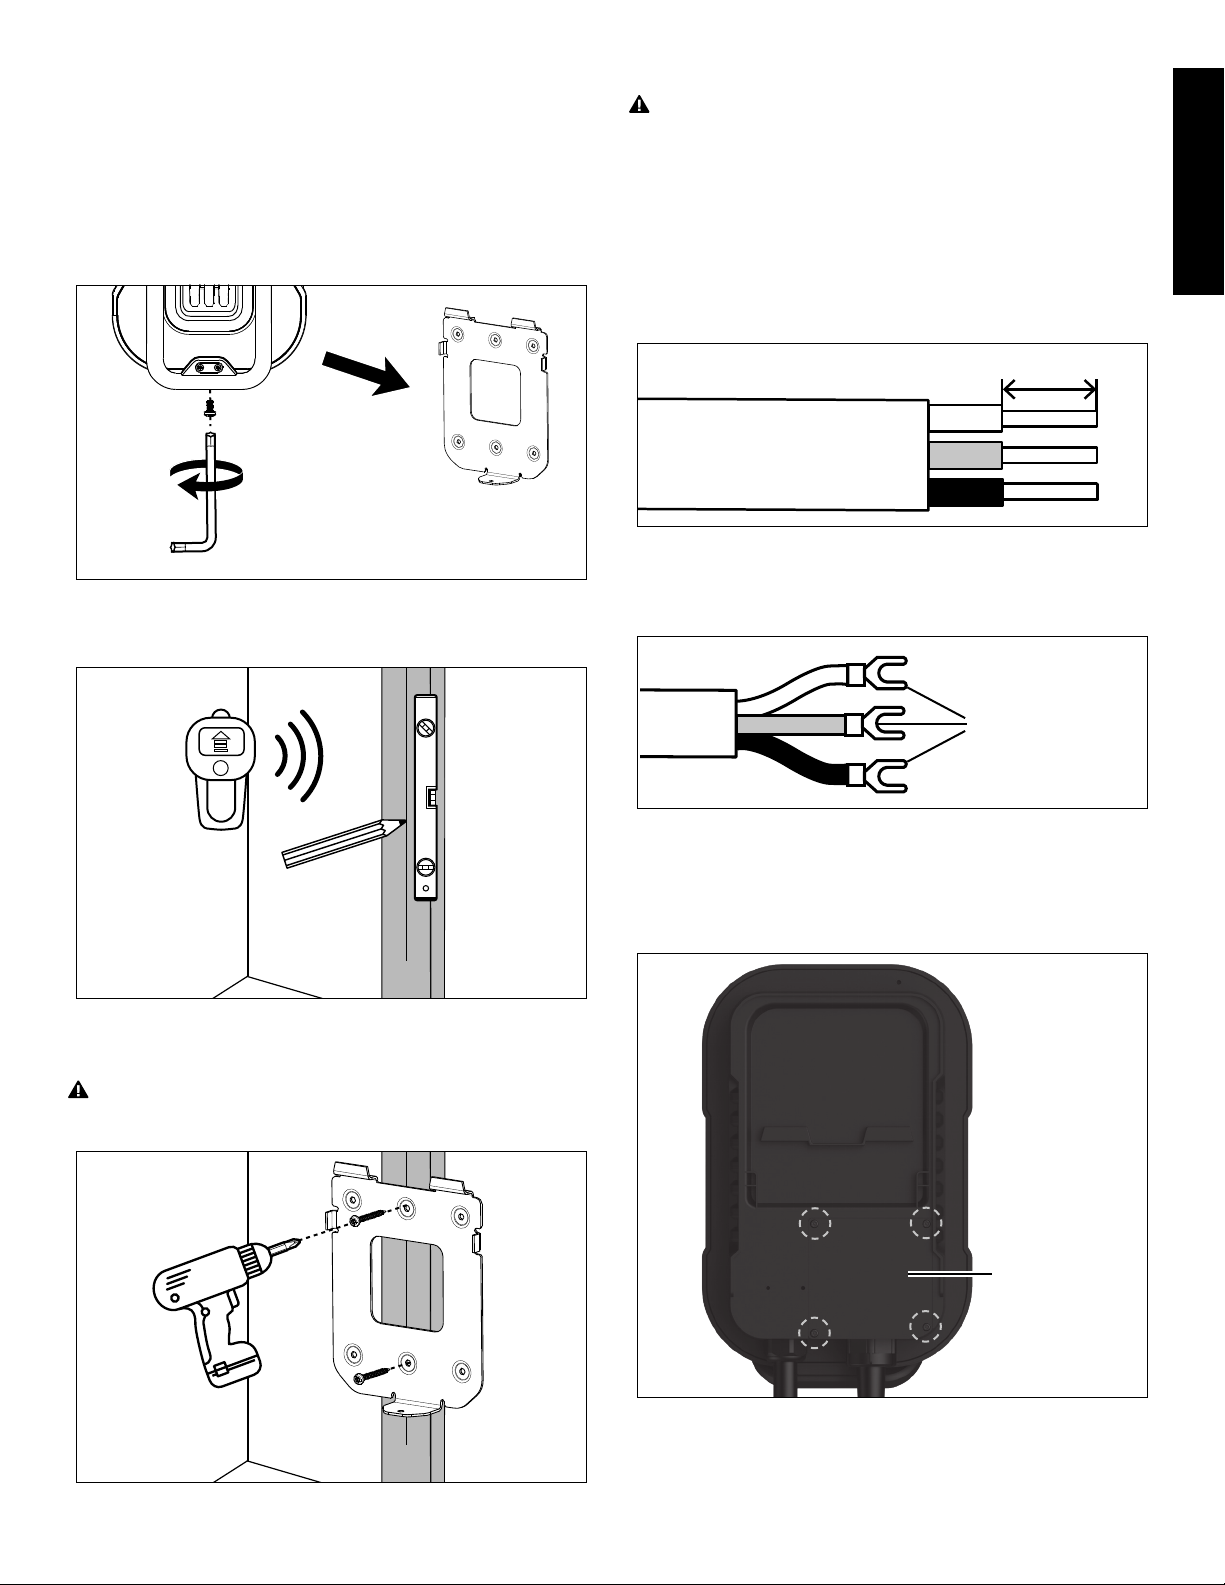
• Ensure the electrical panel supports a 192/264 V dedicated
circuit with a dedicated two-pole circuit breaker, following the
table below� The voltage between the hot wires (L1 and L2) must
be 192/264V�
Circuit breaker (amps) Max output (amps)
60 48
50 40
40 32
30 24
20 16
Definitions: Safety Guidelines
The definitions below describe the level of severity for each
signal word. Please read the manual and pay attention to these
symbols.
DANGER: Indicates an imminently hazardous situation
which, if not avoided, will result in death or serious injury�
WARNING: Indicates a potentially hazardous situation
which, if not avoided, could result in death or serious injury�
CAUTION: Indicates a potentially hazardous situation
which, if not avoided, may result in minor or moderate injury�
NOTICE: Indicates a practice not related to personal injury
which, if not avoided, may result in property damage.
IF YOU HAVE ANY QUESTIONS OR COMMENTS ABOUT THIS
DEWALT EV CHARGER, CALL US TOLL FREE AT: 1-855-815-1171.
48 Amp Smart Electric Vehicle Charging
Station
• The product is intended to charge electric vehicles compatible
with SAE J1772 AC Level 2 charging standard.
• The product is intended to be installed and used in indoor and
protected outdoor areas.
• The product is intended for household use only. Not for use in
commercial garages. A COMMERCIAL GARAGE is defined as a
facility or portion of a facility, also used to house or repair internal
combustion engine vehicles, in which vapors from flammable
liquids (gasoline) are present.
IMPORTANT SAFETY
INSTRUCTIONS
INSTRUCTIONS PERTAINING TO RISK OF
FIRE OR ELECTRIC SHOCK!
Read these instructions carefully and retain them for future
use� If this product is passed to a third party, then these
instructions must be included�
WARNING: When using electric products, basic precautions
should always be followed, including the following� This manual
contains important instructions for DXPAEV048 that shall be followed
during installation, operation and maintenance of the unit�
WARNING: Risk of electric shock! Do not disconnect under load�
WARNING: This product is intended only for charging vehicles
not requiring ventilation during charging�
WARNING: Use of the product may affect or impair the
operation of any medical or implantable electronic devices, such as
an implantable cardiac pacemaker or an implantable cardioverter
defibrillator� Check with your electronic device manufacturer
concerning the effects that charging may have on such electronic
devices before using the product�
WARNING: Do not expose to liquid, vapor or rain�
WARNING: Do not use this product if there is any damage to
the unit�
WARNING: Risk of electric shock� Do not remove cover or
attempt to open the enclosure� No user serviceable parts inside�
Refer servicing to qualified service personnel�
a� Read all the instructions before using this product�
b� Use supervision when operating this product around children�
c� Do not put fingers into the electric vehicle connector�
d� Do not use this product if the flexible power cord or EV cable is
frayed, has broken insulation or any other signs of damage�
e� Do not use this product if the enclosure or the EV connector
is broken, cracked, opened or shows any other indication of
damage�
f� To avoid a risk of fire or electric shock, do not use this device with
an extension cord�

5
English
Español Français
Display
L. Output Current
M. Charging Status
N. Wi-Fi Status
O. Charging Time
P. Actual Current
Q. Electricity Consumption
R. Voltage
L M N
OQ PR
Installation Instructions
WARNING: Wear proper personal protection equipment when
installing the product�
CAUTION: Protect the product from harsh weather conditions
such as rain, snow and extreme temperatures� Consider installing the
product under a carport or in a garage�
CAUTION: Install the product in a safe location away from
flammable materials and out of reach of children and pets�
CAUTION: Take care not to drill into any pipes or power lines
beneath the surface during mounting holes preparation� Use a power
line/ metal detector�
NOTICE: It is recommended to install the product at a sufficient
height from grade such that the height of the storage means for the
coupling device is located between 24" (600 mm) and 48" (1�2m)
from grade�
• Install the product within convenient proximity to where the
hardwired circuit will be installed by a licensed electrician.
Additionally, ensure that the cord or wiring leading into the
product has some slack.
• For optimal charging efficiency, place the product as close as
possible to the electrical panel to avoid lengthy cable runs.
• Install the product to an easily accessible location for the driver
to plug in and out the vehicle. Make sure the installation location
allows enough slack for the charging cable to reach the vehicle's
charging port.
• Test the Wi-Fi signal quality at the installation location.
• The wall used for installation must have the capacity to support
the weight of the product and its accessories and must remain
level once the installation is completed.
• Avoid installing the product in areas with excessive vibration or
elevated temperatures.
WARNING - Grounding Instructions for
Permanently Connected Product
This product must be connected to a grounded, metal, permanent
wiring system or an equipment-grounding conductor must be
run with the circuit conductors and connected to the equipment
grounding terminal or lead on the product�
The lightning flash with arrowhead within a triangle is
intended to tell the user that parts inside the product
are a risk of shock to persons.
SAVE THESE
INSTRUCTIONS
Before First Use
DANGER: Risk of suffocation! Keep any packaging materials
away from children and pets - these materials are a potential source
of danger, e�g� suffocation�
• Remove all packaging materials
• Remove and review all components before use�
• Check the product for transport damages�
Main Unit Components
A. Main Unit
B. Display
C. Handle Cradle
D. Release Lever
E. Charging Handle
F. Protective Cover
G. Wall Bracket
A
B
C
E
D
F
G
Wall Mounting Hardware
H. Screws (x4)
I. Wall Anchors (x4)
J. Bolt (x1)
K. T25 Torx L-Key (x1)
H I J K

6
Français Español
English
3. Drill the holes into the installation surface.
4. Insert the wall anchors into the holes.
5. Firmly mount the wall bracket using the provided screws.
Wall Bracket Installation for Concrete
Walls
REQUIRED TOOLS (NOT INCLUDED)
1. Level
2. Pencil
3. Ø25/64" (10mm) drill bit
4. Power drill
5. Power line/ metal detector
6. Philips screwdriver/bit
MOUNTING THE WALL BRACKET
1. Loosen the bolt at the bottom of the main unit to take the wall
bracket off, using the T25 torx L-key.
2. Use a power line/ metal detector to verify the installation area
has no pipes or power lines beneath the surface. Hold the
wall bracket against the installation surface. Use a level to
ensure that the placement of the wall bracket is horizontal.
Use a pencil to mark the screw holes in the wall bracket onto
the surface.

7
English
Español Français
Hardwire Installation
DANGER: Ensure all power is off before starting to install the
hardwire� Installation of the hardwire should be carried out only by a
licensed and qualified electrician�
REQUIRED TOOLS (NOT INCLUDED)
1. Wire stripper
2. Crimping tool
3. Philips screwdriver/bit
PREPARING THE POWER SUPPLY WIRES
1. Strip each power supply wire to expose the conductors using
a wire stripper. The length of the stripped section should be
about 0.43" (11mm).
0.43" (11 mm)
2. Insert the stripped end of the wire into the crimp barrel of the
terminal, making sure that the strands are aligned and fully
inserted.
3. Use a crimping tool to crimp the terminal onto the wire.
TERMINAL
CONNECTING THE POWER SUPPLY WIRES
NOTICE: The cable gland entry is recommended for 0�9 – 1�3"
(24-32 mm) cables�
1. Loosen the 4 screws on the cover plate on the back of the
main unit.
COVER PLATE
2. Feed the wires through the bottom port.
Wall Bracket Installation for Drywall or
Studs
REQUIRED TOOLS (NOT INCLUDED)
1. Level
2. Pencil
3. Stud finder
4. Philips screwdriver/bit
MOUNTING THE WALL BRACKET
1. Loosen the bolt at the bottom of the main unit to take the wall
bracket off, using the T25 torx L-key.
2. Use a stud finder to locate the center of a wall stud. Use a
level and a pencil to draw a vertical line down the center of
the wall stud.
3. Hold the wall bracket against the installation surface. Align the
vertical line to the holes of the wall bracket. Firmly mount the
wall bracket using the provided screws.
WARNING: At least two screws must be fastened through the
bracket into the stud� For the other holes, it is recommended that
other secure drywall fastening means be utilized�

8
Français Español
English
FIXING THE MAIN UNIT TO THE WALL BRACKET
1. Hang the main unit from the top of the wall bracket.
2. Fasten the bolt at the bottom of the main unit using the T25
torx L-key (recommended torque 5.0 to 5.8 N·m).
Operating Instructions
Display
Charging Status Description
READY Standby status. Power is connected to the
product.
CHARGING Charging is in progress.
CHARGING
COMPLETE The charging process is complete or in
scheduled charging mode.
RESET SUCCESS Network information and local data has been
cleared.
UPGRADING Firmware upgrade is in progress.
Automatic Charging
• With the product powered, it starts charging few seconds after
connecting the charging handle to the vehicle’s charging port.
• The product automatically detects outlet voltage and maximum
allowable input current of your vehicle.
1. Press the release lever and take the charging handle off the
handle cradle.
2. Plug the SAE-J1772 connector of the charging handle to the
vehicle's charging port. The charging process starts.
3. The product switches off automatically once the vehicle's
battery is fully charged.
NOTICE: When the charging is complete, press the release lever and
unplug the SAE-J1772 connector� Place the charging handle back
into the handle cradle of the main unit�
Registering and Connecting the Charger
Scan the code below to download the DEWALT EV Charger app
to control the charging sessions, monitor the charging status in real-
time and set charging schedules.
3. Loosen the connector screws on the terminal blocks.
4. Fully insert the wires into the connectors on the terminal
blocks accordingly:
• Green wire - PE pin
• Red wire - L2 pin
• Black wire - L1 pin
PE
L1
L2
5. Tighten each connector screw to clamp the crimped terminals
securely in place, with a torque of 13.3in·lbs to 17.7in·lbs
(1.5N·m to 2N·m).
6. Tighten the cable gland with a torque of 53in·lbs to 71in·lbs
(6N·m to 8N·m).
NOTICE: The cable gland entry is recommended for 0�9 – 1�3"
(24-32mm) cables, therefore a 1" conduit fitting is recommended�
CABLE GLAND
7. Close the cover plate and fasten the 4 screws with a torque of
4.4in·lbs to 8.9in·lbs (0.5N·m to 1N·m).

9
English
Español Français
Network Information and Local Data
Reset
• The reset button for network information and local data is located
inside the handle cradle on the main unit.
• Press and hold the reset button for 30 seconds to reset the
product.
Reset button
User Maintenance Instructions
WARNING: The product contains no user serviceable parts� Do
not attempt to repair or service any other part of the product yourself�
WARNING: The installation, maintenance, and servicing of the
product must only be performed by qualified personnel in accordance
with applicable local regulations�
WARNING: Disconnect the charging handle from the vehicle's
charging port and switch the circuit breaker off before cleaning�
• Do not use cleaning solvents to clean any part of the product�
• Cover the charging handle with the protective cover before
cleaning�
• Regularly clean the product using a soft, dry cloth to remove
accumulated dust and dirt�
• Regularly inspect the charging cable and plug for any visible
damage or wear�
Moving and Storage Instructions
WARNING: When transporting the product, handle with care� Do
not subject it to strong force or impact or pull, twist, tangle, drag or
step on the product, to prevent damage to it or any components�
• Cover the charging handle with the plug cover before storing�
• Protect the product from any external impact�
• Store the product in a dry indoor area and within the storage
temperature of -22°F to + 122°F (-30°C to + 50°C)� Keep away
from children and pets�
Free Warning Label Replacement
If warning labels become illegible or are missing, please call
1-855-815-1171 for a free replacement.
Connectivity
The product is equipped with a 2.4 GHz, 802.11b/g/n Wi-Fi to
communicate with local routers and mobile devices.
Quick Setup for the APP
Please refer to the quick set-up guide to connect your device with the
free DEWALT EV Charger APP.
The following functions can be found in the app:
Function Description
Start/Stop
Charging Easily control your charge with the touch of a
button.
Set up a
Schedule Want to charge during off peak hours?
Schedule future charging sessions with the
APP.
Soft Lock Protect your device from an unauthorized user.
Notifications Receive real time notifications of your current
charge status.
Share an EV
Charger Provide access to the APP and EV charger by
sending an invitiation to your guests. Without
an invitation, users will not be able to connect
the APP with your DEWALT EV Charger.
Energy Monitor Track your spending by entering your kilowatt
per hour cost. The APP will estimte the cost of
your charging sessions.
Charging History Review your charge history.
Device Settings APP main settings (timezone, language, etc.)
User Settings Review your profile.
Firmware
Upgrade Latest versions of the DEWALT EV Charger
APP can be found here.

10
Français Español
English
If you need assistance regarding accessories,
please contact the manufacturer at 1-855-815-1171 or
support@dewaltevcharger�com�
FCC Statement
FCC Supplier's Declaration of Conformity
Unique identifier: DXPAEV048
Responsible party: Paragon Group USA LLC, 100 West
Forest Avenue, Unit A, Englewood,
NJ07631, USA
U.S. contact
information: Paragon Group USA LLC, 100 West
Forest Avenue, Unit A, Englewood,
NJ07631, USA
Email: support@dewaltevcharger.com.
FCC Interference Statement
NOTICE: This equipment has been tested and found to comply with
the limits for a Class B digital device, pursuant to Part 15 of the FCC
Rules� These limits are designed to provide reasonable protection
against harmful interference in a residential installation� This equipment
generates, uses and can radiate radio frequency energy and, if not
installed and used in accordance with the instructions, may cause
harmful interference to ratio communications� However, there is no
guarantee that interference will not occur in a particular installation� If
this equipment does cause harmful interference to radio or television
reception, which can be determined by turning the equipment off and
on, the user is encouraged to try to correct the interference by one or
more of the following measures:
• Reorient or relocate the receiving antenna�
• Increase the separation between the equipment and the receiver�
• Connect the equipment into an outlet on a circuit different from
that to which the receiver is connected
• Consult the dealer or an experienced radio/TV technician for help�
NOTICE: Per FCC Part 15, changes or modifications to this
equipment not expressly approved by DEWALT could void your
authority to operate this equipment�
Canada IC Notice
This device contains licence-exempt transmitter(s)/receiver(s) that
comply with Innovation, Science and Economic Development
Canada’s licence-exempt RSS(s)� Operation is subject to the
following two conditions:
(1) this device may not cause interference, and
(2) this device must accept any interference, including interference
that may cause undesired operation of the device�
This equipment complies with Industry Canada radiation exposure
limits set forth for an uncontrolled environment�
This Class B digital apparatus complies with Canadian CAN
ICES-003(B) / NMB-003(B) standard�
Service Information
Whether you need technical advice, repair or genuine factory
replacement parts, contact the manufacturer at 1-855-815-1171 or
support@dewaltevcharger�com�
Troubleshooting
Problem Possible solution
The vehicle is not
responding or
charging.
• Verify that the product has power:
Cycle utility power to the product by
switching the circuit breaker off and
then on.
• Verify that the connector of the
charging handle fits securely to the
vehicle's charging port.
• Verify that the vehicle has been turned
off.
• Inspect the product for damage. If
damaged, stop using the product and
switch the circuit breaker off. Contact
customer service.
The app cannot find
the product. • Verify that the product has power:
Cycle utility power to the product by
switching the circuit breaker off and
then on.
• Restart the app.
Error Codes
Error
code Problem Solution
E1 Under voltage Switch the circuit breaker off, wait
for 5seconds and switch it back on.
E2 Over voltage
E3 Over current Wait for 30seconds. If the fault
remains, switch the circuit breaker
off, wait 5seconds and switch it
back on.
E4 Ground fault Switch the circuit breaker off, wait
for 5seconds and switch it back on.
E5 Current leakage Switch the circuit breaker off, wait
for 45minutes and switch it back
on.
E6 Over temperature Switch the circuit breaker off and
let the product cool down before
switch it on again.
E7 Relay failure
Switch the circuit breaker off, wait
for 5seconds and switch it back on.
E8 Failed self-check
E9 Comm fault
E10 Reset failure Switch the circuit breaker off and
contact customer service.
E11 Diode fault
E12 CP fault Switch the circuit breaker off, wait
for 5seconds and switch it back on.
NOTICE: If the solutions did not solve the problem, stop using the
product� Switch the circuit breaker off and contact customer service
for support�
Accessories
WARNING: Since accessories, other than those offered by
DEWALT, have not been tested with this product, use of such
accessories with this product could be hazardous� To reduce the risk
of injury, only DEWALT recommended accessories should be used
with this product�

11
English
Español Français
Specifications
Model: DXPAEV048
Rated input/output
voltage: Nominal 240V~ single-phase
Rated frequency: 60 Hz
Rated current: 48A
Rated charging power: 11 kW
Rated standby power: Max. 5 W
Configurable current: 48A, 40A, 32A, 24A, 16A
Terminal blocks: 8 AWG, copper only
Grounding scheme: Level 2
Charging connector: SAE J1772 standard compliant
Enclosure rating: Type 4
Means of disconnect: External branch circuit breaker
Ground fault circuit
interrupter: Integrated, no additional required
(CCID20)
Wi-Fi: 2.4GHz, 802.11b/g/n
Agency approvals: CSAus
Altitude: ≤1.24 miles (≤2000m)
Operating temperature: -22°F to + 122°F
(-30°C to + 50°C)
Storage temperature: -22°F to + 122°F
(-30°C to + 50°C)
Relative humidity: ≤95% RH, no water droplet
condensation
NEMA rating: Type 4
Net weight: 18 lbs (8.2 kg)
Dimensions W x D x H
(main unit): 11.1 x 7.4 x 17.3"
(28 x 18.9 x 44 cm)
Three Years Limited Warranty
The manufacturer warrants this product against defects in material
and workmanship for a period of three (3) years from the date of retail
purchase by the original end-user purchaser (“Warranty Period”)�
If there is a defect and a valid claim is received within the Warranty
Period, the defective product can be repaired, replaced or refunded,
without charge, in the following ways: (1) Return the product to the
manufacturer for repair, replacement or refund at manufacturer’s
option� Proof of purchase may be required by manufacturer� (2)
Return the product to the retailer where product was purchased
for an exchange (provided that the store is a participating retailer)�
Returns to retailer should be made within the time period of the
retailer’s return policy for exchanges only (usually 30 to 90 days after
the sale)� Proof of purchase may be required� Please check with
the retailer for their specific return policy regarding returns that are
beyond the time set for exchanges�
This warranty does not apply to: accessories, bulbs, fuses and
batteries; defects resulting from normal wear and tear, accidents;
damages sustained during shipping; alterations; unauthorized use or
repair; neglect, misuse, abuse; and failure to follow instructions for
care and maintenance for the product�
This warranty gives you, the original retail purchaser, specific legal
rights and you may have other rights which vary in certain states or
provinces� This product is not intended for commercial use�
90 DAYS Refund Policy
If you are not completely satisfied with the performance of this
product for any reason, you can return it within ninety (90) days from
the date of purchase with a receipt for a full refund�
Please visit our website: www�dewalt�com to register your new
DEWALT product and to be kept up to date on new products and
special offers�

12
Instrucciones Importantes de Seguridad � � � � � � � � � � � � � � � � � � � � � � � � � � � � � � � � � � � � � � � � � � 13
Antes de Usar por Primera Vez � � � � � � � � � � � � � � � � � � � � � � � � � � � � � � � � � � � � � � � � � � � � � � � � � � � � � � 14
Componentes de la Unidad Principal� � � � � � � � � � � � � � � � � � � � � � � � � � � � � � � � � � � � � � � � � � � � � � � 14
Herramientas para Montaje en la Pared� � � � � � � � � � � � � � � � � � � � � � � � � � � � � � � � � � � � � � � � � � � 14
Pantalla� � � � � � � � � � � � � � � � � � � � � � � � � � � � � � � � � � � � � � � � � � � � � � � � � � � � � � � � � � � � � � � � � � � � � � � � � � � � � � � � � � � � 14
Instrucciones de Instalación� � � � � � � � � � � � � � � � � � � � � � � � � � � � � � � � � � � � � � � � � � � � � � � � � � � � � � � � � � 15
Instalación del soporte de pared para muros de concreto� � � � � � � � � � � � � � � � � � � � � � � � � � � � � � � � � � � � � 15
Instalación del soporte de pared en yeso-cartón o montantes� � � � � � � � � � � � � � � � � � � � � � � � � � � � � � � � � 16
Instalación con cableado fijo � � � � � � � � � � � � � � � � � � � � � � � � � � � � � � � � � � � � � � � � � � � � � � � � � � � � � � � � � � � � � � � 16
Instrucciones de Funcionamiento � � � � � � � � � � � � � � � � � � � � � � � � � � � � � � � � � � � � � � � � � � � � � � � � � � � 17
Pantalla � � � � � � � � � � � � � � � � � � � � � � � � � � � � � � � � � � � � � � � � � � � � � � � � � � � � � � � � � � � � � � � � � � � � � � � � � � � � � � � � � � 17
Carga automática � � � � � � � � � � � � � � � � � � � � � � � � � � � � � � � � � � � � � � � � � � � � � � � � � � � � � � � � � � � � � � � � � � � � � � � � � 18
Registro y conexión del cargador � � � � � � � � � � � � � � � � � � � � � � � � � � � � � � � � � � � � � � � � � � � � � � � � � � � � � � � � � � � 18
Conectividad � � � � � � � � � � � � � � � � � � � � � � � � � � � � � � � � � � � � � � � � � � � � � � � � � � � � � � � � � � � � � � � � � � � � � � � � � � � � � 18
Configuración rápida de la aplicación � � � � � � � � � � � � � � � � � � � � � � � � � � � � � � � � � � � � � � � � � � � � � � � � � � � � � � � 18
Información de Red y Restablecimiento de Datos Locales � � � � � � � � � � � � � � � � � � � � � � � � � � � � � � � � � � � � 18
Instrucciones de Mantenimiento � � � � � � � � � � � � � � � � � � � � � � � � � � � � � � � � � � � � � � � � � � � � � � � � � � � � 18
Instrucciones de Manejo y Almacenamiento � � � � � � � � � � � � � � � � � � � � � � � � � � � � � � � � � � � � � 19
Reemplazo Gratuito de la Etiqueta de Advertencia� � � � � � � � � � � � � � � � � � � � � � � � � � � � � 19
Resolución de Problemas � � � � � � � � � � � � � � � � � � � � � � � � � � � � � � � � � � � � � � � � � � � � � � � � � � � � � � � � � � � � � 19
Códigos de Error � � � � � � � � � � � � � � � � � � � � � � � � � � � � � � � � � � � � � � � � � � � � � � � � � � � � � � � � � � � � � � � � � � � � � � � � 19
Accesorios � � � � � � � � � � � � � � � � � � � � � � � � � � � � � � � � � � � � � � � � � � � � � � � � � � � � � � � � � � � � � � � � � � � � � � � � � � � � � � � � 19
Declaración FCC� � � � � � � � � � � � � � � � � � � � � � � � � � � � � � � � � � � � � � � � � � � � � � � � � � � � � � � � � � � � � � � � � � � � � � � � � 19
FCC– Declaración de Conformidad del Proveedor� � � � � � � � � � � � � � � � � � � � � � � � � � � � � � � � � � � � � � � � � � � 19
Declaración de Interferencias de la FCC� � � � � � � � � � � � � � � � � � � � � � � � � � � � � � � � � � � � � � � � � � � � � � � � � � � � � 19
Aviso de IC para Canadá � � � � � � � � � � � � � � � � � � � � � � � � � � � � � � � � � � � � � � � � � � � � � � � � � � � � � � � � � � � � � � 20
Información de Servicio � � � � � � � � � � � � � � � � � � � � � � � � � � � � � � � � � � � � � � � � � � � � � � � � � � � � � � � � � � � � � � � 20
Garantía Limitada por Tres Años � � � � � � � � � � � � � � � � � � � � � � � � � � � � � � � � � � � � � � � � � � � � � � � � � � � � 20
Política de Devolución de 90DÍAS� � � � � � � � � � � � � � � � � � � � � � � � � � � � � � � � � � � � � � � � � � � � � � � � � � � � � � � � � � 20
Especificaciones � � � � � � � � � � � � � � � � � � � � � � � � � � � � � � � � � � � � � � � � � � � � � � � � � � � � � � � � � � � � � � � � � � � � � � � � 20

13
c� No ponga los dedos en el conector del vehículo eléctrico�
d� No utilice este producto si el cordón flexible de alimentación
o cable del VE está desgastado, tiene roto el aislamiento, o
cualquier otro signo de daño�
e� No utilice este producto si el envolvente o el conector del VE
están rotos, con agrietamiento, abiertos o muestran indicios de
daños�
f� Para evitar un riesgo de incendio o choque eléctrico, no utilice
este producto con una extensión�
g� No use el producto a temperaturas fuera de su rango operativo
de –22°F a+122°F (–30°C a+50°C)�
h� No coloque materiales inflamables, explosivos o combustibles,
químicos, vapor combustible u otros objetos peligrosos cerca del
producto�
i� Los vehículos eléctricos solo pueden cargarse si están
estacionados con el motor apagado� No arranque el motor con
la empuñadura de carga aún conectada�
j� No toque los terminales ni otras piezas que transmitan corriente
con las manos húmedas�
k� Solo el personal calificado debe realizar la instalación y el cableado
eléctrico, de conformidad con todos los códigos y estándares
correspondientes, incluida la construcción con clasificación
contra el fuego�
l� Tenga cuidado de no taladrar ninguna tubería o línea eléctrica
debajo de la superficie cuando prepare los agujeros para el
montaje� Use un detector de metales/líneas eléctricas�
m� No pise los cables del producto ni conduzca sobre ellos�
n� No coloque ningún objeto extraño en la carcasa�
o� No use generadores de energía como fuente de alimentación
para cargar vehículos eléctricos�
p� No use el producto cuando usted, el vehículo o el producto estén
bajo lluvia intensa, nieve, durante una tormenta eléctrica u otras
condiciones climáticas inclementes�
q� No use o almacene el producto en un recoveco o bajo el nivel
del suelo� Coloque la unidad principal del producto a al menos
18pulgadas (46cm) sobre el suelo�
ADVERTENCIA– Instrucciones de
Seguridad Específicas para un Producto
Conectado Permanentemente
PELIGRO: Hay un alto voltaje presente en la carcasa de su
medidor eléctrico y en el panel eléctrico� El contacto con el alto
voltaje puede causar la muerte o graves lesiones personales�
ADVERTENCIA: La conexión permanente (con cableado fijo)
del producto y/o la instalación de circuitos eléctricos, conductos
y receptáculos NEMA solo deberá ser realizada por un electricista
certificado y calificado� Para evitar lesiones graves o la muerte, la
conexión y la instalación deben cumplir con las disposiciones del
Código Eléctrico Nacional (NEC) y con todas las normas locales�
En caso de un conflicto entre las normas locales y el NEC, tendrán
precedencia las normas locales�
ADVERTENCIA: El producto debe estar conectado a tierra a
través de un sistema de cableado permanente o un conductor para
conexión a tierra de equipos�
ADVERTENCIA: No toque los terminales del producto con
sus dedos o con objetos metálicos puntiagudos como alambre,
herramientas o agujas�
ADVERTENCIA: Desconecte el equipo desde su disyuntor antes
de instalarlo o limpiarlo�
PRECAUCIÓN: Para reducir el riesgo de incendio, conectar
únicamente a un circuito que se proporcione con la siguiente
protección contra sobrecorriente del circuito derivado de acuerdo
con el Código Eléctrico Nacional ANSI/NFPA70y el Código Eléctrico
CanadienseC22�1, ParteI�
Definiciones: Pautas de Seguridad
Las siguientes definiciones describen el nivel de gravedad de
cada palabra de advertencia. Lea el manual y preste atención
a estos símbolos.
PELIGRO: PELIGRO indica una situación peligrosa que, de
no evitarse, provocará la muerte o lesiones severas�
ADVERTENCIA: Indica una situación peligrosa que, de no
evitarse, podría provocar la muerte o lesiones severas�
PRECAUCIÓN: Indica una situación peligrosa que, de no
evitarse, podría provocar lesiones menores o moderadas�
AVISO: Indica una práctica no relacionada a lesiones
personales que, de no evitarse, podría provocar daños a la
propiedad.
SI TIENE PREGUNTAS O COMENTARIOS SOBRE ESTE CARGADOR
PARA VE DEWALT, LLÁMENOS SIN COSTO AL: 1-855-815-1171.
Estación de Carga Inteligente de 48Amp
para Vehículos Eléctricos
• Este producto está hecho para cargar vehículos eléctricos
compatibles con el estándar de carga de nivel 2de CA SAEJ1772.
• Este producto se puede instalar en áreas tanto interiores como
exteriores protegidas.
• Este producto está hecho solo para uso doméstico. No apto
para usarse en garajes comerciales. Un GARAJE COMERCIAL
se define como una instalación o parte de una instalación,
también utilizada para albergar o reparar vehículos de combustión
interna, donde haya presencia de vapores de líquidos inflamables
(gasolina).
INSTRUCCIONES
IMPORTANTES DE
SEGURIDAD
¡INSTRUCCIONES RELACIONADAS A
UN RIESGO DE INCENDIO O CHOQUE
ELÉCTRICO!
Lea atentamente estas instrucciones y guárdelas para
usarlas más adelante� En caso de entregar este producto
a un tercero, también se deben incluir estas instrucciones�
ADVERTENCIA: Cuando se utilizan aparatos eléctricos, siempre
deben seguirse las precauciones básicas, incluyendo las siguientes�
Este manual contiene instrucciones importantes para el equipo
DXPAEV048que deben seguirse durante la instalación, operación y
mantenimiento de la unidad�
ADVERTENCIA: ¡Riesgo de choque eléctrico! No desconecte el
producto si está bajo carga�
ADVERTENCIA: Este producto se destina únicamente para
cargar vehículos que no requieren ventilación durante la carga�
ADVERTENCIA: El uso del producto podría afectar o impedir
el funcionamiento de dispositivos electrónicos médicos o implantes,
como marcapasos o desfibriladores cardioversores implantables�
Antes de usar el producto, consulte al fabricante de su dispositivo
electrónico acerca de los efectos de la carga sobre tales equipos
electrónicos�
ADVERTENCIA: No exponga a líquidos, vapores o la lluvia�
ADVERTENCIA: No utilizar este producto si existe algún daño
en la unidad�
ADVERTENCIA: Riesgo de choque eléctrico� No quitar la
cubierta ni intentar abrir el envolvente� En el interior existen partes
que no pueden repararse por el usuario� Referirse a personal de
mantenimiento calificado�
a� Lea todas las instrucciones antes de utilizar este producto�
b� Supervise el uso del producto cuando haya niños cerca�

14
A
B
C
E
D
F
G
Herramientas para Montaje en la
Pared
H. Tornillos(x4)
I. Anclajes de Pared(x4)
J. Perno(x1)
K. Llave en Torx T25enL(x1)
H I J K
Pantalla
L. Corriente de Salida
M. Estado de Carga
N. Estado WiFi
O. Tiempo de Carga
P. Corriente Actual
Q. Consumo Eléctrico
R. Voltaje
L M N
OQ PR
• Para los conductores, se recomienda el uso de conductor de
cobre con una clasificación de al menos 8AWG una clasificación
de temperatura de 194°F (90°C)� Tenga presente que a menor
valor de calibre AWG, más grueso será el conductor� Use un
calibre de conductor mayor si el cable de alimentación tendrá
más de 131�2pies (40m)�
• Asegúrese de que el panel eléctrico admita un circuito dedicado
de 192/264 V con un disyuntor bipolar dedicado, según la
siguiente tabla� El voltaje entre conductores vivos (L1yL2)debe
ser 192/264V�
Disyuntor (amp) Potencia máxima (amp)
60 48
50 40
40 32
30 24
20 16
ADVERTENCIA– Instrucciones de
Puesta a Tierra para un Producto
Conectado Permanentemente
Este producto debe conectarse a un sistema de cableado
permanente, metálico, puesto a tierra o debe instalarse un conductor
de puesta a tierra del equipo con los conductores del circuito
y conectarse a la terminal o punta terminal de puesta a tierra del
equipo en el producto�
El símbolo de relámpago con cabeza de flecha
dentro de un triángulo indica al usuario que las
partes internas del producto presentan un riesgo de
descarga eléctrica para las personas.
GUARDE ESTAS
INSTRUCCIONES
Antes de Usar por Primera Vez
PELIGRO: ¡Riesgo de asfixia! Mantenga los materiales de
empaque lejos de los niños y mascotas, ya que estos materiales son
una posible fuente de peligro(p�ej� por asfixia)�
• Retire todo el embalaje
• Extraiga y revise todos los componentes antes de usarlos�
• Revise que el producto no haya sufrido daños durante su
transporte�
Componentes de la Unidad Principal
A. Unidad Principal
B. Pantalla
C. Sujetador de la
Empuñadura de Carga
D. Palanca de Liberación
E. Empuñadura de Carga
F. Cubierta Protectora
G. Soporte de Pared

15
2. Use un detector de metales/líneas eléctricas para verificar
que el área de instalación no tenga tuberías ni líneas eléctricas
bajo la superficie. Sostenga el soporte de pared contra la
superficie de instalación. Use un nivel para asegurarse de que
la instalación del soporte de pared esté horizontal. Use un
lápiz para marcar los agujeros de los tornillos del soporte de
pared en la superficie.
3. Perfore los agujeros en la superficie de instalación.
4. Inserte los anclajes de pared en los agujeros.
Instrucciones de Instalación
ADVERTENCIA: Use un equipo de protección personal
adecuado al instalar el producto�
PRECAUCIÓN: Proteja el producto contra condiciones climáticas
adversas, como lluvia, nieve y temperaturas extremas� Considere
instalar el producto bajo un estacionamiento o en un garaje�
PRECAUCIÓN: Instale el producto en un lugar seguro, lejos de
materiales inflamables y del alcance de niños y mascotas�
PRECAUCIÓN: Tenga cuidado de no taladrar ninguna tubería o
línea eléctrica debajo de la superficie cuando prepare los agujeros
para el montaje� Use un detector de metales/líneas eléctricas�
AVISO: Se recomienda instalar el producto a una altura suficiente del
suelo, de manera tal que el alto de almacenamiento signifique que
el dispositivo de acoplamiento esté a entre 24pulgadas (600mm) y
48pulgadas (1�2m) del suelo�
• Instale el producto convenientemente cerca de donde un
electricista certificado instalará el circuito de cableado fijo.
Además, asegúrese de que el cable o cableado que llega hasta
el producto tenga algo de holgura.
• Para lograr una eficiencia de carga óptima, coloque el producto
lo más cercano posible al panel eléctrico para evitar cableados
extensos.
• Instale el producto en un lugar de fácil acceso para que el
conductor pueda conectar y desconectar el vehículo con
facilidad. Asegúrese de que el lugar de instalación permita una
suficiente holgura para que el cable de carga llegue al puerto de
carga del vehículo.
• Pruebe la calidad de la señal Wi-Fi en el lugar de instalación.
• La pared de instalación debe tener la capacidad de resistir el
peso del producto y sus accesorios, y debe permanecer nivelada
una vez completada la instalación.
• Evite instalar el producto en áreas de vibración excesiva o
temperaturas elevadas.
Instalación del soporte de pared para
muros de concreto
HERRAMIENTAS NECESARIAS (NO INCLUIDAS)
1. Nivel
2. Lápiz
3. Broca de Ø25/64pulgadas
(10mm)
4. Taladro eléctrico
5. Detector de metales/líneas
eléctricas
6. Punta de destornillador/
destornillador phillips
INSTALACIÓN DEL SOPORTE DE PARED
1. Suelte el perno del fondo de la unidad principal para sacar el
soporte de pared, usando la llave TorxT25enL.

16
3. Sostenga el soporte de pared contra la superficie de
instalación. Alinee la línea vertical con los agujeros del soporte
de pared. Instale con firmeza el soporte de pared usando los
tornillos incluidos.
ADVERTENCIA: Se debe fijar al menos dos tornillos a través
del soporte y al montante� Para los demás agujeros, se recomienda
utilizar otras sujeciones de seguridad para paredes de yeso-cartón�
Instalación con cableado fijo
PELIGRO: Asegúrese de que toda la alimentación esté
desconectada antes de comenzar con la instalación con cableado
fijo� Solo un electricista certificado y calificado debe realizar la
instalación con cableado fijo�
HERRAMIENTAS NECESARIAS (NO INCLUIDAS)
1. Pinza pelacables
2. Pinza crimpeadora
3. Punta de destornillador/
destornillador phillips
PREPARACIÓN DE LOS CABLES DE ALIMENTACIÓN
1. Use una pinza pelacables para pelar cada cable de
alimentación y dejar a la vista los conductores. La sección
pelada deberá tener aproximadamente 0.43 pulgadas
(11mm) de largo.
0.43pulgadas (11mm)
2. Introduzca el extremo pelado del cable en el cilindro de
crimpado del terminal, asegurándose de que las hebras del
conductor queden alineadas y totalmente insertadas.
3. Use una pinza de crimpado para crimpar el terminal sobre el
conductor.
TERMINAL
5. Instale con firmeza el soporte de pared usando los tornillos
incluidos.
Instalación del soporte de pared en yeso-
cartón o montantes
HERRAMIENTAS NECESARIAS (NO INCLUIDAS)
1. Nivel
2. Lápiz
3. Localizador de montantes
4. Punta de destornillador/
destornillador phillips
INSTALACIÓN DEL SOPORTE DE PARED
1. Suelte el perno del fondo de la unidad principal para sacar el
soporte de pared, usando la llave TorxT25enL.
2. Use un localizador de montantes para encontrar el centro de
un montante. Use un nivel y un lápiz para dibujar una línea
vertical a lo largo del centro del montante.

17
5. Apriete el tornillo de cada conector para pinzar los terminales
crimpados de forma segura en su lugar, con un torque de
13.3a 17.7pulg·lb (1.5a 2Nm).
6. Apriete el prensacables con un torque de 53a 71pulg·lb (6a
8Nm).
AVISO: La entrada con prensacables está recomendada para cables
de 0�9a 1�3pulgadas (24a 32mm), por lo que se recomienda un
conducto de acople de 1pulgada�
PRENSACABLES
7. Cierre la placa cobertora y apriete los 4tornillos con un torque
de 4.4a 8.9pulg·lb (0.5a 1Nm).
FIJAR LA UNIDAD PRINCIPAL AL SOPORTE DE PARED
1. Cuelgue la unidad principal desde la parte superior del
soporte de pared.
2. Fije el perno al fondo de la unidad principal usando la llave
TorxT25enL(torque recomendado: 5.0a5.8Nm).
Instrucciones de Funcionamiento
Pantalla
Estado de Carga Descripción
READY En estado de espera. La energía está
conectada al producto.
CHARGING Carga en curso.
CHARGING
COMPLETE El proceso de carga se completó o está en
modo de carga programada.
RESET SUCCESS La información de red y los datos locales se
restablecieron.
UPGRADING Actualización de firmware en curso.
CONEXIÓN DE LOS CABLES DE ALIMENTACIÓN
AVISO: La entrada con prensacables está recomendada para cables
de 0�9a 1�3pulgadas (24a 32mm)�
1. Afloje los 4tornillos de la placa cobertora de la parte trasera
de la unidad principal.
PLACA
COBERTORA
2. Introduzca los cablea por el puerto inferior.
3. Afloje los tornillos para conductores de los bloques terminales.
4. Introduzca los cables completamente en los conectores de
los bloques terminales de la siguiente forma:
• Cable verde– pin PE
• Cable rojo– pin L2
• Cable negro– pin L1
PE
L1
L2

18
Función Descripción
Comparta un
Cargador para VE Envíe invitaciones para permitir a terceros
acceder a la aplicación y al cargador de
VE. Sin invitación, los usuarios no pueden
conectar la aplicación a su cargador para VE
DEWALT.
Monitor de
Energía Rastree sus gastos al introducir el costo de
kilowatts por hora. La aplicación estimará el
costo de sus sesiones de carga.
Historial de Carga Revise su historial de carga.
Ajustes del
Dispositivo Ajustes principales de la aplicación (zona
horaria, idioma, etc.)
Ajustes de
Usuario Revise su perfil.
Actualización de
Firmware Puede encontrar las últimas versiones de la
aplicación DEWALT EV Charger aquí.
Información de Red y Restablecimiento
de Datos Locales
• El botón de restablecimiento de red y datos locales está dentro
de la empuñadura de carga en la unidad principal.
• Mantenga presionado el botón de restablecimiento durante
30segundos para restablecer el producto.
Botón de
reinicio
Instrucciones de Mantenimiento
ADVERTENCIA: El producto no tiene piezas que el usuario
pueda reparar� No intente reparar ninguna parte del producto usted
mismo�
ADVERTENCIA: La instalación, mantenimiento y reparación del
producto solo se debe realizar mediante personal calificado y bajo las
regulaciones locales pertinentes�
ADVERTENCIA: Desconecte la empuñadura de carga del puerto
de carga del vehículo y apague el disyuntor antes de limpiar�
• No use solventes de limpieza para limpiar partes del producto�
• Cubra la empuñadura de carga con la cubierta protectora antes
de limpiar�
• Limpie regularmente el producto con una tela suave y seca para
quitar el polvo y la suciedad acumulados�
• Inspeccione regularmente que el cable de carga y enchufe no
tengan daños ni desgastes visibles�
Carga automática
• Con el producto encendido, comienza a cargar a los pocos
segundos de conectar la empuñadura de carga al puerto de
carga del vehículo.
• El producto detecta automáticamente el voltaje de la toma de
corriente y la corriente de entrada máxima permisible de su
vehículo.
1. Presione la palanca de liberación y saque la empuñadura de
carga del sujetador de la empuñadura de carga.
2. Enchufe el conector SAE-J1772 de la empuñadura de
carga al puerto de carga del vehículo. El proceso de carga
comenzará.
3. El producto se apaga automáticamente una vez que la batería
del vehículo se carga por completo.
AVISO: Al completarse la carga, presione la palanca de liberación
y desenchufe el conector SAE-J1772� Coloque la empuñadura de
carga de vuelta en el sujetador de la empuñadura de carga de la
unidad principal�
Registro y conexión del cargador
Escanee el siguiente código para descargar la aplicación DEWALT
EV Charger para controlar las sesiones de carga, monitorear el
estado de carga en tiempo real y organizar cargas programadas.
Conectividad
El producto está equipado con Wi-Fi 2.4 GHz, 802.11b/g/n para
comunicarse con los routers y dispositivos móviles locales.
Configuración rápida de la aplicación
Consulte la guía de preparación rápida para conectar su dispositivo
a la aplicación gratuita DEWALT EV Charger.
La aplicación posee las siguientes funciones:
Función Descripción
Inicio/Detención
de la Carga Controle fácilmente la carga con solo tocar un
botón.
Organizar un
Programa de
Carga
¿Quiere cargar fuera del horario en que es más
costosa la electricidad? Organice las futuras
sesiones de carga con la aplicación.
Bloqueo por
Software Proteja su dispositivo ante el uso no
autorizado.
Notificaciones Reciba notificaciones en tiempo real de su
estado de carga actual.

19
Código
de error Problema Solución
E7 Falla del relé
Apague el disyuntor, espere
5segundos y encienda
nuevamente.
E8 Falla de
autocomprobación
E9 Falla de
comunicación
E10 Falla de
restablecimiento Apague el disyuntor y contacte al
servicio de atención al cliente.
E11 Falla del diodo
E12 Falla del CP Apague el disyuntor, espere
5segundos y encienda
nuevamente.
AVISO: Si las soluciones no resolvieron el problema, deje de usar el
producto� Apague el disyuntor y contacte al servicio de atención al
cliente para conseguir soporte�
Accesorios
ADVERTENCIA: Ya que los accesorios no recomendados por
DEWALT no han sido probados en este producto, el uso de los
mismos podría ser peligroso� Para reducir el riesgo de lesiones, use
solo accesorios recomendados por DEWALT con este producto�
Si necesita ayuda con accesorios, contacte al fabricante al 1-855-
815-1171o en support@dewaltevcharger�com�
Declaración FCC
FCC– Declaración de Conformidad del
Proveedor
Identificador único: DXPAEV048
Entidad responsable: Paragon Group USA LLC, 100West
Forest Avenue, UnitA, Englewood,
NJ07631, USA
Información de
contacto en EE.UU.: Paragon Group USA LLC, 100West
Forest Avenue, UnitA, Englewood,
NJ07631, USA
Email: support@dewaltevcharger.com.
Declaración de Interferencias de la FCC
AVISO: Este equipo ha sido probado por cuanto a su cumplimiento
con los límites de un dispositivo digital ClaseB, según la Parte15de
las Reglas FCC� Estos límites están diseñados para proporcionar
una protección razonable contra interferencias dañinas en una
instalación residencial� Este equipo genera, utiliza e irradia energía
de radiofrecuencias; si no se instala según estas instrucciones,
podría provocar interferencias dañinas a las radiocomunicaciones�
Sin embargo, no hay garantía de que no ocurra interferencia en
una instalación particular� Si este equipo genera interferencia que
impida la correcta recepción de radio o televisión, lo cual se puede
determinar apagando y encendiendo el equipo, se insta al usuario a
intentar corregir la interferencia mediante uno o más de los siguientes
métodos:
• Reoriente o reubique la antena de recepción�
• Incremente la separación entre el equipo y el receptor�
• Conecte el equipo a una toma de corriente en un circuito diferente
al que está conectado el receptor
• Consulte al vendedor o a un técnico de radio/TV experimentado
para obtener ayuda�
AVISO: Según el inciso 15 del reglamento FCC, los cambios o
modificaciones a este equipo que no estén aprobados expresamente
por DEWALT podrían anular su autoridad para usar este equipo�
Instrucciones de Manejo y
Almacenamiento
ADVERTENCIA: Al transportar el producto, manipúlelo con
cuidado� Para evitar daños al producto o sus componentes, no lo
someta a fuerzas o impactos fuertes ni tire, gire, enrede, arrastre o
se pare sobre él�
• Cubra la empuñadura de carga con la cubierta del enchufe antes
de almacenar�
• Proteja el producto contra impactos externos�
• Almacene el producto en un área interior a una temperatura de
entre –22°F a+122°F (–30°C a+50°C)� Manténgalo fuera del
alcance de niños y animales domésticos�
Reemplazo Gratuito de la Etiqueta
de Advertencia
Si las etiquetas de advertencia se vuelven ilegibles o se desprenden,
llame al 1-855-815-1171para pedir un reemplazo gratuito.
Resolución de Problemas
Problema Posible solución
El vehículo no
responde o no
carga.
• Compruebe que el producto tenga
energía: Apague y encienda el
disyuntor para volver a conectar la
alimentación al producto.
• Inspeccione que el conector de
la empuñadura de carga se fije
con firmeza al puerto de carga del
vehículo.
• Inspeccione que el vehículo esté
apagado.
• Inspeccione que el producto no
haya sufrido daños. Si tiene daños,
deje de usar el producto y apague
el disyuntor. Contacte al servicio de
atención al cliente.
La aplicación
no encuentra el
producto.
• Compruebe que el producto tenga
energía: Apague y encienda el
disyuntor para volver a conectar la
alimentación al producto.
• Reinicie la aplicación.
Códigos de Error
Código
de error Problema Solución
E1 Bajo voltaje Apague el disyuntor, espere
5segundos y encienda
nuevamente.
E2 Sobrevoltaje
E3 Sobrecorriente Espere 30segundos. Si la falla
permanece, apague el disyuntor,
espere 5segundos y encienda
nuevamente.
E4 Falla de la
conexión a tierra Apague el disyuntor, espere
5segundos y encienda
nuevamente.
E5 Fuga de corriente Apague el disyuntor, espere
45minutos y encienda
nuevamente.
E6 Sobretemperatura Apague el disyuntor y deje enfriar
el producto antes de volver a
encenderlo.

20
Especificaciones
Modelo: DXPAEV048
Voltaje de entrada/salida
nominal: Monofásico nominal de 240V~
Frecuencia nominal: 60Hz
Corriente nominal: 48A
Potencia de carga
nominal: 11kW
Potencia nominal en
espera: Máx. 5W
Corriente configurable: 48A, 40A, 32A, 24A, 16A
Bloques terminales: AWG8, solo cobre
Esquema de conexión a
tierra: Nivel2
Conector del cargador: Cumple con la norma SAEJ1772
Clasificación de la
carcasa: Tipo4
Medio de desconexión: Disyuntor secundario externo
Interruptor del circuito
de falla a tierra: Integrado, no requiere adicional
(CCID20)
Wi-Fi: 2.4GHz, 802.11b/g/n
Aprobaciones: CSAus
Altitud: ≤1.24millas (≤2000m)
Temperatura operativa: –22°F a+122°F
(–30°C a+50°C)
Temperatura de
almacenamiento: –22°F a+122°F
(–30°C a+50°C)
Humedad relativa: ≤95%HR, sin condensación de
gotas de agua
Clasificación NEMA: Tipo4
Peso neto: 18lbs. (8.2kg)
Dimensiones
AnxProfxAl (unidad
principal):
11.1x7.4x17.3pulgadas
(28x18.9x44cm)
Aviso de IC para Canadá
Este dispositivo contiene receptores/transmisores exentos de
licencia que cumplen con la exención de licencia RSS de Innovación,
Ciencia y Desarrollo Económico de Canadá� Su uso está sujeto a las
siguientes dos condiciones:
(1) este dispositivo no puede causar interferencia dañina,
(2) este dispositivo debe aceptar cualquier interferencia, incluida
interferencia que pueda provocar un funcionamiento no deseado
del dispositivo�
Este equipo cumple con los límites de exposición a radiación de
Industry Canada establecidos para un entorno no controlado�
Este aparato digital de claseB cumple con el estándar canadiense
CANICES-003(B) / NMB-003(B)�
Información de Servicio
Ya sea que necesite ayuda técnica, reparación o piezas de repuesto
originales de fábrica, contacte al fabricante al 1-855-815-1171o en
support@dewaltevcharger�com�
Garantía Limitada por Tres Años
El fabricante garantiza este producto contra defectos de materiales y
mano de obra por un periodo de tres(3)años a partir de la fecha de
compra, al usuario adquiriente original (“Periodo de Garantía”)�
Si hay un defecto y se recibe una reclamación válida bajo el periodo
de garantía, el producto defectuoso se puede reparar, reemplazar
o reembolsas, sin cobro alguno, de las siguientes maneras:
(1)Devuelva el producto al fabricante para que lo repare, reemplace
o reembolse a elección del fabricante� El fabricante podría solicitar
una prueba de compra� (2)Devuelva el producto al comercio donde
adquirió el producto para solicitar un cambio (considerando que la
tienda sea un comercio minorista participante)� Las devoluciones
al comercio minorista se deben hacer solo dentro del periodo de
la política de cambio del comercio (normalmente de 30a 90días
después de la venta)� Podría solicitarse una prueba de compra�
Compruebe las políticas de devolución específicas del comercio
minorista en relación a devoluciones más allá del tiempo establecido�
La garantía no se aplica a accesorios, bombillas, fusibles y baterías,
defectos derivados del desgaste y uso normal, accidentes, daños
provocados durante el proceso de envío, alteraciones, uso o
reparaciones no autorizados, negligencia, mal uso, abuso y no seguir
las instrucciones de mantenimiento y cuidados del producto�
Esta garantía le otorga a usted, el adquiriente original, derechos
legales específicos y puede que tenga otros derechos que varían
entre estados o provincias� Este producto no está diseñado para
uso comercial�
Política de Devolución de 90DÍAS
Si por algún motivo no está completamente satisfecho con
el desempeño de este producto, puede devolverlo dentro de
noventa(90)días a partir de la fecha de compra y recibir un reembolso
total, adjuntando el recibo de venta�
Visite nuestro sitio: www�dewalt�com para registrar su nuevo
producto DEWALT y mantenerse al tanto de nuevos productos y
ofertas especiales�
Table of contents
Languages:
Other DeWalt Batteries Charger manuals

DeWalt
DeWalt DW911 User manual

DeWalt
DeWalt DXAEOBD User manual

DeWalt
DeWalt XR Li-Ion DCB118 User manual

DeWalt
DeWalt DW0249 User manual

DeWalt
DeWalt DCB107 User manual

DeWalt
DeWalt DCB107 User manual

DeWalt
DeWalt DCB100 User manual

DeWalt
DeWalt DE9116 User manual

DeWalt
DeWalt DCB115 Series User manual

DeWalt
DeWalt DCB101 User manual

DeWalt
DeWalt DE9135 User manual

DeWalt
DeWalt DCB107 User manual

DeWalt
DeWalt DW9109 User manual

DeWalt
DeWalt DC9000 User manual

DeWalt
DeWalt XR DCB115 User manual

DeWalt
DeWalt DXAEC801B User manual

DeWalt
DeWalt T STak DWST17510 User manual

DeWalt
DeWalt DC011 User manual

DeWalt
DeWalt DW9116 User manual

DeWalt
DeWalt DCB1800 User manual