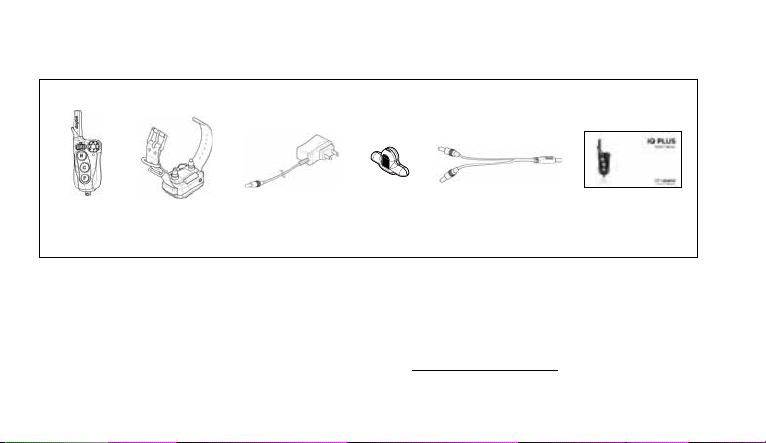
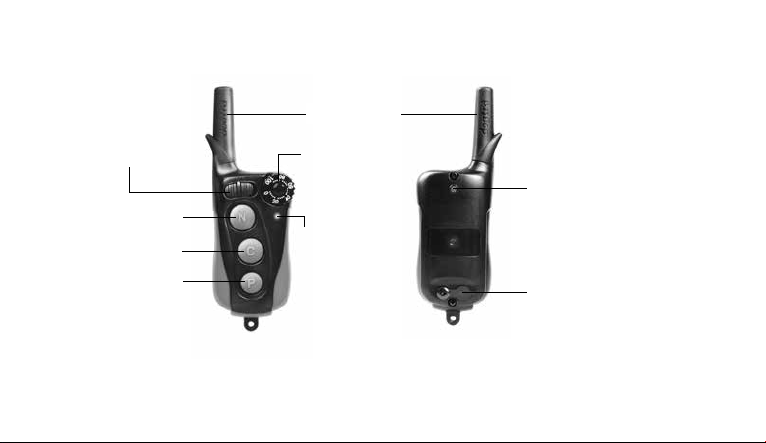
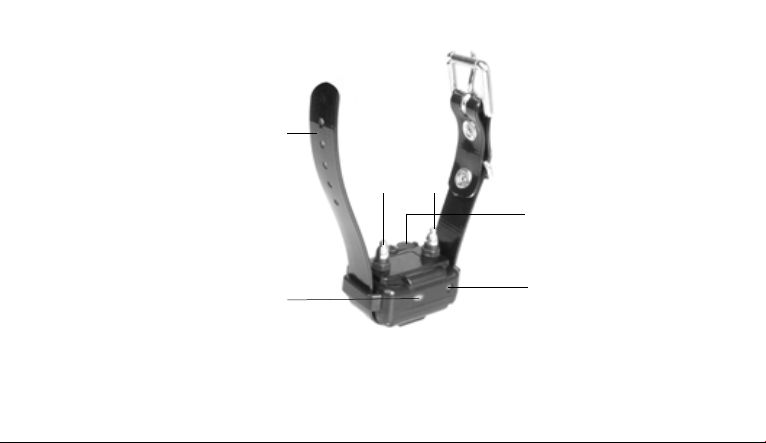
Dogtra iQ PLUS User manual

1
iQ PLUS
EXPANDABLE TO 2-DOG SYSTEM
Owner’s Manual
Please read this manual thoroughly before
operating the iQ PLUS training e-collar.

CONTENTS
AT A GLANCE ••••••••••••••••••••••••••••••••••••••••••••••••••••••••••••••••••••••••••••••••••••••••••••••••••••••••••••••••••••••••••••••••••••••
MAIN FEATURES •••••••••••••••••••••••••••••••••••••••••••••••••••••••••••••••••••••••••••••••••••••••••••••••••••••••••••••••••••••••••••••••
OVERVIEW ••••••••••••••••••••••••••••••••••••••••••••••••••••••••••••••••••••••••••••••••••••••••••••••••••••••••••••••••••••••••••••••••••••••••••
UNDERSTANDING YOUR TRAINING SYSTEM
1. TURNING THE iQ PLUS ON/OFF •••••••••••••••••••••••••••••••••••••••••••••••••••••••••••••••••••••••••••••••••••••••••
2. TRANSMITTER BUTTON FUNCTION ••••••••••••••••••••••••••••••••••••••••••••••••••••••••••••••••••••••••••••••••••
3. RECEIVER FITTING ••••••••••••••••••••••••••••••••••••••••••••••••••••••••••••••••••••••••••••••••••••••••••••••••••••••••••••••••••
4. FINDING THE RIGHT STIMULATION ••••••••••••••••••••••••••••••••••••••••••••••••••••••••••••••••••••••••••••••••
5. MAXIMIZING THE DISTANCE •••••••••••••••••••••••••••••••••••••••••••••••••••••••••••••••••••••••••••••••••••••••••••••••
6. LED INDICATOR ••••••••••••••••••••••••••••••••••••••••••••••••••••••••••••••••••••••••••••••••••••••••••••••••••••••••••••••••••••••••
7. CHARGING THE BATTERY ••••••••••••••••••••••••••••••••••••••••••••••••••••••••••••••••••••••••••••••••••••••••••••••••••••
8.CODE SETTING •••••••••••••••••••••••••••••••••••••••••••••••••••••••••••••••••••••••••••••••••••••••••••••••••••••••••••••••••••••••••
GENERAL TRAINING TIPS •••••••••••••••••••••••••••••••••••••••••••••••••••••••••••••••••••••••••••••••••••••••••••••••••••••••••••••
MAINTENANCE ••••••••••••••••••••••••••••••••••••••••••••••••••••••••••••••••••••••••••••••••••••••••••••••••••••••••••••••••••••••••••••••••••
TROUBLESHOOTING GUIDE •••••••••••••••••••••••••••••••••••••••••••••••••••••••••••••••••••••••••••••••••••••••••••••••••••••••••
WARRANTY AND REPAIR INFORMATION ••••••••••••••••••••••••••••••••••••••••••••••••••••••••••••••••••••••••••••••
6
7
8
10
11
13
14
15
16
17
19
20
22
23
26

6
Optional Accessories
Auto Charger: The auto charger for the iQ PLUS has an input of 12-volts to
24-volts and has an output of 5-volts 1000mAh.
European Charger: designed for use with 220V AC electrical outlets.
To purchase optional accessories, please visit www.dogtra.com or call our
customer service at (888) 811-9111.
AT A GLANCE
Transmitter Receiver Battery Charger Splitter Cable Owner’s Manual
Test Light

7
MAIN FEATURES
Expandable to a
2-Dog System
100-Level
Front Facing Dial
Nick/Constant
Stimulation &
Pager Vibration
For Dogs as
Small as 10 Ibs
400-Yard Range Ultra Compact
Receiver
NC
P
400 yd
Lev. 100
10 Ibs

8
OVERVIEW
Nick
Constant
Pager
Rheostat
Dial
1st Dog/2nd Dog
Toggle Switch
LED Indicator
Light
On/Off Magnetic
Red Dot
Battery Charging
Receptacle &
Rubber Plug
iQ PLUS
Transmitter
Antenna

9
Collar Strap
LED Indicator
Light
Contact points
iQ PLUS
Receiver
Contact
Points
Battery Charging
Receptacle &
Rubber Plug
On/Off Magnetic
Red Dot

10
To turn the receiver on, place the red dot
on the back of the handheld transmitter
to the red dot on the receiver. Hold the
two red dots together for a moment until
the LED light on the receiver comes on.
To turn the receiver off, repeat the same
procedure holding the two red dots
together momentarily. The LED light will
turn red for a brief moment indicating
that the receiver is now off.
The handheld transmitter does not have
an on/off button and it will only activate
when the buttons are pressed.
UNDERSTANDING YOUR TRAINING SYSTEM
1. TURNING THE iQ PLUS ON/OFF

11
N - Nick button
When the Nick button is pressed, the
receiver emits a single rapid pulse of
electrical stimulation.
C - Constant button
Pressing the Constant button gives
continuous stimulation as long as
the button is pressed, for up to 12
seconds. If the button is not released
after 12 seconds, the stimulation will
automatically turn off as a safety feature.
P - Pager button
Pressing the Pager button will give a
vibration for as long as the button is
pressed, for up to 12 seconds.
2. TRANSMITTER BUTTON FUNCTION

12
1st Dog/2nd Dog Toggle Switch
The 1st Dog/2nd Dog Toggle Switch is on
the left of the Rheostat Dial.
I - 1st Dog
Slide the switch to the left underneath “I”
and press any of the buttons to operate
the first receiver.
II - 2nd Dog
Slide the switch to the right underneath
“II” and press any of the buttons to
operate the second receiver.
1st Dog 2nd Dog

13
3. RECEIVER FITTING
Proper Fit
The receiver should be fitted so that the
medical grade stainless steel contact
points press firmly against the dog’s
skin. You should be able to fit two fingers
underneath the collar strap. The best
location is on either side of the dog’s
windpipe.
Improper Fit
A loose fit can allow the receiver to move around on the dog’s neck. When this happens,
the contact points may rub against the skin and cause irritation. If the receiver is too
loose, the contact will not be consistent and cause the corrections to be inconsistent.
Dogtra uses medical grade stainless steel contact points and anti-microbial plastic to
protect the dog’s skin.

14
The iQ PLUS has a Rheostat Dial on the
front of the transmitter (0 is the lowest
and 100 is the highest). Remember
that you will need to adjust the setting
(upward or downward) depending on
your dog’s temperament and threshold
for stimulation. Always start at the
4. FINDING THE RIGHT STIMULATION
Attention!
Leaving the receiver in the same
location on the dog’s neck for an
extended period of time can cause
skin irritation due to the sensitivity
from the contact points. If the dog is
to wear the receiver for long periods,
occasionally reposition the receiver
every few hours so that the contact
points are moved to a different
location on the dog’s neck and remove
the receiver after 8 hours of usage.
Make sure you check for skin irritation
each time you use the unit.

15
5. MAXIMIZING THE DISTANCE
The iQ PLUS has a 400-yard range.
Depending on the way you use your
transmitter, the transmitter range may
vary. To get the greatest range, hold the
transmitter away from your body and
avoid touching the antenna. Keep your
unit properly charged for maximum
signal strength.
Typical range
Maximum range Minimum range
lowest level and work your way up. The
appropriate level can be found when the
dog responds to the stimulation with a
mild reaction. Also, as the dog’s attitude
changes, especially during times of
increased excitement or distraction, you
may need to adjust the intensity level.
Note: The stimulation intensity can be
adjusted even when the stimulation is in
use.

16
The LED indicator flashes every 4
seconds when the receiver is on and
ready for use. The LED indicator will
light up on both the transmitter and the
receiver when the transmitter buttons
are pressed. The LED color indicates
battery life level.
6. LED INDICATOR
Green = Full charge
Amber = Medium charge
Red = Needs charge
If the unit is used while the LED indicator
is red, it may shut down automatically.

17
7. CHARGING THE BATTERY
The Dogtra iQ PLUS uses a lithium
polymer battery. Recharge the unit if the
indicator light is red, the unit does not
turn on, or the system will not stay on
when any button is pressed.
NOTE 1: Only use Dogtra-approved
batteries, chargers, and accessories for
your Dogtra e-collars. This will prevent
any damage that can be incurred from
attempting to use a different charger.
NOTE 2: The unit has a partial charge
when it leaves the Dogtra facility. Upon
receipt of the system, be sure to give
it a full 2-hour initial charge before
the first use away from any flammable
substances.
NOTE 3: When a charger is not in use,
disconnect it from the power source.
Fully charge the batteries if the unit is to
be stored without use for a period of 3
months or more.

18
1. Open the rubber plugs on the battery
charging receptacles and plug in the
charging cable.
2. Plug the charger into a 120-volt wall
outlet or, if using the auto charger,
plug into a cigarette lighter only for
lithium polymer batteries (use a 220
volt European charger for Europe).
All indicator lights should glow red
when properly charging and the unit
will automatically shut off during the
charging process. You will need to turn
the unit on again before use once the
unit is fully charged and unplugged
from the battery cable.
3. The lithium polymer battery is fully
charged within 2 hours. The lights will
stay red during the charging process
and turn green once the unit is fully
charged.
4. After charging, cover the battery
charging receptacles with the rubber
plugs.
Follow the steps below to charge your system:

19
8. CODE SETTING
Coding the 1st Dog Position:
1. Set the Rheostat Dial to 0 and place
the toggle switch in “I” position.
2. With the receiver turned off, place the
red dot on the back of the transmitter
to the red dot on the receiver. Hold
the two red dots together for about
5 seconds until the green LED blinks
rapidly on the receiver.
3. While the green LED is rapidly blinking
on the receiver, separate the two
devices and press the two top buttons
(Nick & Constant) simultaneously on
the transmitter. The LED light on the
receiver will blink every 4 seconds
when coding is complete.
Coding the 2nd Dog Position:
1. Set the Rheostat Dial to 0 and place
the toggle switch in “II” position.
2. With the receiver turned off, place the
red dot on the back of the transmitter
to the red dot on the receiver. Hold
the two red dots together for about
5 seconds until the green LED blinks
rapidly on the receiver.
3. While the green LED is rapidly blinking
on the receiver, separate the two
devices and press the two top buttons
(Nick & Constant) simultaneously on
the transmitter. The LED light on the
receiver will blink every 4 seconds
when coding is complete.

20
GENERAL TRAINING TIPS
Your dog must know some basic
obedience commands before beginning
training with the iQ PLUS. A dog learns
by first being shown a command,
followed by lots of repetition over an
extended period. As the dog becomes
proficient at these commands, the trainer
can introduce distractions and different
locations to strengthen them.
Obedience Training on the Leash
Your dog must fully understand the
obedience commands (sit, stay, here,
heel, and kennel) before using the
e-collar for reinforcement of these
commands. A leash attached to a
standard collar is used to "teach" the dog
the basic obedience commands (here,
heel, sit, and stay). A tug on the leash/
collar is used to reinforce the command.
When the dog complies with the
command, use positive reinforcement/
praise. Once the dog understands these
commands, the e-collar can be used to
reinforce them.
Beginning E-Collar Training
When you feel your dog understands
the obedience commands on the leash
we can now start with the e-collar
training. With the dog on the leash and
wearing the e-collar, continue with your

21
obedience drills. Apply light stimulation
(Nick or Constant) when a command is
given; the stimulation can be removed
as the dog complies. Through repetition,
the dog learns to perform the command.
The final step is the avoidance phase in
which the dog learns that he can avoid
the stimulation altogether by performing
your commands. When these training
procedures are complete, the e-collar
is used as a reminder when the dog
does not comply with your commands
at home or in the field. Keep your initial
training sessions short and positive as
dogs have a short attention span.
How Much Stimulation to Use
Always start with low levels of
stimulation and work your way up
depending on the disposition of your
dog and the given situation. By using
the correct amount of stimulation to get
your point across, you will have a more
controllable environment and a dog
that is under less stress. Animals (and
humans) perform better in a less stressful
environment.
For more training information, please
visit our website at
www.dogtra.com.

22
Basic Maintenance
Make sure the rubber charging cap is
securely in place when the receiver is in
use. After each training session, carefully
inspect the unit for any missing parts
or damage to the casing. Damaged or
broken casing may affect the waterproof
guarantee on the unit. After confirming
that there is no damage to the casing,
rinse the receiver and clean out any dirt
or debris.
Storage Maintenance
The iQ PLUS should be fully charged
before storing for extended periods.
While in storage, the unit should be
given a full charge once a month and
before the first use. Store the units in
room temperature. Do not keep the units
exposed to extreme climates.
Troubleshooting
If the unit is malfunctioning, please refer
to the “Troubleshooting Guide” before
sending it to Dogtra for service. If you
have any questions or concerns, you may
customer service at (888) 811-9111.
MAINTENANCE

23
1. My dog is not reacting to the system.
- Make sure the receiver and transmitter
are on.
- Make sure the collar strap is tight
enough so both contact points are
touching the dog’s skin.
- The contact points may be too short
for your dog’s thick or long coat. You
might need to trim down the hair on
the dog’s neck, so both contact points
are touching the skin.
- The intensity level may be too low
for your dog. Keep increasing the
stimulation until the dog responds
usually by neck movement, head
shaking, looking over his shoulder, etc.
(response may be very subtle so pay
attention.)
2. The LED indicator light comes on, but
I do not feel any stimulation.
- Testing the system at various levels
using the test light is the best way to
test your system. Your tolerance may
be higher than the level you are testing
yourself.
– The battery may be low, so check the
LED light for battery life.
TROUBLESHOOTING GUIDE
Table of contents
Other Dogtra Pet Care Product manuals

Dogtra
Dogtra IQ CLIQ User manual

Dogtra
Dogtra 640C User manual

Dogtra
Dogtra Edge User manual

Dogtra
Dogtra StB-Hawk User manual

Dogtra
Dogtra 280C User manual

Dogtra
Dogtra 2500T series User manual

Dogtra
Dogtra BALL TRAINER User manual

Dogtra
Dogtra FREE PLUS ARC1200S User manual

Dogtra
Dogtra 150NCP User manual

Dogtra
Dogtra 1900S HANDSFREE User manual

Dogtra
Dogtra 3500X User manual

Dogtra
Dogtra 4500 EDGE User manual

Dogtra
Dogtra iQ User instructions

Dogtra
Dogtra ARC HANDSFREE User manual

Dogtra
Dogtra 610C User manual

Dogtra
Dogtra E-Fence 3500 User manual

Dogtra
Dogtra 640C User manual

Dogtra
Dogtra YS 600 User manual

Dogtra
Dogtra 2000T series User manual

Dogtra
Dogtra 175 NCP User manual