Doro 2800 User manual

English
Doro 2800

English
Contents
Overview ........................................................................................................ 1
Congratulations on your purchase ................................................................ 2
Getting started ............................................................................................... 3
Unbox your new phone ......................................................................... 3
Insert SIM card, memory card and battery ........................................... 3
Charge the phone................................................................................... 5
Save energy ............................................................................................ 6
Turn the phone on and off..................................................................... 6
Get to know your phone................................................................................ 7
Assistive functions.................................................................................. 7
Start-up Wizard ...................................................................................... 7
Phone indicators .................................................................................... 7
Notification panel and status bar .......................................................... 7
Descriptions in this document ............................................................... 8
Basic phone operations.......................................................................... 8
Enter text ....................................................................................... 10
Hearing aid compatible........................................................................ 11
Connect the phone to a computer ...................................................... 12
Calls .............................................................................................................. 13
Make a call ........................................................................................... 13
Call from the phonebook ..................................................................... 13
Receive a call........................................................................................ 13
Call information.................................................................................... 13
Call options........................................................................................... 13
SOS calls ............................................................................................... 14
Call log .................................................................................................. 14
Contacts........................................................................................................ 15
Add contact .......................................................................................... 15
Manage phonebook contacts .............................................................. 15
ICE (In Case of Emergency) .............................................................. 17
Assistance button......................................................................................... 18
Make an assistance call........................................................................ 18
Assistance settings ............................................................................... 18
Messages...................................................................................................... 20
Create and send text message (SMS)/picture message (MMS).......... 20
Read and handle messages.................................................................. 21

English
Message settings.................................................................................. 22
Camera ......................................................................................................... 26
Alarm ............................................................................................................ 27
Torch............................................................................................................. 28
Organiser ..................................................................................................... 28
Calendar ............................................................................................... 28
My files................................................................................................. 29
Media ........................................................................................................... 30
Gallery .................................................................................................. 30
FM radio ............................................................................................... 31
Sound recorder .................................................................................... 31
Settings......................................................................................................... 32
General................................................................................................. 32
Display .................................................................................................. 34
Security................................................................................................. 36
Calls ...................................................................................................... 38
Connections.......................................................................................... 40
Sound.................................................................................................... 43
Bluetooth®............................................................................................ 45
Start-up Wizard .................................................................................... 47
SIM ToolKit ........................................................................................... 47
Software update................................................................................... 47
Additional functions..................................................................................... 48
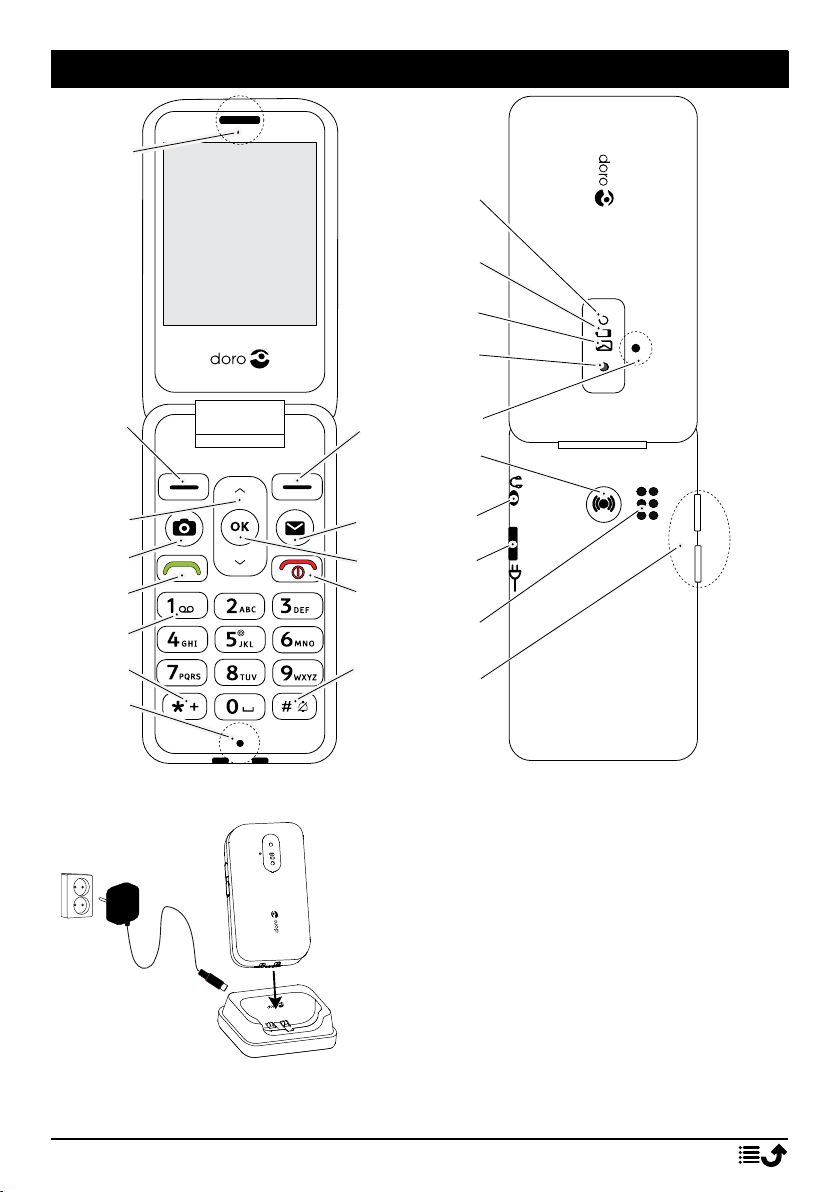
Display status symbols ......................................................................... 48
Display main symbols........................................................................... 48
Safety instructions........................................................................................ 49
Network services and costs ................................................................. 49
Operating environment ....................................................................... 49
Medical units........................................................................................ 49
Areas with explosion risk ..................................................................... 50
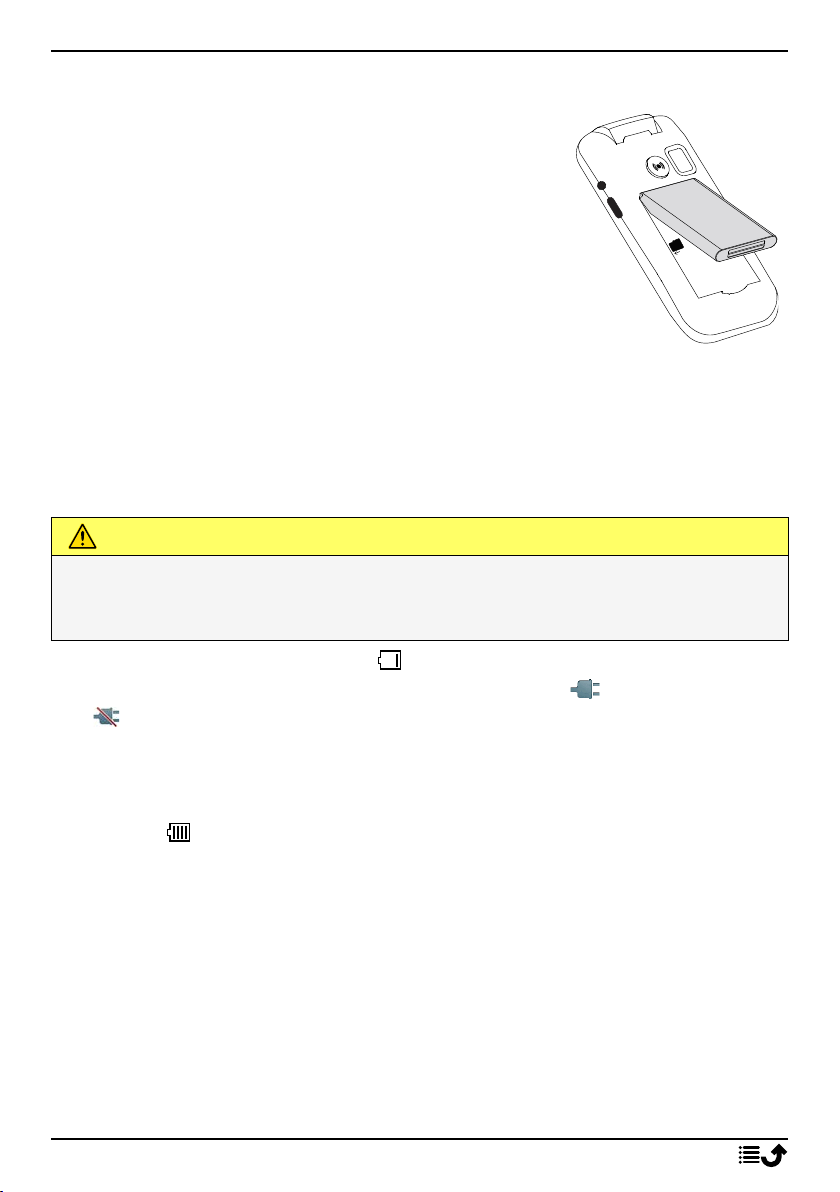
Li-Ion battery........................................................................................ 50
Protect your hearing ............................................................................ 50
Emergency calls.................................................................................... 51
Vehicles ................................................................................................ 51
Protect your personal data .................................................................. 51
Care and maintenance ................................................................................. 51
Warranty ...................................................................................................... 52
Device OS software warranty .............................................................. 53

English
Specifications ............................................................................................... 53
Copyright and other notices ................................................................ 54
Hearing aid compatibility..................................................................... 54
Specific Absorption Rate (SAR) ............................................................ 55
Recycle.................................................................................................. 55
Correct disposal of this product .......................................................... 55
Correct disposal of batteries in this product ...................................... 56
EU Declaration of Conformity.............................................................. 56
Ecodesign declaration, energy efficiency for external power supply . 56
UK Declaration of Conformity.............................................................. 56

English
Overview
Note! All illustrations may not accurately
depict the actual device.
The items supplied with your phone might
vary depending on the software and accesso-
ries available in your region or offered by
your service provider. You can obtain addi-
tional accessories from your local Doro deal-
er. The supplied accessories provide the best
performance with your phone.
1
2
3
4
5
6
7
8
9
10
11
13
12
14
15
16
17
19
20
18
23
21
22
24
1

English
1. Speaker
2. Left selection button
3. Navigation keys
4. Camera shortcut
5. Call button
6. Voicemail
7. International prefix/Symbols
8. Microphone
9. Right selection button
10. Message shortcut
11. OK-button
12. End call/ Power on/off
13. Input method/ Silent mode
14. Camera flash and torch
15. Red light = battery level low /
charging
16. Green light = New message /
missed call
17. Camera lens
18. Assistance button
19. Headset socket
20. Charging socket
21. Second microphone
22. Loudspeaker
23. Volume keys
24. Charging cradle (optional
accessory)
Congratulations on your purchase
Doro 2800 is a stylish 4G clamshell phone that prevents accidental key
presses when folded, and lets you answer and end calls with a simple flip.
Easily call, message and share photos with family and friends thanks to
widely separated, high contrast keys and a large, 2.8" screen. Other fea-
tures include a built-in torch, assistance button, HAC (Hearing Aid Compati-
bility) as well as shortcut keys for the camera and messages.
For more information about accessories or other Doro products please visit
www.doro.com or contact our Helpline.
2

English
Getting started
When you get your phone, you will need to set it up before use.
Tip: Remember to remove any screen protector before you start to use
your phone.
Unbox your new phone
The first step is to unbox the phone and assess the items and equipment
included in the delivery. Make sure to read through the manual so you can
familiarize yourself with the equipment and the basic functions.
•The items supplied with the device and any available accessories may
vary depending on the region or service provider.
•Appearances and specifications are subject to change without prior
notice.
•You can purchase additional accessories from your local Doro retailer.
•Make sure accessories are compatible with the device before
purchase.
•Only use batteries and accessories that have been approved for use
with this particular model. Connecting other accessories may be dan-
gerous and may invalidate the phone’s type approval and warranty.
•Availability of accessories is subject to change depending on manufac-
turing availability. For more information about available accessories,
refer to the Doro website.
Insert SIM card, memory card and battery
The SIM and memory card holder’s are located inside the battery compart-
ment. When you insert cards into the card holder, make sure that you do
not scratch the metallic contacts on the cards.
3

English
Remove the battery cover
IMPORTANT!
Turn off the phone and disconnect the charger
before removing the battery cover.
Be careful not to damage your fingernails when
you remove the battery cover. Do not bend or
twist the battery cover excessively as it may get
damaged.
Insert the SIM and memory cards
Insert the micro-SIM (3FF) card by gently sliding it
into the SIM card slot. Make sure that the SIM
card’s contacts are facing inwards and that the cut
off corner is as shown.
Take care not to scratch or bend the contacts on the
SIM card. Should you need, but have problem to re-
move/replace the SIM card, use adhesive tape on
the exposed part of the SIM card to pull it out.
You may optionally install a memory card in the phone to increase the stor-
age space of your phone to be able to store more files, pictures, videos etc.
Make sure that the memory card’s contacts are facing inwards, as shown
above.
IMPORTANT!
This device accepts micro-SIM card or 3FF. Use of incompatible SIM
cards may damage the card or the device, and may corrupt data stored
on the card.
Use only compatible memory cards with this device. Compatible card
types include microSD, microSDHC, microSDXC, max 128 GB.
Incompatible memory cards may damage the card itself, the device and
corrupt any data stored on the card.
SIM SIM
SIM SIM
SIM SIM SIM SIM
4

English
Insert the battery
Insert the battery by sliding it into the battery
compartment.
Replace the battery cover.
Charge the phone
While it is possible that your phone will already come with enough power
to be turned on right out of the box, we recommend charging the device
fully before using it.
CAUTION
Only use batteries and accessories that have been approved for use with
this particular model. Using unapproved accessories may be dangerous
and may invalidate the phone's type approval and warranty.
When the battery is running low, is displayed and a warning signal is
heard. When the charger is connected to the phone, is displayed briefly,
and when it is disconnected. The battery charge indicator is animated
while charging. It takes approximately 3 hours to fully charge the battery. If
the phone is turned off when the charger is connected to the phone only
the battery charge indicator will be shown on the display. When charging is
completed, is displayed on the screen.
Use a wall power outlet to charge
1. Connect the small head of the charging cable to the charging socket
yon the phone.
2. Plug the power adapter to a wall power outlet.
Use a charging cradle to charge (optional)
1. Connect the small head of the charging cable to the cradle. Place the
phone in the cradle.
2. Plug the power adapter to a wall power outlet.
5

English
Note! To protect the environment we might not provide chargers and USB-
cables with all our products. Your device supports charging with a USB-C
cable and a USB charger that is compliant with applicable country
regulations and international and regional safety standards, such as UKCA
or CE. Do not use USB chargers that do not meet applicable safety
standards. If you use another charger, the power delivered by the charger
must be between minimum 0.60 Watts required by the radio equipment,
and maximum 2.75 Watts in order to achieve the maximum charging speed.
The USB-C charging port does not have audio capability and will not
support connection of a USB-C headset.
Save energy
When the battery is fully charged, disconnect the charger from the device
and unplug the charger from the wall outlet. To save power, the screen
turns off after a while. Press any button to wake the screen up. Full battery
capacity will not be reached until the battery has been charged 3–4 times.
Batteries degrade over time, which means that call time and standby time
will normally decrease with regular use. During extended operation, the
device may feel warm. In most cases, this is normal.
Turn the phone on and off
1. Press and hold on the phone to turn it on or off. Press to
power off.
2. If the SIM card is valid but protected with a PIN code (Personal Identi-
fication Number), PIN code: is displayed. Enter the PIN code and press
. Delete entries with Clear.
Attempts: shows the number of PIN attempts left. When no more attempts
remain, the SIM card must then be unlocked with the PUK code (Personal
Unblocking Key).
Unlock with PUK code
1. Enter the PUK code and press . Delete entries with Clear.
2. Enter a new PIN code and press .
3. Re-enter the new PIN code and confirm with .
Note! If PIN and PUK codes were not provided with your SIM card, please
contact your service provider. If you enter the wrong PUK code more than
10 times the SIM card gets permanently locked.
6

English
Get to know your phone
Assistive functions
Use the symbols below to guide you through supporting sections in the
manual.
Seeing Handling
Hearing Safety
Start-up Wizard
When starting the device for the first time, a Start-up Wizard will be initi-
ated to set some basic settings.
1. Select the wanted language and press .
2. Select the type of setting you want to customise. You can choose to
adjust one or more settings by selecting and pressing . Press Done
when done.
3. You will be provided a short tutorial of the phone’s menu. Press Next
to step through the tutorial. Press Finish to end the tutorial.
Phone indicators
Lights on the phone lid:
•Green light when you have a new notification for a message, missed
call, etc.
•Red light when the battery is running low and during charging.
Notification panel and status bar
At the top of the screen you can see if there are any notifications.
Press to open the main menu to see what applications that have a
notification.
Also at the top of the main screen you can see the status symbols, such as
network signal strength, battery level, Bluetooth activity and more.
7

English
Descriptions in this document
Descriptions in this document are based on your phone’s setup at the time
of purchase. Instructions normally start from the start screen. Press
to reach the start screen. Some descriptions are simplified.
The arrow ( ) indicates next action in step-by-step instructions.
Basic phone operations
Call :
•Dial a number or answer incoming call.
•Enter the call log.
End call/Power on and off :
•End calls or return to the start screen.
•Long press to power on or off.
Options :
Press to see more options available in selected menu. In different menus
and features it will display available options for that feature. Try to always
press this button to explore more options.
Back :
Return to the previous screen.
Assistance :
Press to make an assistance call.
Camera :
Press to initiate the camera app and take a picture or a video.
Messages :
Press to initiate the messaging app and to send a text (SMS) or picture
(MMS) message.
8

English
Navigation keys
•(A) Use the Navigation keys to navigate.
•(B) Use the to open the Menu and to
confirm actions.
Standby (idle mode)
When the phone is ready to use, and you have not keyed in any characters,
the phone is in standby.
Tip: You can always press to return to standby.
Volume keys
Use the up and down buttons to adjust the sound volume during a
call.
See also Volume , p.44 for more information.
Note! If you use a hearing aid or have hearing difficulties when using the
telephone in a noisy environment, you can adjust the phone's audio
settings, see Audio setup , p.43.
Silent mode
You can also set your device to silent mode: press and hold #until ap-
pears. To re-enable ring and message tones, press and hold #until dis-
appears. See also Alert type, p.45 to switch off notification sounds.
Headset
Note! Youmust use a headset with a 3.5 mm stereo plug. The USB-C
charging port does not have audio capability and will not support
connection of a USB-C headset.
When a headset is connected, the internal microphone in the phone is au-
tomatically disconnected. If available, use the answer key on the headset
to answer and end calls.
A
B
9

English
CAUTION
Using a headset at high volume may damage your hearing. Adjust the
volume level carefully when using a headset.
Enter text
Enter text manually
Select character
•Press a numerical key repeatedly until the desired character is shown.
Wait a few seconds before entering the next character. Press Clear to
erase characters.
Special characters
1. Press *for a list of special characters.
2. Select the desired character using the Navigation keys and press
to enter it.
Move the cursor within text
•Use the Navigation keys to move the cursor within the text
Upper case, lower case, numerals and predictive text
•Press #to choose between predictive text, sentence case, lower
case, upper case and numerals. To use predictive text the wanted lan-
guage needs to be selected, see next or Writing language, p.33.
Enter text with predictive text
In some languages you can use predictive text input method which uses a
dictionary to suggest words. See Predictive text, p.34 on how enable/dis-
able the feature.
•Press each key once, even if the displayed character is not the one
you want. The dictionary will suggest words based on the keys you
have pressed.
Example
1. Press 3,7,3,3to write the word “Fred”. Complete the word be-
fore looking at the suggestions.
2. Use the Navigation keys to move the cursor to view the suggested
words.
10

English
3. Press and continue with the next word.
Alternatively, press 0to insert a space and continue with the next
word.
4. If none of the suggested words are correct, use manual input mode.
Note! See Writing language, p.33 for more information.
New word means that you can manually enter a word if its not found in
the dictionary. The entered word will however not be saved in the
dictionary for future use.
Input mode
•Press #to change input mode.
En (or the language
code for the selected
language)
Sentence case with predictive text with first
letter in upper case and the following letters
in the same word in lower case
en (or the language
code for the selected
language)
lower case with predictive text
EN (or the language
code for the selected
language)
UPPER CASE with predictive text
Abc Sentence case
abc lower case
ABC UPPER CASE
123 Numerals
Writing language Select to change writing language, see also
Writing language, p.33
Hearing aid compatible
This phone is hearing aid compatible. Hearing aid compatibility is not a
guarantee that a specific hearing aid will work with a specific phone. Mo-
bile phones contain radio transmitters that may interfere with hearing aid
performance. This phone has been tested for use with hearing aids, for
some of the wireless technologies that it uses, but there may be some
newer wireless technologies that have not been tested yet for use with
hearing aids. To ensure that a specific hearing aid works well with this
phone, test them together before making a purchase.
The standard for hearing aid compatibility contains two types of ratings:
11

English
•M: To use your hearing aid in this mode, make sure that your hearing
aid is set to "M-mode" or acoustic coupling mode, and position the
phones receiver near the hearing aid’s built-in microphone. For the
best results, try using the phone in different positions relative to your
hearing aid—for example, placing the receiver slightly above the ear
may result in better performance for hearing aids with microphones
positioned behind the ear.
•T: To use your hearing aid in this mode, make sure that your hearing
aid is set to "T-mode" or telecoil coupling mode (not all hearing aids
have this mode). For the best results, try using the phone in different
positions relative to your hearing aid—for example, placing the re-
ceiver slightly below or in front of the ear may result in better
performance.
See also Audio setup , p.43 on how you can adjust the audio settings.
Connect the phone to a computer
Connect the phone to a computer to transfer pictures, music and other file
types. Start by connecting a USB cable between the phone and computer.
From your computer's file explorer, you can drag and drop content be-
tween your phone and the computer.
Note! You might not be able to transfer some copyright protected material.
Drag and drop content between phone and a computer
1. Connect your phone to a computer using a USB cable.
2. Wait until the phone or memory card appears as external disks in the
file explorer.
3. Drag and drop selected files between the phone and the computer.
Note! You can transfer files using a USB cable on most devices and
operating systems supporting a USB Mass Storage interface.
Disconnect the USB cable safely
1. Make sure to enable the hardware to be safely removed.
2. Disconnect the USB cable.
Note! Computer instructions may vary depending on your operating
system. See the documentation of your computer's operating system for
more information.
12

English
Calls
Make a call
1. Enter the phone number including the area code. Delete with Clear.
2. Press to make a call.
3. Press to end the call.
Tip: For international calls, always use +before the country code for best
operation. Press *twice for the international prefix +.
Call from the phonebook
1. Press to open the phonebook.
2. Scroll through the phonebook, or quick search by pressing the key cor-
responding to the first letter of the entry, see Enter text , p.10.
3. Press to select an entry and then press to call the selected
entry.
Alternatively, press to call directly.
4. Press to cancel the call.
Receive a call
1. Open the phone and press to answer.
Press to reject the call (busy signal).
To answer an incoming call by opening the phone, see Answer mode,
p.40.
2. Press to end the call.
Tip: Press +or –to temporarily mute the ring signal during an incoming
call.
Call information
During a call, the outgoing or incoming phone number and the elapsed call
time is displayed. If the identity of the caller is withheld or unknown, Pri-
vate or Unknown are displayed.
Call options
Mute
During a call, press Mute to disable the microphone. Press Un-
mute to re-enable the microphone.
13

English
Loudspeaker
During a call, press the right softkey Speaker to activate loudspeaker
mode. Speak clearly into the phone microphone at a maximum distance of
1 m. Press the right softkey Speaker to deactivate loudspeaker mode.
Options
During a call the options button ( ) give access to additional functions.
•Add call to call another number. When the second party is connected
you can again press and then press:
•Merge calls/Split call conference to merge the two calls into a
conference call and then split them again if needed.
•Swap to swap between the two calls.
•Transfer to merge the two calls and disconnect yourself.
•Hold call/Retrieve call to hold/retrieve the current call.
•Mute to disable the microphone. See above.
•End single call to end the current call (same as ).
•End all calls to end all current calls.
Note! For settings related to calling, see Calls, p.38
SOS calls
As long as the phone is switched on, it is possible to place an SOS call by
entering the main local emergency number for your present location fol-
lowed by .
Some networks accept calls to emergency numbers without a valid SIM
card. Contact your service provider for more information.
IMPORTANT!
Mobile phones use radio signals, the mobile phone network, the
terrestrial network and user-programmed functions. This means that
connection cannot be guaranteed in all circumstances. Therefore, never
rely only on a mobile phone for very important calls such as medical
emergencies.
Call log
Received, missed and dialed calls are saved in a combined call log.
1. Press .
14

English
Alternatively, press Call log.
2. Calls are displayed as follows depending on call type:
Incoming call
Outgoing call
Missed call
3. Select wanted entry and press to dial.
Alternatively, select an entry and press to:
•Details to show details for the selected call.
•Call to call the selected number/contact.
•Send message to send a text message.
•Add to contacts to save the number to the contacts.
•Add to new contact to add the number as a new contact.
•Add to existing contact to add the number to an existing
contact.
•Add to blacklist/Remove from blacklist to block/unblock the
number. You will not receive calls or messages from a blocked
number. See Blacklist, p.37.
•Delete to delete the selected entry in the call log.
•Delete all to delete all entries in the call log.
Contacts
Add contact
1. Press to open Contacts Add contact and select where to
save it.
2. Select Set picture and press to add a picture for the contact.
3. Enter Name,Mobile number,Home number,Work number and
choose a special ringtone for calls from the selected contact.
4. Press Save.
Manage phonebook contacts
1. Press to open Contacts.
2. Select a contact and press :
•Add contact to add an entry in the phonebook.
15

English
•Edit to edit the contact. When done, press Save.
•Search contact to search for a contact.
•Add to Top 10 to set the entry as one of the first listed contacts
in the phonebook.
•Delete to delete the selected contact. Press Yes to confirm.
•Delete multiple to delete multiple contacts. Select or search and
select the contacts you want to delete. You can also press
Mark all to select all contacts.
Confirm with to delete the selected contacts.
•Copy contacts to copy contacts from/to phone and SIM memory.
•Copy from: select from where you would like to copy.
•Copy to: select where the contacts should be copied to.
•Press Copy to select the contacts that should be copied. Use
Mark all to select all contacts.
•Press OK to start copying.
•Send vCard to send the selected contact as a vCard via selected
method.
•Send message to send a message. See Create and send text
message (SMS)/picture message (MMS), p.20.
•Owner number this may be preset by the service provider. If not,
you can set the name and number assigned to your SIM card.
•Speed dial contacts to set speed dial numbers to 2–9. Select
the wanted speed dial number and add/replace/remove contacts.
Press and hold the corresponding key to speed dial.
•Memory status to see status of the phonebook memory.
•Import/Export to copy contacts from/to phone and memory card.
•Import contacts to copy contacts to phonebook from inter-
nal memory or SD card. Select from where you would like to
import and then select the contacts. Press OK to import.
•Export contacts to copy contacts from phonebook to inter-
nal memory or SD card. Select the contacts you would like
to export and then select where the contacts should be
saved.
3. You can also select an individual contact and press , then press :
•Edit to edit the contact. When done, press Save.
•Delete to delete the selected contact. Press Yes to confirm.
16
Table of contents
Other Doro Cell Phone manuals