Doro COMFORT 3000 User manual

English
Doro Comfort 3000

English
1. Extra amplification (boost)
2. Handset volume control
3. Speaker volume control
4. Service access keys
5. Two touch memory
6. Hanging peg for handset
7. Store
8. Message waiting indicator
9. New call indicator
10. Phonebook
11. Caller ID
12. Scroll UP/DOWN
13. OK
14. Clear
15. Speaker
16. Microphone
17. Recall
18. Redial
19. Mute

English
Installation
This device is intended for the analogue telephone network lines in AT, BE, BG, CH, CY, CZ, DE,
DK, EE, ES, FI, FR, GB, GR, HU, IE, IS, IT, LV, LT, LU, MT, NL, NO, PL, PT, RO, SI, SK, SE.
Connection
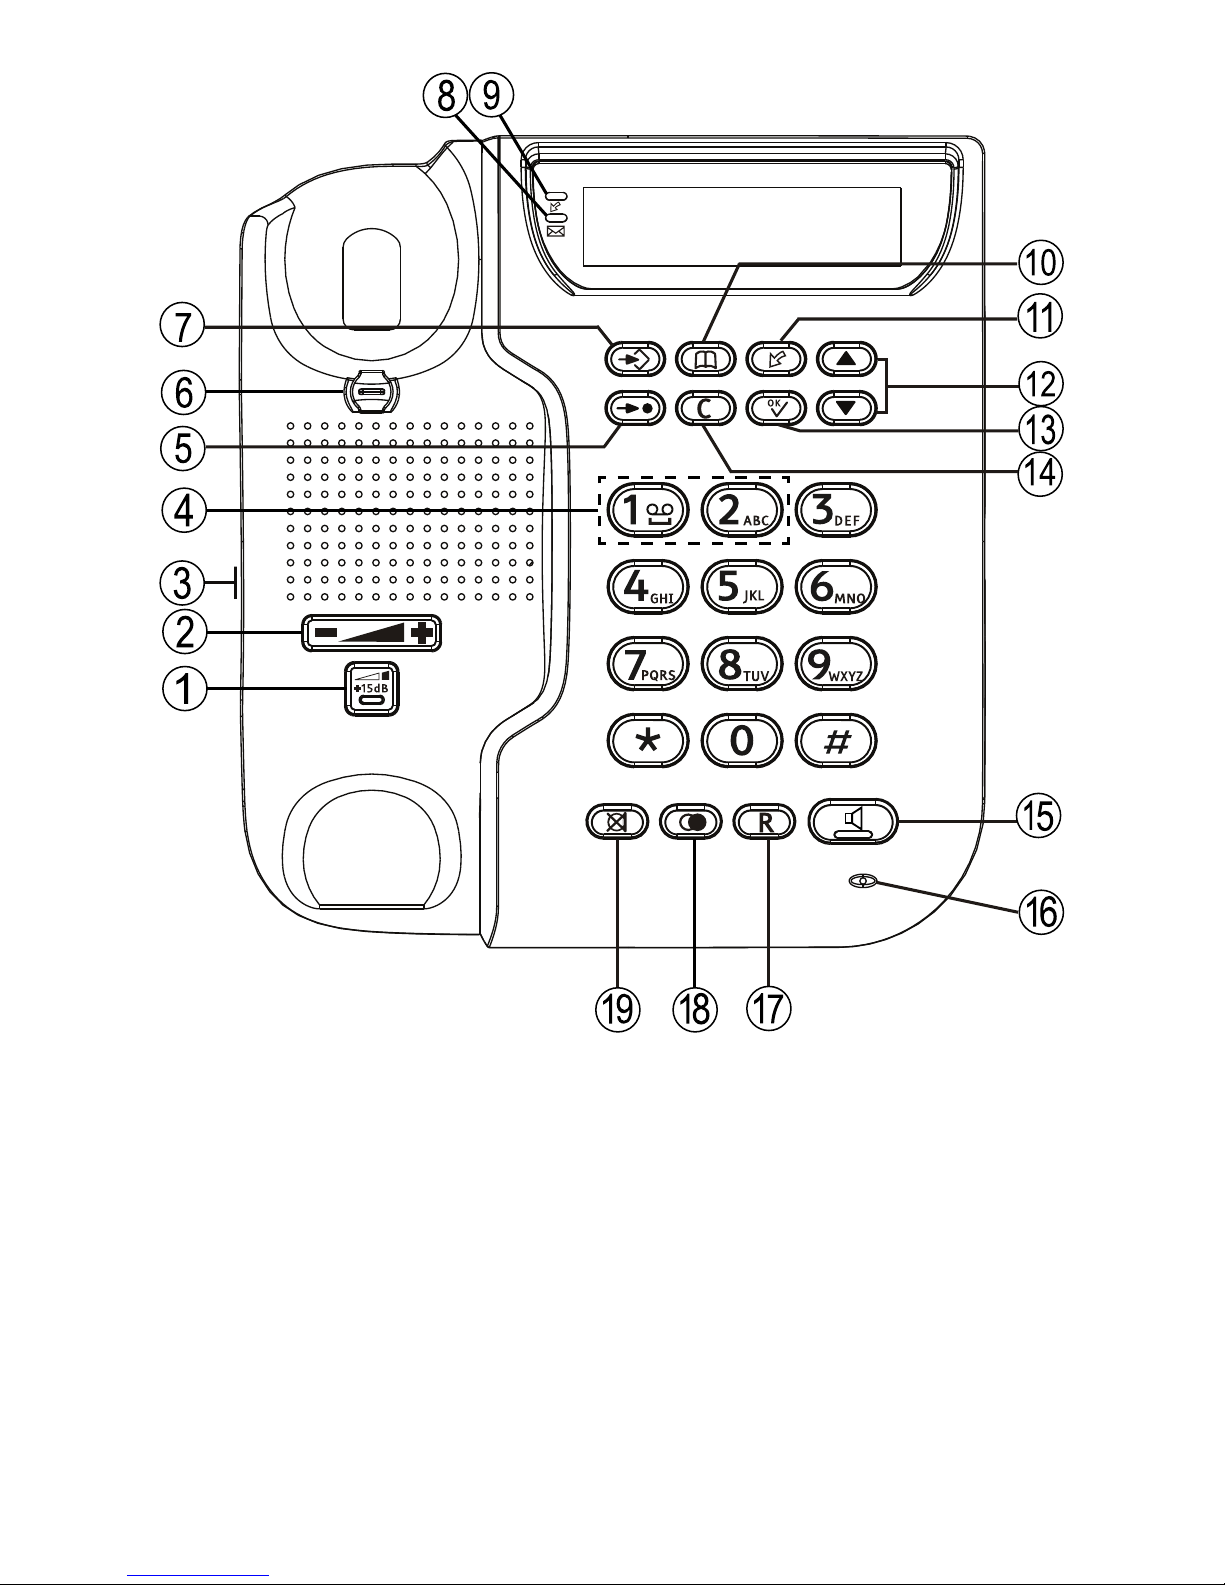
1. Connect the curly cord to the handset and to the socket marked Qon the unit.
2. Connect the mains adapter (if included) to an electrical wall socket and then to the socket
marked DC 9V on the unit.
3. Connect the telephone line cord to a network wall socket and then to the socket marked K
on the unit.
4. Lift the handset and listen for the dial tone.
5. Position the cables in the grooves underneath the unit.
Note! Use supplied telephone line cord, an existing cord from a previous phone may not be
compatible.
Setup
1. Press p.
2. ENGLISH is displayed.
3. Select desired language using v/V. Press 0.
4. Select desired contrast setting (LCD CONTRAST, 2=normal) using v/V. Press 0.
5. Select desired hour (00-23) using v/V. Press 0.
6. Select desired minute using v/V. Press 0.
7. Select desired day using v/V. Press 0.
8. Select desired month using v/V. Press 0.
9. Select TONE or PULSE using v/V. Press 0.
Note! If unsure of which mode to use, select TONE as this works in most locations.
10. Select FLASH TIME using v/V(100 for EU/GB/AUS, 270 France/Portugal and 600 New
Zealand). Press 0.
11. NEW CALL IND. is displayed, press 0. Enable/disable the LED indicator for new calls. Select
ON/OFF, and confirm with 0.
12. Buttons 1and 2can be programmed with service access numbers. SERVICE ACCESS is
displayed, press 0. Use v/Vto select KEY 1 or KEY 2, and then press 0. Use the keypad
to edit/enter the access number. Press 0. Enter the name for the service. Press 0.
Note! SERVICE ACCESS/KEY 1 can be pre-configured to France Telecom voicemail service (3103).
Changing the clock, language or contrast
If you wish to change the settings for time or language etc. later on, repeat steps as above.
Batteries
4 x AAA alkaline batteries are needed for the display and speakerphone operation.
If mains adapter is included, the batteries are needed for the display and speakerphone opera-
tion in the event of a power cut.
When
is displayed, replace all 4 batteries. Use only good quality batteries.
1. Unplug the telephone cord and remove the battery cover.
2. Insert the batteries (4 x AAA) ensuring that the correct battery polarity is observed.
1

English
3. Replace the battery cover and connect the telephone cord.
Wall mounting
The phone can be wall mounted.
WARNING
Make sure that no cables, water pipes or gas pipes are located inside the wall before drilling
into it.
1. Drill two holes in the wall, vertically 102 mm apart.
2. Insert the screws, allowing them to project ~5 mm out from the wall.
3. Unplug and remove the handset.
4. Position the phone so that the screws on the wall fit into the slots in the bracket, then slide
the phone downwards until it is hanging on the screws.
5. Activate the hanging peg (located by the hook switch) by rotating it 180 degrees.
6. Replace the handset, on the hanging peg, in the hook switch.
Operation
The display
In standby mode the date and time is indicated on the display, the total number of calls that have
been stored in the Caller ID memory, and the number of new calls. See also Message, p.6.
Timer
During a call the display shows a call timer, indicating the duration of the call. The timer is a sim-
ple way to help you keep track of how long the call lasts.
Make a call
Normal call
1. Lift the handset.
2. Enter the phone number.
Pre dial
Pre dial allows you to enter and change a phone number before it is dialled.
1. Enter the phone number. Delete with c.
2. Lift the handset to dial.
Re dial
Re dial allows you to call the last dialled phone numbers.
•Lift the handset and press rto dial the most recently dialled phone number.
•Repeatedly press rto scroll through the dialled numbers. Lift the handset to dial the phone
number.
Handsfree/speakerphone
It is only possible for one person at a time to talk in handsfree mode. Avoid loud background
noises, e.g. music, as this interferes with the handsfree function.
1. Press
to activate the handsfree function.
2. Enter the phone number.
2

English
3. Press
to end the call.
Tip: You can switch between handset and handsfree mode during a call, press or lift the
handset.
Service access dial
Shortcut keys to operator service access numbers.
1. Press and hold or 1or 2until the service access number is displayed.
2. Lift the handset, press 0or
to dial.
Mute
Press and hold zto disconnect the handset's microphone, release zto resume the
conversation.
Volume control
The handset volume may be adjusted during a call with
.
To adjust the speakerphone volume (handsfree), use located on the side of the phone.
Extra amplification (boost)
Press the
button to activate amplification. When activated the Amplifier on light is lit. The
amplification is deactivated at the end of each call to avoid harming people with normal hearing.
WARNING
The handset/headset volume can be turned up very loud. The amplification should only be
used by people with impaired hearing ability.
Hearing aid compatible
WARNING
Do not use extra amplification (boost) together with a hearing aid if not necessary. The handset
volume can be turned up very loud.
This telephone is hearing aid compatible. Select the T-mode on your hearing aid to use this fea-
ture. Hearing-aid compatibility is not a guarantee that a specific hearing aid will work with a spe-
cific telephone. To ensure that a specific hearing aid works well with this telephone, test them
together before making a purchase.
T: To use your hearing aid in this mode, make sure that your hearing aid is set to "T-mode" or tele-
coil coupling mode (not all hearing aid have this mode). For the best results, try using the tele-
phone in different positions relative to your hearing aid-for example, placing the receiver slightly
below or in front of the ear may result in better performance.
Connecting a headset
You can connect a headset to the socket =. When a headset is connected the speaker key
is
used to connect/disconnect a telephone call (equivalent to lifting handset and to hang up).
The volume in the headset can be adjusted during a call using v/V.
A neck loop/extra handset can be connected to this socket instead of a headset. DORO original
headsets are tested and adapted for this model. Other types and makes of headsets may be
3

English
used, though the function and sound quality cannot be guaranteed. In the worst case, these could
damage the headset and phone. This type of damage is not covered by the telephone’s
guarantee.
Selecting headset or handsfree mode
Select headset-/handsfree mode by setting the switch =/
on the back of the phone.
Note! On delivery, the phone is set to handsfree mode. The handsfree function will not work when
the headset function is activated and vice versa.
Ringer
The ringer volume can be set using the switch on the back of the phone, melody and tone can be
set using the switches located under the battery cover.
Ringer volume
Ringer tone
Ring melody
Two touch memories
You can use the numerical keys 0–9as two touch memories. Once a number has been stored
as two touch memory, you only need to press two keys to make a call.
Storing two touch memories
1. Press
, until is displayed.
2. Press and hold puntil STORE NUMBER is displayed.
3. Enter the phone number. Press p.
4. Enter the name. Press p.STORAGE PLACE? is displayed.
5. Select 0–9by pressing the corresponding key. SAVED is displayed
Two touch dialling
1. Lift the handset.
2. Press Mand select relevant memory location 0–9.
Phonebook
The phonebook will store 50 sets of names and phone numbers. Contacts in the phonebook are
arranged alphabetically. Each name can be up to 16 characters in length, and phone numbers
can be up to 22 digits in length.
If you subscribe to a Caller ID service, the name/number of the caller will be shown when you re-
ceive an incoming call (for those numbers stored in the phonebook or the memories).
Note! To access the phonebook features make sure that bis displayed. If
is displayed, press
b.
Character table
Each number key has been allocated certain characters.
4

English
1[Espace] + & - / X 1
2A B C Å Ä Æ æ å ä ß 2
3D E F ë 3
4G H I ï 4
5J K L 5
6M N O Ñ ñ Ö əö 6
7P Q R S 7
8T U V Ü ü 8
9W X Y Z 9
*` @ ( ) * < >
0, . : ? = 0
#$ _ % ! #
Storing contacts
1. Press b.
2. Press and hold puntil SAVE? is displayed. Press p.
3. Enter the phone number. Press p.
4. Enter the name. Press the corresponding digit key for the first letter, one or more times, see
Character table.
5. Press p.SAVED is displayed.
If you need to insert a pause in the phone number press r. Mistakes can be erased with c.
Dialing from the phonebook
1. Press b.
2. Scroll using v/V. Quick search by pressing the corresponding digit key for the first letter,
one or more times, see Character table.
3. Press 0, and lift the handset.
Edit contacts
1. Press b.
2. Scroll to the desired entry using v/V.
3. Press and hold puntil EDIT? is displayed.
4. Press and hold p.
5. Correct/change the number using cand v/V. Press p.
6. Correct/change the name, see Character table. Press p.SAVED is displayed.
Deleting contacts
1. Press b.
2. Scroll to the desired contact using v/V.
3. Press cthe display shows DELETE?.
4. Hold cdown until the number disappears.
5

English
Deleting all contacts
1. Press b.
2. Press and hold cuntil DELETE ALL? is displayed.
3. Hold cdown until the displayed number disappears.
Caller ID (caller identification)
Caller ID allows you to see who is calling before you answer a call and to see who has called in
your absence. If the number is stored in the phonebook, the caller’s name will be shown. Re-
ceived calls are stored chronologically, the sequential number shown on the display.
When the Caller ID memory is full, the oldest number will be deleted automatically as the new call
is logged. New calls are indicated on the display and indicated with T, the New call indicator (
) flashes.
Note! In order for numbers to be shown you must subscribe to the Caller ID service provided by
your network operator. Contact your operator for more information.
Retrieving and dialling incoming numbers
1. Press
.
2. Press v/Vto scroll through received phone numbers/calls.
3. Press 0and lift the handset.
Message
Apart from phone numbers, the display can show:
OUT OF AREA No information received, e.g. an international call
PRIVATE The call comes from a withheld number or a PBX
TNumber not previously seen
ZSeveral calls have been received from this particular person
qA call is received while using the Call Waiting function
MESSAGE WAITING / 5Message indication*
*Message indication can be erased manually with c.
Deleting phone numbers
1. Scroll to the desired number using v/V.
2. Press c,DELETE? is displayed or press and hold cuntil DELETE ALL? is displayed.
3. Hold down cuntil the number disappears.
Transferring numbers to the phonebook
1. Scroll to the desired entry using v/V.
2. Press and hold puntil COPY NUMBER? is displayed.
3. Press and hold p.SAVED is displayed.
Number and name can be added/edited in the same way as Edit contacts, p.5.
6

English
Other
PBX Message Waiting Indicator
Some PBX systems use a function called Message Waiting. The telephone will indicate when a call
was received by the Message Waiting light (5) next to the display. The switch is located behind
the battery cover on the underside of the telephone.
The MW function operates differently depending on the PBX in question. Please contact the sys-
tem controller for more information. The following 4 alternatives are available: ringer indicator (
), high DC voltage (HV), +and –. When the telephone is used in systems without a PBX, ringer
indicator ( ) should be selected.
Troubleshooting
Check that the telephone cord is undamaged and properly plugged in. Disconnect any additional
equipment, extension cords and other phones. If the problem is resolved, the fault is with some
other equipment.
Test the equipment on a known working line (e.g. at a neighbour’s house). If the equipment works
there the fault is probably with your telephone line. Please inform your network operator. If the tel-
ephone still does not work, contact the place of purchase for service. Don’t forget the receipt or a
copy of the invoice.
Care and Maintenance
CAUTION
Only use batteries, mains adapter and accessories approved for use with this particular model.
Connecting other accessories may be dangerous and may invalidate the phone's type approval
and guarantee. The mains adapter is the disconnect device between the product and mains
power. The mains socket outlet must be close to the equipment and easily accessible.
Your unit is a technically advanced product and should be treated with the greatest care. Negli-
gence may void the warranty.
•Protect the unit from moisture. Rain/snowfall, moisture and all types of liquid can contain
substances that corrode the electronic circuits. If the unit gets wet, you should disconnect it,
remove the battery and allow the unit to dry completely before you replace it.
•Do not use or keep the unit in dusty, dirty environments. The unit’s moving parts and elec-
tronic components can be damaged.
•Do not keep the unit in warm places. High temperatures can reduce the lifespan for elec-
tronic equipment, damage batteries and distort or melt certain plastics.
•Do not keep the unit in cold places. When the unit warms up to normal temperature, conden-
sation can form on the inside which can damage the electronic circuits.
•Do not try to open the unit in any other way than that which is indicated here.
•Do not drop the unit. Do not knock or shake it either. If it is treated roughly the circuits and
precision mechanics can be broken.
•Do not use strong chemicals to clean the unit.
The advice above applies to the unit, battery and other accessories. If the unit is not working as it
should, please contact the place of purchase for service. Don’t forget the receipt or a copy of the
invoice.
7

English
Warranty
This product is guaranteed for a period of 24 months from the date of purchase. In the unlikely
event of a fault occurring during this period, please contact the place of purchase. Proof of pur-
chase is required for any service or support needed during the guarantee period. This guarantee
will not apply to a fault caused by an accident or a similar incident or damage, liquid ingress, neg-
ligence, abnormal usage, non-maintenance or any other circumstances on the user’s part.
Furthermore, this guarantee will not apply to any fault caused by a thunderstorm or any other volt-
age fluctuations. As a matter of precaution, we recommend disconnecting the mains adapter dur-
ing a thunderstorm.
Batteries are consumables and are not included in any guarantee.
Please note that this is a voluntary manufacturer’s warranty and provides rights in addition to,
and does not affect statutory rights of end-users.
EU declaration of conformity
Hereby, Doro declares that the equipment type Doro Comfort 3000 is in compliance with Direc-
tives: 2014/53/EU and 2011/65/EU. The full text of the EU declaration of conformity is available
at the following internet address: www.doro.com/dofc.
8

English
9

English
Version 2.0
© 2017 Doro AB. All rights reserved.
www.doro.com
REV 17578 — STR 20140115
Other manuals for COMFORT 3000
1
Table of contents
Other Doro Telephone manuals