manuals.online logo
Brands
  1. Home
  2. •
  3. Brands
  4. •
  5. Dräger
  6. •
  7. Respiratory Product
  8. •
  9. Dräger X-plore 9300 User manual

Dräger X-plore 9300 User manual

X-plore® 9300
Belt set Instructions for use
3363102 (A3-D-P)
1 Safety-related information
● Before using this product, carefully read the instructions for use.
● Strictly follow the instructions for use. The user must fully understand and
strictly observe the instructions. Use the product only for the purposes
specified in the intended use section of this document.
● Do not dispose of the instructions for use. Ensure that they are retained and
appropriately used by the product user.
● Only trained and competent users are permitted to use this product.
● Comply with all local and national rules and regulations associated with this
product.
● Only trained and competent personnel are permitted to inspect, repair and
service the product. Dräger recommend a Dräger service contract for all
maintenance activities and that all repairs are carried out by Dräger.
● Use only genuine Dräger spare parts and accessories for maintenance
work. Otherwise, the proper functioning of the product may be impaired.
● Do not use a faulty or incomplete product. Do not modify the product.
● Notify Dräger in the event of any component fault or failure.
The latest version and other translations of these instructions for use
can be downloaded in electronic form from the Technical
Documentation database (www.draeger.com/ifu). In light of product
updates, Dräger recommend always using the latest version of the
instructions for use.
2 Conventions used in this document
2.1 Meaning of the warning indicators
Warning indicators are used in this document to provide and highlight text that
requires a greater awareness by the user. The meaning of each of the warning
indicators is defined as follows:
WARNING
Indicates a potential hazardous situation which, if not avoided, could
result in death or serious injury.
CAUTION
Indicates a potentially hazardous situation which, if not avoided, could
result in physical injury, or damage to the product or environment. It
may also be used to alert against unsafe practices.
NOTICE
Indicates additional information on how to use the product.
2.2 Trademarks
The following internet page lists the countries in which Dräger trademarks are
registered: www.draeger.com/trademarks.
3 Description
3.1 Product overview
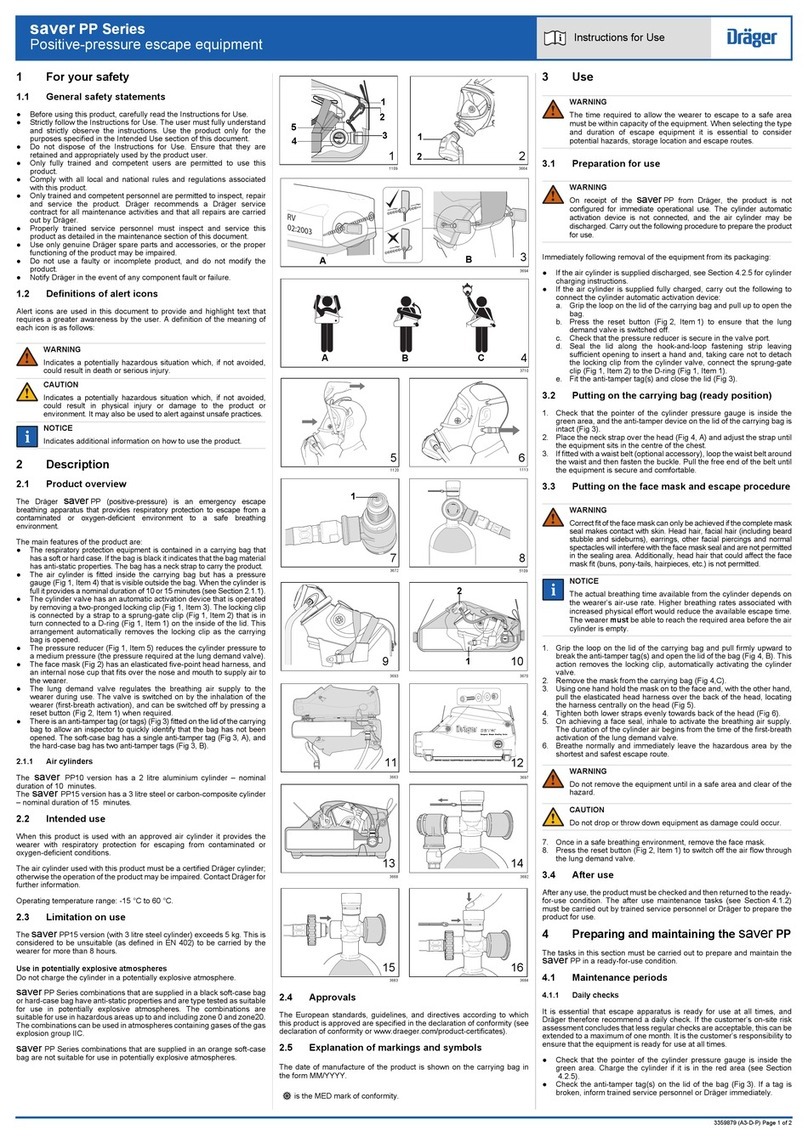
The Dräger X-plore 9300 (Fig. 1) is a belt-mounted manifold that connects an
external breathing air supply (airline) with a facepiece worn by the user. The
manifold has an input connection (5) for connecting the airline and an output
connection (4) for connecting the facepiece by means of a corrugated hose (3)
with a quick connect coupling at each end. The manifold is equipped with a
sound dampener pressed onto the upper part of the output connection. It serves
to reduce the ventilation noise in the facepiece.
During use, a pressure reducer in the manifold delivers a steady flow of air from
the airline into the facepiece. The air flow lies within the safe limit values
required by the facepiece. The X-plore 9300 is available with or without an
adjustable regulator valve (2). Once installed, the regulator valve lets the
wearer of the device adjust the flow of air within the preset limit values.
The whistle (1) is a warning device for low input pressure. The whistle will sound
during use to alert the wearer in the event that the pressure of the breathing air
supply falls below the level necessary for a sufficient supply.
The X-plore 9300 is used with the facepiece of the Dräger X-plore 8000 along
with hoods and protective helmets. The compatible Dräger hoods and Dräger
helmets are classified according to the following table.
For a complete description of the facepiece, see the instructions for use
supplied with the facepiece.
This device is available with optional radio frequency identification (RFID) to
facilitate electronic management and location of devices by means of a radio
frequency reader. When fitted, the passive RFID tag is positioned inside the
manifold casing.
3.1.1 Breathing air supply
The breathing air supply (supply from an airline) is an external breathing air
source that is fed from a breathing air cylinder or a compressor unit; the
breathing air supply delivers the specified air quality with the required pressure
and required flow rate (see section 4.1 for more information).
3.2 Intended use
The X-plore 9300 is designed for use with compressed air respiratory protection
equipment approved by Dräger. It protects the respiratory system from the
effects of hazardous materials. The equipment is only suitable for use with an
airline.
The compressed air respiratory protection equipment and other accessories used
with this device must be certified Dräger components that are used in the
approved configuration. Failure to comply with this requirement can impair the
operation of the device. Contact Dräger for further information.
Use in potentially explosive atmospheres
The suitability for use in potentially explosive atmospheres depends on the
components used. Approval information is specified on the component name
plates. The component with the lowest zone determines the suitability of the
system.
Contact Dräger for more information.
3.3 Limitations on use
The device is not suitable for CBRN hazard situations (chemical, biological,
radiological and nuclear hazard situations).
3.4 Approvals
This product is approved per:
● EN14594:2018
● (EU) 2016/425
● Regulation 2016/425 on personal protective equipment, as amended to
apply in GB
● AS/ NZS 1716:2012
Declarations of conformity: see www.draeger.com/product-certificates.
Important notice regarding the Pressure Equipment Directive (German: DGRL):
The X-plore 9300 is intended for exclusive use with compressed air hose
equipment. It is classified as safe pressure equipment according to the DGRL
under the requirement of good engineering practice. The equipment cannot be
DGRL-certified.
3.5 Marking and symbols
The product type is specified on the label on the manifold casing. The product's
serial number is located on the manifold.
The marking on the air supply hose indicates whether the hose is heat
resistant (H) and/or antistatic (S).
4Use
4.1 Breathing air supply
WARNING
The quality of the breathing air supply must meet the requirements for
breathing air in accordance with EN 12021 in EU countries or AS/
NZS 1715 2009 in Australia and New Zealand. Do not use oxygen or
oxygen-enriched air. The moisture content of breathing air should,
unless otherwise indicated, be kept within the specified limits in order
to prevent the equipment from freezing.
Carry out a risk assessment of the workplace to ensure that it is not
possible to connect to any breathing air supply other than breathable
air.
In highly toxic atmospheres, the device might not offer sufficient
protection.
The user must ensure that the capacity of the respiratory protective
device is sufficient for every user who is connected to it. The user must
also ensure safe exits in case of a failure of the breathing air supply
from the airline.
Use either a breathing air cylinder with a pressure reducer or a stationary or
mobile compressor with an appropriate filter system and air-heating / air-cooling
system. Compliance of the breathing air supply with the quality criteria is
mandatory. It must meet the following requirements for pressure and flow:
● Input pressure 2.8 to 10 bar
● Input flow 200 to 1200 litres/minute (to guarantee the entire
flow range in models with a regulator valve, at least
350 litres/minute are necessary)
For the maximum number of users who can be connected to the Dräger
breathing air supply system at any one time, refer to the instructions for use for
the supply equipment.
It must be possible to move the air supply around a hazardous area if using a
breathing air cylinder arrangement. Conductive floors are mandatory in zone 1
and zone 21 if combustible dusts with a minimum ignition energy of less than
10 mJ are present.
4.1.1 Compressed air supply hose
● The coupling of the airline must be compatible with the coupling at the inlet
of the device. Unless specified otherwise, the inlet is outfitted with a
coupling from the Rectus 96 Series or a male type CEJN quick connect
coupling (Dräger also provides other couplings).
● The maximum working pressure of the Dräger compressed air supply hose
is 10 bar.
● Ensure that supply hoses with a total length greater than 50 m have an
appropriate earth connection.
EU countries
When using a Dräger-approved hose: The hose must not be longer than 100 m
and at most four individual hoses (maximum five hose connections) may be
connected to the airline.
Australia and New Zealand
Approved hoses must be used in order to comply with the AS/NZS regulatory
standard. Hoses between 5 and 30 m, or up to 90 m of connected hoses may
be used.
4.1.2 Pressure drop in the compressed air supply hose
CAUTION
The use of extension hoses causes a pressure drop between the
breathing air supply and the manifold.
► To compensate for the resulting pressure drop, increase the
pressure from the breathing air supply (e.g. ring pipe, compressor)
accordingly.
The following table is a guide that lists examples of breathing air supply
pressures necessary so that a sufficient flow of air is available at the manifold
inlet.
This table only applies if using approved Dräger supply hoses. If using hoses
from other manufacturers, the minimum pressure of 2.8 bar must be available
at the manifold inlet.
Trademark Trademark owner
X-plore®Dräger
Product
type
Facepiece Class per
EN 14594:2018
Helmets Helmet L1Z (3710775),
helmet with visor (R58325/
R59910), protective visor (R59900)
2B
Helmet L3Z (3710785) 3B
Helmet L2Z (3710780) 4A/3B
Helmet L2T2 (3710790),
helmet L3T4 (3710795),
hood T2 (3710776),
hood T4 (3710774)
4A/3B
Hoods R59800, R59810, R59820,
R59830, R59840, R59850,
R59860, R59870
3B
!
!
i
i
Approved body:
BSI Assurance UK Ltd.
Kitemark Court Davy Avenue
Knowlhill
Milton Keynes
MK5 8PP
United Kingdom
Identification number:
Notified body
involved in type approval and quality
control:
DEKRA EXAM GmbH
Dinnendahlstr. 9
44809 Bochum
Germany
Reference number:
Hose lengths in
metres
Pressure in bar Hose lengths in
metres
Pressure in bar
1-10 3.1 51–60 4.6
11-20 3.4 61-70 4.9
21-30 3.7 71-80 5.2
31-40 4.0 81-90 5.5
41-50 4.3 91-100 5.8
0086 0158
!
!
4439
4440
4528
4
4442 4429
6
MAXIMUM
MINIMUM
4446
1
12
3
4
5
3
2
5
X-plore® 9300
Belt set Instructions for use
3363102 (A3-D-P)
3363102
© Dräger Safety AG & Co. KGaA
Edition 04 – 2022-06 (Edition 01 – 2014-08)
Subject to alterations
Importer (UK): Draeger Safety UK Ltd
Ullswater Close,
Blyth Riverside Business Park
Blyth, Northumberland NE24 4RG, UK
Manufacturer: Dräger Safety AG & Co. KGaA
Revalstraße 1 Tel +49 451 882 0
23560 Lübeck Fax +49 451 882 80
Germany www.draeger.com
If the warning whistle still sounds, there may be a pressure loss in the hose due
to the specific conditions of the breathing air supply. In this case, the pressure
must be increased until the warning whistle stops sounding.
4.2 Preparation for use
4.2.1 Product preparation
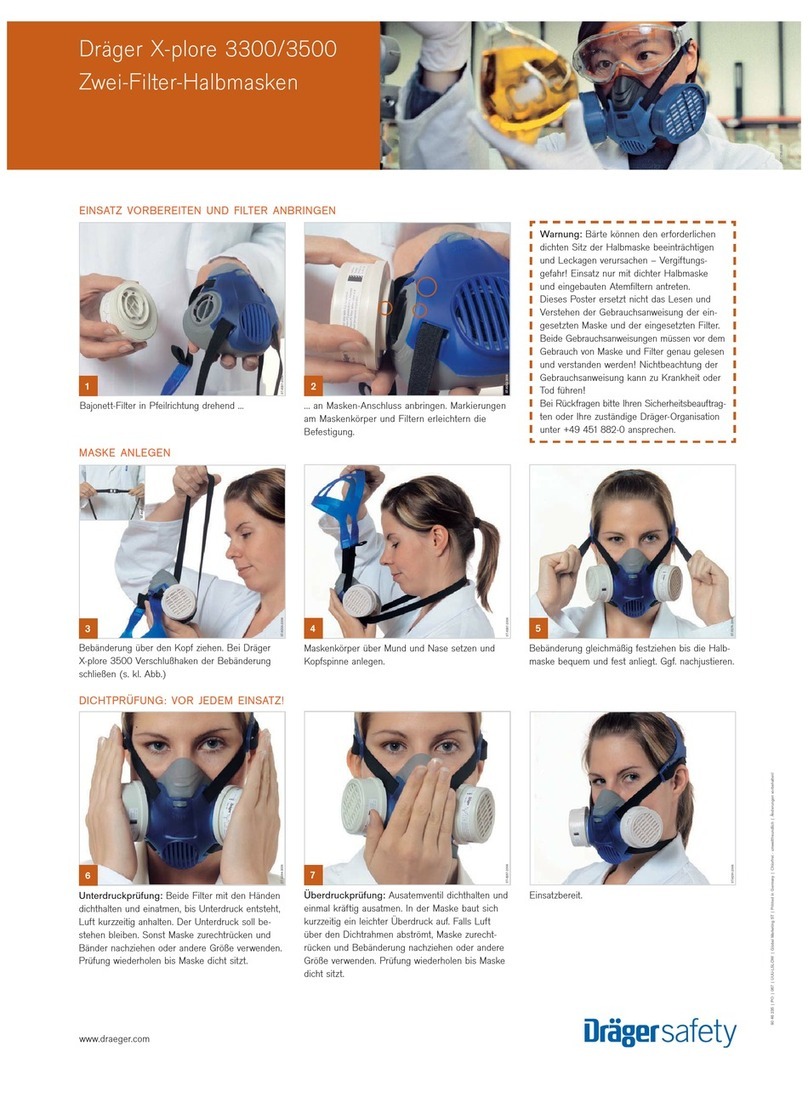
The manifold can be worn on the left or the right side. To change the side,
loosen the belt, remove the back plate (if installed), and rotate the manifold
(Fig. 2). When reassembling, make sure that the tab on the whistle housing
rests under the ridge on the manifold mount (Fig. 3). The manifold must rest on
the hip such that the head can be moved freely without applying any tension on
the hose, and such that there is no risk of it becoming caught on protruding
objects.
1. Carry out a visual inspection (see section 6.2).
2. Don the belt and adjust it as desired. Ensure that the X-plore 9300 is fitted
close to the body.
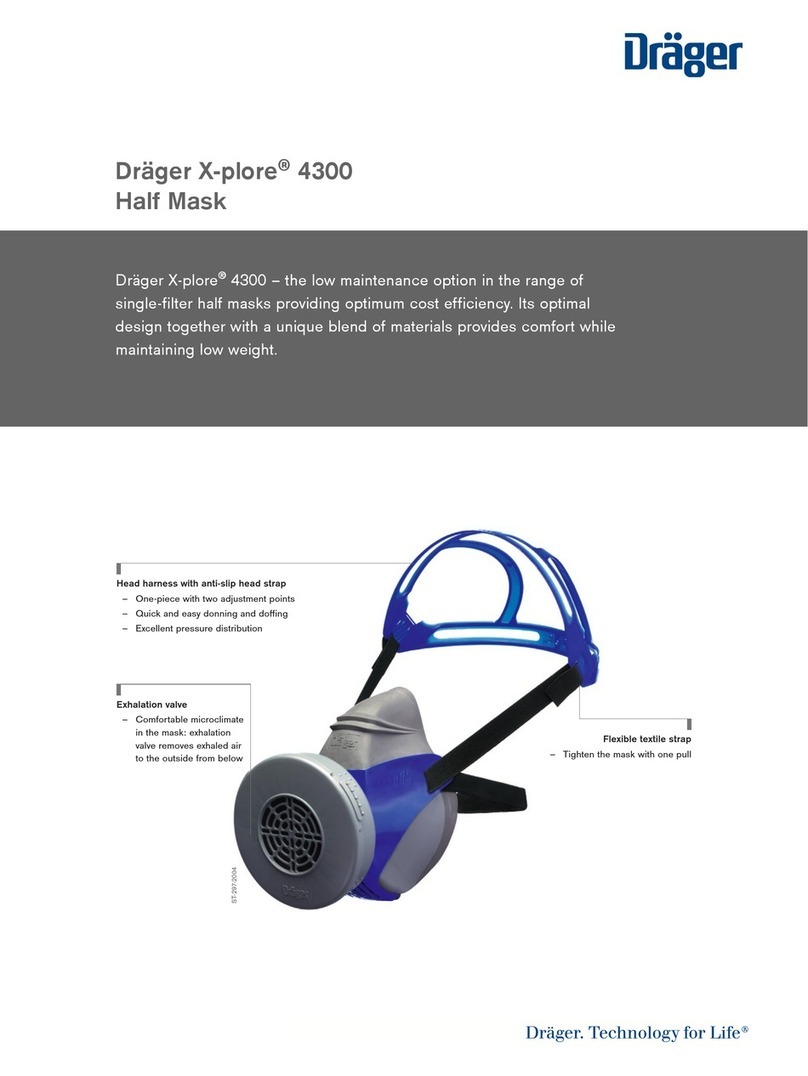
3. Connect the facepiece hose to the output connection, then connect the
facepiece (Fig. 4).
4. Connect the airline supply to the input connection (Fig. 5). The whistle will
sound briefly when the pressure increases.
5. Don the facepiece (see the instructions for use supplied with the hood and
helmet).
6. Do not allow clothing or other parts of the equipment to kink or press on the
pneumatic hoses.
7. Check that there is sufficient air available by taking several deep breaths,
then breathe normally.
4.3 During use
NOTICE
If using earmuffs or noise-isolating communication equipment,
remember that it will be harder to hear the whistle.
Regulator valve: When starting work, set the setting knob to the lowest flow
(Fig. 6 shows the minimum and maximum position). Use the knob to adjust the
air flow based on the demands of the work being performed.
Whistle: If the whistle sounds, cease work immediately and exit the hazard
zone by the shortest and safest route. Do not disconnect the airline supply from
the manifold. Remove the facepiece once no more hazards are present.
4.3.1 In explosion-hazard areas
WARNING
Do not use or store equipment near processes that produce an electric
charge.
Do not use the equipment unless conductive parts of the equipment
have an appropriate earth connection via the wearer.
Do no use materials in combination with the equipment that influence
the properties of the product.
4.4 After use
WARNING
Only remove the equipment in a safe environment.
1. Remove the facepiece (follow the instructions for use supplied with the
facepiece).
2. Remove the airline supply from the input coupling.
3. Remove the facepiece hose from the output connector and the facepiece
inlet.
4. Open the buckle of the waist belt and take off the equipment.
5. Follow the maintenance table and carry out the servicing work that is
required after use (see section 6.1).
5 Troubleshooting
The table shows fault diagnoses and repair information for the user. For more
information on troubleshooting, refer to the instructions for use of the device in
question (e.g. facepiece or air supply equipment).
Contact Dräger or service personnel if the problem persists after carrying out
troubleshooting actions.
6 Maintenance
6.1 Maintenance intervals
Dräger recommend that regular inspection, testing and servicing of the
breathing apparatus is carried out in accordance with the table below. The table
also applies to out-of-use (stored) equipment. Record all maintenance in the
equipment log book. Observe the maintenance information for all equipment
parts that are in use (hood, protective helmet, etc.). Additional inspection and
testing may be required in the country of use to ensure compliance with national
regulations.
6.2 Visual inspection
Carry out a visual inspection, checking the entire respiratory protection
equipment including all components and accessory parts. Ensure that the
device is clean and undamaged. Pay particular attention to the pneumatic
components, hoses and connections. Typical signs of damage that may affect
the operation of the respiratory protection equipment include impact, scratches,
cuts, corrosion and discolouration. Report damage to service personnel and do
not use the equipment until all faults have been rectified.
6.3 Cleaning and disinfecting
CAUTION
Do not exceed 60 °C for drying. Take components out of the drying
system as soon as they are dry. The drying time in a dryer must not
exceed 30 minutes.
Do not immerse pneumatic or electronic components in cleaning
solutions or water. Contact Dräger as required for information
regarding additional cleaning methods for heavily soiled parts.
If water is trapped inside and then becomes frozen in the pneumatic
system or respiratory protection equipment, operation will be restricted.
Prevent entry of liquid; thoroughly dry the respiratory protection
equipment after cleaning to prevent this.
Always clean the Dräger X-plore equipment in a well-ventilated space
or in the open air. Hazardous materials may become deposited in parts
of the equipment.
NOTICE
For use with a welding facepiece, the X-plore 9300 has a leather belt.
Do not clean the leather belt with the cleaning agents listed in
document 9100081. Instead, use a suitable leather cleaning product as
needed.
For information regarding suitable cleaning and disinfecting agents and
their technical details, see www.draeger.com/IFU, document 9100081.
Also follow the instructions for use for the hood and the protective helmet, as
well as for other accessories.
● Use only clean, lint-free cloths.
1. Clean the breathing apparatus manually using a cloth moistened with
cleaning solution to remove excess dirt.
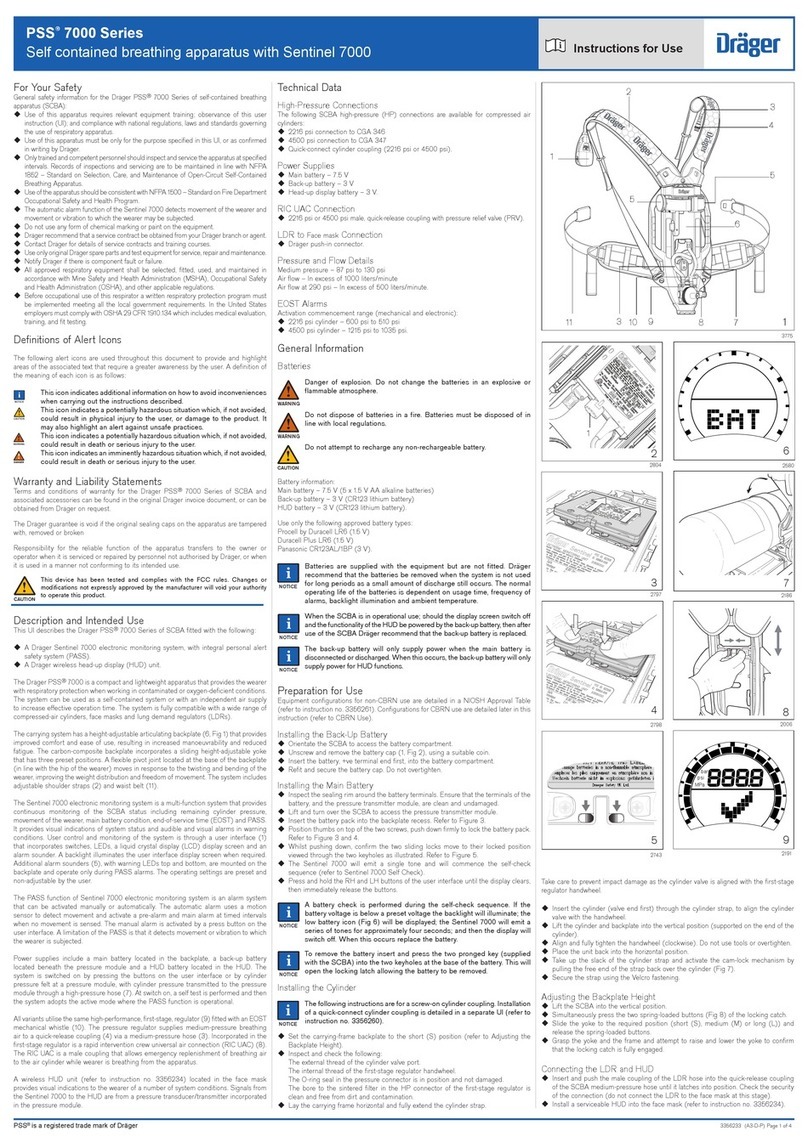
○ If required, take the equipment apart and clean single parts individually.
Fig. 7 shows the disassembled parts individually. Fig. 8 shows how to
feed the belt through the buckle during assembly so that it can be
tightened from behind.
2. Apply disinfectant to all inner and outer surfaces.
3. Rinse all components thoroughly with clean water to remove all cleaning
and disinfecting agents.
4. Dry all components using a dry cloth, in a heated dryer or in air.
5. Contact service personnel or Dräger if disassembly of pneumatic or
electronic components is required.
7Storage
The equipment must be kept in a dry environment free of dust and dirt, where
damage or wear to the equipment cannot occur as a result of abrasion. Do not
expose the equipment to direct sunlight. Route hoses in such a way that the
bend radius is not too acute and the hose is not stretched, compressed or
twisted.
For the temperature range for storage, refer to the technical specifications
(section 9).
8 Disposal
The product has a service life of 10 years starting with the first use. When
necessary, dispose of the device in accordance with national or local
regulations for waste disposal.
9 Technical specifications
Weight (manifold and belt) < 0.5 kg
Belt size (standard size) 38 mm x 750-1450 mm
Belt size (large belt) 38 mm x 750-1950 mm
Whistle volume >90 dBa
Input pressure 2.8 to 10 bar
Input flow 200 to 1200 litres/minute (to guarantee the
entire flow range in models with a regulator
valve, at least 350 litres/minute are
necessary)
Operating temperature -10 to +60 °C
Storage temperature -20 to +40 °C
Symptom Error Remedy
Leak Loose or dirty coupling Remove coupling, clean,
reinstall and test again
Faulty hose or
component
Replace user-replaceable
component and test again
Whistle sounds,
or insufficient air
flow to the
wearer
Air supply is restricted Remove any kinks or
constrictions in the hoses
Faulty hose or
component
Replace user-replaceable
component and test again
Input filter clogged Contact service personnel or
Dräger
Warning signal
sounds
Pressure is too low Increase pressure or shorten
the hose
Whistle does
not work or is
too quiet
Dirty whistle or whistle
cover
Clean whistle and cover as
necessary
Faulty component Contact service personnel or
Dräger
Excessive
ventilation noise
Defective or missing
sound absorber in the
manifold outlet
connection
Ensure that the sound absorber
is installed and undamaged.
Contact service personnel or
Dräger if a replacement is
necessary
Hood inflates
excessively or
the visor fogs up
Check the outlet opening
of the hood/helmet
See instructions for use for
hood
i
i
!
!
Task Before
use
After use Annually
Visual inspection (see notice 1 and
section 6.2)
Note
O Dräger recommendation
1 Clean the equipment if it gets dirty. If the equipment was exposed to
contaminants, disinfect all components that come into contact with skin
directly for extended periods of time.
O O
Functional test (see notice 2)
2 This maintenance task may only be carried out by Dräger or trained service
personnel. Refer to the technical manual for further details about the test.
This manual is issued to service personnel who have participated in
relevant Dräger service training.
O
!
i
i
4433
8
7
'
'
4424

Other Dräger Respiratory Product manuals

Dräger PAS Colt Series User manual

Dräger

Dräger PAS Colt Series User manual

Dräger X-plore 8000 Series User manual

Dräger

Dräger X-plore 8000 Series User manual

Dräger PAS Colt Series User manual

Dräger

Dräger PAS Colt Series User manual

Dräger PARAT 4000 Series User manual

Dräger

Dräger PARAT 4000 Series User manual

Dräger NIV Operating instructions

Dräger

Dräger NIV Operating instructions

Dräger PSS 5000 Series User manual

Dräger

Dräger PSS 5000 Series User manual

Dräger X-plore 1700 User manual

Dräger

Dräger X-plore 1700 User manual

Dräger UCF FireCore User manual

Dräger

Dräger UCF FireCore User manual

Dräger X-plore 6570 User manual

Dräger

Dräger X-plore 6570 User manual

Dräger PARAT C box User manual

Dräger

Dräger PARAT C box User manual

Dräger PARAT 3160 User manual

Dräger

Dräger PARAT 3160 User manual

Dräger PARAT 4000 Series User manual

Dräger

Dräger PARAT 4000 Series User manual

Dräger X-plore 9500 User manual

Dräger

Dräger X-plore 9500 User manual

Dräger saver PP Series User manual

Dräger

Dräger saver PP Series User manual

Dräger Panorama Nova S - PE/ESA User manual

Dräger

Dräger Panorama Nova S - PE/ESA User manual

Dräger Filterbox 40-91 User manual

Dräger

Dräger Filterbox 40-91 User manual

Dräger X-plore 8000 User manual

Dräger

Dräger X-plore 8000 User manual

Dräger CPS 7800 User manual

Dräger

Dräger CPS 7800 User manual

Dräger PAS Series User manual

Dräger

Dräger PAS Series User manual

Dräger X-plore 5500 User manual

Dräger

Dräger X-plore 5500 User manual

Dräger X-plore 7300 User manual

Dräger

Dräger X-plore 7300 User manual

Dräger Oxy K 30 E User manual

Dräger

Dräger Oxy K 30 E User manual

Dräger X-plore 1950 User manual

Dräger

Dräger X-plore 1950 User manual

Dräger Panorama Nova S User manual

Dräger

Dräger Panorama Nova S User manual

Popular Respiratory Product manuals by other brands

ResMed Ultra Mirage user guide

ResMed

ResMed Ultra Mirage user guide

Walter ArcOne AirPlus User instruction manual

Walter

Walter ArcOne AirPlus User instruction manual

Sundstrom SR 507 operation instruction

Sundstrom

Sundstrom SR 507 operation instruction

ResMed VPAP S Brochure & specs

ResMed

ResMed VPAP S Brochure & specs

Drive 18090-FS manual

Drive

Drive 18090-FS manual

3M Aura 9300+ Series Technical data sheet

3M

3M Aura 9300+ Series Technical data sheet

Continuous Composites CP-95 Instructions for use

Continuous Composites

Continuous Composites CP-95 Instructions for use

NIOSH MS6115 User instruction

NIOSH

NIOSH MS6115 User instruction

Flaem NEBULAIR Instructions for use manual

Flaem

Flaem NEBULAIR Instructions for use manual

NIOSH BNX N95 quick start guide

NIOSH

NIOSH BNX N95 quick start guide

ResMed Quattro FX user guide

ResMed

ResMed Quattro FX user guide

Medisana USC instruction manual

Medisana

Medisana USC instruction manual

Pari LC Sprint Instructions for use

Pari

Pari LC Sprint Instructions for use

AOSafety Surgical Respirator N95 Specifications

AOSafety

AOSafety Surgical Respirator N95 Specifications

3M 6100 quick start guide

3M

3M 6100 quick start guide

HOMEAIDE Easy Neb Guide book

HOMEAIDE

HOMEAIDE Easy Neb Guide book

3M 5000 Series user manual

3M

3M 5000 Series user manual

AEROSURE MEDIC+ user manual

AEROSURE

AEROSURE MEDIC+ user manual

manuals.online logo
manuals.online logoBrands
  • About & Mission
  • Contact us
  • Privacy Policy
  • Terms and Conditions

Copyright 2025 Manuals.Online. All Rights Reserved.