manuals.online logo
Brands
  1. Home
  2. •
  3. Brands
  4. •
  5. Dräger
  6. •
  7. Respiratory Product
  8. •
  9. Dräger PSS 5000 Series User manual

Dräger PSS 5000 Series User manual

3359002 (A3-D-P) - Page 1 of 4
PSS 5000 Series
Self-contained breathing apparatus with Sentinel 7000 Instructions for Use
i
1 For your safety
1.1 General safety statements
● Beforeusingthisproduct,carefullyreadtheInstructionsforUse.
● StrictlyfollowtheInstructionsforUse.Theusermustfullyunderstandand
strictly observe the instructions. Use the equipment only for the purposes
speciedinthisdocument.
● DonotdisposeoftheInstructionsforUse.Ensurethattheyareretainedand
appropriatelyusedbytheproductuser.
● Onlyfullytrainedandcompetentusersarepermittedtousethisproduct.
● Complywithalllocalandnationalrulesandregulationsassociatedwiththis
product.
● Onlytrainedandcompetentpersonnelarepermittedtoinspect,repairand
service the product. Dräger recommends a Dräger service contract for all
maintenanceactivitiesandthatallrepairsarecarriedoutbyDräger.
● Properlytrainedservicepersonnelmustinspectandservicethisproductas
detailedintheMaintenancesectionofthisdocument.
● Use only genuine Dräger spare parts and accessories, or the proper
functioningoftheproductmaybeimpaired.
● Donotuseafaultyorincompleteproduct,anddonotmodifytheproduct.
● NotifyDrägerintheeventofanycomponentfaultorfailure.
● UseoftheapparatusshouldbeconsistentwithNFPA1500–Standardon
FireDepartmentOccupationalSafetyandHealthProgram.
● All approved respiratory equipment shall be selected, tted, used,
and maintained in accordance with MSHA (Mine Safety and Health
Administration),OSHA(OccupationalSafetyandHealthAdministration),and
otherapplicableregulations.
● Donotuseanyformofchemicalmarkingorpaintontheequipment.
● TheairsupplyshallmeettherequirementsforbreathingairaccordingtoCGA
G–7.1,GradeDorhigherqualityand,whereappropriate,beinaccordance
with:NFPA1989StandardonBreathingAirQualityforEmergencyServices
RespiratoryProtection.
● Beforeoccupationaluseof thisrespiratora writtenrespiratoryprotection
program must be implemented meeting all the local government
requirements.IntheUnitedStatesemployersmustcomplywithOSHA29
CFR1910.134whichincludesmedicalevaluation,training,andttesting.
!
CAUTION
 This device has been tested and complies with the FCC (Federal
Communications Commission) rules. Changes or modications not
expressly approved by the manufacturer will void your authority to
operatethisproduct.
1.2 Denitionsofalerticons
Alerticons are usedin thisdocumentto provideand highlight textthat requires a
greaterawarenessbytheuser.Adenitionofthemeaningofeachiconisasfollows:
!
WARNING
 Indicatesapotentiallyhazardoussituationwhich,ifnotavoided,could
resultindeathorseriousinjury.
!
CAUTION
 Indicatesapotentiallyhazardoussituationwhich,ifnotavoided,could
result in physical injury or damage to the product or environment. It
mayalsobeusedtoalertagainstunsafepractices.
i
i
NOTICE
 Indicatesadditionalinformationonhowtousetheproduct.
1.3 Trademarks
FPS® is a registered trademark of Dräger in the United States and/or other
countries.ContactDrägerfordetails.
Procell®and Duracell®areregisteredtrademarksofDuracellU.S.Operations,
Inc.intheUnitedStatesand/orothercountries.
Panasonic®isaregisteredtrademarkofPanasonicCorporation,Japaninthe
UnitedStatesand/orothercountries.
Dow Corning® and Molykote® are registered trademarks of Dow Corning
CorporationintheUnitedStatesand/orothercountries.
2 Description
2.1 Product overview
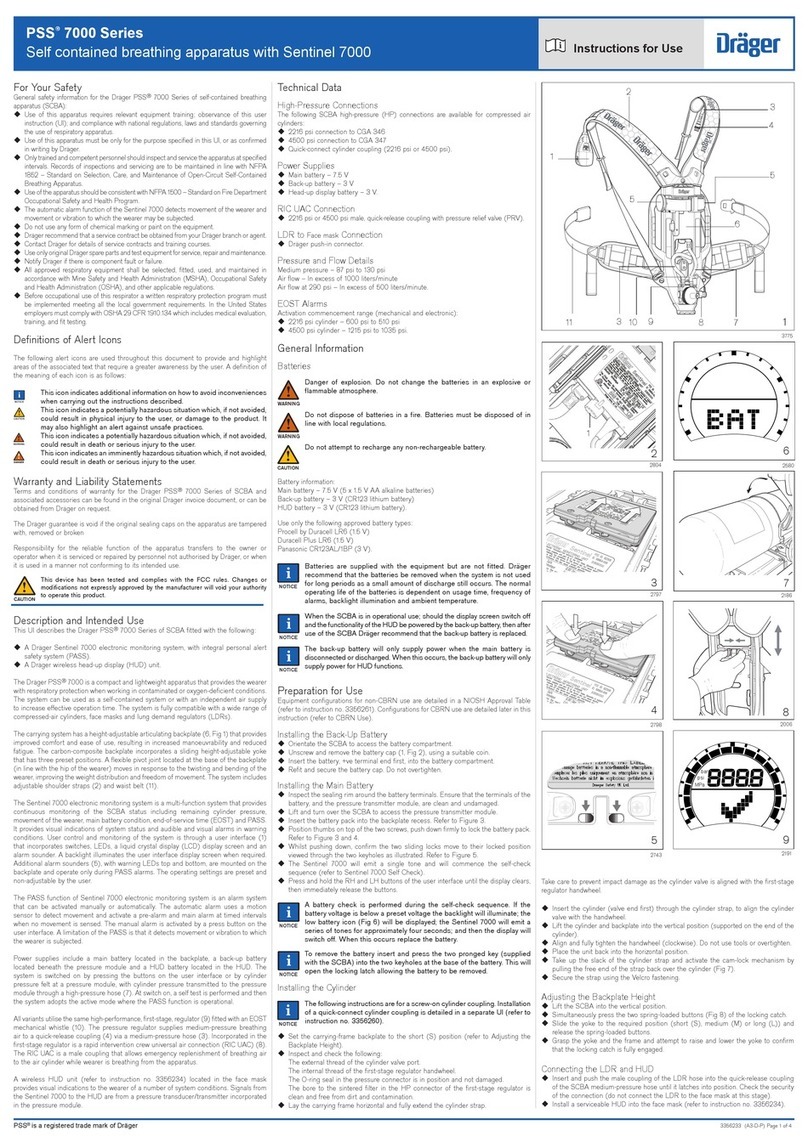
TheDräger PSS5000 Seriesisa compactand lightweightbreathing apparatus
thatprovidesthewearerwithrespiratoryprotectionusinganopen-circuit,pressure-
demand,compressed-airsystem.Theapparatuscanbeusedasaself-contained
system, or with an independent air supply for supplied-air respirator (SAR)
operations.TheseriesiscompatiblewithawiderangeofDrägercompressed-air
cylindersandfacemasks(e.g.FPS®7000facemasks,andaluminumorcomposite
cylinders).Theproductincludesthefollowingelectronicmonitoringsystems:
● ADrägerSentinel7000electronicmonitoringsystem,withintegralPASS
(personalalertsafetysystem).
● ADrägerwirelessHUD(head-updisplay)unit.
2.2 Feature description
The carrying system has a carbon-composite backplate, with adjustable
shoulderstrapsandwaistbeltconnectedusingquickreleaseconnectors.The
waist pad is connected at a exible joint to compensate for the twisting and
bendingoftheuser.
Allvariantsusethesamehigh-performancerst-stageregulator(Fig1,Item5)
ttedwithawhistlethatsoundsattheend-of-servicetime(EOST)(seeSection8
forthe EOSTactivationpressures).Theregulator suppliesmedium-pressure
breathing air through a medium-pressure hose (Fig 1, Item 6) and a quick
coupling (Fig 1, Item 2) to an attached lung demand regulator. Incorporated
intherst-stageregulatorisaRICUAC(rapidinterventioncrewuniversalair
connection)(Fig 1, Item 4),which is amale coupling that allowsemergency
rellingoftheaircylinderwhilewearerisbreathingfromtheapparatus.
The system is switched on by pressing the left and right buttons on the user
interface,orbycylinderpressurefeltatapressuremoduleinthebackplate,with
pressuretransmittedtothepressuremodulethroughahigh-pressurehose(Fig1,
Item3)whenthecylinderisopened.Atswitchon,theunitperformsaselfcheck,
and once the self check is passed, the system adopts the active mode where
theelectronicfunctionsareoperational.Duringtheselfchecksequence,theunit
scrollsthroughaseriesofscreensandprovidesstart-upinformationandoptions,
including:
● Themainbatterychargestate.
● Theelectronicleaktestoption.
● Thepersonalidentity(scrollingdata)option.
● Ifthesystemfailstheselfcheck,theunitprovidesfailsignalattheendof
thesequence.
ThePASSalarmcanbeactivatedmanuallyorautomatically.Themanualalarm
isactivatedbypressingtheyellowbuttonontheuserinterface(Fig2,Item2).
Theautomaticalarmusesamotionsensortodetectmovementandactivatesa
pre-alarmandmainalarmattimedintervalswhennomovementissensed.The
pre-alarmactivatesafter21-25secondswithoutmovement,andthemainalarm
activatesafterafurther8secondswithoutmovement.
ThewirelessHUDttedinthefacemaskprovidesvisualindicationsofsystem
conditions(seetheHUDInstructionsforUse3356234forfulldetails).Signals
fromtheSentinel7000totheHUDarefromapressuretransducer/transmitter
incorporatedinthepressuremodule.
System power supplies are the main battery in the backplate, the back-up
batteryinthepressuremoduleandtheHUDbatteryintheHUD.
A Dräger PC Link Module, congured to a Windows based PC software
package,isavailableasanoptionalaccessorythatallowswirelessreadingand
reprogrammingof the unit.The linkmodule allows reprogrammingthe system
operating settings, enabling additional functions, and downloading a record of
events(datalog).ContactDrägerforfulldetails.Thefunctions andparameters
describedinthisdocumentarethedefaultsettingsfortheSentinel7000.
Compressed-air cylinders, lung demand regulators and face masks
TheDrägerPSS5000Seriesiscompatiblewithaluminumorcompositematerial
cylindersof30to60minutecapacity,andisavailablein2216psior4500psi
versions. Full descriptions and user instructions are contained in separate
instructionssuppliedwiththecylinder,facemaskorlungdemandregulator.
2.3 Intended use
The Dräger PSS 5000 Series breathing apparatus is intended for use in
applications where a high level of respiratory protection is required. When
usedwithanapprovedlungdemandregulator,facemaskandaircylinder,the
breathingapparatusprovidesawearerwithrespiratoryprotectionforworking
incontaminatedoroxygen-decientconditions.
Thecylinder,lung demandregulator,face maskand other accessoriesused
with this product must be certied Dräger components, assembled in an
approvedconguration,otherwisetheoperationofthedevicemaybeimpaired.
ContactDrägerforfurtherinformation.
2.3.1 Limitation
A limitation of the PASS automatic distress alarm is that the motion sensor
detects movement or vibration to which the wearer is subjected, and may
notactivateifthewearerismotionlessonamovingplatform(forexampleon
movingorvibratingmachinery).
2.4 Approvals
TheDrägerPSS5000SeriesiscertiedbyNIOSHandincertaincombinations
to provide protection from military grade chemical, biological, radiological,
andnuclearhazards(CBRN).The seriesisalsocertied bySEItomeet the
requirementsofNFPA1981:2007andNFPA1982:2007.Theapparatusmust
onlybeusedinconjunctionwithcompressed-aircylindersapprovedbyNIOSH.
2.5 Explanation of marking and symbols
Refertothe relevantauthority forexplanationof approvalbodysymbols and
markingontheequipment.Examplesofothermarkingoncomponentpartsof
the breathing apparatus are:
2117
3
3382
4
3380
1
3381
2
psi
 BRAC-1359  – Drägerserialnumber
 08/09   – Monthandyearofmanufacture
 3356812orR21034 – Drägerpartnumber
 SF   – Standardforcecoupling
 LF   – Lowforcecoupling
3 Use
!
WARNING
 Only trained and competent personnel should prepare and use
breathingapparatus.Ensurethatanyaccessories,ancillaryequipment
andotherprotectiveclothingitemsdonotinterferewiththeapparatus
anddonotcreateasafetyhazard.
!
WARNING
 Theeffectiveworkingduration ofthe apparatusisdependent onthe
initialairsupplyavailableandthebreathingrateofthewearer.Fillair
cylinderstotheirfullratedpressurepriortouse,anddonotcommence
any operation (including supplied-air respirator (SAR) operations)
usingacylinderthatislessthan90percentfull.
!
CAUTION
 Donotapplyexcessiveforceorusetoolstoopenorcloseacylinder
valve,anddonotdroporthrowdownthebreathingapparatus.
Refertothefollowingadditionalinformationbeforepreparingorusing
the breathing apparatus:
● Thespecialinstructions(seeSection9).
● For non-CBRN use see the separate NIOSH Approval Label
3359028forapprovedcongurations.
● For CBRN use see the separate NIOSH CBRNApproval Label
3359027 for approved congurations. For CBRN use the user
must also refer to the FPS® NFPA Lung demand Regulator and
CBRNSpecialInstructions3356259.
3.1 Preparation for use
i
i
NOTICE
 Thedisplayscreenmaybettedwithathinexibleprotectivecovering.
Removethiscoveringbeforerstuse.
 Ifonactivationtheunitfailstooperateoralowbatteryalarmactivates,
renewtherelevantbatteries.
1. Carryoutavisualinspectionoftheapparatus(seeSection3.5.1).
2. Installthemainbatteryandtheback-upbatteryifnecessary(seeSection
3.5.2).
3. Fittheaircylinder(seeSection3.5.3).
4. Pressthemalecouplingofthelungdemandregulatorhoseintothefemale
couplingofthemedium-pressurehoseuntil anaudibleclickisheard(do
notconnecttheregulatortothefacemaskatthisstage).
5. Presstheresetbutton(Fig3,Item1)toswitchoffthepositivepressure.
Pressandrotatethebypassbutton(Fig3,Item3)toaligntheredspotsand
thenreleasethebuttontoswitchoffthebypass.
6. InstalltheHUDintothefacemaskifnecessary(seetheHUDInstructions
forUse3356234).
7. Carryoutafullfunctionaltestoftheapparatus(seeSection3.6).
8. Align and push the lung demand regulator into face mask port until it
latchesinposition,andchecktheattachmentbygentlyattemptingtopull
thecouplingapart.
3.2 Putting on the apparatus
1. Fullyloosenthe shoulderstrapsandwaist beltandput onthebreathing
apparatus.
2. Checkthatthe shoulderpadsare nottwistedand taketheweightofthe
systemontheshouldersbypullingtheshoulderstraps.Donotfullytighten
atthisstage.
3. Closethewaistbeltbuckleandpulltheendsofthewaistbeltforwarduntil
thestrappaddingtssecurelyandcomfortablyoverthehips(Fig4).Tuck
thebeltendsbehindthewaistpad.
4. Pulltheshoulder strapsuntilthe breathingapparatusrests securelyand
comfortablyonthehips.Donotovertighten.Pullthestrapretainersdown
tosecurethestrapends(Fig5).
5. Fullyloosentheheadstrapsofthefacemaskandplacetheneckstrapover
thebackoftheneck.
6. Presstheresetbutton(Fig3,Item1)toswitchoffthepositivepressure.
7. Openthecylindervalve(counterclockwise)slowly,butfully,topressurize
system.TheSentinel7000andHUDsystemswillactivate.
!
WARNING
 For use in a CBRN environment, use only the face mask sizes that
havebeenconrmedbyaquantitativettest(QNFT).
8. Puton the facemask andcheck for tightt (fornon-CBRN use seethe
Dräger FPS® 7000 Face Mask Instructions for Use 9021721; for CBRN
use see the FPS® NFPA Lung Demand Regulator and CBRN Special
Instructions3356259).
3.3 During use
!
WARNING
 Fullyopenallcylindervalvesandensurethattheyremainopenduring
use.
 Users should be in a safe area before the whistle or end-of-service
time warnings commence. Evacuate to a safe area immediately if
warningscommenceduringanoperation.
Observeallwarninganddisplaysignalsshownorindicatedbythesystem,and
note the following:
● Regularly check the user interface display to conrm the exact cylinder
pressureandtheremainingtimeuntilthetoend-of-servicetime(EOST)alarm
activates(seeSection8fortheEOSTactivationpressures).Bothareshown
numericallyonthenormaloperatingscreen(Fig6).Cylinderpressureisalso
shown as follows:
 ○ The HUD LEDs show the approximate cylinder pressure (see
Section3.3.1).
 ○ Thesegmentsontheuserinterfacescreenshowtheapproximatecylinder
pressure(Fig6).
● Foremergencyhelporassistance,presstheyellowbuttoninthecenterofthe
userinterfacetoactivatethemanualalarm.
● Toilluminatethedisplaybacklight,pressandreleasetheleftorrightbuttonof
theuserinterface.
 ○ Pressingtherightbuttonwillalsoscrollanyprogrammedpersonalidentity
information(seeSection3.7.1).
● Reacttothefollowingalarmandwarningsignalsasnecessary:
 ○ EOST–Theuserinterfaceemitsanaudiblealarmtone,andredandblue
LEDsashandtherstquartersectorofthesegmentdisplayashesred.
TheredLED(RinFig7)ontheHUDashes.Themechanicalwhistleon
therst-stageregulatorsounds.
 ○ PASS pre-alarm – If no movement is detected for approximately
25 seconds, a repeating audible alarm tone is emitted from the user
interface and the second sounder. Move the user interface within
8secondstocancelthealarm(donotattempttousethebuttonstoswitch
offthepre-alarm).
 ○ PASSmainalarm–Ifnomovementisdetectedafter8secondsofpre-
alarm,ahigh-levelsweepingalarmisemittedfromtheuserinterfaceand
thesecondsounder.RedandblueLEDsontheuserinterfaceandthetop
andbottomofthesecondsounderashintermittently.Theuserinterface
3088
5
1
2
3
456
LR
2
3
1
2


1
3
3383
6
psi
2189
7
R
A
G
G
B
G/Y
2580
8
3359002 (A3-D-P) - Page 2 of 4
PSS 5000 Series
Self-contained breathing apparatus with Sentinel 7000 Instructions for Use
i
displaystheautomaticalarmicon( ).Simultaneouslypressandholdthe
leftandrightbuttonsoftheuserinterfacetocancelthealarm.
 ○ Low main battery – A low battery icon displays on the user interface
(Fig8),andthebatteryLED(G/YinFig7)ontheHUDashesyellow.
 ○ LowHUDbattery–ThebatteryLED(G/YinFig7)ashesgreen.
 ○ LossofHUDcommunication–ThebluecommunicationLED(BinFig7)
ashes.
!
WARNING
 Usingthebypassbutton(Fig3,Item3)willuseairfromthecylinder
andrapidlyreducetheworkingdurationoftheapparatus.
● If additional air is required, briey press and release the bypass button
(Fig3,Item3)todeliverasinglejetofairintothefacemask.
!
WARNING
 The emergency air ow procedures below may greatly reduce the
operating duration of the air supply. When activated the user must
immediatelyevacuatetoasafearea.Thereasonforusingtheprocedure
mustbeinvestigatedandrepairedbeforereusingtheapparatus.
● Additionalairowrequired(emergencyprocedureonlyusedintheunlikely
conditionofloworblockedairow)–Pressandrotatethebypassbutton
(Fig3,Item3)todeliverasustainedairsupply(85to130liters/minute)into
thefacemask.
● Excessive or loss of air ow (emergency procedure only used in the
unlikelyconditionofhighorlossofairow)–Closethecylindervalvethen
immediatelybegin to slowly reopenthe valve. Usethe cylinder valve as
a regulating valve to set the air ow to meet the user requirement. This
procedurecanbeusedwithscrew-typeandratchet-typecylindervalves.
3.3.1 Head-up display LEDs
ThecylindercontentsLEDs(R/A/G/GinFig7)indicatethatcylinderpressureis
withintherangesshowninthefollowingtable.
LEDs
Cylinder contents Red
(R)
Amber
(A)
Green
(G)
Green
(G)
Fullto3/4 ● ● ● ●
3/4to1/2 ● ● ●
1/2(amberashesfor20seconds) ● *
1/2to1/4 ● ●
1/4toapproximately100psi *
Key:  ●On  *Flashing
3.4 After Use
!
WARNING
 Do not remove the breathing apparatus until in a safe breathing
environment.
1. Loosen the face mask straps.As the seal between the face mask and the
faceisbroken,presstheresetbutton(Fig3,Item1)toswitchoffthepositive
pressure.Fullyremovethefacemaskandextendallofthestrapsofthehead
harness.
2. Closethecylindervalve.
3. Pressthefrontbutton(Fig3,Item2)toventsystemandthenpressthereset
button(Fig3,Item1)toswitchoffthepositivepressure.
4. Releasethewaistbeltbuckle.
5. Lifttheshoulderstrapendstoreleasethestrapretainers(Fig5)andthenlift
theshoulderstrapbucklestoloosenthestraps.
6. Removethebreathingapparatusandfacemask.
7. If the lung demand regulator has been set to bypass, press and rotate the
bypassbutton(Fig3,Item3)toaligntheredspotsandthenreleasetoswitch
offthebypass.
8. Pressandholdtheleftandrightbuttonsoftheuserinterfaceuntilthedisplay
clears,thenimmediatelyreleasethebuttons.Afterapproximately180seconds,
allsixHUDLEDswillashtwicetoindicatethattheunithasloggedoff.
9. Carryouttheafterusetasksinthemaintenancetable(seeSection5.1).
10. Removetheaircylinderifrequired(seeSection3.5.3).
11. Pass the breathing apparatus to the service department with details of any
faultsordamagethatoccurredduringuse.
3.5 Common user tasks
3.5.1 Visual inspection
A visual inspection must check the full breathing apparatus including all
component parts and accessories. Check that the equipment is clean and
undamaged, paying particular attention to pneumatic components, hoses
and connectors. Typical signs of damage that may affect the operation of
the breathing apparatus include impact, abrasion, cutting, corrosion and
discoloration. Report damage to service personnel and do not use the
apparatusuntilfaultsarerectied.
3.5.2 Fitting or replacing the batteries
!
WARNING
 Dangerofexplosionorre.Donotremoveorinstallthebatteriesinan
explosiveorammableatmosphere.
 Explosion,reorchemicalhazard.Donotexposethebatteriestoheat
sources,donotattempttorechargeanynon-rechargeablebattery,and
donotshortoutthebatteryterminals.
 Riskofexplosionifbatteryisreplacedbyanincorrecttype.Useonly
the recommended battery type, replace batteries as a matched set,
anddonotmixnewandusedbatteries.
!
CAUTION
 Environmentalhazard.Dispose ofusedbatteriesin accordancewith
nationalorlocalregulations.
i
i
NOTICE
 Theback-upbatterywillonlysupplypowerwhenthemainbatteryis
disconnectedordischarged.Whenthisoccurs,theback-upbatterywill
onlysupplypowerforHUDfunctions.
 Ifthedisplayscreen switchesoffandthefunctionalityof theHUDis
poweredbytheback-upbattery duringuse,Drägerrecommendthat
theback-upbatteryisreplacedafteruse.
General battery information
● Thenormaloperatinglifeofthebatteriesisdependentonoperatingtime,
frequencyofalarmsandambienttemperature.
● Removedischargedbatteriesfromtheproduct.
Systembatteries:
Mainbattery:7.5V(5x1.5VAAalkalinebatteries)
Back-upbattery:3V(CR123lithiumbattery)
HUDbattery:3V(CR123lithiumbattery).
2797
10
2798
11
2743
12
3094
14
D
3095
15
3379
13
1
2804
9
1
2330
17
2191
18
MPa
psi
bar
3384
19
2279
20
2373
21
3385
22
psi
3386
23
psi
3387
24
psi
2201
16
Useonlythefollowingapprovedbatterytypes:
Procell®byDuracell®LR6(1.5V)
Duracell®PlusLR6(1.5V)
Panasonic®CR123AL/1BP(3V).
Back-up battery
1. Orientatetheapparatustoaccessthebatterycompartment.
2. Unscrewandremovethebatterycap(Fig9,Item1)usingasuitablecoin.
3. Insertthebattery,+veterminalendrst,intothebatterycompartment.
4. Retandsecurethebatterycap.Donotovertighten.
Main battery pack
1. Inspectthesealingrimaroundthebatteryterminals.Ensurethattheterminals
ofthebatteryandthepressuretransmittermodulearecleanandundamaged.
2. Liftandturnovertheapparatustoaccessthepressuretransmittermodule.
3. Insertthebatterypackintothebackplaterecess(Fig10).
4. Positionthumbsontopofthetwoscrewsandpushdownrmlytolockthe
batterypack(Fig11).
5. Whilst pushing down, conrm the two sliding locks move to their locked
positionviewedthroughthetwokeyholesasillustrated(Fig12).
6. TheSentinel7000willemitasingletoneandwillcommencetheself-check
sequence(describedinSection3.6.1).
7. Switchofftheunitifrequiredoncetheunithaspassedtheselfcheck.To
switchoff,pressandholdtheleftandrightbuttonsoftheuserinterfaceuntil
thedisplayclears,thenimmediatelyreleasethebuttons.
i
i
NOTICE
 To remove the main battery insert and press the two pronged key
(supplied with the breathing apparatus) into the two keyholes at the
baseofthebattery.Thiswillopenthelockinglatchallowingthebattery
toberemoved.
Main battery pack –cell replacement
1. Removetheeightscrewsusinga2.5 mmhexagonkey,andremovethe
batterycover.
2. Remove the discharged batteries and install a new set observing the
polaritymarkedinsidethepack.
3. Checkthesealingringandretthebatterycoverandscrews.Donotover
tightenthescrews:Drägerrecommendtorqueof0.5lbfft(0.7Nm).
3.5.3 Aircylinderttingandremoving
!
WARNING
 High-pressure air release may cause injury to the user or other
personnelnearthebreathingapparatus.Closethecylindervalveand
fullyventthesystembeforeattemptingtodisconnectanaircylinder.
 Impactdamagetothecylindervalveorrst-stageregulatorconnector
may prevent valve connection or cause an air leak. Handle the air
cylinderandbreathingapparatuswithcare.
i
i
NOTICE
 Thefollowinginstructionsareforathreadedcylindercoupling.Fitting
aquick-connectcylindercouplingisdetailedinaseparatedocument
(seetheQuick-ConnectCylinderCouplingUserInstructions3356260).
Fitting the cylinder
1. Checkthethreadsofthecylindervalveportandtherst-stageregulator.
EnsurethattheO-ringseal(Fig13,Item1)intherst-stageregulatoris
cleanandundamaged.
2. Laythebackplatehorizontal,withtherst-stageregulatoruppermost,and
fullyextendthecylinderstrap.
3. Insertthecylinderthroughtheloopofthestrap,andalignthevalvewiththe
regulator.
4. Liftthecylinderandbackplateintotheverticalposition(supportedonthe
endofthecylinderoppositethevalve).
5. Tightenthehandwheeloftheregulator,usingonlythethumbandindexnger,
untiladenitemetal-to-metalcontactisfelt.Donotusetoolsorovertighten.
6. Placetheunitbackintothehorizontalposition.
7. Takeuptheslackinthecylinderstrap(Fig14).
8. Pullthestrapoverthecylindertooperatethecamlock(Fig15)andsecure
usingthehook-and-loopfastener.
Removing the cylinder
1. Closethecylindervalveandpressthefrontbutton(Fig3,Item2)tofully
ventthesystem.
2. Laythebackplatehorizontal,withthecylinderuppermost.
3. Removethefreeendofthecylinderstrapfromthehook-and-loopfastener.
4. Liftthestrapagainstthecamlocktoreleasethebuckletensionandloosen
thestrap.
5. Disconnectthecylindervalvefromtherst-stageregulator.
6. Liftthecylinderawayfromtherst-stageregulatorandremovethecylinder.
3.6 Functional testing
!
WARNING
 Failure of the breathing apparatus to meet any of the standards or
parametersdescribedinthefunctionaltestsindicatesasystemfault.
ReportthefaulttotrainedservicepersonnelorcontactDräger.Donot
usethebreathingapparatusuntilthefaultconditionisrectied.
Assemblethebreathingapparatusasdescribedinthepreparationforuse(see
Section3.1)beforecommencinganyfunctionaltesting.
A full functional test includes the self check, the PASS check, and the leak
andEOST/whistletestsinthissection.Duringthefunctionaltestingcheckthe
display and the audible alarms and do not use the equipment if any of the
following is found:
● Anycasingiscrackedorbroken.
● TheLCDdisplayoftheuserinterfacecannotberead,oroneormoreofthe
displaysegmentsorLEDsisinoperative.
● Audibleand/orvisualalarmsarenotfunctioning.
● Anyfaulticonisshown.
3.6.1 Self check
i
i
NOTICE
 If the battery voltage is very low (below a minimum preset voltage),
thebacklightilluminates,thelowbatteryicon(Fig8)displays,theunit
emitsaseriesoftonesandthenswitchesoff.Ifthisoccurs,ortheunit
failstoswitchon,replacethebattery(seeSection3.5.2).
1. Press the left button of the user interface to activate the self-check
sequence:
 a. The unit will commence the self-check. During the sequence, the
systemchecksalarmsandindicatorsandthedisplayscrollsthrough
a series of start-up screens. For a full description of the start-up
sequenceandoptions,seeSection3.7.
 b. At the end of the sequence, the normal operating screen displays,
andthegreenLEDashesatapproximatelyonesecond intervalsto
indicatethattheSentinel7000haspassedtheselfcheckandisinthe
activemode.
i
i
NOTICE
 Ifthecrossiconwithafaultcodedisplays(Fig16),theSentinel7000
hasfailedtheselfcheck.RecordthefaultcodeandcontactDrägerfor
repair.
3.6.2 PASS Check
1. Press the Yellow button in the centre of the user interface. The distress
alarm sounds, the manual alarm icon ( ) displays and the red and blue
LEDsashintermittently.
2. Simultaneously press and hold the left and right buttons until the alarm
stops.
3. Immobilizetheuserinterface.After21to25secondsthepre-alarmsounds
andthebacklightashes.Immediatelymovetheunittocancelthealarm.
4. Immobilize the user interface again and do not cancel the pre-alarm.
After 8 seconds of pre-alarm, the main alarm sounds, the alarm icon
( )displays,andalloftheuserinterfaceLEDsashintermittently.
5. Simultaneously press and hold the left and right buttons to cancel the
alarm.
6. Toswitchoff,againpressandholdtheleftandrightbuttonsuntilthedisplay
clears,thenimmediatelyreleasethebuttons.
3.6.3 High-pressure leak test
i
i
NOTICE
 Thisisnot intended as afunctional test of HUD. Ifthe HUD fails to
operateasdescribed,seetheHUDInstructionsforUse.
1. Placethefacemasknexttothebreathingapparatus(withinthreefeetof
thepressuremodule).
2. Presstheresetbutton(Fig3,Item1)toswitchoffthepositivepressure.
Pressandrotatethebypassbutton(Fig3,Item3)toaligntheredspotsand
thenreleasethebuttontoswitchoffthebypass.
3359002 (A3-D-P) - Page 3 of 4
PSS 5000 Series
Self-contained breathing apparatus with Sentinel 7000 Instructions for Use
i
3. Openthecylindervalve(counterclockwise)slowly,butfully,topressurize
system.TheSentinel7000selfcheckcommences.
 ○ Upto approximately 45seconds after thestart of theselfcheck, all
six HUD LEDs (Fig 7) will ash twice to indicate that the Sentinel
7000iscommunicatingwiththeHUD.ThecylindercontentsLEDswill
thenashonfor15secondsandofffor45secondscontinuously(the
numberofLEDsisdependentonthecylinderairpressure).
4. Close the cylinder valve and observe the user interface display. The
pressurereadingshallnotdecreasemorethan300psiin20seconds.
!
CAUTION
 If the breathing apparatus fails this test, or an immediate leak is
evident,donotcontinuewiththetest.Ventthepressure,switchoffthe
systemandcontactDrägerforrepair.
3.6.4 Optional electronic leak test
i
i
NOTICE
 ThistestisanoptionalfunctionoftheSentinelsystemwhichcanonly
beusedifitiscongured.ContactDrägerfordetails.
 Thisisnot intended as afunctional test of HUD. Ifthe HUD fails to
operateasdescribed,seetheHUDInstructionsforUse3356234.
1. Placethefacemasknexttothebreathingapparatus(withinthreefeetof
thepressuremodule).
2. Presstheresetbutton(Fig3,Item1)toswitchoffthepositivepressure.
Pressandrotatethebypassbutton(Fig3,Item3)toaligntheredspotsand
thenreleasethebuttontoswitchoffthebypass.
3. Press the left button of the user interface to activate the self-check
sequence.
 ○ Upto approximately 45seconds after thestart of theselfcheck, all
six HUD LEDs (Fig 7) will ash twice to indicate that the Sentinel
7000iscommunicatingwiththeHUD.ThecylindercontentsLEDswill
thenashonfor15secondsandofffor45secondscontinuously(the
numberofLEDsisdependentonthecylinderairpressure).
4. Whentheperformleaktesticon( )displays,presstheleftbutton.
5. Theopenvalveicon( )displaysandtheradialsegmentsbegintoswitch
offclockwise.
i
i
NOTICE
 Open the cylinder valve before the last segment switches off or the
low-pressure icon ( )willdisplaybrieyandtheself-checkwillrestart.
 Ifthecylinderpressureisverylowandfallsbelowapresetthreshold
during pressure stabilization, the low pressure icon ( ) will display
brieyandtheselfcheckwillrestart.
6. Immediatelyopenthecylindervalve.Asingletonesoundsandthescreen
alternatesbetweentheclosecylindervalveicon( ) and press right button
icon ( ).
7. Immediately close the cylinder valve and then press the right button.
Pressure stabilizing starts, the wait icon ( ) displays, and the radial
segmentsswitchoffclockwise.
8. Whenstabilizingiscompleteasingletonesounds,theleaktesttimingicon
()displays,andtheradialsegmentsswitchoffclockwise.
9. Whentimingiscompleteasingletonesoundsandthetestresultisshown:
 a. Theleaktestpassedicon( )indicatesaleaktestpass.Observethe
noticebelowandcontinuetotheEOST/whistletest(Section3.6.5).
 b. Theleaktestfailedicon( )indicatesaleaktestfail.Investigateand
repairthefault(seeSection4),andthenrepeattheleaktest.
i
i
NOTICE
 Theleaktestpassedicon( )displaysforuptothreeminutes.The
EOST/whistletestmustbecompletedwithinthattimeortheunitwill
resetandtheselfcheckwillrestart.
3.6.5 EOST/whistle test
1. Cover the outlet port of the lung demand regulator with the palm of the
handandpressthefrontbutton(Fig3,Item2).
2. CarefullyliftthepalmofthehandtoslowlyventthesystemuntiltheEOST
alarmsactivate,andobservethepressuredisplayedontheuserinterface.
i
i
NOTICE
 Electronicandmechanicalactivationdoesnotneedtobesimultaneous
but both must be within the acceptable range (see EOSTAlarms in
Section8).
3. Allowthesystemtoventfully.Thedisplaywillshowzeropressureandall
userinterfaceLEDs(Fig2,Item3)willashatapproximatelyonesecond
intervals.
4. Press and hold the left and right buttons of the user interface until the
displayclears,thenimmediatelyreleasethebuttons.
 ○ Afterapproximately180secondsallsixHUDLEDswillashtwiceto
indicatethatithasloggedofffromtheSentinel7000.
5. Presstheresetbutton(Fig3,Item1)toswitchoffthepositivepressure.
3.7 Sentinel 7000 self check
(start-up sequence and options)
Each time the electronic system switches on (with or without an air cylinder
tted),thedisplayscrollsthroughaseriesofscreensastheelectronicsystem
runstheselfcheck.Thestart-upsequenceis:
1. The unit emits a single tone from the user interface and the second
sounder,andthewaiticon(Fig17)displays.
2. Thetickicon(Fig18)displaysandtheblue,redandgreenLEDsilluminate.
3. The battery icon (Fig 19) displays. The segments around the screen
indicatetheconditionofthemainbattery(allsegmentslledindicatesfull
battery).
4. Theleaktesticon(Fig20)displaysifthisoptioniscongured.Pressingthe
leftbuttonstartstheleaktestprocedure(seeSection3.6.4).
5. Thepersonalidentityicon(Fig21)displays.Pressingtheleftbuttonstarts
theproceduretoreadpersonalidentityinformationfromapersonalIDcard
(seeSection3.7.1).
6. Theautomaticalarmicon(Fig22)displaysandalarmtonessound.
7. Endofsequence–Thenormaloperatingscreen(Fig6)displaysandthe
greenLEDashesatonesecondintervals.
3.7.1 Personal identity information
Personalidentityinformation(e.g.username,brigadename,stationnumber)
canbestoredintheuserinterfacememory.Oncestored,theinformationcan
bescrolledacrossthescreenbypressingtherightbuttonoftheuserinterface
duringuse.Theproceduretouploadinformationfromapersonal(user)IDcard
intotheuserinterfacememoryisshownbelow.
1. LocateandholdthepersonalIDcardontothebackoftheuserinterface,
directlybehindthescreen.
2. Presstheleftbuttonoftheuserinterfacetostarttheself-checksequence.
3. Whenthepersonalidentityscreen(Fig21)displays,immediatelypressthe
leftbutton.Thescreenwillbriey illuminateand theradialsegments will
begintoswitchoffclockwise.
4. The system will read, upload and store the data from the transponder
embeddedinthecardtothememoryintheuserinterface.Whenthefull
datauploadiscomplete,thescreenwilldisplaythetickicon(Fig23).
5. Pressandreleasetherightbuttonoftheuserinterfacetocheckthatthe
uploadeddataiscorrect.Theuserdetailswillscrollfromrighttoleftacross
thescreen(Fig24).Repeattheprocedureiftheinformationisincomplete
orinaccurate.
6. Ifrequired,switchoffbypressingandholdingtheleftandrightbuttonsoftheuserinterfaceuntilthedisplayclears,thenimmediatelyreleasethebuttons.
FurtheroptionsforpersonalidentityinformationandadditionalscrollingoptionsareavailableusingthePCLinkModule.ContactDrägerforfulldetails.
4 Troubleshooting
Thetroubleshootingguideshowsfaultdiagnosisandrepairinformationapplicabletobreathingapparatususers.Furthertroubleshootingandrepairinformationis
availableinInstructionsforUsesuppliedwithassociatedequipment.
Wherethetroubleshootingguideshowsmorethanonefaultorremedy,carryoutrepairactionsintheorderthattheyappearinthetable.
ContactservicepersonnelorDrägerwhentheremedyinformationindicatesaservicetask,orifthesymptomremainsafterallremedyactionshavebeenattempted.
Symptom Fault Remedy
Facemaskairleak LungdemandregulatorO-ringleaking
Headstrapsnottight
Exhalationvalveleaking
Speechdiaphragmdefective
ReneworlubricateO-ring
Tighten
Servicetask
Servicetask
Unsatisfactorycommunication Speechdiaphragmdefective Servicetask
High-pressureairleakorfailedleaktest Looseordirtyconnector
Faultyhoseorcomponent
Disconnect,cleanandreconnectcouplingsandretest
Substitute user replaceable accessories and retest
Airleakfrommedium-pressurehoseconnectionat
therst-stageregulator(safetyreliefvalve)
FaultyO-ring,retainer,springorrst-stageregulator Servicetask
Lungdemandregulatorallowingconstantairowinto
thefacemask
Bypassbuttonengaged
Internalfault
Turnoffthebypassbutton(Fig3,Item3)
Servicetask
Highorlowmediumpressure First-stageregulatorfault Servicetask
Poor sounding whistle Whistledirty Cleanwhistleuteandretest
Whistlenotfunctioningcorrectly Activationmechanismfault Servicetask
Lowbatteryindicationontheuserinterface(Fig8) Lowmainbattery Renewthemainbattery
Faultcodeindicationontheuserinterface(Fig16) Sentinel 7000 failure Servicetask
Sentinel 7000 will not switch on Lowmainbattery
Lowcylinderpressure(below145psi)
Unknown
Renewthemainbattery
Rechargecylindertomaximumworkingpressure
Servicetask
HUDG/YLEDashinggreen LowHUDbattery RenewtheHUDbattery
HUDG/YLEDashingyellow Lowmainbattery Renewthemainbattery
HUDwillnotlogontotheSentinel7000 HUDoutofrange
LowHUDbattery
Lowcylinderpressure(below100psi)
MovetheHUDtowithinthreefeetofthepressuremodule
RenewtheHUDbattery
Rechargecylindertomaximumworkingpressure
Batterypackslidinglocksnotmovingtothelocked
position


Dirty,damagedorfaultycomponents Attemptremedyactionsintheordershownbelow:
1.Pushdownrmlyonthebatterypack
2.Removeandcleanthebatterypackandbackplate
recessandretry
3.Replacethebatterypackandretry
4.ContactDräger
5 Maintenance
5.1 Maintenance table
Serviceandtestthebreathingapparatus,includingout-of-useapparatus,inaccordancewiththemaintenancetable.Recordallservicedetailsandtesting.Refer
alsototheInstructionsforUseforthelungdemandregulator,facemaskandotherassociatedequipment.
Additionalinspectionandtestingmayberequiredinthecountryofusetoensurecompliancewithnationalregulations.
Component/
System
Task Before
use
After
use
Every
month
Every
year
Every
10 years
Complete
apparatus
Visualinspection(seeNote1andSection3.5.1)   
Functionaltesting(seeSection3.6)  
Flowandstatictests(seeNote2) 
Lungdemand
regulator
Checkpush-intypeconnectorsforlubricant(seeNote3) 
First-stage
regulator
Medium-pressurecheck(seeNote2) 
Inspectthesinteredlter(seeNote2andNote4) 
Inspectthehigh-pressureconnectorO-ring(seeNote2andNote5) 
Overhaul.ContactDrägerfortheRepairExchange(REX)service(seeNote6) 
Cylinder Chargecylindertocorrectworkingpressure(seeSection5.3.1) 
Checkchargedpressure(storedcylindersonly) 
Checktestdateofcylinder(carboncompositecylindersover15yearsoldmustberetired) 
Recertication Accordingtonationalregulationsinthecountry
of use
Cylindervalve Overhaul Atthetimeofcylinderrecertication
Notes
 Drägerrecommendations
1 Cleantheequipmentifitisdirty.Ifittheequipmenthasbeenexposedtocontaminants,disinfectanycomponentsthatcomeintodirectandprolongedcontact
withtheskin.
2 ThesemaintenancetasksmayonlybecarriedoutbyDrägerortrainedservicepersonnel.DetailsofthetestsarecontainedintheTechnicalManualwhichis
issuedtoservicepersonnelthathaveattendedarelevantDrägermaintenancecourse.
3 Asaguide,lubricantshouldbefeltonthengersbutnotseen.Ifrelubricationisrequired,lightlyapplyDowCorning®Molykote®111 (other lubricants are not
testedandmaydamagetheequipment).
4 Replacethesinteredlterifadropinrst-stageregulatorperformanceisobservedduringaowcheckorifitisvisiblydamaged.
5 Replacethehigh-pressureconnectorO-ringifitisfoundtoleakduringfunctionaltestingoriftheO-ringisvisiblydamaged.
6 Wherethebreathingapparatusissubjectedtoahighlevelofuse(intrainingestablishmentsetc.),reducetheoverhaulperiodfortherst-stageregulator.In
thesecircumstances,Drägerrecommendthattheoverhaulfrequencyshouldbelessthan5,000applicationsofuse.Anapplicationofuseisdenedasasingle
useofthefullyassembledbreathingapparatus,wheretheuserbreathesfromtheaircylinder.Itdoesnotincludesystempressurizationforpre-operational
checks.
5.2 Cleaning and disinfecting
!
CAUTION
 Donotexceed140°F(60°C)fordrying,andremovecomponentsfromthedryingfacilityimmediatelywhendry.Dryingtimeinaheateddryermustnot
exceed30minutes.
 Donotimmersepneumaticorelectroniccomponentsincleaningsolutionsorwater.
 If water is trapped and then freezes inside the pneumatic system of the breathing apparatus (such as the lung demand regulator), operation will be
impaired.Preventanyliquidfromentering,andthoroughlydrythebreathingapparatusaftercleaningtopreventthisfromoccurring.
Forinformationaboutsuitablecleaninganddisinfectingagentsandtheirspecicationsrefertodocument9100081onwww.draeger.com/IFU.
Referalsototheinstructionsforthelungdemandregulator,facemaskandotherassociatedequipment.
5.2.1 Manual cleaning of the breathing apparatus
● Useonlycleanlint-freecloths.
1. Cleanthebreathingapparatusmanuallyusingaclothmoistenedwithcleaningsolutiontoremoveexcessdirt.
2. Applydisinfectingsolutiontoallinternalandexternalsurfaces.
3. Rinseallcomponentsthoroughlywithcleanwatertoremoveallcleaninganddisinfectingagents.
4. Dryallcomponentsusingadrycloth,inaheateddryerorinair.
5. ContactservicepersonnelorDrägerifdisassemblyofpneumaticorelectroniccomponentsisrequired.
3359002 (A3-D-P) - Page 4 of 4
PSS 5000 Series
Self-contained breathing apparatus with Sentinel 7000 Instructions for Use
i
3359002
©DrägerSafetyUKLimited
Edition13–November2018(Edition01–June2010)
Subject to alteration
5.2.3 Carrying harness – Thorough cleaning
!
CAUTION
 Thorough cleaning may only be carried out by suitably trained
personnel. Disassembly of the breathing apparatus by untrained
personnelisnotpermittedandmaydamagetheapparatus.
1. Remove the harness from the carrying system and clean using one of the
followingmethods:
 a. Cleanmanuallyinabathcontainingrecommendedcleaningordisinfecting
agents.
 b. Machinewash(at86°F(30°C))usingasuitablecleaningagent.
2. Rinse the harness thoroughly with clean water to remove all cleaning and
disinfectingagents.
3. Dryallcomponentsincludinginternalparts.
5.3 Maintenance work
5.3.1 Air cylinder charging
!
WARNING
 Airqualityforcompressed-aircylindersmustconformtotheminimum
grade requirements for Type 1 gaseous air as dened in the CGA
CommoditySpecicationforAir,G-7.1(GradeDorhigherquality)and,
where appropriate, be in accordance with: NFPA 1989 Standard on
BreathingAirQualityforEmergencyServicesRespiratoryProtection.
Refertotheinstructionssuppliedwiththecylinderandthechargingapparatus
forrechargingacompressed-aircylinder.
6 Storage
6.1 Storage preparation
● Extendtheshoulderstraps,waistbeltandtheheadharnessstrapsofthe
facemask.
● Forstorage,place thefacemaskinaprotectivebag (contactDrägerfor
supplyofasuitablebag).
● Routerubberhosesinsuchawaythatthebendradiusisnottooacuteand
thehoseisnotstretched,compressedortwisted.
● Withthesystemswitchedoff,asmallamountofbatterypowerisconsumed.
Ifthesystemisnottobeusedforalongperiod,removethebatteries(see
Section3.5.2).
6.2 Storage conditions
● Storetheequipmentbetween5°Fand77°F(-15°Cand+25°C).Ensure
thattheenvironmentisdry,freefromdustanddirt,anddoesnotsubjectthe
equipmenttowearordamageduetoabrasion.Donotstoretheequipment
indirectsunlight.
● Fix the breathing apparatus securely to any raised mounting point to
preventitfromfalling.
7 Disposal
Disposeofusedbatteriesinaccordancewithnationalorlocalregulations.When
required,disposeofotherpartsofthebreathingapparatus,includingelectrical
and electronic equipment, in line with any national or local environmental
regulations.
8 Technical data
Compressed-aircylinders:
● 30minutesto60minutescapacity
● 2216psior4500psipressure
● Aluminumorcompositematerials.
Cylinderhigh-pressureconnectors:
● 2216psiconnectortoCGA346
● 4500psiconnectortoCGA347
● Quick-connectcylindercoupling(2216psior4500psi).
Power supplies:
● Mainbattery:7.5V
● Back-upbattery:3V
● Head-updisplaybattery:3V.
RICUACConnector
● 2216 psi or 4500 psi, male, quick-release coupling with pressure relief
valve.
Lungdemandregulatortofacemaskconnector
● Drägerpush-inconnector.
EOSTAlarms–Activationcommencementrange(mechanicalandelectronic):
● 2216psicylinder:600psito510psi
● 4500psicylinder:1215psito1035psi.
9 Special instructions
9.1 Use of an independent air supply (supplied air-
line respirator (SAR) connection)
!
WARNING
 Airqualitymustconformtothestatutoryrequirements.
 Use of an airline connection by a second person (buddy-breather)
voidsNIOSHapproval.
 Thetimerequiredforthewearertoescapetoasafeareamustbewithin
the remaining breathing time of the cylinder, taking into account the
remainingaircontentinthecylinderandthebreathingrateofthewearer.
Independentairsuppliesmustmeetthefollowingstandards:
● Type-1 gaseous air as dened in: CGA Commodity Specication forAir,
G-71(gradeDorhigher)
● NFPA 1989 Standard on BreathingAir Quality for Fire and Emergency
ServicesRespiratoryProtection
● Airsupplypressure:87psito125psi
● Airlinehoselength:5feetto300feet(maximumworkinghoselengthmust
notexceed12individualhoselengths)
● Airlineowrate:550liters/minute
● Approvedforuseattemperaturesabove-25°F(-31.7°C).
i
i
NOTICE
 Sentinel7000alarmsandwarningsignalswilloperateasnormal.The
user interface display will show cylinder pressure when the cylinder
valveisopen.
1. Turnontheindependentairsupply.
2. Connecttheindependentairsupplycouplingtothesecondarysupplyhose
(seethePSSSeriesPneumaticAccessoriesInstructionsforUse3355853)
andbreathenormally.
3. Closethecylindervalve(ifthewhistle sounds,silenceitby takingseveral
short deep breaths or momentarily operating the lung demand regulator
bypassbutton(Fig3,Item3).
4. Ifanyairsupplyproblemsareencountered,proceedasfollows:
 a. Openthecylindervalvetoreturntobreathingfromtheattachedcylinder.
 b. Disconnecttheindependentairsupplycoupling.
 c. Leavethe hazardousareaby theshortestand safestescape route,if
necessary.
9.2 CBRN Use
TheDrägerPSS5000SeriesiscertiedbyNationalInstituteforOccupational
Safety and Health (NIOSH), for chemical, biological, radiological or nuclear
(CBRN) use and by the Safety Equipment Institute (SEI) to meet the
requirements of NFPA 1981. Approvals are only valid when the apparatus
is used with compressed-air cylinders approved by NIOSH. Equipment
congurations for CBRN use are detailed in a CBRN Approval Label (see
CBRNApprovalLabel3356226).
Dräger recommend that a quantitative t test (QNFT) be performed on the
facemaskbeforeuseinaCBRNenvironment.Thettestmustbeconducted
strictlyinaccordancewiththerequirementsoutlinedintheOSHARespiratory
ProtectionStandard29CFR,Section1910.134.
9.3 Cautions and limitations
D –Air-linerespiratorscan beusedonlywhentherespiratorsaresuppliedwith
respirableairmeetingtherequirementsofCGAG–7.1,GradeDorhigher
quality.
E –Use only the pressure ranges and hose lengths specied in the User’s
Instructions.
I –Containselectricalpartsthatmaycauseanignitioninammableorexplosive
atmospheres.
J –Failuretoproperlyuseandmaintainthisproductcouldresultininjuryordeath.
M–All approved respirators shall be selected, tted, used, and maintained in
accordancewithMSHA,OSHA,andotherapplicableregulations.
N –Neversubstitute,modify,add,oromitparts.Useonlyexactreplacementparts
inthecongurationasspeciedbythemanufacturer.
O –Referto User’sInstructions and/ormaintenance manualsforinformationon
useandmaintenanceoftheserespirators.
S –Special or critical User’s Instructions and/or specic use limitations apply.
RefertoUser’sInstructionsbeforedonning.
CBRN Use
Q–Use in conjunction with personal protective ensembles that provide
appropriatelevelsofprotectionagainstdermalhazards.
R –SomeCBRNagentsmaynotpresentimmediateeffectsfromexposure,but
canresultindelayedimpairment,illnessordeath.
T –Direct contact with CBRN agents requires proper handling of the
SCBA after each use and between multiple entries during the same
use. Decontamination and disposal procedures must be followed. If
contaminated with liquid chemical warfare agents, dispose of the SCBA
afterdecontamination.
U –Therespiratorshouldnotbeusedbeyond6hoursafterinitialexposureto
chemicalwarfareagentstoavoidpossibilityofagentpermeation.
S – Special or Critical Users Instructions
● Approvedforuseattemperaturesabove-25°F(-31.7°C).
● Whenusedasacombinationsupplied-airrespirator/self-containedbreathing
apparatus(SAR/SCBA),notmorethan20percentoftheairsupplycanbe
usedduringentry.
● Duringsuppliedairuse,thecylindervalvemustremainclosed.Ifthesupplied
airfails,openthecylindervalveandimmediatelyproceedtofreshair.
● Supplied air source must meet the following criteria: pressure 87 psi to
125psi,airowrateatleast550liters/minute.
Important Note: If it is decided to exit the working area with the airline
disconnected or, in an emergency, if the air supply fails, breathe normally
and immediately proceed as follows:
● Open the cylinder valve (counterclockwise) slowly, but fully, and breathe
normally.
● Disconnectthehoseoftheindependentairsupplyfromthemalecoupling
oftheairlinehoseconnection.Breathenormallyandimmediatelyleavethe
hazardousareabytheshortestandsafestroute.
Safety Warning: The remaining duration begins from the time of opening
the cylinder valve and disconnecting the independent air supply. The time
required to allow the wearer to escape to a safe area must be within the
remaining air capacity (volume) of the cylinder taking into account the
breathing rate of the wearer.
RIC UAC Use
● UseoftheRICUACshouldbebytrainedandcompetentpersonnelonly.
● The RIC UAC lling hose is a required component of the NFPA 1981
certication.OnlyuseallinghosewhichhasbeencertiedtoNFPA1981
foruseinimmediatelydangeroustolifeorhealth(IDLH)atmospheres.
● DonotusetheRICUACconnectionforsecondperson(buddy-breather).
● DonotusetheRICUACsupportpacktotransferairfromonecompressed-
airbreathingapparatustoanother.
● Do not allow oil, grease or other contaminants to contact the RIC UAC
connection.
● DonotattempttodisassembleorrepairtheRICUACconnection.
● Caution:ThesecondaryairsupplypressuretotheRICUACmustnotexceed
maximumratedworkingpressureofthecylinder(s)beinglled.
● Caution:IfthepressurereliefvalveoftheRICUACisactivated,theSCBA
mustbereturnedtothenearestDrägerbranchoragent.
● Caution: If a leak is detected while relling in a contaminated or oxygen-
decient gaseous atmosphere, stop relling and immediately leave the
hazardousarea.
10 Warranty information
UnlessotherwiseagreedbetweenDrägerandthecustomer,thefollowingshall
applyin theeventofdefectsof theproduct inmaterial orworkmanship:The
customer shall contact the company where he bought the product (“Seller”).
The warranty conditions agreed between the customer and the Seller shall
apply.TheproductmustbeusedinstrictaccordancewiththeInstructionsfor
Use.AnyusedisregardingtheInstructionsforUsemayvoidwarranty.
11 Contact Details
Anyissueswiththeequipment,includingdamage,malfunction,orfailure
ofthebreathingapparatusthatmaypresentahazardtotheusershould
bereportedtoDrägerUSCustomerService–Phone:1-800-437-2437.
Contact with the certication organizations may be reached at: NIOSH,
NPPTL–Phone1-412-386-4000
SEI (NFPA) – 1307 Dolley Madison Blvd, Suite 3A, McLean, VA 22101
Phone 1-703-442-5732
DraegerSafetyUKLimited
UllswaterClose Tel +441670352891
Blyth,NE244RG Fax +441670356266
UnitedKingdom www.draeger.com

Other Dräger Respiratory Product manuals

Dräger saver PP Series User manual

Dräger

Dräger saver PP Series User manual

Dräger X-plore 8000 User manual

Dräger

Dräger X-plore 8000 User manual

Dräger Oxy K 30 E User manual

Dräger

Dräger Oxy K 30 E User manual

Dräger X-plore 1950 User manual

Dräger

Dräger X-plore 1950 User manual

Dräger X-plore 5500 User manual

Dräger

Dräger X-plore 5500 User manual

Dräger X-plore 5500 User manual

Dräger

Dräger X-plore 5500 User manual

Dräger Panorama Nova P - sideport - RA User manual

Dräger

Dräger Panorama Nova P - sideport - RA User manual

Dräger Panorama Nova S-RP User manual

Dräger

Dräger Panorama Nova S-RP User manual

Dräger X-plore 6300 User manual

Dräger

Dräger X-plore 6300 User manual

Dräger Oxy 3000 T User manual

Dräger

Dräger Oxy 3000 T User manual

Dräger X-plore 8000 User manual

Dräger

Dräger X-plore 8000 User manual

Dräger PAS Colt PPM User manual

Dräger

Dräger PAS Colt PPM User manual

Dräger NIV Operating instructions

Dräger

Dräger NIV Operating instructions

Dräger X-plore 1300 Series User manual

Dräger

Dräger X-plore 1300 Series User manual

Dräger saver PP Series User manual

Dräger

Dräger saver PP Series User manual

Dräger Oxy 3000 MK III User manual

Dräger

Dräger Oxy 3000 MK III User manual

Dräger Oxy 3000 MK II User manual

Dräger

Dräger Oxy 3000 MK II User manual

Dräger Prestor 5000 User manual

Dräger

Dräger Prestor 5000 User manual

Dräger PARAT 4000 Series User manual

Dräger

Dräger PARAT 4000 Series User manual

Dräger PSS 5000 series User manual

Dräger

Dräger PSS 5000 series User manual

Dräger X-plore 2100 User manual

Dräger

Dräger X-plore 2100 User manual

Dräger PAS Micro Series User manual

Dräger

Dräger PAS Micro Series User manual

Dräger Panorama Nova RA User manual

Dräger

Dräger Panorama Nova RA User manual

Dräger X-plore 6000 User manual

Dräger

Dräger X-plore 6000 User manual

Popular Respiratory Product manuals by other brands

INTERSPIRO Inspire user manual

INTERSPIRO

INTERSPIRO Inspire user manual

Sundstrom SR 63 User instructions

Sundstrom

Sundstrom SR 63 User instructions

Weinmann JOYCE Device Description and Instructions for Use

Weinmann

Weinmann JOYCE Device Description and Instructions for Use

3M 6100 quick start guide

3M

3M 6100 quick start guide

Sundstrom SR500EX manual

Sundstrom

Sundstrom SR500EX manual

Avita NE10 instruction manual

Avita

Avita NE10 instruction manual

ResMed AirFit F30i user guide

ResMed

ResMed AirFit F30i user guide

Gima EOLO user manual

Gima

Gima EOLO user manual

PHILIPS Respironics OptiLife Instructions for use

PHILIPS Respironics

PHILIPS Respironics OptiLife Instructions for use

Drive Nebulizers 18080 Instruction guide

Drive

Drive Nebulizers 18080 Instruction guide

Sanosil Q-Jet Advanced 2 Series Operation and maintenance manual

Sanosil

Sanosil Q-Jet Advanced 2 Series Operation and maintenance manual

PHILIPS Respironics BiPAP Synchrony Setup guide

PHILIPS Respironics

PHILIPS Respironics BiPAP Synchrony Setup guide

3M VFlex 9105 User instructions

3M

3M VFlex 9105 User instructions

OCENCO EBA-75 instruction manual

OCENCO

OCENCO EBA-75 instruction manual

Roscoe Medical DINOSAUR Series manual

Roscoe Medical

Roscoe Medical DINOSAUR Series manual

3M 9542V User instructions

3M

3M 9542V User instructions

ERA 1100 instructions

ERA

ERA 1100 instructions

Sealey Worksafe 2005V/12 quick start guide

Sealey

Sealey Worksafe 2005V/12 quick start guide

manuals.online logo
manuals.online logoBrands
  • About & Mission
  • Contact us
  • Privacy Policy
  • Terms and Conditions

Copyright 2025 Manuals.Online. All Rights Reserved.