manuals.online logo
Brands
  1. Home
  2. •
  3. Brands
  4. •
  5. dreo
  6. •
  7. Heater
  8. •
  9. dreo DR-HSH009S User manual

dreo DR-HSH009S User manual

Looking for help?
Contact us to get expert support.
DR-HSH009S
www.dreo.com
Mon- Fri, 9:00 am-5:00 pm PST/PDT
support@dreo.com (888) 290-1688 www.dreo.com
Smart Wall
Mounted Heater
USER MANUAL
EXTEND
YOUR WARRANTY
FOR FREE
Scan or visit dreo.com/warranty
To extend your warranty for free by registering your product. If
you have any product issues, we always stand ready to help.
support@dreo.com
www.dreo.com
Mon - Fri, 9:00 am-5:00 pm PST/PDT
(888) 290-1688
Thanks for
Choosing
DREO!
Your support means the world to us. We
hope you enjoy our product as much as
we did creating it.
IMPORTANT SAFETY
INSTRUCTIONS
IMPORTANT INSTRUCTIONS
12
CONTENTS
01
01
02
IMPORTANT SAFETY
INSTRUCTIONS
2-4
KNOWING YOUR
HEATER
5
03 04
INSTALLATION
INSTRUCTIONS
6-7
OPERATING
INSTRUCTIONS
8
05 06
USING YOUR HEATER
9-12
CLEANING AND
MAINTENANCE
13-14
07
TROUBLESHOOTING
15-16
08
DREO CUSTOMER CARE
17-18
When using electrical
appliances, basic precautions
should always be followed to
reduce the risk of fire, electric
shock, and injury to persons,
including the following:
Do not use the fan heater
near flammables and
combustibles.
CAUTION - High
temperature, risk of fire,
keep electrical cords,
drapery, furnishings, and
other combustibles at least 3
feet (0.9) from the front of
the heater and away from
the side and rear.
1. Read all instructions before installing or using this heater.
2. This heater is hot when in use. To avoid burns, do not let bare skin touch hot surfaces. Keep
combustible materials, such as furniture, pillows, bedding, papers, clothes, etc. And curtains at
least 3 feet (0.9m) from the front of the heater and keep them away from the sides
(restrictions apply to location dedicated heaters only).
3. Extreme caution is necessary when any heater is used by or near children or invalids and
whenever the heater is left operating and unaended.
4. Do not operate any heater after it malfunctions. Disconnect power at service panel and
have heater inspected by a reputable electrician before reusing.
5. To disconnect the heater, turn o power from the control panel or remote control, wait for
the heater to stop blowing air (about 30 seconds), and unplug the heater from its power
outlet.
>3ft
6. CAUTION: TO PREVENT ELECTRIC SHOCK, MATCH WIDE BLADE OF PLUG TO WIDE SLOT AND
FULLY INSERT.
7. In order to avoid overheating, do not cover the heater. It cannot be used in a wardrobe.
8. Do not use outdoors.
9. CAUTION: Whenever the heater is left operating unaended, caution may be necessary if
children or invalids are nearby.
10. The appliance should not be used by children or persons with reduced physical, sensory or
mental capabilities, or lack of experience and knowledge, unless they have been given
supervision or instruction.
11. Do not insert or allow foreign objects to enter any ventilation or exhaust opening as this
may cause an electric shock or fire, or damage the heater.
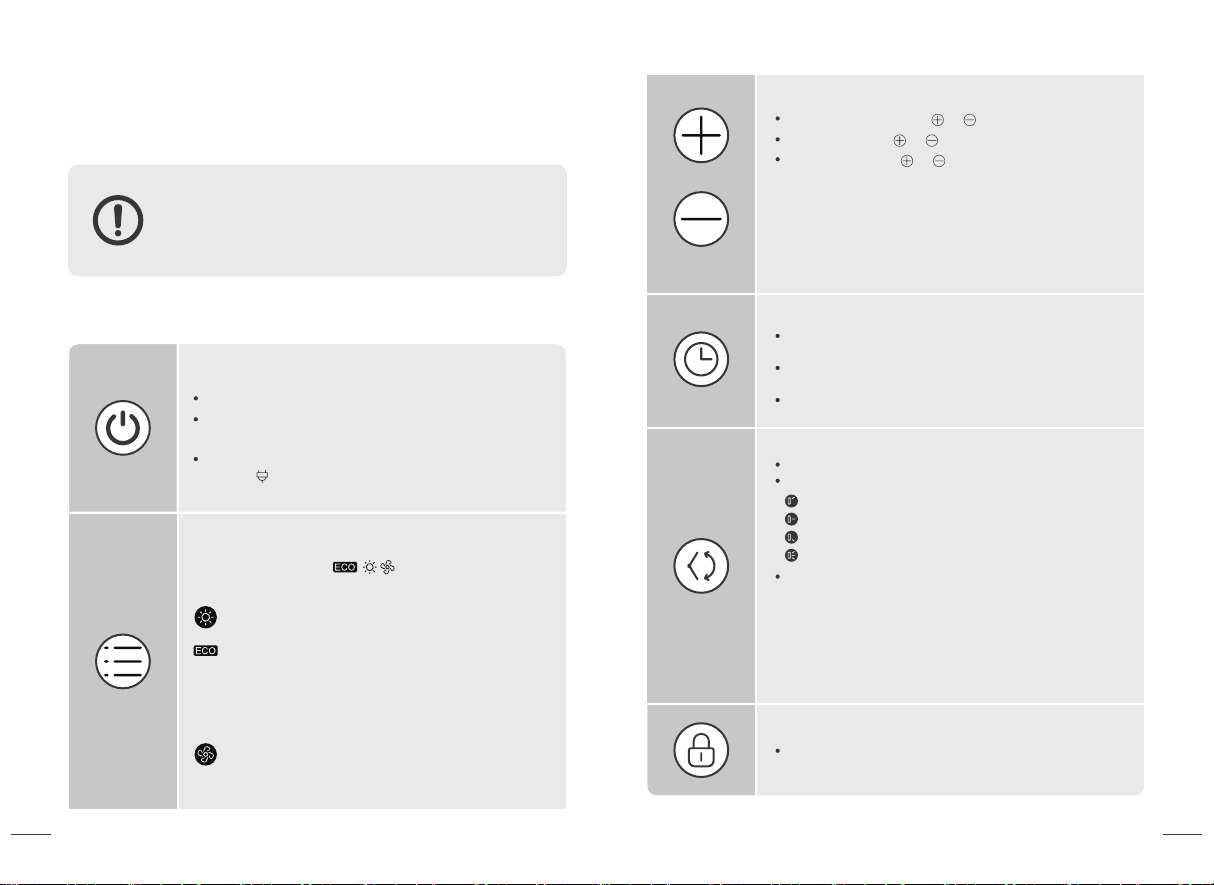
12. Do not operate the outlet fin manually as this may cause malfunction and risk of fire. Always
use the control panel, remote control or the Dreo app to change the blowing angle.
13. Unsupervised children should be instructed not to play with the appliance.
14. Do not let children operate the appliance through the Dreo app.
15. To prevent a possible fire, do not block air intakes or exhaust in any manner.
16. Do not operate any heater with a damaged cord or plug or after the heater malfunctions,
has been dropped or damaged in any manner. Discard heater, or return to an authorized
service facility for examination and/or repair.
17. If the supply cord is damaged, it must be replaced by the manufacturer, its service agent, or
similarly qualified persons in order to avoid hazard.
18. A heater has hot and arcing or sparking parts inside. Do not use it in areas where gasoline,
paint, or flammable vapors or liquids are used or stored.
19. There is a thermostat limiter inside the heater. When the inner temperature over-heats or
abnormal heating occurs, the heater will automatically cut o power supply to avoid risk of fire
or damage to the heater.
20. Use this heater only as described in this manual. Any other use not recommended by the
manufacturer may cause fire, electric shock, or injury to persons.
21. The output of this heater may vary and its temperature may become hot enough to burn
exposed skin. Use of this heater is not recommended for persons with a high sensitivity to
heat or an inability to react to avoid burns.
22. Do not aempt to modify or repair the product by yourself. Doing so could void the
warranty and cause damage or personal injury. Only a repair technician may disassemble or
repair this product.
23. Make sure that no pieces of polystyrene or other packaging material have been left
between elements of the appliance. It may be necessary to pass over the appliance with a
vacuum cleaner.
24. If the machine is not working as it should, has received a sharp blow, has been dropped,
damaged, left outdoors, or dropped into water, do not use and contact Customer Support.
25. Do not run the cord under carpeting. Do not cover the cord with throw rugs, runners, or
similar coverings. Do not route cord under furniture or appliances. Place the cord away from
high traic areas. Place the cord where it will NOT cause tripping hazard.
26. Extreme caution is necessary when any heater is used by or near children or invalids and
whenever the heater is left operating and unaended.
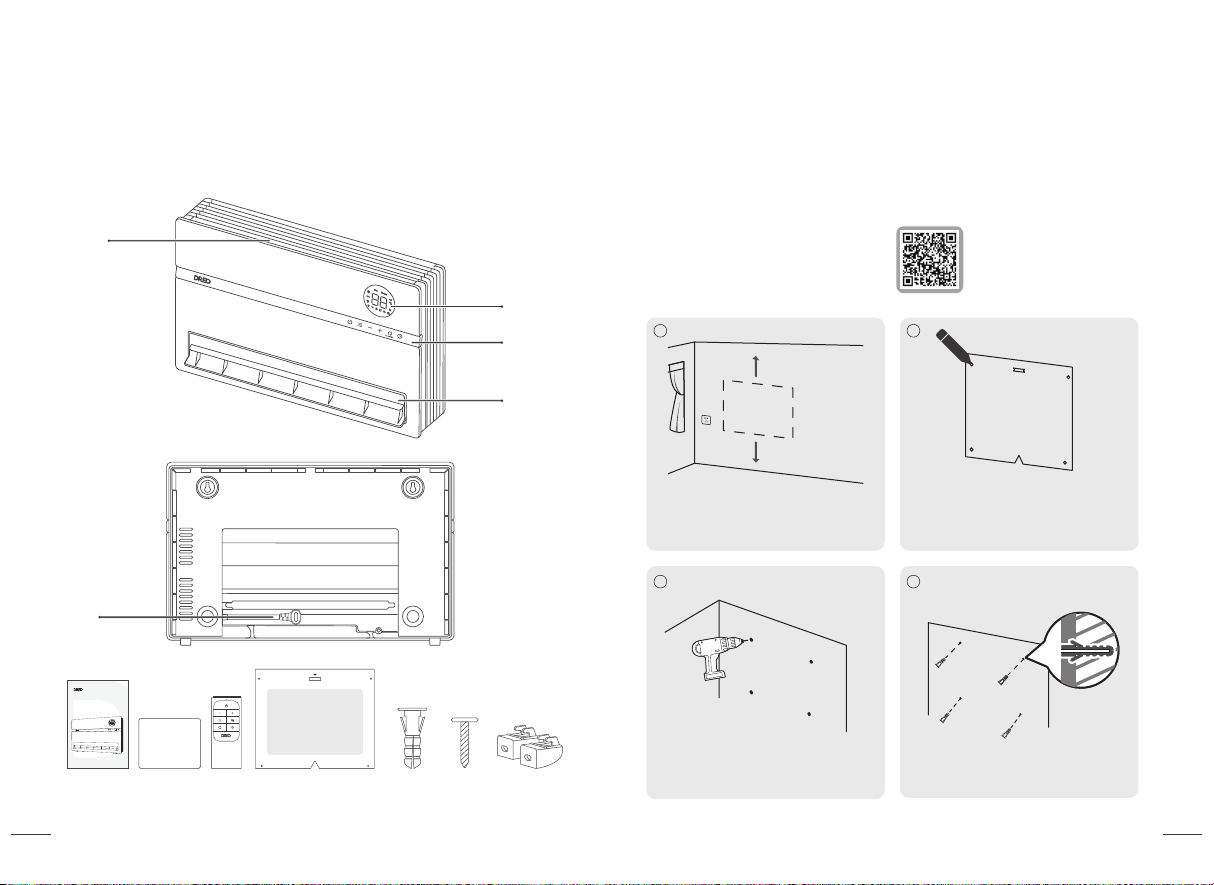
27. This heater is intended for use as WALL MOUNTED heater only. Failure to properly secure
the heater to a flat, level and vertical wall may result in heater malfunction and/or property
damage.
28. This heater is not intended for use in bathrooms, laundry areas and similar indoor locations.
Never locate heater where it may fall into a bathtub or other water container.
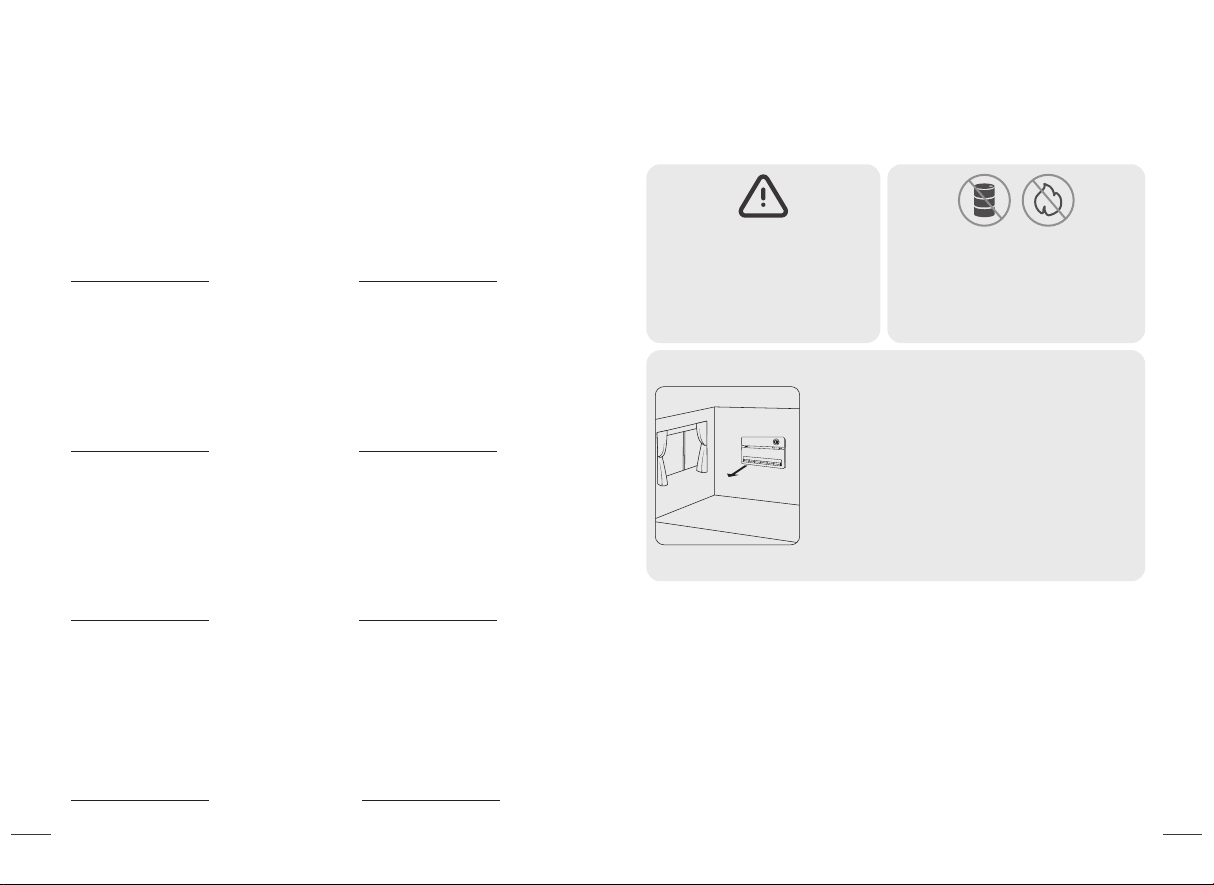
29. CAUTION - High temperature, keep electrical cords, drapery, and other furnishings
at least 3 feet (0.9m) from the front of the heater and away from the side and rear.
30. Voltage protection: This heater is intended for 120V outlets only. If heater is plugged in a
240V outlet by mistake, the PCBA will cut o the heating immediately, it will show a “UH” error
code, and the heater must be unplugged. The heater will function properly when plugged in
the right voltage.
SAVE THESE INSTRUCTIONS
Gentle Reminder:
HOT SURFACE
THE FRONT SURFACE CAN BE VERY HOT
DURING USE.
DO NOT TOUCH WHEN IN USE.
Check the appliance reglarly and
refer to TROUBLESHOOTING or
contact our customer support if
it shows any of the following
signs:
- Power cord or plug is damaged.
- Loud noise, unusual smell or excessive heat.
Model
Rated Power
Input
Remote Control
Baery
DR-HSH009S
1500W
120V~60Hz
CR2025,3V
FOR HOUSEHOLD USE ONLY
READ AND SAVE THESE
INSTRUCTIONS
34
THE HEATER MUST BE PROPERLY INSTALLED BEFORE IT IS USED.
CAUTION: YOUR HEATER MUST BE INSTALLED ON A WALL. DO NOT PROP THE HEATER UP
AGAINST OBJECTS OR USE THE HEATER WITH THE GRILL PLACED VERTICALLY.
INSTALLATION
INSTRUCTIONS
KNOWING YOUR
HEATER 02 03
5x Wall
Anchors 5x
Screws
1x Drilling Guideline
with Level
2x Base
Anchors
Power & Plug
Air Inlet/ Filter
Package Contents
LED Display
Control Panel
Outlet Fin
Smart Wall
Mounted Heater
USER MANUAL
Quick Start
Guide
Tools needed for installation:
Electric Drill (5/16 inches, 96mm)
Phillips Screwdriver (5/16 inches, 150mm)
Pencil
56
Make the drillings for the
wall anchors.
Find a suitable wall to install your
heater.
Fix the WALL ANCHORS on the
drilled positions.
ONLY FOR DRYWALL
>1ft.
>1ft.
Use the drilling guide to MARK
the position of for the wall
anchors.
1 2
34
Scan the QR code to watch
the installation video.
OPERATING
INSTRUCTIONS 04
78
Aach the TWO BASE ANCHORS
into the boom of the heater. Launch Dreo and sign in or create an account by following in-app instructions.
Enable Bluetooth on your mobile device and plug in your heater.
Hold the Fan Angle buon for 5s to start WiFi connection seings.
(Tip: The WiFi icon will keep flashing when pairing.)
Tap + Add Device and select WH719S.
Follow in-app instructions to complete WiFi connection.
You’re now ready to control the appliance on your app.
(Tip: To restart connection seings, hold the Fan Angle buon again for 5 seconds.)
Long press 10 seconds power buon to unpair WiFi and restore factory seings.
CONNECTING TO YOUR HEATER
Before connecting the appliance to your mobile device, please
scan the QR code on the left or go to the app store and search
“Dreo”, then select and download the app.
This device includes the radio transmiing module whose CMIIT
ID is FCC ID: 2A3SYHSH009.
You can use the Dreo app to connect your smart heater to Amazon
Alexa or Google Assistant.
Please follow the in-app instructions to set up your voice assistant.
Note: You must create a Dreo account to access voice assistants.
1
2
3
5
6
4
1/5
inches
Screw ONLY THE TWO TOP
ANCHORS first leaving at least a
1/5 inches gap.
Unfold the power cord.
Note: Make sure the cord can
reach the outlet.
REAR
REAR
REAR
FRONT
FRONT
FRONT
Hang the heater from the top.
Make sure it is firmly hanged before
securing the boom anchors.
Screw the BASE ANCHORS to
secure the heater. Plug-in the heater.
56
78
910
In Power Heat mode, touch or to adjust the heating level.
In ECO mode, touch or to adjust the set temperature.
In Timer mode, touch or to set the timer between (0-24h).
Heat Level/ Temperature
Note:
In ECO mode, the heater will flash the ℉/℃ indicator light and turn
o automatically when the set temperature has been reached. If
your heater turns o frequently, please raise the set temperature
or switch to Power Heat mode.
Timer
When the heater is on, touch to set a timer (0-24h). After the
timer ends, the heater will turn o automatically.
To cancel, press the timer buon again or set the timer to “”
hour.
Long press for 3s to deactivate the schedule function.
Long press + and - for 3s (LED display will show a countdown) to
activate/deactivate Child Lock.
Child Lock
Touch to change air blowing angle from 120/90/60/Oscillation.
The LED Display indicates the angle of fan angle accordingly:
Long press for 5s to enter WiFi pairing mode (LED WiFi indicator
will flash and a countdown will be shown on the display while long
pressing.)
Fan Angle
60°
90°
120°
Oscillation
Caution: Moving the outlet fin manually could lead to malfunction
and risk of fire.
Note: When turning o the heater, it will continue to blow air for
30s to close the air outlet.
Control Panel
USING YOUR HEATER 05
CAUTION: Moving the outlet fin manually could lead to
malfunction and risk of fire.
Always use the control panel, remote control or the Dreo app to
change the blowing angle.
Touch to turn the heater on or o.
Long press for 10s to restore factory seings.
Note:
When the heater is plugged into the electric outlet, the power
indicator will light in red.
Power On/O
10
Touch to switch between .
Long press for 5s to calibrate the thermostat temperature.
Mode Seings
The heater will automatically select its optimal heating power,
depending on the dierence between the set temperature
(41-95°F) and room temperature.
Note:
- When activating ECO Mode, the display will flash the target
temperature for 3 seconds.
Fan Only.
Power Heat with three heating levels:
H1(900W), H2(1300W), H3(1500W).
9
Remote Control
Baery Replacement
Overheat
Protection
Thermostat
Calibration
When the fin is working abnormally, the appliance will stop heating
to avoid risks of fire (See troubleshooting page 15.)
This thermostat comes with a built-in thermostat to read room
temperatures. If desired, the thermostat on the heater can be
calibrated to match your HVAC system using the Dreo app.
Power On/O
Heat/ Temp/Time -
Mode
Fan Angle
Heat/Temp/Time +
Mute
Timer
CR2025 3V
1
2
3
Note: If the indicator on the remote control doesn’t turn
on anymore, please consider replacing the baery.
Press the locking buon to pop out the baery holder.
Replace with the same baery type with the (+) side
facing up.
Push in the holder until securely locked into place
1.
2.
3.
Chemical Burn Hazard.
Keep baeries away from children.
WARNING
This product contains a lithium buon/coin cell baery. If a new or used lithium buon/coin
cell baery is swallowed or enters the body, it can cause severe internal burns and can lead to
death in as lile it can cause severe internal burns and can lead to death in as lile the baery
compartment does not close securely, stop using the product, remove the baery, and keep it
away from children. If you think baeries might have been swallowed or placed inside any part
of the body, seek immediate medical aention.
The baeries must bedisposed of properly, including keeping them away from children. Even
used cells may cause injury.
LED Display
More Features
In low light conditions, the Led lights will automatically turn o. You
may press any buon in the control panel, remote control or app to
turn lights back on.
Note: This function is activated by default, you can turn this feature
o/on through the Dreo app.
Display Auto
Dimming
Mute/Unmute
Target temperature
indicator
Room temperature
indicator
Hour indicator
Power Heat Temperature unit
(Use the Dreo app to switch to °C)
Schedule indicator
Timer indicator
ECO Mode
Plugged in
WiFi Indicator
Child Lock Indicator Fan Angle
Fan Only
11 12
You can turn o the beep sounds by touching on your remote
control, or in the seings of your Dreo app.
Filter Cleaning
Recommended once every month.
Cleaning and Maintenance
CLEANING AND
MAINTENANCE 06
Unscrew both sides and press the
center to remove the air inlet cover.
Rinse the air inlet cover and the filter
with lukewarm water.
DO NOT unscrew
the unit.
DO NOT use cleaning
agents.
DO NOT use abrasive
scrubbers.
Put the filter back in place, then match the
tabs in the cover with the cavities in the
heater, than press the center and screw
both sides to replace the cover.
Clean the surface of the air inlet
cover and the filter with a handheld
vacuum cleaner.
Always turn o and unplug before
cleaning.
Wait for the heating element to cool-o
before cleaning.
Outer Surface
Use a soft, dry cloth to gently wipe clean
the outer surface.
Note: Do not move the outlet fin while
cleaning.
Note: Let the filter dry properly before
placing it back on the heater.
12
3 4
ATTENTION
Fire or electrical shock hazard. DO NOT immerse the
main unit in water. NEVER allow water to get inside the
heater.
Except for cleaning, any servicing should be performed
by an authorized service representative.
Store in a cool, dry area and keep the cable out of
high-traic areas to avoid tripping hazards.
13 14
Troubleshooting
TROUBLESHOOTING 07
Problem Possible Causes Solution
Malfunction codes on
LED display
Heater does not start
The heater suddenly
stops during heating.
The heater doesn’t
raise temperature
If your problem is not listed or still persists, contact our Customer Support (see page 17).
F1 - Outlet Fin Protection
Error
In ECO mode, the heater
will turn o
automatically when the
set temperature has
been reached.
This is normal. If your
heater turns o
frequently, please raise
the set temperature or
switch to Power Heat
mode.
If you are farther away
from your heater, you
can raise the target
temperature or switch
to Power Heat mode.
No power is passing
through the unit.
The set temperature is
lower than the ambient
temperature.
Ensure that the
temperature is set to be
higher than the ambient
temperature.
The temperature
exceeds the threshold
of the thermal cuto.
Turn o and unplug the
unit. Allow it to cool and
plug into the electrical
outlet again.
Remove any objects on
or near the heater.
Ensure that your circuit
breaker or fuse is
working properly.
Wait until the heater
cools down to re-start it.
Make sure the outlet fin is
working properly.
If the problem persist,
contact Customer
Support.
F2 - Overheat Protection
BP - Outlet Fin Deviation
Unplug and wait for it to
cool down before
plugging in again.
Make sure there are no
objects obstructing the
outlet fin, re-start the
appliance.
Do not manually adjust
the outlet fin angle.
If the problem persist,
contact Customer
Support.
E1 - Temperature Sensor
Error
Unplug it from the power
source and contact
Customer Support.
E0 - PCBA Panel
Connection Error
Unplug it from the power
source and contact
Customer Support.
ECO mode doesn’t reach
my target temperature.
15 16
Default 12-Month Warranty
Extend Your Warranty
DREO CUSTOMER
CARE
This appliance is covered by Dreo warranty for 12 months from the date of its original
purchase.
Extend your warranty by registering your new appliance on our website
hps://dreo.com/warranty.
We can only provide after-sales service for products that are sold by Dreo or Dreo authorized
retailers and distributors. If you have purchased the appliance from a dierent place, please
contact your seller for return and warranty issues.
The warranty will not apply in cases of:
Accident, misuse, or repairs performed by unauthorized personnel.
Any unit that has been tampered with or used for commercial purposes.
Normal wear and tear of wearable parts.
Use of force, damage caused by external influences.
Damage caused by non-observance of the User Manual, e.g. connection to an unsuitable
mains supply or noncompliance with the instructions.
Partially or completely dismantled appliances.
Defects caused by or resulting from damages from shipping or from repairs, service, or
alteration to the product or any of its parts that have been performed by a repair person not
authorized by Dreo.
1.
2.
3.
4.
5.
6.
7.
17 18
08
Rev_1.0_EN
We’re Here to Help!
Shenzhen Hesung Innovation Technology Co., LTD
26F, Bldg A7, Creative City, Shenzhen, China
www.dreo.com
(888) 520-3736 Mon - Fri, 9:00 am-5:00 pm PST/PDT
[email protected]
MADE IN CHINA
Intertek
5020677
FCC Statement
This device complies with Part 15 of the FCC Rules.
This equipment has been tested and found to comply with the limits for a
Class B digital device, pursuant to Part 15 of the FCC Rules. These limits are
designed to provide reasonable protection against harmful interference in a
residential installation.This equipment generates, uses and can radiate
radio frequency energy and, if not installed and used in accordance with the
instructions, may cause harmful interference to radio communications.
However, there is no guarantee that interference will not occur in a
particular installation.
Please note that changes or modifications of this product is not expressly
approved by the party responsible for compliance could void the user's
authority to operate the equipment.
If this equipment does cause harmful interference to radio or television
reception, which can be determined by turning the equipment o and on,
the user is encouraged to try to correct the interference by one or more of
the following measures:
-Reorient or relocate the receiving antenna.
-Increase the separation between the equipment and receiver.
-Connect the equipment into an outlet on a circuit dierent from that to
which the receiver is connected.
-Consult the dealer or an experienced radio/TV technician for help.
This device complies with Part 15 of the FCC Rules. Operation is subject to
the following two conditions: (1) this device may not cause harmful
interference, and (2) this device must accept any interference received,
including interference that may cause undesired operation.
This equipment complies with FCC radiation exposure limits set forth for an
uncontrolled environment. This equipment should be installed and operated
with a miniimum distance of 20cm between the radiator & your body. This
transmier must not be co-located or operating in conjunction with any
other antenna or transmier.

Other dreo Heater manuals

dreo DR-HSH004 User manual

dreo

dreo DR-HSH004 User manual

dreo DR-HSH002 User manual

dreo

dreo DR-HSH002 User manual

dreo DR-HSH007 User manual

dreo

dreo DR-HSH007 User manual

dreo DR-HSH010 User manual

dreo

dreo DR-HSH010 User manual

dreo Solaris Slim H3 User manual

dreo

dreo Solaris Slim H3 User manual

dreo Atom 316 User manual

dreo

dreo Atom 316 User manual

dreo OmegaHeat OH515 User manual

dreo

dreo OmegaHeat OH515 User manual

dreo DR-HSH009AS User manual

dreo

dreo DR-HSH009AS User manual

dreo DR-HSH010 User manual

dreo

dreo DR-HSH010 User manual

dreo Solaris Max User manual

dreo

dreo Solaris Max User manual

dreo DR-HSH003 User manual

dreo

dreo DR-HSH003 User manual

dreo DR-HSHS004A User manual

dreo

dreo DR-HSHS004A User manual

dreo Atom One User manual

dreo

dreo Atom One User manual

dreo DR-HSH005 User manual

dreo

dreo DR-HSH005 User manual

dreo DR-HSH011 User manual

dreo

dreo DR-HSH011 User manual

dreo DR-HSH002 User manual

dreo

dreo DR-HSH002 User manual

dreo Solaris Slim H2 User manual

dreo

dreo Solaris Slim H2 User manual

Popular Heater manuals by other brands

Well Straler RC-17 user guide

Well Straler

Well Straler RC-17 user guide

Rointe Kyros instruction manual

Rointe

Rointe Kyros instruction manual

Heatilator Maxus MAX60L Installation & operating instructions

Heatilator

Heatilator Maxus MAX60L Installation & operating instructions

Gasmate EH515 user guide

Gasmate

Gasmate EH515 user guide

Jata JCRC2115 Instructions of use

Jata

Jata JCRC2115 Instructions of use

Vent-Axia Optimax Plus Storage VASH050E instruction manual

Vent-Axia

Vent-Axia Optimax Plus Storage VASH050E instruction manual

Uberhaus 68125104 Operator's manual

Uberhaus

Uberhaus 68125104 Operator's manual

Roberts Gorden DualAir DAT100 Operation and service manual

Roberts Gorden

Roberts Gorden DualAir DAT100 Operation and service manual

Trotec TCH 1 E operating manual

Trotec

Trotec TCH 1 E operating manual

Jaga BRIZA041 Wall Mounting instructions

Jaga

Jaga BRIZA041 Wall Mounting instructions

Emil Lux 370163 Original instructions

Emil Lux

Emil Lux 370163 Original instructions

Easy Radiant Works ED-40U operating instructions

Easy Radiant Works

Easy Radiant Works ED-40U operating instructions

Watlow CAST-X 500 Specifications

Watlow

Watlow CAST-X 500 Specifications

DeLonghi HSX4324E manual

DeLonghi

DeLonghi HSX4324E manual

Desa RLP30SP owner's manual

Desa

Desa RLP30SP owner's manual

EUROM RK2009N instruction manual

EUROM

EUROM RK2009N instruction manual

AUTOTERM PLANAR-2D-12/24 installation instructions

AUTOTERM

AUTOTERM PLANAR-2D-12/24 installation instructions

HeatPerformance Heated SLIPPERS user guide

HeatPerformance

HeatPerformance Heated SLIPPERS user guide

manuals.online logo
manuals.online logoBrands
  • About & Mission
  • Contact us
  • Privacy Policy
  • Terms and Conditions

Copyright 2025 Manuals.Online. All Rights Reserved.