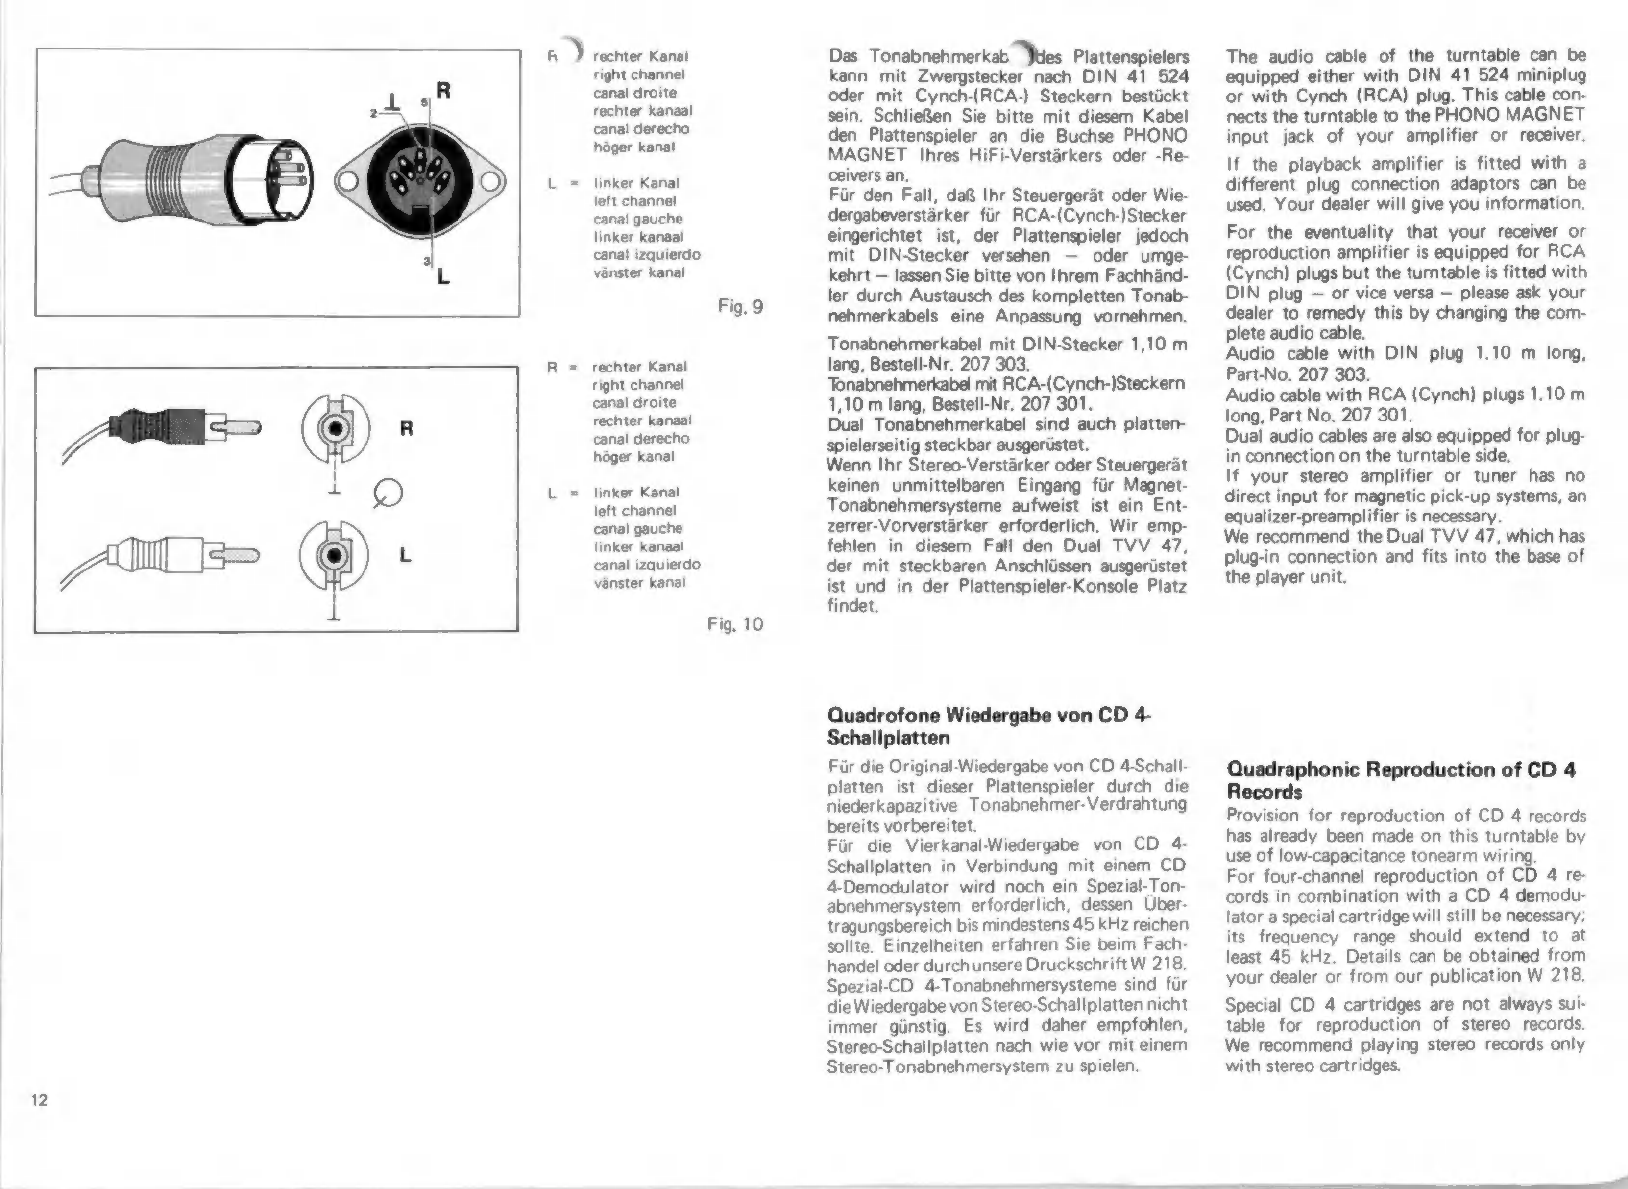
Dual 510 User manual

€
«
Bedienungsanleitung
Operating
instructions
Notice
demploi
Gebruiksaanwijzing
Instrucciones
de
manejo
Bruksanvisning

Sehr
geehrter
Schallplattenfreunu
`
Die
Bedienung
Ihres
neuen
Plattenspielers
ist
sehr
einfach.
Trotzdem
bitten
wir,
diese
Anleitung
zu
lesen,
bevor
Sie
das
Gerät
in
Betrieb
nehmen.
Die
für
die
erstmalige
Inbetriebnahme
notwendigen
Hinweise
finden
Sie
auf
den
Seiten
6
bis
14
dargestellt,
während
die
eigentliche
Bedienung
des
Gerätes
auf
den
Seiten
14
bis
16
erklärt
ist.
Eine
Gesamtabbildung
mit
Kurzbeschreibung
aller
Bedienungselemente
finden
Sie
auf
den
ausklappbaren
Umschlagseiten.
Diese
Anleitung
soll
gleichzeitig
technisches
Handbuch
Ihres
Gerätes
sein
und
Ihnen
die
vielen
Besonderheiten
erläutern.
Aus
diesem
Grunde
empfehlen
wir
auch
die
übrigen
Seiten
Ihrer
Aufmerksamkeit.
Wir
wünschen
Ihnen
nun
viel
Freude
mit
Ihrem
Dual
510.
Dear
Music
Lover
Operating
your
new
automatic
turntable
is
very
simple.
However,
you
should
read
the
instructions
carefully
before
you
operate
the
turntable
for
the
first
time.
On
pages
6
through
14
you
will
find
instructions
showing
the
steps
to
be
taken
before
the
initial
operation.
Pages
14
through
16
show
operating
instructions
for
the
unit
itself.
The
last
page
is
foldable
and
you
will
find
an
overall
detailed
description
of
the
operating
features.
These
operating
instructions
give
you
the
technical
information
regarding
the
particular
engineering
features
of
this
outstanding
turntable.
For
this
reason
we
ask
you
to
read
every
page
carefully.
Good
listening
with
your
Dual
510.
Cher
ami
discophile
L'emploi
de
votre
nouvelle
platine
est
très
simple.
Cependant,
nous
vous
conseillons
de
lire
le
mode
d’emploi
avant
de
vous
en
srevir.
Les
instructions
de
premiére
mise
en
service
se
trouvent
pages
7
à
15.
Les
instructions
propres
a
l'appareil
se
trouvent
pages
15
a
17.
Sur
la
derniére
page
de
votre
couverture,
dépliable,
se
trouve
un
schéma
d'en-
semble
avec
une
description
de
tous
les
éléments.
Nous
voudrions
que
ce
mode
d’emploi
soit
votre
manuel
technique
où
vous
trouverez
expliquées
les
nombreuses
particularités
que
recèle
cette
platine
inhabituelle
et
exceptionnelle.
C'est
la
raison
pour
laquelle
nous
attirons
votre
attention
sur
toutes
les
informations
contenues
dans
ce
mode
d'emploi.
Nous
sommes
certain
que
votre
platine
Dual
510
sera
pour
vous
une
source
de
satisfaction.
a
Geachte
gra..\mofoonplatenliefhebber
De
bediening
van
uw
nieuwe
platenspeler
is
zeer
eenvoudig.
Toch
verzoeken
wij
u
deze
gebruiksaanwijzing
aandachtig
te
lezen,
voordat
u
het
apparaat
gaat
gebruiken.
De
voor
de
eerste
in
gebruikname
nodige
aanwijzingen
vindt
u
op
de
bladzijden
7
tot
15
beschreven
terwijl
de
eigenlijke
bediening
op
de
bladzijden
15
tot
17
uiteengezet
wordt.
Een
afbeel-
ding
van
het
geheel
met
een
korte
beschrijving
vindt
u
op
de
uitvouwbare
laatste
omslag-
pagina's.
Deze
gebruiksaanwijzing
maar
een
technisch
handboek
voor
uw
apparaat
zijn,
waarin
ook
de
vele
bijzonderheden
die
deze
ongewone
platenspeler
kenmerken
worden
uiteengezet.
Het
is
hierom
dat
wij
ook
de
overige
pagina's
van
de
gebruiksaanwijzing
graag
in
uw
aan-
dacht
aanbevelen.
Wij
wensen
u
veel
plezier
met
uw
Dual
510.
Estimado
aficionado
a
los
discos
EI
manejo
de
su
nuevo
tocadiscos
es
muy
sencillo.
Sin
embargo,
le
rogamos
leer
atenta-
mente
estas
instrucciones
antes
de
poner
en
marcha
el
aparato.
Las
indicaciones
necesarias
para
poner
en
marcha
el
tocadiscos
por
primera
vez
se
detallan
en
las
páginas
7
a
15,
mientras
que
en
las
páginas
15
a
17
se
indican
las
operaciones
para
el
servicio
normal
del
aparato,
Abriendo
la
parte
doblada
de
esta
hoja
encontrará
una
vista
general
del
aparato
con
indicación
de
todos
los
elementos
de
mando.
Este
prospecto
le
informará
al
mismo
tiempo
sobre
las
características
técnicas
que
posee
este
tocadiscos
tan
extraordinario.
Por
este
motivo
recomendamos
también
prestar
aten-
ción
al
resto
de
la
hojas.
Por
último,
le
deseamos
muchas
satisfacción
con
su
Dual
510.
Arade
kunder
Detta
ar
en
handledning
som
fordrar
nágra
minuters
uppmärksamhet
fran
Er
sida.
Det
kan
vara
värt
denitiden
även
om
skivspelaren
ar
mycket
lätt
att
sköta.
Studera
först
bilden
pá
de
utfällbara
omslagsidorna
sá
att
Ni
lär
känna
Dual
510
och
lätt
hittar
de
olika
manéverorganen,
Varje
funktion
ar
dessutom
tydligt
férklarad
i
text
och
bild
under
sina
resp
rubriker
pá
sidorna
15
till
17.
Men
det
ar
inte
enbart
en
enkel
bruksanvisning
utan
handledningen
upptar
även
en
be-
skrivning
av
de
tekniska
finesserna
hos
Dual
510.
Vi
ónskar
Er
mycket
gládje
med
Ert
val
av
Dual
510.


Die
Bedienung
"3
(1)
Plattenteller-Drehzahl-Einstellung
(2)
Tonhöhen-Abstimmung
(3)
Achse
für
Schallplattenzentrie-
rung
(4)
Tonarmgriff,
Tonabnehmerkopf-Verriegelung
(5)
Tonabnehmerkopf
(Systemträger)
(6)
Tonarmstütze
mit
Tonarmauflage
(7)
Tonarmverriegelung
(8)
Justierschraube
für
Tonarmauf-
setzpunkt
(9)
Justierschraube
für
Tonarmlift
(10)
Tonarmauflagekraft-Einstellung
(11)
Tonarm-Balancegewicht
(12)
Feststellschraube
für
Tonarm-
Balancegewicht
(13)
Antiskating-Einstellung
(14)
Transportsicherungsschraube
(15)
Tonarmlift
(16)
Drehknopf
für
Tonarmaufsetz-
hilfe
(17)
Leuchtstroboskop
Operation
(1)
Speed
selector
(2)
Pitch
control
(3)
Centering
spindle
(4)
Tonearm
lift
and
cartridge
holder
lock
(5)
Cartridge
holder
(6)
Tonearm
support
with
tonearm
rest
(7)
Tonearm
lock
(8)
Adjustment
screw
for
tonearm
set-down
(9)
Cue
contro!
height
adjustment
(10)
Stylus
force
setting
(11)
Tonearm
counterweight
(12)
Set
screw
for
tonearm
counter-
balance
(13)
Antiskating
setting
(14)
Transport
safety
(hold-down)
screw
(15)
Cue
control
(16)
Turning
knok
for
tonearm
lower-
ing
aid
(17)
Illuminated
strobe

Fig.
1
Fig.
2
Auspacken
und
Au
Velten
Bitte
beachten
Sie
auch
die
Hinweise
der
Packan
leitung
und,
wenn
Ihr
Dual
510
Teil
einer
HiFi-
Komplettanlage
ist,
auch
die
entsprechenden
Emp-
fehlungen
des
Herstellers
Stellen
Sie
bitte
nach
Öffnen
des
Kartons
den
Styroporeinsatz
mit
dem
kompletten
Zu
behör
zunächst
zur
Seite.
Nehmen
Sie
die
Konsole
mit
eingesetztem
Plattenspieler
aus
dem
Karton
und
stellen
Sie
das
Gerät
an
den
hierfür
vorgesehenen
Platz.
Hinweiszettel
am
Gerät
bitte
erst
lesen
und
danach
mit
den
Verpackungsfolien
entfernen.
Zum
Lösen
der
Transportsicherungsschrauben
drehen
Sie
diese
im
Uhrzeigersinn,
bis
sie
ca.
15
mm
tiefer
rutschen
und
ziehen
Sie
diese
-
durch
Weiterdrehen
im
Uhrzeigersinn
—
fest
Damit
ist
der
Plattenspieler
für
die
Spielstel-
lung
federnd
gelagert.
Wenn
Sie
das
Gerät
als
Einbau-Chassis
ge-
kauft
haben
sollten,
nehmen
Sie
bitte
das
Einsetzen
in
die
Konsole
oder
den
vorberei-
teten
Montagebrettausschnitt
wie
folgt
vor
Führen
Sie
bitte
zuerst
Netz-
und
Tonab-
nehmerkabel
durch
die
Bodenöffnung
der
Konsole.
Drücken
Sie
die
linke
hintere
Trans
portsicherungsschraube
zum
Chassisrand
und
setzen
Sie
den
Plattenspieler
mit
der
hinteren
Kante
zuerst
in
die
Konsole
so
ein,
daß
die
beiden
hinteren
Federtöpfe
in
Ihren
Bohrun-
gen
sitzen,
Verfahren
Sie
jetzt
mit
den
beiden
anderen
Transportsicherungsschrauben
in
gleicher
Weise
und
bringen
Sie
die
vorne
links
und
rechts
am
Plattenspieler
angeordneten
Feder-
töpfe
in
die
Bohrungen
der
Konsole.
Dann
ziehen
Sie
die
Transportsicherungsschrauben
im
Uhrzeigersinn
fest
und
haben
damit
das
Chassis
in
Spielstellung
federnd
gelagert.
Aufsetzen
des
Plattentellers
Nehmen
Sie
den
Plattenteller
aus
der
Styro-
porverpackung
und
ziehen
Sie
bitte
die
Schutzkappe
von
der
Plattentellerachse
ab.
Plattenteller-Lagerachse
vorsichtig
in
die
La-
gerbuchse
am
Plattenspieler
führen
und
Plat-
tenteller
sorgsam
aufsetzen.
Achtung!
Der
Plattenteller
ist
vor
jedem
Transport
des
Gerätes
abzunehmen,
Unpacking
and
Installation
Please
also
note
details
of
the
packing
instructions
and
if
your
510
is
part
of
a
compact
unit
or
console
follow
the
instructions
of
the
latter
manufacturer.
Take
out
the
styrofoam-protected
platter
assembly
and
put
it
aside
for
the
time
being
Remove
the
base
with
the
turntable
and
place
it
where
it
will
be
used.
Read
carefully
the
special
instruction
sheet
attached
to
the
turntable
before
removing
it
and
the
packing
material
from
the
turntable
Loosen
the
transit
safety
screws
by
turning
them
clockwise
until
they
slide
downward
(about
15
mm),
releasing
the
chassis
from
the
base;
then
continue
turning
them
clockwise
to
tighten
the
screws
into
the
top
of
the
chassis.
The
turntable
is
now
in
spring-supported
po:
sition
required
for
play
position.
If
your
turntable
is
not
in
a
base
but
inten:
ded
to
be
installed
in
a
console
or
a
cutout
mounting,
install
it
as
follows:
First
feed
the
power
cord
and
audio
cable
through
the top
of
the
base,
and
out
through
the
openings
in
the
bottom
of
the
base,
Then
press
the
left
rear
transport
safety
screw
to
the
side,
and
insert
the
player
chassis
in
the
base,
rear
edge
first,
so
that
both
rear
spring
cups
fit
into
the
appropriate
holes
in
the
base,
Move
the
other
two
transport
safety
screws
inward
in
a
similar
fashion, locating
left
and
right
front
spring
cups
in
their
holes
Then
turn
the
transport
safety
screws
clock
wise
to
the
right.
The
chassis
is
now
spring
mounted.
Mounting
the
Turntable
platter
Take
out
the
platter
assembly
from
the
styro-foam
packing
and
remove
the
protec-
ting
cover
from
the
shaft
of
the
turntable
platter.
Place
platter
shaft
carefully
into
bushing,
then
put
on
turntable
platter
care-
fully.
Attention!
Remove
platter
always
before
shipping
the
turntable.

Fig.
4
Einlegen
des
Rieme
Y
Der
geschliffene
Prazisionsriemen
befindet
sich
bereits
auf
der
Riemenlauffläche
des
Plattentellers.
Nach
dem
Aufsetzen
des
Plat-
tentellers
ist
der
Riemen
úber
die
Antriebs-
rolle
zu
legen:
1.
Prüfen
Sie
nach
Anheben
des
Plattenteller-
belages,
an
welcher
der
beiden
Ausspa-
rungen
des
Plattentellers
die
rote
Griff-
lasche
unter
dem
Riemen
liegt.
2.
Drehen
Sie
den
Plattenteller
so,
daß
die
Grifflasche
unmittelbar
hinter
der
An-
triebsrolle
steht.
3,
Grifflasche
zwischen
Daumen
und
Zeige-
finger
der
linken
Hand
nehmen,
mit
dem
Antriebsriemen
nach
außen
führen
und
über
die
Antriebsrolle
legen.
Dabei
mit
dem
rechten
Zeigefinger
den
Riemen
in
die
Führungsgabel
bringen
4.
Rote
Grifflasche
entfernen.
Nehmen
Sie
bitte
dasTonarm-Balancegewicht
aus
dem
Styroporeinsatz
und
stecken
Sie
den
Dorn
des
Balancegewichtes,
nach
Lösen
der
Feststellschraube,
in
die
dafür
vorgesehene
Öffnung
am
hinteren
Ende
des
Tonarmes.
Die
dreikantförmige
Aussparung
am
Dorn
muß
dabei
nach
unten
zeigen
(Fig.
5).
Das
Ausbalancieren
sowie
das
jetzt
erforder
lich
werdende
Einstellen
von
Auflagekraft
und
Antiskating
ist
ausführlich
beschrieben
auf
den
Seiten
20
und
22.
Die
Höhe
der
Auflagekraft
für
das
in
das
Gerät
bereits
eingesetzte
Tonabnehmersystem
entnehmen
Sie
bitte
den
technischen
Daten
auf
dem
separaten
Beilageblatt.
Nehmen
Sie
jetzt
den
Anschluß
an
den
Wie-
dergabe-Verstarker
vor
und
verbinden
Sie
das
Netzkabel
mit
der
Steckdose.
Beachten
Sie
bitte
hierzu
die
separaten
Hinweise
in
dieser
Anleitung
Nachträglicher
Transport
Der
Plattenteller
liegt
ohne
zusätzliche
Si
cherung
auf
und
ist
unbedingt
vor
jedem
Transport
abzunehmen.
Darüberhinaus
sind
die
Transportsicherungsschrauben
entgegen
Fitting
the
Drive
belt
The
precision
drive
belt
is
placed
already
on
the
surface
of
the
turntable
platter.
After
the
turntable
platter
is
put
on,
the
drive
belt
has
to
be
placed
over
the
drive
pulley:
1.
Lift
turntable
mat
and
check
on
which
of
the
two
holes
of
the
turntable
platter
the
red
clip
is
placed
underneath
the
drive
belt.
2.
Move
the
turntable
platter
by
hand
until
the
clip
is
placed
just
behind
the
drive
pulley.
3.
Take
the
clip
between
thumb
and
index
finger
of
your
left
hand
and
move
drive
belt
outside
and
place
it
over
the
drive
pulley.
On
this
occasion,
place
belt
into
the
guide
fork
using
your
right
index
finger.
4.
Remove
red
clip.
Take
the
tonearm
counterbalance
out
of
its
styrofoam
insert.
Loosen
the
setscrew
at
the
rear
of
the
tonearm,
and
insert
the
shaft
of
the
counterbalance
in
the
opening
provided
for
this
purpose,
The
triangular-
shaped
notch
of
the
shaft
must
point
in
downward
direction
(Fig.
5)
Pages
20
and
22
explain
how
to
balance
the
tonearm
and
then
apply
stylus
pressure
and
anti-skating.
The
separate
Technical
Data
sheet
advises
you
on
setting
tracking pressure
for
the
cartridge
already
inserted
in
the
unit.
Now
connect
the
phono
cables
to
the
ampli-
fier
and
connect
the
line
cord
either
to
the
convenience
outlet
on
the
back
of
the
am-
plifier
or
directly
to
the
house
current
Please
read
the
separate
instructions
given
for
this
phase
of
installation.
Later
Transport
Important:
the
platter
simply
rests
and
must
be
removed
prior
to
any
transport.
In
addition,
the
chassis
must
be
secured
to
the
base
with

Fig.
6
Fig.
8
Fig.
7
dem
Uhrzeigersinn
loci
Yu
schrauben,
hoch-
zuziehen
und
durch
Weiterdrehen
—
entgegen
dem
Uhrzeigersinn
—
festzuziehen.
Anschluß
an
das
Wechselstromnetz
Bei
Kombinationsgeráten
beachten
Sie
bitte
auch
die
Hinweise
in
der
jeweiligen
Bedienungsanleitung.
Das
Gerät
kann
an
Wechselstrom
50
oder
60
Hz,
110
—
130
V
oder
220
—
240
V
ange-
schlossen
werden
und
ist
im
Normalfall
auf
220
Volt
50
Hz
eingestellt.
Wird
eine
andere
Netzspannung
oder
Fre-
quenz
erforderlich,
wenden
Sie
sich
bitte
an
Ihren
Fachhändler
oder
eine
autorisierte
Dual
Kundendienststelle.
Zur
Spannungs-Umschaltung
ist
der
Deckel
der
Anschlußplatte
abzunehmen.
Die
Umschaltung
erfolgt
durch
Umstecken
der
Motor-Anschlußkabel
an
Hand
des
An-
schluRschemas.
Der
Netzschalter
ist
für
den
Anschluß
von
Vor-
und
Leistungsverstárkern
eingerichtet,
die
mit
dem
Plattenspieler
selbsttátig
ein-
und
ausge-
schaltet
werden
kónnen,
Die
max.
Schaltlast
darf
3A
nicht
úberschrei-
ten.
Interessant
ist
natürlich
nur
der
Anschluß
von
volltransistorisierten
Verstarkern,die
ohne
Anheizzeit
sofort
betriebsbereit
sind.
Der
Anschluß
erfolgt
an
die
am
Netzschalter
bzw.
der
Anschlußplatte
hierfür
vorgesehenen
Kontakte.
Das
Netzanschlußkabel
des
betreffenden
Ver-
stärkers
ist
in
diesem
Falle
mit
AMP-Steck-
hülsen
auszurüsten:
Bestell-Nr.
214
602,
AMP-Nr.
925
518-1
Anschluß
an
den
Verstärker
Bei
Kombinationsgeräten
(HiFi-Komplettanlagen)
ist
die
Verbindung
Plattenspieler-Verstärker
in
der
Regel
bereits
hergestellt.
the
transport
safety
screws.
Loosen
the
screws
by
turning
them
counter
clockwise,
then
pull
them
up
and
tighten
again
by
continuing
to
turn
them
counter
clockwise.
Connection
to
AC
Power
Line
If
you
have
a
combination
unit,
please
read
its
instructions
in
addition
to
these.
The
unit
can
be
operated
from
alternating
current
at
50
or
60
Hz,
110
—
130
Volts
or
220
—
240
Volts.
It
is
normally
supplied
ready
for
use
on
220
V,
50 Hz
current.
If
a
different
voltage
supply
and/or
frequency
becomes
necessary
please
consult
your
dea-
ler
or
an
authorized
Dual
Service
Station.
To
change
over
the
voltage,
remove
the
cover
of
the
connection
plate.
Changeover
is
carried
out
according
to
model
by
switching
over
or
reconnecting
the
motor
supply
leads
using
the
connection
diagram
in
the
power
switch
cover
The
power
switch
is
designed
for
connecting
preamplifiers
or
power
amplifiers
so
that
they
can
be
switched
on
or
off
automatically
by
the
on-off
operation.
The
maximum
switching
load
should
not
exceed
3
A,
It
is
advisable,
of
course,
to
use
this
feature
only
with
fully
transistorized
amplifiers
which
are
ready
for
use
immedia-
tely
without
warm-up
time.
Connection
is
carried
out
at
the
contacts
pro-
vided
for
the
purpose
on
the
power
switch
or
the
connection
board.
The
power
connection
lead
of
the
amplifier
concerned
should
in
this
case
be
fitted
with
AMP
connector
sleeves:
Part
Nr,
214
602,
AMP
No.
925
518-1
Connection
to
Amplifier
If
you
have
a
combination
unit,
the
turntable
and
amplifier
are
usually
already
connected.

fi
rechter
Kanal
right
channel
canal
droite
rechter
kanaal
canal
derecho
höger
kanal
L
=
linker
Kanal
left
channel
canal
gauche
linker
kanaal
canal
izquierdo
vanster
kanal
Fig.
9
R
=
rechter
Kanal
right
channel
canal
droite
rechter
kanaal
canal
derecho
hoger
kanal
L
=
linker
Kanal
left
channel
canal
gauche
linker
kanaal
canal
izquierdo
vänster
kanal
Fig.
10
Das
Tonabnehmerkab
"tes
Plattenspielers
kann
mit
Zwergstecker
nach
DIN
41
524
oder
mit
Cynch-(RCA-)
Steckern
bestückt
sein.
Schließen
Sie
bitte
mit
diesem
Kabel
den
Plattenspieler
an
die
Buchse
PHONO
MAGNET
Ihres
HiFi-Verstärkers
oder
-Re-
ceivers
an.
Für
den
Fall,
daß
Ihr
Steuergerät
oder
Wie-
dergabeverstärker
für
RCA-(Cynch-)Stecker
eingerichtet
ist,
der
Plattenspieler
jedoch
mit
DIN-Stecker
versehen
—
oder
umge-
kehrt
—
lassen
Sie
bitte
von
Ihrem
Fachhänd-
ler
durch
Austausch
des
kompletten
Tonab-
nehmerkabels
eine
Anpassung
vornehmen,
Tonabnehmerkabel
mit
DIN-Stecker
1,10
m
lang,
Bestell-Nr.
207
303.
Tonabnehmerkabel
mit
RCA-(Cynch-)Steckern
1,10
m
lang,
Bestell-Nr.
207
301.
Dual
Tonabnehmerkabel
sind
auch
platten-
spielerseitig
steckbar
ausgerüstet.
Wenn
Ihr
Stereo-Verstarker
oder
Steuergerat
keinen
unmittelbaren
Eingang
fiir
Magnet-
Tonabnehmersysteme
aufweist
ist
ein
Ent-
zerrer-Vorverstarker
erforderlich.
Wir
emp-
fehlen
in
diesem
Fall
den
Dual
TVV
47,
der
mit
steckbaren
Anschliissen
ausgeriistet
ist
und
in
der
Plattenspieler-Konsole
Platz
findet.
Quadrofone
Wiedergabe
von
CD
4-
Schallplatten
Für
die
Original-Wiedergabe
von
CD
4-Schall-
platten
ist
dieser
Plattenspieler
durch
die
niederkapazitive
Tonabnehmer-Verdrahtung
bereits
vorbereitet.
Für
die
Vierkanal-Wiedergabe
von
CD
4-
Schallplatten
in
Verbindung
mit
einem
CD
4-Demodulator
wird
noch
ein
Spezial-Ton-
abnehmersystem
erforderlich,
dessen
Uber-
tragungsbereich
bis
mindestens
45
kHz
reichen
sollte.
Einzelheiten
erfahren
Sie
beim
Fach-
handel
oder
durch
unsere
Druckschrift
W
218.
Spezial-CD
4-Tonabnehmersysteme
sind
für
die
Wiedergabe
von
Stereo-Schallplatten
nicht
immer
günstig.
Es
wird
daher
empfohlen,
Stereo-Schallplatten
nach
wie
vor
mit
einem
Stereo-Tonabnehmersystem
zu
spielen.
The
audio
cable
of
the
turntable
can
be
equipped
either
with
DIN
41
524
miniplug
or
with
Cynch
(RCA)
plug.
This
cable
con-
nects
the
turntable
to
the
PHONO
MAGNET
input
jack
of
your
amplifier
or
receiver.
If
the
playback
amplifier
is
fitted
with
a
different
plug
connection
adaptors
can
be
used,
Your
dealer
will
give
you
information.
For
the
eventuality
that
your
receiver
or
reproduction
amplifier
is
equipped
for
RCA
(Cynch)
plugs
but
the
turntable
is
fitted
with
DIN
plug
—
or
vice
versa
—
please
ask
your
dealer
to
remedy
this
by
changing
the
com-
plete
audio
cable.
Audio
cable
with
DIN
plug
1.10
m
long,
Part-No.
207
303.
Audio
cable
with
RCA
(Cynch)
plugs
1.10
m
long,
Part
No.
207
301.
Dual
audio
cables
are
also
equipped
for
plug-
in
connection
on
the
turntable
side.
If
your
stereo
amplifier
or
tuner
has
no
direct
input
for
magnetic
pick-up
systems,
an
equalizer-preamplifier
is
necessary.
We
recommend
the
Dual
TVV
47,
which
has
plug-in
connection
and
fits
into
the
base
of
the
player
unit.
Quadraphonic
Reproduction
of
CD
4
Records
Provision
for
reproduction
of
CD
4
records
has
already
been
made
on
this
turntable
by
use
of
low-capacitance
tonearm
wiring.
For
four-channel
reproduction
of
CD
4
re-
cords
in
combination
with
a
CD
4
demodu-
lator
a
special
cartridge
will
still
be
necessary;
its
frequency
range
should
extend
to
at
least
45
kHz.
Details
can
be
obtained
from
your
dealer
or
from
our
publication
W
218.
Special
CD
4
cartridges
are
not
always
sui-
table
for
reproduction
of
stereo
records.
We
recommend
playing
stereo
records
only
with
stereo
cartridges.

Fig.
11
Abdeckhaube
)
Gilt
nicht,
wenn
Ihr
Dual
Plattenspieler
Teil
einer
HiFi-Komplettanlage
ist,
Die
aus
Transportsicherungsgründen
separat
verpackte
Abdeckhaube
Ihres
Gerätes
ist
in
Spezialscharnieren
gelagert,
die
die
Haube
in
beliebiger
Stellung
über
der
Konsole
offen
halten.
Dadurch
wird
nicht
nur
die
Bedienung
des
Plattenspielers
vereinfacht,
sondern
auch
die
Unterbringung
des
Gerätes
in
flachen
Re-
galen,
Bücherwänden
und
dergleichen
mög-
lich.
Zum
Aufsetzen
der
Abdeckhaube
drehen
Sie
bitte
das
Gerät
so,
daß
sich
die
Spezial-
scharniere
leicht
zugänglich
vor
Ihnen
be-
finden.
Überzeugen
Sie
sich
zuerst
von
der
Stellung
der
Einstecklaschen
an
den
Schar-
nieren,
in
die
die
Haube
einzuschieben
ist,
bevor
Sie
die
Abdeckhaube
parallel
zu
der
Stellung
der
Laschen
an
diese
ansetzen
und
satt
eindrücken.
In
dieser
Stellung
(Öffnungswinkel
ca.
600)
läßt
sich
die
Haube
jederzeit
auch
wieder
abziehen.
Sollte
eine
Korrektur
des
Entlastungsmomen-
tes
(Federkraft,
die die
Haube
über
der
Kon-
sole
hält)
notwendig
werden,
kann
dies
durch
Drehen
an
den
beiden
Schrauben
“R”
erfol-
gen
Drehen
im
Uhrzeigersinn
vergrößert
die
Haltekraft
Drehen
entgegen
dem
Uhrzeigersinn
verkleinert
die
Haltekraft.
Bitte
nehmen
Sie
zur
Korrektur
des
Ent-
lastungsmomentes
die
Abdeckhaube
ab
und
nehmen
Sie die
Einstellung
an
beiden
Schrau-
ben
in
gleicher
Weise
vor.
Eine
Korrektur
um
jeweils
eine
halbe
Schraubenumdrehung
dürf-
te
in
den
meisten
Fällen
bereits
genügen.
Inbetriebnahme
Mit
dem
Einschwenken
des
Tonarmes
über
die
Schallplatte
Jäuft
der
Plattenteller
auto-
matisch
an.
Wird
der
Tonarm
von
der
Stütze
abgehoben
und
auf
die
Tonarmablage
neben
der
Tonarm-
stútze
gelegt,
dreht
sich
der
Plattenteller.
Die
aufgelegte
Schallplatte
kann
in
dieser
Ton-
armposition
von
Staub
gereinigt
werden.
(z.B.
mit
Antistatic-Tuch
usw.)
Dust
Cover
Disregard
this
section
if
your
Dual
record
player
is
part
of
a
HiFi
component
system.
The
dust
cover
of
your
unit
is
packed
sepa-
rately
for
safe
transport
and
provided
with
special
hinges
which
allow
the
cover
to
re-
main
open
at
any
angle.
This
simplifies
ope-
ration
of
record
player
and
also
facilitates
accommodation
of
the
complete
unit
in
bookshelves,
consoles
etc.
For
placing
the
dust
cover
turn
the
unit
in
such
a
manner
that
the
special
hinges
are
readily
accessible.
Make
sure
that
the
recei-
ving
sections
of
the
hinges
into
which
the
cover
shall
be
pushed
in
are
correctly
posi-
tioned
(tilted
at
600)
before
the
dust
cover
is
paralleled
to
the
position
of
the
receptors
and
depressed.
In
this
position
the
dust
cover
can
be
remo-
ved
completely.
For
adjustment
of
spring
relief
(the
cover
is
kept
by
spring
power
in
its
position)
turn
both
screws
marked
"H"
accordingly.
Turning
clockwise
increases
spring
ten-
sion.
Turning
counter
clockwise
reduces
spring
tension.
For
adjustment
of
spring
tension,
the
dust
cover
should
be
removed
completely
and
adjusted
in
the
same
manner
by
using
both
screws.
In
most
cases
half
a
turn
will
be
sufficient.
Operation
of
the
Turntable
After
the
tonearm
has
been
swung
over
the
record
the
turntable
platter
automatically
starts
to
rotate.
When
the
tonearm
is
lifted
from
its
post
and
placed
beside
the
tonearm
rest,
the
platter
will
rotate.
The
record
on
the
platter
can
be
cleaned
(with
an
anti-static
cloth
etc.)
when
the
tonearm
is
in
this
position.

Fig
13
Wählen
Sie
bitte
die
"Ptenteller-Drehzahl
33
1/3
oder
45
U/min,
entriegeln
Sie
den
Tonarm
und
klappen
Sie
den
Nadelschutz
nach
oben.
Nehmen
Sie
jetzt
den
Tonarm
von
der
Stütze
und
schwenken
Sie
diesen
über
die
Schall-
platte.
Beim
langsamen
Einwärtsführen
des
Tonarmes
ist
bei
den
Schallplatten-Durch-
messern
30
cm
und
17
cm
je
eine
Raststelle
fühlbar,
die
exakt
den
Aufsetzpunkt
des
Abtastdiamanten
für
die
Einlaufrille
dieser
Schallplatten
anzeigt
Die
Aufsetzhilfe
ist
abschaltbar,
um
z.B
bei
einer
30
cm-Schallplatte
das
Aufsetzen
an
einer
gewünschten
Stelle
zu
ermöglichen,
auch
wenn
diese
im
Bereich
der
Einlaufrille
der
17
cm-Schallplatte
liegt.
Zum
Absenken
über
der
Einlaufrille
oder
der
speziellen
Stelle
der
Schallplatte
genügt
leich-
tes
Antippen
des
Steuerhebels
(15).
Dadurch
wird
der
Tonarmlift
ausgelöst
und
die
Ab-
tastnadel
setzt
behutsam
auf
der
Schallplatte
auf.
Nach
dem
Abspielen
der
Schallplatte
schaltet
der
Plattenspieler
selbsttätig
aus.
Gleichzeitig
hebt
sich
der
Tonarm
von
der
Schallplatte
und
der
Steuerhebel
der
Absenkeinrichtung
geht
in
die
Ausgangsposition.
Wir
empfehlen,
den
Tonarm
auf
die
Stütze
zurückzuführen,
ihn
wieder
zu
verriegeln
und
den
Nadelschutz
herunterzuklappen,
Spielunterbrechung
ist
jederzeit
möglich.
Bringen
Sie
hierzu
den
Steuerhebel
des
Tonarmliftes
in
Position
Y.
Nach
dem
Antippen
des
Steuerhebels
und
Wieder-Aufsetzen
des
Tonarmes
werden
die
letzten
gespielten
Takte
wiederholt.
Technische
Hinweise
Tonabnehmersystem
Die
folgenden
Anweisungen
gelten
nur
für
den
Fall,
daß
Sie
ein
Tonabnehmersystem
einbauen
wollen
Die
Montage
sollte
zweckmäßigerweise
von
Ihrem
Fachhändler
vorgenommen
werden
ausgenommen
Tonabnehmersysteme
mitDual
Rasthalterung,
bei
denen
sich
beim
Einsetzen
Select
platter
speed,
33
1/3
or
45
rpm,
then
unlock
tonearm,
move
stylus
tip
protector
upwards.
Now
remove
tonearm
from
post
and
swing
it
over
the
record.
During
this
operation,
at
the
record
diameter
of
30
cm
or
17
cm
an
index
hole
is
percep:
tible,
this
indicates
the
correct
set-down
point
for
the
diamond
to
the
lead-in
groove
of
the
record.
This
aid
for
the
correct
setting
of
the
tone-
arm
may
be
switched
off
if
the
tonearm
should
be
lowered
when
a
30
cm
record
is
used
at
another
position,
for
ex.
in
the
area
of
a
17
cm
record.
In
order
to
lower
the
tonearm
to
a
specific
position
of
the
record
only
a
light
touch
of
the
guide
lever
(15)
is
necessary.
The
cueing
lift
now
operates
and
the
dia-
mond
is
placed
carefully
on
the
record,
At
the
end
of
the
record
the
turntable
switches
off
automatically.
The
tonearm
is
removed
from
the
record
and
the
guide
lever
returns
to
its
initial
position
It
is
recommended
to
place
the
tonearm
always
back
to
its
post
and
secure
it
again,
also
move
stylus
tip
protector
downwards.
Interruption
of
Play
Interruption
is
always
possible.
Move
guide
lever
of
tonearm
lift
to
position
Y
.
After
touching
the
guide
lever
and
after
the
tone-
arm
has
lowered
to
the
record,
the
last
cadences
of
the
music
are
re-played.
Technical
Information
Cartridge
The
following
instructions
are
applicable
only
you
want
to
install
a
cartridge.
Cartridges
for
your
Dual
510
should
be
in
stalled
by
your
Dual
dealer
except
for
car
trıdges
equipped
with
Dual
mounting
sup:
ports
which
automatically
have
the
accurate
geometric
position
in
regard
to
the
stylus.

Fig.
14
=
Fig.
15
der
richtige
geometris
Port
fiir
die
Nedel-
spitze
automatisch
einstellt.
Verwenden
Sie
den
bereits
am
Tonarm
eingesetzten
Tonab-
nehmerkopf
(Systemträger)
oder
lassen
Sie
das
Tonabnehmersystem
auf
einen
zusätz-
lichen
Systemträger
(Dual
TK
24,
Bestell-Nr
236
242)
montieren,
In
das
Gerät
kann
jedes
Tonabnehmersystem
mit
einem
Eigengewicht
(inkl.
Befestigungs-
material)
von
5,5
—
10
Gramm
und
1/2
inch.
Befestigungsmaß
eingebaut
werden.
1.
Zur
Montage
des
Tonabnehmersystems
lösen
Sie
den
Systemträger
(5)
vom
Tonarm,
indem
Sie
den
Tonarmgriff
(4)
nach
hinten
drücken.
Halten
Sie
dabei
den
Systemträger
fest,
da
er
nach
Öffnen
der
Verriegelung
herunterfällt
2.
Befestigen
Sie
das
Tonabnehmersystem
unter
Verwendung
des
dem
Tonabnehmer-
system
beigefügten
Zubehörs
auf
dem
Sy-
stemträger.
Zu
beachten
ist,
daß
das
Tonab-
nehmersystem
mit
der
Systemlehre
am
geo-
metrisch
richtigen
Ort
für
die
Abtastnadel-
spitze
im
Systemträger
montiert
wird
(Fig.
15).
3.
Die
Anschlüsse
am
Systemträger
und
Ton
abnehmersystem
sind
gekennzeichnet
(Fig.
16).
Verbinden
Sie
die
Anschlußlitzen
des
Systemträgers
mit
den
entsprechenden
und
gleich
gekennzeichneten
Anschlußstiften
des
Tonabnehmersystems
4.
Der
Systemtráger
wird
von
unten
an
den
Tonkopf
angelegt
und
durch
Verschwenken
des
Tonarmgriffes
wieder
mit
dem
Tonarm
verriegelt.
Bitte
prüfen
Sie
nach
erfolgter
Montage
eines
Tonabnehmersystems
auch
die
Höhenstellung
der
Abtastnadel
bei
Tonarmlift
in
Stellung
¥
sowie
das
Aufsetzen
der
Nadel
in
die
Ein-
laufrille
der
Schallplatte.
Siehe
Abschnitte
“Tonarmlift’,
Seite
24
und
"Justierung
des
Tonarmaufsetzpunktes”
Seite
28.
Abtastnadel
Die
Abtastnadel
ist
durch
den
Abspielvor-
gang
natürlichem
Verschleiß
ausgesetzt,
Wir
empfehlen
daher
eine
gelegentliche
Über-
prüfung,
die
sich
bei
Diamant-Abtastnadeln
Use
the
cartridge
holder
already
mounted
on
the
tonearm,
or
have
the
cartridge
moun-
ted
on
an
additional
cartridge
holder
(Dual
TK
24
article
No.
236
242)
This
model
will
accept
any
cartridge
weigh:
ing
from
5,5
—
10
g
(including
mounting
hardware)
and
having
1/2”
spaced
mounting
holes,
1.
To
mount
the
cartridge,
detach
the
cart
ridge
holder
(5)
from
the
tonearm
by
pres:
sing
the
tonearm
lift
(4)
backward,
while
holding
the
cartridge
holder
with
your
hand
to
prevent
its
falling
down
when
the
lock
is
released,
2.
Using
the
hardware
provided,
mount
the
cartridge
on
the
cartridge
holder.
Use
the
gauge
to
make
sure
that
the
cartridge
is
mounted
in
the
geometrically
proper
place
in
the
cartridge
holder
(Note
location
of
stylus
tip
in
fig.
15).
3.
The
connection
inputs
on
the
cartridge
holder
and
on
the
cartridge
are
color
coded.
Connect
the
leads
of
the
cartridge
holder
to
the
correspondingly
coded
connection
pins
of
the
cartridge
(fig.
16).
4.
Install
the
cartridge
holder
underneath
the
tonearm
head
and
lock
it
again
to
the
tone-
arm
by
swinging
the
tonearm
lift
forward.
After
completing
the
installation
of
the
cart
ridge,
check
the
height
of
the
stylus
with
the
cue
control
in
position
¥
.
Also
check
the
set-down
position
of
the
stylus
in
the
lead-in
groove
of
the
record.
See
"Tonearm
lift”
on
page
24
and
“Adjustment
of
the
Tonearm
Set
Down
Point”
on
page
28.
Stylus
In
normal
use,
every
stylus
is
subject
to
wear
and
tear.
We
recommend
that
it
be
inspec-
ted
occasionally,
but
certainly
after
aproxi
mately
300
playing
hours
in
case
of
diamond

OW
iner
Kona
left
channel
canal
gauche
linker
kanaal
canal
izquierdo
vanster
kanal
GL
=
linker
Kanal
left
channel
canal
gauche
linker
kanaal
canal
izquierdo
vanster
kanal
GR
=
rechter
Kanal
right
channel
canal
droite
rechter
kanaal
canal
derecho
hóger
kanal
Fig.
16
R
=
rechter
Kanal
right
channel
canal
droite
rechter
kanaal
canal
derecho
hóger
kanal
Fig.
17
20
erstmalig
nach
ca.
D
Spielstunden
emp-
fiehlt.
Ihr
Fachhändler
wird
dies
gern
kosten-
los
fir
Sie
tun,
Abgenutzte
oder
beschadigte
(abgesplitterte)
Abtastnadeln
meißeln
die
Mo-
dulation
aus
den
Schallrillen
und
zerstören
die
Schallplatten.
Verwenden
Sie
bei
Ersatz-
bedarf
nur
die
in
den
technischen
Daten
des
Tonabnehmersystems
empfohlene
Nadelty-
pe.
Nachgeahmte
Abtastnadeln
verursachen
hórbare
Qualitätsverluste
und
erhöhte
Schall-
platten-Abnutzung.
Denken
Sie
bitte
daran,
daß
der
Nadelträger
mit
dem
Abtast-Diamanten
aus
physikalischen
Gründen
sehr
grazil
und
deshalb
zwangsläufig
empfindlich
gegen
Stoß,
Schlag
oder
unkon-
trollierte
Berührung
sein
muß.
Nehmen
Sie
zur
Prüfung
der
Abtastnadel
den
kompletten
Tonabnehmerkopf
(das
Abnehmen
vom
Ton-
arm
ist
vorstehend
beschrieben)
zum
Fach-
händler.
Ausbalancieren
des
Tonarmes
Der
Tonarm
wird
durch
Verschieben
des
Balancegewichtes
mit
dem
Dorn
zunächst
annähernd
und
durch
Drehen
des
Rändel-
rades
am
Balancegewicht
(11)
exakt
ausba:
lanciert:
1.
Auflagekraftskala
(10)
und
Antiskating-
skala
(13)
auf
,,0”
stellen.
2.
Tonarm
entriegeln
und
über
die
Tonarm
ablage
schwenken.
3.
Wenn
der
Tonarm
sich
nicht
von
selbst
horizontal
einpendelt,
Feststellschraube
(F)
lösen
und
das
Balancegewicht
mit
dem
Dorn
so
lange
verschieben,
bis
sich
eine
ungefähre
Balance
ergibt.
Der
Dorn
des
Balancegewichtes
ist
dann
durch
Anziehen
der
Feststellschraube
zu
arretieren.
4.
Durch
Drehen
des
Rändelrades
am
Balan-
cegewicht
die
exakte
Balance
des
Tonar-
mes
herstellen.
Der
Tonarm
ist
ausbalanciert,
wenn
Kante
"A"
des
Tonarmkopfprofils
und
Kante
"RB
der
Tonarmstütze
auf
gleicher
Höhe
sind
(Fig.
18),
oder
wenn
der
Tonarm
sich
nach
Antippen
in
vertikaler
Richtung
wieder
von
selbst
in
die
horizontale
Lage
einpendelt,
d.h.
weder
oben
anstößt
noch
unten
auf
der
Tonarmablage
aufliegt.
Beim
Ausbalancieren
styli.
Your
Dual
dealer
will
do
this
without
charge.
Worn
or
damaged
(chipped)
styli
will
grind
the
modulation
out
of
record
grooves
and
damage
the
records.
In
case
of
replace-
ment,
obtain
only
the
stylus
type
recom-
mended
in
the
Technical
Data
for
the
cart-
ridge.
Imitations
cause
noticeable
loss
in
sound
quality
and
rapid
record
wear.
Please
keep
in
mind
that
the
stylus
holder
with
the
diamond
tip
is
necessarily
quite
delicate
in
order
to
provide
quality
perform-
ance.
It
is,
therefore,
extremely
sensitive
to
harsh
handling,
accidental
touch, blows,
etc.
Take
the
cartridge
in
the
holder
to
your
Dual
dealer
for
inspection
of
the
stylus.
(Removal
of
cartridge
holder
is
described
above.)
Balancing
the
Tonearm
Shifting
the
counterbalance
(11)
on
its
shaft
balances
the
tonearm
coarsely;
turning
the
knurled
ring
of
the
counterbalance
weight
balances
the
tonearm
exactly.
1.
Set
stylus
pressure
dial
(10)
and
anti-skat-
ing
dial
(13)
to
0”
(zero).
2.
Unlock
the
tonearm
and
move
ıt
over
the
tonearm
rest,
3.
If
the
tonearm
does
not
come
to
rest
hori-
zontally,
loosen
setscrew
(F)
and
slide
the
counterbalance
with
¡ts
shaft
until
an
ap-
proximate
balance
has
been
achieved.
Then
secure
the
shaft
of
the
counterbal-
ance
by
tightening
the
setscrew.
4.
Now
find
the
exact
balance
by
turning
the
knurled
ring
of
the
counterweight
The
tonearm
is
exactly
balanced
when
edge
"A"
of
the
tonearm
head
profile
is
at
preci
sely
the
same
height
as
edge
“B”'
of
the
tone-
arm
rest
(Fig.
18),
or
when
the
tonearm
tapped
vertically,
returns
automatically
to
a
horizontal
position.
When
balancing
the
tone:
arm,
the
automatic
mechanism
must
be
dis-

22
Fig,
19
des
Tonarmes
muß
cr
von
der
Kinematik
entkoppelt
sein.
Tonarmlift
in
Stellung
Y
bringen
und
eventuell
Plattenteller
von
Hand
im
Uhrzeigersinn
(einige
Umdrehungen)
dre-
hen,
Eine
präzise
Tonarmbalance
ist
vor
allem
bei
Tonabnehmersystemen
mit
kleiner
Auflage:
kraft
wichtig.
Der
Tonarm
ist
nur
einmal
auszubalancieren.
Es
empfiehlt
sich
jedoch,
die
Tonarmbalance
von
Zeit
zu
Zeit
zu
über
prüfen
Einstellen
der
Auflagekraft
Jedes
Tonabnehmersystem
erfordert
eine
be-
stimmte
Auflagekraft,
bei
der
optimale
Wie-
dergabe
erzielt
wird.
Für
das
eingebaute
Tonabnehmersystem
finden
Sie
diese
Angabe
auf
dem
beiliegenden
Datenblatt
Zu
kleine
Auflagekraft
führt
bei
Fortestellen
zu
Wiedergabeverzerrungen.
Ist
die
Auflage-
kraft
dagegen
zu
groß,
so
kann
sowohl
das
Tonabnehmersystem
und
die
Abtastnadel
als
auch
die
Schallplatte
beschädigt
werden.
Prü-
fen
Sie
deshalb
vor
dem
Einstellen
der
Auf-
lagekraft
die
Tonarm-Balance.
Ist
der
Tonarm
ausbalanciert,
wird
durch
Verdrehen
der
Auflagekraftskala
(10)
die
für
das
Tonabnehmersystem
erforderliche
Auf
lagekraft
eingestellt.
Die
Auflagekraft
läßt
sich
kontinuierlich
im
Bereich
von
O
bis
30
mN
(0-3
p)
einstellen,
wobei
die
Ziffern-
angabe
auf
der
Skala
1=10mN
£
1p
20mN
2
2p
3=30mN
&
3p
bedeutet.
Analog
dazu
ist
ein
Teilstrich
im
Bereich
von
O
-
15
mN
(0-
1,5
p)
1
mN
(0,1
p)
im
Bereich
von
15-30
mN
(1,5-3
p)
2,5
mN
(0,25
p)
Das
Gerät
arbeitet
ab
5
mN
(0,5
p)
Auf-
lagekraft
betriebssicher
Antiskating
Zur
Kompensation
der
Skating-Kraft
muß
am
Tonarm
eine
in
Größe
und
Richtung
ge-
nau
definierte
Gegenkraft
angreifen.
Die
Antiskating-Einrichtung
(13)
Ihres
HiFi-Plat-
tenspielers
erfüllt
diese
Forderung
und
er-
engaged.
To
be
sure
of
this,
place
the
cue
control
in
position
Y
and
turn
platter
by
hand
clockwise
a
few
rotations.
Precise
tonearm
balance
is
most
important
for
cartridges
with
low
stylus
pressure.
Bal
ancing
need
be
done
only
once.
We
recom-
mend,
however,
that
you
occasionally
inspect
the
tonearm.
Setting
the
Stylus
Pressure
Each
cartridge
has
an
optimum
stylus
pres-
sure.
See
instructions
supplied
with
your
cartridge.
Too
low
a
stylus
pressure
will
cause
distor:
tion
in
loud
passages.
If,
however,
the
stylus
force
is
too
high,
the
stylus
and
record
may
both
be
damaged.
Tonearm
balance
should
be
checked,
therefore,
before
the
tracking
force
is
applied.
Once
the
tonearm
is
balanced,
the
stylus
pressure
is
set
to
the
recommended
value
for
the
cartridge
by
turning
the
stylus
force
scale
(10).
The
stylus
pressure
can
be
set
to
any
value
from
0
—
30
mN
(0
-
3
g)
whereby
the
figures
on
the
scale
are
to
be
interpreted
as
follows
1
=
10mN2
1g
2
=
20mN2
29
3
=
30mN2
3g
Consequently
scale
division
means
in
the
range
from
O
-
15
mN
(0
-
1,59)
1
mN
(0.19).
in
the
range
from
15
-
30
mN
(1.5
-
3
g)
2.5
mN
(0.25
g)
The
unit
is
designed
to
operate
with
stylus
pressures
from
5
mN
(0.5
g).
Antiskating
To
compensate
for
skating
force,
a
counter
force,
precisely
defined
in
weight
and
direc
tion,
must
be
applied
to
the
tonearm.
The

24
Fig,
20
Fig.
21
laubt
eine
Veránderu.H
der
Skating-Kom-
pensation
auch
während
des
Spiels,
wichtig
2.8.
beim
Übergang
von
trockenen
zum
Ab-
spielen
von
benetzten
Schallplatten.
Für
die
heute
üblichen
bzw.
genormten
Na-
deltypen
sind
getrennte
Einstellskalen
vor
handen,
entsprechend
den
aufgedruckten
Symbolen
O
-
Skala
geeicht
für
sphárische
15
um-Abtast
nadeln
nach
DIN
45
500
O
-
Skala
geeicht
für
biradiale
(elliptische)
Abtastnadeln
mit
den
Radien
5
-
8
x
18
x
22
um
CD
4
—
Skala
geeicht
fiir
die
Wiedergabe
mit
CD
4-
Spezial-Tonabnehmersystemen,
Die
Einstellung
der
Antiskating-Einrichtung
hat
synchron
zur
Einstellung
der
Auflagekraft
zu
erfolgen:
Drehen
Sie
bitte
die
Antiskating-
Einrichtung
auf
die
Ziffer
der
betreffenden
Skala,
die
der
eingestellten
Auflagekraft
ent
spricht,
also
z.B.
bei
12
mN
(1,2
p)
Auflage-
kraft
den
Antiskating-Drehknopf
ebenfalls
auf
"1,2"
Beim
Naßabtasten
(Abspielen
von
mit
Flüs-
sigkeit
benetzter
Schallplatte)
verringert
sich
die
Skatingkraft
um
ca.
10%.
Es
wird
in
diesem
Fall
empfohlen,
die
Ein-
stellung
entsprechend
anzupassen
Bei
abweichender
Nadelverrundung
können
Sie
die
Antiskating-Einstellung
der
Tabelle
entnehmen.
anti-skating
mechanism
(13)
of
your
turntable
fulfills
this
requirement
and
allows
the
change
of
the
skating
compensation
even
while
a
record
is
being
played,
for
example,
when
playing
a
moistened
record
after
a
dry
re-
cord.
Separate
calibrations
are
provided
for
the
stylus
types
used
almost
exclusively
today,
according
to
the
imprinted
symbols:
O
-
scale:
calibrated
for
conical
15
micron
stylus
DIN
45
500
O
—
scale:
calibrated
for
biradial
(elliptical)
styli
radii,
5
-
8
x
18
-
22
microns
CD
4
—
scale:
calibrated
for
playing
special
CD
4
cartridges
The
setting
of
anti-skating
compensation
cor-
responds
to
the
setting
of
stylus
pressure
Turn
the
anti-skating
knob
to
the
number
on
the
appropriate
scale
which
corresponds
to
the
stylus
pressure
you
have
set.
That
is,
for
a
stylus
pressure
of 12
mN
(1.2
grams),
set
the
anti-skating
knob
also
at
"1.2".
When
playing
records
moistened
with
a
clea-
ning
agent,
the
skating
force
is
reduced
by
approximately
10
%. In
such
cases
we
recom-
mend
a
corresponding
10
%
decrease
in
anti-
skating
compensation.
For
other
stylus
tip
diameters,
choose
the
correct
antiskating
setting
from
the
table
below.
Auflagekraft
Verrundungsradien
nun
Stvluspressure
radii
of
stylus
tip
wane
mN2
p
11
13
17
19
mNSp
11
13
17
19
5
05
0,60
055
0,45
0,40
5
05
060
055
0,45
0,40
10
10
110 105
095
090
10
10
1,10
1,05
095
0,90
15
15
165
155
145
140
15
75
165
155 145
1,40
20
2,0
2,15 2,05
1,95
1,90
20
2,0
2,15 2,05
1,95
1,90
25
25
2,65
2,55
2,45 2,40
25
26
2,65
2,55
2,45
2,40
30
3,0
_
2%
290
30
30
2.95
2,90
Tonarmlift
Cue
Control
Ihr
HiFi-Plattenspieler
ist
mit
einem
er-
schütterungsfrei
bedienbaren,
in
beiden
Be-
wegungsrichtungen
siliconbedämpften
Ton-
Your
unit
is
equipped
with
a
shock-free
cue
control
siliconedamped
in
both
directions

26
Fig
22
armlift
ausgestattet.
Phi:
kann
der
Ton-
arm
sanfter
auf
jede
gewünschte
Stelle
der
Schallplatte
aufgesetzt
werden,
als es
von
Hand
möglich
ist.
Die
Absenkgeschwindigkeit
ist
unempfindlich
gegen
Temperaturänderun-
gen.
Der
Steuerhebel
des
Tonarmliftes
(15)
hat
zwei
Stellungen
Y
wählen
der
Tonarm
ist
von
der
Schallplatte
abge
hoben
Y
spielen
der
Tonarm
ist
auf
die
Schallplatte
abge
senkt
Das
Antippen
des
Steuerhebels
(15)
leitet
das
Absenken
ein,
Die
Höhe
der
Abtastnadel
über
der
Schallplatte
bei
Tonarmlift
in
Stel
lung
Y
läßt
sich
durch
Verdrehen
der
Stell
schraube
(9)
im
Bereich
von
O
bis
6
mm
variieren,
Tonhöhenabstimmung
(pitch
control)
Jede
der
beiden
Normdrehzahlen
33
1/3
und
45
U/min
kann
mit
der
Tonhöhenabstim
mung
(2)
variiert
werden.
Die
Einstellung
erfolgt
mit
dem
Drehknopf
„pitch
(2)
(Fig.
23).
Regelbereich
bei
33
1/3
U/min
ca.
1/2
Ton
(6%)
Mit
der
Tonhöhen-Abstimmung
lassen
sich
Tonlage
und
Tempi
der
Wiedergabe
indivi
duell
regeln,
z.B.
wenn
ein
Instrument
zur
Schallplatte
gespielt
wird
und
die
Tonhöhe
jer
Platte
darauf
abgestimmt
werden
soll,
oder
einige
Musiktakte
genau
auf
die
Länge
einer
Filmszene
gebracht
werden
sollen.
Die
genaue
Einstellung
der
Plattenteller-Dreh
zahl
33
1/3
U/min
kann
mit
Hilfe
der
be
leuchteten
Stroboskop-Teilung
des
Platten
teller-Außenrandes
auch
während
des
Spieles
kontrolliert
werden
(Fig.
24).
Dreht
sich
der
Plattenteller
exakt
mit
33
1/3
U/min,
bleibt
die
Strichmarkierung
scheinbar
stehen.
Läuft
die
Markierung
in
der
Dreh
richtung
des
Plattentellers,
ist
die
Platten
teller-Drehzahl
zu
hoch.
Laufen
die
Markie.
rungen
rückwärts,
dreht
sich
der
Plattenteller
langsamer,
als
es
der
jeweiligen
Nenndrehzahl
entspricht
Thus,
the
tonearm
can
be
lowered
to
any
desired
point
on
the
record
more
gently
than
by
hand.
The
rate
of
descent
of
the
tonearm
is
unaffected
by
temperature
changes.
When
lifted,
the
tonearm
does
not
appreciably
change
its
horizontal
position.
The
lever
of
the
cue
control
(15)
has
two
positions
Y
selecting
position,
tonearm
raised
Y
playing
position,
tonearm
on
record
A
light
touch
on
the
lever
(15)
starts
the
descent
of
the
tonearm.
The
height
of
the
stylus
tip
over
the
record
in
the
raised
tonearm
position
Y
can
be
varied
from
O
to
6
mm
by
turning
the
ad-
justment
screw
(9).
Pitch
Control
Each
of
the
two
standard
speeds
(33
1/3
and
45
rpm)
can
be
varied
with
the
pitch
con-
trol
(2).
Adjustment
is
made
with
pitch
con:
trol
knob
(2).
Adjustment
range
at
33
1/3
rpm
approx.
1
semitone
(6
%).
The
illuminated
strobe
mechanism
can
be
used
to
adjust
the
exact
speeds
for
33
1/3
while
a
record
is
playing
(Fig.
24).
When
the
turntable
rotates
at
exactly
33
1/3
no
movement
of
the
bars
is
observed.
If
the
bars
appear
to
advance
in
the
same
direction
as
the
turn
table
the
turntable
speed
is
too
high.
If
the
bars
appear
to
retreat,
the
speed
is
too
low
Note:
when
speed
is
exact
fa
33
1/3
rpm,
it
will
also
be
exact
for
45
rpm
The
pitch
control
also
provides
other
than
the
nominal
speed;
for
example,
when
the
pitch
of
recorded
music
is
to
match
a
live
musical
instrument,
or
when
a
record
passa
ge
is
to
match
the
length
of
a
motion
picture
scene.

28
Fig.
24
Fig,
25
Netzfrequenz
50
c
y
60
Hz
Die
Umristung
auf
eine
andere
Netzfrequenz
erfolgt
durch
Austausch
der
Antriebsrolle
Wird
eine
andere
Netzspannung
oder
Fre
quenz
erforderlich,
wenden
Sie
sich
bitte
an
Ihren
Fachhändler
oder
eine
autorisierte
Dual
Kundendienststelle.
Abschaltbare
Aufsetzhilfe
Dieser
HiFi-Plattenspieler
ist
mit
einer
Auf
setzhilfe
ausgerüstet,
die
das
Auffinden
der
jeweiligen
Einlaufrillen
von
17
cm-
und
30
cm-Schallplatten
schnell
ermöglicht.
Beim
langsamen
Einwärtsführen
des
Ton-
armes
ist
bei
den
Schallplatten-Durchmessern
30
cm
und
17
cm
je
eine
Raststelle
fühlbar,
die
exakt
den
Aufsetzpunkt
des
Abtast
diamanten
für
die
Einlaufrille
dieser
Schall-
platten
anzeigt.
Um
ein
Aufsetzen
im
Fangbereich
der
Rast
stelle
des
jeweiligen
Aufsetzpunktes
zu
er
möglichen,
ist
die
Aufsetzhilfe
abschaltbar
V
Rastung
für
Aufsetzpunkte
in
die
Em
laufrillen
eingeschaltet
—
Rastung
außer
Funktion
Justierung
des
Tonarmaufsetzpunktes
Bei
eingeschalteter
Aufsetzhilfe
(Drehknopf
(16)
in
Stellung
V
)
senkt
sich
die
Abtast-
nadel
selbsttätig
in
die
Einlaufrille
der
Schall-
platte.
Setzt
z.B.
bei
einem
nachträglich
montierten
Tonabnehmersystem
der
Abtast
stift
zu
weit
innen
oder
außerhalb
der
Schall-
platte
auf,
kann
mit
der
Justierschraube
(8)
der
Aufsetzpunkt
des
Abtastdiamanten
kor
rigiert
werden.
Wenn
der
Abtaststift
zu
weit
innen
auf
der
Schallplatte
aufsetzt,
drehen
Sie
die
Justier-
schraube
nach
links,
setzt
die
Nadel
zu
weit
außen
auf,
entsprechend
nach
rechts.
Die
Einstellung
ist
sowohl
für
17
cm-
als
auch
30
cm-Schallplatten
wirksam.
50
or
60
Hz
Line
Frequency
Conversion
to
adifferent
power
line
frequen-
cy
is
accomplished
by
exchanging
the
motor
drive
pulley
and
resetting
the
stroboscope.
If
any
other
line
voltage
or
frequency
is
nec
essary
please
consult
your
dealer
or
an
au-
thorized
Dual
Service
Station
Switch-off
of
Set-down
Aid
This
HiFi
turntable
is
fitted
with
a
set
down
aid
enabling
you
to
find
the
correct
position
of
lead-in
grooves
for
either
17
cm
or
30
cm
records.
When
the
tonearm
is
moved
slowly
inside
a
stop
location
is
palpable
at
each
17
cm
or
30
cm
diameter,
indicating
the
exact
set:
down
point
for
the
diamond
for
the
lead-in
groove
of
these
records.
To
choose
any
other
portion
of
the
record,
the
set-down
aid
may
be
switched
off
V
Position
switched
on
—
Catch
not
in
function
Adjusting
the
Tonearm
set-down
point
When
the
set-down
aid
is
switched
on
(knob
(16)
in
position
Y
)
diamond
will
place
itself
into
the
correct
position
of
the
lead-in
groove
of
the
record.
If
for
example
another
stereo
cartridge
has
been
mounted
later
on
and
if
the
diamond
is
setting-down
too
far
inside
or
outside
of
the
record,
the
desired
set-down
point
for
the
diamond
may
be
chosen
by
means
of
an
adjusting
screw
(8).
In
case
that
the
set-down
point
is
too
far
inside,
the
adjusting
screw
(8)
has
to
be
turned
clockwise,
if
the
diamond
is
setting
down
outside
a
30
cm
record,
then
turn
adjusting
screw
counterclockwise.
The
same
procedure
may
be
followed
for
17
cm
or
30
cm
records
as
well.

Service
>
Alle
Schmierstellen
sind
ausreichend
mit
Öl
versorgt.
Damit
wird
unter
normalen
Bedin-
gungen
Ihr
Gerät
jahrelang
einwandfrei
ar-
beiten.
Versuchen
Sie
an
keiner
Stelle
selbst
nachzuölen.
Sollte
Ihr
Plattenspieler
jemals
eine
Wartung
brauchen,
bringen
Sie
ihn
bitte
entweder
zu
Ihrem
Fachhändler
oder
fragen
Sie
diesen
nach
der
Adresse
der
nächsten
autorisierten
Dual
Kundendienstwerkstatt.
Bitte
achten
Sie
darauf,
daß
nur
Original-
Dual-Ersatzteile
verwendet
werden.
Sorgen
Sie
bei
einem
eventuellen
Versand
des
Gerätes
für
eine
einwandfreie
Verpak-
kung,
möglichst
unter
Verwendung
der
Ori-
ginal-Verpackung.
Elektrische
Sicherheit
Das
Gerät
entspricht
den
internationalen
Sicherheitsbestimmungen
für
Rundfunk-
und
verwandte
Geräte
(IEC
65)
und
ist
bei
den
jeweiligen
nationalen
Sicherheitsbehörden
(VDE,
SEV,
SEMKO,
CSA,
UL
usw.)
appro-
biert.
Technische
Daten
Stromart
Wechselstrom
50
oder
60
Hz
umrústbar
durch
Austausch
der
Antriebsrolle
Netzspannung
110
-
130
Volt
und'220
-
240
Volt
umsteck-
bar
Antrieb
Dual
Acht-Pol-Synchron-Motor
über
Prazisi-
ons-Flachriemen
auf
Plattenteller
Leistungsaufnahme
ca.
10
Watt
Stromaufnahme
bei
220
Volt,
50
Hz:
ca.
75mA
bei
117
Volt,
60
Hz:
ca.
140
mA
Anlaufzeit
(bis
zum
Erreichen
der
Nenndrehzahl)
ca.
2
s
bei
33
1/3
U/min
Plattenteller
nichtmagnetisch,
abnehmbar.
1,3
kg
schwer,
300
mm
¢
Service
All
lubrication
points
are
adequately
supplied
with
oil
prior
to
delivery
to
the
customer.
Under
normal
conditions,
your
Dual
should
function
properly
for
many
years;
do
not
oil
any
part
of
your
Dual
yourself.
Should
your
player
ever
require
service,
please
take
it
to
your
Dual
dealer,
or
ask
him
for
the
address
of
the
nearest
authorized
Dual
ser-
vice
station.
Please
make
sure
that
only
original
Dual
replacement
parts
are
used.
Should
shipping
of
your
Dual
become
neces-
sary,
make
sure
the
packing
is
adequate.
Use,
if
possible,
the
original
packing
material
in
which
you
received
your
Dual
510.
Electrical
safety
This
player
meets
international
safety
stan-
dards
for
radio
and
related
equipment
(IEC
65)
and
is
approved
by
the
various
national
safety
organizations
(VDE,
SEV,
SEMKO,
CSA,
UL,
etc.).
Technical
data
Current
AC
50
or
60
Hz
Changeable
by
changing
motor
pulley
Line
Voltage
110
-
130
V
or
220
-
240
V,
switchable
Drive
Dual
eight
pole
synchronous
motor
via
pre-
cision
flat
belt
on
turntable
platter
Power
consumtion
approx.
10
Watts
Current
drain
at
220
V,50
Hz:
approx.
75mA
at
117
V,
60
Hz:
approx.
140
mA
Start-up
Time
(until
nominal
speed
is
reached)
approx.
2s
at
33
1/3
rpm
Platter
Non-magnetic,
detachable,
1.3
kg,
300
mm@

32
Plattenteller-Drehzahle
Y
33
1/3
und
45
U/min
Abschaltbare
Tonarmaufsetzhilfe
für
30
cm-
und
17
cm-Schallplatten
Tonhöhenabstimmung
für
33
1/3
und
45
U/min
Regelbereich
ca.
1/2
Ton
(ca.
6%)
bei
33
1/3
U/min
Drehzahlkontrolle
mit
Leuchtstroboskop
für
Plattenteller-Dreh-
zahl
33
1/3
U/min
Empfindlichkeit
des
Leuchtstroboskops
für
0,1
%
Drehzahl-Abweichung
3
Striche/min
bei
50
Hz
3,6
Striche/min
bei
60 Hz
Gesamt-Gleichlauffehler
<
+
0,08
%
bewertet
nach
DIN
45
507
Störspannungsabstand
(nach
DIN
45
500)
Rumpel-Fremdspannungsabstand
>
42
dB
Rumpel-Geräuschspannungsabstand
>
63
dB
Tonarm
verwindungssteifer,
Ganzmetall-Tonarm
in
kardanischer
Vierpunkt-Spitzenlagerung
Wirksame
Tonarmlänge
222
mm
Kröpfungswinkel
25°
20°
Tangentialer
Spurfehlwinkel
0,160/cm
Tonarm-Lagerreibung
bezogen
auf die
Abtastspitze
vertikal
<
0,07
mN
(0,007
p)
horizontal
<
0,16
mN
(0,016
p)
Auflagekraft
von
0
-
30
mN
(0
-
3
p)
stufenlos
regelbar,
mit
1
mN
(1/10
p)
Kalibrierung
im
Bereich
von
0
-
15
mN
(0
-
1,5
p)
betriebssicher
ab
5
mN
(0,5
p)
Auflagekraft
Tonabnehmerkopf
(Systemtráger)
abnehmbar,
geeignet
zur
Aufnahme
der
Ton-
abnehmer
mit
Dual
Rastbefestigung
und
aller
Tonabnehmersysteme
mit
1/2
inch.
Befesti-
gung
und
einem
Eigengewicht
von
5,5—
10g
(inkl.
Befestigungsmaterial)
Einstellbarer
Oberhang
5
mm
Tonabnehmersystem
siehe
separates
Datenblatt
Abmessungen
420
x
148
x
365
mm
Gewicht
ca.
4,3
kg
Platter
speeds
33
1/3
and
45
rpm,
tonearm
set-down
aid
may
be
switched
off
for
either
30
cm
or
17
cm
records
Pitch
Control
Variation
for
33
1/3
and
45
rpm
records,
adjustment
range
of
approx.
1
semi-tone
(approx.
6
%)
at
both
platter
speeds.
Speed
control
with
illuminated
stroboscope
for
platter
speed
33
1/3
rpm
Sensitivity
of
Stroboscopic
Light
for 0.1
%
Speed
Variation
3
locating
marks/min
at
50
Hz
3.6
locating
marks/min
at
60
Hz
Total
Wow
and
Flutter
According
to
DIN
45
507
(German
Industry
Standard)
<
+
0.08%
Rumble
(according
to
DIN
45
500)
Unweighted
>
42
cB
Weighted
>
63dB
Tonearm
Torsion-resistant
tubular
aluminium
tonearmä
in
four-point
gimbal
Effective
Lenght
of
Tonearm
222
mm
Offset
Angle
25°
20°
Tangential
Tracking
Error
0.160/cm
Tonearm
Bearing
Friction
(related
to
stylus
tip)
Vertical
<
0.07
mN
(0.007
p)
Horizontal
<
0.16
mN
(0.016
p)
Stylus
Pressure
from
O
-
30
mN
(0
-
3g)
infinitely
variable
with
1
mN
(1/10
g)
calibrations
from
O
-
15
mN
(0-
1.5
g)
operable
from
5
mN
(0.5
g)
stylus
pressure
up
Cartridge
holder
Removable,
accepting
any
cartridges
with
1/2"
mounting
and
a
weight
from
5.5
to
10g
(including
mounting
hardware)
Adjustable
Overhang
5mm
Cartridge
See
separate
data
sheet
Dimensions
420
x
148
x
365
mm
Weight
approx.
4.3
kg

Dual
Gebrüder
Steidinger
7742
St.
Georgen/Schwarzwald
236
186-4
10/0576
Printed
in
Germany
by
Dual

510
Berichtigung
zur
Bedienungsanleitung
Correction
of
Operating
Instructions
Rectificatif
de
la
notice
d’emploi
Correcties
gebruiksaanwijzing
Rectificación
correspondiente
al
folleto
de
instrucciones
de
manejo
Rättelser
Other manuals for 510
2
Table of contents
Other Dual Turntable manuals