Elko eLAN-IR-003 User manual

02-18/2012 1/16
Converter Ethernet to IR code
eLAN-IR-003 Introduction:
Installation Manual
Instruction Manual for the
eLAN-IR-003

02-18/2012 2/16
Converter Ethernet to IR code
eLAN-IR-003 Introduction:
Installation Manual
Contents
1.Introduction:............................................................................................................................3
2.Main characteristics of the eLAN-IR-003:................................................................................3
3.Technical parameters: .............................................................................................................4
4.Emission characteristics of IR transmitter:..............................................................................5
5.Hardware installation: .............................................................................................................5
5.1Front panel: ......................................................................................................................5
5.2Rear panel:........................................................................................................................6
5.3System requirements: ......................................................................................................6
5.4Requirements for installation environment:...................................................................6
5.5Connecting the device:....................................................................................................7
6.Configuring the computer: .....................................................................................................8
7.Configuring the iMM Client:..................................................................................................10
8.Configuring the eLAN-IR-003................................................................................................ 11
8.1Settings tab: ...................................................................................................................12
8.2Tab Firmware: .................................................................................................................13
8.3Tab Builder:.....................................................................................................................14
8.4Tab Panel: .......................................................................................................................15
8.5Tab log out:.....................................................................................................................16
9.Troubleshooting: ...................................................................................................................16

02-18/2012 3/16
Converter Ethernet to IR code
eLAN-IR-003 Introduction:
Installation Manual
1. Introduction:
Congratulations on purchasing the eLAN-IR-003 control unit, an element of the iNELS intelligent system.
Before you begin
The instruction manual provides information on installing and operating the device. The instruction manual
is always a part of the supply. Perform installation after complete familiarization with this manual and
device functions.Problem-free function of the device also depends on the way it was shipped, stored and
handled. If you notice any signs of damage, deformation, malfunction or a missing part, do not install this
product and return it to the point of sale. At the end of its service life, the product and its parts must be
treated as electronic waste. Before starting the installation, make sure that all wires and connected parts are
not under voltage. When assembling and performing maintenance, you must uphold safety regulations,
standards, directives and special provisions for working with electrical equipment.
2. Main characteristics of the eLAN-IR-003:
The product eLAN-IR-003 is a converter of commands from Ethernet to the IR code.
The eLAN-IR-003 is designed for easy control of IR equipment using the iMM Client or PC connected
to the same Ethernet network.
For access to eLAN-IR-003 from the Internet, you must connect the eLAN-IR-003 to a Public IP
address.
The device is compliant with standards 802.3/802.3u (Fast Ethernet)
The device is compliant with standards ISO 802.3/ IEEE 802.3u ( 10BASE-T)
Automatic cable crossing detection of Ethernet cable - MDIX
10/100BaseT Ethernet, auto-detection
Support for administration and configuration via web interface.
It supports firmware updates via a web interface.
Its own web server
Option of powering via data network cable - PoE (Power over Ethernet)
Supports IR codes over a carrier frequency of 20 - 60kHz
Possible of learning up to 100 IR codes
Has three IR outputs available, enabling control of up to three different devices.
Enables replacement of all IR controllers and combining them under one
Aluminum design box in desktop style.
Adapter and IR transmitter are part of the supply

02-18/2012 4/16
Converter Ethernet to IR code
eLAN-IR-003 Technical parameters:
Installation Manual
3. Technical parameters:
IR sensor: infrared sensor for learning IR codes (on device rear panel)
Carrier IR Frequency 20 - 60 kHz
Learning distance up to 1m
Output: 3 x IR transmitter
Connection: 3 x 3.5 jack connector, cable length 1 m
Output indication 3 x green Status LED IR1-IR3
Range: upto1mfromdevice
Operating status indication ETH: green LED
Communication indication ETH: yellow LED
Communications interface: 10/100 Mbps (RJ45)
Supply voltage / jm. Current: 10-27 V DC / 200 mA (safe low voltage)
Connection: connector Jack Ø 2.1 mm
Power supply via PoE: when upholding conditions of sup. voltage 10-27 V DC / 200 mA
Supply voltage indication: green LED
Other powering options: connector USB-B
Indication: yellow USB status LED
Button RESET: restart product / reset product to factory settings
Power source: 230 VAC / 12 V DC part of supply
Working temperature: -20 .. +55 °C
Storage temperature: -25 .. +70 °C
Protection class: IP 30
Pollution degree: 2
Working position: any
Installation: free
Design: designbox
Dimensions: 90 x 52 x 65 mm
Weight: 136g
Factory settings:
Login: admin,user
Password: elkoep
IP address: 192.168.1.1
Default gateway: x. x. x. 254*
*The default gateway is always set as the IP address of the product, with the address that the last number is
the 254.
02-18/2012 5/16
Converter Ethernet to IR code
eLAN-IR-003 Emission characteristics of IR
Installation Manual
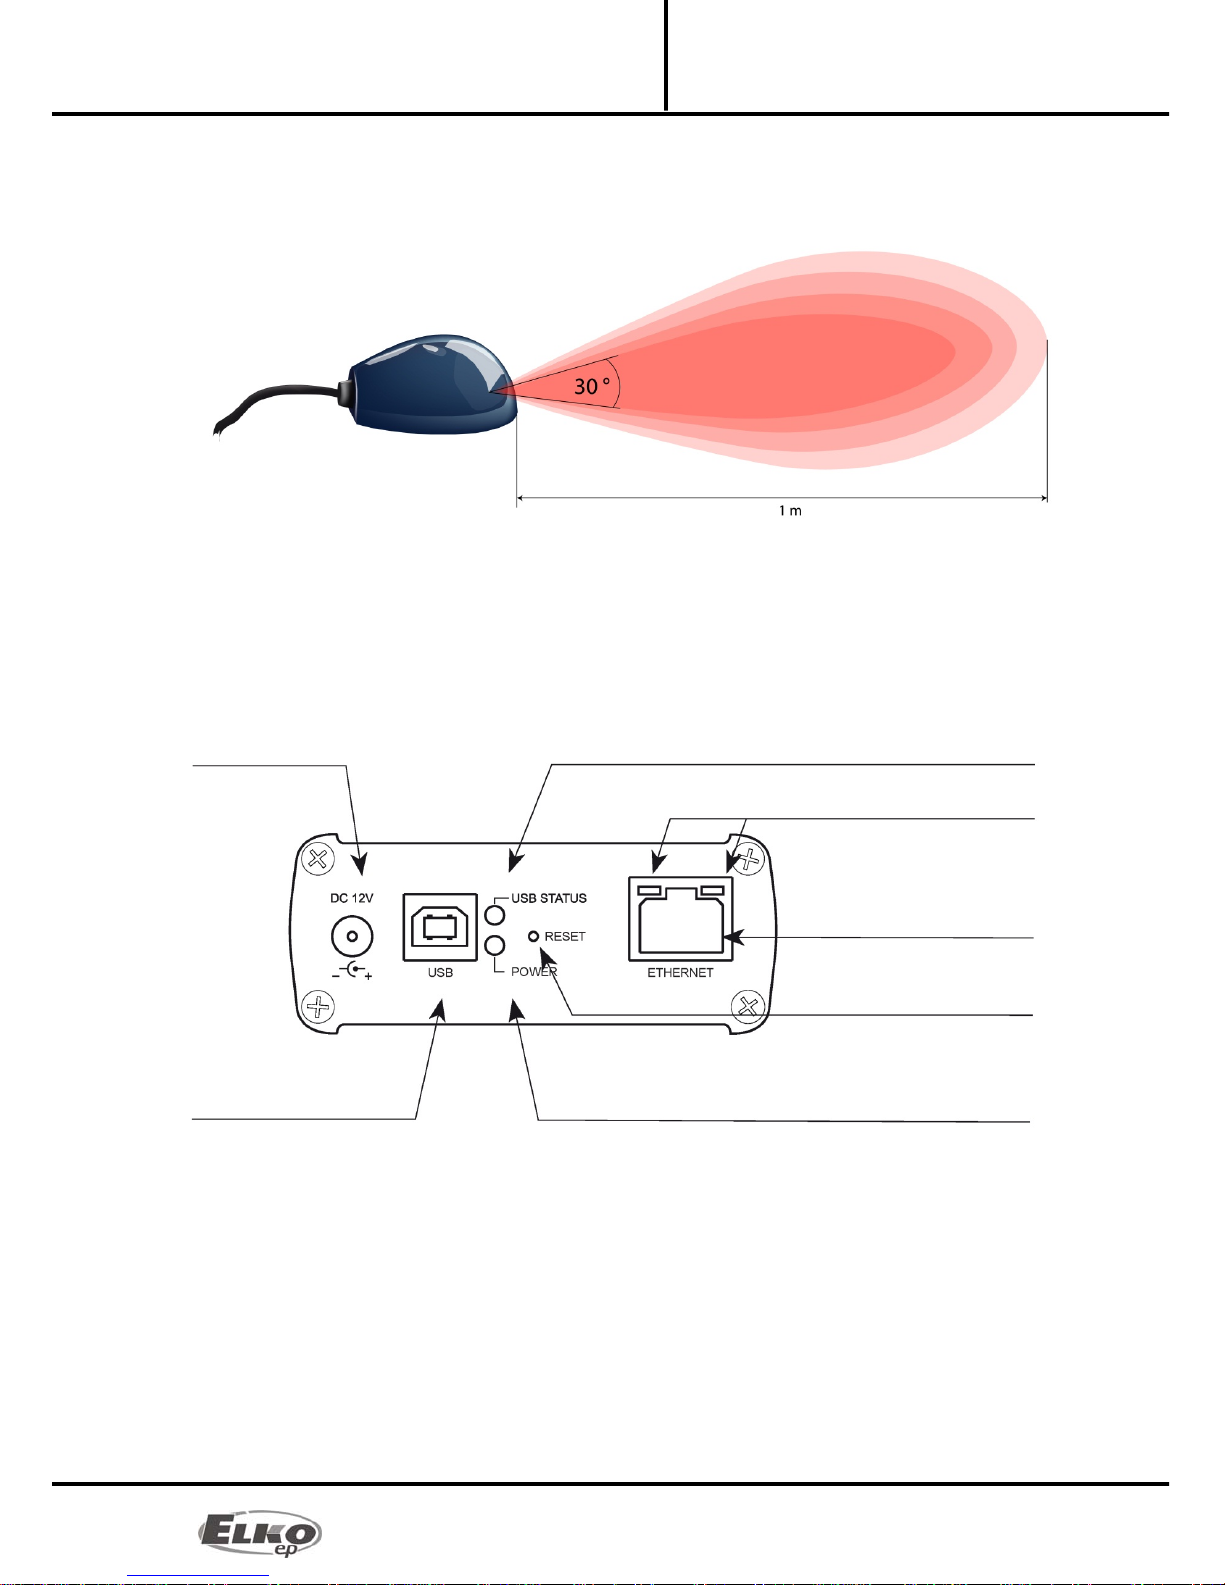
4. Emission characteristics of IR transmitter:
The emission characteristics of the transmitter are displayed by a symbol in the image above. The IR beam
emitted is cone shaped and emits from the front part of the transmitter. The emission angle is 30°, so make
sure to point the transmitter directly at the receiver of the controlled device. The distance from the controlled
device should not exceed 1m.
5. Hardware installation:
5.1 Front panel:
Power connector DC 10-27V max. 200mA – Input for connecting supplied power supply adapter.
Plug USB B – Used for servicing, (or can be used to power the product).
Green POWER LED power supply indicator.
Yellow USB Status LED – displays activity at the USB port.
RESET button – used to restart or restore the product to factory settings*.
Ethernet RJ 45 connector – used to connect mainly to the local network (LAN) or PC.
Ethernet connector yellow LED - indicates operating status.
Green LED diode to Ethernet connector - indicates communication.
*By shortly pressing (around 1s) the RESET BUTTON in the status where the product is connected to the
supply voltage, the product will restart. This restart neither changes nor deletes settings.
Power connector
10-27V/200mA
Yellow USB status LED
LED indicator of Ethernet
communication
Ethernet connector (RJ 45)
RESET button
Green POWER LED power supply indicator
USB B connector
02-18/2012 6/16
Converter Ethernet to IR code
eLAN-IR-003 Hardware installation:
Installation Manual
RESET to factory settings occurs after pressing and holding the RESET for min. 10s. This restart returns the
product to its factory settings, i.e. the IP address is set to 192.168.1.1, the user name and password are
set at: admin / elkoep, user / elkoep, all learning and assigned IR codes are erased as well as
the web server control panel.
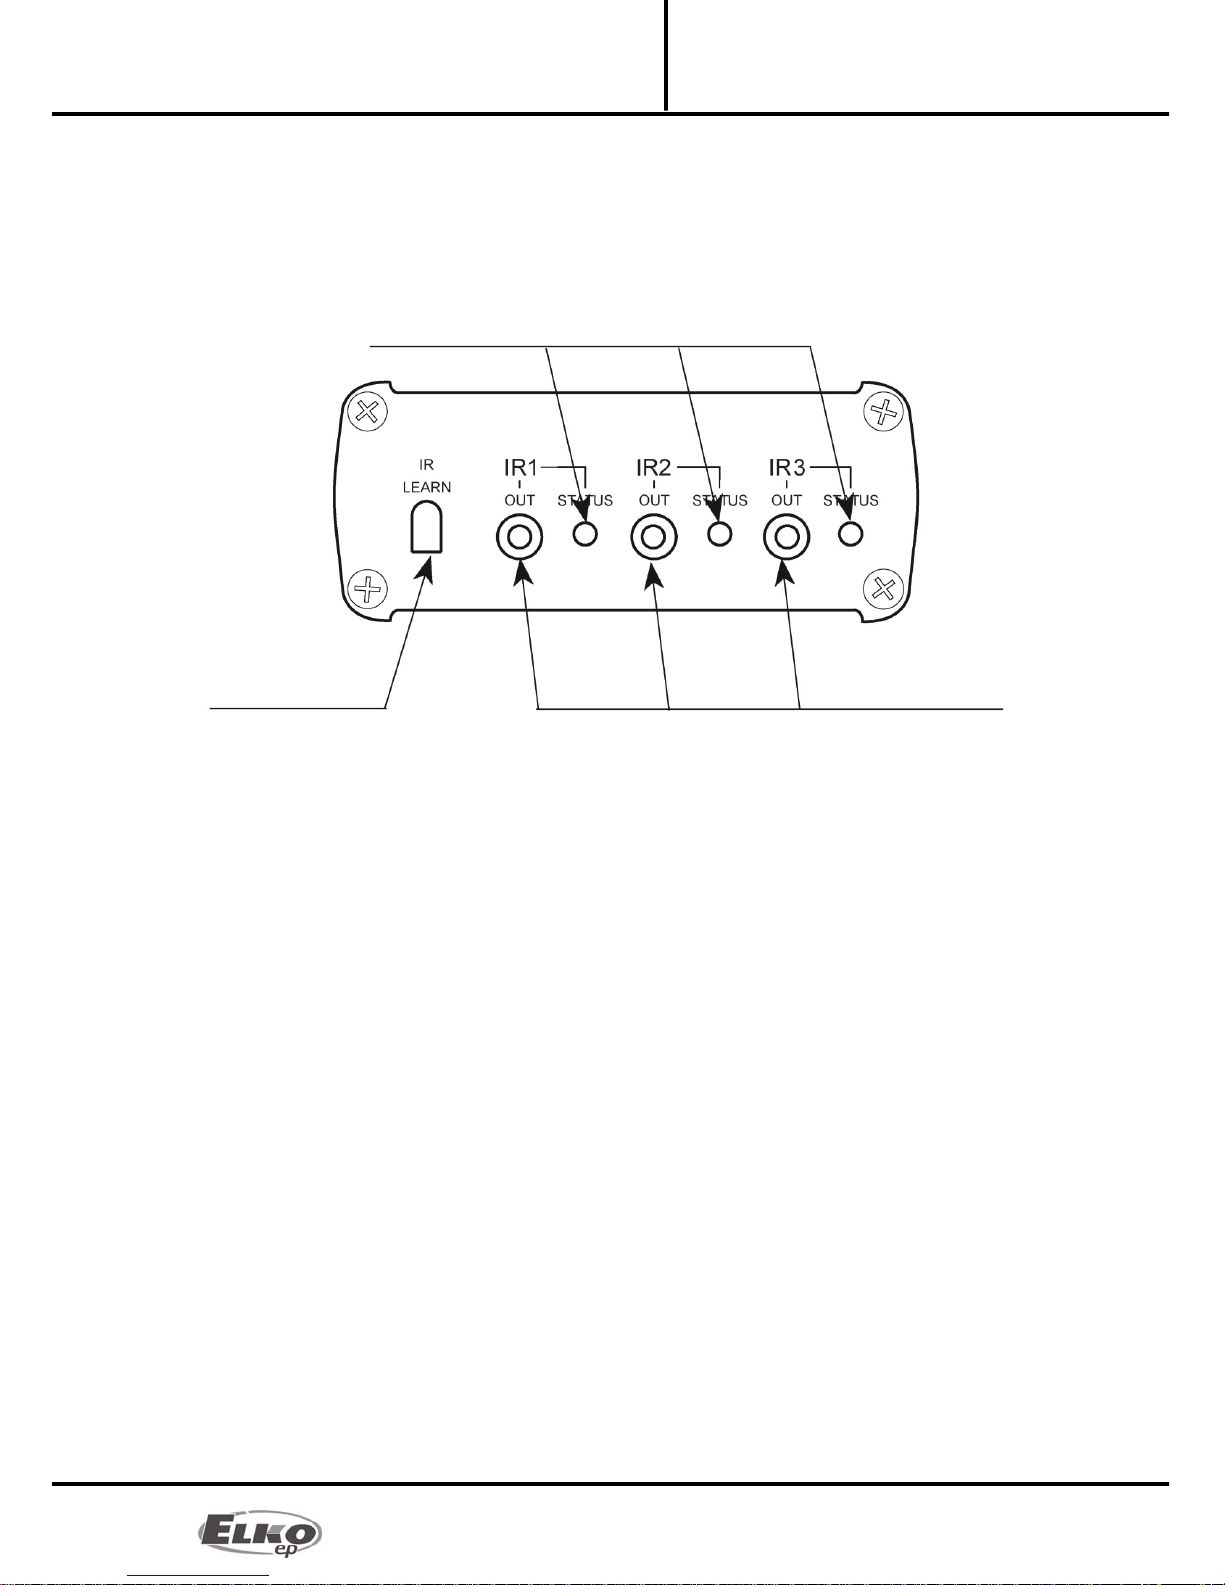
5.2 Rear panel:
IR LEARN - IR receiver for learning IR codes.
IR1 – IR3 - Outputs for connecting IR transmitters. The IR transmitter is connected via a
3.5mm jack.
The green Status LED signals transmission of a specific output.
5.3 System requirements:
Functioning iMM Client or PC with functioning Ethernet adapter.
For PCs, installed web browser (such as Mozilla Firefox, Opera, Internet Explorer from version 10, ..)
that supports Java.
Connecting Ethernet cable with RJ45 connectors.
5.4 Requirements for installation environment:
The product cannot be placed where it is exposed to moisture or excessive heat.
Place the eLAN-IR-003 at a spot where it can be connected to the Ethernet network and power
supply. Its IR transmitters must be far enough away from the controlled device.
For flawless IR communication, the transmitter cannot become dusty or otherwise contaminated.
The IR transmitter and controlled device must be directly in sight of each other, and the distance
between the transmitter and receiver should not be more than one meter.
The transmitter should be pointed directly at the receiver - see emission characteristics of IR
transmitter.
Green Status LED
IR signal receiver Output for IR transmitter

02-18/2012 7/16
Converter Ethernet to IR code
eLAN-IR-003 Hardware installation:
Installation Manual
5.5 Connecting the device:
Connect the power supply using the supplied adapter.
Connect the eLAN-IR-003 device to the computer via the Ethernet cable, or the iMM Client to the
network card (the cable must have an RJ45 connector; the device has the function of automatic
cable crossing detection).
Connect the IR transmitter to the product output (the IR transmitter is included in the product
supply) and place it no farther than 1m from the controlled device. Turn the transmitter to a position
based on the emission characteristics of the IR transmitter
After testing the function of the IR connection, secure using tape on the IR transmitter.
Example of typical connection:
02-18/2012 8/16
Converter Ethernet to IR code
eLAN-IR-003 Configuring the computer:
Installation Manual
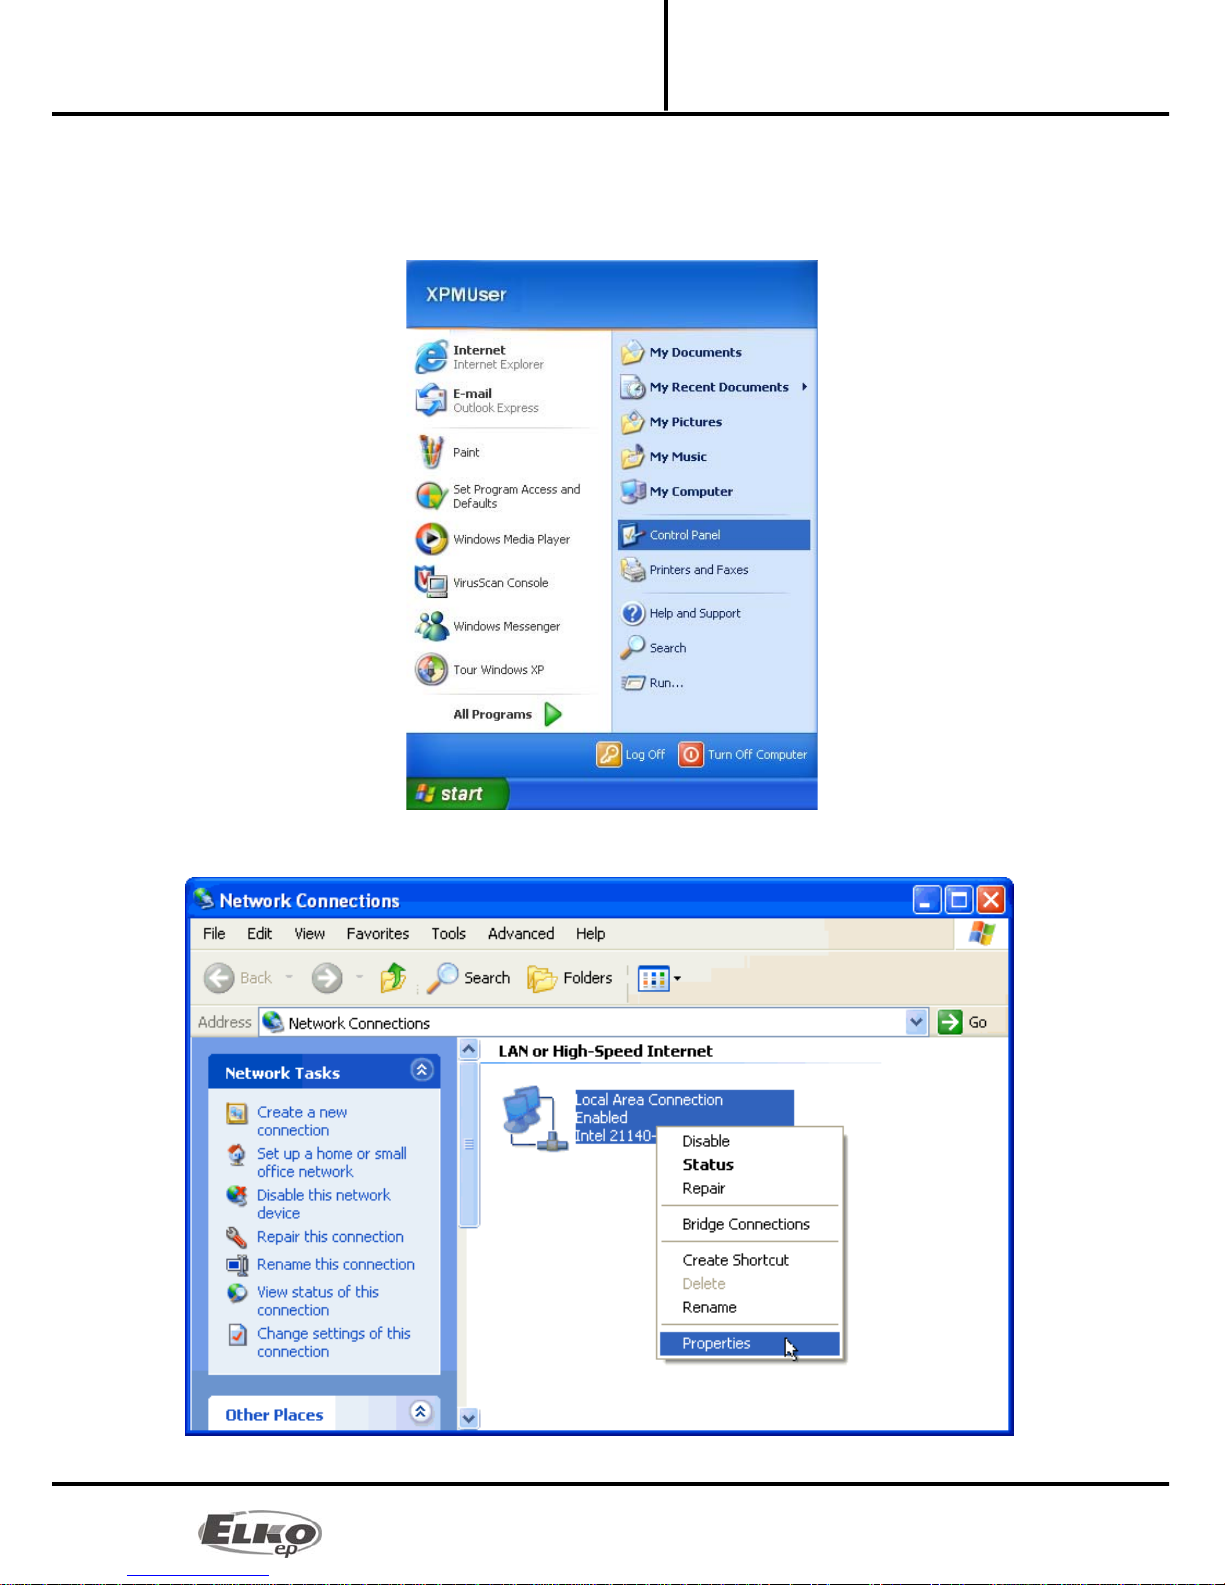
6. Configuring the computer:
For logging onto the web server or changing the IP address (192.168.1.1).
Example of configuration in the Windows system, proceed according to the following instructions :
1. In the computer's Start menu, open the Control panel and select Network connections.
2. In the Network connections window, right click on LAN (connection to local network), then again
on Properties.
02-18/2012 9/16
Converter Ethernet to IR code
eLAN-IR-003 Configuring the computer:
Installation Manual
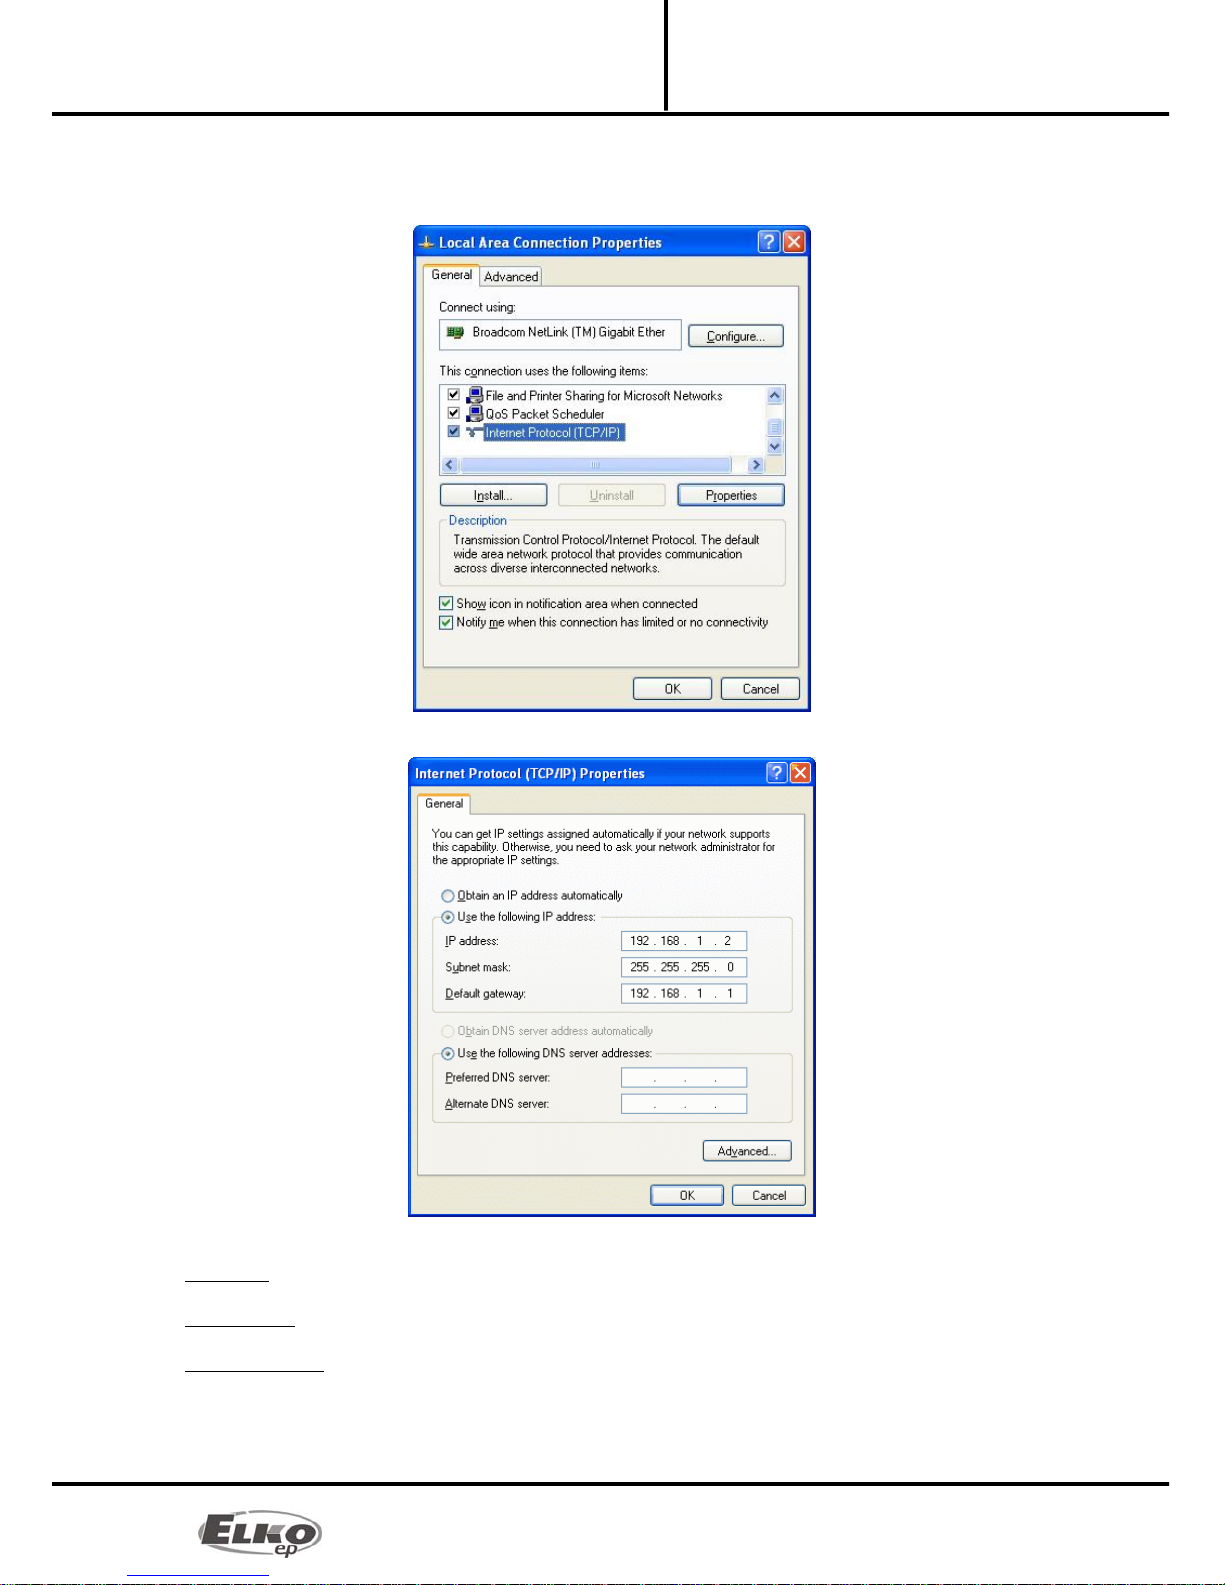
3. After opening the window: Connect to the local network in the main dialog box choose "Internet
Protocol (TCP/IP)". After choosing this type of protocol by clicking on Properties, another
configuration window opens.
4. Perform configuration by choosing the tab Use the following IP address :
Enter the following settings into the text field:
IP Address: Set the IP address of your computer in dotted decimal notation, ex. 192.168.1.2 (where 2 is any
value from 2 to 255).
Subnet Mask: address code that determines the size of the network. The value 255.255.255.0 is commonly
used for the subnet mask.
Default Gateway: here enter the address of the product IP eLAN-IR-003 in dotted decimal format (default
setting: 192.168.1.1).
The address of the DNS server need not be entered.
5. Save the settings by confirming - click OK

02-18/2012 10/16
Converter Ethernet to IR code
eLAN-IR-003 Configuring the iMM Client:
Installation Manual
7. Configuring the iMM Client:
To configure the iMM Client in the Linux system, proceed according to the following instructions:
In the main panel in Linux, run the setting "Connect to a network ".
In the tab Wired connections add new connection by clicking on the button "Add".
Give the new connection a name.
Open the tab "IPv4 settings" and choose the settings method "Manually". After pressing the button "Add"
write into the dialog window "Addresses" the settings of the address, network masks and gateways.
Enter the following settings into the text field:
Address: Set the IP address of your computer in dotted decimal notation, ex. 192.168.1.2 (where 2 is any value
from 2 to 255).
Network mask: address code that determines the size of the network. The value 255.255.255.0 is commonly
used for the subnet mask.
Gateway: here enter the address of the product IP eLAN-IR-003 in dotted decimal format separated by
periods (default setting: 192.168.1.1).
The address of the DNS server need not be entered.
Save the settings by pressing the button "Apply".

02-18/2012 11/16
Converter Ethernet to IR code
eLAN-IR-003 Configuring the eLAN-IR-003
Installation Manual
8. Configuring the eLAN-IR-003
After successfully configuring the computer or iMM Client, open your web browser.
In the panel "Address" (in the web browser) write the set IP address of the product eLAN-IR-003.
(When configuring for the first time, enter the factory-supplied IP address : 192.168.1.1 )
After confirming the entered IP address, the web server's login page will come up.
The initial screen displays the version of FW recorded in the eLAN-IR-003 ( v.x.x) and the login
window.
The factory setting for administrator login is:
Login: admin
Password : elkoep
◦Upon the next user or administrator login, use the newly set login and password.
Login options:
It is possible to log into the web interface of eLAN-IR-003 either as the administrator
(admin) with full access to controls and settings, or as the user (user), for whom only the
panel itself is displayed. The user thus only has the option of controlling the device (the
factory setting of the password for logging in as admin and user is: elkoep).
Both users log into the same dialog field (Login, password), but each uses his/her own
name and password.
Confirm login by clicking on Log in.
Note: after performing RESET on the device eLAN-IR-003 (by a long press of the button on the device
front panel), the IP address and login data are returned to factory settings.

02-18/2012 12/16
Converter Ethernet to IR code
eLAN-IR-003 Configuring the eLAN-IR-003
Installation Manual
8.1 Settings tab:
The settings tab is used to change the login name, password, network connection and panel configuration.
Change Administrator name / password:
This login data is used for administrator login. Logging in enables all settings to be changed.
For changing the login name or password, overwrite in the text fields the original login name and
password with the new ones. You must confirm the password in the next window Confirm
password. The password is saved by clicking on Save these settings.
Change username / password:
This login data is used for administrator login. Logging in only enables control of the device via the
panel. After signing in, the user only sees the control panel.
For changing the login name or password, overwrite in the text fields the original login and
password with the new ones. You must confirm the password in the next window Confirm
password. The password is saved by clicking on Save these settings.
Changing the TCP/IP parameters :
To change the network connection parameters, overwrite the original settings with the new ones
and then save the settings.
IP Address – enter the new IP address of the eLAN-IR-003 in dotted decimal format (default setting:
192.168.1.1).
Subnet Mask – address code determining size of network. The value 255.255.255.0 is commonly
used for the subnet mask.
EPSNET port - port of the TCP/IP protocol used by the superior protocol EPSNET. Use the factory
preset port 61682. In case of problems with the firewall, we recommend choosing ports in a range of
49152 to 65535.
Parameters are saved by clicking on Save .
02-18/2012 13/16
Converter Ethernet to IR code
eLAN-IR-003 Configuring the eLAN-IR-003
Installation Manual
Panel parameters (Change in visualization panel parameters):
Type – choose between background types:
None – if you choose this background, it is only possible to set the background size. The
background color will be white.
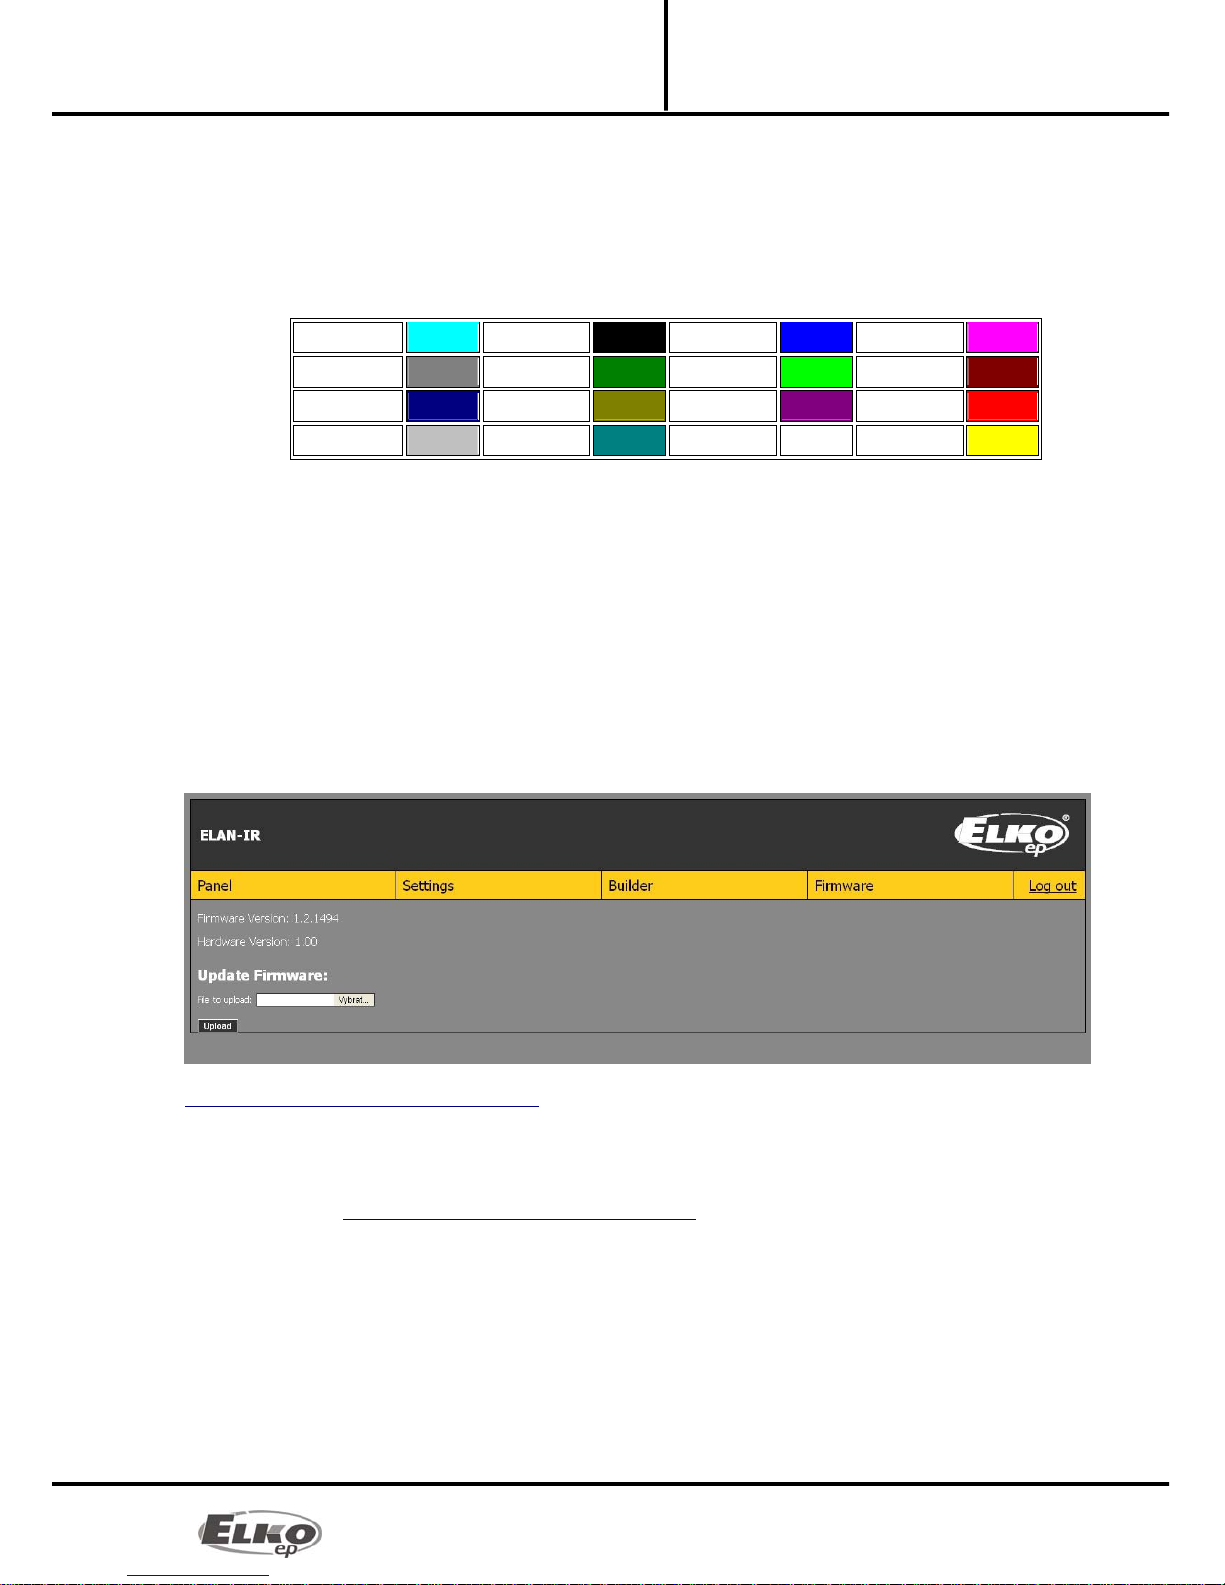
Color – as opposed to the background "None", this choice enables color selection. You can set
the background color by writing in the standardized English name for the colors at the HTML or
according to the CSS specification (ex. red = 0xFF0000, green = 0x00FF00 , blue = 0x0000FF ).
Basic colors:
0x00FFFF 0x000000 0x0000FF 0xFF00FF
0x808080 0x008000 0x00FF00 0x800000
0x000080 0x808000 0x800080 0xFF0000
0xC0C0C0 0x008080 0xFFFFFF 0xFFFF00
File – this setting enables an image to be displayed as the background in the formats *.JPG,
*.GIF, *.PGN . The resulting panel size will be based on the size of the imported image.
Note: If you change the IP address, to log into the eLAN-IR-003 you must use the new IP address. If the new IP
address that you entered is not in the same subnetwork, the connection will not work if settings are not
changed in the connected device (PC, iMM Client) to the same subnetwork.
The panel height and width must be entered for the settings None and Color. Parameters are entered in Pixel
units.
The maximum panel resolution is 2000x2000 pixels for background types None, Color and File. Upload
background images with maximum resolution of 2000x2000 pixels!
8.2 Tab Firmware:
This tab is used for easy eLAN-IR-003 firmware updates. New firmware is available at the address
http://www.elkoep.com/download/software/ and can be downloaded free. If the eLAN-IR-003 indicates no
difficulties, it is not necessary to download the newer firmware version as long as the new version has no
additional function that you would like to use.
When updating the eLAN-IR-003, proceed according to the following instructions:
1. From the website http://www.elkoep.com/download/software/ download the latest firmware version.
2. Click on the Browse button and select the file to be downloaded (this file must always include the
extension *.bin ).
3. Click on the button Upload:
Firmware Version – the current firmware version displays (here or on the login page you can check the
success of the update).
Hardware Version – displays the current hardware version. The hardware version of the updated file must
correspond to the existing hardware version.
02-18/2012 14/16
Converter Ethernet to IR code
eLAN-IR-003 Configuring the eLAN-IR-003
Installation Manual
Note: do not turn off device or use the Reset button when updating the firmware. eLAN-IR-003 restarts after
completing the update.
Note: After the firmware update, all settings will remain preserved. This means that the set IP, login
data, visualization panel will remain the same as with the SW version prior to the update.
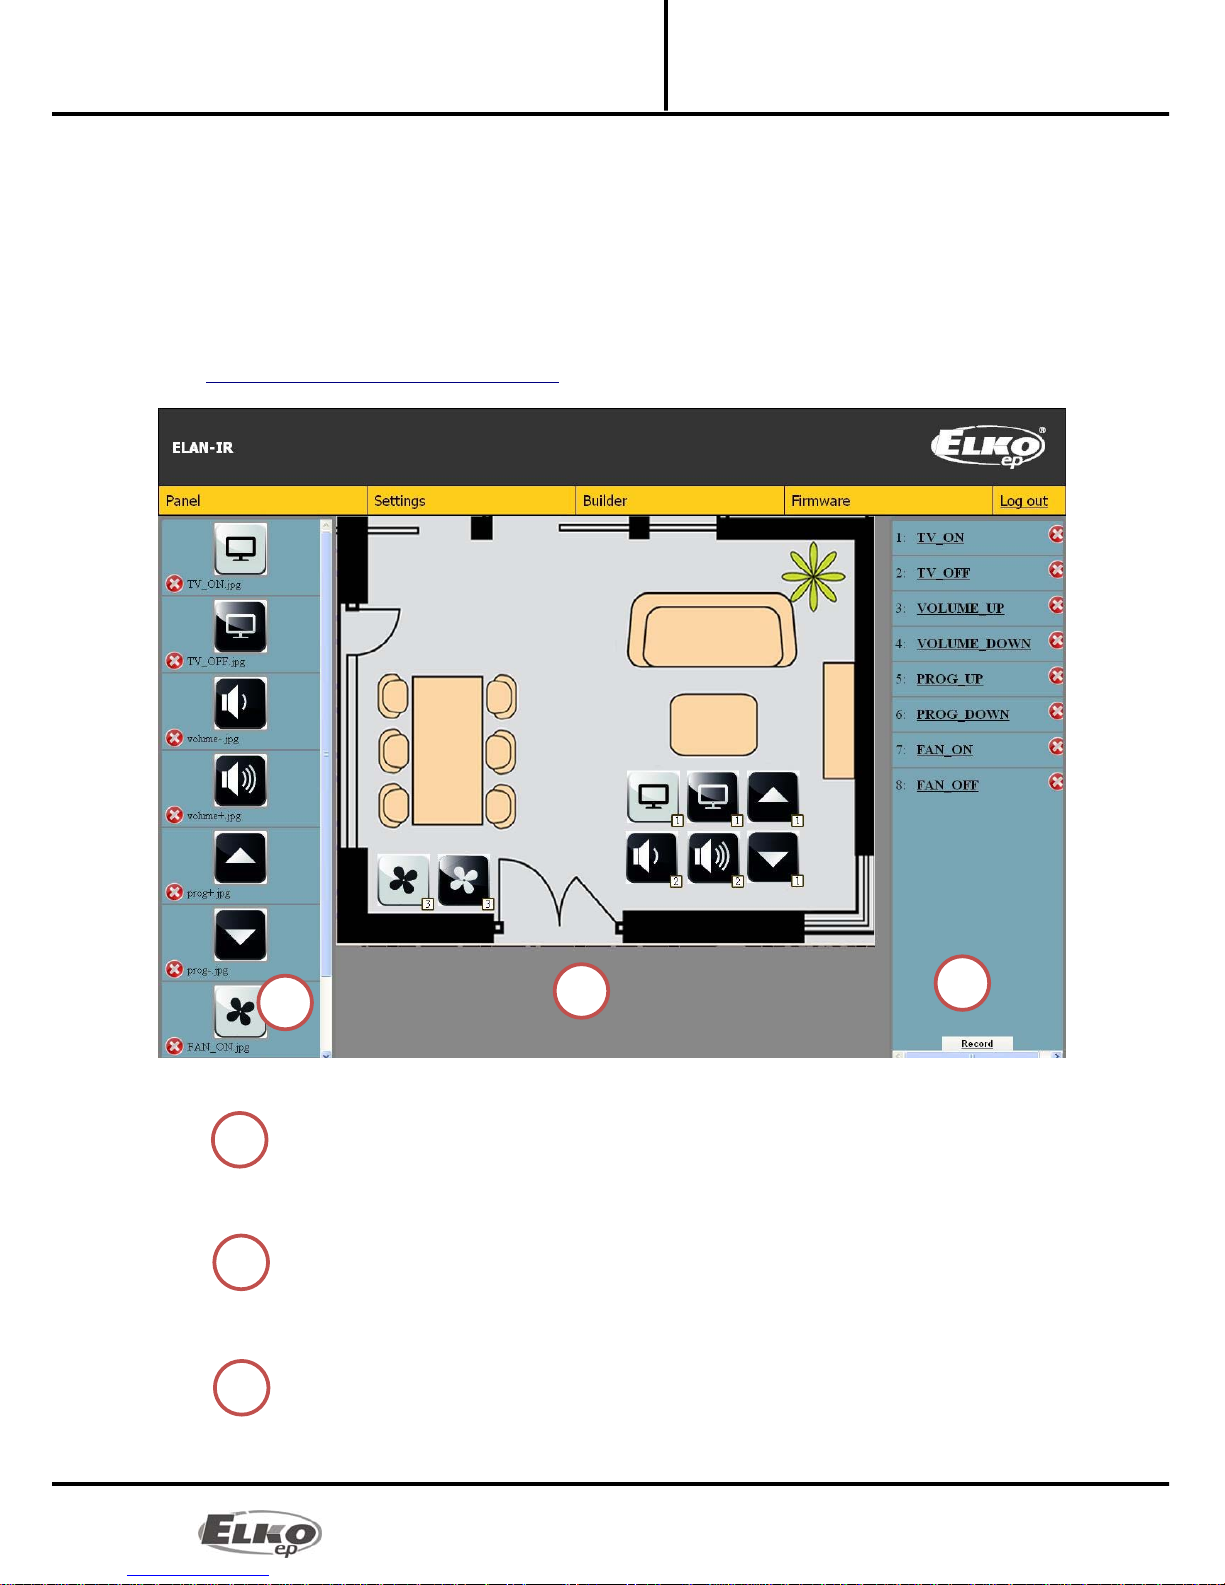
8.3 Tab Builder:
This tab is used to configure the control panel. Configuration contains the recording of the IR code
into the memory of the eLAN-IR-003, recording of icons (downloads
onhttp://www.elkoep.com/download/software/) and their assignment to already recorded IR codes.
The "builder" tab contains three panels:
The left part is used to import icons. By clicking on Add found in the lower part of this
panel, open the dialog window for selecting a file. Here choose the required icon. You can
store image files with the extensions *.JPG, * .GIF, *.PGN. Successfully recorded icons appear
in the left column. You can delete the recorded icon by clicking on the "x" button in the left
lower part of the icon.
The right part is used to manage IR codes. By clicking on Record in the lower part of this
panel, you can learn new IR codes. By clicking on Record, you will send the IR code to eLAN-
IR-003. If the code was received in order, a new row will appear in this window with a new
code number. The assigned code can be renamed by right clicking on the code number. The
code can be deleted by clicking on "x" on the right side of the code.
Central visual part. In this part, you will create the final control panel appearance. The icons
that you have already imported into the left column can easily be dragged to the
visualization desktop by left clicking and holding the icon, then dragging it to the desktop.
If you have all needed icons distributed on the desktop, you can assign the IR code in similar
1 32
2
3
1
02-18/2012 15/16
Converter Ethernet to IR code
eLAN-IR-003 Configuring the eLAN-IR-003
Installation Manual
fashion. After dragging the code to the icon, a window appears where you must choose the
output through which the IR code will be transmitted. You can easily verify a correctly
assigned code, where in the lower right window of each icon, a window is displayed with
the number of the transmission channel. Delete an icon from the visualization panel by left
double clicking on the applicable icon.
Note:
Changes that you make must be stored prior to switching or closing this web tab by clicking on " Save " in
the lower right corner of the web page.
IR codes are updated in real time, i.e. if you record or delete an IR code, these changes are saved even without
clicking on Save.
The name of IR codes may contain up to 16 characters, but do not use special characters in its name (when
using diacritics, the maximum number of characters decreases).
Only uniquely named icons can be added. If an icon that you want to assign has the same name as an already
assigned icon, it will not be assigned.
Record icons that are compressed to the minimum size to save storage space. The icon must always be
smaller than the size of the desktop upon which you are placing it. The size and remainder of memory space
is displayed on the indicator in the left lower part of this tab.
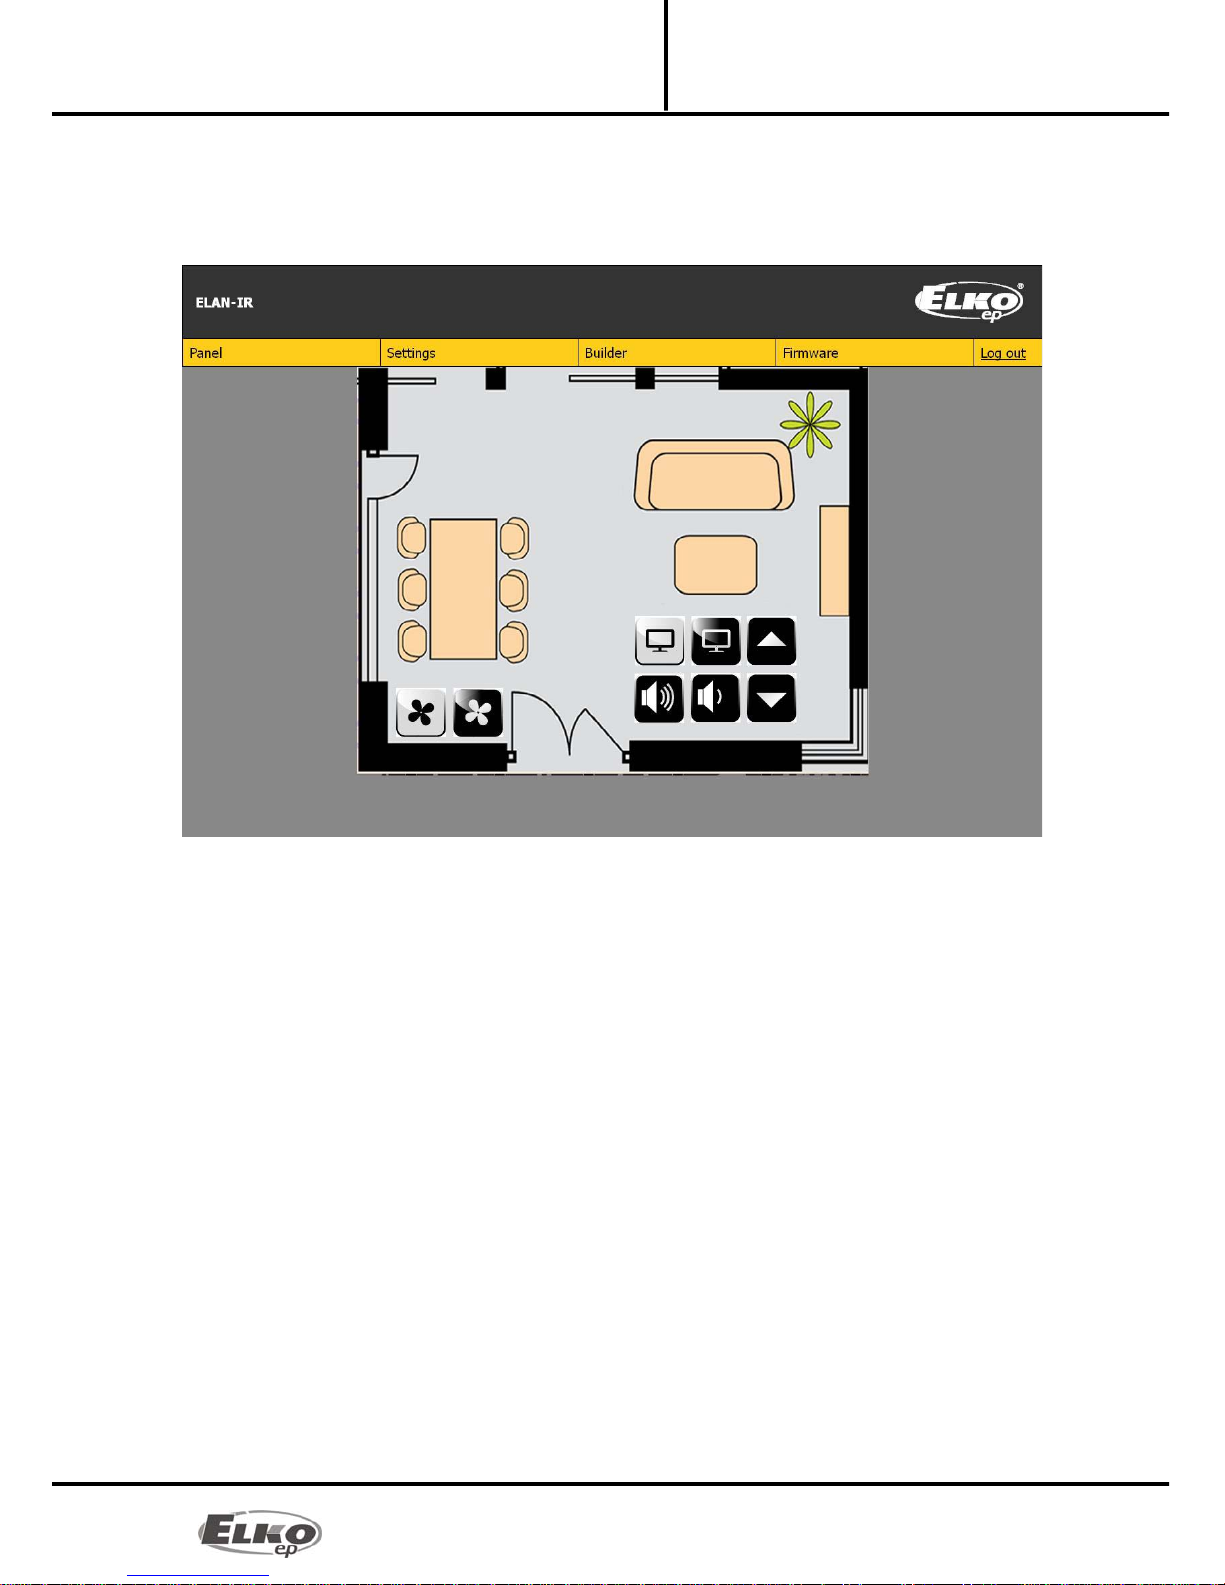
8.4 Tab Panel:
You will perform all visualization of this panel in the tab Builder. This panel is only used for the
actually sending of IR codes (commands). The code is sent by simply left clicking on the applicable icon. You
can verify the sending of the IR code by checking for the flashing Status LED of the given channel. The Status
LED will signal sending of the code only if a functioning IR transmitter is connected to this output.
Note: Controlling the panel is the same as when logging in as a user or administrator. Only in the user panel
in the lower part there appears the button "Log out", which logs out the user.

02-18/2012 16/16
Converter Ethernet to IR code
eLAN-IR-003 Troubleshooting:
Installation Manual
8.5 Tab log out:
After completing settings or administration, log out of the main page by clicking on "Log out".
9. Troubleshooting:
The product does not communicate (cannot connect to the Web server)
Solution:
◦Check the power supply: Check to see that the product is connected to the power supply, and
the Power LED on the front panel is illuminated.
◦Check the Ethernet network connection. Check to see if the yellow LED operating status is
illuminated, and that the green communication LED is either illuminated or flashing. If
something is wrong, recheck the network connection.
◦If there is no problem with the above-mentioned points and all settings are correctly set,
perform a restart by briefly pressing the RESET button or by disconnecting and reconnecting the
power supply.
The device does not react to sent IR commands
Solution:
◦Check to see if the Status IR LED is flashing. Check to make sure the eLAN-IR-003 is connected to
the power supply, the Ethernet connection is functioning and the IR transmitter is connected to
the output from which you are sending the IR code. The green LED STATUS must be flashing
while the IR code is being sent.
◦If this LED is not flashing, the cause is an incorrectly chosen channel, the cable is not inserted all
the way, or the IR transmitter is defective.
◦If the LED is flashing but the device does not react, check to see that the IR code is correctly
recorded, or rerecord the code.
Table of contents
Other Elko Media Converter manuals

Elko
Elko RFIM-20B User manual

Elko
Elko iNels RFTM-1 User manual

Elko
Elko RFIM-20B User manual

Elko
Elko 7180 User manual

Elko
Elko inels RFSG-1M User manual

Elko
Elko inels RFSG-1M User manual

Elko
Elko eLAN-RF-003 User manual

Elko
Elko RFIM-20B User manual

Elko
Elko iNELS RFTM-1 User manual

Elko
Elko RFSG-1M User manual


Popular Media Converter manuals by other brands


 user guide")


epic power
epic power EPC Series installation guide

Voltronic
Voltronic VCC 1212-25 IUoU-Li operating manual

Humandata
Humandata USB-013 user manual

Sony
Sony SQD-2020 Owner's instruction manual

Hanwha Techwin
Hanwha Techwin Wisenet SPD-150 user manual

ITALCOPPIE SENSORI
ITALCOPPIE SENSORI EVOMINIX W quick start guide