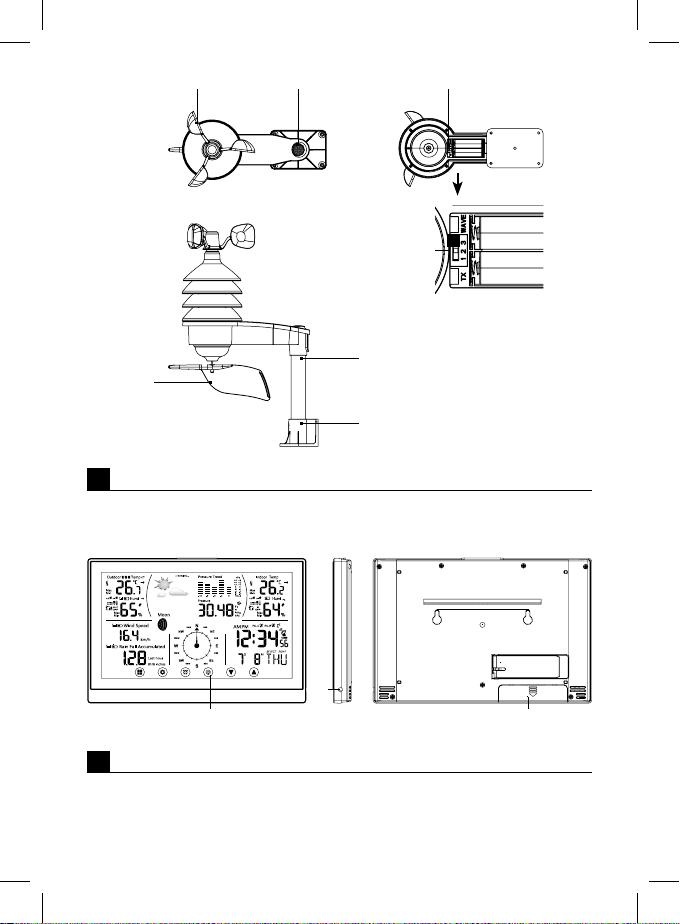
Emos E06016 User manual

2693000230_31-E06016_00_01 105 × 148 mm
www.emos.eu
E06016
GB Wireless Sensor
CZ Bezdrátové čidlo
SK Bezdrôtové čidlo
PL Czujnik bezprzewodowy
HU Vezeték nélküli érzékelő
SI Brezžični senzor
RS|HR|BA|ME Bežični senzor
DE Funksensor
UA Бездротовий датчик
RO|MD Senzor fără r
LT Belaidis jutiklis
LV Bezvadu sensors
EE Juhtmeta andur
BG Безжичен сензор

2
1
2
1 2 4
1 3
2
3
5
6

3
GB | Wireless Sensor
Technical Specications
outdoor temperature: -30 °C to +60 °C, 0.1 °C resolution
temperature measurement accuracy:
±1 °C for 20 °C to +24 °C range,
±2 °C for 0 °C to +20 °C and 24 °C to +40 °C range,
±3 °C for -20 °C to 0 °C and 40 °C to +50 °C range,
±4 °C for other ranges
indoor and outdoor humidity: 1–99 % RH, 1 % resolution
humidity measurement accuracy: 5 %
wind sensor measurement range: 0 to 127.5 km/h
unit of wind speed: km/mph
precipitation sensor measurement range: 0 to 2,999 mm
unit of precipitation: mm/inch
radio signal range: up to 100 m in an open space
transmission frequency 433 MHz, 10 mW e.r.p. max.
temperature/humidity/wind sensor power supply: 4× 1.5 V AA (not included)
temperature/humidity/wind sensor dimensions and weight: 275 × 135 × 310 mm, 377 g (without
batteries)
Sensor Description
See g. 1
1 – wind sensor cups
2 – compass
3 – wind direction paddle
4 – temperature/humidity/wind sensor battery compartment
Buttons: TX – send signal from sensor to station,
1/2/3 – switch sensor channel number,
WAVE – manual activation/deactivation of DCF signal reception
5 – mounting rod (26 mm diameter)
6 – mounting base
Station Description
See g. 2
1 – CHANNEL button – search for sensor signal/browse through readings from individual con-
nected sensors
2 – power adapter socket
3 – battery compartment
Getting Started/Installation
1. Connect the adapter to the station, then insert batteries rst into the weather station (3× 1.5 V
AAA), then into the wireless temperature/humidity/wind sensor (4× 1.5 V AAA).
2. When inserting the batteries, make sure the polarity is correct to avoid damaging the weather
station or sensor. Only use alkaline batteries of the same type; do not use rechargeable batteries.
3. Place the two units next to each other. The weather station will automatically detect the signal
from sensors within 3 minutes. If signal from sensors is not detected, long-press the CHANNEL
button on the weather station to repeat the search and press the TX button on the sensor.
4. To ensure correct measurement, the temperature/humidity/wind sensor and precipitation
sensor must be placed above the ground (at least 1.5 m) onto a horizontal surface and outside
of buildings and structures. The sensor must be mounted rmly to prevent its damaging. First,
screw the mounting plate onto a level surface, then mount the mounting rod into it. Screw the
temperature/humidity/wind sensor onto the rod. Wind must ow freely around the wind sensor
from all sides. Check that the wind direction indicator and paddles for measuring wind speed can

4
rotate freely. The north arrow (N) on the built-in compass must point to the real north. Otherwise,
wind direction will always be displayed incorrectly. When choosing a suitable place for mounting
the sensor, check before installation that the main station is within range of the sensor. The range
of the sensor may decrease substantially in areas with large number of obstacles.
5. Do not place the sensor onto metal objects; doing so will reduce the transmission range.
6. If the low battery icon is displayed, replace batteries in the sensor or weather station.
Switching Channels and Connecting Additional Temperature/Humidity/Wind
Sensors
1. Select channel 1, 2 or 3 for the sensor by repeatedly pressing the CHANNEL button. Then, long-
press the CHANNEL button. The icon will begin ashing.
2. Remove the cover from the battery compartment on the rear of the sensor and set the sensor
switch to the desired sensor channel number (1, 2, 3), then insert batteries (4×1.5 V AA). Data
from the sensor will be loaded within 3 minutes.
3. If sensor signal is not found, remove the batteries and follow steps 1 and 2 again or press the
TX button.
Attention:
The anemometer (wind speed and direction measurement) only functions on channel 1 (spare
sensor E06016).
Channels 2 and 3 are used for information about outdoor temperature and humidity (spare sensor
E06018).
Safety Instructions and Warnings
Read the user manual before using the device.
The product is designed to serve reliably for many years if used properly.
• Read the manual carefully before using this product.
• Do not expose the product to direct sunlight, extreme cold and humidity, and sudden changes
in temperature.
• Do not place the product in locations prone to vibration and shocks – may cause damage.
• Do not subject the product to excessive force, impacts, dust, high temperatures or humidity –
doing so may cause malfunction, shorten battery life, damage batteries and deform plastic parts.
• Do not expose the product to rain or moisture if it is not designed for outdoor use.
• Do not place any open ame sources on the product, e.g. a lit candle, etc.
• Do not place the product in places with inadequate air ow.
• Do not insert any objects in the product‘s vents.
• Do not tamper with the internal electric circuits of the product – doing so may damage the product
and will automatically void the warranty.
• To clean the product, use a slightly moistened soft cloth. Do not use solvents or cleaning agents
– they could scratch the plastic parts and cause corrosion of the electric circuits.
• Do not submerse the product in water or other liquids or expose it to dripping or splashing water.
• If the product becomes damaged or defective, do not perform any repairs yourself; bring it for
repair to the store where you bought it.
• This device is not intended for use by persons (including children) whose physical, sensory or
mental disability or lack of experience and expertise prevents safe use, unless they are supervised
or instructed in the use of the appliance by a person responsible for their safety.
Do not dispose with domestic waste. Use special collection points for sorted waste. Contact
local authorities for information about collection points. If the electronic devices would be
disposed in landll, dangerous substances may reach groundwater and subsequently food
chain, where it could aect human health.
Hereby, EMOS spol. s r.o. declares that the radio equipment type E06016 is in compliance with Directive
2014/53/EU. The full text of the EU declaration of conformity is available at the following internet
address: http://www.emos.eu/download.

5
CZ | Bezdrátové čidlo
Technické specikace
venkovní teplota: -30 °C až +60 °C, rozlišení 0,1 °C
přesnost měření teploty:
±1 °C pro rozmezí 20 °C až +24 °C,
±2 °C pro rozmezí 0 °C až +20 °C a 24 °C až +40 °C,
±3 °C pro rozmezí -20 °C až 0 °C a 40 °C až +50 °C,
±4 °C pro ostatní rozmezí
vnitřní a venkovní vlhkost: 1–99 % RV, rozlišení 1 %
přesnost měření vlhkosti: 5 %
měřicí rozpětí čidla větru: 0 až 127,5 km/h
jednotka větru: km/mph
měřicí rozpětí čidla srážek: 0 až 2 999 mm
jednotka srážek: mm/inch
dosah rádiového signálu: až 100 m ve volném prostoru
přenosová frekvence 433 MHz, 10 mW e.r.p. max.
napájení čidla teploty/vlhkosti/větru: 4× 1,5 V AA (nejsou součástí)
rozměry a hmotnost čidla teploty/vlhkosti/větru: 275 × 135 × 310 mm, 377 g (bez baterií)
Popis čidla
viz obr. 1
1 – misky čidla větru
2 – kompas
3 – lopatka směru větru
4 – bateriový prostor čidla teploty/vlhkosti/větru
Tlačítka: TX – odeslání signálu z čidla do stanice,
1/2/3 – přepínání čísla kanálu čidla,
WAVE – manuální aktivace/deaktivace příjmu DCF signálu
5 – montážní tyč (průměr 26 mm)
6 – montážní základna
Popis stanice
viz obr. 2
1 – tlačítko CHANNEL – vyhledání signálu z čidla/přepínání údajů z připojených čidel
2 – vstup pro síťový zdroj
3 – bateriový prostor
Uvedení do provozu/instalace
1. Připojte do stanice síťový zdroj, potom vložte baterie nejdřív do meteostanice (3× 1,5 V AAA) a
poté do bezdrátového čidla teploty/vlhkosti/větru (4× 1,5 V AAA).
2. Při vkládání baterií dbejte na správnou polaritu, aby nedošlo k poškození meteostanice nebo čidla.
Používejte pouze alkalické baterie stejného typu, nepoužívejte nabíjecí baterie.
3. Obě jednotky umístěte vedle sebe. Meteostanice automaticky vyhledá signál z čidel do 3 minut.
Není-li nalezen signál z čidel, stiskněte na meteostanici dlouze tlačítko CHANNEL pro opakování
vyhledávání a na čidle stiskněte tlačítko TX.
4. Pro zajištění správného měření je nutné čidlo teploty/vlhkosti/větru a čidlo srážek umístit výše
nad povrch (min. 1,5 m) na vodorovnou plochu a mimo stavby a konstrukce. Čidlo musí být
pevně přišroubované, aby nedošlo k jeho poškození. Nejdříve přišroubujte montážní desku na
rovný povrch a potom do ní montážní tyč, na kterou přišroubujete čidlo teploty/vlhkosti/větru.
Vítr musí volně proudit okolo čidla větru ze všech směrů. Ujistěte se, že se směrovka větru a
vrtule pro měření rychlosti větru mohou volně otáčet. Podle vestavěného kompasu musí šipka
severu (N) směřovat na sever i ve skutečnosti. Jinak směr, ze kterého přichází vítr, se bude vždy
Table of contents
Languages:
Other Emos Accessories manuals