ENCAD VinylJet 36 User manual

VinylJet Series
Printer Quick Start Guide
P/N 219523-00
(Text P/N 219509-1 Rev. 1)
Copyright Eastman Kodak Company, 2002
KODAK, ENCAD®, VinylJet®, NovaJet®, CADJET®, Extreme Color
Printing™, and Graphic Outdoor Matched System™ (GO) are trademarks
of Eastman Kodak Company.
Other trademarks and registered trademarks are the property of their
respective owners.
No part of this manual may be copied or distributed, transmitted,
transcribed, stored in a retrieval system, or translated in any human or
computing language, in any form or by any means, electronic,
mechanical, magnetic or otherwise, or disclosed to a third party without
the express written permission of:
Encad, Inc., 6059 Cornerstone Court West, San Diego, CA 92121, U.S.A.
Revision History
draft 1: April 23, 2002
draft 2: August 2, 2002
Beta: September 9 2002
ENGLISH

VinylJet 36 Printer Quick Start Guide
2
Other reference materials
In addition to this guide, the following additional documentation is included with your
printer:
System CD-ROM - contains:
•Printer Reference Guide, which provides complete reference information regarding
the printer's options;
•Maintenance Guide, instructions for maintaining your printer;
•Graphic Troubleshooting Guide;
•Print Quality Guide;
•Windows Drivers;
•Print Server Software; and
•utility software.

ENGLISH
VinylJet 36 Printer Quick Start Guide
3
Contents
Environmental considerations ...............................................................6
Unpacking your printer.........................................................................6
Assembling the printer.........................................................................6
Installing the infrared (IR) bulb ..............................................................9
Removing protective shipping material ................................................. 11
Connecting power ............................................................................. 11
Setting the platen heat ...................................................................... 11
Setting the cure heat .........................................................................12
Using the control panel ......................................................................13
Choosing menu functions ...................................................................14
Setting the language .........................................................................14
Loading media ..................................................................................14
Loading banner vinyl ..........................................................................18
Moving the carriage ...........................................................................19
Installing the cutter............................................................................19
Filling the ink reservoirs .....................................................................20
Inspecting the ink cartridges ..............................................................21
Installing ink cartridges ......................................................................22
Priming the ink delivery lines ..............................................................23
Printing the prime pattern...................................................................27
Clogged jets .....................................................................................29
Paper axis calibration ........................................................................31
Aligning the ink cartridges ..................................................................31
Cartridge recognition .........................................................................35
Connecting the printer to your computer ..............................................35
Making a test print ............................................................................36
Continuous printing ...........................................................................36
Canceling a print ...............................................................................37

VinylJet 36 Printer Quick Start Guide
4
This page is intentionally blank.

ENGLISH
VinylJet 36 Printer Quick Start Guide
5
VinylJet Quick Start
Congratulations on your purchase of a VinylJet wide format color printer. This
guide gives you details on the following:
•unpacking and assembling the printer
•installing the infrared (IR) bulb
•loading media
•filling ink reservoirs
•installing ink cartridges
•installing the media cutter
•priming ink system
•aligning cartridges.
Your printer is designed to print on uncoated, untreated vinyl. The printed piece
does not require post-printing treatment to be prevent fading due to light and
moisture.
Make sure you review this entire guide before starting the installation process.
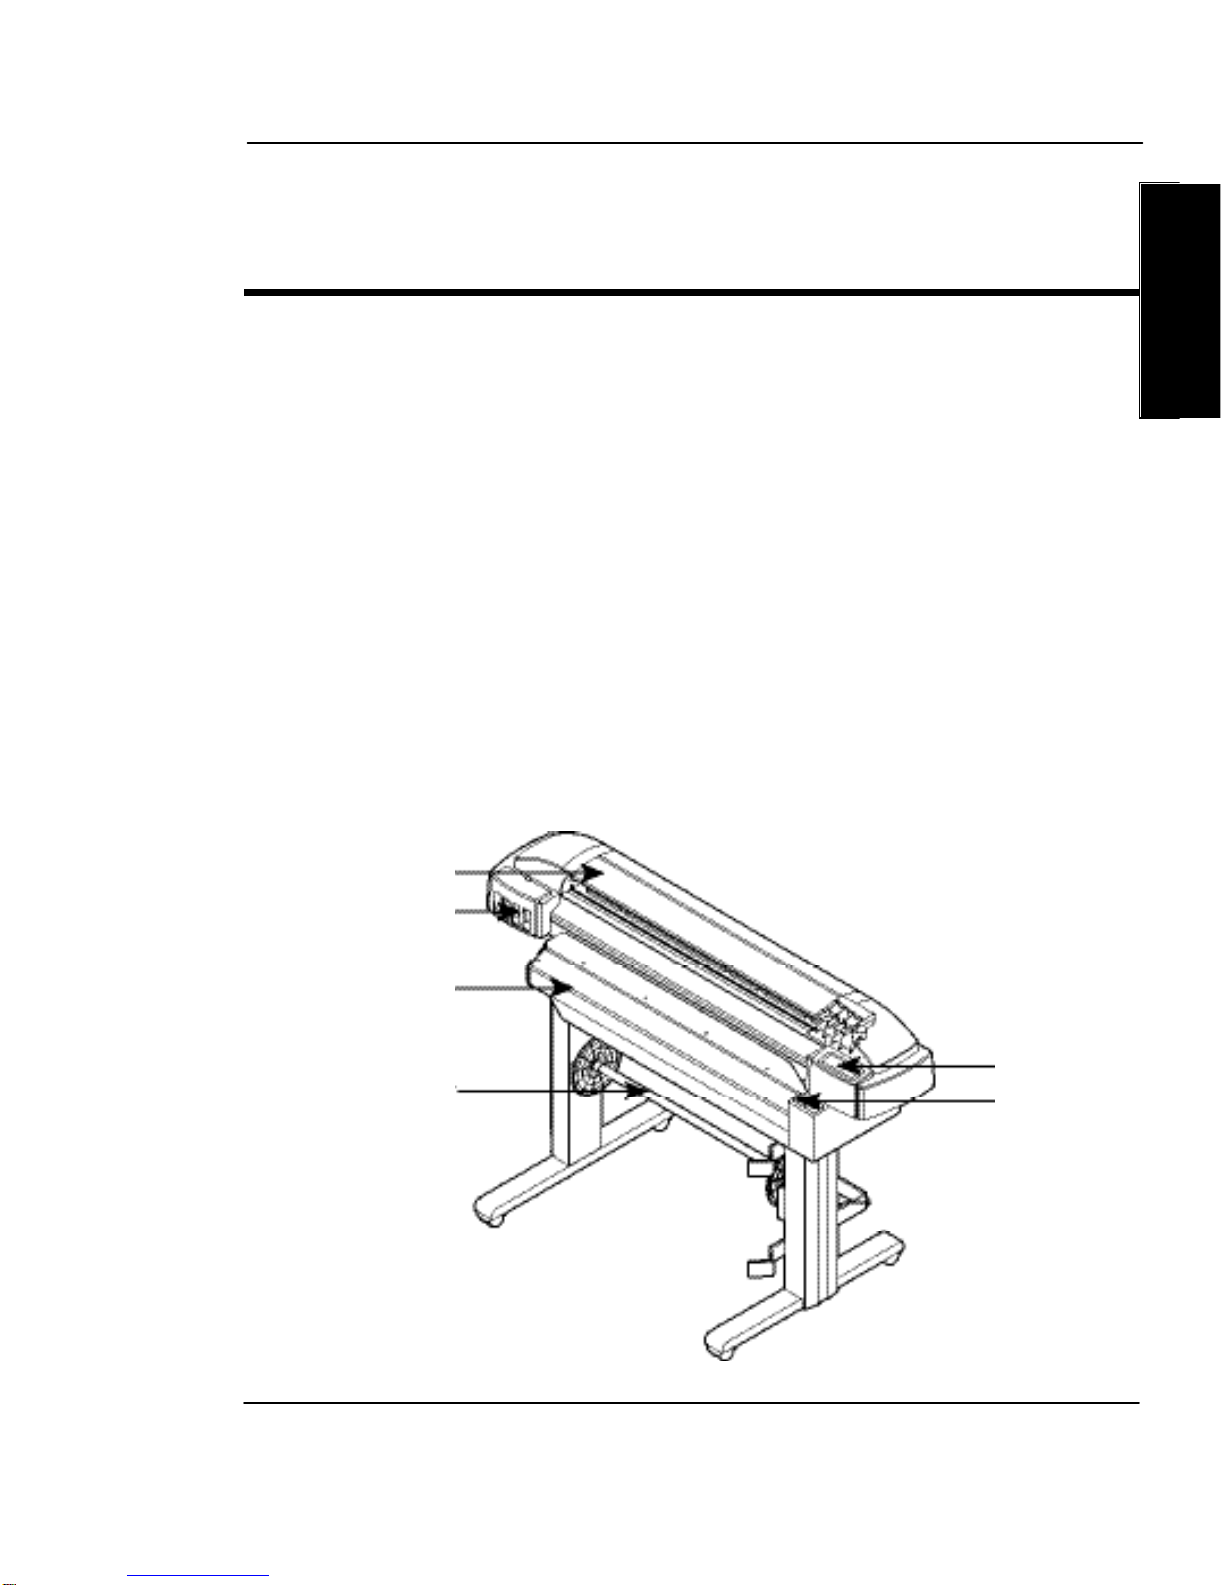
Cover
Ink Reservoirs
Heater Controls
Control Panel
Takeup Roller
Heat Shield

VinylJet 36 Printer Quick Start Guide
6
Environmental considerations
Vinyl and inks used with the printer may have odors that are objectionable to
some people. Be sure to locate your printer in a well-ventilated area.
Important! Because of the heated platen and IR bulb used to cure the ink, the
VinylJet 36 is not designed for unattended printing. Be sure to locate the printer
where someone can visually monitor print jobs. TURN THE PRINTER OFF
WHEN YOU LEAVE FOR THE DAY or if you are not going to print for 3
or more hours.
Unpacking your printer
Your printer is shipped in three separate boxes.
Box 1: Printer with curing system
Box 2: Stand
Box 3: Ink setup kits and infrared lamp
The printer and stand boxes are large and weigh approximately 140 lbs. We
recommend you have two people move them. Before assembly, you may want to
measure halls and elevators to determine whether the unit should be assembled in
the area where it will be used. Be sure you have the box which includes the IR
bulb.
Assembling the printer
1Open the box containing the stand/takeup. Remove the entire contents of
this box and place nearby for easy access. In the same box, locate the
screws for use in subsequent steps.
2Locate the box containing the printer head. Open it so that the underside of
the printer is facing up. Do not remove the printer from the box yet.
3One of the stand legs has a connector in the center of the leg. (See the
following illustration.) Pull the connector from the access hole in the leg and
remove the tiewrap holding the connector in place. Attach the connector to
the receptacle on the bottom of the printer head. Orient the stand legs so
that the roll holder brackets are facing the center of the printer head and
align with the holes in the bottom of the printer head. Attach both stand legs
to the printer head using eight of the 10-24 size screws.
Note: To help ensure that the legs seat properly on the printer head, attach
screws snugly in opposite corners first. Then, when all screws are in place,
tighten them securely.

ENGLISH
VinylJet 36 Printer Quick Start Guide
7
CAUTION: Be careful not to pinch the cable when attaching the leg.
4We recommend two people perform the following steps. Turn the box 90
degrees so that the media sensors are on top. Slide the printer out of the
box and then rotate it upright. Remove the assembled printer and stand
from the box. Save the boxes and packing materials in case you need to
ship the printer.

VinylJet 36 Printer Quick Start Guide
8
5Check to make sure the media sensors are plugged into their respective
connectors on the right stand leg.

ENGLISH
VinylJet 36 Printer Quick Start Guide
9
Installing the infrared (IR) bulb
The IR bulb is used to cure the ink on the vinyl. It turns on automatically when
printing starts.
CAUTION: Be sure to always wear the gloves provided when handling the
bulb. Oils from your skin that are transferred to the bulb can damage it.
1Using the Phillips head
screwdriver provided in the
accessory kit, remove the eight
screws that attach the grill to
the heat shield.
2Remove the four screws that attach
the heat shield.

VinylJet 36 Printer Quick Start Guide
10
3On the right side of the printer, pull back on the pin to rotate the heater
down. Remove the screw on the left side.
4Remove each of the two end
covers from the bulb contacts by
squeezing their bottom edge and
rotating them upward.
5Push the bulb into the clips,
centering the bulb in the
contacts.
6Reinstall the end covers.

ENGLISH
VinylJet 36 Printer Quick Start Guide
11
7Rotate the heater back into place and reinstall the screws. Reinstall the
rest of the heater assembly. When replacing the grill, be sure to slide it
securely into the interlock switch.
Removing protective shipping material
CAUTION: Before turning on the printer,
make sure to remove the protective foam
material that secures the carriage and remove
the protective film from the control panel.
Connecting power
1Plug the power cord into the power connector on the back of the printer and
plug the other end into an appropriately-rated, grounded outlet. Be sure to
use a 20A dedicated circuit.
2To turn on the printer, turn the power switch on at the rear of the printer. The
control panel will display the printer's model name, the firmware version,
status and progress of the power on self-test, and status.
Be sure to allow the platen heaters to warm up for at least 15
minutes before printing.
Setting the platen heat
The platen is heated to prepare the vinyl for printing. Use the keypad on the
left side of the controller to set the platen temperature to 65 degrees C (149
degrees F). The setting is saved even after power off, so it is not necessary to
reset it. It may be necessary to make minor adjustments to platen temperature
depending on ambient temperature.

VinylJet 36 Printer Quick Start Guide
12
➪To set the platen heat
1The platen heat is preset to 15 degrees C
(59 degrees F). It needs to be set to 65
degrees C.
2Press the Index button. Press the up arrow
button until 65.0 degrees C is shown on
the display. Press Enter. Press Index.
Setting the cure heat
The IR lamp cures the ink on the vinyl. It is turned on automatically at the
beginning of a print job and turned off when printing is completed. To ensure
consistent drying of the entire print, the carriage traverses the entire media width
on every pass.
The lamp should be set to achieve proper curing (refer to the chart below). The
lamp adjustment is on the left side of the controller unit. This setting is saved
even after power off, so it is not necessary to reset it. It may be necessary to
make minor adjustments to the setting depending on the media used, ambient
temperature, or difference in line voltage. If you are unsure of your input voltage,
have a qualified person measure it.
Country Voltage Frequency (hz) IR Setting (%)*
Japan 200 50 80
North America 220 60 60
China 220 50 55
Hong Kong 220 50 55
South Korea 220 60 60
Europe 230 50 50
Italy 230 50 50
United Kingdom 230 50 50
Australia 240 50 45
*for banner vinyl, reduce setting by 5%.
Before using settings other than those listed above, contact customer support.

ENGLISH
VinylJet 36 Printer Quick Start Guide
13
➪To set the cure heat
1Refer to the table above for the proper
dial setting.
2Turn the rheostat dial so that the
indicator points to the proper dial setting.
Using the control panel
The control panel at the right side of the printer includes eight buttons and a
display which indicates modes and settings. An overview is provided here so
that you can load media and ink cartridges. Details on menu options are in-
cluded in the Reference Guide on the system CD-ROM. The menu tree in
Appendix C of the Reference Guide also gives you a summary of all the printer
menus and their functions.
oLoad Media Feed Media Menu
o
oCut Setup Menu
o
oPause Utility Menu
o
oReset o
Two types of menus are displayed: action menus provide a list of additional
menus or immediate tasks to perform, such as Cut, Load Media, etc. Selection
menus let you view and modify values.

VinylJet 36 Printer Quick Start Guide
14
Choosing menu functions
To select a function, press the button adjacent the function displayed.
The display will list options available for the selected function. Press the button
for the option you want and press OK to accept the selection.
Depending on the type of menu, you can return to the previous menu level by
pressing the OK or Exit button. There is no way to immediately return to the top
level menu.
Press the Cancel button to restore the previous setting and exit the menu.
Refer to the Reference Guide on the System CD for a description of all the
menu features.
Setting the language
With the appropriate firmware version, your printer can display menu items and
messages in English, German, French, Italian, Portuguese, Spanish, Japanese,
Korean, traditional and simplified Chinese.
➪To change the language
1Press Setup Menu/User Setup Menu/Language, and select the language
you want.
2Press OK.
Loading media
Your printer is designed for printing on uncoated, untreated vinyl such as adhe-
sive-backed calendered vinyl or adhesive backed cast vinyl supplied as 24" or 36"
roll media with a core of 2". A core of up to 3" can be used with a core adapter.
To ensure straight media loading and avoid skewing, be sure to hold the media
parallel to the platen. Use the load lines on the platen as a guide to correctly align
the media. Be sure to load from the back only. Set the media guides to the width
of the media.
The takeup roll allows unattended printing by automatically winding printed media
onto a core. You MUST tape the media to the takeup roll to ensure proper curing
of the vinyl. Be sure that the media sensor on the printer's right leg is not
blocked.
Depending on the ambient humidity, temperature, and amount of ink coverage,
you may want to set a dry time and set the EOP (end of print) dry option to "On"
as described in the Reference Guide on the System CD-ROM.

ENGLISH
VinylJet 36 Printer Quick Start Guide
15
Note: Instructions for unloading media follow this section.
!The rolls can be heavy, so you may want to have someone help you to load and
unload them.
!If your roll media has wrinkled or damaged edges, cut off the damaged part
prior to loading to prevent the media from jamming in the printer.
➪To load roll media
1Slide the media guide over the feed roller
into the media core, and secure it by
tightening the locking mechanism.
2Lay the media on a table, and slide the
roller into the core. Attach and tighten the
locking mechanism.

VinylJet 36 Printer Quick Start Guide
16
3If the core of your media roll is larger
than 2", use the core adapter as
shown. The core adapter can
accomodate rolls up to 3".
4Install the media roll onto the printer.
5Mount an empty media core on the
takeup roller before inserting the
roller into the stand as shown below.
Insert the end of a roller into the
space provided in the left roller
support, then fit the other end of the
roller into the right support. Make
sure the gear on the roller is engaged
in the gear on the support.

ENGLISH
VinylJet 36 Printer Quick Start Guide
17
6Insert the media's leading edge into the back of the printer, aligning the
media edge with the alignment mark on the platen. Continue pushing the
media up into the printer. After a few seconds, the printer will sense the
presence of the media and feed it automatically. Be sure that the media is
fed so that it passes in front of the IR bulb safety shield.
Note: Be sure that a media core is installed on the takeup roll. Attach the
leading edge of the media to the takeup roll with three pieces of tape: one
at the left, right, and center of the core. Orient the media as shown in the
following illustration.

VinylJet 36 Printer Quick Start Guide
18
7Lay the media tension bar on the
media to ensure the media has
consistent tension and distance
from the IR bulb. Be sure to use the
bar which matches the width of your
media (24" or 36").
As printing progresses, media loops
down in front of the takeup core and
will be detected by the sensor on
the printer stand leg. The takeup roll
will then be activated to roll the
media. Make sure the media feeds
between the IR lamp assembly and
the platen as shown above.
Be sure not to block the sensor!
8Adjust the media edge guides on the back of the printer: 1/16" gap spacing
is optimum.
Loading banner vinyl
Banner vinyl requires the use of a spacer bar which lifts it up from the platen to
prevent distortion. Insert the spacer bar into the media guides as shown below.
Media Guides
Media Tension
Bar
Feed Roller
Take-up Roller
Spacer Bar

ENGLISH
VinylJet 36 Printer Quick Start Guide
19
➪To unload the takeup roll
1Remove the media tension bar.
2Press Cut to cut the media.
3Roll the printed or unused media onto the takeup roll.
4Slide the media and core out of the printer.
5Release the adjustable roll guide.
Moving the carriage
When not in use, the ink cartridges rest in the service station at the right side of
the printer. This device seals the inkjets to prevent them from drying out. With
the power turned on, select Utility Menu/Access Cartridge on the control
panel to move the carriage away from the service station so that you can install,
change, adjust or clean the ink cartridges, change the cutter, or clean the
service station.
!Do not move the carriage manually as you could damage the printer.
Installing the cutter
A cutter located in the ink cartridge carriage cuts roll media. The printer is
shipped with the cutter installed. Use the following procedure to replace the
cutter, when necessary.
!Be careful when handling the cutter to avoid injury.
!Cutting media with a worn cutter can cause the media to jam and create
a ragged cut line. Replace the cutter to avoid this condition. Do not cut
media on the printer with an external knife, as you could seriously
damage the platen and void the warranty.
➪To install the cutter
1Press Utility Menu/Access Cartridge to
move the carriage out from the service
station.
2The cutter fits in the printer on the left
side of the carriage. To remove a cutter,
push the cutter lever down and pull it out.
Install the new cutter by pushing it into
the slot until it clicks into place.
3Press Utility Menu/Access Cartridge to
move the carriage back into the service station.
This ensures that the cutter blade is in the home position.

VinylJet 36 Printer Quick Start Guide
20
Filling the ink reservoirs
The printer can support long, uninterrupted printing runs because of the large
capacity of each of the four ink reservoirs. The ink reservoirs are located on the
left side of the printer.
Note: Refill reservoirs when the ink level is approximately 50ml or 1/4 inch from
the bottom. Allowing ink levels to drop lower increases the risk of getting air in
the ink lines and losing pressure.
Be sure to use the same ink type in all the reservoirs and ink cartridges.
➪To fill the ink reservoirs
1Open the reservoir door.
2Push the button on the valve to release the
reservoir. Slide the reservoir forward.
3Unscrew and remove the cap of one
reservoir. Open only one reservoir at a
time to prevent contamination with other
ink colors.
4Make sure the ink color matches the
reservoir and pour in the ink.
Other manuals for VinylJet 36
1
Table of contents
Other ENCAD Printer manuals

ENCAD
ENCAD VinylJet 36 User manual

ENCAD
ENCAD Croma 24 User manual

ENCAD
ENCAD ENCAD T200+ User manual

ENCAD
ENCAD CROMA24 User manual

ENCAD
ENCAD NovaJet 880 User manual

ENCAD
ENCAD NovaCut 24 User manual

ENCAD
ENCAD NovaJet PRO 600e User manual

ENCAD
ENCAD CROMA24 User manual

ENCAD
ENCAD 215319-1 User manual

ENCAD
ENCAD CADJET 2 User manual

ENCAD
ENCAD NovaJet 500 Manual

ENCAD
ENCAD NovaJet PRO 600e User manual

ENCAD
ENCAD 60e User manual

ENCAD
ENCAD Encad NovaJet 1000i User manual

ENCAD
ENCAD CADJET User manual

ENCAD
ENCAD CADJET 3D User manual

ENCAD
ENCAD NovaJet 4 User manual

ENCAD
ENCAD NovaJet 800 Series User manual

ENCAD
ENCAD NovaJet 630 User manual

ENCAD
ENCAD CADJET 3D User manual