Enelion Wallbox Easy User manual

Copyright, Enelion Sp. z o. o.
The manual may change as the product develops. The information provided may not be correct. All rights
reserved.
Revision: V 3.2
Number of pages: 14
Released: March 5, 2021
1

Wallbox Easy - Assembly manual 3 - 2021
Contents
1 General provisions 4
1.1 General provisions . . . . . . . . . . . . . . . . . . . . . . . . . . . . . . . . . . . . . . . . . . . 4
1.2 Safety instructions . . . . . . . . . . . . . . . . . . . . . . . . . . . . . . . . . . . . . . . . . . . . 4
2 General information 5
2.1 Opening and closing of Enelion Wallbox Easy . . . . . . . . . . . . . . . . . . . . . . . . . . . . . 5
3 Design indications of the installation 6
3.1 Recommended power connection . . . . . . . . . . . . . . . . . . . . . . . . . . . . . . . . . . . 6
3.2 Location selection criteria . . . . . . . . . . . . . . . . . . . . . . . . . . . . . . . . . . . . . . . . 6
4 Assembly 7
4.1 Preparing the installation . . . . . . . . . . . . . . . . . . . . . . . . . . . . . . . . . . . . . . . . 7
4.2 Selection of bolts and anchors . . . . . . . . . . . . . . . . . . . . . . . . . . . . . . . . . . . . . 7
4.3 Mounting the device . . . . . . . . . . . . . . . . . . . . . . . . . . . . . . . . . . . . . . . . . . . 7
5 Connection 9
5.1 Power connection . . . . . . . . . . . . . . . . . . . . . . . . . . . . . . . . . . . . . . . . . . . . 9
5.1.1 Standard power connection . . . . . . . . . . . . . . . . . . . . . . . . . . . . . . . . . . . 9
6 Maintenance 11
6.1 Cleaning................................................. 11
7 Technical data 12
7.1 Enelion Wallbox Easy . . . . . . . . . . . . . . . . . . . . . . . . . . . . . . . . . . . . . . . . . . 12
2 Contents

Wallbox Easy - Assembly manual 3 - 2021
Congratulations on the purchase of the Enelion charger and thank you for your trust. Before the installation,
make sure that the module packages contain all the elements. Current version of the operation manual can be
accessed at http://enelion.pl/pomoc.
See the contents of the manual before initiating any activities related to the installation or the activation of the
charger.
3 Podzi˛ekowania za zakup

Wallbox Easy - Assembly manual 3 - 2021
1. General provisions
1.1. General provisions
The Enelion charger (hereinafter called the device,
charger or charging terminal) is a charging station in-
tended for charging electric vehicles within the mean-
ing of the “Act on electromobility and alternative fuels”
of January 11, 2018 in points 5, 12, 13 and 27 of Art. 2
of the above act.
Installation and servicing of the device must be per-
formed by qualified and authorized persons, and re-
pairs may only be carried out by the manufacturer or
entities authorized by the manufacturer.
Tampering with the mechanical, electrical and elec-
tronic components and the device software is forbid-
den and shall result in the nullification of the warranty.
The exceptions include operations described herein
and those agreed in writing with the manufacturer.
The manufacturer is not responsible for damage to
property resulting from the forbidden interference in the
product.
The electrical installation to be used by the device dur-
ing its operation must meet the conditions described
in the installation manual. The manufacturer is not re-
sponsible for incorrect assembly and/or protection of
the electrical installation to which the device is con-
nected.
The manufacturer is not responsible for the malfunction
of the electrical installation to which the device is con-
nected.
The electrical installation to be used by the device dur-
ing its operation must comply with the legal standards
in force in the place of assembly and the operation of
the device. The manufacturer is not liable for any dam-
age caused by an electrical installation that does not
meet legal standards.
The device does not have a built-in switch. The de-
vice activates when the supply voltage is applied. The
power supply cut off function must be provided by the
appropriate electrical installation devices described in
the assembly manual. Except in emergencies, the de-
vice must not be turned off during the charging process.
It is forbidden to supply the power to the device when
the device casing remains open.
It is forbidden to use a mechanically damaged charger
or a charger that indicates a critical error.
It is forbidden to place any objects in the charger socket
not intended for this purpose. A working power cable
with a cross-section appropriate for the power supplied
to the device and appropriate for the type of electric
vehicle, terminated with a functional plug type 2 in ac-
cordance with EC 62196-2 is the only object that may
be plugged in the charger socket.
It is forbidden to use any cable extensions to be con-
nected to the charging cable.
The manufacturer is not responsible for loss of health
or life by any persons resulting from failure to comply
with the above-mentioned recommendations.
The data plate on the device is an integral part of the
device and its removal or damage shall result in the nul-
lification of the warranty.
1.2. Safety instructions
Outdoor installation should not be carried out during
precipitation or strong wind, if there is a risk of water
or dirt getting into the device.
All operations described in this manual should be per-
formed only after making sure that there is no voltage
in the power cord.
4 General provisions

Wallbox Easy - Assembly manual 3 - 2021
2. General information
Wallbox Easy is a charging station encased in alu-
minum cover with strengthened polymer sides, in-
tended for electric passenger vehicles. It includes a
charging control module, a front panel with a LED sig-
naling system and a TYPE 2 socket.
Enelion Wallbox Easy is available in silver color and
with three modes of connection:
• K - 16 A 230 V power supply cable with „unis-
chuko“ plug offering maximum charging power of
3,7 kW.
• T - 16 A 400 V power supply cable with 6H plug
offering maximum charging power of 11 kW.
• H - 32 A 400 V power supply cable with 6H plug
offering maximum charging power of 22 kW.
Enelion Wallbox Easy operates in Plug Charge mode,
activating the charging once the car has been con-
nected.
Fig. 1: Enelion Wallbox Easy.
INFO
See „User manual” to learn more. The manual
contains detailed information on the functional-
ity and use of the device.
2.1. Opening and closing of Enelion Wall-
box Easy
oWARNING
Enelion Wallbox Easy is not a device intended
to be opened. Tampering with its casing shall
result in the nullification of the warranty.
5 General information

Wallbox Easy - Assembly manual 3 - 2021
3. Design indications of the installation
3.1. Recommended power connection
Enelion charging stations are adapted to five-wire
power supply from TN-S type grid. It is possible to apply
three-wire power supply from TN-S type grid.
Enelion charging terminal must be powered from the
electrical distribution board. The switchgear must have
the required protections in the form of an overcurrent
circuit breaker with B or C characteristics and rated cur-
rent of 32A or lower, appropriate to the device version.
To be compliant with the PN-EN IEC 61851-1: 2019-10
standard, each charging point must also be protected
against type B residual current. This requirement must
be met by:
1. installation of a type B residual current device
(RCD B 30 mA/40 A) or RCD EV (30 mA/40 A) in
the switchboard..
The final selection of the safety devices belongs to an
authorized designer or a qualified electrician.
The cross-section of the power supply cables must be
selected by an authorized electrician, depending on the
distance from the switchgear and other conditions per-
tinent to the location. To obtain the maximum charging
power, the use of cables with a conductor cross-section
equal to or greater than 6 mm2is recommended.
Cables running underground must be installed in accor-
dance with the binding building regulations. For conve-
nient installation, flexible power cables, stranded type,
terminated with clamping sleeves are recommended.
Enelion Wallbox Easy devices can be connected to
sockets compatible with the device version. The avail-
able variants are:
1. K - 16 A 230 V power supply cable with “unis-
chuko” plug offering maximum charging power of
3,7 kW.
2. T - 16 A 400 V power supply cable with 6H plug
offering maximum charging power of 11 kW.
3. H -32 A 400 V power supply cable with 6H plug
offering maximum charging power of 22 kW.
3.2. Location selection criteria
Wall-mounted Enelion devices may be installed both in-
side or outside. The device is designed to be installed
near parking spaces for electric vehicles. When used in
the vehicle collision hazard zone, the structure should
be secured with appropriate fenders painted in yellow
and black stripes (warning about the gauge).
Please bear in mind that national regulations may de-
fine the place for the installation. The device should not
be located in a place of high exposure to sunlight, which
could cause overheating. Do not install the device near
heat sources or in small, closed cubicles (e.g. in a box).
It is forbidden to install a power cord that does not com-
ply with the guidelines in section 3.1 Recommended
power connection. It is forbidden to install the device
in potentially explosive environment.
Local regulations for electrical installations, fire preven-
tion measures and accident prevention must be taken
into account, and escape routes at the installation site
must be provided.
It is forbidden to install the device in a location where
falling objects may damage the charger.
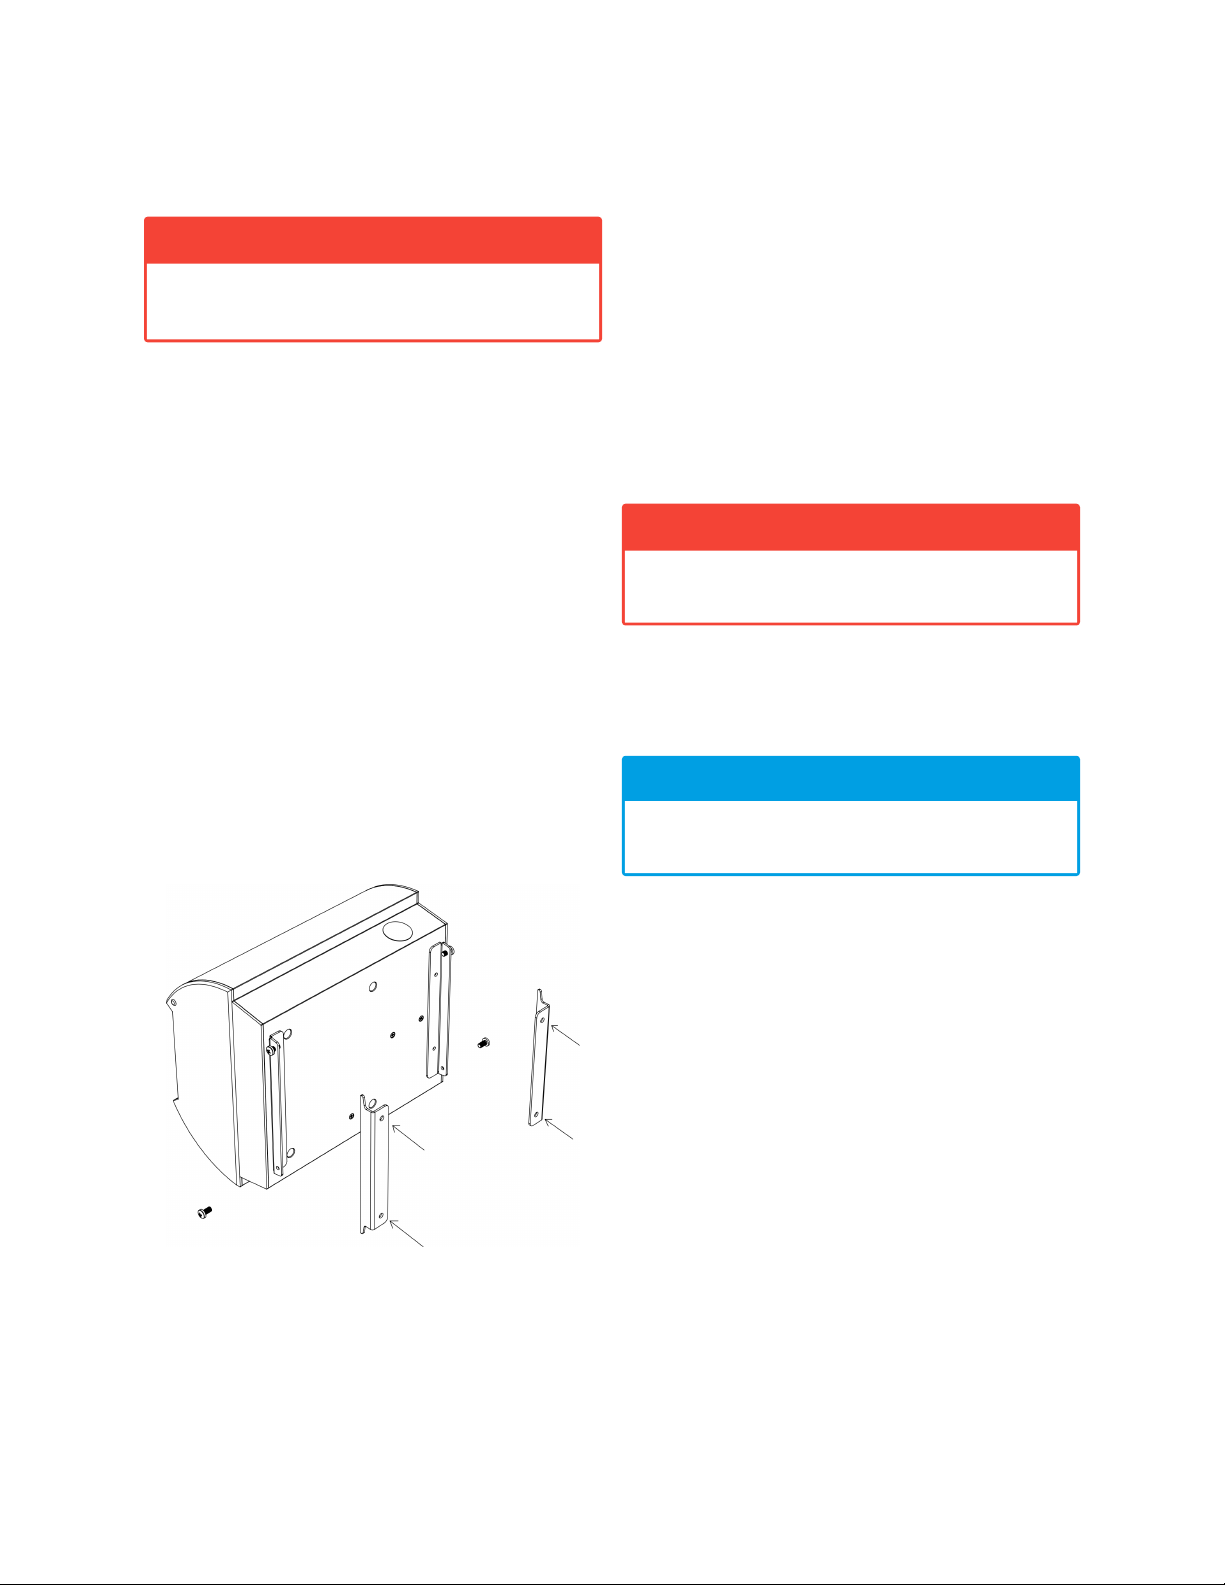
Before installation, make sure that the mounting space
for the device is sufficient.
Wallbox units, should have at least:
1. 10 cm clearance on each side of the unit.
oWARNING
The manufacturer accepts no responsibility for
any damage resulting from failure to comply
with the above-mentioned recommendations.
6 Design indications of the installation

Wallbox Easy - Assembly manual 3 - 2021
4. Assembly
oWARNING
Before commencing the installation, switch off
the power supplied to the cables.
4.1. Preparing the installation
1. Place the packaged Enelion Wallbox Easy hori-
zontally, in accordance with the markings on the
outside. Cut the package open along the indi-
cated line. Take the device out of the cardboard
box, remove the polystyrene protective casing
and put the device in the correct horizontal po-
sition.
2. Enelion Wallbox Easy is mounted on vertical sur-
faces with the use of mounting clamp (two ele-
ments affixed to the device casing and two holds
mounted on the wall) which has four mounting
holes (indicated in the drawing by arrows).
3. Before the installation, unscrew the two bottom
bolts and loosen the top ones. Next, separate the
two clamp holds from the device.
Fig. 2: Preparing the installation
4.2. Selection of bolts and anchors
In order to choose the mounting method appropriate for
the surface consider the information below:
1. Four assembly holes of 5,5 mm diameter are lo-
cated on a rectangular plan of 232 mm x 120 mm
(width by height).
2. The device weighs 2,8 kg,
3. The mounting must provide stability for the device
to withstand significant forces affecting it when
plugging and unplugging the charging cable in
the socket.
oWARNING
Use all mounting holes in the process of instal-
lation.
4.3. Mounting the device
INFO
A template facilitating the assembly of the de-
vice has been included.
1. Determine the final position of the device us-
ing the attached template and a level and mark
the mounting holes (specified on the template to-
gether with the outline of the device).
Mounting holes should be at least 5 cm from the
edge of the wall, and in the case of a recess –
at a distance from the edge of the recess that
provides sufficient access for a screwdriver to the
mounting clamps (on both sides).
2. Make assembly holes and install the anchors.
Mounting holes should be made in accordance
with the specification of anchors (expansion
bolts). The anchors should be placed in the
cleaned holes.
3. Place the elements of the clamps to the holes and
affix them to the mounting surface, observing the
vertical and horizontal.
4. Hang the device on the clamps.
7 Assembly

Wallbox Easy - Assembly manual 3 - 2021
Fig. 3: Mounting Wallbox Easy on the affixed
clamps.
5. Screw in the bottom bolts all the way to secure
the device. Next, tighten the upper bolts.
Fig. 4: Fastening (locking) the device with secur-
ing bolts.
The device may now be connected to the power supply.
8 Assembly

Wallbox Easy - Assembly manual 3 - 2021
5. Connection
5.1. Power connection
Enelion Wallbox Easy comes in three types. Depend-
ing on which type is being installed, different electric
socket will be required. ?? depicts the possible meth-
ods of connection.
5.1.1. Standard power connection
Connect the device depending on the type of the de-
vice.
1. K - Type E (CEE 7/5) or Type F (CEE 7/3) socket
- 16 A 230 V,
2. T - 6H CEE 17 socket, IEC/EN 60309 16 A 400 V,
3. H - 6H CEE 17 socket, IEC/EN 60309 32 A 400 V.
INFO
After connecting the cable, the power may be
supplied to the socket.
9 Connection

Wallbox Easy - Assembly manual 3 - 2021
Socket
TYPE 2
Charging module - Type 2 socket Charging module - Type 2 socket Charging module - Type 2 socket
METER METER METER
Socket
TYPE 2
Socket
TYPE 2
VARIANT 1 VARIANT 2 VARIANT 3
Housing Housing Housing
Power cord
32A 400V with 6H connector
Power cord
16A 400V with 6H connector
Power cord
16A 400V with "unischuko" connector
fuse fuse fuse
Fig. 5: Connection variants
10 Connection

Wallbox Easy - Assembly manual 3 - 2021
6. Maintenance
The device is designed to operate in temperatures from
−25 °C to 55 °C. The manufacturer does not guarantee
the proper functioning of the charging station in temper-
atures outside the specified range. Chargers that are
damaged because of exposure to temperatures below
−25 °C or above 55 °Care not covered under the war-
ranty. In case it is necessary to open the device, make
sure that it is disconnected from the power source. With
the device installed outdoors, make sure that there is no
precipitation or strong wind.
oWARNING
The device may only be opened by a qualified
and authorized person.
6.1. Cleaning
The correct way to clean the charger is to wipe the
housing with a microfiber cloth using a cleaning agent
dedicated to anodized aluminum. Plexiglas elements
(front panel) and plastic elements (socket) should be
cleaned with a microfiber cloth using a cleaning agent
dedicated to cleaning window panes. Other cleaning
methods (e.g. wire brush) may lead to the damage of
the device housing. Damage resulting from improper
cleaning of the device does not constitute grounds for
warranty claims.
oWARNING
The device meets the IP 54 standard. There-
fore, it is forbidden to wash the charger with
pressure washers, garden hoses, shower or any
other water stream.
11 Maintenance

Wallbox Easy - Assembly manual 3 - 2021
7. Technical data
7.1. Enelion Wallbox Easy
Electrical data
Routing of the power cord External
Power cord cross-section Integrated power cord
Supply voltage (Europe)
Depending on version:
• K 230 V
• T, H - 3 x SI3x230 V/400 VAC
Voltage frequency 50 Hz/60 Hz
Network type TN, TT
Overvoltage category III according to EN 60664–1
Rated short-circuit current Effective value < 6 kA according to EN 61439–1
Overcurrent protection Not included. Protection to be made in accordance with
the locally valid regulations and according to the version
of the device.
Protection Class Class I
Socket type Type 2, standard socket 32 A/400 VAC in accordance with
EN 62196–1
Mechanical data
Dimensions (width x height x depth) 271 mm x 249 mm x 173 mm
Weight 2,75 kg ±5%
IP Class IP54
Mechanical strength class IK10
Ambient conditions
Working temperature from −25 °C to 55 °C
Storage temperature range from −40 °C to 80 °C
Permitted relative air humidity from 5% to 95%
Elevation max. 2000 m above the sea level
12 Technical data


© 2021 ENELION
Pana Tadeusza 50, 80-123 Gda ´
nsk, Polska
Table of contents
Other Enelion Batteries Charger manuals

Enelion
Enelion Stilo User manual

Enelion
Enelion Wallbox User manual

Enelion
Enelion Stilo User manual

Enelion
Enelion Vertica User manual

Enelion
Enelion Vertica User manual

Enelion
Enelion Vertica User manual

Enelion
Enelion LUMINA User manual

Enelion
Enelion Wallbox User manual

Enelion
Enelion Vertica User manual

Enelion
Enelion LUMINA User manual