manuals.online logo
Brands
  1. Home
  2. •
  3. Brands
  4. •
  5. Englefield
  6. •
  7. Bathroom Fixture
  8. •
  9. Englefield STANDARD BATH SCREEN User manual

Englefield STANDARD BATH SCREEN User manual

-1-
V084030-H June 0
8
TOOLS REQUIRED
• Level
• Tape
• Pencil
• Phillips screwdriver
• Drill
• Hacksaw
• Caulking gun
• Stanley knife
IMPORTANT
READ ALL INSTRUCTIONS
CAREFULLY BEFORE
STARTING THE
INSTALLATION
Failure to comply
may void warranty
Bath screens must be installed in situations where the fl oor of the bathroom has a waterproof membrane installed.
For New Zealand, the bath screen must be installed in accordance with NZBC E3/AS1 clause 3.1.1.
For other countries, the bath screen must be installed in accordance with local building codes.
NOTE:
•A fl oor waste is recommended.
•Do not install in bathrooms where the fl oor is carpeted.
INSTALLATION GUIDE
STA
NDARD
BATH SCREEN
Sika Silafl ex NG
Usage:
•
1 cartridge per
bath screen
SEALANT
REQUIRED TO COMPLETE THIS INSTALLATION:
SEALANT REQUIRED TO COMPLETE THIS INSTALLATION:SEALANT
( not supplied)
-2-
V084030-H June 0
8
Kohler Co.
Exploded view and parts list
VIEW A
-3-
V084030-H June 0
8
Kohler Co.
Installation Instructions
Bath
MUST
be installed
level.
2.
Tape over waste outlet.
1.
Item Description Part No. Qty.
1 Glass Q5167CL 1
2 & 4 8 x 1
1
/
2
” screw Q911160 4
3 Top cam Q69203X 1
5 Top cap Q69204X 1
6 Wall retainer Q0084WH 1
8 6 x 1
1
/
4
” screw Q911150 3
9 Hinge post Q1000XX 1
10 Edge cap Q1020XX 1
3 Top cam Q69203X 1
5 Top cap Q69204X 1
6 Wall retainer Q0084WH 1
” screw Q911150 3
9 Hinge post Q1000XX 1
10 Edge cap Q1020XX 1
Item Description Part No. Qty.
11 6 x
3
/
8
” screw Q911104 2
12 Screw cap Q3540XX 2
13 R/H seal extension Q6910RH 1
14 L/H seal extension Q6910LH 1
15 Sleeve Q69200X 1
16 Bottom cam Q69201X 1
17 Bottom cap Q69202X 1
18 Drip edge seal Q371200 1
19 Installation instructions VO84030 1
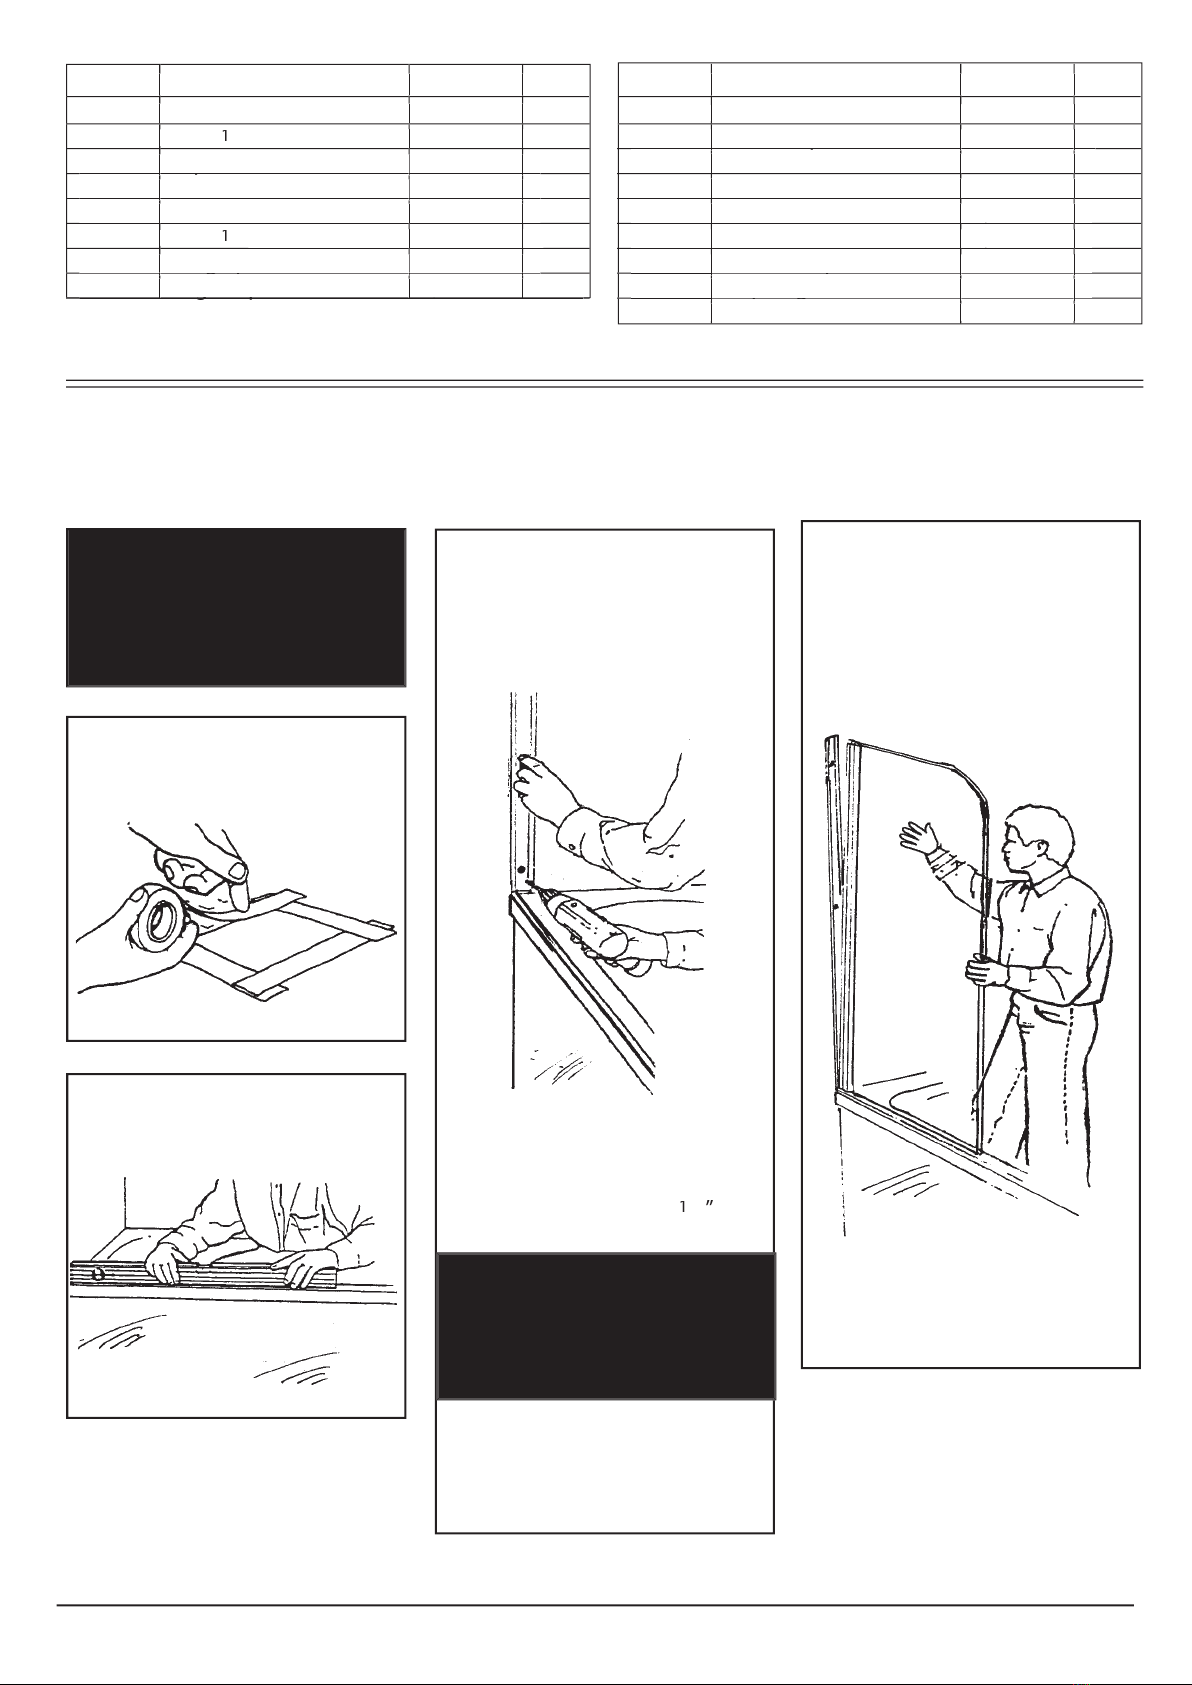
CAUTION: BEFORE DRILLING
HOLES, ENSURE THERE ARE NO
ELECTRICAL CABLES OR WATER
PIPES BEHIND WALLS.
DRILLING INTO THESE CAN
ENDANGER LIFE AND PROPERTY.
Position wall retainer fl ush
to the outside of the bath
and vertical using a spirit
level.
3.
Slide the screen into the wall
retainer as shown.
Hold the screen in place using
tape strips.
4.
Item Description Part No. Qty.
1 Glass Q5167CL 1
2 & 4 8 x 1
3 Top cam Q69203X 1
5 Top cap Q69204X 1
6 Wall retainer Q0084WH 1
8 6 x 1
9 Hinge post Q1000XX 1
10 Edge cap Q1020XX 1
3 Top cam Q69203X 1
5 Top cap Q69204X 1
6 Wall retainer Q0084WH 1
9 Hinge post Q1000XX 1
10 Edge cap Q1020XX 1
Item Description Part No. Qty.
1 Glass Q5167CL 1
” screw Q911160 4
3 Top cam Q69203X 1
5 Top cap Q69204X 1
6 Wall retainer Q0084WH 1
” screw Q911150 3
9 Hinge post Q1000XX 1
10 Edge cap Q1020XX 1
3 Top cam Q69203X 1
5 Top cap Q69204X 1
6 Wall retainer Q0084WH 1
” screw Q911150 3
9 Hinge post Q1000XX 1
10 Edge cap Q1020XX 1
12 Screw cap Q3540XX 2
13 R/H seal extension Q6910RH 1
14 L/H seal extension Q6910LH 1
15 Sleeve Q69200X 1
15 Sleeve Q69200X 1
15 Sleeve Q69200X 1
15 Sleeve Q69200X 1
16 Bottom cam Q69201X 1
17 Bottom cap Q69202X 1
18 Drip edge seal Q371200 1
Item Description Part No. Qty.
11 6 x
12 Screw cap Q3540XX 2
13 R/H seal extension Q6910RH 1
14 L/H seal extension Q6910LH 1
15 Sleeve Q69200X 1
16 Bottom cam Q69201X 1
17 Bottom cap Q69202X 1
18 Drip edge seal Q371200 1
12 Screw cap Q3540XX 2
13 R/H seal extension Q6910RH 1
14 L/H seal extension Q6910LH 1
15 Sleeve Q69200X 1
16 Bottom cam Q69201X 1
17 Bottom cap Q69202X 1
18 Drip edge seal Q371200 1
19 Installation instructions VO84030 1
18 Drip edge seal Q371200 1
Item Description Part No. Qty.
” screw Q911104 2
12 Screw cap Q3540XX 2
13 R/H seal extension Q6910RH 1
14 L/H seal extension Q6910LH 1
15 Sleeve Q69200X 1
16 Bottom cam Q69201X 1
17 Bottom cap Q69202X 1
18 Drip edge seal Q371200 1
12 Screw cap Q3540XX 2
13 R/H seal extension Q6910RH 1
14 L/H seal extension Q6910LH 1
15 Sleeve Q69200X 1
16 Bottom cam Q69201X 1
17 Bottom cap Q69202X 1
18 Drip edge seal Q371200 1
19 Installation instructions VO84030 1
18 Drip edge seal Q371200 1
Check that the bottom of the
glass is parallel with the top
edge of the bath.
Mark the position of the three
holes in the wall retainer and,
using a 3mm drill bit, drill the
holes for the No. 6 x 1
1
/
4
”
screws.
CAUTION: Fixing the retainer only to
the backboard may void warranty
as a backboard by itself may
not be able to provide enough
support for the bath screen.
Note: If it is not possible to
screw directly into a wooden
stud, drill the holes and use
nylon anchors.
-4-
V084030-H June 0
8
Kohler Co.
Select the correct seal ex-
tension and slide into place
as shown.
Clip the drip edge seal onto
the bottom of the glass.
6.
Drill holes into the hinge
post using a 3mm drill bit.
The guide holes on the wall
retainer will assist here.
Lock the hinge post in place
using the No. 6 x
3
/
8
”
screws.
Fit screw caps over the top
of the screws.
5.
Using recommended
Sealant, seal full height
between walls and Wall
Retainer Profi les, and all
other exterior joins.
7.
IMPORTANT:
SEALANT
SHOULD BE APPLIED TO ALL
OUTSIDE JOINTS – DO NOT
SEAL FROM INSIDE.
SEALANT
APPLICATION
Follow the sealant manufacturer’s
dirrections. Some sealants may
require primer.
NEW ZEALAND
KOHLER NZ Ltd.
133 Diana Drive,
Glenfi eld,
Auckland.
Ph (09) 980 6800
Fax (09) 980 6899
info@kohler.co.nz
www.kohler.co.nz
CALL US FOR HELP
AUSTRALIA
KOHLER Co.
Unit 10, 70-99 St. Hilliers Road,
Auburn,
Sydney. NSW 2144.
Ph (02) 9714 3900
Fax (02) 9714 3966
info@kohler.com.au
www.kohler.co.nz
All rights reserved to alter designs and specifi cations without notice.
WARNING: Products in this leafl et are subject to Industrial Property Protection. All dimensions given are approximate only.
©
Copyright Kohler NZ Ltd 200
8

Other Englefield Bathroom Fixture manuals

Englefield 31258A User manual

Englefield

Englefield 31258A User manual

Englefield PREMIUM BATH SCREEN User manual

Englefield

Englefield PREMIUM BATH SCREEN User manual

Englefield 5625A User manual

Englefield

Englefield 5625A User manual

Englefield TAPWARE STUDIO 5622A-CP User manual

Englefield

Englefield TAPWARE STUDIO 5622A-CP User manual

Englefield MILANO Alcove User manual

Englefield

Englefield MILANO Alcove User manual

Englefield VALENCIA ELITE User manual

Englefield

Englefield VALENCIA ELITE User manual

Englefield Tapware Studio II Slide Shower 22980A-CP User manual

Englefield

Englefield Tapware Studio II Slide Shower 22980A-CP User manual

Englefield VALENCIA Slim Vanity User manual

Englefield

Englefield VALENCIA Slim Vanity User manual

Englefield PREMIUM BATHSCREEN User manual

Englefield

Englefield PREMIUM BATHSCREEN User manual

Englefield STUDIO 5624A User manual

Englefield

Englefield STUDIO 5624A User manual

Englefield VALENCIA ELITE User manual

Englefield

Englefield VALENCIA ELITE User manual

Englefield MILANO Square User manual

Englefield

Englefield MILANO Square User manual

Englefield VALENCIA SLIM VANITY User manual

Englefield

Englefield VALENCIA SLIM VANITY User manual

Englefield VALENCIA ELITE User manual

Englefield

Englefield VALENCIA ELITE User manual

Englefield STUDIO II 22982A-CP User manual

Englefield

Englefield STUDIO II 22982A-CP User manual

Englefield 1830 User manual

Englefield

Englefield 1830 User manual

Popular Bathroom Fixture manuals by other brands

Allibert LAJA 828572 quick start guide

Allibert

Allibert LAJA 828572 quick start guide

Symmons Allura Trim 4703-TRM Operation and maintenance manual

Symmons

Symmons Allura Trim 4703-TRM Operation and maintenance manual

Franke CAMPUS CMPX538E Installation and operating instructions

Franke

Franke CAMPUS CMPX538E Installation and operating instructions

Svedbergs 9082 manual

Svedbergs

Svedbergs 9082 manual

Akuaplus IRENE FLSD 802M001 user manual

Akuaplus

Akuaplus IRENE FLSD 802M001 user manual

Toto Aimes TB626S1 Installation and owner's manual

Toto

Toto Aimes TB626S1 Installation and owner's manual

Gasmate HWS0012 instructions

Gasmate

Gasmate HWS0012 instructions

Kermi Therm X2 installation manual

Kermi

Kermi Therm X2 installation manual

baliv WA-5160 manual

baliv

baliv WA-5160 manual

Hewi 950.50.06490 Mounting instructions

Hewi

Hewi 950.50.06490 Mounting instructions

Helvex Premier II E-941 installation guide

Helvex

Helvex Premier II E-941 installation guide

Helvex PIURA PIU-200 installation guide

Helvex

Helvex PIURA PIU-200 installation guide

Porcelanosa Noken URBAN 100104972 instructions

Porcelanosa

Porcelanosa Noken URBAN 100104972 instructions

Helvex H-3008 installation guide

Helvex

Helvex H-3008 installation guide

Kohler 10-Jet K-1005-H2 Homeowner's guide

Kohler

Kohler 10-Jet K-1005-H2 Homeowner's guide

HAFA Fine 1381840 manual

HAFA

HAFA Fine 1381840 manual

BELLOSTA Beethoven 7705/3/A Installation instruction

BELLOSTA

BELLOSTA Beethoven 7705/3/A Installation instruction

Toto YH902 Series instruction manual

Toto

Toto YH902 Series instruction manual

manuals.online logo
manuals.online logoBrands
  • About & Mission
  • Contact us
  • Privacy Policy
  • Terms and Conditions

Copyright 2025 Manuals.Online. All Rights Reserved.