Eonon G2202 User manual

OWNER'S MANUAL
Car Audio Hifi System
TOUCH SCREEN 2-DIN 7 TFT LCD DVD PLAYER

SRC
VOL
MUTE
EJECT
Addition
1
STOP
REPEAT
TITLE
REP
BACK
SD/USB................................................................15
Receiption collection
Speaker collection
Warning and Precautions.........................................2
Electric Connection.................................................4
Loading and Replacing the battery
Basic operation
Install the unit
Remove the unit
Installation..............................................................5
General Features.....................................................6
Remote Control.......................................................7
Setup Operation.....................................................10
Basic Operation.......................................................9
General operation
Video operation
Audio operation
Band
Band tuner
AS/PS
Radio Operation....................................................11
Accessories.........................................................20
Specifications.....................................................26
Troubleshooting...................................................21
Familiar characters and their meanings
General problems
TFT Monitor
Radio Tuner
Mp3 playback
DVD player
TV ........................................................18Operation
Play Operation......................................................13
Bluetooth.............................................................16
Contents
GPS Navigation....................................................19

2
Warnings and Precautions
1Only connect the unit to a 12V power supply with negative grounding.
Never install the unit where the operation for safety driving is restrained.
Never use the video display function in the front when driving to prevent the violation of laws
regulations and also to reduce the risk of traffic accident except using for rear view video camera.
Never expose the unit, amplifier, speakers to moisture or water to prevent electronic sparks or fires.
Please don't change the fuse in the power cord without professional guidance, improper fuse may
cause damage to this using unit or even cause fire.
Please power off the unit at once and send it back to the after-sales service center or the dealer/
distributor yo purchased from if one of the following symptoms is found:
(a)NO audio output; (b)NO image output;(c)Water or other obstacle enters the unit; (d)Smoking;
(e)Peculiar smell.
To ensure safe driving, please adjust the volume to a safe and comfort level in case of emergency
situations.
2
3
4
5
6
7
Warnings

3
1
2
3
4
5
6
7
8
9
10
11
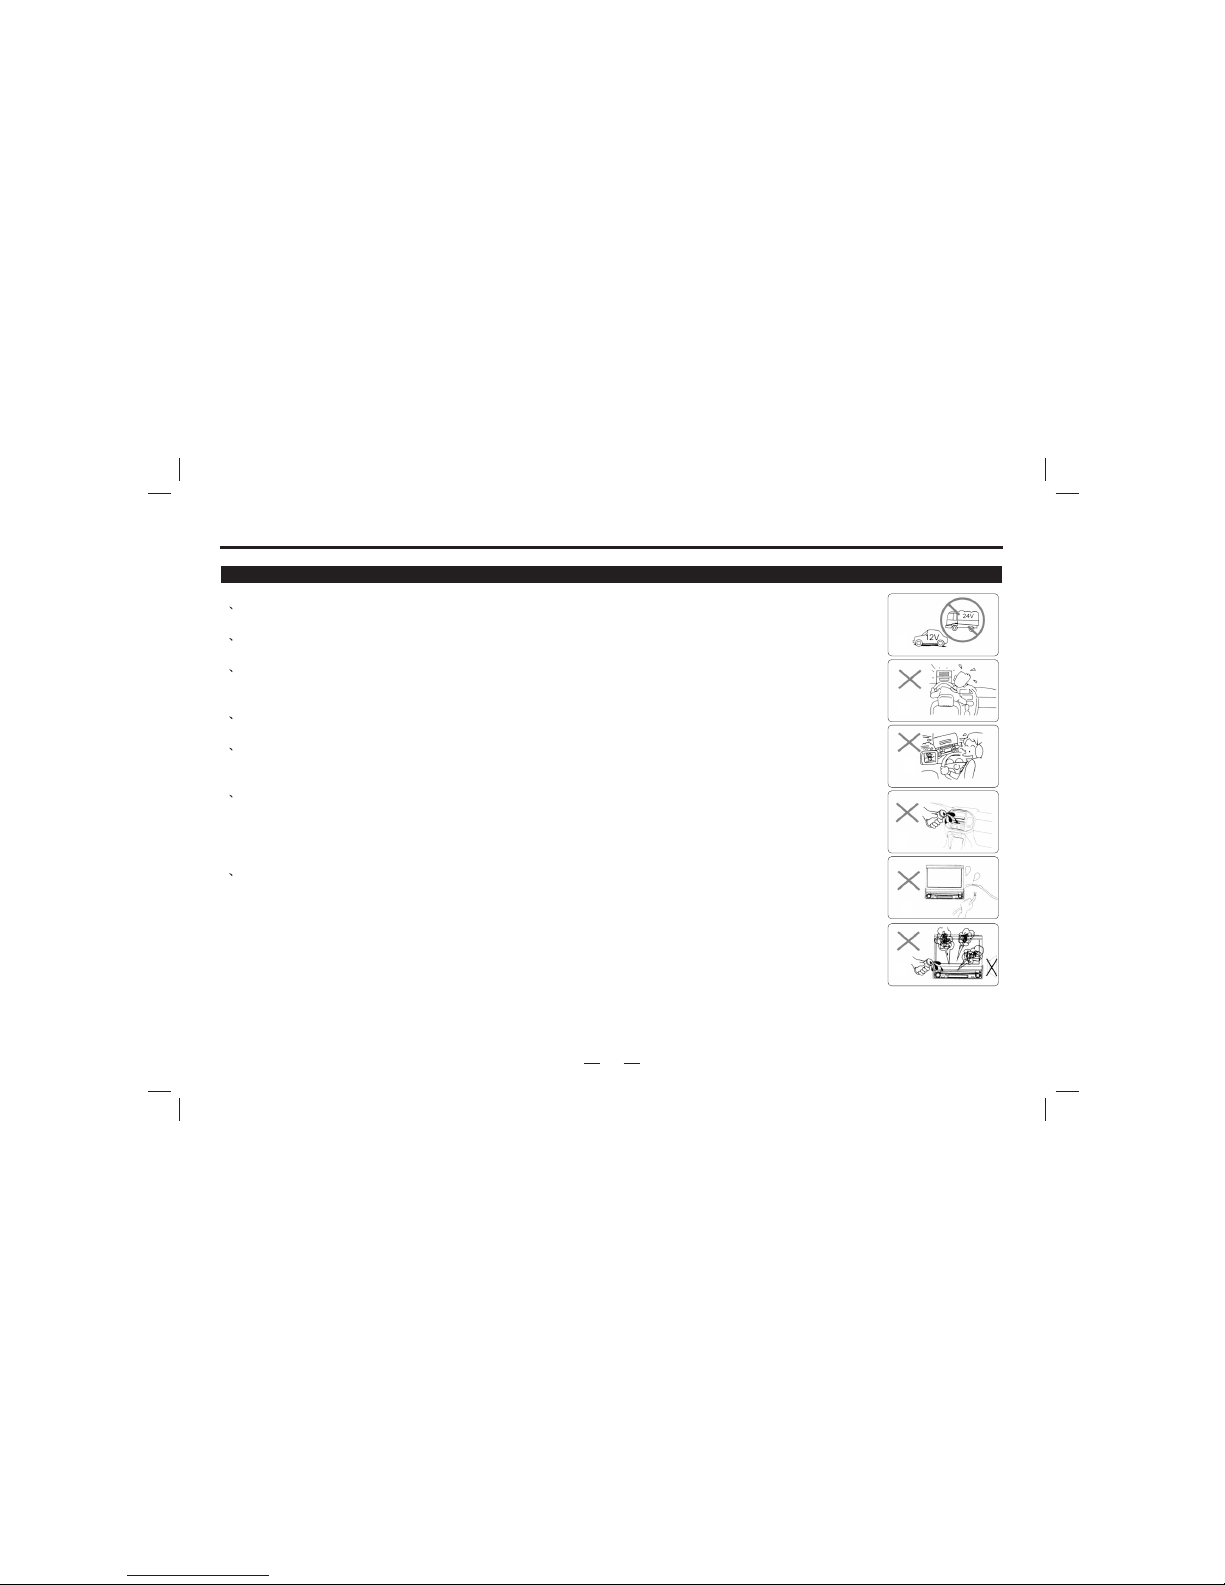
Never disassemble or adjust the unit without any professional guide. For details, please consult any professional car shop/
dealer for inquiry.
If the front panel or the TFT monitor is squalid, please use a clean silicone cloth and neutral detergent to wipe off the spot.
Using a rough cloth and non-neutral detergent such as alcohol for cleaning may result in scratching or decoloration to the
applicant.
If any abnormal behavior of the unit is found, please refer to trouble shooting guide of this manual. If no relevant information is
found , please press the [RESET] key on the front panel to resume factory default.
If you have parked the car in hot or cold weather for a long time, please wait until the temperature in the car becomes normal
before operating the unit.
Using in-car heater in low temperature environment may result in beads coagulate inside the unit, DO NOT use the unit in this
situation, eject the disc and wipe off the bead on the disc. If the unit still doesn
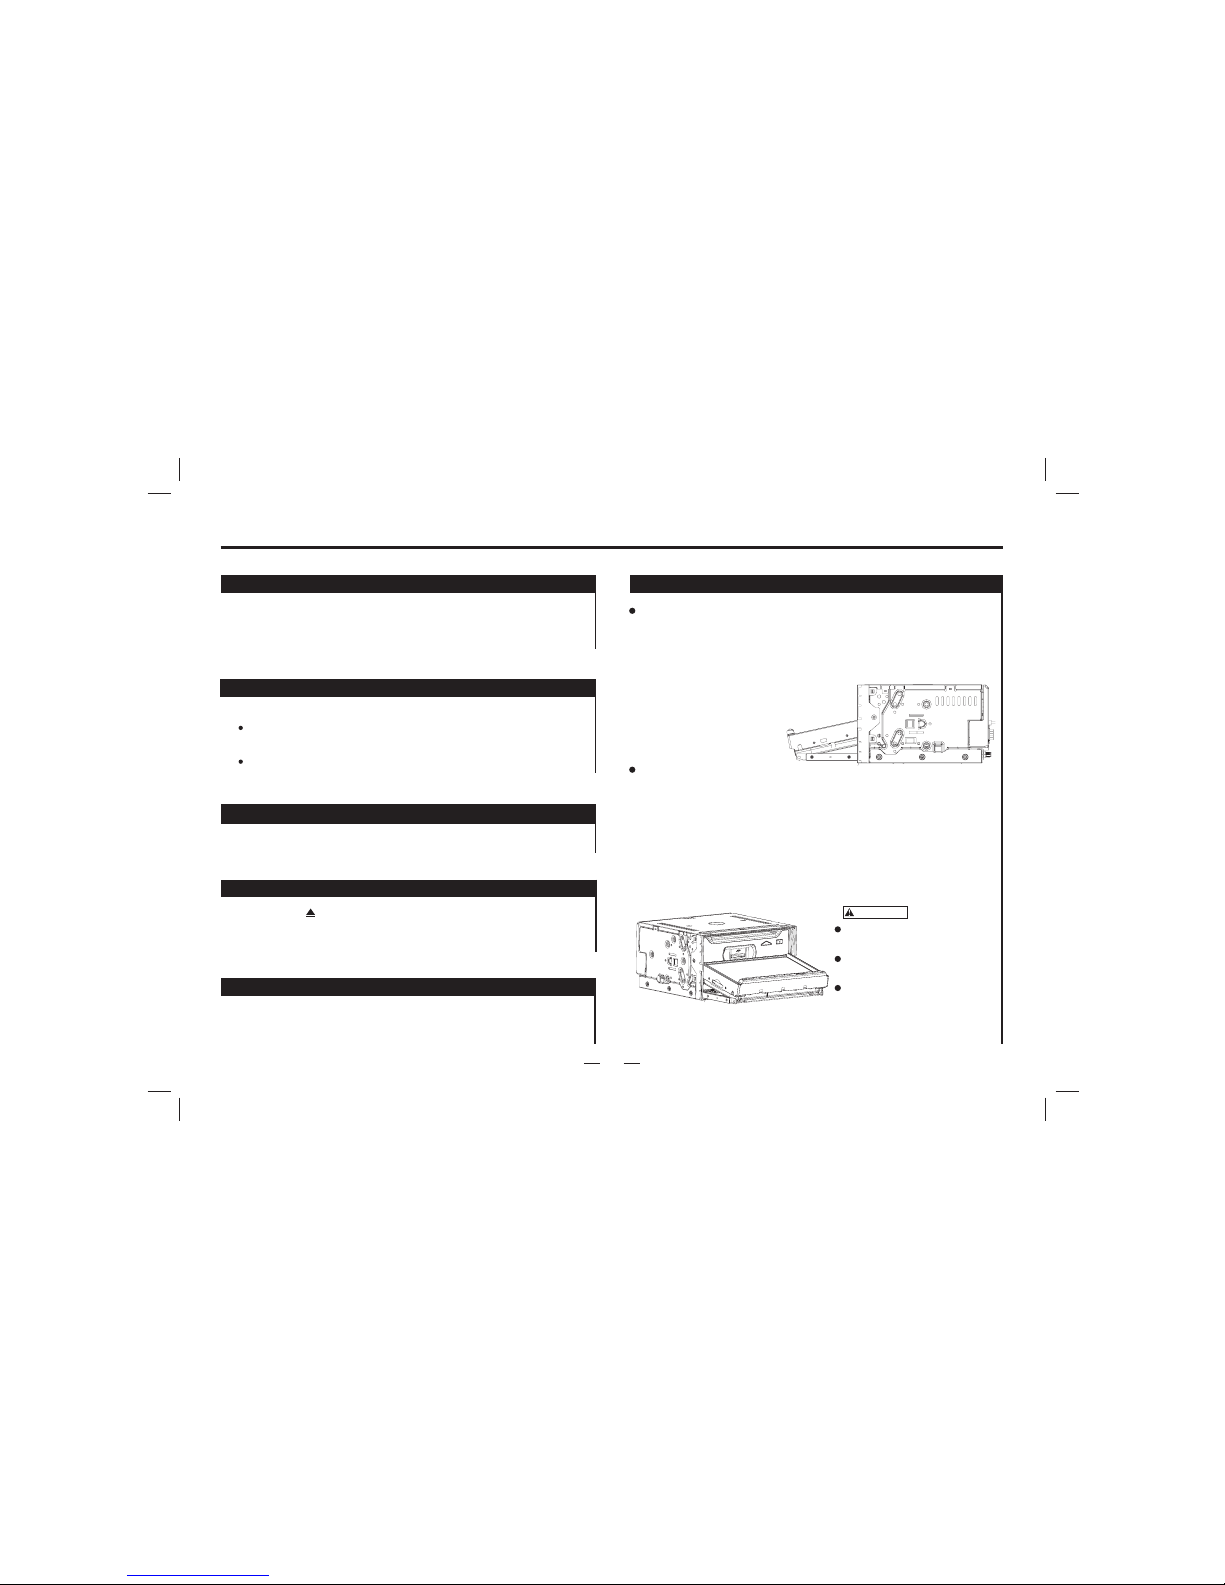
No fierce impact to the LCD monitor when it is in open position for preventing the damage to any mechanisms inside.
To prevent the damage to the screen, avoid touching it with sharp objects.
The monitor employs auto motorizing mechanism, please do
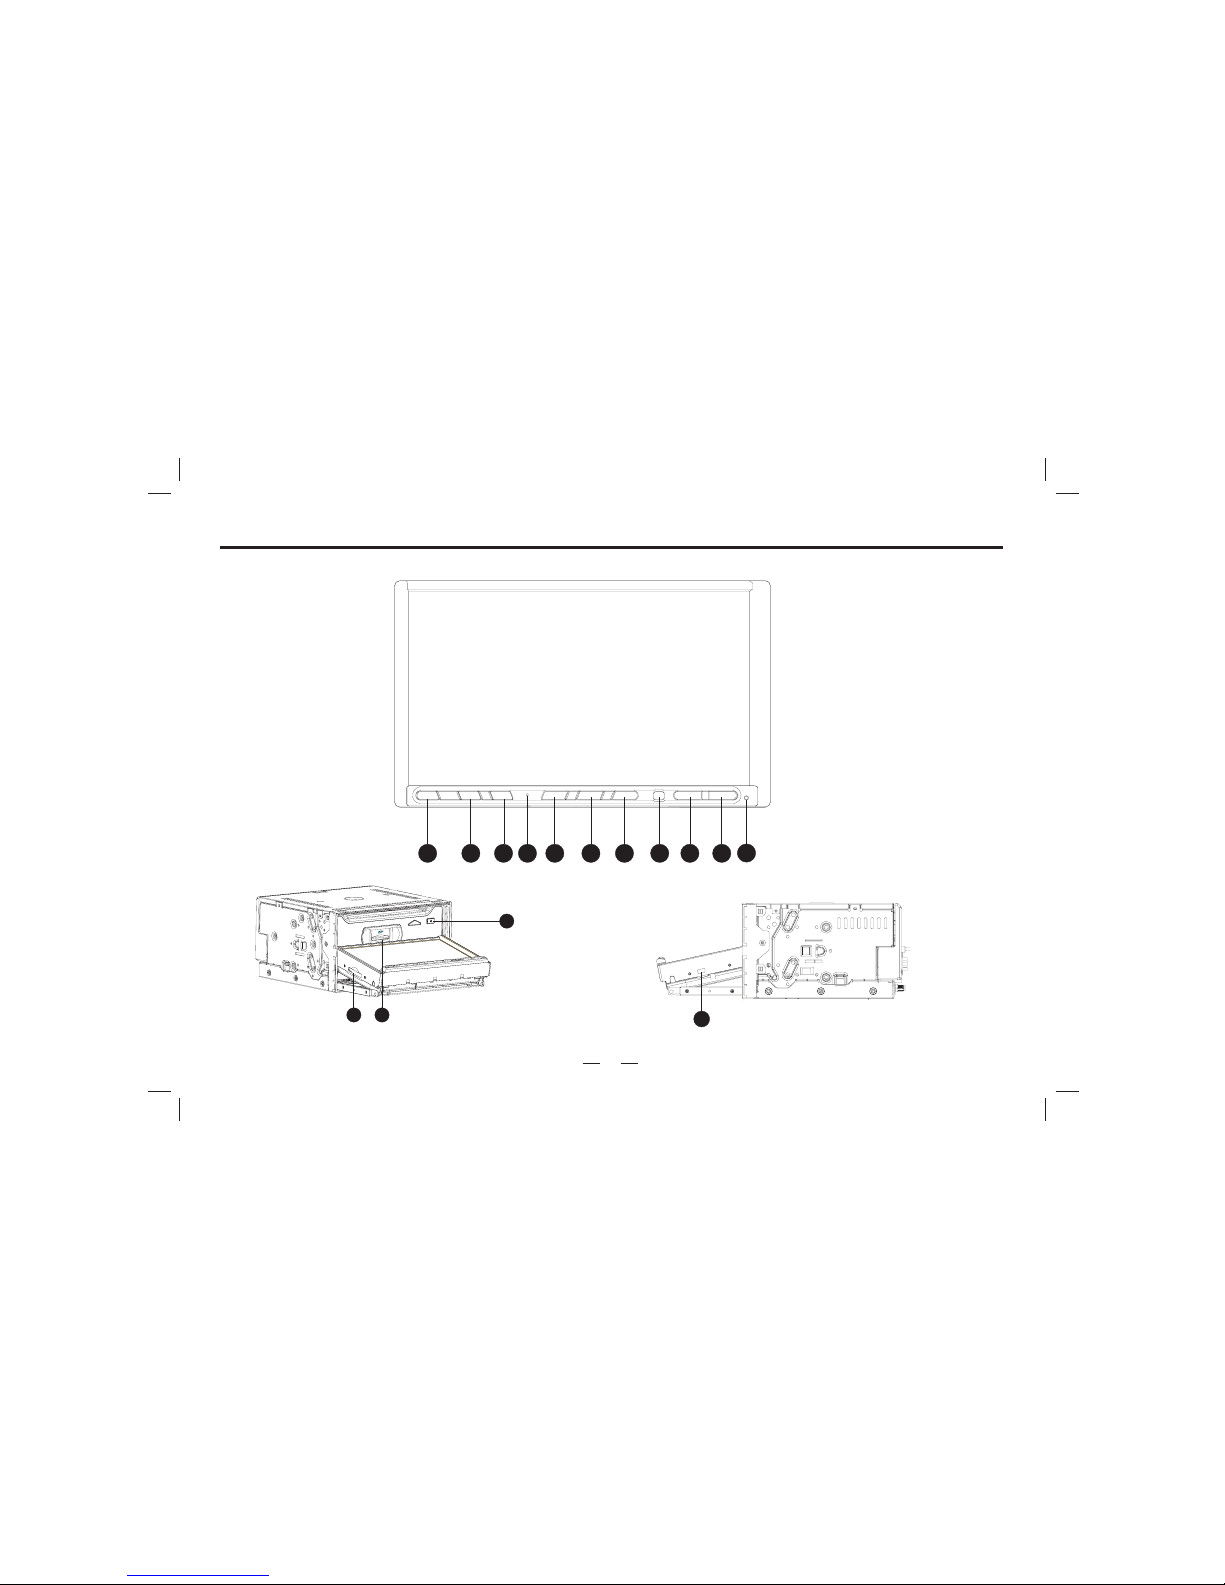
To provide a clear demonstration and an alternative for easy understanding to the operation of this unit, graphic illustrations
are used. However, these illustrations are some different from the actual images displayed in the unit.
During operation the unit," "is displayed if the particular operation is not available or illegal.
Operate the unit correctly according to this manual to prevent. Unnecessary problem. The guarantee won
't work after a few hours, please contact with
after-sales service center.
n't push, pull, or swivel the monitor manually to prevent damage
to any mechanisms inside.
't be valid if the
problem is caused by inappropriate operation.
Precautions
Warnings and Precautions

4
Electric Connection
Car Antenna
Video in(Yellow)
Video out(Yellow)
Front right RCA out(Red)
Front left RCA out(White)
Back a car video in(Yellow)
Subwoofer(Brown)
AUX left in(White)
AUX right in(Red)
Back right RCA out(Blue)
Back left RCA out(Purple)
White/Black
Gray
To front left speaker
To front right speaker
To rear left speaker
To rear right speaker
Green
Ignition wire(Red)
Battery wire(Yellow)
Ground wire(Black) (To car chassis)
Battery
Car fuse box
(Main fuse)
Ignition key
sw tchi
White
Gray/Black
Green/Black
Purple
Purple/Black
Light wire
Connect control for antenna
Back car detecting wire
Brake detecting wire
Remote control for amplifier.
Gray
Brown
Pink
Blue
Orange
Front.L
Front.R
Rear.L
Rear.R
TV ANTENNAPLUG
(Without TV tuner,
without this wire.)

5
Before installing the receiver, fit it in the approximate place in your car and connect the equipment according to the speakers and electrical
connections. When your system is operated properly, follow the instructions for permanent installation of your system.
INSTALL THE UNIT
1. Install the snapclose.
2. Lock up the unit in a car through screwdriver.
REMOVE THE UNIT
1. Remove the unit through screwdriver.
2. Remove the snapclose . Make the unit
deviate from the car, then take the connecting pin down.
2. screw
3. screwdriver
1. snapclose
Install

PWR OPEN ADJ MUTE NAVI BT VOL+
MIC VOL
-
23 4 56789
10 11
1
12 13
14
15
6
General Features

1
2
3
4
5
7
6
8
9
10
11
7
Note: If unit not have BT, also not have mic. 14
PWR OPEN ADJ MUTE NAVI BT VOL+
MIC VOL
-
23 4 56789
10 11
1
SRC Button:
OPEN Button: turn down button.
ADJ Button:
MIC.
MUTE Button: Mute.
NAVI Button: switch to Navigation mode directly.
BT Button: switch to BT mode directly.
VOL- Button:
VOL+Button:
Play SRC switch.
Display position Adjustment.
Signal received window.
decrease volume.
increase volume.
Reset Button.
MapSDslot.
SD Slot.
[ ]Button: To eject the DISC.
USB Port.
General Features
Pull out
Loading and replacing the battery
Remote Control
Notes of remote control using:
Aim the remote controller at the remote sensor on the unit.
Remove the battery from the remote control or insert a
battery insulator if the battery has not been used for a
month or longer.
DO NOT store the remote control under direct sunlight
or in high temperature environment, or it may not function
properly.
The battery can work for 6 months under normal condition.
If the remote control can't work, please change the battery.
Use(button shaped) lithium battery(CR-2025)only.
DO NOT recharge, disassemble, heat or expose the battery
in fire.
Insert the battery in proper direction according to the
1)
2)
3)
4)
5)
6)
7) (+)
and(-)poles.
Store the battery in a place where children cannot reach to
avoid risk of accident.
8)
12
13
14
15

8
5
1
3
4
2
Mute
Sub-T
Band
APSAPSAPS
EQEQ STS T
R/L N/P
SRC
PWR
123
45 6
78 9
0
Enter
SEL
CLK
TitleTitle
Setup
AF
TA
PTY
RDM
PRG
RPT
PBC
OSD
ID3ID3
#
ABC DEF
GHI JKL MNO
PQRS
TUV
WXYZ
GotoRO/SN
10+
*
Language Angle
7
6
[BAND/RDM] Button: Band switch/Play randomly
[APS/PRG] Button: Scan/Program
[ST/RPT] Button: Stereo switch/Repeat
[ ]Button: Play/Pause
[ ]Button: Stop
[Setup] Button: Menu setting
[Title] Button: Title Menu
[ENTER] Button: Play/Confirm
[ ][ ][ ][ ]Button: Up/down/left/right button
[0~9]Button:0~9
[GOTO] Button: GOTO search
[RO/SN] Button: Radio scan
[AF] Button: Search stations automatically
[TA] Button: Traffic broadcast
[PTY] Button: Program style
[ ]Button: Forward/Next chapter
[ ]Button: Rewind/Last chapter
[+/-]Button: Increase/recluce volume
[SEL] Button: System setting
[CLK] Button: Clock display
[EQ] Button: Sound effect
[N.P/ANGLE] Button: Video switch/Angel Adjustment
[R.L/LANGUAGE] Button: Left/right sound track switch
dialogue language.
[PWR] Button: Power
[REC/Sub-T]Button: Transfer recording/Language switch
[MUTE] Button: Mute
[SRC] Button: Play source switch
Note: Remote picture just for confernce.
Note: This unit doesn't have RDS function, AF/TA/PTY neither.
This unit doesn't have bluetooth function, [ ]/[ ] neither.
1
2
3
4
5
6
7
[ ] Button: Ring on
[OSD/ Id3] Button: Screen Display/ Id3 information
[ ] Button: Ring off
REC
Button and Function
Remote Control

SRC
9
OPEN
Press [OPEN] button, the screen will turn down, press again,
it will back to originality.
Basic Operation
Volume
Increasing Volume:
Decreasing Volume:
Press the [VOL+]button can increase the volume.
Press the button can decrease the volume[VOL- ]
MUTE
Press this button to turn off volume and again to resume.
Eject
EJECT: Press [ ] to exit the disc.
NOTE: About 10 seconds after the disc ejected, if not taken out, the disc
will be absorbed in again.
Press button repeatedly can adjust the
screen angle gradually. The unit has 3 angles for
adjustment. Each time you press the
button, the screen will move from one
angle to another angle on the same
direction. The screen angle will
move on the opposite
direction if you operate
it again.
[ADJ]
Press [ADJ] button can adjust angle of screen
:
Turn on the unit again, the
angle will back to original
setting.
CAUTION
Do not place any object on
the screen, or push it rudely.
Do not move the screen
rudely.
The movable range of the
screen may be limited to
different types of car and
install positions, etc.
Adjust Angle
Display position adjustment
Press [SRC] button shortly will turn the unit on.
Press [SRC] button shortly turn off.

10
Enter the main menu, touch the setup button will display:
SETUP
BASS 0
TREBLE
-07
BALANCE R06
AUDIO
FADER R06
EQ FLAT
BRIGHT 14
COLOR
14
CONTRAST 13
VIDEO
MODE USER
LOUD O FF
BEEP ON
CLOCK 00:00
BASIC
Setup Operation
V d o mode:ie
Audio mode:
Basic mode:
Menu operation
Touch [ ]/[ ] to choose menu.
Touch [ ]/[ ]to adjust parameter.
Touch [ ] to back main menu.
Menu operation
Touch [ ]/[ ] to choose menu.
Touch [ ]/[ ]to adjust parameter.
Touch [ ] to back main menu.
Menu operation
Touch [ ]/[ ] to choose menu.
Touch [ ]/[ ]to adjust parameter.
Touch [ ] to back main menu.
Vd osetupie
Bright Color Contrast.
Mode
STAD USER
BRIG SOFT
Audio setup
Audio setup Bass Treble Balance Fader
setup between 7.
EQ setting
Basic setup
Loud ON and OFF
Beep ON and OFF
Time Adjust press [ ] or[ ] button to select hour/
minute then press [ ]or [ ]button to setup.
FLAT ROCK
POP
CLAS
NORM
+

11
BAND
FM1 FM2
AM1AM2
FM3
AF TA PTY
Radio Operation
Press [BAND] on the screen to select among three FM or two AM
bands. (FM1-FM2-FM3-AM1-AM2)
Band Tune
Manually Tune
Automatically Tune
Press[ ] button: adjust to higher frequency.(such as
87.5,87.55...)
Press[ ] button: adjust to lower frequency(such as
105.5,105.0...)
Holding down the [ ] button: search higher frequency
station, and will stop when meeting one.
Holding down the [ ] button: search lower frequency
station, and will stop when meeting one.
Press [APS] icon
Seek Tune:
Under radio playing mode, long touch [APS] icon can seek
and store strong frequency stations automatically.
Select station
Note: If the unit doesn't have RDS function, the touch-screan won't
show "AF, TA and PTY".

Radio Operation
AF(Alternative Frequency)
TA(Traffic announcement)
Press TA, the unit will prior to seek the traffic information. If
the machine receives the traffic information, it will choose this
signal and quit other radio signal or CD program. If press TA
again, other program will recover and the traffic information
program will quit.
PTY(Program type)
Turn on PTY , then press PTY and 1-6 buttons to
choose one certain program style . After this, the unit will
scan the same style programs automatically. Such as select
News programs. The unit will only scan News programs.
AmongAF,TAandPTY,TAhastheabsoluteprioritytobechosen.
Turn "AF",the unit will switch to the stronger signal of the
same station automatically.
Note: If the unit is without RDS function, pls skip this page.
12

13
TITLE
T 001/003
TITLE
C 002/025
BACK
REP
00:33:11/01:45:44
DVD-V OFF
1/2
BACK
REP
00:33:11/01:45:44
DVD-V OFF
Note:Because the different situation of Disc REC, some of the CD-R,
CD-RW,DVD-R,DVD-RW,DVD+R,DVD+RW Disc may can not be readed.
And the Disc without final treatment can not be readed too. Regarding the
final treatment, please make conference to the guide of REC set or
REC manual.
TITLE: In play mode, press [TITLE] on the screen or remote control
to back to the title menu, and re-select the items needed.
REP
BACK
OFF
Note: when play DVD not have multi caption this function invalidation.
OFF
OFF
1/3
1/3
Insert DVD disc, touchscreen will show menu as follows:
Play operation
Repeat mode:
CHAPTER/OFF/TITLE/CANCEL.
When playing DVD, press [REP], you can switch on
Back to Mutimedia: When playing DVD, press [BACK], it will back
to player media.
You can choose any icon to
play or setup.
Caption choose
Caption choose: If DVD contain several langrage you can switch
caption.
Choose angle
Choose angle: If DVD support multi angle function, touch [ ]or
press [ANGLE] icon or remote, you can switch
different angle.
Note: when play DVD not have multi angle, this function invalidation.
Volume Control
Volume control: Touch [ ], can switch, between 1, have volume
and music ; 2, not have volume but have music;
3, volume and music separate.
Note: general DVD only have two mode.

14
Select chapter or section: press [ ] to choose
the last chapter; press [ ] to choose the next chapter.
In the DVD mode,
Play/pause: Press [ ] button to play or pause.
001 001 MP3
001
MUSIC
002 002 MP3
003 003 MP3
004 004 MP3
005 005 MP3
Back
MUSIC
NONE
FILE NAME: 004 MP3
ALBUM: NONE
00:00:30/00:04:12
REPEAT BACK
PLAYING
REPEAT
001 001 MP3
001 CD
MUSIC
002 002 MP3
003 003 MP3
004 004 MP3
005 005 MP3
Back
MUSIC
CDDA
TRACK12
00:00:30/00:04:12
REPEAT BACK
PLAYING
Media
T 001/003
STEREO
PBC
BACK
REP
00:33:11/01:45:44
VCD
PBC
REP
In this menu, the menu on the right side is the sub-menu.
You can press[ ][ ]tu button to select the file and items
you like.
Insert MP3 disc, touchscreen will show menu as follows:
Insert CD disc, touchscreen will show menu as follows: Insert VCD disc, touchscreen will show menu as follows:
Play operation
Chapter choose: When play CD/MP3, press[ ] to choose the pre
music, press [ ] to next music.
Repeat mode:
TRACK/OFF/FOLDER/ALL.
When playing DVD, press [REP], you can switch on
PBC menu: when playing VCD, press [PBC], you can switch
between ON/OFF/CANCEL.
Repeat mode: when playing VCD, press [REP], you can switch
between TRACK/OFF/ALL/CANCEL.
Track switch
Track switch: you can switch STEREO/LEFT/RIGHT by touch the
right up letter.

15
USB/SD play opration
USB
SD
USB/SD operation
Press [ ] button to play or pause.
PLAY/PAUSE:
Under USB or SD play mode, press[ ] button to select
tracks.
,
Select:
CHAPTER
TITLE CANCEL
OFF
Note: when playing, press [BAND] to radio mode.
USB/SD mode
Inset USB/SD,the play will to the USB/SD playing mode
antomaticly.
USB/SD mode
When playing, you can switch the function by touch
[REPEAT].
Repeat mode:

Press [BT] or touch BT icon, can enter BT mode when calling.
BT Choose
16
(NO.1)
Bluetooth
The Bluetooth is wireless mode of transmission in short
distance.Through Bluetooth function, the DVD unit establishes
connection with Bluetooth handset. And then, these units can
realize mutually contrdling and file transfering.
Working mode of Bluetooth
Bluetooth has the following functions:
A: Paring
Make DVD Bluetooth function as handsets
facility through pairing.
B: Connecting
After connecting with the handset,
you can operate the mobile phone through DVD unit
(such as H,F, call, call record etc.)
'
Paring
Phone set pairing step as follows:
A: Turn on Bluetooth, then
touch On/Off icon to turn
on this function.
B: Turn on Bluetooth
function .
C: When the mobile phone
set finds the signal, input
pairing number. Initial Pairing Code No. 0000
D: After pairing, TFT screen shows pairing succeed and
quit the pairing.
handsets
'
NO.2
(NO.2)
BT Choose:

13590201359020
13590201359020
13590201359020
17
Bluetooth
Mobile phone
After connected, you can make phone call through, touch
screen or phone record.
A: Making mobile phone call
After making phone call, the [ ]will shining.
B: Making touch screen call
Input the numbers on the screen, press [ ] icon can correct
the numbers;
Press [ ] icon to answer phone call;
Press[ ] icon to cancel or hang up.
Answering
Answering functions as follows:
A: After connected, the unit can use the telephone function.
B: When there is a phone call, the Bluetooth will switch to
phone function and show the calling number automatically.
C: Touch Transfer icon can
switch to phone answer mode.
Touch it again can return to
Bluetooth function of the unit.
Hang up
You can press the [ ]button to hang up.
Note: If the unit does not have this function, pls skip it.
Some models of mobile phones are not supported by the
Bluetooth module of this unit.

18
Note: If the unit does not have this function, please skip this page.
[PREV]: choose channel up.
[NEXT]: choose channel down.
You need install TV antenna, when receive program.
TV mode:
Press [MENU] enter into main menu, then press TV icon to
enter.
Press [AMS] can seek TV programs and restore them
automatically.
ESC
TV
AMS PREV NEXT
TV
[ESC] prss [ESC] back TV mode to main menu.
Without touch function, without these icons.
TV tuner
TV operation
Channel seek:
Channel choose:
Back:

GPS Navigation
19
Insert the SD card with map, touch [GPS] icon or press
[NAVI], enter Navigation menu, as follows:
TV
[ ]: show the satellite signal process data.
[ ]: show satellite signal histogram.
Press[ ]can set the Nevagation path.
Enter Navigation
Enter Navigation menu:
Press[ ] icon, it will show picture as follows, satellite
Navigation, histogram.
Table of contents
Other Eonon Car Video System manuals

Eonon
Eonon E1060 User manual

Eonon
Eonon E0853 User manual

Eonon
Eonon E1056 User manual

Eonon
Eonon D2203D User manual

Eonon
Eonon E1022 User manual

Eonon
Eonon Headrest with pillow TFT LCD Monitor User manual

Eonon
Eonon D1303 User manual

Eonon
Eonon D2209 User manual

Eonon
Eonon E1052 User manual

Eonon
Eonon E0805 User manual