ERA WIRELESS HD CCTV SYSTEM User manual

WIRELESS HD CCTV
SYSTEM
USER MANUAL
PLEASE READ THIS MANUAL CAREFULLY BEFORE
OPERATING THE SYSTEM.
RETAIN FOR FUTURE REFERENCE.
HOME SECURITY

6.5.1.2 Single Recording Mode------------------------------------
6.5.1.1 All Camera’s-----------------------------------------------
6.5.3 Motion Detecting Recording Mode -------------------------------
6.5.2 Scheduled Recording Mode ---------------------------------------
6.5.1 Manual Recording Mode ------------------------------------------
6.7 Camera Pairing -----------------------------------------------------------
6.6 Playback Operation ------------------------------------------------------
6.5 Recording Mode ---------------------------------------------------------
9. MONITOR SYSTEM MAP ------------------------------------------------------
8. TROUBLESHOOTING ----------------------------------------------------------
7. SPECIFICATION ----------------------------------------------------------------
6.2 Date & Time -------------------------------------------------------------
4.1 Introduction --------------------------------------------------------------
4. SETTING UP YOUR DEVICE ----------------------------------------------------
CONTENTS
SAFETY INSTRUCTION ------------------------------------------------------------
6.4 Live Display --------------------------------------------------------------
6.3 Format SD Card----------------------------------------------------------
6. SETUP WIZARD -----------------------------------------------------------------
5.3 Using your device with a TV/Monitor-----------------------------------
5.2 Using the App ------------------------------------------------------------
5. USING YOUR DEVICE WITH YOUR SMARTPHONE --------------------------
4.4 Connecting to your home network--------------------------------------
6.1 Introduction --------------------------------------------------------------
5.1 Installing the App----------------------------------------------------------
4.3 Cables ---------------------------------------------------------------------
4.2 Camera Positioning -----------------------------------------------------
3.5 Camera Overview --------------------------------------------------------
3.4 Remote Control ----------------------------------------------------------
3.3 Mini DVR -----------------------------------------------------------------
3.2 Cable Connector ---------------------------------------------------------
3.1 LCD Monitor Overview --------------------------------------------------
3. GETTING TO KNOW YOUR DEVICE -------------------------------------------
2. BOX CONTENTS
---------------------------------------------------------------
1.1 Features ------------------------------------------------------------------
1. INTRODUCTION----------------------------------------------------------------
3
5
5
5
6
6
7
7
8
8
9
9
9
11
11
12
12
12
13
14
14
14
14
15
16
16
16
16
17
17
18
18
19
21
22
ERA CCTV
Contents
1

ERA CCTV Overview
OR
OR
Wireless Bullet
Camera
Wireless Dome
Camera
7” LCD Monitor
With built in DVR
DVR
20
2

3
SAFETY INSTRUCTION
ERA CCTV
Safety
This device has been manufactured in accordance with international safety standards. Please
read the enclosed safety information and installation guide fully before proceeding and retain
for future use.
1. Unpack all components carefully and check box contents. If any items are missing, please
return the product in its original packaging to your retailer.
2. Install in accordance to manufacturer’s instructions.
3. Use only attachments and accessories specified by the manufacturer.
4. Do not install next to a water source, any heat source, in direct sunlight and do not block
any ventilation openings. As this is a wireless device communicating over Wi Fi network,
please avoid installing near fridges, microwaves and cookers, as electrical interference may
occur.
5. Ensure products are fixed to a suitable, stable surface to prevent accidental falls and damage
to the products.
6. Products are fitted with ventilation openings to the rear, which should not be covered at
any time. This product should not be fitted in a built in installation unless proper
ventilation is provided (min. 10 cm).
7. Safeguard the power cord by observing the following information:
- Do not modify or manipulate the power cable or plug.
- Do not allow anything to rest on the power cord and do not position where there is a risk
of the cable being stepped on.
- Ensure the mains cable is positioned away from any heating equipment, damp or moisture.
8. This product is equipped with a 3 wire grounding plug. Only operate this device using the
appropriate power source as detailed on the back of the product. If you are unsure please
contact your electrician. Disconnect the device from the power supply before carrying
out maintenance or installation.
9. Never open the housing or power supply unit. Do not insert any object into the product,
as this could lead to an electric shock.
10. If any of the following occur, unplug this product from the wall and contact our helpline:
- Power cord or plug is damaged.
- Liquid has been spilled into the product.
- Product does not operate normally, when the operating instructions have been followed.
- Product has been dropped or damaged.
11. Unplug the product from the wall before cleaning. Carefully clean surface with a soft,
damp cloth, taking care not to scratch the surface finish. Do not use any liquid or aerosol
cleaners.
20
4
SafetyERA CCTV
NEVER REMOVE THE BACK COVER
Removal of the back cover should be carried out only by qualified personnel.
KEEP IN A WELL VENTILATED PLACE
Ventilation holes are provided on the cabinet to prevent the temperature from rising.
Do not cover the unit or place anything on the top of the unit.
AVOID HEAT
Avoid placing the unit in direct sunshine or near a heating appliance.
TO ELIMINATE EYE FATIGUE
Do not use the unit against a bright background and where the sunlight or other light
sources will shine directly on the monitor.
BE CAREFUL OF HEAVY OBJECTS
Neither the monitor itself nor any other heavy object should rest on the power cord.
Damage to a power cord can cause fire or electrical shock.
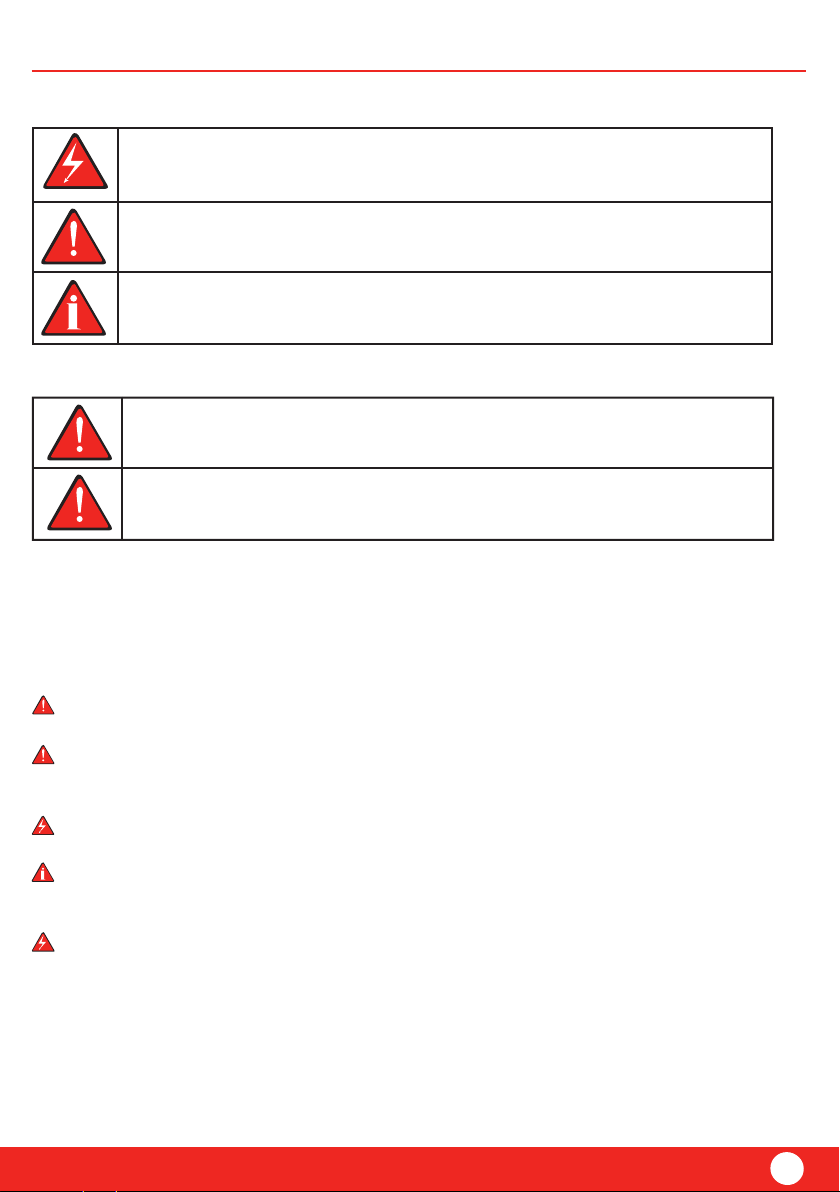
This symbol indicates special tips and notes on the operation of the unit.
In the event of material or personal damage caused by improper operation or non-
compliance with the safety information, we cannot be held liable. All guarantee claims
are void in such cases.
All guarantee claims are invalid in the event of damage caused by non compliance with
this user guide. We cannot be held liable for resulting damages.
The triangular warning symbol indicates important notes in these operating instructions
which must be observed.
The triangular high voltage symbol is used to warn of the risk of injury or health hazards
(e.g. caused by electric shock).
Important Information
Explanation of symbols
CAUTIONS

5
Introduction
ERA CCTV
AV output cable
(for Mini DVR)
DC5V/1A Power Adaptor
(for Camera/ Mini DVR)
DC12V/1/25A Power
Adaptor (for Monitor)
Remote ControllerBracket (for Monitor)
User Manual and Window Sticker
1.3 Mega pixels
IR LED for night vision
With automatic IR cut
Built-in microphone
CAMERA
MPEG4 compression, support VGA and HD with two kinds of resolution
Support SDHC up to 64GB
Multiple recording modes
Up to 200m wireless transmission range
Supports 4 channel auto switching
Supports 2 split/ 4 quad image view
Interference free, secure and private signal camera
VGA resolution: 640x480, HD resolution: 1280x720
Network
1.1 Features
MONITOR/ MINI DVR
2. BOX CONTENTS
1. INTRODUCTION
Thank you for purchasing ERA CCTV. Your new wireless security system has been designed for
ease of installation and incorporates a range of features to secure your home.
Additional cameras can be purchased separately to extend the system.
INSIGHT
CCTV System
USER’S MANUAL
PLEASEREAD THIS MANUAL CAREFULLY BEFORE
OPERATINGYOUR SET.
RETAINIT FOR FUTURE REFERENCE.
Camera
Monitor or Mini DVR
20
6
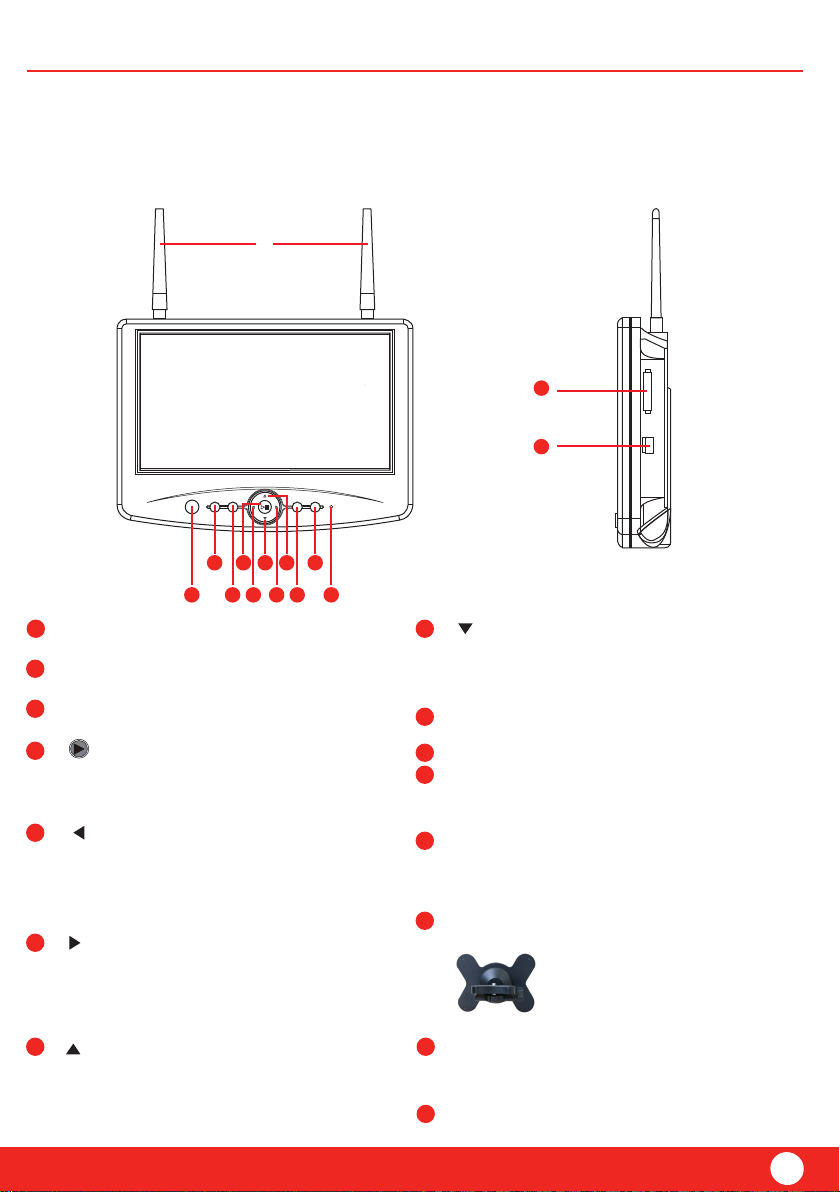
IR Sensor:
Remote control sensor.
MENU button:
Press to enter or exit the Main menu
REC/STOP button:
Press to enter or exit the Recording mode.
button:
In “Playback/Video” menu, press to play or
pause the selected file
Enter to sub-menu under main menu.
button:
In the on-screen menu, press to select setting
item.
During playback mode, use to select the
previous file.
button:
In the on-screen menu, press to select
setting item.
During playback mode, use to select the next
file.
button:
In the on screen menu, press to select setting
item or increase the parameter. In live or
playback mode, press to increase the volume.
ERA CCTV
SD card socket:
Insert SD card into the socket for both video
and audio recording.
SideFront
3. GETTING TO KNOW YOUR DEVICE
3.1 LCD Monitor with built in DVR
Product Overview
8
7
6
13
12
11
10
9
5
4
3
2
1
15
14
button:
In the on screen menu, press to select setting
item or decrease the parameter. In live or
playback mode, press to decrease the volume.
QUAD button:
Short press to toggle between CH1 - CH4
TV OUT button
LED indicator:
The LED lights turn blue when the power is
turned ON.
RF Double Antenna:
Sends and receives signals to or from the
camera. Double Antenna: to enhance the
sensitivity and date rate.
Bracket
Mini USB socket
Menu Rec Quad TV-Out
2
1 3
4
5 6 9 11
7 108
12
14
15

7
Product Overview
ERA CCTV
3.3 Mini DVR
3.2 Cable Connector (Monitor)
Video Output:
Connect the included A/V cable to view video
From the receiver on the TV or monitor.
DC power outlet: DC 12V/1.5A
Rj45: Internet connection
3
2
1
Antenna
DC Power input socket
Audio & Video output
RJ45 Internet connection
LED Indicator
IR Sensor
SD Socket
Mini USB socket
15
14
13
8
7
6
5
4
3
2
1
12
11
10
9
4321 58765
321
9
10
11
12
13
14
15
TopRearFront
“PLAY/ENTER” button: Play or pause the
selected file under “Playback/Video”
menu, Press to select
SINGLE/QUAD/AUTO display mode.
“ ” button: In the on-screen menu,
press to select setting
item. In playback mode, use the button to
rewind. In single mode, press to decrease
the volume.
“ ” Button: In the on-screen menu, press
to select setting item. In playback mode, use
the button to fast-forward.
In single mode, press to increase the volume.
“ ” Button: In the on-screen menu, press
to select setting item or increase the
parameter. In live or playback mode,
press to increase volume.
“ ” Button: In the on-screen menu, press
to select setting item or decrease the
parameter. In live or playback mode,
press to decrease volume.
“MENU/ESC” Button: Press to enter or exit
the main menu. Press to return to the main
menu or exit playback mode.
“REC/STOP“ Button: Press to enter or exit
recording mode.

20
8
8
7
7
6
6
12
11
10
9
5
3.4 Remote Control
ERA CCTV Product Overview
“Power” button: Power on/off the display screen.
“CH1-CH4” button: Single image view mode.
“QUAD” button: Quad image view mode
“REC/STOP“ button: Press to enter or exit recording mode.
“AV” button: Press to output audio/video. When outputting audio
and video, the LCD screen will turn black. Press AV button again to
return to LCD mode.
“ ” Button: Play or pause selected file under “Playback/Video” menu.
“ ” Button: In the on-screen menu, press to select setting item.
In playback mode use to fast-forward. In Single mode use to the change
channel.
“ ” Button: In the on-screen menu, press to select setting item. In
playback mode use these buttons to fast-forward and rewind. In Single
mode use these buttons to change channel.
3.5 Camera Overview
Camera Antenna: Sends and receives
signal from receiver.
Lens
IR LEDS: Light up the filmed area.
Bracket: To mount the camera on to a
wall or other surface.
4
3
2
1
5
4
3
2
1
1
23
4 5
6 78
1211 10
9
“ ” Button:
In the on-screen menu, use buttons scroll up and down. In live or playback mode use these to
increase/decrease the volume.
“ ” Button:
In the on-screen menu, use buttons scroll up and down. In live or playback mode use these to
increase/decrease the volume.
“MENU“ button: Press to enter or exit the main menu.
“DEL” button: Use to delete any unwanted files.
Pairing Button
Microphone: Transmit voice into digital
signal.
DC Connection
4
3
2
1
5
6
7
3
2
9
Please take the following factors into consideration when installing cameras.
4.2 Camera Positioning
Careful consideration should be taken when deciding the best place to install the cameras and
recording devices. Please read safety instructions on page 1 before proceeding with installation,
the below tips may also offer some guidance.
4. SETTING UP YOUR DEVICE
4.1 Introduction
ERA CCTV
Installation
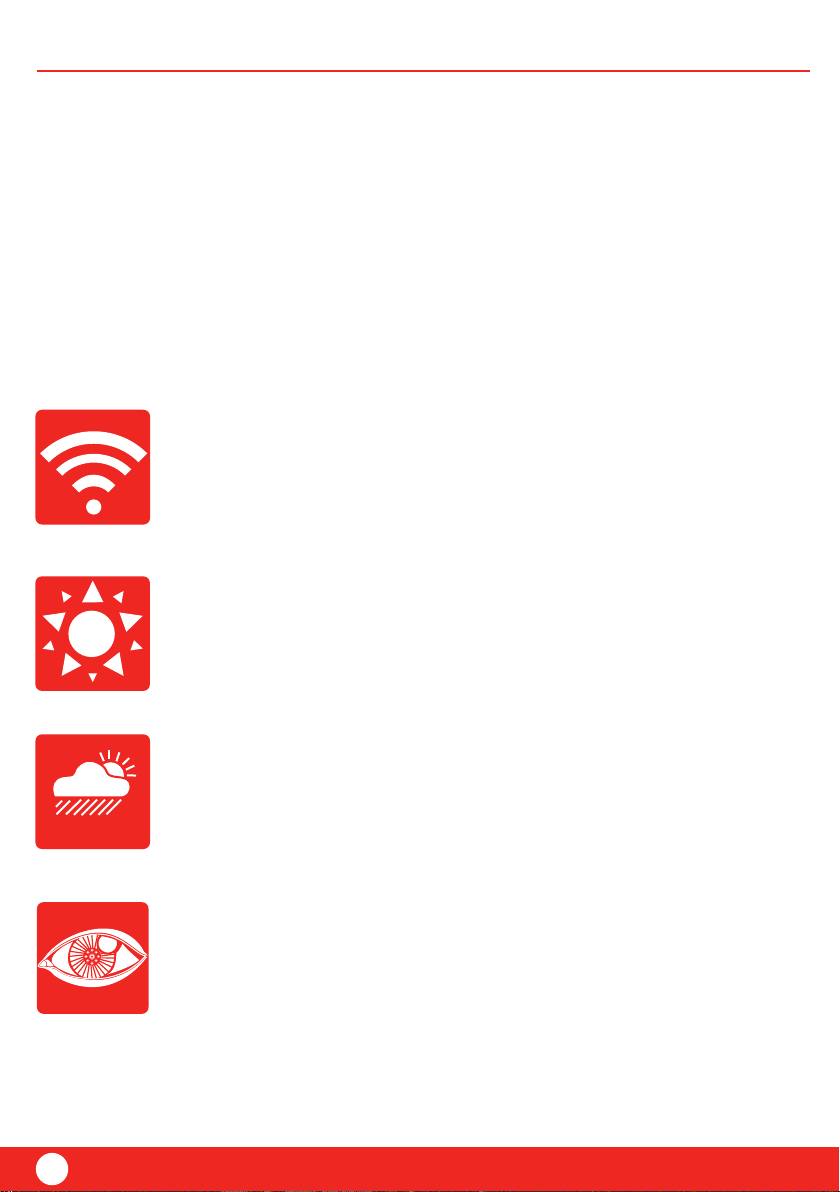
Lighting Conditions
Ensure that cameras have adequate lighting to record the target area.
For the best results do not point the camera towards a light source.
It is recommended to clean the camera lens periodically to ensure picture
quality is consistent
Environmental Conditions
Ensure the cameras aren’t subject to any excessive heat
Target Area
Ensure cameras are positioned to provide ample coverage. Consider blind
spots and mounting the camera in an elevated position for a high vantage
point and to keep out of the reach of burglars and vandals.
Distance from the camera to the DVR
Ensure that the cameras are within the wireless range

20
10
ERA CCTV Installation
Front of house/door
Ideally the camera would be positioned
to view the entire garden, if you have a
larger garden you may want to consider
using 2 cameras.
Recommended to install where the roof
meets the walls, this will shelter the
camera and maximise the target area.
Back of house/door

11
IndoorsSide of house/garage
If you want to cover a side entrance or
blind spot that the front and rear camera
can’t see you may want to consider an
additional camera to the side.
Ideally an indoor camera should be placed
in areas of high traffic and close to the
main entry/exit points. e.g. hallways.
4
3
2
1
4.4 Connecting to your home network
4.3 Cables
Please refer to the safety guidelines for information on the cables and power. It is important that
any power cables are managed safely and protected from damage.
ERA CCTV
Installation

20
12
5. USING YOUR DEVICE WITH A
SMARTPHONE
ERA CCTV Mobile App/AV
Connect the monitor/ DVR to your home wireless router using a network cable.
Press “MENU” > “System Setting” and select “Network”.
Select “Dynamic IP”
Press “PLAY”.
Ensure your smartphone is connected to your home network (Wi Fi).
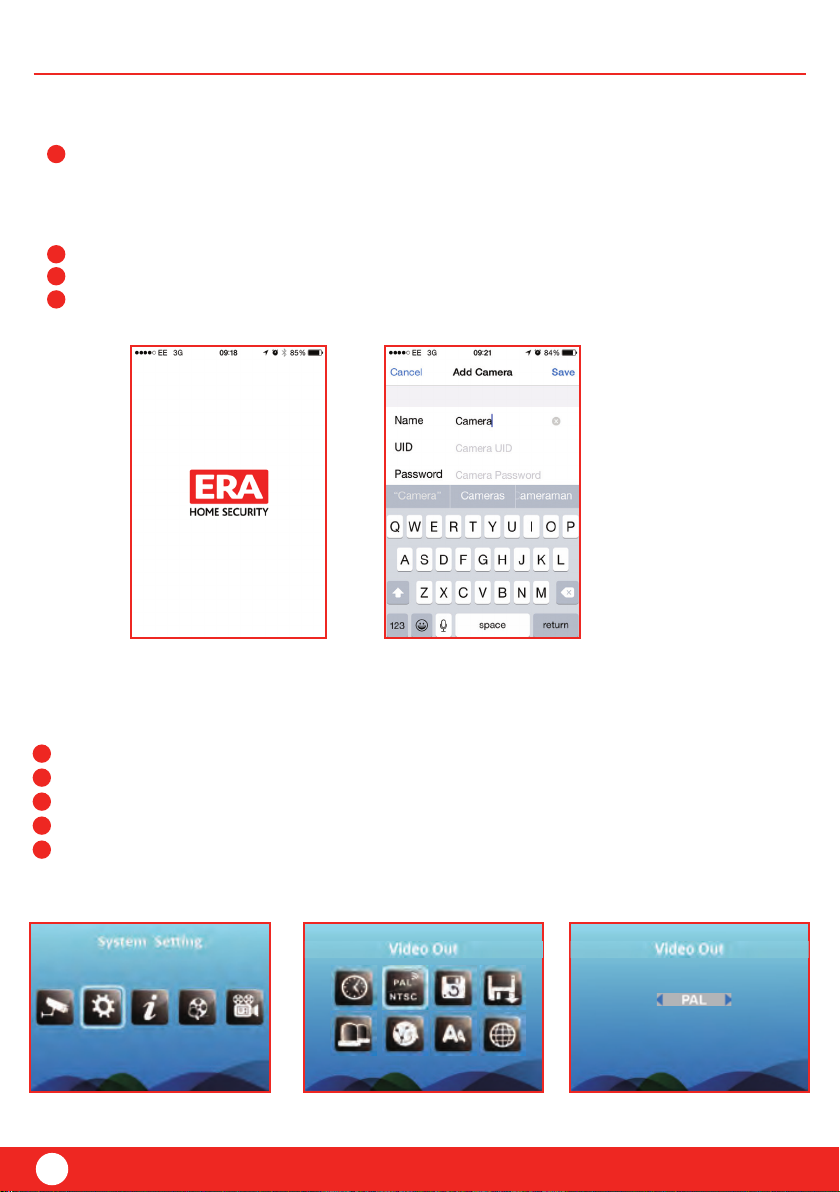
Download the app “ERA CCTV” from your android market or the
Apple Store using your smartphone.
Once downloaded open the App and select “Add Camera”
Press the “search” arrow and the UID reference of the product should appear.
Select the UID. It will ask for the password. The default password is 000 000.
We recommend changing the password as soon as possible for security (this setting
can be found in Advanced Settings, Password).
3
2
1
2
1
5.1 Installing the App
4
3
2
1
5.2 Using the App
13
If the UID does not appear automatically after search you can add a camera manually by
selecting “Add camera”. Enter the UID reference and default password. To find the UID
reference use your CCTV device and press “MENU” > “System Info” and select “Network
Info”
If you want to change camera resolution in the app press “Edit Camera”
Stored recordings are found in the “Event Menu”.
Alternatively by selecting the camera button you can take a snapshot.
6
5
7
ERA CCTV
Content
Use the specific output cable provided
Press “MENU” > “System Setting” and select “Video Out”
Select “PAL” or “NTSC” (depending on the country).
Press the “TV-OUT” button to transfer the signal to the other monitor.
Press the “TV-OUT” button to return to the LCD display (CCTV Monitor).
5
4
3
2
1
5.3 Using your device with a TV/Monitor (AV output)
4

20
14
CAUTION: All data will be deleted after formatting the SD card
Press “MENU”
Select “System Setting”
Select “Format”
Select “YES” to confirm formatting by pressing “PLAY”
ERA CCTV Setup
Press “MENU”
Select “System Setting”
Select “Date and Time”
Use the arrows to set the correct date and time.
To confirm setting press “PLAY”
To exit press “MENU”.
6
5
4
3
2
1
6.3 Format SD Card
Before using the system for the first time please ensure you set the correct date and time for recording
purposes and to enable the use of the video search function.
When purchased as a kit the cameras are automatically pre-paired to the monitor/DVR. If you have
purchased additional cameras please go to section 6.7 Camera Pairing before proceeding.
NOTE: It’s highly recommended to pair the cameras to the receiver before permanently mounting
the cameras.
6.2 Date & Time
6 SETUP WIZARD
6.1 Introduction
5
4
3
2
1
15
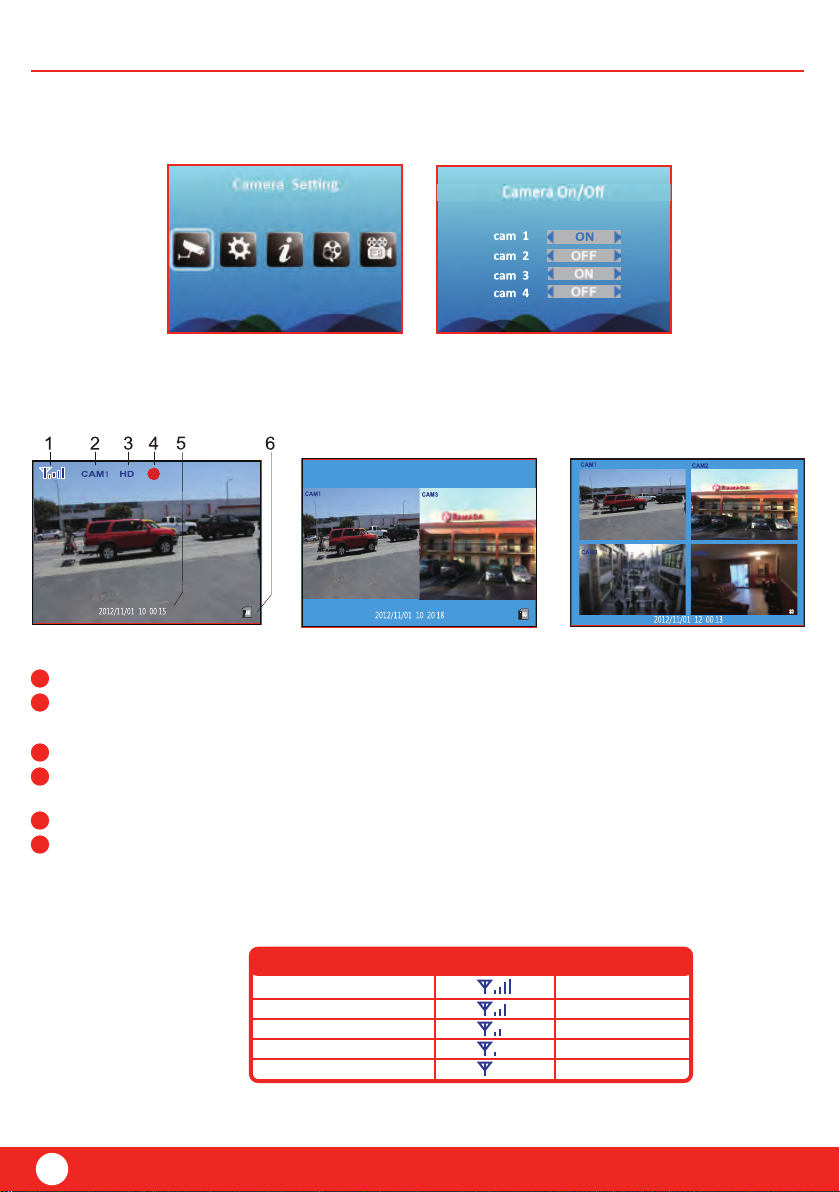
Press the “NEXT” button to view each camera channel (1 to 4) individually. When more than one
camera is in use press “QUAD” to view all paired cameras.
6.4 Live Display
Signal Indicator
Signal indicator - The signal indicator shows the strength of the connection to the camera.
Channel indicator - Displays the current channel number. Press “ CH1/ CH2/CH3/ CH4”
on the remote control to switch between the available channels.
Camera resolution display
Recording indicator - When the receiver is recording, the red indicator “REC” will be shown
on the LCD screen.
Date & time display
SD card indicator - When an SD card is inserted into the SD card slot, the indicator will be
shown on the LCD screen.
WarningIndicatorSignal Strength
No Signal
Low
Fair
No signal
Low signal
Low signal
NoneGood
NonePerfect
6
5
4
3
2
1
Setup
ERA CCTV
20
16
6.5.1.2 Single recording mode
If you want a single camera to record manually, view the wanted camera on the monitor by
pressing “QUAD” and use the previous and next buttons to choose the correct camera.
Press “REC“to start recording. A file will automatically be created every 5, 10 or 15 minutes.
To select time interval go to ”File Section” by pressing “MENU” > “Record Setting” and
select“File Section”.
Press “REC” to stop recording.
4
3
2
1
Press “REC” again to exit the record mode.
3
2
1
6.5.1.1 All cameras
6.5.1 Manual recording mode
If you want all cameras to record manually, view all cameras on the monitor by pressing
“QUAD”.
Press “REC” to start all cameras recording.
Press “REC to stop all cameras recording.
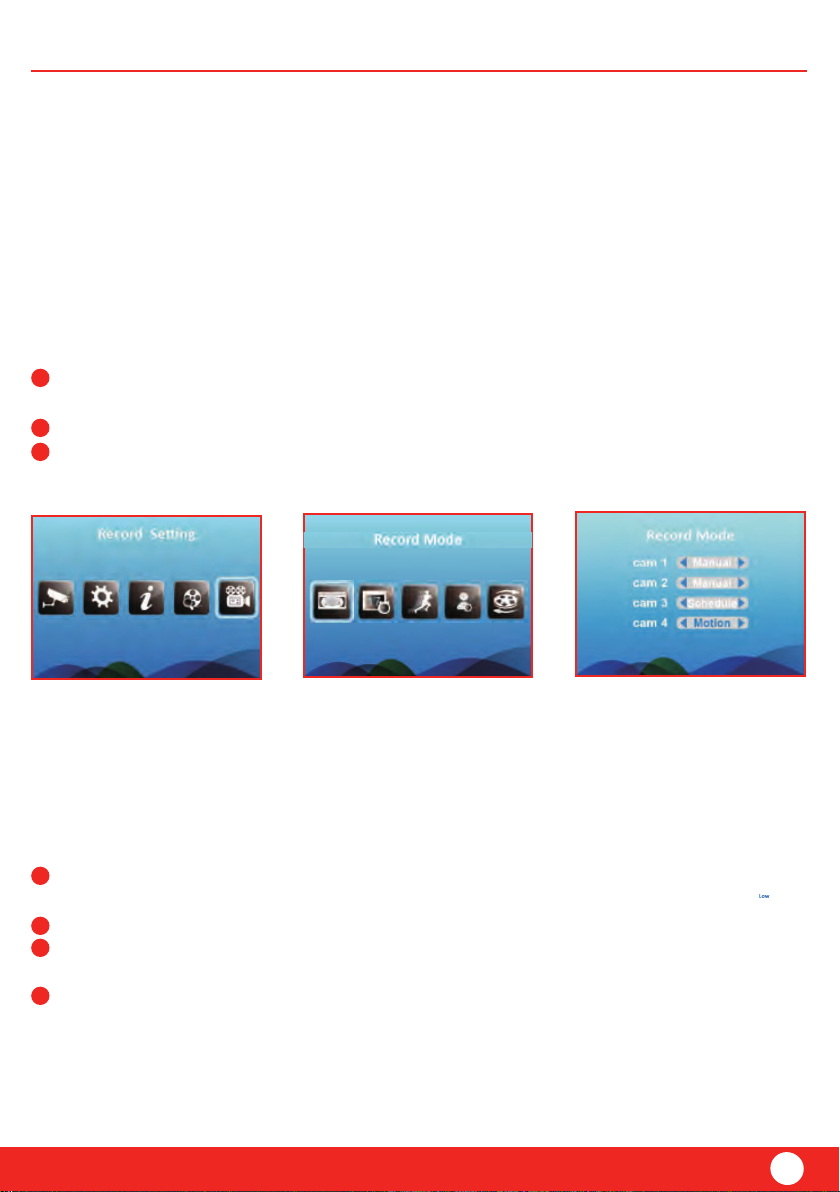
The system is designed for SD card recording. Before recording insert the SD card (up to 64 GB
capacity) into the SD card slot. Files are recorded in .ASF format and can be played in e.g.
Windows Media Player.
The system supports three recording modes “Manual”, “Scheduled” or “Motion Detection”.
6.5 Recording Mode
ERA CCTV
Setup
17
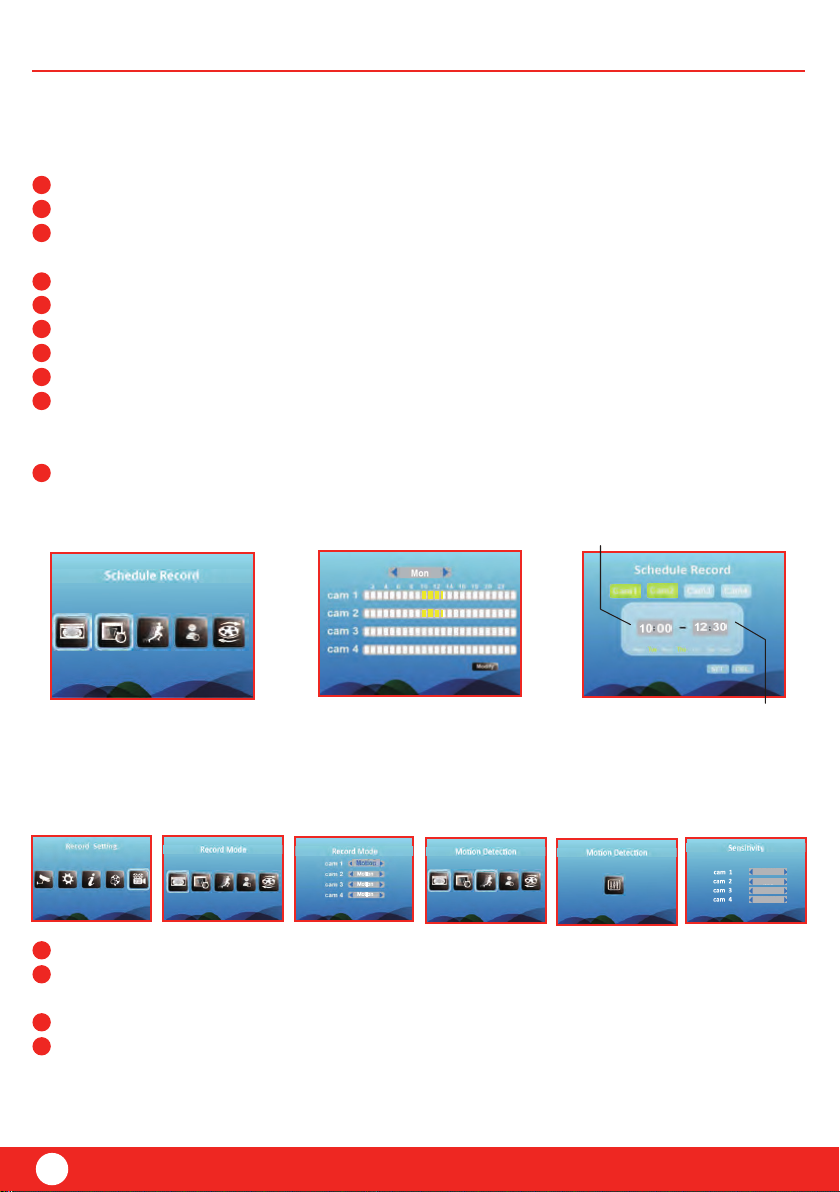
End Time:
record end time
Start time:
record start time
6.5.2 Scheduled Recording Mode
To schedule a recording press “MENU” > “Record Setting” and enter “Schedule Record”.
Enter the schedule settings by pressing “PLAY”
Choose one or more cameras to record by using the previous and next button and accept
by pressing “PLAY”.
To set start and end time use the next button to jump to time setting.
To set start and end time use the up and down buttons.
To choose the day or recording use the next button to jump to day setting.
Select day by pressing “PLAY”. It is possible to choose more than one day.
To confirm the recording go to “SET” by using the next button and press “PLAY”.
To view your scheduled recordings you can browse through the calender by using the
previous and next buttons. Please note that the date and time have to be set correctly
to ensure the successful scheduled recording (see 6.4 for date and time setting).
To delete a scheduled recording simply create an identical scheduled recording and press
“DEL” instead of “SET”.
10
9
8
7
6
5
4
3
2
1
Setup
ERA CCTV
4
3
2
1
6.5.3 Motion Detecting Recording Mode
In this mode the receiver starts recording when motion is detected by any activated camera
To activate a camera press “MENU” > “Record Setting” and select “Record Mode”.
Use the up and down buttons to select a camera; and then using the previous and next
buttons select the mode “Motion”.
Enter the settings by pressing “PLAY”
NOTE: To adjust the sensitivity of the motion detection go to “Motion Detection” in the
“Record Settings” menu. Use the up and down buttons to select a camera and previous and
next buttons to select the level of sensitivity.

20
18
Setup
ERA CCTV
Select appropriate camera channel, e.g. CAM1 (scroll using the
previous and next arrows).
A message will be displayed on the monitor screen. A timer on
the monitor will count down from 30 to 0, you must press the
“Pair” button on the camera power cord during this time to
successfully pair the camera. If the button is not pressed during
the countdown “Par Fail” will be displayed and the pairing
will be unsuccessful.
Repeat for each additional camera.
Turn on the Monitor/DVR and cameras by connecting them
to power outlet with the supplied power adapter. If using DVR
please connect to external monitor for setup using “AV Output”.
Press the “menu” button on the monitor/DVR (or the remote
control) and select “Camera
Setting”. To select press “PLAY”.
Select “Pairing”
When purchased as a kit the cameras are automatically pre-paired to
the monitor/DVR. You only need the following information, if you
have purchased additional cameras.
NOTE: It’s highly recommended to pair the cameras to the receiver
before permanently mounting the cameras.
The pairing function assigns each camera to a different channel on
the wireless receiver (up to 4 cameras in total) and enables you to
configure additional cameras.
6.7 Camera Pairing
4
3
2
1
6
5
6.6 Playback Operation
To view recorded files press “MENU” and select “Playback”. Open the created folder by
pressing “PLAY”.
Browse through the recordings using the up and down buttons. A recording is selected with
the “PLAY” button.
To play or pause the recording use the “PLAY” button.
To rewind or fast-forward the recording use the previous and next button. To increase the
speed press multiple times.
4
3
2
1
19
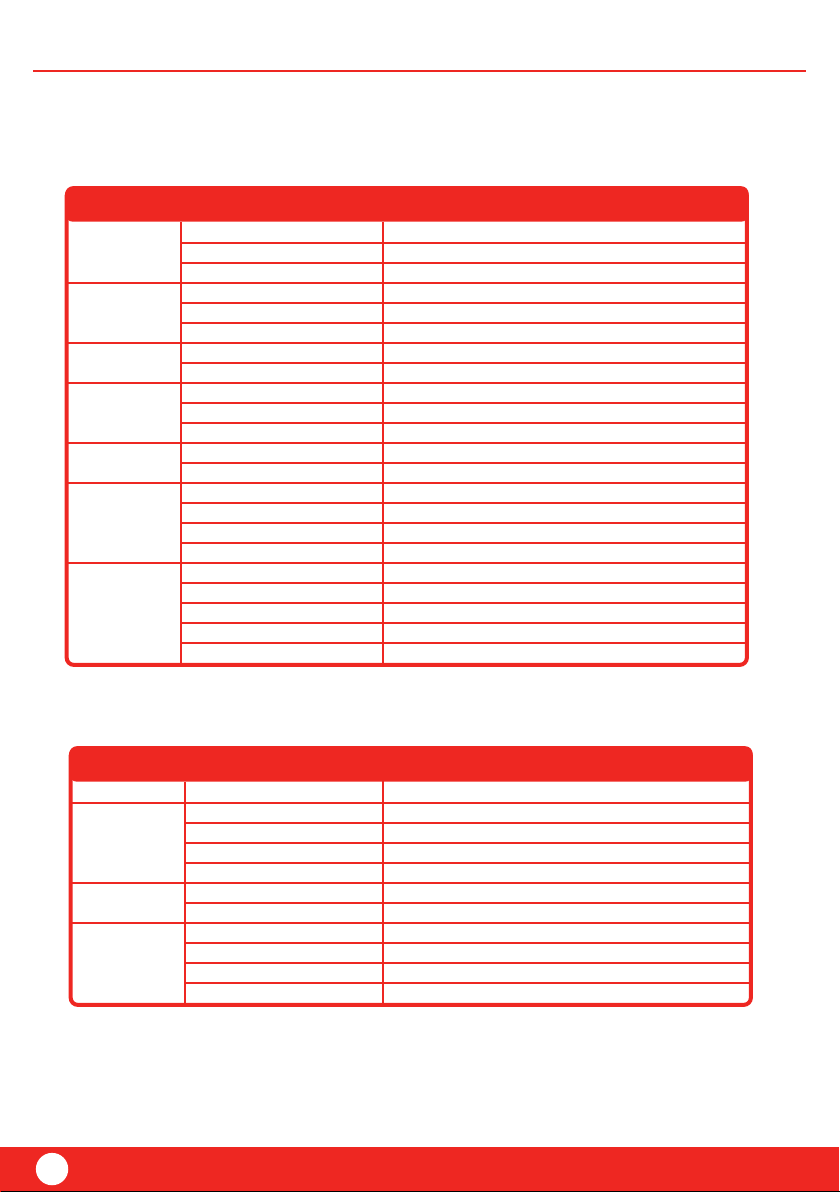
Specification
Frame rate
Recording mode
Recording resolution
Picture compression
Audio output
Video output
Receiving sensitivity
Receiving Range
Auto switching dwell time
Manual / Schedule / Motion detection
30FPS @ 320x240 QVGA (Max) 25FPS @ 640x480 VGA (Max)
VGA / QVGA
1ch audio output, impendance 600Ω
1ch CBVS 1.0Vp-p, impendance 75Ω
MPEG4
-89dBm
Up to 200m line of sight
5 seconds
2.400GHz ~ 2.483GHzFrequency range
Record
&
Playback
AV Output
Wireless
Video & Audio
input
Item Parameter
PAL / NTSCVideo standardSystem
Monitor
Mini DVR
Weight (without package)
Dimensions
Atmosphere pressure
Operating humidity
Operating temperature
Power consumption
Power supply
SD card
PC playback
Mini USB
Local
Recording mode
Recording format
Picture compression
Audio output
Video output
Receiving sensitivity
Receiving range
86kpa ~ 106jps
470g
183mm x 136mm x 30mm
10%~90%
6W max.
0°C ~+ 50°C
DC12V/1.25A
Used for software update (for manufacturer use only)
64GB max.
30FPS @ VGA, 30FPS @ HD 720p
Manual / Schedule / Motion detection
Real time encoder typically at VGA 30FPS @64MHz, HD 20FPS @96MHz
.ASF
No
MPEG4
1ch CVBS 1.0Vp-p, impendance 75Ω
-89dBm 4M mode Dev=1MHz
Up to 200m line of sight
PAL / NTSC
2.400GHz ~ 2.483GHzFrequency range
Environmental
Connector
Framerate
Record
&
Playback
AV Output
Wireless
Video & Audio
input
Video Standard
Resolution
Item Parameter
800(H) X RGB X 480(V)
7”TFT LCD (16:9)Display Screen
System
7. SPECIFICATION
ERA CCTV
Table of contents
Other ERA Security System manuals


Popular Security System manuals by other brands


Cobra
Cobra 57648 Owner's manual & safety instructions

DSC
DSC Envoy NT9010 installation guide

Caresafe Alarm
Caresafe Alarm EV-07W Quick reference user guide

Extel
Extel WESV 82600 Installation and user guide

Bunker Hill Security
Bunker Hill Security 60565 owner's manual

Inhep Digital Security
Inhep Digital Security IDS 800 Installer manual


