Eurotops 27326 User manual

Rechargeable Motor Hoe
Cat. No.: 27326
Read the instructions thoroughly before operating the tool and keep this manual for future reference!
OVERVIEW
INTENDED USE
Your rotary tiller has been designed for garden. Do not use for any other purpose. This tool is intended for domestic use
only.
Your charger has been designed for charging batteries of the type supplied with this tool. Do not use to charge other
batteries.
EXPLANATION OF SAFETY SYMBOLS
SAFETY INSTRUCTIONS
WARNING: Read all safety warnings and all instructions. Keep them carefully for future reference.
1) Secure the work area
a) Keep work area clean and well lit.
b) Do not operate it in presence of flammable liquids, gases or dust.
c) Keep children and people surrounding you at a safe distance while you are using this tool.
Danger due to materials blown out of
machine! Remove persons in the vicinity
from the danger are!
Caution!
Risk of injuring feet!
To prevent falling objects!
Do not expose the device to the damp!
Do not put your hand into the device!
Wear ear and eye protection!
1. Lock-off button
2. On/off switch
3. Battery pack
4. Grip Area
5. lock Nut
6. Blade

2) Electrical safety
a) Power tool plugs must match the outlet. Never modify the plug!
b) Do not expose power tools to rain or wet conditions.
c) Do not damage the power cord. Never force the cord for carrying, pulling or unplugging.
d) When using the appliance outdoors, use a suitable extension cord.
e) If you must use the unit in a humid place, use a protected supply current device (RCD).
3) Personal safety
a) Stay alert, watch what you are doing and use common sense when operating a power tool. Do not use the device
when you are tired or under the influence of drugs, alcohol or medication.
b) Use safety equipment. Always wear eye protection.
c) Avoid accidental starting. Check that the switch is in the off position before connecting to a source or battery,
picking up or transporting.
d) Remove all adjustment tools (or keys) before turning the unit on.
e) Do not wear loose clothing or jewelry. Keep your hair, clothing and gloves away from moving parts.
f) If the connections devices are provided make sure they are properly connected and used.
4) Using the machine
a) Do not force. Use the right tool for the job to be performed.
b) Do not use the power tool if the On / Off switch is not working.
c) Disconnect the plug from the power source and / or remove the battery from the tool before making any
adjustments, changing accessories, or storing the tools.
d) Store idle tools out of reach of children and do not allow persons unfamiliar with the tool to use.
e) Maintain tools. If damaged, repair it before use.
f) Keep sharp and clean cutting tools.
5) Use and maintenance of batteries
a) Recharge only with the charger and the battery specified by the manufacturer.
b) If liquid leaking from the battery: avoid contact. In case of accidental contact, rinse with water. If the fluid comes
into contact with eyes, seek medical attention.
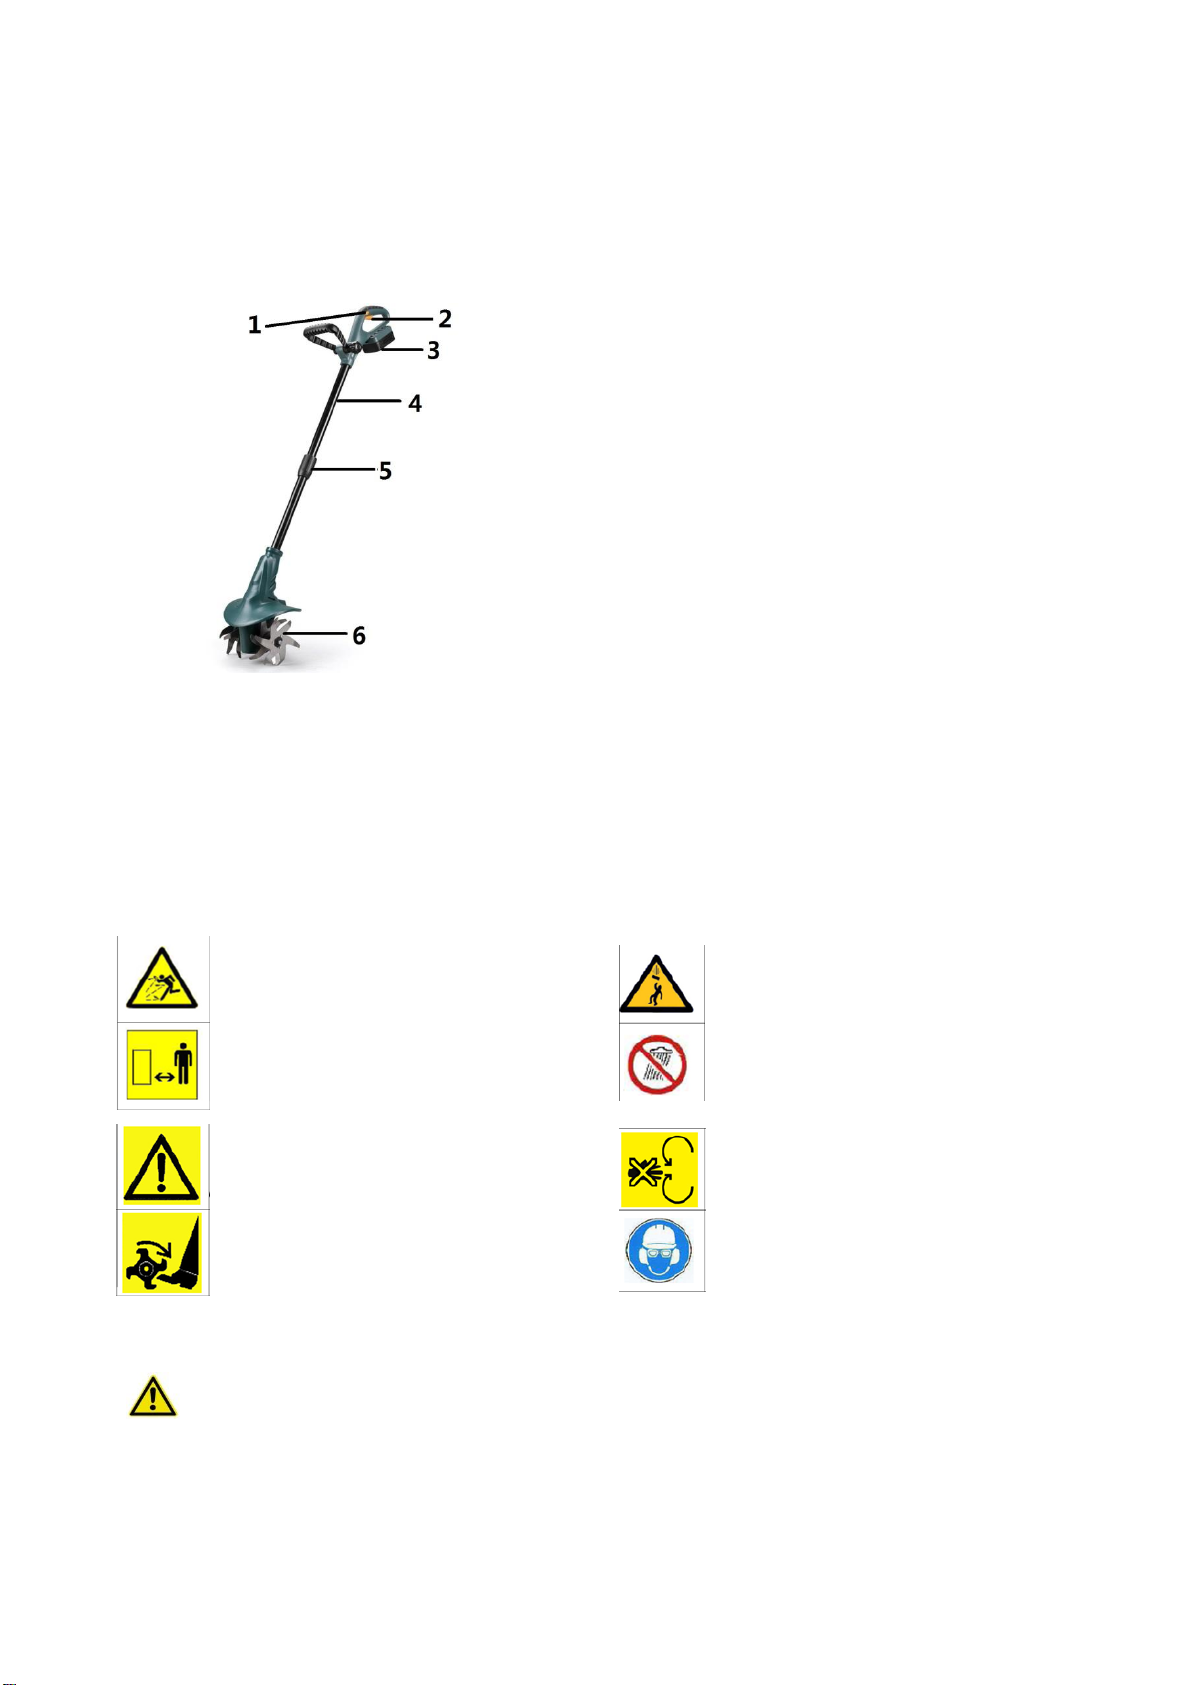
6) Safety instructions for the tiller
a) Hold the tool by the insulated handles when performing an operation where the unit's blade can be in contact with
hidden wiring.
b) Do not use the tool without protective cover. If the rubber protections are damaged, replace them with new ones.
c) Keep hands away from the cutting zone. Do not reach under the work piece.
d) Once the cut is complete, turn off the machine and pull the tiller blade only after a blackout is found.
e) Use appropriate detectors to determine if utility lines are hidden in the work area or call the local power company to
make sure.
f) Always wait until the machine is at a complete stop before the rest.
g) Before any work on the machine (eg, maintenance, tool change, etc.) as well as during transport and storage,
always lock the on / off switch in the off position.
7) Storage
a) Always use protection during transport or storage.
b) Cleaning and maintenance before storage.
BATTERY
1. Never try to open or modify the battery pack for any reason. The electrolyte is corrosive and may cause damage to eyes
and skin. It may be toxic if swallowed.
2. Do not immerse / expose to water.

3. Do not store in areas where temperatures exceed 104 ° F (40 ° C).
4. Load the tool at room temperature: 64 ° F-75 ° F (18 ° C-24 ° C) never to ambient temperatures below 40 ° F (4 ° C) and
above 104 ° F (40 ° C).
5. Load the tool using only the charger provided with the tool.
6. Before loading, make sure the battery is clean and dry.
ASSEMBLY INSTRUCTIONS
Warning! Remove the battery pack before cleaning the tool.
Insert/remove the battery pack
Always release the On/Off switch before insertion or removal of the battery pack.
To remove the battery pack, depress the button 1 on end of the battery pack, and then remove the pack 2 from the
tool.
To insert the battery pack, align the latches on both side of the battery cartridge with the groove in the housing and
slip it into place. Always insert it all the way until it locks in place with a little click. If not, it may accidentally fall out of
the tool, causing injury to you or someone around you.
Do not use force when inserting the battery pack. If the cartridge does not slide in easily, it is not being inserted correctly.
Attach adjustable handle (FIG A)
1
2Remove Insert 2
FIG A
a. Turn the handle knob and Draw out the bolt from
the adjustable handle.
b. Insert the adjustable handle in the machine handle.
c. Insert the bolt and handle knob, then turn the
handle knob lightly tighten.
d. Before tightening completely, turn the adjustable
handle in desired angle. When adjustable handle is
in desired angle, tighten the handle knob securely.

OPERATION
Setting the handle length and angle: (FIG C)
1,Turn the clamping bolt aligning the “UNLOCK” direction and extend
upper part of handle to desired handle length. Then turn the clamping
bolt aligning the “LOCK” direction and turn tightly.
Setting the adjustable handle angle: (FIG D)
Loosen the locking button and turn adjustable handle to required angle. There are 7 working positions. Then turn the
locking button tightly.
Starting the Rotary Tiller: (FIG E)
RISK OF INJURY! Cutting elements continue to rotate after the motor is switched off. Do not try to stop the
cutting device (nylon blade) with your hands. Always let it come to a stop by itself.
CHARGING THE BATTERY (FIG F)
The battery needs to be charged before first use and whenever it fails to produce sufficient power on jobs that were
easily done before.
The battery may become warm while charging; this is normal and does not indicate a problem.
NOTE: After several charge and discharge cycles, the battery will attain full capacity.
DO NOT CHARGE THE BATTERY AT AMBIENT TEPERATURES BELOW 4ºC OR ABOVE 40ºC. RECOMMEND
CHARGING TEPERATURE: APPROX. 24ºC.
FIG D
FIG E
FIG B
FIG C
Switching the Rotary Tiller on:
1. Press and hold the safety lock-off button (A) and
then press the start button (B) on the handle.
2. Release the safety lock-off button (A) again.
Switching the Rotary Tiller off:
Release the start button (B) on the handle.

Attention! It cannot be charged if charging the battery immediately after using the machine. The battery
pack should be cooling for a period of time. The LED 9 lights from green to red means it can be charged.
Important charging notes
Longest life and best performance can be obtained if the battery pack is charged when the air temperature is between
18-24℃. Do not charge the battery pack in a very low or very high air temperature.
1. When using your tool continuously, the batteries in your battery pack will become hot. You should let a hot
battery pack cool down for approximately 30 minutes before attempting to recharge.
2. The charger and battery pack may become warm to touch while charging. This is a normal condition, and does not
indicate a problem.
3. If the battery pack does not charge properly –
(1) Check current at receptacle by plugging in a lamp or other appliance.
(2) Move charger and battery pack to a location where the surrounding air temperature is approximately 18-24℃. (3).if
charging problems persist, take or send the tool, battery pack and charger to your local service center.
4. The battery pack should be recharged when it fails to produce sufficient power on jobs which were easily done
previously. DO NOT CONTINUE to use under these conditions. Follow the charging procedure. You may also charge a
partially used pack whenever you desire with no adverse affect on the battery pack.
5. Under certain conditions, with the charger plugged in to the power supply, the exposed charging contacts inside the
charger can be shorted by foreign material. Foreign materials of a conductive nature such as, but no limited to, steel
wool, aluminum foil, or any buildup of metallic particles should be kept away from charger cavities. Always unplug the
charger from the power supply when there is no battery pack in the cavity. Unplug charger before attempting to clean.
6. Do not immerse charger in water or any other liquid.
7. WARING! Don’t allow any liquid to get inside charger. Electric shock may result. To facilitate the cooling of the battery
pack after use, avoid placing the charger or battery pack in a warm environment such as in a metal shed, or an
uninsulated trailer.
8. CAUTION! Never attempt to open the battery pack for any reason. If the plastic housing of the battery pack breaks or
cracks, return to a service center for recycling; do not put it into further use
MAINTENANCE
1. After use, remove the battery pack from the trimmer;
2. Use only manufacturer recommended replacement parts and accessories;
3. To clean the tool, remove battery pack and use only mild soap and a damp cloth to clean the tool. Do not immerse
tool in water or squirt it with a hose. Do not allow any liquid to get inside it. Do not clean with a pressure washer.
9
7
8
6
FIG F
(1). Connect the charger 7 to the charger station 8.
(2). Plug the charger into an appropriate AC power outlet.
The LED 9 lights green to tell you that the charger is
ready for use.
(3) Insert the charger station 8 into the battery pack 6, as
shown in Fig F, making sure the charger station is fully
seated in the battery pack. The LED 9 lights red to tell
you that the battery pack is on charge.
(4).The battery pack will be fully charged in about 5-6
hours. And the LED 9 lights green again to tell you that
the battery pack is fully charged.

TECHNICAL DATA
Voltage
18VDC
Blade strokes (no load)
280 /min
Max. Working width(mm):
200mm
Max. Working depth(mm):
80mm
Battery type
Lithiun-ion
Battery capacity
1.3Ah
Working Time
Approx. 25-minute
Battery charging time
Approx. 5-6 hours
DISPOSAL:
The packaging material is reusable. Dispose of the packaging in an environmentally friendly way by putting it in the
appropriate recyclable waste collection containers.
Dispose of the product and the batteries in view of the environment if you want to separate. The device
and the batteries must not be thrown in with domestic waste. Take them to a recycling center for used
electrical and electronic devices. For more information you can consult your local government. Remove
batteries first.
Eurotops Versand GmbH
Elisabeth-Selbert-Straße 3
40764 Langenfeld, Germany
If technical support is needed, please call ...
* 14 Cents/minute via German landline, max. 42 cents/minute via mobile phone network
**34 Cents/minute via French landline
A possible return of products should be addressed to the return address stated on your invoice.
The manual only reflects the technical conditions available under printing. Any changes in technology and equipment are
reserved.
© 01.01.2016
Other manuals for 27326
1
Table of contents
Other Eurotops Lawn And Garden Equipment manuals

Eurotops
Eurotops 45522 User manual

Eurotops
Eurotops 29054 User manual

Eurotops
Eurotops 25560 User manual

Eurotops
Eurotops 25560 User manual

Eurotops
Eurotops 50743 User manual

Eurotops
Eurotops B2145 User manual

Eurotops
Eurotops 46899 User manual

Eurotops
Eurotops 45228 User manual

Eurotops
Eurotops 50507 User manual

Eurotops
Eurotops 39072 User manual
Popular Lawn And Garden Equipment manuals by other brands

Oypla GARDEN
Oypla GARDEN 3839 user manual

Simplicity
Simplicity 1695067 Illustrated parts list

Husqvarna
Husqvarna 42" Collection System Operator and parts manual

Cub Cadet
Cub Cadet THE TANK TR20 Specifications

Classen
Classen CA-18H Operator's manual

Coopers of Stortford
Coopers of Stortford 10275 Instructions for use