Faema E92 User manual

1Code 924-812-060 (rev. 1013)
Dichiarazione di conformità CE
Con la presente il GRUPPO CIMBALI S.P.A. dichiara sotto la propria responsabilità che:
EC Declaration of conformity
GRUPPO CIMBALI S.P.A., hereby declares, under its own responsibility, that:
&HUWL¿FDWGHFRQIRUPLWp&(
Par la présente le GRUPPO CIMBALI S.P.A. déclare sous sa propre responsabilité que:
EG-Konformitätserklärung
Die GRUPPO CIMBALI S.P.A. hiermit in eigener Verantwortlichkeit wie folgt:
Declaraciòn de conformidad CE
Con la presente el GRUPPO CIMBALI S.P.A. declara bajo su propia responsabilidad que:
Declaração de conformidade
Com a presente o GRUPPO CIMBALI S.P.A. declara, sob a própria responsabilidade que:
è conforme alle seguenti direttive: is in compliance with the following directives:
est conforme aux normatives suivantes: entspricht den folgenden Gesetzesbestimmungen:
es conforme a las siguientes directivas: está conforme às seguintes directrizes:
2006/95/EC Direttiva bassa tensione - EC Low Voltage Directive - Normes CE Basse-tension
EG-Niederspannungrichtlinie - Directiva de la maquinaria CE - Directiva sobre a baixa tensão CE
(& (0&(&(OHFWURPDJQHWLF&RPSDWLELOLW\GLUHFWLYH1RUPHV&(&RPSDWLELOLWppOHFWURPDJQpWLTXH
EG-Richtlinie Elektromagnetische Verträglichkeit - Directiva de la maquinaria CE
Directiva sobre a compatibilidade el.magn. CE
2006/42/EC Direttiva macchine - EC Machinery Directive - Normes CE Machines -
EG-Maschinenrichtlinie - Directiva de la maquinaria CE - Directiva sobre as máquinas CE
97/23/EC Direttiva attrezzature a pressione (PED) (Vedere tabella nella pagina successiva)
Pressure Equipment Directive (PED) (See chart in the following page)
Directive Èquipements sous Pression (PED) (Voir tableau dans la page suivant)
Richtlinie-Druckgeräte (PED) (Siehe Tabelle auf der nächsten Seite)
Directiva equipos a presión (PED) (Véase cuadro en la página siguiente)
Directiva equipos sobre pressão (PED) (Veja quadro na página seguinte)
HVXFFHVVLYHPRGL¿FKHHGLQWHJUD]LRQL DQGODWHUPRGL¿FDWLRQVDQGLQWHJUDWLRQV
HWPRGL¿FDWLRQVXOWpULHXUHVHWLQWpJUDWLRQV VRZLHGHQQDFKIROJHQGHQbQGHUXQJHQXQG(UJlQ]XQJHQ
\VLJXLHQWHVPRGL¿FDFLRQHVHLQWHJUDFLRQHV HDOWHUDo}HVHLQWHJUDo}HVVXEVHTXHQWHV
6HGHOHJDOH5HJLVWHUHGRI¿FH6LqJHVRFLDO
Rechtssitz - Sede legal - Sede legal: Via A. Manzoni 17, Binasco (Mi), ITALY
Data - Date - Date
Datum - Fecha - Data 22.03.2010 ........................................................ ........................................................
Product Development Manager Industrial Manager
Apparecchio - Appliance - Appareil Gerätes - Aparato - Aparelho
Marca - Brand - Marque - Marke - Marca - Tipo Fabbricante - Manufacturer - Fabricant Hersteller - Fabricante - Fabricante
Tipo di macchina - Type of machine - Type de la machine Maschinentypen - Tipo de la màquina - Tipo de la màquina
N° della macchina - Serial number - N° de la machine
Maschinen-Nummer - N° de la máquina - No de la máquina
vedere targa dati refer to machine data voir étiquette données siehe Angaben zum Maschinentyp
ver la placa de la caracterìsticas
ver la plaqueta das características
/DSUHVHQWHGLFKLDUD]LRQHSHUGHODVXDYDOLGLWjQHOFDVRLQFXLO¶DSSDUHFFKLRYHQJDPRGL¿FDWRVHQ]DHVSUHVVDDXWRUL]]D]LRQHGHO
costruttore oppure se installato o utilizzato in modo non conforme a quanto indicato nel manuale d’uso e nelle istruzioni.
7KLVGHFODUDWLRQLVQXOODQGYRLGLIWKHPDFKLQHLVPRGL¿HGZLWKRXWWKHH[SUHVVDXWKRUL]DWLRQRIWKHPDQXIDFWXUHURULILPSURSHUO\
installed and used in such a way that does not comply with indications in the users’ manual and the instructions.
/DSUpVHQWHGpFODUDWLRQSHUGWRXWHYDOLGLWpGDQVOHFDVRO¶DSSDUHLOHVWPRGL¿pVDQVO¶DXWRULVDWLRQGXFRQVWUXFWHXURXVLO¶DSSDUHLO
HVWLQVWDOOpRXXWLOLVpGHIDoRQQRQFRQIRUPHjFHTXLHVWLQGLTXpGDQVOHPDQXHOHWGDQVOHPRGHG¶HPSORL
'LHYRUOLHJHQGH%HVFKHLQLJXQJYHUOLHUWLKUH*OWLJNHLWIDOOVGDV*HUlWRKQHDXVGUFNOLFKH*HQHKPLJXQJGHV+HUVWHOOHUPRGL¿]LHUW
werden sollte oder falls es nicht entsprechend der im Bedienungs- und Wartungshandbuch aufgeführten Anleitungen installiert
oder benutzt werden sollte.
/DSUHVHQWHGHFODUDFLyQSLHUGHVXYDOLGH]HQHOFDVRGHTXHHODSDUDWRVHDPRGL¿FDGRVLQH[SUHVDDXWRUL]DFLyQGHOFRQVWUXFWRU
o bien si ha sido instalado o utilizado de forma no conforme a lo indicado en el manual de uso y en las instrucciones.
$SUHVHQWHGHFODUDomRGHL[DGHWHUYDOLGDGHQRFDVRHPTXHRDSDUHOKRVHMDPRGL¿FDGRVHPDXWRUL]DomRGRFRQVWUXWRURXVH
LQVWDODGRRXXWLOL]DGRGHPDQHLUDQmRFRQIRUPHDRLQGLFDGRQRPDQXDOGHXVRHQDVLQVWUXo}HV

2
Caldaia
Service boiler
Chaudiére
Heizkessel
Caldera
Caldeira
Scambiatore
Heat exchanger
Èchangeur
Wrmeaustauscher
Intercambiador de calor
Trocador de calor
133° C
tipo di macchina
Type of machine
type de la machine
Maschinentypen
modelo de la machina
tipo de la màquina
acqua/vapore
water/steam
eau/vapeur
wasser/dampf
agua/vapor
água/vapor
acqua
water
eau
wasser
agua
água
1 gruppo
1 unit
1 groupe
1 gruppe
1 grupo
1 grupo
2 gruppi
2 units
2 groupes
2 gruppen
2 grupos
2 grupos
3 gruppi
3 units
3 groupes
3 gruppen
3 grupos
3 grupos
4 gruppi
4 units
4 groupes
4 gruppen
4 grupos
4 grupos
Tmax
[ °C ]
Pmax
[ bar ]
2 bar
Fluido - Fluid - Fluide
Flüssig - Fluido - Fluido
2.5 - 8 5 - 11 15 - 17.5 20 - 24.1
0.14 - 0.65
x 1
0.14 - 0.65
x 2
0.65
x 3
0.65
x 4
133° C12 bar
[ L ]
Capacità - Capacity - Capacitè
Kapazität - Capacidad - Capacidade
Caldaia
Service boiler
Chaudiére
Heizkessel
Caldera
Caldeira
Scambiatore
Heat exchanger
Èchangeur
Wrmeaustauscher
Intercambiador de calor
Trocador de calor
133° C
tipo di macchina
Type of machine
type de la machine
Maschinentypen
modelo de la machina
tipo de la màquina
acqua/vapore
water/steam
eau/vapeur
wasser/dampf
agua/vapor
água/vapor
acqua
water
eau
wasser
agua
água
X1
X2
X4
X53
X3
1 gruppo
1 unit
1 groupe
1 gruppe
1 grupo
1 grupo
X3
2 gruppi
2 units
2 groupes
2 gruppen
2 grupos
2 grupos
Tmax
[ °C ]
Pmax
[ bar ]
2 bar
Fluido - Fluid - Fluide
Flüssig - Fluido - Fluido
2.5 - 4 0.9 - 3.4 4.8
133° C12 bar
[ L ]
Capacità - Capacity - Capacitè
Kapazität - Capacidad - Capacidade
Boiler caffè
Coffee boiler
Boiler café
Boiler Kaffee
Boiler café
Boiler cafè
acqua
water
eau
wasser
agua
água
170° C12 bar
0.14 - 0.31 - -
- 0.9 0.9 x 2

3
E92/A
14
16
11
18
9
21
13
17
10
19
20 8
22 25
23
651231a 4
15
12
c
b
a
15Idp
24 32
37
33 34 3531 36
26 27 28 2930
91

4
LEGENDA
1Interruttore generale
1a Interruttore inserimento
resistenze caldaia
2Spia luminosa macchina accesa
(verde)
3Spia luminosa inserimento
resistenze caldaia (arancione)
4Spia luminosa (livello) carico
acqua in caldaia (rossa)
5Spie luminose scaldatazze
DFFHVR/('
6Pulsante scaldatazze
8Manometro rete/ pompa
9Lancia destra erogazione vapore
10 Lancia erogazione acqua calda
11 Leva erogazione vapore lancia (9 dx)
12 Pulsante vapore automatico
$87267($0
13a Pulsante erogazione acqua calda
(dose 1/STOP)
13b Pulsante stop - continuo acqua
calda
13c Pulsante erogazione acqua calda
(dose 2/STOP)
14 Display alfanumerico
15 Display pubblicitario
15Idp Interruttore display pubblicitario
16 3XOVDQWHODWWHYDSRUH
17 Leva erogazione vapore lancia (20 sx)
18 &DSSXFFLQDWRUH
19 Indicatore livello ottico acqua in
caldaia
20 Lancia sinistra erogazione vapore
21 3RUWD¿OWURSHUXQDWD]]D
22 Leva riempimento manuale acqua
in caldaia
23 )LQHVWUHOODSHUFRQWUROOR¿DPPD
24 0DQRSRODSXOVDQWHUXELQHWWRJDV
25 3RUWD¿OWURSHUGXHWD]]H
26 Pulsante erogazione un caffè
ristretto
27 Pulsante erogazione due caffè
ristretti
28 Pulsante erogazione un caffè
lungo
29 Pulsante erogazione due caffè
lunghi
30 Pulsante erogazione continua/STOP
31 Pulsante visualizzazione quadri di
programmazione
32 Pulsante PROG
33 Pulsante freccette
34 Pulsante incremento valori (+)
35 Pulsante diminuzione valori (-)
36 Pulsante reset
37 Tastiera di programmazione
91 Bacinella appoggiatazze
,FRPSRQHQWLVRQRDSSOLFDWLVRORVX
DOFXQHFRQ¿JXUD]LRQLGLSURGRWWL
Legenda - Legend - Legende
LEGEND
1Main switch
1a Boiler heat resistance switch
2Machine “ON” indicator light
(green)
3Boiler heating element pilot light
(orange)
4%RLOHUZDWHU¿OOLQGLFDWRUOHYHO
light (red)
5Cup warmer “ON” indicator light
/('
6Cupwarmer button
8Pump pressure gauge
9Right steam wand
10 Hot water wand
11 Steam lever (9 dx)
12 Automatic steam button
$87267($0
13a Hot water touche button
(dose 1/STOP)
13b Stop button, continuous hot water
13c Hot water touche button
(dose 2/STOP)
14 Alphanumeric display
15 Promotional display
15ldp Ad display switch
16 0LONVZLWFKVWHDP
17 Steam lever (20 sx)
18 &DSSXFFLQRPDNHU
19 Boiler water level indicator
20 Left steam delibery wand
21 Filter-holder for one cup
22 0DQXDOUH¿OOZDWHUOHYHULQERLOHU
23 Flame check window
24 *DVWDSEXWWRQ
25 Filter-holder for two cups
26 One coffee key long
27 Two coffees key long
28 One coffee key short
29 Two coffees key short
30 Continue / STOP key
31 Panels display button
32 PROG key
33 Arrows key
34 Values increase key (+)
35 Values decrease key (-)
36 Reset button
37 Programming control panel
91 Cup rest tray
,WHPVPDUNHGDUH¿WWHGLQVRPH
SURGXFWFRQ¿JXUDWLRQVRQO\
LEGENDE
1Interrupteur général
1a Interrupteur branchement
résistance chaudière
2Témoin lumineux de la machine en
marche (verte)
3Témoin lumineux allumage
résistance chaudière (orange)
4Voyant lumineux (niveau) charge
de l’eau dans la chaudière (rouge)
5Témoin lumineux chauffe-tasses
DOOXPp/('
6Bouton poussoir chauffe-tasses
8Manomètre
9Lance droite de débit vapeur
10 Lance de débit d'eau chaude
11 Levier de débit de lance vapeur
(9 droite)
12 Bouton poussoir vapeur automatique
$87267($0
13a Clavier débit d’eau chaude
(dose 1/STOP)
13b Bouton poussoir stop - continue
eau chaude
13c Clavier débit d’eau chaude
(dose 2/STOP)
14 Display alphanumérique
15 (FUDQSXEOLFLWDLUH
15Idp Interrupteur écran publicitaire
16 %RXWRQSRXVVRLUODLWYDSHXU
17 Levier de débit pour lance vapeur
lance (20 sx)
18 “cappuccinomatic”
19 Indicateur du niveau optique de
l’eau dans la chaudière
20 Lance gauche de débit vapeur
21 3RUWH¿OWUHSRXUXQHWDVVH
22 Levier remplissage manuel eau
dans chaudière
23 Petite fenêtre de contrôle de la
ÀDPPH
24 Bouton-bouton poussoir robinet du
JD]
25 3RUWH¿OWUHSRXUGHX[WDVVHV
26 Touche de débit de café restreint
27 Touche de débit de deux cafés
restreints
28 Touche de débit de café long
29 Touche de débit de deux cafés
longs
30 Touche de débit continu / STOP
31 %RXWRQSRXVVRLUDI¿FKDJHWDEOHDX[
32 Touche PROGR.
33 7RXFKHGHVSHWLWHVÀqFKHV
34 Touche d’ augmentation des
valeurs (+)
35 Touche de diminution des valeurs (-)
36 Bouton poussoir reset
37 Clavier de programmation
91 Cuve appui-tasses
/HVGpWDLOVQHVRQWDSSOLTXpVTXj
FHUWDLQHVFRQ¿JXUDWLRQVGHSURGXLW
I FGB

5
Legende - Leyenda - Legenda
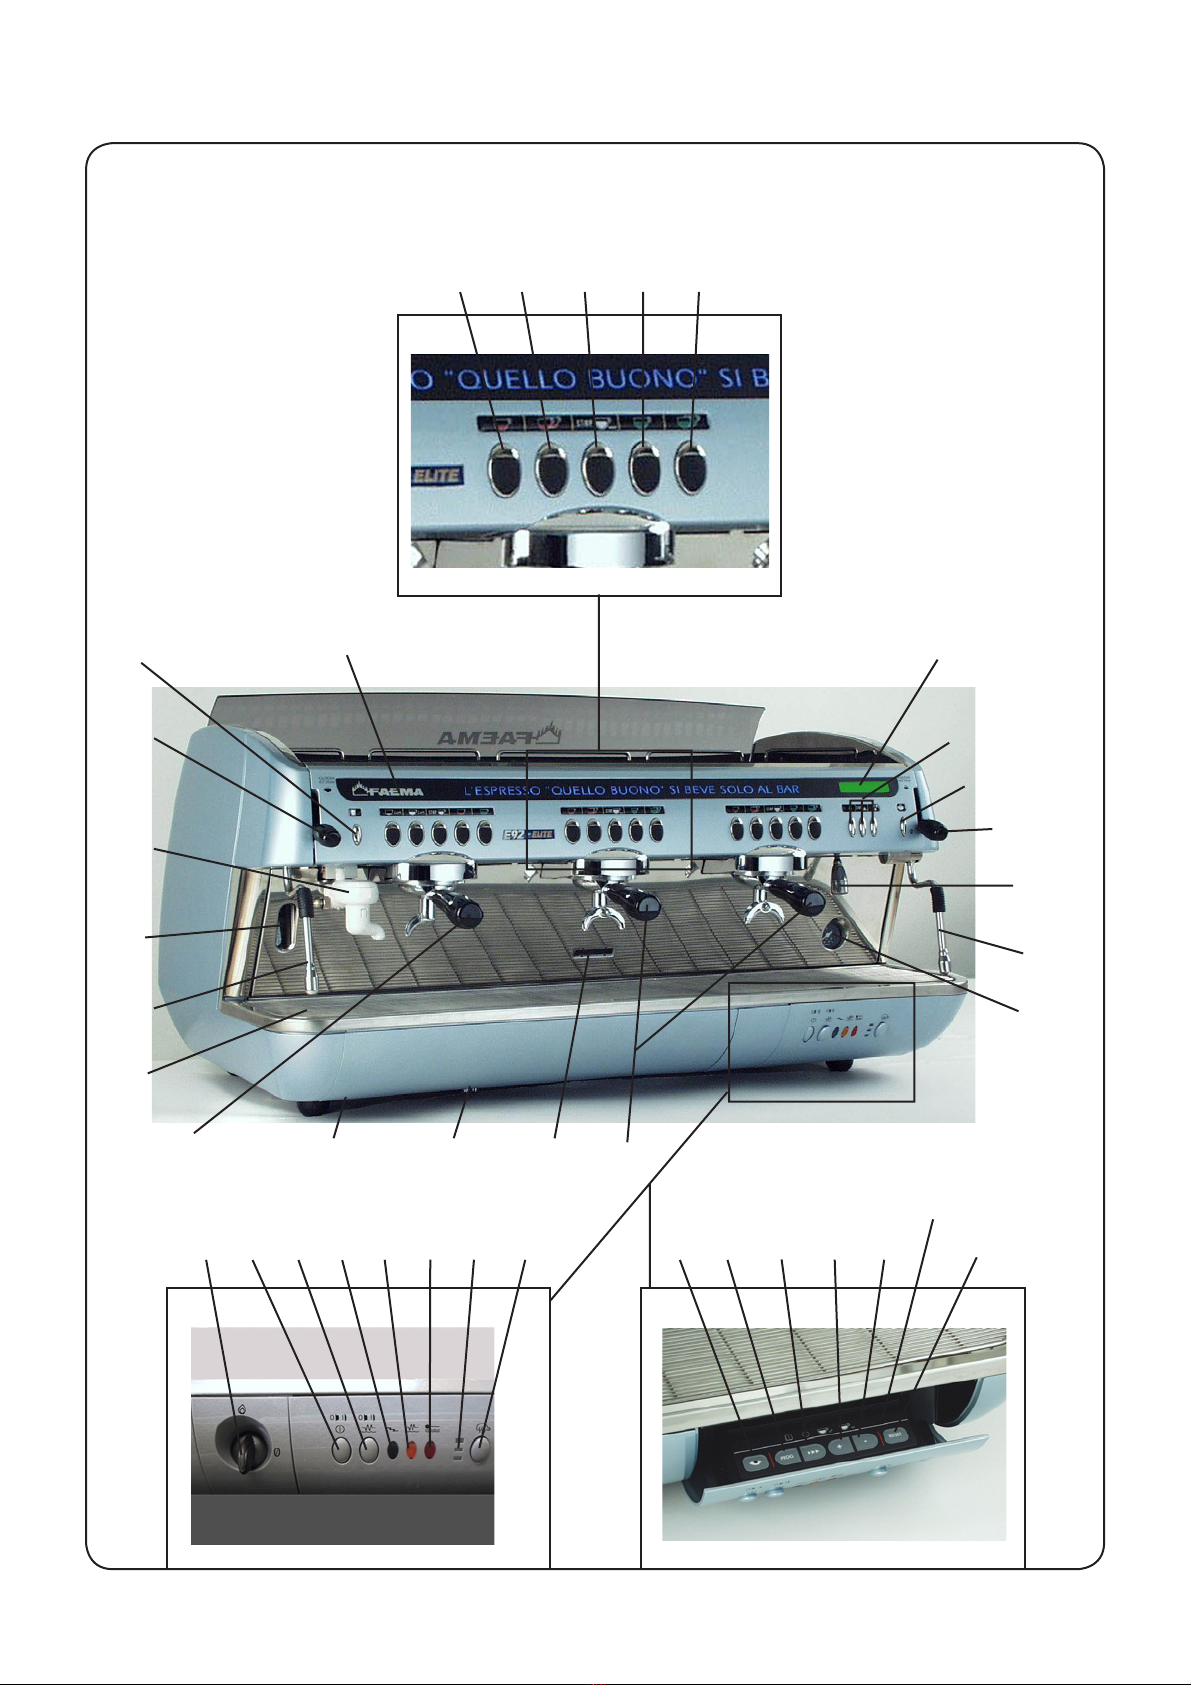
LEGENDE
1Hauptschalter
1a Schalter zur Aktivierung der
Wasserkesselbeheizung
2Kontrolleuchte ‘Maschine
eingeschaltet’ (grün)
3Kontrolleuchte Heizelemente (orange)
4Kontrolleuchte (Standanzeige)
Wasserzuführung in Kessel (rot)
5Kontrolleuchte Tassenvorwärmer
/('
6Taste „Tassenvorwärmer"
8Manometer
9Dampfrohr rechs
10 Heißwasserausgabe
11 Hebel Dampfausgabe (9 Rechtes)
12 Taste „automatische Dampfabgabe“
$87267($0
13a Heißwasserausgabe (Dosis 1/STOP)
13b Stopp-Taste (Fortsetzung
Heißwasserabgabe)
13c Heißwasserausgabe (Dosis 2/STOP)
14 Display alfanymmering
15 Werbedisplay
15Idp Taste Werbedisplay
16 Taste „Milchabgabe
'DPSIDEJDEH
17 Hebel Dampfausgabe (20 Linkes)
18 Cappuccinatore
19 Optische Anzeige des
Wasserstandes im Kessel
20 Dampfrohr links
21 Filterhalter für 1 Tasse
22 Hebel manuelle füllung Wasser in
Kessel
23 .RQWUROO|IIRXQJIU*DVÀDPPH
24 5HJOHU7DVWH*DVYHQWLO
25 Filterhalter für 2 Tassen
26 Taste Kaffeeausgabe 1 Tasse
(Ristretto)
27 Taste Kaffeeausgabe 2 Tassen
(Ristretto)
28 Taste Kaffeeausgabe 1 Tasse
(gross)
29 Taste Kaffeeausgabe 2 Tassen
(gross)
30 Taste Kaffeeausgabe kontinuierlich
und STOP
31 Taste zur Menüabbildung
32 Programmiertaste (PROG)
33 Pfeiltasten
34 Plus-Taste (+)
35 Minus-Taste (-)
36 Taste Rücksetzung (Reset)
37 Tastenfeld zur Programmierung
91 Wanne zur Tassenablage
'LHPLWJHNHQQ]HLFKQHWHQ
Komponenten sind nur in bestimmten
Modellen installiert.
LEYENDA
1Interruptor general
1a Interruptor accionamiento
resistencias caldera
2Indicador luminoso máquina
encendida (verde)
3Indicador luminoso conexión
resistencias caldera (naranja)
4Indicador luminoso (nivel) carga
agua en la caldera (roja)
5Indicador luminoso calienta-tazas
HQFHQGLGR/('
6Botón calienta-tazas
8Manómetro
9Tubo derecho erogación vapor
10 Tubo erogación agua caliente
11 Palanca erogación vapor tubo
(9derecha)
12 Botón vapor automático
$87267($0
13a Botón erogación agua caliente
(dosis 1/STOP)
13b Botón stop – continuo agua
caliente
13c Botón erogación agua caliente
(dosis 2/STOP)
14 Visualizador alfanumérico
15 Display publicitario
15Idp Interruptor display publicitario
16 %RWyQOHFKHYDSRU
17 Palanca erogación vapor tubo
(20 sx)
18 Cappuccinador
19 Indicador nivel óptico agua en la
caldera
20 Tubo izquierdo erogación vapor
21 3RUWD¿OWURSDUDXQDWD]D
22 Palanca llenado manual agua en la
caldera
23 Ventanilla para control llama
24 0DQJRERWyQJULIRJDV
25 3RUWD¿OWURSDUDGRVWD]DV
26 Botón erogación un café corto
27 Botón erogación dos cafés cortos
28 Botón erogación un café largo
29 Botón erogación dos cafés largos
30 Botón erogación continua/STOP
31 Botón visualización cuadros
32 Botón PROG
33 %RWyQÀHFKDV
34 Botón incremento valores (+)
35 Botón disminución valores (-)
36 Botón reset
37 Panel mandos de programación
91 Bandeja apoya-tazas
/RVGHWDOORVVHSXHGHQDSOLFDUVyORHQ
DOJXQDVFRQ¿JXUDFLRQHVGHOSURGXFWR
LEGENDA
1Interruptor geral
1a Interruptor de inserimento de
resistências da caldeira
2Indicador luminoso da máquina
acesa (verde)
3Indicador luminoso de inserimento
das resistências da caldeira (laranja)
4Indicador luminoso (nível) de
carregamento da água na caldeira
(vermelho)
5Indicadoresluminososdoaquecedor
GHFKiYHQDVDFHVR/('
6 %RWmRGRDTXHFHGRUGHFKiYHQDV
8Manómetro rede/bomba
9 /DQoDGLUHLWDGHGLVWULEXLomRGRYDSRU
10 /DQoDGHGLVWULEXLomRGDiJXDTXHQWH
11 $ODYDQFDGHGLVWULEXLomRGRYDSRU
QDODQoD9 dir)
12 %RWmRGHYDSRUDXWRPiWLFR
$87267($0
13a %RWmR GH GLVWULEXLomR GD iJXD
quente (dose 1/STOP)
13b %RWmRVWRS±FRQWtQXRGDiJXDTXHQWH
13c %RWmR GH GLVWULEXLomR GD iTXD
quente (dose 2/STOP)
14 Mostrador alfanumérico
15 Mostrador publicitário
15Idp Interruptor do mostrador, publicitário
16 %RWmRGROHLWHYDSRU
17 $ODYDQFDGHGLVWULEXLomRGRYDSRU
ODQoD20 esq)
18 3UHSDUDGRUGHFDSSXFFLQR
19 Indicador de nível óptico da água
na caldeira
20 /DQoDHVTXHUGDGHGLVWULEXLomRGR
vapor
21 3RUWD¿OWURSDUDXQDFKiYHQD
22 Alavanca de enchimento manual
da água na caldeira
23 Janelinha para o controle da chama
24 0DQtSXORERWmRGDWRUQHLUDGRJiV
25 3RUWD¿OWURSDUDGXDVFKiYHQDV
26 %RWmRGHGLVWULEXLomRGHXPFDIpIRUWH
27 %RWmRGHGLVWULEXLomRGHGRLVFDIpV
fortes
28 %RWmRGHGLVWULEXLomRGHGRLVFDIpV
cimbalinos
29 %RWmRGHGLVWULEXLomRGHGRLVFDIpV
cimbalinos
30 %RWmRGHGLVWULEXLomRFRQWtQXD6723
31 %RWmRGHYLVXDOL]DomRGRVTXDGURV
GHSURJUDPDomR
32 %RWmR352*
33 %RWmRGDVVHWDV
34 %RWmRGHDXPHQWRGRVYDORUHV
35 %RWmRGHGLPLQXLomRGRVYDORUHV
36 %RWmRGHUHDUPH
37 7HFODGRGHSURJUDPDomR
91 Bacia para apoiar as chávenas
2VFRPSRQHQWHV³³±VmRDSOLFDGRVDSHQDV
VREUHDOJXPDVFRQ¿JXUDo}HVGHSURGXWRV
D E P

Index
Page
1. General Rules 44
2. Installation Rules 45
3. Electrical Installation Rules 45
4. Equipotential Connection 46
5. Water Installation Rules 46
6. Installation Check-up 47
USE
7. Switching on – electric 48
8. Cup-Warmer 48
9. Switching on – gas (only for G machines) 48
10. Switching-on – dual (gas and electric) 49
11. Forced switching-on 49
12. Drinks distribution - coffee 49
12.1 Drinks distribution - hot water 50
12.2 Drinks distribution - milk 50
12.3 Drinks distribution - cappuccino
(only if the cappuccino function is active) 51
12.4 Cappuccino maker instruction 51
12.5 Drinks distribution - steam 52
Autosteam 52
13. Water level control of boiler 53
14. Rinsing 53
15. Cleaning 53
16. Rules for the worker operating the machine 55
17. Caution 56
18. Maintenance and Repairs 56
19. Dismantling the machine 57
20. Defects - Malfunctions 57
PROGRAMMING - USER MODE
'DWDÀRZFKDUW&XVWRPHUSURJUDPPLQJ 58
22. Clock adjustment 59
23. How to access the programming mode 59
23.1 Programming the coffee distribution keys 60
23.2 Programming the cappuccino distribution keys 60
23.3 Programming the milk distribution key 62
23.4 Programming the hot water distribution keys 63
23.5 Programming the automatic steam key -
AUTOSTEAM (Turbosteam) 64
24. Service time menu 65
25. Counter display and zeroing 66
26. Language selection 66
PROGRAMMING - ENGINEER MODE
'DWDÀRZFKDUW7HFKQLFLDQSURJUDPPLQJ 67
28. Programming 69
29. Technician programming - Coffee selection 69
30. Technician programming -
Cappuccino - Milk selection 69
31. Technician programming - Hot water selection 70
32. Technician programming -
“SELF-LEARNING” function 70
7HFKQLFLDQSURJUDPPLQJ&RQ¿JXUDWLRQPHQX 70
7HFKQLFLDQSURJUDPPLQJ&RQ¿JXUDWLRQPHQX
Data menu 72
DATA menu: COUNTERS 72
DATA menu: MALFUNCTIONS ARCHIVE 72
DATA menu: INFO 72
Serial number 72
Version 73
Setup 73
Entering Standard Data 73
Dip settings 74
7HFKQLFLDQSURJUDPPLQJ&RQ¿JXUDWLRQPHQX
Components test 74
7HFKQLFLDQSURJUDPPLQJ&RQ¿JXUDWLRQPHQX
Autosteam (Turbosteam) 75
37. Check-control messages 76
ILLUSTRATIONS 213
Disassembly 214
Setting 217
Wiring diagram 223
Hydraulic circuit 230
Service Line 234
Page
Dear Madam, Dear Sir
Congratulations on your new Faema!
With this purchase, you have chosen an advanced espresso coffee machine built with the most modern technologies. This
PDFKLQHQRWRQO\RIIHUV\RXDSHUIHFWFRPELQDWLRQRIHI¿FLHQF\DQGIXQFWLRQDOLW\EXWDOVRSURYLGHV\RXZLWKDOOWKHWRROV\RX
need to do your job in the best possible way.
We recommend that you take some time to read this Use and Maintenance Booklet. It will help you become more familiar with
your new espresso machine, which we’re sure you are looking forward to using.
Wishing you all the best.
GRUPPO CIMBALI S.p.A.
7KHVHFKDSWHUVLQWKHPDQXDODUHWREHXVHGE\TXDOL¿HGDXWKRUL]HGWHFKQLFDOVWDII
43
English

1. General Rules
Please read the warnings and rules in this User’s Manual carefully before using or handling the machine
in any way because they provide important information regarding safety and hygiene when operating the
machine.
Keep this booklet handy for easy reference.
The machine was designed solely for preparing espresso coffee and hot beverages using hot water or steam, and for
warming cups.
The machine must only be used by suitably trained employees who are well aware of the possible risks that can occur when
operating the machine.
The machine is for professional use only.
The machine must not be used by children or by people with physical, sensorial, or mental impairments: if such people use
the machine, they must be supervised during operation.
The machine must not be left unattended.
The machine must not be used outdoors.
If the machine is stored in rooms where the temperature can drop below freezing, empty the boiler and water circuit tubes.
Do not expose the machine to atmospheric agents (rain, sun, and cold).
Noise: the equipment does not exceed 70dB.
If the machine is used improperly or for purposes other than those described above, it can be a source of danger. The
manufacturer will not be held responsible for damages caused by improper use of the machine.
44
English

2. Installation Rules
WARNING
,QVWDOODWLRQ GLVPDQWOLQJ DQG DGMXVWPHQWV PXVW RQO\ EH SHUIRUPHG E\ TXDOL¿HG DQG DXWKRUL]HG
technicians.
Carefully read the warnings and rules in this manual because they provide important information regarding
VDIHLQVWDOODWLRQXVHDQGPDLQWHQDQFHRIWKHPDFKLQH
Keep this booklet handy for easy reference.
After removing the machine from its packing materials, make sure that the machine and its safety devices are intact.
,IWKHSRZHUVXSSO\FRUGLVGDPDJHGLWFDQRQO\EHUHSODFHGE\TXDOL¿HGDQGDXWKRUL]HGWHFKQLFLDQV
Packing materials (plastic bags, polystyrene foam, staples, etc.) must be kept out of the reach of children because they are
potentially hazardous.
Before plugging in the machine, make sure that the information on the nameplate (voltage, etc.) matches that of the electrical
and water systems.
Completely unwind the power supply cable.
7KHFRIIHHPDFKLQHVKRXOGVLWRQDÀDWVWDEOHVXUIDFHDWOHDVWPPIURPZDOOVDQGIURPWKHFRXQWHU.HHSLQPLQGWKDWWKH
highest surface on the machine (the cup warmer tray) sits at a height of at least 1.2 meters. Make sure there is a shelf nearby
for accessories.
Room temperature must range between 10° and 32°C (50°F and 90°F).
An electrical outlet, water connections, and a drain with siphon must be in the immediate vicinity.
Do not install in rooms (kitchens) that are cleaned with jets of water.
Do not clean the machine with jets of water.
Do not obstruct openings or ventilation and heat vents.
Do not install the machine outdoors.
Prior to installation, make sure there is a circuit breaker installed with a distance between the contacts that allows for complete
disconnection when there is a category III overload and that provides protection against current leakage equal to 30 mA. The
circuit breaker must be installed on the power supply in compliance with installation rules.
7KHHOHFWULFDOVDIHW\RIWKLVPDFKLQHLVRQO\HQVXUHGZKHQLWLVFRUUHFWO\FRQQHFWHGWRDQHI¿FLHQWHDUWKLQJV\VWHPLQFRPSOLDQFH
ZLWKWKHHOHFWULFDOVDIHW\ODZVLQIRUFH7KLVIXQGDPHQWDOVDIHW\UHTXLUHPHQWPXVWEHYHUL¿HG,ILQGRXEWUHTXHVWWKDWDTXDOL¿HG
electrician inspect the system. The manufacturer cannot be held responsible for any damage caused by the lack of an earthing
system on the electrical supply.
It is unadvisable to use adaptors, multiple plugs, and/or extension cords. If their use is indispensible, only use simple or multiple
adaptor plugs and extension cords that are in compliance with safety laws. Make sure these devices do not exceed the voltage
capacity marked on the simple adaptor and on extension cords, and the maximum voltage marked on the multiple adaptor.
Check that the type of connection and voltage correspond with the information on the nameplate: see LOOXVWUDWLRQVFKDSWHU¿JXUH.
For machines with a Y connection: see LOOXVWUDWLRQVFKDSWHU¿JXUH.
For machines with a 'connection: see LOOXVWUDWLRQVFKDSWHU¿JXUH.
For machines with a single-phase connection: see LOOXVWUDWLRQVFKDSWHU¿JXUH.
3. Electrical Installation Rules
45
English

This type of connection, required by some laws, prevents differences in the electric potential level between the earthing connections
of equipment installed in the same room.
This machine is provided with a clamp underneath the base for connection to an external equipotential cable.
After installation, this type of connection MUST be made:
Use a cable with a nominal section in compliance with the laws in force.
Connect one end of the cable to the clamp (see LOOXVWUDWLRQVFKDSWHU¿JXUH) and the other end to the earthing of adjacent
equipment.
Failure to follow this safety norm releases the manufacturer from any responsibility for machine breakdowns or damage to people
or property.
NOTE: DO NOT CONNECT TO THE POWER SUPPLY EARTHING BECAUSE IT IS NOT CONSIDERED AN EQUIPOTENTIAL
CABLE CONNECTION.
4. Equipotential Connection
Bear in mind that Gruppo Cimbali S.p.A. is not responsible for damage caused by improper electrical connections,
and that the installer is responsible for any damage.
5. Water Installation Rules
WATER REQUIREMENTS
Water used in coffee machines must be potable and suitable for human consumption (see laws and regulations in force).
Check on the machine’s water inlet that:
the pH level complies with the laws in force
the chloride value is less than 100 mg/l
If the values do not fall within the limits, an appropriate water treatment device must be inserted (respecting the local laws and
compatible with the machine).
,IWKHPDFKLQHXVHVZDWHUZLWKDKDUGQHVVH[FHHGLQJ)'DVSHFL¿FPDLQWHQDQFHSODQPXVWEHLPSOHPHQWHGDFFRUGLQJ
to the hardness detected and machine usage.
WARNING
Only use the supplied parts for installation. If other parts are installed, they must be new (not used) and they must be able to come
in contact with potable water suitable for human consumption (according to local laws in force).
WATER CONNECTIONS
3ODFHWKHPDFKLQHRQDÀDWVXUIDFHDQGVWDELOL]HLWE\DGMXVWLQJDQGVHFXULQJWKHIHHW
Hook up the water connections as shown in the ,OOXVWUDWLRQVFKDSWHU )LJXUH, respecting the hygiene, water safety, and anti-
pollution laws in the country of installation.
Note: If the water pressure can rise above six bar, install a pressure reducer set at 2-3 bar. See ,OOXVWUDWLRQVFKDSWHU)LJXUH.
Water draining tube: place the end of the water draining tube in a drain with a siphon for inspection and cleaning.
IMPORTANT: The curves of the draining tube must NOT bend as shown in ,OOXVWUDWLRQVFKDSWHU)LJXUH.
46
English

WATER CONNECTIONS
No leaks from the connections or tubes
FUNCTIONING
Boiler and operating pressures are normal.
The pressure gauge is working properly.
The self-leveling device is working properly.
The expansion valves are working properly
6. Installation Check-up
WARNING$)7(5,167$//$7,21&+(&.726((,)7+(0$&+,1(,6 :25.,1*3523(5/<VHHWKH
Installation Module C)
GROUPS
+RRNXSWKH¿OWHUKROGHUVWRWKHJURXSVZLWKRXWFRIIHH
Let each group dispense water for about a minute.
HOT WATER
Continuously dispense hot water (pressing the appropriate button) until at least 6 liters of water have been used for a ma-
chine with 2 groups, 9 liters for a machine with 3 groups and 12 liters for a machine with 4 groups (see the “Cleaning and
Maintenance” Chapter in the User’s Manual).
STEAM (also with Autosteam)
Dispense steam from the nozzles for about a minute, using the appropriate buttons.
CAPPUCCINO MAKER (automatic cappuccino maker device)
After removing the intake tube from the milk container, carry out a few test cycles.
WARNING: ONCE THE MACHINE HAS BEEN INSTALLED AND IS READY FOR USE, BEFORE ALLOWING THE
:25.(57267$57 86,1*7+( 0$&+,1( :$6+7+( ,17(51$/&20321(176$&&25',1*727+(
INSTRUCTIONS BELOW:
47
English

USE
7. Switching on – electric
“Before switching on the machine, ensure the
following:
The mains switch is on.
The water mains tap is open”.
Press the master switch (1); the indicator light “machine on”
(2) switches on.
At the same time, the current working pressure “boiler pressure
0.00 bar” is displayed (14).
If the water level in the boiler is less than the minimum required,
the indicator light “boiler level” (4) lights up and the boiler is
¿OOHGXSWRWKHFRUUHFWOHYHOLQGLFDWRUOLJKW4switches off).
Press the master switch (1a) to position 2.
The heating element inserted indicator light (3) lights up.
The boiler is heating. Wait until the pressure reading on the
display corresponds to the required working pressure value,
i.e. the indicator light (3) switches off.
CHARACTERISTICS
- Roomy cup-heating shelf
- Choice of several heating temperatures
Arrange the cups on the shelf. Best results are obtained when
NOT MORE than three layers of cups are put on the shelf.
8. Cup-Warmer
CAUTION: do not put any cloth on the cup-warmer.
1241a 3 6
“Do notswitch on thegas when the boileris under
pressure”.
Before switching on the machine. check the following:
- The mains switch is on.
- The water mains tap is open.
- The gas cut-off cock is open
Press the mains switch (1) to position 1, the indicator light
“machine on” (2) lights up.
At the same time, the current working pressure “boiler pressure
0.00 bar” is displayed (14).
If the water level in the boiler is less than the minimum required,
the indicator light “boiler level” (4) lights up and the boiler is
¿OOHGXSWRWKHFRUUHFWOHYHOLQGLFDWRUOLJKW4switches off).
Press and rotate the knob of tap (24) towards the left to position
B, and keep pressed for about 30 seconds. Check that window
(23) is open and after a few seconds release knob (24).
The boiler is heating up. Wait until the indication on the display
(14) corresponds to the pressure value required.
9. Switching on – gas (only for G machines)
To change the cup-warmer power, press the key (6) a number
of times.
- All LEDS on = full power
- All LEDS off = OFF
When the machine is turned off after the day’s operations, the
selections will remain in the machine’s memory.
24 421
B
48
English

10. Switching-on – dual (gas and electric)
The boiler may be heated by both gas and electricity simul-
taneously.
In this way the working pressure is reached more rapidly since
the water in the boiler is heated simultaneously by the electrical
KHDWLQJHOHPHQWVLQVLGHWKHERLOHUDQGE\WKHÀDPHIURPWKH
burner under the boiler.
To switch on, follow the procedures in Paragraph 1. SWITCHING
ON – ELECTRIC and 3. SWITCHING ON – GAS.
11. Forced switching-on
At the end of the programmed switch-on time the following
message will be displayed:
When the machine needs to be used, keep a STOP (30) key
pressed down for 10 seconds.
The machine will again be activated for use.
To return to programmed switch-off, check the position of the
mains switch (1), disable it, and then return to the previous
position.
machine OFF
12. Drinks distribution - coffee
5HPRYHWKH ¿OWHU FDUULHU 21 or 25), clean it of the used
FRIIHHJURXQGVDQGUH¿OOLWZLWKRUGRVHVRIJURXQGFRIIHH
DFFRUGLQJWRWKH¿OWHUFDUULHUXVHG
3UHVVWKHFRIIHH HYHQO\ LQ WKH ¿OWHU XVLQJ WKH GRVHJULQGHU
press.
5HPRYHDQ\FRIIHHJURXQGVIURPWKHHGJHVRIWKH¿OWHU
,QVHUWWKH¿OWHUFDUULHU21 or 25WRWKHJURXSORFNLQJLW¿UPO\LQ
place. Position the cup (or cups) under the spout (or spouts)
RIWKH¿OWHUFDUULHU21 or 25).
Press the coffee distribution key ( or 29) corresponding
to the desired dose. The corresponding led lights up, the coffee
will be issued and will stop automatically upon completion.
Press the continuous/STOP distribution button (30) for a
continuous distribution.
The distribution, both dosed and continuous, may be interrupted
at any time by pressing the continuous/STOP key (30).
This function allows to visualize on the display the duration of
the coffee base drinks of each group of the machine.
For example, if a delivery is made from group 1, the following
message will appear on the display:
where "xxx" indicates the time of the delivery in seconds.
Time control (only if the function is active)
If deliveries are made at the same time (for example, from
group 1 and from group 3), the display shows the time of every
single delivery:
2QFH WKH GHOLYHULQJ SKDVH LV ¿QLVKHG WKH GDWD UHPDLQV
visualized for about 10''; after that the display will return to
show the date and the pressure of the boiler.
Note: the "time control" function is active only in normal
conditions of work of the machine and without any other
message on the display.
GR1
xxx
GR1 GR3
xxx xxx
26 29
28
25
30
27
49
English

12.1 Drinks distribution - hot water
After having positioned the appropriate container under the hot
water nozzle (32), distribution is made in two ways.
DOSED FUNCTION
Press one of the hot water distribution keys (13a or 13c). The
corresponding led will light up, hot water will be issued and
will stop automatically upon completion.
The distribution may be interrupted at any time by pressing
the previously active key again (shown by the lighted led), or
the Stop button, continuous hot water (13b).
CONTINUOUS FUNCTION
Press the hot water distribution key (13b).
Hot water will be issued continuously until the hot water key
(13b) is pressed again to stop this function.
In continuous function the progrmmed dosed in the key is
not changed.
12.2 Drinks distribution - milk
GENERAL INDICATIONS
Milk is a delicate biological product and can easily deteriorate.
+HDWPRGL¿HV LWV VWUXFWXUH 0LONPXVWEH NHSW DW DVWRUDJH
temperature no higher than 5°C (41°F) from the moment the
container is opened and throughout its entire period of use.
Our storage appliances are suitable for this purpose.
NOTE: at the end of the work day (or not more than 24 hours
from the time the container is opened), any remaining milk
must be discarded.
MILK DISTRIBUTION
Insert the tube (18d) into the milk.
After having positioned the appropriate container under the
cappuccino maker (18), press the milk distribution key (16).
The led above the selected key lights up.
The quantity of milk memorized during the programming phase
ZLOOÀRZLQWRWKHFXSDQGZLOOVWRSDXWRPDWLFDOO\7KHÀRZFDQ
be stopped at any time by pressing the milk distribution key
(16) again.
3DUDJUDSK³8VHU,QVWUXFWLRQVIRUWKH&DSSXFFLQR0DNHU´
describes how to adjust the temperature of the milk and
the density of the milk froth.
“When the machine is not used for a long period of
time, comply with the hygiene procedures regarding
preservation of milk”.
16
18
18d
10
13c
13b
13a
50
English

12.3 Drinks distribution - cappuccino (only if the cappuccino function is active)
8VHRQO\WKH¿OWHUFDUULHUZLWKDRQHZD\VSRXWDQG
the distribution group to the left.
$IWHUKDYLQJ UHPRYHG WKH ¿OWHU FDUULHU 21) from the group
DQGHPSWLHGLWRIWKHSUHYLRXVJURXQGV¿OOZLWKDQHZGRVHRI
ground coffee and press.
,QVHUWWKH¿OWHUFDUULHULQWRWKHJURXSORFNLQJLWZHOOLQSODFH
Place the cappuccino maker (18 FORVH WR WKH ¿OWHU FDUULHU
spout (21).
Position the cappuccino cup, or a suitable container in such a
ZD\VRWKDWWKHFRIIHHDQGPLONFDQÀRZLQWRWKHFXSZLWKRXW
KDYLQJWRPRYHLWEHWZHHQWKHWZRÀRZV
Press one of the cappuccino distribution keys ( or
29). The led above the selected key lights up, distribution
commences and then stops automatically.
It is possible to stop the distribution at any time by pressing
the continuous/STOP key (30).
As described in Chapter “Programming the cappuccino
distribution keys”, it is possible to select whether to distribute
¿UVWWKHPLONDQGWKHQWKHFRIIHHRUYLFHYHUVD
Paragraph, “User Instructions for the Cappuccino Maker”
describes how to adjust the temperature of the milk and the
density of the milk froth.
“When the machine is not used for a long period of
time, comply with the hygiene procedures regarding
preservation of milk”.
21
2928
3027
26
18
12.4 Cappuccino maker instruction
18
18d
18c
18b
18a
Insert the tube (18d) into the milk.
Place a container under the cappuccino maker (18).
Remove the knob (18b) to facilitate the circulation of air.
Completely rotate the air adjustment screw (18a) clockwise,
then turn it back by half a turn.
Completely rotate the temperature adjustment screw (18c)
clockwise, then turn it back by half a turn.
At this point, press the required key to obtain milk or
cappuccino.
Adjustment of the cappuccino froth
Too much froth:
Finely rotate the air adjustment screw (18a) clockwise.
Too little froth:
Finely rotate the air adjustment screw (18a) anticlockwise.
Cappuccino temperature
If the cappuccino is too hot:
Finely rotate the temperature adjustment screw (18c)
anticlockwise.
If the cappuccino is not hot enough:
Finely rotate the temperature adjustment screw (18c
clockwise.
Distribution of hot unwhipped milk
Press and completely push in the knob (18b), then press the
desired milk or cappuccino distribution key.
51
English

12.5 Drinks distribution - steam
Completely immerse the right (9) or left (20) steam nozzle into
the container with the liquid to be heated and push the steam
control lever (11 or 17) upwards.
Wait until the liquid has reached the desired temperature, then
lower the steam command lever to stop the issue of steam.
1RWH$WWKHFRQFOXVLRQRIHDFKVWHDPGLVSHQVLQJSKDVH
clean the inside of the steam nozzle as follows:
Turn the nozzle towards the cup tray and carefully
activate steam dispensing at least once.
Dispensing with the Autosteam (Turbosteam) selector
(12) (when provided)
Machines equipped with the AUTOSTEAM (STOP STEAM)
dispensing system have the "VWRS VWHDP GLVSHQVLQJ ZKHQ
set temperature is reached" function, and can rapidly heat
and froth milk.
Steam is dispensed when the key (12) is pressed, and the
lever (11) is pressed for the type of milk.
In particular:
- lever down: foamed milk
- lever up: heated milk.
After selecting the type of milk you desire (heated or frothed),
insert the steam nozzle (9) into a suitable container, making
sure the bulb is completely immersed in the milk.
After pressing the key (12), the temperature detected by the
probe appears on the display.
When the temperature is reached, steam dispensing can be
stopped either automatically or manually, as described in
paragraph "2.5 User dosage - automatic steam dispensing
key programming"
9
11
9
12
11
9
12
11
Frothed milk Hot milk
52
English

7KHPDFKLQHLV¿WWHGZLWKDVHULHVRIDXWRPDWLFOHYHOFRQWURO
devices to keep the water in the boiler at a pre-set level.
The indicator light (4) comes on when water enters the
boiler.
Filling the boiler with water using the manual service tap
This function should be used only if the electronic level control
devices are not working correctly.
3XVKWKHPDQXDOERLOHUZDWHU¿OOOHYHU22), taking care not to
exceed the MAX level on the optic indicator (19).
13. Water level control of boiler
15. Cleaning
Cleaning the cappuccino maker
This operation must be made at the end of each working
day.
1. Fill a container with 0,5 litre of cold water and one dose of
liquid detergent (see product instructions).
2. Remove the suction (18d) tube from the milk container and
immerse it in the solution.
3. Press button (16) and repeat the operation until all the
detergent has been used up.
4. Disassemble the cappuccino maker (18):
Unscrew the knob (18b) and remove the cappuccino
maker (18).
Remove the cover.
Unscrew the ring nut of the knob (18b) and remove it.
Unscrew and remove the adjustment screw (18a).
Prepare another dose of detergent and clean each
piece.
Remove any residue with a sponge.
Reassemble the cappuccino maker.
5. Rinse, pumping out at least one litre of cold water.
!
Before operating the machine, perform a rinse of
the internal circuits and change the water in the
boiler.”
8.1 Changing the water in the internal groups circuits
5HPRYHWKH¿OWHUFDUULHUV of the distributor groups.
Via the continuous distribution key (30), empty the water
from each group for approximately one minute. Repeat this
operation twice.
8.2 Changing the water in the boiler
Ensure that the indication on the display corresponds to the
working pressure value.
.HHSWKHKRWZDWHUGLVWULEXWRUNH\13a - 13c) pressed down
for approximately 5 seconds.
The following message will be displayed: “WATER CHANGE”,
followed by an audio signal. The water from the boiler will
drain from the hot water nozzle (10) (60 - 70% ca. of the total
capacity).
The boiler resistance and all dispensing keys will be
disabled.
14. Rinsing
10
13c
13b
13a
30
21/25
Dispensing will stop automatically (Note. The delivery can be
interrupted in whichever moment by means of the push button
STOP 13b).
After the procedure, the machine will return to its normal fun-
FWLRQVDQGWKHERLOHUZLOOEHUH¿OOHGZLWKIUHVFKZDWHU
18
18d
18b
18a
16
53
English

15. Cleaning and maintenance
Cleaning dispensing unit
This operation must be made on all the groups at the end
of each working day
1) Using a brush, clean the cover gasket.
,QVHUWWKHUXEEHUGLVNLQWRWKH¿OWHUKROGHUZLWKLWV¿OWHU
3) Pour in a packet or dosing cupful of detergent powder
,QVHUWWKH¿OWHUFDUULHULQWRWKHJURXSDQGSUHVVWKHVHOHFWLRQ
button. After a few seconds, press the STOP button. Repeat
this operation a few times.
5HPRYHWKH ¿OWHUKROGHU DQG FOHDQ WKH VKRZHU ZLWK D
sponge.
6) Flush each dispenser unit with water for about 30
seconds.
First left-hand dispenser unit with cappuccino-selection
panel:
1) Remove the milk-aspiration tube from the milk container
and rest it against the grille of the cup-shelf basin.
2) Press one of the selection buttons. Wait a few seconds and
press the STOP button. Repeat this operation a few times.
Be careful, steam will come out of the cappuccino-maker’s
dispensing spout.
Filter-holders
1) Put a liter of cold water in a suitable container and add
detergent.
6RDNWKH¿OWHUKROGHUVLQWKLVVROXWLRQIRUDERXWKRXUV
5HPRYHWKH¿OWHUVIURPWKH¿OWHUKROGHUVDQGZDVKWKHSDUWV
in the same detergent solution, using a small sponge.
4) Flush thoroughly with cold water.
5HLQVWDOOWKH¿OWHUVLQWKH¿OWHUKROGHUVPDNLQJVXUHWKDW
¿OWHUUHWDLQHUVSULQJVHDWVSURSHUO\
Steam and hot water dispensing pipes
Using a clean sponge, wash with hot water removing any
organic residue present. Rinse carefully.
To clean the inside of the steam nozzle, follow these steps:
Turn the nozzle towards the cup tray and carefully activate
steam dispensing at least once.
)RUFRUUHFWDSSOLFDWLRQRI WKH +$&&3V\VWHP
please follow the instructions in this paragraph.
ATTENTION
When the machine has not been used for more
than 8 hours, and in any case once a day, the
internal components must be washed before
use, in accordance to the following instructions:
Supply Groups
,QVHUWWKH¿OWHUFDUULHUVLQWRWKHJURXSVZLWKRXWFRIIHHDQG
dispense from each group for one minute.
Hot water
Dispense hot water repeatedly (using the relative
command) until at least 6 liters of water have been
dispensed from the 2-group machine, 9 liters of water
from the 3-group machine and 12 liters from the 4-group
machine.
Steam
$OORZWKHVWHDP WRÀRZ IRUDSSUR[LPDWHO\ RQHPLQXWH
using the appropriate commands.
Grille and Drip Basin
Remove the grille from the basin, extract the grille sections and
complete the cleaning operation under running water.
Discharge Basin
At the end of the working day, pour about a liter of hot water
into it to remove any discharge residues.
Bodywork
Use a soft cloth and cleaning products WITHOUT ammonia
or abrasives, removing any organic residue present in the
work area.
N.B. Do not spray liquids into the panel slots.
1
2
3
54
English

BEFORE YOU START
Groups
+RRNXSWKH¿OWHUKROGHUVWRWKHJURXSVZLWKRXWFRIIHH
Let each group dispense water for about a minute.
Hot Water
Continuously dispense hot water (pressing the appropriate button) until at least 6 liters of water have been used for a ma-
chine with 2 groups, 9 liters for a machine with 3 groups and 12 liters for a machine with 4 groups (see the “Cleaning and
Maintenance” Chapter in the User’s Manual).
Steam (also with Autosteam)
Dispense steam from the nozzles for about a minute, using the appropriate buttons.
Cappuccino Maker (automatic cappuccino maker device)
After removing the intake tube from the milk container, carry out a few test cycles.
ON THE JOB
Steam dispensing (also with Autosteam)
Before heating the beverage (water, milk, etc.), open the steam nozzle for at least 3 seconds and let the steam escape so
that the condensation is eliminated.
Coffee dispensing
If the machine has not been used for more than an hour, before making coffee, dispense about 100 cc and discard the
liquid.
Hot water dispensing
If the machine has not been used for more than an hour, before using the hot water, dispense about 200 cc and discard the
liquid.
Cappuccino dispensing (with the automatic cappuccino maker)
If the machine has not been used for more than an hour, before using the cappuccino maker, removed the milk intake tube
and do a test cycle.
Cleaning the coffee circuits
3OHDVHUHDGWKHVSHFL¿FVHFWLRQLQWKHXVHU¶VPDQXDOWROHDUQKRZWRFOHDQWKHVHFLUFXLWV
16. Rules for the worker operating the machine
WARNING: BEFORE YOU START OPERATING THE MACHINE, WASH THE INTERNAL COMPONENTS
FOLLOWING THE INSTRUCTIONS INDICATED BELOW.
THESE STEPS MUST BE REPEATED AT LEAST ONCE A DAY AND WHEN THE MACHINE HAS NOT BEEN
OPERATED FOR MORE THAN 8 HOURS.
55
English

Danger of burns
The areas marked with this sign become hot. Great
care should be taken when in the vicinity of these
areas.
WARNING: Hot surface
ACHTUNG:+HLVVH2EHUÀlFKH
ATTENTION: Surface chaude
ATTENZIONE:6XSHU¿FLHFDOGD
18. Maintenance and Repairs
GENERAL
Use of gas operated appliances in premises smaller than
12 m2is not permitted.
,IDJDVKHDWHGLQVWDOODWLRQLVXVHGFKDQJHWKHÀH[LEOH
tube at the due expiry date.
The manufacturer disclaims all liability for damages to
items or persons due to improper use or due to the coffee
machine being used for reasons other than its intended
use.
Never work the coffee machine with wet hands or naked
feet.
Danger of Burns
Do not place the hands or other parts of the body close to the
coffee distribution points, or near to the steam and hot water
nozzles.
Ensure that the machine is not handled by children or persons
who have not been instructed in its correct use.
Cup-warming plate
Place only coffee cups, cups and glasses to be used in
conjunction with the coffee machine on the cup-warming
plate.
Ensure that the coffee cups are completely drained before
placing them on the cup-warming plate.
No other objects shall be placed on the cup-warming plate.
MACHINE CLOSE-DOWN
When the machine remains unattended for
DORQJSHULRGRI WLPH DW QLJKW GXULQJ WKH
weekly closing day or during holidays) the
following operations shall be performed:
- Remove the plug or switch off the main
switch.
- Close the water tap.
- Close the gas tap.
Non-compliance with these safety measures
exonerates the manufacturer from all liability
for malfunctions or damage to persons or
items.
17. Caution
If the machine is not working properly, turn off the machine, turn
off the main off-on switch, and call the service center.
7R HQVXUH VDIHW\ GXULQJ RSHUDWLRQ LW LV
absolutely necessary to:
- follow all the manufacturer’s
instructions
;
KDYHTXDOL¿HGDQGDXWKRUL]HGWHFKQLFLDQV
periodically check that all safety devices
are intact and functioning properly (the
first inspection within three years of
purchase and every year after that).
WARNING 0DLQWHQDQFH E\ XQTXDOL¿HG SHRSOH
can jeopardize the safety and conformity of the
machine.
2QO\XVHTXDOL¿HGDXWKRUL]HGWHFKQLFLDQVIRU
repairs.
WARNING
After maintenance, perform the installation
&+(&.83DV LQGLFDWHG LQ WKH VSHFL¿F VHFWLRQ
of the user’s manual.
If the power supply cord is damaged, switch off the machine
and request a replacement from the service center.
WARNING
Only use original spare parts guaranteed by the
manufacturer.
If original spare parts are not used, the manufac-
turer warranty will no longer be valid.
56
English

DISMANTLING THE MACHINE
7R SURWHFW WKH HQYLURQPHQW SOHDVH
proceed in compliance with the local laws
in force.
19. Dismantling the machine
Electrical equipment cannot be disposed of as ordinary
urban waste: it must be disposed of according to the special
EU directive for the recycling of electric and electronic
equipment.
GRUPPO CIMBALI electrical equipment is marked with a
pictogram of a garbage can inside a barred circle. This symbol
means that the equipment was sold on the market after August
13, 2005, and must be disposed of accordingly.
Due to the substances and materials it contains, inappropriate
or illegal disposal of this equipment, or improper use of the
same, can be harmful to humans and the environment.
Improper disposal of electric equipment that fails to respect
WKHODZVLQIRUFHZLOOEHVXEMHFWWRDGPLQLVWUDWLYH¿QHV DQG
penal sanctions.
20. Defects - Malfunctions
Direct action by the customer
Before calling service personnel, to avoid useless expense, check whether the machine problem corresponds to one of the cases
listed below.
DEFECT
The coffee machine does not function
and the indicator light (2) is off.
The coffee machine does not work but
the indicator light (2) is on.
The coffee machine does not heat up.
/HDNIURPHGJHRI¿OWHUKROGHU
25).
&RIIHHÀRZWLPHWRRVKRUW
Water leaks from under the machine.
The coffee is warm and weak (after
QRUPDOWLPHRIEUHZDQGÀRZ
The reading on the pressure gauge
(8) of the pump pressure is greater
than 9 bars.
REMEDY
Check that the electricity is on.
Check the position of the main switch
(12).
Press the STOP (30) key for a few
seconds to force switch-on.
Reprogram the clock
Press the switch knob (1a).
Clean with the supplied brush.
*ULQGWKHFRIIHHPRUH¿QHO\
Change the coffee
Clean the tank.
Press the coffee distribution button
2/3 times to try and eliminate the air
bubble.
Call the authorized servicing
department.
CAUSE
No electricity.
Wrong programming of the switch-on
times.
Wrong position of the switch (1a).
The undercup gasket is dirty with coffee
residue.
Coffee grinds too coarse.
Coffee too old.
Drainage tank clogged.
Air bubble in thermosyphonic circulation
system.
The pump’s by-pass valve is blocked.
57
English
Other manuals for E92
1
Table of contents
Other Faema Coffee Maker manuals

Faema
Faema PRESTIGE + Technical manual

Faema
Faema Enova User manual

Faema
Faema SMART / S Technical manual

Faema
Faema E71 E Quick start guide

Faema
Faema BARCODE Technical manual

Faema
Faema Enova A Technical manual

Faema
Faema E71 E Technical manual

Faema
Faema Teorema User manual

Faema
Faema E71 Technical manual

Faema
Faema E98/A-2 Compact User manual

Faema
Faema E61 3 GR User manual

Faema
Faema E98/S-1 User manual

Faema
Faema X20 User manual

Faema
Faema E61 Legend Technical manual

Faema
Faema SMART/A R User manual

Faema
Faema Family User manual

Faema
Faema X2 GRANDITALIA User manual

Faema
Faema CARISMA S-1 Technical manual

Faema
Faema E61 3 GR User manual

Faema
Faema E61 Jubile Technical manual