FLOS ARCHIMOON SOFT User manual
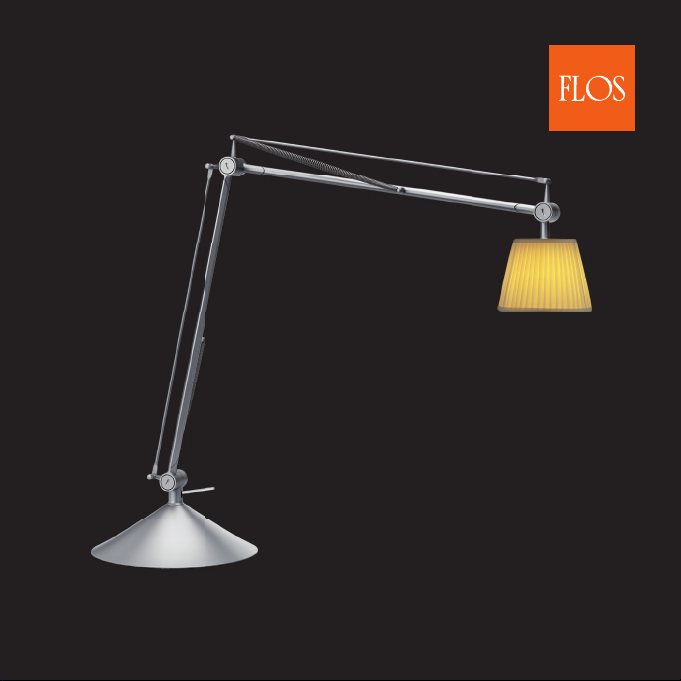
ARCHIMOON
INSTRUCTION FOR INSTALLATION AND USE
<IT> ISTRUZIONIDIINSTALLAZIONEEDIMPIEGO
ATTENZIONE!
La sicurezza dell’apparecchio é garantita solo rispettando
queste istruzioni sia in fase di installazione che di impiego;
é pertanto necessario conservarle.
AVVERTENZE:
- All’atto dell’installazione ed ogni volta che si interviene
sull’apparecchio, assicurarsi che sia stata tolta la tensione
di alimentazione.
- L’apparecchio non può essere in alcun modo modicato
o manomesso, ogni modica ne può compromettere la
sicurezza rendendo lo stesso pericoloso. FLOS declina
ogni responsabilità per i prodotti modicati.
- Se il cavo essibile si danneggia, deve essere sostituito da
FLOS o da personale qualicato al ne di evitare pericoli.
- Il simbolo riportato sull’apparecchio indica la
necessità di utilizzare lampade di tipo autoprotetto.
- Il simbolo riportato sull’apparecchio indica
la distanza minima alla quale va posto il soggetto da
illuminare.
- Il simbolo riportato sull’apparecchio indica che il
prodotto deve essere smaltito in modo differenziato dai
riuti urbani.
ISTRUZIONIPERLAPULIZIADELL’APPARECCHIO
- Per la pulizia dell’apparecchio utilizzare esclusivamente
un panno morbido eventualmente inumidito con acqua e
sapone.
- Attenzione: non utilizzare alcool o solventi.
<GB> INSTRUCTIONFORCORRECTINSTALLATIONANDUSE
WARNING!
The safety of this tting can only be guaranteed if these
instructions are observed, during both installation and
use. Please retain these instructions safety.
REMARKS:
- When installing and whenever acting on the appliance,
ensure that the power supply has been switched off.
- The appliance may in no way be modied or tampered
with, any modication may compromise safety causing
the appliance to become dangerous. FLOS declines all
responsibility for products that are modied.
- Should the external trailing cable get damaged,it must
be replaced by FLOS or by qualied personnel in order to
avoid any danger.
- The symbol marked on the appliance indicates the
need to use self-protected bulbs.
- The symbol marked on the appliance
indicates the minimum distance at which the subject to
be illuminated should be placed.
- The symbol shown on the device indicates that the
product must be thrown out in a different manner than
with the urban trashes.
CLEANINGINSTRUCTIONS
- Use only a soft cloth to clean the appliance, dampened
with water and soap or mild cleanser if needed for
resistant dirt.
- Warning: do not use alcohol or other solvents.
IMPORTANTSAFETYINSTRUCTIONS
Lighted lamp is HOT!
WARNING - To reduce the risk of FIRE, ELECTRIC SHOCK,
EXPOSURE TO EXCESSIVE UV RADIATION, OR INJURY TO
PERSONS:
- Bulb (lamp) gets HOT quickly! Only contact switch/plug
when turning on.
- Do not touch hot lens, guard, or enclosure.
- Do not remain in light if skin feels warm.
- Do not look directly at lighted lamp.
- Keep lamp away from materials that may burn.
- Use only with a 40 watt or smaller bulb (lamp).
- Do not touch the bulb (lamp) at any time. Use a soft
cloth. Oil from skin may damage bulb (lamp).
Keep away from combustibles. Unplug to change lamp.
Do not touch bulb. Do not operate without complete lamp
enclosure in place or if lens is damaged.
<DE> INSTALLATION-UNDGEBRAUCHSANWEISUNGEN
ACHTUNG!
Wir garantieren nur dann für die Sicherheit der Leuchte,
wenn diese Anweisungen sowohl bei der Installation als
auch beim Gebrauch genau beachtet werden. Es ist daher
ratsam, sie aufzubewahren.
BEMERKUNGEN:
- Bei der Installation und bei Eingriffen an der Leuchte ist
sicherzustellen, daß die Anlage vom Netz abgeschaltet ist.
- Der Apparat darf auf keinen Fall veraendert oder unerlaubt
geoeffnet werden, jede Veraenderung desselben kann die
Sicherheit in Frage stellen und somit gefaehrlich werden.
FLOS lehnt jede Verantwortung fuer unsachgemaess
behandelte Produkte ab.
- Falls das exible äußere Kabel beschädigt wird, muß es
von FLOS oder von qualiziertem Personal ersetzt werden,
um Gefahren zu vermeiden.
- Das auf der Leuchte wiedergegebene Symbol zeigt
an, dass Glühbirnen des selbstschützenden Typs zu
benutzen sind.
- Das Symbol auf der Leuchte gibt den
erforderlichen Mindestabstand zum beleuchteten
Gegenstand an.
- Das auf dem Gerät wiedergegebene Symbol zeigt an, dass
das Produkt getrennt vom Stadtmüll entsorgt werden muss.
REINIGUNGSVORSCHRIFTEN
- Bei der Reinigung der Leuchte darf man ausschließlich weiche
Tücher verwenden. Eventuell kann man diese mit Wasser und
Seife oder mit einem neutralen Reinigungsmittel anfeuchten.
- Achtung: Weder Alkohol noch Lösungsmittel verwenden.
<FR> INSTRUCTIONSD’INSTALLATIONETD’EMPLOI
ATTENTION!
La sûreté de cet appareil est garantie uniquement si l’on
respecte ces instructions soit en phase d’installation soit
pendant l’utilisation; il faut donc les conserver.
NOTICES:
- Au moment de l’installation et chaque fois que l’on intervient
sur l’appareil, s’assurer que la tension d’alimentation ait été
coupée.
- L’appareil ne peut être modié ou altéré de quelque manière
que ce soit, toute modication peut compromettre la sécurité
de celui-ci en le rendant dangereux. FLOS décline toute
responsabilité pour les produits modiés.
- Si le cordon exible externe est endommagé, il doit être
remplacé par FLOS ou par le personnel qualié an d’éviter
des dangers.
- Le symbole reporté sur l’appareil indique la nécessité
d’utiliser des ampoules de type “auto-protégé”.
- Le symbole présent sur l’appareil indique
la distance minimale à lequelle doit être placé le sujet
à éclairer.
- Le symbole reporté sur l’appareil indique que le produit
doit être éliminé d’une autre façon que celle avec les déchets
urbains.
INSTRUCTIONSPOURLENETTOYAGE
- Pour le nettoyage de l’appareil utiliser exclusivement un chiffon
doux, humecté si nécessaire, avec de l’eau et du savon ou avec
un détergent neutre pour les salissures les plus tenaces.
-Attention: ne pas utiliser d’alcool ou solvents.
INSTRUCTIONSIMPORTANTEPOURLASECURITE
Une lampe allumée est très CHAUDE!
AVERTISSEMENT - pour réduire le risque d’INCENDIE,
DE CHOCS ELECTRIQUES, D’EXPOSITION EXCESSIVE AUX
RADIATIONS U.V., OU DE LESIONS AUX PERSONNES:
- L’ampoule devient CHAUDE très rapidement! Touchez
uniquement l’interrupteur / che pour allumer la
lampe.
- Ne touchez pas les lentilles chaudes, les dispositifs
et les enceintes de protection.
- Ne restez pas sous la lampe si votre peau est chaude.
- Ne regardez pas directement la lampe si elle est
allumée.
- Ne mettez jamais la lampe près de matériel qui puisse
s’incendier.
- Employez la lampe uniquement avec une ampoule de
40 watt ou moins.
- Ne touchez jamais l’ampoule! Utilisez un torchon
moelleux. L’huile de la peau pourrait endommager
l’ampoule.
Tenez la lampe loin de matières combustibles. Ne
touchez jamais l’ampoule. N’utilisez jamais la lampe
sans l’enceinte de protection en place ou si la lentille est
avariée.
<ES> INSTRUCCIONESDEINSTALACIÓNYDEUSO
¡ATENCIÓN!
La seguridad del aparato sólo puede garantizarse con la
condición de que se respeten las siguientes instrucciones,
tanto en la fase de instalación como de uso, por lo cual se
recomienda conservarlas.
ADVERTENCIA:
- Para efectuar la instalación, y toda vez que se efectúe
alguna operación en el aparato, asegurarse de haber
cortado la corriente eléctrica.
- El aparato no puede ser en ningùn caso modicado o
forzado, cualquier modicaciòn puede comprometer la
seguridad haciéndolo peligroso. FLOS declina cualquier
responsabilidad por los productos modicados.
- Si el cable externo se estropea, debe ser sustituido
por FLOS o por personal cualicado con el n de evitar
situaciones peligrosas.
- El símbolo marcado en el aparato indica la necesidad
de utilizar bombillas de tipo autoprotegido.
- El símbolo marcado en el aparato indica la
distancia mínima a la que se debe colocar el objeto que
se tiene que iluminar.
- El símbolo marcado en el aparato indica que el
producto debe ser eliminado en modo diferenciado del
resto de los desechos urbanos.
INSTRUCCIONESPARALIMPIARELAPARATO
- Para la limpieza del aparato, utilizar exclusivamente un
paño suave. En caso de suciedad más resistente, humedecer
el paño con agua y jabón o un detergente neutro.
- Advertencia: no emplear alcohol ni disolventes.
IMPORTANTESINSTRUCCIONESDESEGURIDAD
La lámpara iluminada está CALIENTE!
ADVERTENCIA – Con el n de reducir el riesgo de INCENDIO,
DESCARGA ELÉCTRICA, EXPOSICIÓN A EXCESIVA RADIACIÓN
UV O DAÑOS A PERSONAS:
- La bombilla (lámpara) se CALIENTA rápidamente!
Apriete el interruptor de encendido/conecte la clavija
únicamente cuando el aparato esté conectado a la
alimentación eléctrica.
- No toque la lente caliente, el dispositivo de seguridad o
la carcasa.
- No permanezca bajo la luz, en caso de sentir calor
sobre la piel.
- No mire directamente la luz de la lámpara iluminada.
- Mantenga la lámpara alejada de materiales inamables.
- Use sólo con una bombilla (lámpara) de 40 watt o
menor.
- No toque la bombilla (lámpara) en ningún momento.
Use un paño suave. Aceite proveniente de la piel podría
dañar la bombilla (lámpara).
:
Mantenga alejada de combustibles. Desenchufe para
cambiar la bombilla.
No toque la bombilla. No opere sin la carcasa completa de
la lámpara en el lugar o si la lente está dañada.

<PT> ISTRUÇÕESINSTALAÇÃOEUSO
ATENÇÃO!
A segurança do aparelho é garantida somente se
respeitarmos as instruções tanto na fase de instalação
como na de uso; portanto é necessário conservar tais
instruções.
ADVERTÊNCIA:
- Para efectuar la instalación, y toda vez que se efectúe
alguna operación en el aparato, asegurarse de haber
cortado la corriente eléctrica.
- De forma alguma o aparelho deve ser modicado ou
alterado, toda e qualquer modicação pode comprometer a
segurança tornando o aparelho perigoso. FLOS declina toda
e qualquer responsabilidade pelos produtos modicados.
- Se o cabo exível está danicado, deve ser substituído
pela FLOS ou por pessoal qualicado para evitar qualquer
perigo.
- O símbolo indicado no aparelho indica a necessidade
de utilizar lâmpadas com blindagem externa.
- O símbolo colocado no aparelho indica a
distância mínima onde se colocar o objeto a ser iluminado.
- O símbolo indicado no aparelho indica que o produto
deve ser eliminado de forma diferenciada em relação ao
lixo urbano.
INSTRUÇÕESPARAALIMPEZADOAPARELHO
- Para limpeza do aparelho utilizar exclusivamente um
tecido macio eventualmente úmido com água e sabão ou
detergente neutro para a sujeira mais difícil.
- Atenção: não utilizar álcool ou solventes.
<RUS>
Надёжность устройства гарантируется только
при соблюдении данных инструкций, как в
фазе монтажа, так и при применении, поэтому
необходимо обеспечить их сохранность.
- В момент установки и каждый раз при проведении
работ с устройством, убедиться в снятии
напряжения питания.
- Устройство не может изменяться или разбираться,
любые изменения могут нарушить надёжность,
делая его опасным. FLOS не несёт ответственность
за измененную продукцию.
- При повреждении гибкого кабеля он должен
заменяться FLOS или квалифицированным
персоналом в целях
предотвращения опасности.
- Обозначение приведённое на устройстве,
указывает на необходимость использования
самозащищаемых лампочек.
- Обозначение приведенное
на устройстве, указывает минимальное
расстояние, на котором должен располагаться
освещаемый объект.
- Символ приведённый на устройстве, указывает
на то, что данная продукция должна быть
переработана отдельно от городских отходов.
Для очистки устройства использовать только
мягкую тряпку, смоченную водой с мылом или
нейтральным моющим средством для наиболее
стойких загрязнений.
- : Не использовать спирт или другие
растворители.
<J> 取り付けおよびご使用方法
警告
安全な器具の取り付けおよびご使用のために、取
扱説明書に従って作業を行ってください。また、取
扱説 明書は必ず保管してください。
注意
‐取り付け作業および取り外しや再取り付け時
には、必ず電源を切ってください。
‐危険ですので、器具を改造したり、部品を追加・
変更して使用しないでください。改造した製品に
対して は、FLOSは一切責任を負いません。
‐可とうケーブルが損傷した場合、危険防止の
ため、必ずFLOS社または有資格者にケーブル
の交換を依
頼 してくだ さ い 。
‐器具上の表示 は、破損防止形または飛散
防止形の電球の使用を表します。
‐器具上の表示 は、器具と被照射面と
の最小距離を表します。
‐器具上の表示 は、一般ごみと区別して本製
品を廃棄しなければならないことを表します。
器具の清掃について
器具の清掃には、柔らかい布を使用してくださ
い。落ちにくい汚れは、柔らかい布を石鹸水ま
たは薄めた
中性洗剤に浸し、十分に絞ってから拭き取ってく
ださい。注意:アルコールや溶剤などは使用しな
いでく ださい。
重要な安全指示
点灯された電球は高熱です!
注意-人への火災危険、感電、過度のUV放射線
の接触あるいは損傷を減らすために:
- 電球(ランプ)は直ぐに高熱になります!点灯す
る際は必ずスイッチ/プラグで接続して下さ い。
- 高熱のレンズ、ガード、囲いには触れないで下
さい。
- 皮膚が温かいと感じる場合はライトの側から離
れて下さい。
- 点灯している電球(ランプ)を直視しないで下さ
い。
- ランプから可燃物の距離を確実に離して下さ
い。
- 40wまたはそれ以下の電球(ランプ)を使用し
て下さい。
- 常時電球(ランプ)には触らないようにして下さ
い。柔らかい布を使用して下さい。皮脂が電球(
ランプ)にダメージを与える恐れがあります。
人への火傷/負傷の危険警告
可燃物に近づけさせないで下さい。ランプを取
替え時プラグを抜いて下さい。電球には触れな
いで下さい。ランプが完全に正しい位置状態で
はない場合またレンズに破損がある場合には
作動させないで下さい。
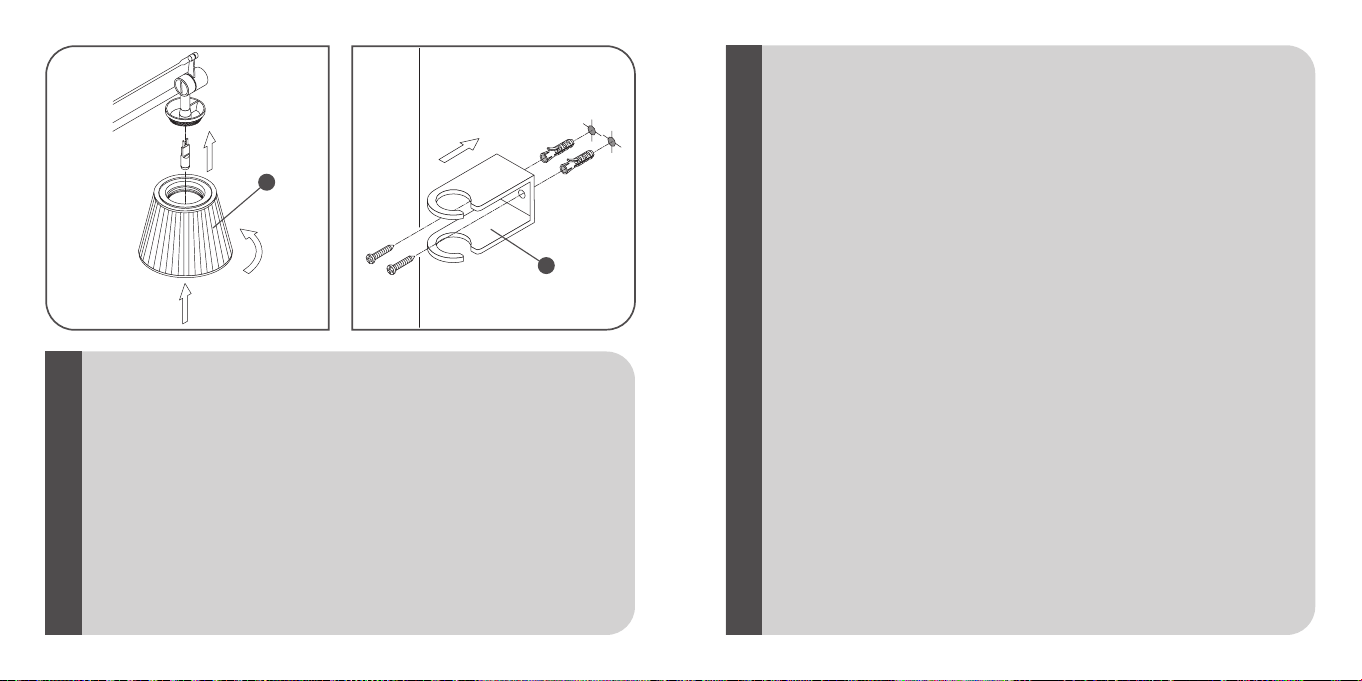
Fig.2Fig.1
<IT>
<GB>
<DE>
<FR>
<ES>
Fig.1Inserire la lampada ed avvitare la corona (A). Fig.2 ATTACCOPARETE- Fissare l’attacco a muro (B) mediante
i tasselli ad espansione. NOTA BENE: scegliere i tasselli ad espansione idonei per la supercie destinata al
montaggio.
Fig.1Insert the bulb and screw on the crown (A). Fig.2 WALLBRACKET- Fix the wall bracket (B) by means of screw
anchors. NOTE: choose the correct expansion plugs for the surface that it has to be mounted on.
Abb.1Die Lampe einsetzen und den Kranz (A) einschrauben. Abb.2 WANDBEFESTIGUNG- Die Wandbefestigung
(B) mit den Spreizdьbeln befestigen. BEACHTENSIE! für die für die Montage vorgesehene Fläche passende
Spreizdübel auswählen.
Fig.1Mettre l’ampoule et visser la couronne (A). Fig.2 RACCORDMURAL- Fixer le raccord mural (B) l’aide des
chevilles expansion.
NOTE:
choisir les vis tamponnées adaptées à la surface destinée au montage.
Fig.1Poner la lámpara y enroscar la corona (A). Fig.2 ENGANCHEPARED- Sujetar el enganche de pared (B)
mediante los tacos de expansion. NOTAIMPORTANTE: elegir los tacos a expansión idóneos para la supercie
destinada al montaje.
<PT>
<RUS>
<J>
Fig.1 Inserir a lâmpada e aparafusar a coroa (A). Fig.2 LIGAÇAO A PAREDE - Fixar na parede o suporte B)
utilizando as buchas. OBSERVARBEM: escolher as buchas de expansão correctas de acordo com a superfície
destinada à montagem.
Установить лампочку и завинтить обод (A). -
Закрепить настенное крепление (B) посредством расширительных вставок.
Выбирать расширительные вставки, соответствующие поверхности, предназначенной для
монтажа.
図1. 電球 を取り付 けてクラウン( A)をねじ回します。 図2. ウォ ー ル ブ ラ ケット - スクリューアン
カーを使ってウォールブラケット(B)を固定します。 その他の注意: 取り付 け面に適したアンカ
ーを使 用 するようにしてください。
B
A
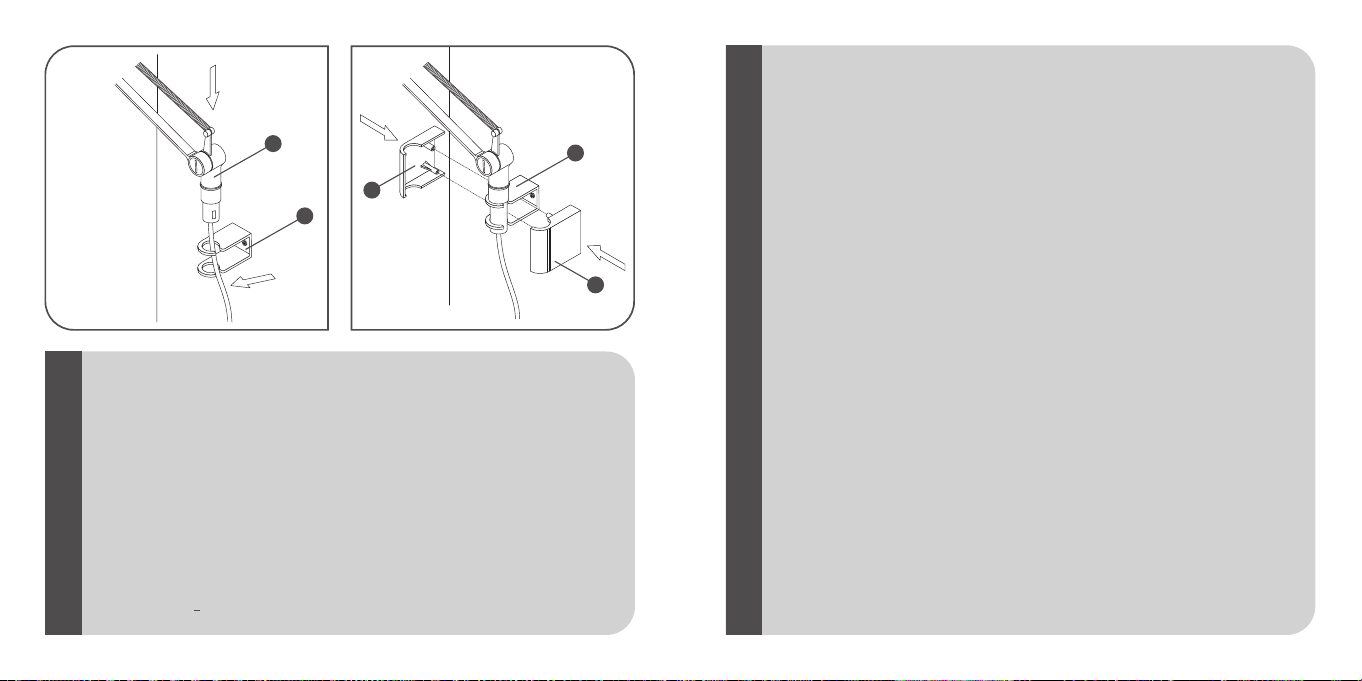
Fig.3 Fig.4
<IT>
<GB>
<DE>
<FR>
<ES>
<PT>
Fig.3ATTACCOPARETE- Inserire il corpo (C) nell’attacco a muro (B). Fig.4 ATTACCOPARETE-Agganciare le
coperture (D) sull’attacco a muro (B) come indicato in gura.
Fig.3WALLBRACKET- Insert the body (C) in the wall bracket (B). Fig.4 WALLBRACKET- Hook the covers (D) onto
the wall bracket (B) as indicated in the gure.
Abb.3WANDBEFESTIGUNG- Den Korper (C) in die Wandbefestigung (B) einsetzen. Abb.4 WANDBEFESTIGUNG-
Die Abdeckungen (D) wie in der Abbildung gezeigt in die Wandbefestigung (B) einhngen.
Fig.3RACCORDMURAL- Insérer le corps (C) dans le raccord mural (B). Fig.4 RACCORDMURAL- Monter les
éléments de couverture (D) sur le raccord mural (B) comme indiqué sur la gure.
Fig.3ENGANCHEPARED- Introducir el cuerpo (C) en el enganche de pared (B). Fig.4 ENGANCHEPARED- Sujetar
las tapas (D) en el enganche de pared (B) de la manera indicado en la gura.
Fig.3LIGAÇAOAPAREDE- Colocar o corpo (C) no suporte da parede (B). Fig.4 LIGAÇAOAPAREDE- Colocar as
coberturas (D) na ligaçao a parede (B) como indicado na gura.
<RUS>
<J>
Вставить корпус (C) в настенное крепление (B).
Закрепить крышки (D) к настенному креплению (B) в
соответствии с рисунком.
図3. ウォールブラケット - 本体(C)をウォールブラケット(B)に差込ます。 図4. ウォールブラ
ケット - 図の示されたようにウォールブラケット(D)にカバー(B)を掛けます。
C
B
B
D
D

Fig.5 Fig.6
15 mm MIN
65 mm MAX
<IT>
<GB>
<DE>
<FR>
<ES>
<PT>
Fig.5/6MORSETTO- Posizionare le guarnizioni (G e H) rispettivamente sotto il supporto (F) e sul morsetto (E).
Inserire il morsetto (E) nel supporto (F) e serrarlo mediante la vite (I).
Fig.5/6CLAMP- Position the gaskets (G and H) under the support (F) and on the clamp (E), respectively. Insert
the clamp E) in the support (F) and tighten the screw (I).
Abb.5/6KLEMME- Die Dichtungen (G und H) jeweils unter der Halterung (F) und der Klemme (E) anordnen.
Klemme (E) in die Halterung (F) einsetzen und mit Schraube (I) festziehen.
Fig.5/6ETAU- Positionner les garnitures (G et H) respectivement sous le support (F) et sur l’étau (E). Introduire
l’étau (E) dans le support (F) et le serrer au moyen de la vis (I).
Fig.5/6BORNE- Colocar las juntas (G e H) respectivamente debajo del soporte (F) y en el borne (E). Introducir el
borne (E) en el soporte (F) y apretarlo con el tornillo (I).
Fig.5/6BORNE- Colocar as guarniçoes (G e H) respectivamente em baixo do suporte (F) e no borne (E). Inserir
o borne (E) no suporte (F) e fechar com os parafusos (I).
<RUS>
<J>
Позиционировать прокладки (G и H) соответственно под опорой (F) и на
зажиме (E). Установить зажим (E) в опору (F) и закрепить его посредством винта (I).
図5/6. 留め金 - ガスケット(GとH)を支柱(F)の下と留め金(E)の上にそれぞれ置きます。留
め金(E)を支柱(F)に差し込んでねじ(I)で締めます。
F
G
E
H
I
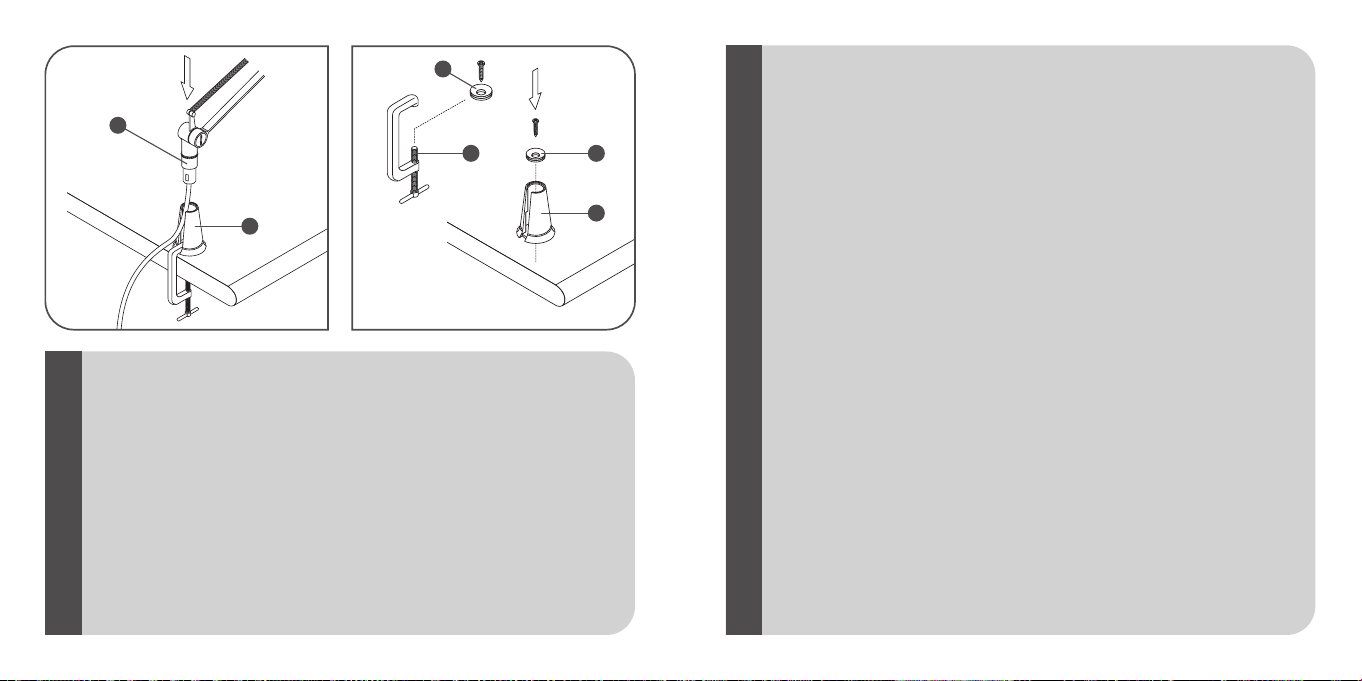
Fig.7 Fig.8
<IT>
<GB>
<DE>
<FR>
Fig.7MORSETTO- Inserire il corpo (C) nel supporto (F). Fig.8 NOTABENE: per ssare direttamente, sul piano di
appoggio, il supporto (F): Svitare la bussola (H) dalla struttura del morsetto (I). Inserire la bussola (H) sul fondo
del supporto (F). Serrare il tutto mediante una vite autolettante TPS Æ 4,2 lunghezza minima 25mm.
Fig.7CLAMP- Insert the body (C) in the support (F). Fig.8 NOTE: to x the support (F) directly on the backing
surface: Unscrew the bush (H) from the structure of the clamp (I). Attach the bush (H) to the bottom of the
support (F). Lock the assembly in place with a self-tapping screw TPS Æ 4.2 at least 25 mm long.
Abb.7KLEMME- Den Körper (C) in die Halterung (F) einsetzen. Abb.8 BEACHTENSIE! für die Befestigung der
Halterung (F) direkt auf der Auageäche: Die Buchse (H) aus der Struktur der Klemme (I) schrauben. Die
Buchse (H) in den Boden der Halterung (F) einsetzen. Alles mit selbstschneidenden Senkkopfschrauben Æ 4,2,
Mindestlänge 25 mm befestigen.
Fig.7ETAU-Introduire le corps (C) dans le support (F). Fig.8
NOTE:
pour xer directement le support (F) sur le
plan d’appui: Dévisser la douille (H) de la structure de l’étau (I). Placer la douille (H) sur le fond du support (F).
Serrer le tout au moyen d’une vis autotaraudeuse à tête plate conique Æ 4,2 longueur mini 25 mm.
<ES>
<PT>
<RUS>
<J>
Fig.7BORNE- Introducir el cuerpo (C) en el soporte (F). Fig.8 NOTAIMPORTANTE: para sujetar directamente
el soporte (F) en la supercie de apoyo: Desenroscar el casquillo (H) de la estructura del borne (I). Introducir el
casquillo (H) en el fondo del soporte (F). Apretar todos los elementos con un tornillo autorroscante TPS Æ 4,2
longitud mínima 25 mm.
Fig.7BORNE- Inserir o corpo (C) no suporte (F). Fig.8 OBSERVARBEM:para xar directamente, no plano de
apoio, o suporte (F): Desaparafusar a aranha (H) da estrutura do borne (I): Colocar a aranha (H) no fundo do
suporte (F). Fechar tudo com um parafuso auto-roscante TPS Æ 4,2 comprimento mínimo 25mm.
Вставить корпус (C) в опору (F). для непосредственного
крепления к опорной поверхности опоры (C): Отвинтить втулку (H) от структуры зажима (I).
Установить втулку (H) в основание опоры (F). Затянуть всё посредством самонарезающего
винта TPS Æ 4,2 минимальной длиной 25мм.
図7. 留め金 - 本体(D)を支柱(G)に差込ます。 図8. 注意: 裏側表面上に直接支柱(G)を固定
するには: ブッシュ(L)を留め金組み立て部分(M)から外します。ブッシュ(L)を支柱の底に付
着させます。 セルフタッピングねじTPS Æ4,2最小長さ25mmを使って組立て部品を適所
にロックさせます。
C
H
HI
F
F
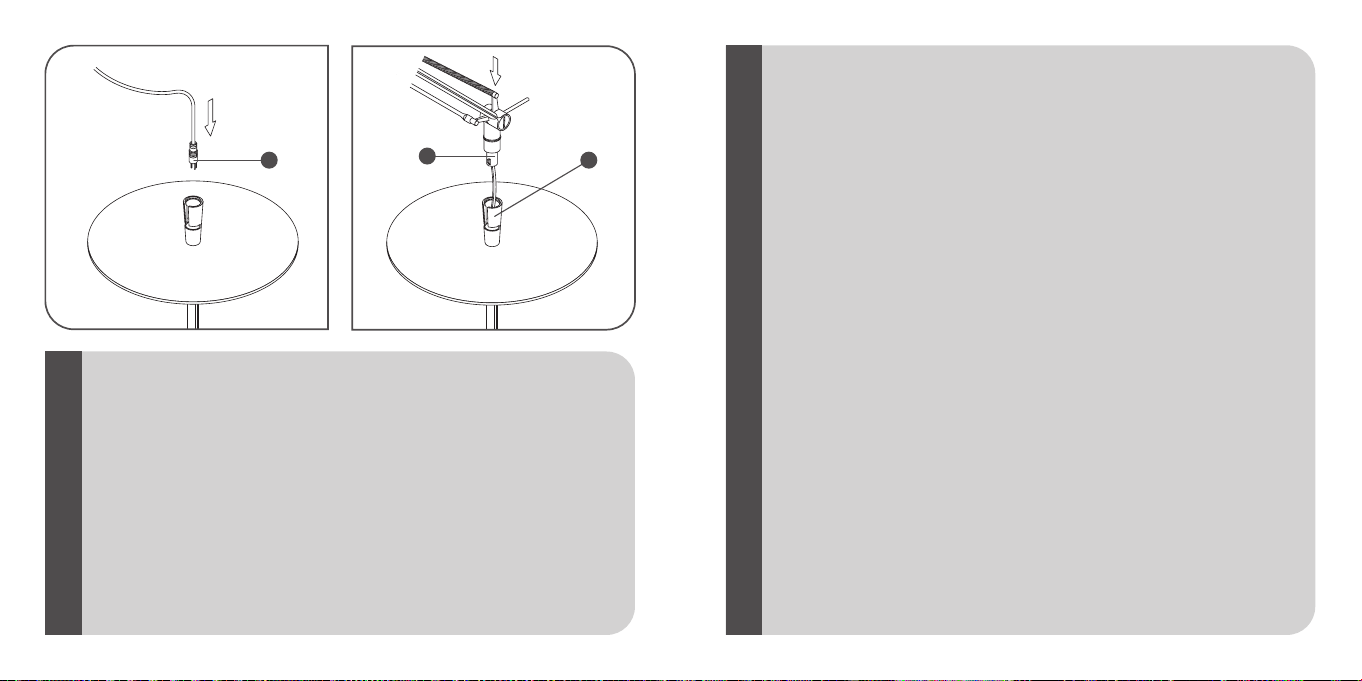
Fig.9 Fig.10
<IT>
<GB>
<DE>
<FR>
<ES>
<PT>
Fig.9TAVOLINO-Inserire il cavo di alimentazione dell’apparecchio (L) nell’asta del tavolino. Fig.10 TAVOLINO
-Inserire il corpo (C) nel supporto (M).
Fig.9TABLE-Run the power wire from the appliance (L) through the rod in the table. Fig.10 TABLE-Fit the body
(C) into the holder (M).
Abb.9TISCH-Die elektrische Zuleitung des Geräts (L) in den Stab der Leuchtenbasis einführen. Abb.10 TISCH-
Körper (C) in die Halterung (M) einsetzen.
Fig.9PETITETABLEIntroduire le câble d’alimentation de l’appareil (L) dans la tige de la base de la petite table.
Fig.10PETITETABLEInsérer le corps (C) dans le support (M).
Fig.9MESITAIntroducir el cable de alimentación del aparato (L) en la varilla de la ménsula. Fig.10 MESITA
Insertar el cuerpo (C) en el soporte (M).
Fig.9MESINHA-Inserir o cabo de alimentação do aparelho (L) na haste da mesinha. Fig.10 MESINHA-Inserir
o corpo (C) no suporte (M).
<RUS>
<J>
Вставить кабель питания прибора (L) в шток столика.
Установить корпус (C) в опору (M).
図9. 台 - 台の軸棒に電源コードの部品(L)を通させます。図10. 台 - ホルダー(M)に本体(C)
を固定します。
L M
C
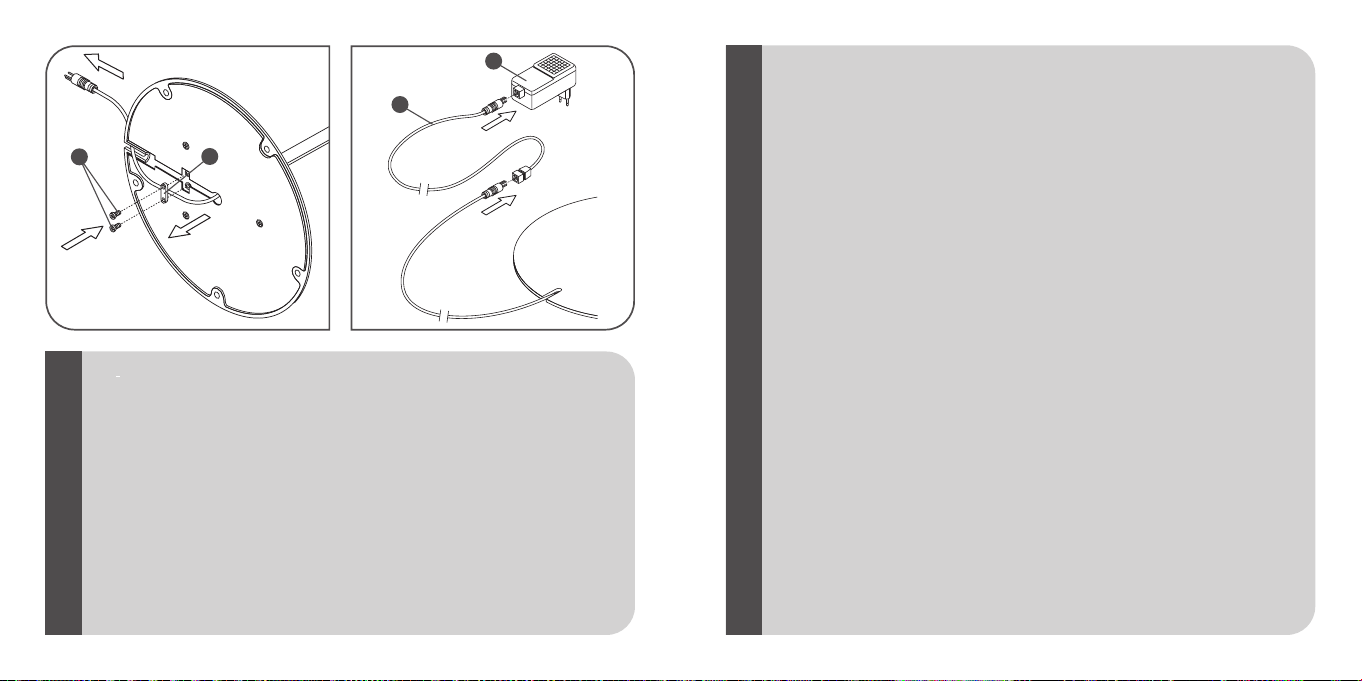
Fig.11 Fig.12
<IT>
<GB>
<DE>
<FR>
Fig.11TAVOLINO-Svitare le viti (N), togliere il ponticello fermacavo (O), posizionare il cavo di alimentazione
nella apposita scanalatura della base e quindi ssarlo riposizionando il ponticello e riavvitando le viti. Fig.12
TAVOLINO- Eseguire le connessioni elettriche della prolunga (Q) in dotazione e del trasformatore (P) come
indicato in gura. NOTA BENE: Nella versione GB-UK la connessione elettrica deve essere effettuata senza
l’ausilio della prolunga (Q).
Fig.11TABLE-Loosen the screws (N), remove the cable clamp (O), position the power wire in the groove provided
in the base and then x it in place with the cable clamp and screw down. Fig.12 TABLE- Make the electric
connections for the extension cord (Q) provided and for the transformer (P), as illustrated. NOTE: In the UK
version the electrical connection must be made without using the extension (Q).
Abb.11TISCH-Die Schrauben (N) ausschrauben, die Zugentlastung (O) entfernen, die elektrische Zuleitung in der
hierfür vorgesehenen Nut in der Basis anordnen und sie dann mit der Zugentlastung und den Schrauben sichern.
Abb.12 TISCH - Den elektrischen Anschluß der beiliegenden Verlängerung (Q) und des Trafos (P) wie in der
Abbildung gezeigt ausführen. BEACHTENSIE!Bei der Ausführung GB-UK muß der elektrische Anschluß ohne die
Verlängerung (S) ausgeführt werden.
Fig.11PETITETABLE Dévisser les vis (N), retirer la pièce de maintien du câble (O), faire passer le câble d’alimentation
<ES>
<PT>
<RUS>
<J>
dans la rainure de la base et le xer en remettant la pièce de maintien et en revissant les vis de cette dernière.
Fig.12 PETITETABLEEffectuer les connexions électriques de la rallonge (Q) fournie de série et du transformateur
(P) comme indiqué sur la gure.
NOTE:
Dans la version GB-UK, la connexion électrique doit être réalisée sans
l’aide de la rallonge (Q).
Fig.11MESITADesenroscar los tornillos (N), quitar la grapa (O), colocar el cable de alimentación en la
correspondiente ranura de la base, jarlo con la grapa y volver a apretar los tornillos. Fig.12 MESITA
Efectuar las conexiones eléctricas de la extensión (Q) y del transformador (P), como se indica en la gura.
NOTAIMPORTANTE: En la versión para el Reino Unido la conexión eléctrica se debe efectuar sin el uso de la
prolongación (Q).
Fig.11MESINHA-Desaparafusar os parafusos (N), tirar o cavalete trava cabo (O), colocar o cabo de alimentação
na apropriada ranhura da base e então xar recolocando o cavalete e aparafusando novamente os parafusos.
Fig.12 MESINHA-Realizar as conexões eléctricas da extensão (Q) em dotação e do transformador (P) como
indicado na gura. OBSERVARBEM: Na versão GB-UK a conexão eléctrica deve ser feita sem o auxílio da
extensão (Q).
Отвинтить винты (N), снять кабельный мост (O), позиционировать кабель
питания в специальный канал основания и закрепить его, вновь позиционируя мост и
завинчивая винты. Выполнить электрические соединения удлинителя (Q),
предоставляемого в принадлежностях, и трансформатора (P) в соответствии с рисунком.
В версии GB-электрическое соединение должно осуществляться без
удлинителя (Q).
図11. 台 - ねじ(Q)をゆるめ、ケーブル留め金を外して、基部内の所定の溝に電源を置いてケ
ーブル留め金とねじで締め直します。 図12. 台 - 図で示されてるように、備え付けの延長コード
(S)と変圧器(T)を電気接続させま す。 注意: GB-UK 版の電気接続では延長コード援助なし
で行って下さい。
O
P
Q
N
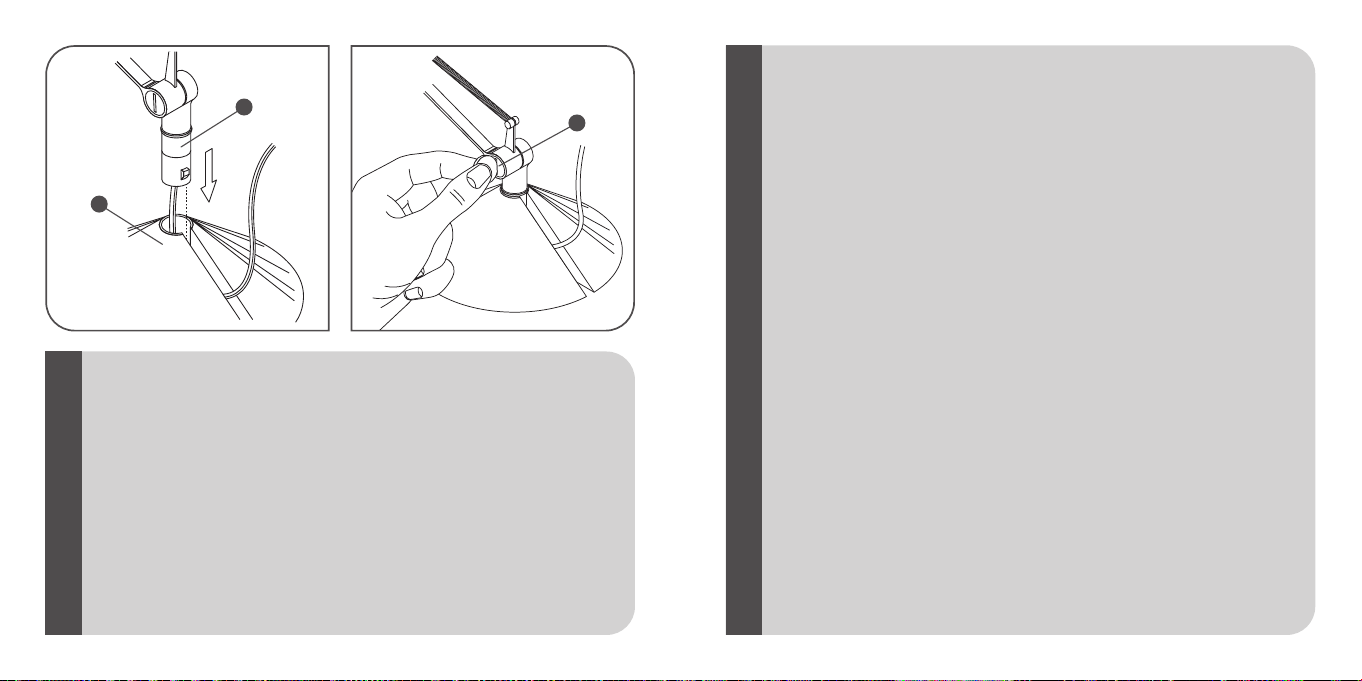
Fig.13 Fig.14
<IT>
<GB>
<DE>
<FR>
<ES>
Fig.13BASE-Inserire il corpo (C) nella base (R) come indicato in gura. Fig.14 NOTA BENE: Per regolare il
bilanciamento della struttura dell’apparecchio, serrare la vite (S) in senso orario, agendo con una monetina od
oggetto simile come indicato in Fig. 14.
Fig.13BASE- Insert the body (C) in the base (R) as indicated in the gure. Fig.14 NOTE: To adjust balancing of
the appliance structure, tighten the screw (S) by turning it clockwise with a coin or similar object as indicated
in Fig. 14.
Abb.13SOCKEL- Den Korper (C) auf den Sockel (R) stecken (siehe Abbildung). Abb.14 BEACHTENSIE! Um das
Gestell des Geräts ins Gleichgewicht zu bringen, die Schraube (S) mit Hilfe einer Münze oder eines ähnlichen
Hilfsmittels im Uhrzeigersinn einschrauben (siehe Abb. 14).
Fig.13 BASE- Insérer le corps (C) dans la base (R) comme indiqué sur la gure. Fig.14 NOTE: Pour régler
l’équilibrage de la structure de l’appareil, serrer la vis (S) vers la droite, à l’aide d’une pièce de monnaie ou d’un
objet du même genre, comme indiqué Fig.14.
Fig.13BASE- Introducir el cuerpo (C) en la base (R) de la manera indicado en la gura. Fig.14 NOTAIMPORTANTE:
para regular el equilibrio de la estructura del aparato, apretar el tornillo (S) en el sentido de las manecillas del
<PT>
<RUS>
<J>
reloj, mediante una moneda o un objeto similar, tal como se ilustra en la Fig. 14.
Fig.13BASE- Colocar o corpo (C) na base (R) como indicado na gura. Fig.14 OBSERVARBEM: Para regular o
balanceamento da estrutura do aparelho, fechar os parafusos (S) no sentido horário, usando uma moeda ou um
objecto similar como indicado na gura 14.
Вставить корпус (C) в основание (R) в соответствии с рисунком.
Для выравнивания структуры устройства затянуть винт (S) по
часовой стрелке, воздействуя монетой или подобным предметом согласно Рис.14.
図13. 基部 - 図に示されたように本体(C)を基部(R)にはめ込みます。 図14. 器具を設置中ま
た作用しているときは電源が切れていることを必ず確認して下さい。器具組 立てのバランスを
調節するには、表図のように硬貨またはそれに類似した物でねじ(S)を 右回りに回します。
C
S
R
18150 - 26/01/2010
VERSIONE
EUR Lampada incandescente ad alogeni MAX 40W attacco G9, tipo HSGS/F.
USA(UL/C-ULListed) Lampada incandescente ad alogeni MAX 40W attacco G9, tipo T4 Bi-pin.
EUR/USATAVOLINO Lampada incandescente ad alogeni 12V MAX 35W attacco Gy6.35, tipo HSG.
<IT> DATITECNICI
VERSIÓN
EUR Bombilla de incandescencia alógena max 40W conexión G9 tipo HSGS/F.
USA(ListadoUL/C-UL) Bombilla de incandescencia alógena max 40W conexión G9 tipoT4 Bi-pin.
EUR/USATABLE Bombilla de incandescencia alógena 12V max 35W conexión Gy6,35 tipo HSG.
<ES> DATOSTECNICOS
VERSION
EUR Incandescent halogen bulb MAX 40W , G9 attachment type HSGS/F.
USA(UL/C-ULListed) Incandescent halogen bulb MAX 40W , G9 attachment type T4 Bi-pin.
EUR/USATABLE Incandescent halogen bulb 12V MAX 35W , Gy6,35 attachment type HSG.
<GB> TECHNICALDATA
VERSIÓN
EUR Lâmpada incandescente alógena MAX 40W ligação G9 tipo HSGS/F.
USA(UL/C-ULListed) Lâmpada incandescente alógena MAX 40W ligação G9 tipo T4-Bi-pin.
EUR/USATISCH Lâmpada incandescente alógena 12V MAX 35W ligação Gy6,35 tipo HSG.
<PT> DADOSTÉCNICOS
AUSFÜHRUNG
EUR Halogen-Glühlampe MAX 40W, Fassung G9, typ HSGS/F.
USA(UL/C-ULListed) Halogen-Glühlampe MAX 40W, Fassung G9, typ T4 Bi-pin.
EUR/USATISCH Halogen-Glühlampe 12V MAX 35W, Fassung Gy6,35 , typ HSG.
<DE> TECHNISCHEDATEN
EUR
Аллогенная лампочка накаливания макс.40Вт цоколь G9 тип HSGS/F.
USA(UL/C-ULListed)
Аллогенная лампочка накаливания макс.40Вт цоколь G9 тип T4 Bi-pin.
USA/EUR
Столик
Аллогенная лампочка накаливания
12В
макс.35Вт цоколь Gy6,35 тип HSG.
<RUS>
VERSION
EUR Ampoule incandescente à halogènes MAX 40W, douille G9, type HSGS/F.
USA(MarquéeUL/C-UL) Ampoule incandescente à halogènes MAX 40W, douille G9, type T4 Bi-pin
EUR/USAPETITETABLE Ampoule incandescente à halogènes 12V MAX 35W, douille Gy6,35, type HSG.
<FR> DONNEESTECHNIQUES
VERSION
EUR 白熱ハロゲン球 最大40W、口金G9、HSGS/F タイプ
USA(UL/C-ULListed) 白熱ハロゲン球 最大40W、口金G9、T4 Bi-pin タイプ
EUR/USA台白熱ハロゲン球 12 V 最大35W、口金Gy6,35、HSG タイプ
<J> 技術的な仕様

www.os.com
Table of contents
Other FLOS Home Lighting manuals

FLOS
FLOS ROMEO SOFT T1 User manual

FLOS
FLOS TACCIA LED F6602004 User manual

FLOS
FLOS MISS SISSI User manual

FLOS
FLOS ROMEO SOFT F User manual

FLOS
FLOS BON JOUR User manual

FLOS
FLOS F6430009 User manual

FLOS
FLOS KELVIN LED User manual

FLOS
FLOS TAB T LED User manual

FLOS
FLOS NOCTAMBULE F User manual

FLOS
FLOS RF05861 User manual

FLOS
FLOS Michael Anastassiades COPYCAT User manual

FLOS
FLOS Sarfatti 1063 User manual

FLOS
FLOS ROMEO SOFT F User manual

FLOS
FLOS TACCIA SMALL User manual

FLOS
FLOS TOIO LED F7630009 User manual

FLOS
FLOS NOCTAMBULE F User manual

FLOS
FLOS BRERA F1 User manual

FLOS
FLOS TOIO F7600030 User manual

FLOS
FLOS WIRERING F9512020 User manual

FLOS
FLOS RF29987 User manual


