manuals.online logo
Brands
  1. Home
  2. •
  3. Brands
  4. •
  5. Fracarro
  6. •
  7. Amplifier
  8. •
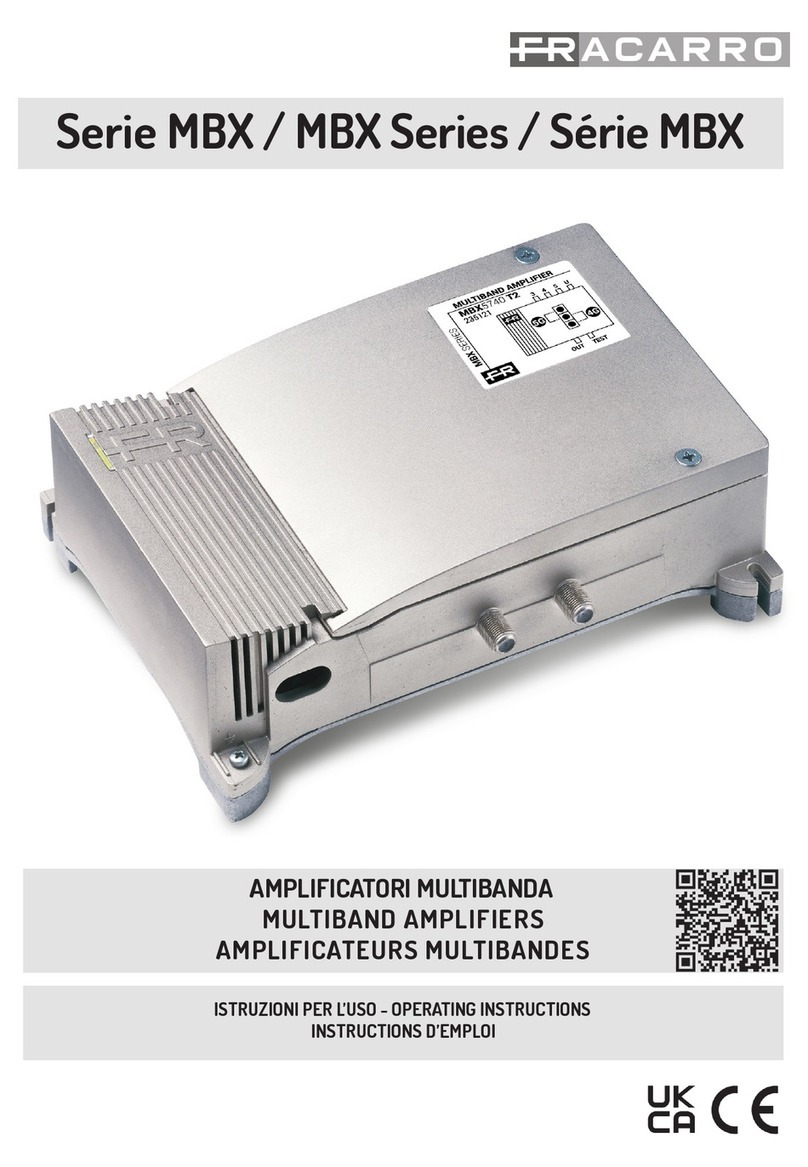
  9. Fracarro MBX5851 User manual

Fracarro MBX5851 User manual

1
MBX
AMPLIFICATORI MULTIBANDA
MULTIBAND AMPLIFIERS
AMPLIFICATEURS MULTIBANDES
ISTRUZIONI PER L’USO - OPERATING INSTRUCTIONS
INSTRUCTIONS D’EMPLOI
2
I: L’installazione del prodotto deve essere eseguita da personale qualicato in confor-
mità alle leggi e normative locali sulla sicurezza. Fracarro Radioindustrie di conseguen-
za è esonerata da qualsivoglia responsabilità civile o penale conseguente a violazioni
delle norme giuridiche vigenti in materia e derivanti dall’improprio uso del prodotto da
parte dell’installatore, dell’utilizzatore o di terzi.
L’installazione del prodotto deve essere eseguita secondo le indicazioni di installazione
fornite, al ne di preservare l’operatore da eventuali incidenti e il prodotto da eventuali
danneggiamenti.
Non togliere il fondo del prodotto, parti a tensione pericolosa possono risultare acces-
sibili all’apertura dell’involucro.
Avvertenze per l’installazione
Umidità e gocce di condensa potrebbero danneggiare il prodotto. In caso di condensa,
prima di utilizzare il prodotto, attendere che sia completamente asciutto. Maneggiare
con cura. Urti impropri potrebbero danneggiare il prodotto. Lasciare spazio attorno al
prodotto per garantire una ventilazione sufciente. L’eccessiva temperatura di lavoro
e/o un eccessivo riscaldamento possono compromettere il funzionamento e la durata
del prodotto. Non installare il prodotto sopra o vicino a fonti di calore o in luoghi polve-
rosi o dove potrebbe venire a contatto con sostanze corrosive. In caso di montaggio a
muro utilizzare tasselli ad espansione adeguati alle caratteristiche del supporto di s-
saggio. La parete ed il sistema di ssaggio devono essere in grado di sostenere almeno
4 volte il peso dell’apparecchiatura.
ATTENZIONE: per evitare di ferirsi, questo apparecchio deve essere assicurato alla pa-
rete/pavimento secondo le istruzioni di installazione.
L’apparecchio deve essere installato in modo che la spina di alimentazione di rete sia
facilmente accessibile. Il prodotto non deve essere esposto a gocciolamento o a spruzzi
d’acqua e va pertanto installato in un ambiente asciutto, all’interno di edici.
Il prodotto deve essere collegato all’elettrodo di terra dell’impianto d’antenna confor-
memente alla norma EN 60728-11.
La vite predisposta per tale scopo è contrassegnata con il simbolo .
Si raccomanda di attenersi alle disposizioni della norma EN 60728-11 e di non collegare
tale vite alla terra di protezione della rete elettrica di alimentazione.
Simbolo di classe II Simbolo di terra dell’impianto d’antenna
Avvertenze generali
In caso di guasto non tentate di riparare il prodotto altrimenti la garanzia non sarà più
valida. Le informazioni riportate in questo manuale sono state compilate con cura,
tuttavia Fracarro Radioindustrie S.r.l. si riserva il diritto di apportare in ogni momento
e senza preavviso, miglioramenti e/o modiche ai prodotti descritti nel presente ma-
nuale. Consultare il sito www.fracarro.com per le condizioni di assistenza e garanzia.
EN: The product must only be installed by qualied persons, according to the local
safety standards and regulations. Fracarro Radioindustrie is free from all civil and
criminal responsibilities due to breaches of the current legislation derived from the
improper use of the product by the installer, user or third parties.
The product must be used in full compliance with the instructions given in this manual
in order to protect the operator against all possible injuries and the product from being
damaged. Never remove the lid of the product as there are live parts inside.
Installation warnings
Humidity and condensation could damage the product. In case of condensation, wait
until the product is dry before using it.
Handle the product carefully. Impacts can damage the product. Leave enough space
around the product to ensure sufcient ventilation.
Excessive temperatures and/or an overheating may affect the performance and the
life of the product.
Don’t install the product above or near any heat sources, in dusty places or where it
might come into contact with corrosive substances.
In the event that the unit is xed to the wall, use the proper screw anchors suitable to
the characteristics of the xing support. The wall and the anchoring system must be
able to support at least 4 times the weight of the unit.
ATTENTION: To avoid being hurt, the unit must be xed to the wall/oor in accordance
with the installation instructions.
Install the unit in such a way that the power outlet is easily reachable.
The product must not be exposed to any dripping or splashing and thus it should be
installed indoors and in a dry location.
The product must be connected to the earth electrode of the antenna system, in ac-
cordance with standard EN60728-11.
The screw arranged for this scope is marked by the symbol .
It is recommended to follow the provisions of the standard EN60728-11 and not to
connect this screw (terminal) (product) to the protective ground of the supply mains.
Class II symbol Earth screw/Faston connector symbol
General warnings
In the event of a malfunctioning, do not try to x the product as the guarantee would
be invalidated. Although the information given in this manual has been prepared care-
fully and thoughtfully, Fracarro Radioindustrie S.r.l. reserves the right to modify it with-
out notice and to improve and/or modify the product described in this manual. See
the website www.fracarro.com to have information relevant to the technical support
and product guarantee.
F: L’installation du produit doit être effectuée par du personnel qualié conformément
aux lois et aux normes locales sur la sécurité. Par conséquent, Fracarro Radioindustrie
décline toute responsabilité civile ou pénale dérivant de violations des normes juri-
diques en vigueur et de l’utilisation incorrecte du produit de la part de l’installateur, de
l’utilisateur ou de tiers.
Le produit doit être installé en suivant les indications fournies, an de préserver l’opé-
rateur d’éventuels accidents et le produit d’éventuels endommagements. Ne jamais
ôter le couvercle du produit ; des pièces sous tension dangereuses peuvent être acces-
sibles si le couvercle est ouvert.
Précautions d’installation
L’humidité et les gouttes de condensation, pourraient endommager l’appareil. En cas
de condensation, attendre que le produit soit complètement sec avant de l’utiliser.
Manier avec soin. Les chocs pourraient endommager le produit. Laisser de l’espace
autour du produit pour garantir une ventilation sufsante.
La température excessive de fonctionnement et/ou un réchauffement excessif
peuvent nuire au fonctionnement et à la durée du produit.
Ne pas installer le produit sur ou près des sources de chaleur, dans des endroits très
poussiéreux ou en contact avec des substances corrosives.
En cas de montage mural, utiliser des chevilles à expansion correspondant aux carac-
téristiques du support de xation. La paroi et le système de xation doivent être en
mesure de supporter au moins 4 fois le poids de l’appareil.
ATTENTION : Pour ne pas se blesser, xer le produit au mur/sol en suivant les instruc-
tions de montage. Installer le produit de façon que la che d’alimentation de secteur
soit facilement accessible.
Le produit ne doit pas être exposé à l’égouttement ou aux éclaboussures d’eau et il doit
donc être installé dans un endroit sec, à l’intérieur.
Le produit doit être connecté à l’électrode de terre de l’installation de l’antenne en
conformité avec la norme EN 60728-11.
La vis prévue à cet effet est caractérisée par le symbole .
Il est conseillé de respecter les dispositions de la norme EN60728-11 et de ne pas relier
cette vis (borne) (produit) à la terre de protection du secteur.
Classe II Symbole électrode de terre de l’installation de l’antenne
Avertissements généraux
En cas de panne, ne pas tenter de réparer le produit, sans quoi la garantie ne sera
plus valable. Les informations indiquées dans ce mode d’emploi ont été renseignées
soigneusement ; toutefois, Fracarro Radioindustrie S.r.l. se réserve le droit d’améliorer
et/ou de modier à tout moment et sans préavis les produits décrits dans ce mode
d’emploi. Consulter le site www.fracarro.com pour connaître les conditions d’assis-
tance et de garantie.
I: AVVERTENZE PER LA SICUREZZA EN: SAFETY WARNINGS F:AVERTISSEMENT DE SÉCURITÉ
3
I: INSTALLAZIONE DEL PRODOTTO EN: PRODUCT INSTALLATION F: INSTALLATION DU PRODUIT
MORSETTO PER IL COLLEGAMENTO ALLA TERRA
DELL’IMPIANTO SECONDO LA NORMA EN60728-11 (non
collegarlo alla terra di protezione della rete di alimen-
tazione).
CONNECTOR FOR CONNECTING TO THE ANTENNA SY-
STEM EARTH, ACCORDING TO EN60728-11 (do not con-
nect such screw to the protection earth of the electric
power supply).
CONNEXION POUR LIASON À LA TERRE DU BÂTIMENT,
SUIVANT EN60728-11 (Ne pas raccorder cette vis à la
terre de protection de l’alimentation électrique).
TRIMMER REGOLAZIONE GUADAGNO
GAIN ADJUSTMENT TRIMMER
TRIMMER DE RÉGLAGE DU GAIN
CONNETTORI F IN
F CONNECTORS IN
CONNECTEURS F IN
SPIA DI ALIMENTAZIONE
POWER SUPPLY LED
INDICATEUR D’ALIMENTATION
CONNETTORI F OUT
F CONNECTORS OUT
CONNECTEURS F OUT
JUMPER PER TELEALIMENTAZIONE
JUMPER FOR REMOTE POWER
JUMPER POUR TÉLÉALIMENTATION
CONNETTORE CAVO DI ALIMENTAZIONE
POWER CORD CONNECTOR
CONNECTEUR CÂBLE D’ALIMENTATION
4
I: ISTRUZIONI PER L’UTILIZZO EN: OPERATING INSTRUCTIONS F: INSTRUCTIONS D’EMPLOI
2
1
3
3
2
1
I: Per accedere più facilmente alle regolazioni è possibile togliere completamente
il coperchio:
1. Aprire leggermente il coperchio
2. Spingere lievemente il coperchio verso l’alimentatore
3. Togliere il coperchio
EN: To get an easier access to the settings it is possible to remove the cover:
1. Open the cover a little bit
2. Push the cover slightly towards the power supply unit
3. Remove the cover
F: Pour avoir un accès plus pratique aux réglages il est possible de déposer le couvercle :
1. Soulever légèrement le couvercle
2. Pousser légèrement le couvercle vers le bloc alimentation.
3. Enlever le couvercle
I: Per le regolazioni del guadagno:
1. Svitare le due viti imperdibili
2. Aprire il coperchio
EN: To get access to the settings:
1. Unscrew the two safety screws
2. Open the cover
F: Pour avoir accès aux réglages :
1. Dévisser les deux vis imperdables
I: A questo punto sono accessibili gli attenuatori per la regolazione del guadagno.
La banda di lavoro di ciascun attenuatore è descritta nel cartoncino interno.
EN: The attenuators for the gain adjustment are now accessible.
The position and specications of each path are described on the label.
F: Les atténuateurs permettant le réglage des gains sont alors accessibles.
La position et les spécications de chaque voie sont indiquées sur l’étiquette.
Cartoncino interno
Label
Étiquette
5
I: Per cambiare le posizioni dei jumper, per esempio per abilitare la
telealimentazione negli ingressi, togliere il cartoncino interno e agire sui
relativi jumper.
EN: To change the jumper positions, e.g. to enable the remote power supply in
the inputs, remove the internal cardboard label and change the relevant
jumpers.
F: Pour changer les positions des jumpers, par exemple pour activer la
télé-alimentation au niveau des entrées, enlever l’étiquette interne et
intervenir sur les jumpers correspondants.
OFF
ON
Switch Aperto *
Open switch *
Interrupteur ouvert
*
Telealimentazione OFF
Remote power OFF
Téléalimentation inactive
Switch Chiuso
Close switch
Interrupteur fermé
Telealimentazione ON
Remote power ON
Téléalimentation active
*I: L’assenza del ponticello disabilita la telealimentazione.
EN: The absence of the jumper disables the remote power.
F: L’absence du jumper désactive la
télé-alimentation
.
6
I: Chiudere le entrate non utilizzate con un carico da 75 Ohm (CA75F) e veri care che i ponticelli per la telealimentazione siano
disabilitati negli ingressi non utilizzati o privi di preampli catore a monte. Consigliamo di situare l’ampli catore MBX.. vicino all’an-
tenna, per ridurre la lunghezza del cavo di interconnessione ottimizzando così il rapporto segnale/rumore (S/N).
EN: Close the unused inputs with a 75 Ohm (CA75F) load and make sure that the jumpers for the remote power supply are disa-
bled in those inputs that are not used or do not have a pre-ampli er upstream. We recommend to place the MBX.. ampli er close
to the antenna to reduce the length of the interconnection cable in order to optimize the signal/noise (S/N) ratio.
F: Fermer les entrées inutilisées avec une charge de 75 Ohm (CA75F) et véri er que les liaisons destinées à la télé-alimentation
sont désactivées au niveau des entrées inutilisées ou sans préampli cateur en amont. Il est conseillé de positionner l’ampli cateur
MBX.. près de l’antenne pour réduire la longueur du câble d’interconnexion, optimisant par conséquent le rapport signal/bruit
(S/N).
I: CARATTERISTICHE TECNICHE EN: TECHNICAL CHARACTERISTICS F: CARACTERISTIQUES TECHNIQUES
TV
TV
TV
TV
AMPLIFICATORE DA PALO
MAST AMPLIFIER
PRÉAMPLIFICATEUR
MBX
DERIVATORE
TAP
DÉRIVATEUR
MBX
7
I: SPECIFICHE TECNICHE EN: TECHNICAL SPECIFICATIONS F: SPECIFICATIONS TECHNIQUES
I: Le caratteristiche tecniche di ogni singolo prodotto sono riportate nell’apposito cartoncino posto all’interno del contenitore, per
l’apertura dello stesso vedere il paragrafo “istruzioni per l’utilizzo”.
Contenitore in metallo pressofuso completamente schermato (EN50083-2) con elevata dissipazione del calore, il trattamento
superficiale al nickel evita la formazione di ossido. Connettori di tipo “F”.
alimentatore switching protetto contro i cortocircu-
iti; uscita miscelata classe d’isolamento: II
facile fissaggio a parete; uscita test point -30dB dimensioni : 194x143x64mm
telealimentazione disponibile su ogni ingresso (12V,
50mA max totali); alimentatore a 220-240V ~50-60 Hz temperatura di funzionamento:
-10°C a +55°C
attenuatori variabili da 0 a 20 dB per ogni ingresso; grado di protezione IP20
Nota: dati riportati potrebbero subire delle variazioni, qualora ciò sia reso necessario per il miglioramento del prodotto. Fanno
testo quelli indicati nel cartoncino del prodotto. I dati tecnici sono nominali e riferiti alla temperatura di 25° C.
EN: The technical characteristics of each product are specified on the cardboard label inside the case; to open the case, see the
“Operating instructions” paragraph. Completely shielded die-cast metal case (EN50083-2) with high heat dissipation, the nickel sur-
face treatment prevents oxide formation. “F” type connectors.
protection against short circuits one mixed output insulation: class II
easy wall mounting Test point output: -30dB dimensions : 194x143x64mm
remote supply available on every input (
12V
50mA
max totals) mains 220-240V ~50-60 Hz operating temperature:
-10°C to +55°C
variable input attenuators from 0 to 20 dB protection index: IP20
Note: data could be modied in the event the item needs to be improved. Please refer to the data shown in the product label.
The technical data are nominal values and refer to an operating temperature of 25° C.
F: Les caractéristiques techniques de chaque produit sont indiquées sur l’étiquette spécifique à l’intérieur du récipient, pour
l’ouverture de celui-ci, voir le paragraphe «instructions pour l’emploi».
Récipient en métal moulé sous pression complètement blindé (EN50083-2) avec une dissipation élevée de la chaleur, le traite-
ment superficiel au nickel évite la formation d’oxyde. Connecteurs de type “F”.
alimentation protégé du court-circuit un seul sortie melangée classe d’isolement: II
facile xation au paroi (mur) (facilité d’installation) Sortie test point -30dB dimensions : 194x143x64mm
téléalimentation disponible sur chaque entreé (
12V
50mA max) alimentation à 220-240V ~50-60 Hz température d’explaitation:
-10°C à +55°C
atténuations variables de 0 à 20 dB pour chaque
entrée Degré de protection IP20
Note : les données indiquées pourraient subir des variations si nécessaire pour améliorer le produit. Se rapporter aux données
indiquées sur l’étiquette du produit.
Les caratéristiques techniques sont nominales et se réfèrent à une température de fonctionnement de 25° C.
I: CONFORMITÀ ALLE DIRETTIVE EUROPEE.
Fracarro dichiara che il prodotto è conforme alle direttive 2014/53/UE e 2011/65/UE. Il testo completo della
dichiarazione di conformità UE è disponibile al seguente indirizzo internet ce.fracarro.com.
EN: CONFORMITY TO EUROPEAN LAWS.
Fracarro declares that the product complies with EU Directive 2014/53 and 2011/65/UE. The full text of the EU
Declaration of Conformity is available on the following website ce.fracarro.com;
F: CONFORMITÉ AUX DIRECTIVES EUROPÉENNES.
Fracarro déclare que le produit est conforme à la directive 2014/53/UE et 2011/65/UE. Le texte complet de la
déclaration de conformité UE est disponible à l’adresse internet suivante : ce.fracarro.com.
3IS474 - rev.02 - 16/06/2017
Fracarro Radioindustrie SRL Via Cazzaro n.3 - 31033 Castelfranco Veneto (TV) - ITALIA - Tel: +39 0423 7361 - Fax: +39 0423 736220
Fracarro France S.A.S. 7/14 rue du Fossé Blanc Bâtiment C1 - 92622 Gennevilliers Cedex - FRANCE Tel: +33 1 47283400 - Fax: +33 1 47283421
Fracarro (UK) - Ltd Unit A, Ibex House, Keller Close, Kiln Farm, Milton Keynes MK11 3LL UK - Tel: +44(0)1908 571571 - Fax: +44(0)1908 571570
www.fracarro.com - [email protected] - support[email protected] - WhatsApp +39 335 7762667
Garantito da/ Guaranteed by/ Garanti par/ Garantizado por/ Garantido por/ Garantiert durch/ Zajamčena od/ Garantirano od/ Garantovano od/ Gwarantowane przez / Εγγυημένο από/
Гарантировано - Fracarro Radioindustrie SRL, Via Cazzaro n. 3, 31033 Castelfranco Veneto (Tv) – Italy
INFORMAZIONE AGLI UTENTI
A sensi dell’art. 26 del Decreto Legislativo 14 marzo 2014, n. 49 "Attuazione della direttiva 2012/19/UE sui riuti di
apparecchiature elettriche ed elettroniche (RAEE)"
Il simbolo del cassonetto barrato riportato sull’apparecchiatura indica che il prodotto alla ne della propria vita
utile deve essere raccolto separatamente dagli altri riuti. L’utente dovrà, pertanto, conferire l’apparecchiatura
giunta a ne vita agli idonei centri di raccolta differenziata dei riuti elettronici ed elettrotecnici, oppure
riconsegnarla al rivenditore al momento dell’acquisto di una nuova apparecchiatura di tipo equivalente, in
ragione di uno a uno. L’adeguata raccolta differenziata per l’avvio successivo dell’apparecchiatura dismessa
al riciclaggio, al trattamento e allo smaltimento ambientalmente compatibile contribuisce ad evitare possibili
effetti negativi sull’ambiente e sulla salute e favorisce il riciclo dei materiali di cui è composta l’apparecchiatura.
USER’S INFORMATION
Disposal of Old Electrical & Electronic Equipment (Applicable in the European Union and other European countries with
separate collection system
This symbol on the product or on its packaging indicates that this product shall not be treated as household
waste. Instead it shall be handed over to the applicable collection point for the recycling of electrical and
electronic equipment. By ensuring this product is disposed of correctly, you will help prevent potential negative
consequences for the environment and human health, wich could otherwise be caused by inappropriate waste
handling of this product. The recycling of materials will help to conserve natural resources. For more detailed
information about recycling of this product, please contact your local city ofce, your household waste disposal
service or the shop where you purchased the product.
INFORMATION AUX UTILISATEURS
Traitement des appareils électriques et électroniques en n de vie (Applicable dans les pays de l’Union Européenne et
aux autres pays européens disposant de systèmes de collecte sélective)
Ce symbole, apposé sur le produit ou sur son emballage, indique que ce produit ne doit pais être traité avec
les déchets ménagers. Il doit être remis à un point de collecte approprié pour le recyclage des équipments
électriques et électroniques. En s’assurant que ce produit est bien mis au rebus de manière appropriée, vous
aiderez à prévenir les conséquences négatives potentielles pour l’environnement et la santé humaine. Le
recyclage des matérieux aidera à conserver les resources naturelles. Pour toute information supplémentaire
au sujet du recyclage de ce produit, vous pouvez contacter votre municipalité, votre déchetterie ou le magasin
où vous avez acheté le produit.

This manual suits for next models

17

Other Fracarro Amplifier manuals

Fracarro MBJ EVO LTE Series User manual

Fracarro

Fracarro MBJ EVO LTE Series User manual

Fracarro AFI User manual

Fracarro

Fracarro AFI User manual

Fracarro AMP9762B User manual

Fracarro

Fracarro AMP9762B User manual

Fracarro MBJ EVO LTE Series User manual

Fracarro

Fracarro MBJ EVO LTE Series User manual

Fracarro SWA930TS User manual

Fracarro

Fracarro SWA930TS User manual

Fracarro EDFA 4 WDM User manual

Fracarro

Fracarro EDFA 4 WDM User manual

Fracarro KW20D User manual

Fracarro

Fracarro KW20D User manual

Fracarro MBX Series User manual

Fracarro

Fracarro MBX Series User manual

Fracarro MBX Series User manual

Fracarro

Fracarro MBX Series User manual

Fracarro MAP EVO Series Technical specifications

Fracarro

Fracarro MAP EVO Series Technical specifications

Fracarro AMP9564 User manual

Fracarro

Fracarro AMP9564 User manual

Fracarro MAP Series User manual

Fracarro

Fracarro MAP Series User manual

Fracarro MAP Series User manual

Fracarro

Fracarro MAP Series User manual

Fracarro MBJ User manual

Fracarro

Fracarro MBJ User manual

Fracarro MINIBOOST 12P User manual

Fracarro

Fracarro MINIBOOST 12P User manual

Fracarro AMP9762 User manual

Fracarro

Fracarro AMP9762 User manual

Fracarro AFI User manual

Fracarro

Fracarro AFI User manual

Fracarro MBJ Series User manual

Fracarro

Fracarro MBJ Series User manual

Popular Amplifier manuals by other brands

Marantz AV7005 Specification sheet

Marantz

Marantz AV7005 Specification sheet

Phil Jones Bass PJB Roadcase owner's manual

Phil Jones Bass

Phil Jones Bass PJB Roadcase owner's manual

Sound Devices MixPre user guide

Sound Devices

Sound Devices MixPre user guide

Onkyo A-44 Service manual

Onkyo

Onkyo A-44 Service manual

Phoenix Gold Carver MP42 user manual

Phoenix Gold

Phoenix Gold Carver MP42 user manual

Arturia V76-Pre user manual

Arturia

Arturia V76-Pre user manual

Yamaha JX30B owner's manual

Yamaha

Yamaha JX30B owner's manual

Fluke 5220A instruction manual

Fluke

Fluke 5220A instruction manual

Toa M-9000 operating instructions

Toa

Toa M-9000 operating instructions

VAC Vintage Line Stage Mk II operating instructions

VAC

VAC Vintage Line Stage Mk II operating instructions

Rane DA216S Operator's manual

Rane

Rane DA216S Operator's manual

DLS ULTIMATE A1 owner's manual

DLS

DLS ULTIMATE A1 owner's manual

Fishman AGP-2 Template

Fishman

Fishman AGP-2 Template

Musical Fidelity M1 SDAC Instructions for use

Musical Fidelity

Musical Fidelity M1 SDAC Instructions for use

Crate CA30 DG user guide

Crate

Crate CA30 DG user guide

Marshall Amplification 1959HW owner's manual

Marshall Amplification

Marshall Amplification 1959HW owner's manual

ASTRO MixAmp Pro TR quick start guide

ASTRO

ASTRO MixAmp Pro TR quick start guide

ASTRO HVO V40 P operating manual

ASTRO

ASTRO HVO V40 P operating manual

manuals.online logo
manuals.online logoBrands
  • About & Mission
  • Contact us
  • Privacy Policy
  • Terms and Conditions

Copyright 2025 Manuals.Online. All Rights Reserved.